
:max_bytes(150000):strip_icc():format(webp)/GettyImages-1345967858-4e7ba42433504ee899e05ceb500f3b68.jpg)
How to Transfer Apple iPhone 8 Plus Data to iPhone 12 A Complete Guide | Dr.fone
How to Transfer Apple iPhone 8 Plus Data to iPhone 12: A Complete Guide
Apple announced a line-up of iPhones with four new devices in 2020. The series is called the iPhone 12 series that has four handsets of different sizes and price ranges. The iPhone 12 series include iPhone 12, iPhone 12 Mini, iPhone 12 Pro, and iPhone 12 Pro Max. These are the company’s first-ever 5G devices. They surely took a step into the future of technology with the 12 series.
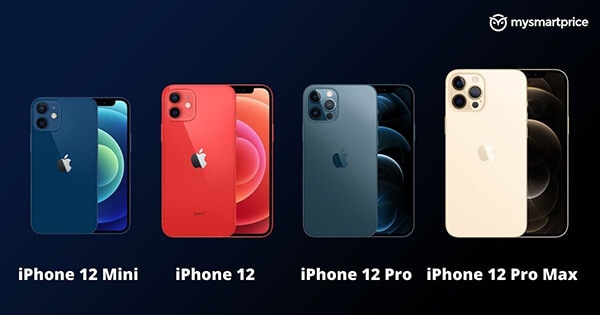
The device is considered lighter than the iPhone SE launched in 2020. iPhone 12 Pro Max holds an outstanding camera system for high-quality image processing. Besides, the introduction of A14 SoC has encouraged the exceptional performance of all four models. Each of the series models is secured with suitable features and new capabilities. Let’s take a glance at the relevant specifications and iPhone 12 price.
Part 1: Apple iPhone 12 Series Specifications
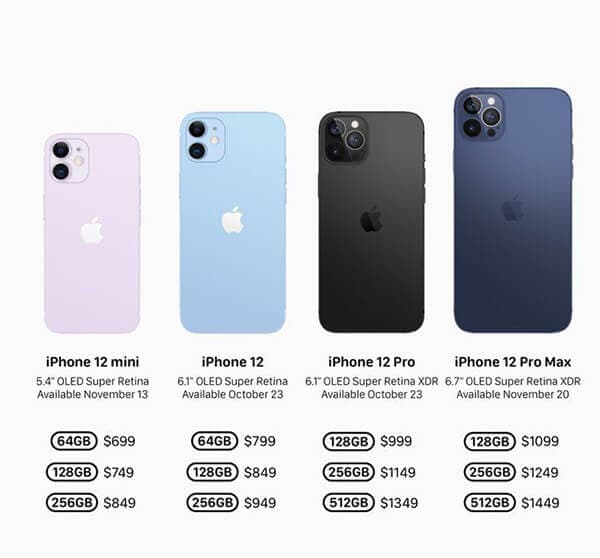
To mention the iPhone 12 series specifications, these models are secured with an SoC of Apple A14 Bionic. All 4 of them consist of DRAM. The displays of these smartphones are quite satisfactory.
Display: The iPhone 12 Mini and iPhone12 have a display of 5.42” OLED (2340 x 1080) and 6.06” OLED (2532 x 1170). On the other hand, the magnificent iPhone 12 Pro has a display of 6.06” OLED (2532 x 1170) and 6.68” OLED (2778x1284).
Size & Weights: The size concerning height, width, and depth of both iPhone 12 and iPhone 12 pro are the same at 146.7 mm, 71.5 mm, 7.4 mm. Besides, the iPhone Mini stands at a height width and depth of 131.5 mm, 64.2 mm, and 7.4 mm. The iPhone 13 Pro max has a height of 160.8 mm, a width of 78.1 mm, and a depth of 7.4 mm. While the iPhone Mini weighs the lightest with 135g, iPhone 12 max weighs the heaviest (228 g). Both iPhone 12 and iPhone 12 Pro remain at 164g and 189g, respectively.
Wireless Charging: Each of the iPhone 12 series models supports MagSafe Wireless Charging up to 15 W. They are also Qi Compatible (7.5 W). Now, coming to the camera quality, all four models are secured with a front camera of 12 MP f/2.2.In rear camera setup, iPhone 12 Mini, iPhone 12, and iPhone 12 Pro have a main camera of 12 MP 1.4µm, 26mm eq. f/1.6, Optic OIS. iPhone 12 Pro Max comes with the main camera of 12 MP 1.7µm, 26mm eq. f/1.6.
Camera: The high-quality telephoto camera of the iPhone 12 Pro is 12 MP, 52mm eq. f/2.0 OIS. For iPhone 12 Pro Max is 12 MP, 65mm eq. f/2.2 OIS. The entire iPhone series model has an ultra-wide camera of 12 MP 13mm eq. f/2.4. The splash, water, and dust resistance feature with IP68 for up to 6m and 30 minutes keeps the phone durable.
iPhone Series devices hold dual-SIM support with nano-SIM and eSIM. Both iPhone 12 Mini and iPhone 12 come in distinct storage capacities like 64 GB, 128 GB, and 256 FB. The iPhone 12 Pro and Pro Max are available in the storage of 128 GB, 256 GB, and 512 GB.
Part 2: Transfer old iPhone data to iPhone 12
We know that the excitement of buying a new iPhone is real. However, it’s important to do one thing before jumping into the camera quality. And that’s data transfer. You do not want your old phone data to be gone with the old device, do you? We hope not. Here are some of the tactics by which you can transfer the old iPhone data to the new iPhone 12
2.1 Through iCloud
Before transferring, make sure your data is backed up. For that, connect the old iPhone with the WiFi and then go to “Settings.” Next, tap your name and then on “iCloud.” Next, select the “Backup Now” option and wait for the process to get completed. After completing the backup, follow the steps given below.
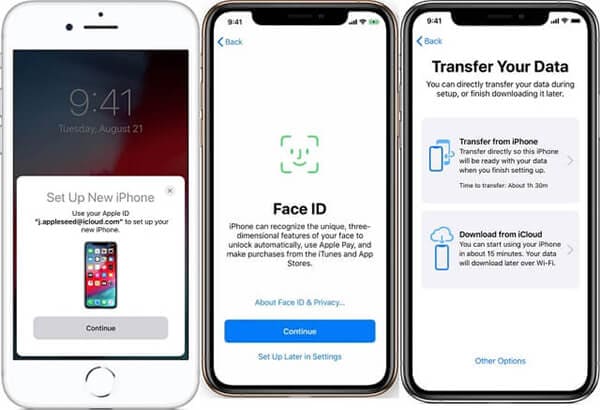
Step 1: First, turn on the new device to see the “Hello” screen. Now, follow the instructions appearing on the screen. Once you notice the WiFi screen, tap a WiFi network to join. Keep following the steps till the “Apps & Data” screen shows up. Tap on “Restore from iCloud.”
Step 2: Sign in to your iCloud with relevant credentials like Apple ID and password. Choose a backup but make sure to check the date and size.
If you have bought iTunes or App store content with multiple IDs, sign in with those accounts too.
Step 3: The restore process will be initiated. Make sure to be connected and wait till the process gets completed successfully. Once done, continue with the other steps to complete the setup process successfully.
2.2 Through iTunes or Finder
Start with the backup process by opening iTunes. Now, connect your iPhone with the PC. After it gets connected, choose your iPhone on the top toolbar. To transfer the data related to Health and Activity/saved passwords, choose the “Encrypt backup” option. Next, input a password and click “Back Up Now.”
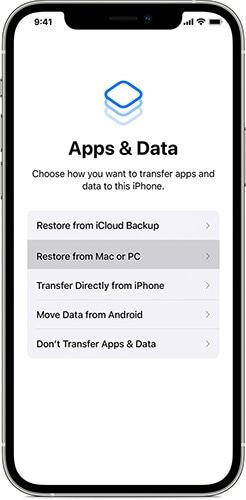
To transfer the data through iTunes or Finder, launch your new device. Once the “Hello” screen appears, follow the instructions appearing on the screen. As soon as you note the “Apps & Data Screen,” tap on “Restore from Mac or PC.” Connect the new device to PC/Mac and open the iTunes/Finder window. Once your device name is visible on the screen, tap it.
Select “Restore Backup” to choose a “Backup.” Ensure that the size and data are accurate. To restore from an encrypted backup, input the password. The restoration process will start. Now, wait for the entire process to get completed and then move on to the remaining setup steps.
Part 3: Transfer Android Data to iPhone 12
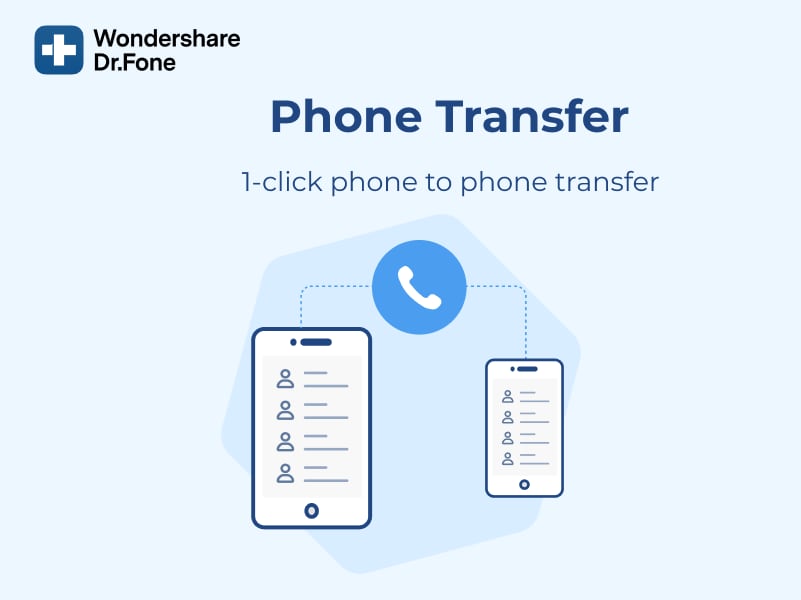
The methods mentioned above can be time-consuming. In that case, it’s best to opt for a simple process that does not require too much work. For example, Dr.Fone - Phone Transfer all is an efficient and easy-to-use phone switch app.
As the name signifies, this App can help you with iPhone 12 transfer data in a few minutes. Experienced developers develop it for both iOS and Android users. So, you can transfer data from any of the Apple iPhone 8 Plus devices to the new iPhone 12.
With Dr. Fone, you can migrate 13 files of distinct size to the new iPhone 12. Here’s a glimpse of the files below
Contact, photo, videos, voicemail, wallpaper, calendar, and many more
To transfer data through Dr. Fone, follow the easy steps mentioned below.
Step 1: First, connect both the old device and new iPhone 12 to your PC/Mac with USB.
Step 2: Now, launch the Dr. Fone - Phone Transfer and select the app
Step 3: Once the app starts, you will note a device detected as a source. Similarly, there will be other devices detected as destinations. Then, you will be given the option to flip the source and destination. For that, click on the “Flip” option.
Step 4: After selecting the Apple iPhone 8 Plus device status, mark the checkboxes beside the files for transferring. Once done, tap on the “Start Transfer” button appearing on the screen.
You can select “Clear data before copy” to delete the data from the destination device before transferring. It will speed up the entire process.
Conclusion
Hopefully, you got a clear idea of how to transfer data to iPhone 12. Dr. Fone - Phone Transfer is one of the finest names for data recovery and data transfer between devices. They have distinct outstanding products that are efficient and useful for the users. One of the best things about the application is that you can transfer the data regardless of the mobile operating system. Be it an iOS or Android device, follow the steps provided above, and that’s it. The iPhone 12 data transfer process is quick, easy, and requires less effort.
5 Tutorials on How to Transfer Photos From Apple iPhone 8 Plus to New iPhone
When it comes to camera systems, the iPhone is certainly ahead of others. It has high-performing lenses and professional camera features that support various photography styles. For instance, you may use the Priotize Faster Shooting option to capture multiple photos at a time. Another thing is that you may enable Action Mode when shooting videos to keep the frame stable throughout the duration. Simply put, you can surely do a lot of things using your iPhone camera
Let’s say you’re planning to share your stunning snaps and footage with others. Is it possible to facilitate the transfer with little to no effort? The short answer is absolutely yes. There are many easy ways to move your media files between two iPhones. In no time, you can surely find the best tutorial on how to transfer photos from Apple iPhone 8 Plus to iPhone. Just choose one that matches perfectly your current situation.
In this article, we will talk about the iPhone’s Shared Album feature and its main benefits to users. We will also provide some tutorials on how to transfer pictures from Apple iPhone 8 Plus to iPhone quickly and easily. Continue reading below to learn more.
Everything You Need to Know About Shared Album
The Photos mobile application on iOS devices is a very powerful gallery software. It provides numerous options to help you organize and manage all your media files in one place. When it comes to data transfer, Photos offers users some channels to facilitate such procedures. One of which is through the syncing feature called Shared Album. It’s basically an ordinary folder where you can move and store your media files. But as the name suggests, you can share this folder with others by simply granting them access to it. Don’t worry. Your Shared Albums remain private on the platform. Only the people you add as subscribers can view its content and make changes. Therefore, the Shared Album feature is the best answer to the question: “How to transfer photos from Apple iPhone 8 Plus to iPhone.”
It’s true to say that Shared Album is a great iOS feature. However, it’s important to point out that it also has a few limitations. First on the list is the type of files supported by this feature. For images, Shared Album is compatible with photos in HEIF, JPEG, RAW, PNG, GIF, and TIFF formats. On the one hand, video formats supported by Shared Album include HEVC, MP4, QuickTime, H.264, and MPEG-4. Another thing to consider is the capacity of the Shared Album folder. By default, you can only store up to 5000 photos or videos in the album.
Do you find Shared Album a useful tool, though? If so, here are the tutorials on how to activate this feature and create one in the Photos app.
How to Activate Shared Album?
Here’s how to activate Shared Album on Settings.
- Step 1: Go to Settings.
- Step 2: Click your Apple ID Profile.

- Step 3: Click iCloud.
- Step 4: Click Photos.

- Step 5: Toggle on the radio button next to Shared Albums.

How to Create Shared Albums in Photos
Here’s how to create Shared Albums in Photos.
- Step 1: Go to the Photos.
- Step 2: Click the Album tab.
- Step 3: Click the + icon at the top-left corner of your screen to add a new folder.

- Step 4: Click New Shared Album.

- Step 5: Rename the Shared Album and then click Create.
How to Transfer Photos From Apple iPhone 8 Plus to iPhone in Easy Steps?
Undoubtedly, the Shared Album feature is a very convenient way to move media files from one iPhone to another. Imagine all you have to do is consolidate all the files in a Shared Album folder and add subscribers. From there, you can easily access the album on multiple iOS devices and download the files. But it’s important to note that there are other photo transfer methods you can try apart from using Shared Album. Check out the 5 tutorials below on how to transfer photos from Apple iPhone 8 Plus to iPhone.
Method 1: Transfer photos from Apple iPhone 8 Plus to iPhone by enabling iCloud photos
How do I transfer photos from Apple iPhone 8 Plus to iPhone? Well, the easiest way is to sync the photos to iCloud and enable the iCloud photos on both devices. Don’t worry. It’s very easy to set up. Here’s how to transfer photos from Apple iPhone 8 Plus to iPhone using iCloud.
- Step 1: On your device that contains the files, go to Settings.
- Step 2: Click on the Apple ID Profile.
- Step 3: Click Photos.

- Step 4: Toggle on the radio button next to Sync This iPhone. From then on, your iPhone will sync your photos to iCloud.

- Step 5: Do the same series of steps on the other iPhone. Once the synchronization has been completed, open the Photos app. Find the newly synced iCloud photos on the All Photos album.
Method 2: Transfer photos from Apple iPhone 8 Plus to iPhone using AirDrop
If you’re just sending a few pieces of photos, AirDrop is indeed a great transfer medium. It’s basically a wireless sharing option allowing users to send files between two iOS devices. Do you want to try it? Here’s how to transfer photos from Apple iPhone 8 Plus to iPhone using AirDrop.
- Step 1: Toggle on the Wi-Fi and Bluetooth connectivity on both iPhones. After that, find the AirDrop option on the two devices and then switch it on. Choose Everyone.

- Step 2: On the Apple iPhone 8 Plus device that contains the files, go to Photos. Select the images you want to transfer. After that, click the Share button at the bottom-left corner of your screen.
- Step 3: Choose AirDrop.

- Step 4: Select the recipient from the provided list. After that, accept the AirDrop request on the other device.
Method 3: Transfer photos from Apple iPhone 8 Plus to iPhone via Mail
Another reliable method you can try is to email the photos from one iPhone to another. Like AirDrop, it works great if you’re just moving a few bits of files to another device. Don’t work. The process will not take much time. Here’s how to transfer photos from Apple iPhone 8 Plus to iPhone via Mail.
- Step 1: On the Apple iPhone 8 Plus device containing the files, go to the Photos app.
- Step 2: Select the specific photos you want to transfer. After that, click the Share icon at the bottom-left corner of your screen.
- Step 3: Choose Mail among the given options.

- Step 4: Key in the email address of the recipient. Subsequently, click the Send icon.
- Step 5: Open the email on the other iPhone. Then, download the photos sent as email attachments.
Method 4: Transfer photos from Apple iPhone 8 Plus to iPhone using iCloud Link
Let’s say you’re sending one photo to another iPhone user. What is the best transfer option in this case? If you’re currently using iCloud photos might as well send files through the iCloud link. Don’t worry. It’s not that hard to get such details. Here’s how to transfer photos from Apple iPhone 8 Plus to iPhone using the iCloud link.
- Step 1: On the Apple iPhone 8 Plus device where your files are stored, go to the Photos app.
- Step 2: Select the specific group of images you want to transfer. Right after, click the Share icon at the bottom-left corner of your screen.
- Step 3: Scroll down and find the Copy iCloud Link. Click on it.

- Step 4: Share the iCloud link via Messages, Mail, or internet messaging platform. On the other iPhone device, access the link and then download the photos from there.
Method 5: Transfer photos from Apple iPhone 8 Plus to iPhone using Wondershare Dr.Fone
The first four tutorials above on how to transfer pictures from Apple iPhone 8 Plus to iPhone are very easy to follow. But if you wish to explore another convenient option, Wondershare Dr.Fone can help you with that. Its phone transfer feature has a powerful facility that can move your photos and other files between two mobile devices. Here’s how to use it in easy steps.
- Step 1: Download Wondershare Dr.Fone from its official website. Then, install it on your computer.
- Step 2: Open the newly installed software on your desktop. After it fully loads, connect your two iPhones using a data cable.
- Step 3: Access the left-side panel and then click Toolbox. On the main dashboard, click Phone Transfer.

- Step 4: Set the iPhone that contains the photos as the Source and the other iPhone as the Target. Alternatively, click the Flip button to modify the transfer path according to your liking.

- Step 5: Click Photos as the category of the files. Right after, click Start Transfer to proceed.

- Step 6: Wait while Wondershare Dr.Fone is facilitating the transfer. If you wish to terminate the progress, simply click Cancel.

- Step 7: After completing the process, click OK to wrap it up. Check your files from their respective locations afterward.

BONUS TIP: Back Up Your Photos First
The tutorials above on how to transfer all photos from Apple iPhone 8 Plus to iPhone are safe to initiate. You can be sure about that. But as an additional layer of protection, it’s best to back up your iPhone first before the transfer. Don’t worry. Wondershare Dr.Fone. simplifies the backup process for you. Here’s a quick tutorial to get you started.
- Step 1: Launch the Wondershare Dr.Fone on your computer. After it fully loads up, connect your iPhone using a data cable.
- Step 2: Access the left-side panel and then click My Backup. On the main dashboard, click Back Up Now.

- Step 3: Follow the on-screen instructions for SMS backup. After that, click OK to proceed.

- Step 4: Wait while Wondershare Dr.Fone is backing up your files.

- Step 5: After completing the backup process, click View Backups or Open in Folder to check your files.

Conclusion
Transferring photos between two iOS devices is very easy. In fact, you can instantly complete the migration process with just the snap of a finger. Refer to the five tutorials above on how to transfer photos from Apple iPhone 8 Plus to iPhone enumerated. One of them can certainly fit your situation and help you in this regard. For a more convenient file transfer option, download Wondershare Dr.Fone for free. It has a potent phone transfer feature that can aid in the transfer of your dearly cherished photos.
4 Ways to Transfer Messages from Apple iPhone 8 Plus to iPhone Including iPhone 15
“Do text messages transfer to the new iPhone from the old iPhone? I have bought a new iPhone but can’t understand how to transfer messages from Apple iPhone 8 Plus to iPhone?”
Lately, we have gotten plenty of feedback like this from users who wish to learn how to transfer messages to new iPhone, like iPhone 15/15 Pro (Max), from an existing iOS device. If you have the same doubts, then you have come to the right place.
While it is quite easy to move music, videos, or pictures from one iPhone to another , you might need to walk an extra mile to transfer contacts or messages. To make it easier for our readers, we have come up with three different techniques to transfer messages from an old to a new iPhone effortlessly.
Read on and learn how to transfer messages from Apple iPhone 8 Plus to iPhone in no time.
Which method to choose?
There are 4 different ways on how to transfer messages to the new iPhone. But which one to choose? Chances are that you might get confused. To make things easier for you, we here provide a quick comparison.
Method 1: How to transfer messages from Apple iPhone 8 Plus to iPhone including iPhone 15/15 Pro (Max) in one click
If you want to learn how to transfer texts from Apple iPhone 8 Plus to iPhone seamlessly, then take the assistance of Dr.Fone toolkit. Simply use Dr.Fone - Phone Transfer to move your messages from one iPhone to another. Not only messages, but you can also use it to transfer all data files to new iPhone .
Dr.Fone - Phone Transfer
Quickly Transfer Text Messages /iMessages from Apple iPhone 8 Plus to iPhone
- Transfer messages from Apple iPhone 8 Plus to iPhone without backup.
- Support any iDevices including iPhone, iPad, and iPod.
- Transfer everything including contacts, music, video, photo, SMS, app data, and more.
- Can be installed both on Win and Mac computers.
3981454 people have downloaded it
In this technique, the simple process goes as follows to transfer messages to new iPhone:
Open software > Connect iPhones to PC > Select “Messages” > Click “Start Transfer”
Now let’s dive in and learn how to transfer messages to new iPhone:
1. Set up Dr.Fone - Phone Transfer to Windows or Mac computer. Connect and start the application with your iPhone. On the home screen, click the “Phone Transfer” option.
2. Confirm that both iPhones have the correct target and source positions. Or to exchange by clicking “Flip”.

3. Choose the type of information to be transferred. Before clicking on the button “Start Transfer” make sure that the option “Text Messages” is enabled.
4. Wait a while for your old iPhone messages to be transferred to the new iPhone.

5. Once it is done, you can disconnect your iPhones from the PC, and view the messages on the target iPhone.

After following these easy steps, you can learn how to transfer texts from Apple iPhone 8 Plus to iPhone with Dr.Fone - Phone Transfer.
Video Guide: How to transfer messages from Apple iPhone 8 Plus to iPhone
You may be interested in:
- 4 ways to transfer SMS from Apple iPhone 8 Plus to Android
- 5 Ways to Transfer WhatsApp Messages from Apple iPhone 8 Plus to iPhone
Method 2: How to Transfer Messages from Apple iPhone 8 Plus to iPhone Including iPhone 15/15 Pro (Max) Using iCloud Backup
Transferring data, including crucial messages, from an old iPhone to a new one is a smooth process using iCloud Backup. It allows you to access your essential conversations and other message data on your new device. Restoring your messages from an iCloud backup is a straightforward process. To effortlessly move your messages from one iPhone to another using an iCloud backup, adhere to the simple steps outlined below:
Step 1: Go to “Settings” on your iPhone, tap your name, and access “iCloud.” Press the “iCloud Backup” option, and on the following screen, ensure “Back Up This iPhone” is enabled. Now, “Back Up Now” to create a backup of your old iPhone’s data, including messages, on iCloud.

Step 2: Afterward, start setting up your new iPhone until you reach the “Apps & Data” screen. Here, choose “Restore from iCloud Backup” and log in using your Apple ID. Then, go on to select the backup you want to restore and complete the process by following the on-screen instructions.

Method 3: How to Transfer Messages from Apple iPhone 8 Plus to iPhone, including iPhone 15/15 Pro (Max), using iCloud Sync
Ensuring a smooth transition to the latest iPhone is made simple with the aid of iCloud sync. It enables the transfer of essential data, including precious messages, from your old device. With it, you can sync your messages and other crucial data to your new device. This allows continued access to your valuable conversations and attachments. Below are the step-by-step instructions for transferring messages using the iCloud sync feature:
Step 1: On your old iPhone, access phone Settings and tap on your Apple ID. Press “iCloud” on the following screen and move to the “Apps Using iCloud” section.

Step 2: Here, tap “Show All” and go on to press “Messages in iCloud” from the list. On the following screen, enable the “Use on this iPhone” feature. It will sync iMessage with your iCloud account, allowing you to access them on your new iPhone.

Method 4: How to transfer messages from Apple iPhone 8 Plus to iPhone including iPhone 15/15 Pro (Max) using iTunes/Finder
Besides iCloud, one can also take the assistance of iTunes/Finder to move their content from one iOS device to another. Not only do text messages transfer to new iPhone, other kinds of data files like photos or contacts can also be moved with this method. To learn how to transfer texts from Apple iPhone 8 Plus to iPhone using iTunes, follow these steps:
1. Connect your source iPhone to your computer and launch iTunes or Finder (Mac Computer).
2. Select the Apple iPhone 8 Plus device and go to its Summary page.
3. Under the Backups section, click on the “Backup Now” button to take a complete backup of your phone. Make sure that you are taking a backup on the computer instead of iCloud.

4. After taking a backup of your device, disconnect it, and connect the target phone to the computer.
5. Launch iTunes/Finder and wait for it to recognize the new iPhone. From here, you can choose to set up your device while restoring a previous backup.

6. Alternatively, you can also go to its “Summary” page and click on the “Restore Backup” option to restore the existing backup on your target device.

This will let you move not just messages, but all the major data files from one iOS device to another.
You may be interested in:
- Does iTunes Backup Text Messages? How to Restore?
- iTunes Not Working? Here Are All Solutions You Need
Now when you know how to transfer messages from Apple iPhone 8 Plus to iPhone in different ways, you can simply pick the preferred option. We have also compared these techniques so that you can go with the most suitable alternative.
Go ahead and follow this stepwise tutorial to transfer your messages from one iPhone to another. Whenever someone asks “do text messages transfer to the new iPhone,” make them familiar with an easy solution by sharing this informative post.
Also read:
- 4 Ways to Transfer Music from Apple iPhone 6 to iPod touch | Dr.fone
- 5 Ways to Send Ringtones from Apple iPhone SE to iPhone Including iPhone 15 | Dr.fone
- How to Transfer from Apple iPhone 14 Pro to iPhone 8/11/11 Pro | Dr.fone
- In 2024, Refurbished Apple iPhone 14 Pro Max Everything You Need to Know | Dr.fone
- In 2024, Solved How To Transfer From Apple iPhone 12 to iPhone 15 | Dr.fone
- How to Transfer Photos from Apple iPhone 13 Pro Max to other iPhone without iCloud | Dr.fone
- Complete Tutorial Sending Photos From Apple iPhone 7 Plus to iPad | Dr.fone
- In 2024, Complete Tutorial Sending Photos From Apple iPhone SE to iPad | Dr.fone
- How to Move Custom Ringtones from Apple iPhone 11 Pro to Android? | Dr.fone
- How to Transfer from Apple iPhone 11 Pro to Samsung Galaxy S20? | Dr.fone
- In 2024, 5 Tutorials on How to Transfer Photos From Apple iPhone 12 mini to New iPhone | Dr.fone
- In 2024, How to Move Custom Ringtones from Apple iPhone XS Max to Android? | Dr.fone
- In 2024, How to Transfer from Apple iPhone 6 to iPhone 8/X/11 | Dr.fone
- In 2024, Fix Apple iPhone 8 Stuck on Data Transfer Verified Solution! | Dr.fone
- 5 Easy Ways to Transfer Contacts from Apple iPhone 14 Pro to Android | Dr.fone
- Fix Apple iPhone 6 Plus Stuck on Data Transfer Verified Solution! | Dr.fone
- In 2024, Methods to Transfer from Apple iPhone 7 Plus to Android | Dr.fone
- In 2024, Ultimate Guide, How to Transfer Music From Apple iPhone 7 Plus to iPhone | Dr.fone
- In 2024, 4 Ways to Transfer Messages from Apple iPhone SE (2020) to iPhone Including iPhone 15 | Dr.fone
- Methods to Transfer from Apple iPhone 12 to Android | Dr.fone
- 5 Ways to Send Ringtones from Apple iPhone 11 to iPhone Including iPhone 15 | Dr.fone
- How to Copy Contacts from Apple iPhone 6 to SIM? | Dr.fone
- 4 Ways to Sync Contacts from Apple iPhone 12 Pro to iPad Easily | Dr.fone
- Fix Apple iPhone SE Stuck on Data Transfer Verified Solution! | Dr.fone
- Various Methods to Transfer Pictures from Apple iPhone 12 Pro Max to PC | Dr.fone
- In 2024, 6 Methods for Switching from Apple iPhone 13 Pro Max to Samsung | Dr.fone
- In 2024, 5 Easy Ways to Transfer Contacts from Apple iPhone 14 Pro Max to Android | Dr.fone
- How to Transfer Data from Apple iPhone 12 Pro Max to ZTE Phones | Dr.fone
- How to Transfer from Apple iPhone 15 Pro to iPhone 8/X/11 | Dr.fone
- Methods to Transfer from Apple iPhone X to Android | Dr.fone
- In 2024, Detailed guide of ispoofer for pogo installation On Samsung Galaxy XCover 7 | Dr.fone
- Possible solutions to restore deleted messages from Realme C55
- How to Simulate GPS Movement in AR games On Nokia C02? | Dr.fone
- How to Bypass Google FRP Lock from Motorola Razr 40 Ultra Devices
- 3 Best Tools to Hard Reset Motorola Moto G23 | Dr.fone
- In 2024, Latest Guide on iPad 2/3 and Apple iPhone 11 Pro iCloud Activation Lock Bypass
- Reasons for Vivo Y78t Stuck on Startup Screen and Ways To Fix Them | Dr.fone
- Fixes for Apps Keep Crashing on Honor X9b | Dr.fone
- How to Hide/Fake Snapchat Location on Your Lava Yuva 3 | Dr.fone
- How to Change Spotify Location After Moving to Another Country On Oppo F25 Pro 5G | Dr.fone
- Forgot iPhone 8 Backup Password? Heres What to Do
- 9 Solutions to Fix Poco M6 Pro 5G System Crash Issue | Dr.fone
- Undelete lost contacts from G54 5G.
- Will the iPogo Get You Banned and How to Solve It On Xiaomi Redmi 13C | Dr.fone
- In 2024, How to Transfer Contacts from Nubia Red Magic 8S Pro to iPhone XS/11 | Dr.fone
- How to Transfer Videos from Xiaomi Redmi 13C 5G to iPad | Dr.fone
- Full Guide on Mirroring Your Vivo Y55s 5G (2023) to Your PC/Mac | Dr.fone
- How to Mirror Apple iPhone 12 Pro Max to iPad? | Dr.fone
- How To Repair iOS System of Apple iPhone 6s Plus? | Dr.fone
- How To Activate and Use Life360 Ghost Mode On Poco C65 | Dr.fone
- In 2024, Lock Your Xiaomi Redmi K70E Phone in Style The Top 5 Gesture Lock Screen Apps
- A Working Guide For Pachirisu Pokemon Go Map On Lava Yuva 2 Pro | Dr.fone
- Title: How to Transfer Apple iPhone 8 Plus Data to iPhone 12 A Complete Guide | Dr.fone
- Author: Charlotte
- Created at : 2024-04-30 12:58:24
- Updated at : 2024-05-01 12:58:24
- Link: https://iphone-transfer.techidaily.com/how-to-transfer-apple-iphone-8-plus-data-to-iphone-12-a-complete-guide-drfone-by-drfone-transfer-from-ios/
- License: This work is licensed under CC BY-NC-SA 4.0.
