
:max_bytes(150000):strip_icc():format(webp)/TheWolfAmongUsBigby-793544cded2749488ae1d20113d8d73a.jpg)
5 Easy Ways to Transfer Contacts from Apple iPhone 14 Pro to Android | Dr.fone
5 Easy Ways to Transfer Contacts from Apple iPhone 14 Pro to Android
Whenever we move from one device to another, the first thing that we wish to do is transfer our contacts. After all, we can’t communicate with anyone without our list of contacts. Surprisingly, a lot of people find it hard to transfer contacts from Apple iPhone 14 Pro to Android. Truth to be told - there can find countless ways to move contacts from Apple iPhone 14 Pro to Android. You don’t need to worry a lot about the compatibility issues of different systems and can replace old phones at will when there is a new phone release, like the upcoming Samsung Galaxy S22 series. You can use a third-party app, a cloud service (like iCloud), and iTunes. Read on to learn how to transfer contacts from Apple iPhone 14 Pro to Android in 5 different ways.
Part 1: Transfer all contacts from Apple iPhone 14 Pro to Android in 1 click
The easiest way to transfer all the iPhone contacts to Android is by using Dr.Fone - Phone Transfer . A part of the Dr.Fone toolkit can easily transfer all your data from one device to another with a single click. The application is compatible with every leading Android and iPhone model. You can transfer your data from Apple iPhone 14 Pro to Android and vice-versa. Besides a cross-platform transfer of data, iPhone to iPhone and Android to Android transfer is also supported.
The application also supports transferring all the leading data types such as videos, music, photos, messages, and so much more. Extremely easy to use, it is a must-have tool for every smartphone user out there. To learn how to move contacts from Apple iPhone 14 Pro to Android, you can take these steps:
Step 1. First of all, launch the Dr.Fone toolkit on your Mac or Windows PC, and from its welcome screen, visit the “Phone Transfer” module.

Step 2. Connect your Android and iOS devices to the system and let the application detect them automatically. Since you wish to export iPhone contacts to Android, iPhone should be the source while Android should be the destination device. You can use the Flip button to interchange their positions.
Step 3. select the category of data you wish to transfer. Once you have checked the “Contacts” option, click on the “Start Transfer” button to start the process.

Step 4. Sit back and wait for a couple of minutes as the application syncs contacts from Apple iPhone 14 Pro to Android. Make sure that both the Apple iPhone 14 Pro devices are kept connected to the system until the process is completed.

Step 5. Once the transfer completes, you will be shown a message. In the end, you can remove the 2 devices safely from your system.

Part 2: Move contacts from Apple iPhone 14 Pro to Android with Google Account
Another fast and hassle-free way to sync contacts from Apple iPhone 14 Pro to Android is by using your Google Account. Since you can add your Google account on the iPhone, you can also use it to sync your contacts. While setting up your Android, you can use the same Google account. To learn how to import contacts from Apple iPhone 14 Pro to Android using your Google account, these quick steps can be implemented.
Step 1. Unlock your iPhone and go to its Settings > Mail, Contacts, Calendars > Add Account and tap on “Google.”

Step 2. Sign in with your Google account credentials and grant your phone the needed permissions to access your Gmail data.
Step 3. Now, you can go back to your Google account from here and turn on the sync option for “Contacts.”

Step 4. Once your contacts are synced with your Google account, you can easily access them on any Android device. You can use the Google Contacts app or use the same account to set up your device for auto-sync contacts.
Part 3: Import contacts from Apple iPhone 14 Pro to Android with iCloud
Another simple way to sync contacts from Apple iPhone 14 Pro to Android is by using iCloud. Firstly, you need to sync the iPhone contacts with iCloud, and later you can export them a VCF file. To this end, the vCard can be imported to Google Contacts. Yes - it does sound a bit complicated. After all, the Dr.Fone tools provide such a hassle-free way to move contacts from Apple iPhone 14 Pro to Android compared to this technique. Though, this is a free solution and can be your plan B. To learn how to transfer contacts from Apple iPhone 14 Pro to Android via iCloud, follow these steps.
1. Before you proceed, make sure your iPhone contacts are synced with iCloud. To do this, go to the iCloud settings and turn on the sync for 1.Contacts.
2. Great! Once your contacts are synced with iCloud, you can easily access them remotely. Go to iCloud.com and log in with your Apple ID.
3. After logging in to your iCloud account, go to the “Contacts” option from the home screen.
4. This will display a list of all the synced contacts. Select the contacts you wish to move. To select all contacts, click on the gear icon (settings) at the bottom right corner.
5. Once you have made the desired selections, go to its settings again (the gear icon) and choose “Export vCard.” This will save a VCF file having all the contact details.
6. Now, go to Gmail and login with your account details. Select the Contacts option. Alternatively, you can go to the official website of Google Contacts as well.
7. From here, you can choose to Import a file. Click on the vCard option and browse the saved VCF file that you have just exported from iCloud.
8. Once you have imported these contacts to your Google account, you can easily access them on the connected device as well.
Part 4: Copy contacts from Apple iPhone 14 Pro to Android using iTunes
If you are an avid user of iTunes, you can try this technique to export iPhone contacts to Android. Earlier, iTunes has a feature to sync contacts with Google, Outlook, and Windows account. Now, the Google feature has been removed from iTunes. Therefore, you first need to sync your contacts to your Windows account and can later export them into a card. Needless to say, the technique can also be a bit complicated. Though, you can implement these steps to copy contacts from Apple iPhone 14 Pro to Android using iTunes.
1. Launch the latest version of iTunes from your system, and connect your iPhone with a cable.
2. Select your connected device and go to its Info tab. Enable the “Sync Contacts“ option and choose to sync them with Windows Contacts.
3. Ensure that you choose to sync “All Contacts” before clicking on the “Apply” button.
4. Great! Once you have synced your iPhone contacts to your Windows account, you can safely remove the Apple iPhone 14 Pro device. Go to your Account > Contacts and click on the “Export” button on the toolbar.
5. Choose to export the contacts to a vCard and select the location to save the VCF file.

6. In the end, you can manually copy the VCF file to your Apple iPhone 14 Pro or import it to your Google Contacts as well.
Part 5: Switch contacts from Apple iPhone 14 Pro to Android without a computer
Often, users don’t wish to use a computer to export iPhone contacts to Android. If you have the same requirements, then you can use a data transfer app. While there are many apps out there that can help you move contacts from Apple iPhone 14 Pro to Android, I would recommend My Contacts Backup. This is because the app is available on both iOS App Store and Google Play Store . To use this app to transfer contacts from Apple iPhone 14 Pro to Android, follow these steps.
1. Firstly, download the My Contacts app on your iPhone and launch it. Grant the app the needed permissions to access your contacts.
2. The app will automatically detect all the contacts saved on your device and would give you an option to either mail them or save them to its server.
3. You can choose to email the contacts to your own Gmail account as well. A VCF file will be mailed to your account that can later be downloaded and synced.

4. Additionally, you can also upload the contacts to its server.
5. Now, you have to install the My Contacts Backup app on your Apple iPhone 14 Pro and Google Play Store.
6. Launch the app and choose to restore your contacts using an in-app vCard. In this way, all the saved contacts will be exported to your Apple iPhone 14 Pro.

Now that you have learned 7 different ways to move contacts from Apple iPhone 14 Pro to Android, you can easily fulfill your requirements. Out of all the 8 provided options, Dr.Fone - Phone Transfer is the fastest and most convenient option to move all the contacts at once.
How to Move Custom Ringtones from Apple iPhone 14 Pro to Android?
“Is it hard to move custom ringtones from Apple iPhone 14 Pro to Android?”
Apple has always emphasized IOS’s superiority over Android. Making it easier to transfer music files, ringtones from Apple iPhone 14 Pro to Android was never Apple’s priority. There are times when people feel the urge to transfer iPhone ringtones for android. The process is easy but it requires a bit of manual intervention on user’s behalf. Sometimes the entire data needs to backed up or transferred to another device. In this article, we will explain clearly on how to move custom ringtones from Apple iPhone 14 Pro to Android without any fuss.
Part 1. How to move custom ringtones from Apple iPhone 14 Pro to Android?
IOS’s file extension of a ringtone is .m4r whereas on an Android device a file with .m4a can be selected as the ringtone. This is the primary reason to change the extension when ringtones files are needed to be transferred from Apple iPhone 14 Pro to Android and vice versa.
Before we proceed, it is important to let you know that making ringtones from Apple music is not possible with any application since they are encrypted by Apple.
There are a dramatic number of versatile apps for all purposes related to iTunes, Android, IOS devices. With help of third party Phone Manager, you can manage all activities of your contacts right from your Desktop. Simply a hassle free as well convenient way. Here we will introduce Dr.Fone - Phone Manager (iOS) due to its important feature of the ability to provide so many functionalities without iTunes.
You can also explore all the files of your Device from your computer. With the help of this option, you can manually select an individual file to copy it on your computer.
Dr.Fone - Phone Manager (iOS)
One Stop Solution to Make and Manage iPhone Ringtones
- Transfer, manage, export/import your music, photos, videos, contacts, SMS, Apps etc.
- Backup your music, photos, videos, contacts, SMS, Apps etc. to computer and restore them easily.
- Transfer music, photos, videos, contacts, messages, etc from one smartphone to another.
- Highlighted features such as fix iOS/iPod, rebuild iTunes Library, file explorer, ringtone maker.
- Fully compatible with iOS 7, iOS 8, iOS 9, iOS 10, iOS 11, iOS 12, iOS 13, iOS 14, iOS 15, iOS 16, iOS 17 and iPod.
3,426,808 people have downloaded it
There are many online tools also which claims to provide similar services. However, it is crucial to note that trustful application will increase your experience in comparison of other unreliable apps that could spy and harm your devices.
Here are the methods to successfully transfer iPhone ringtones for android and we will show you how to custom iPhone ringtones as well.
Transfer iPhone Ringtones for Android with a Trustful App
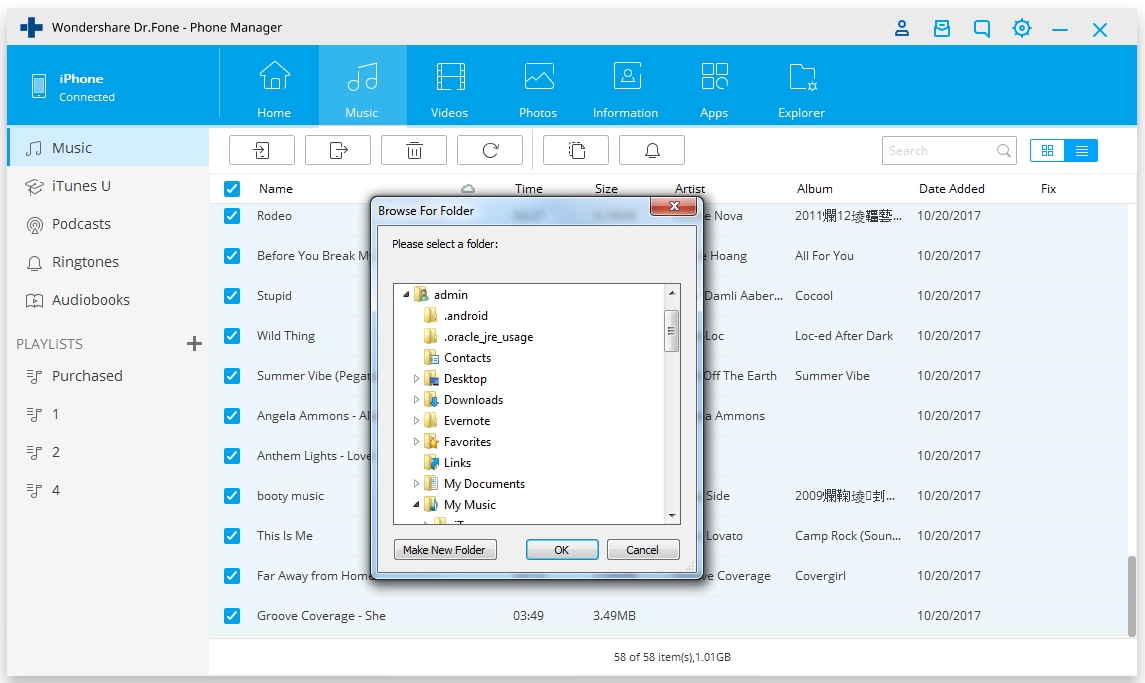
Step 1 Dr.Fone - Phone Manager (iOS) allows the transfer of selected media files like videos and ringtones. To do that, you need to install the application first. Connect your IOS device and run the application.
Step 2 Choose the source device that you want to transfer from.

Step 3 Go to the “Music” tab. Select the Ringtones option on the left sidebar. Choose the ringtone you want to transfer and go to “Exports” option and select the “Export to …….” Where “……” is your Samsung device in this example. You can export the files to as many IOS, Android devices you want.
Part 2. How to Make Ringtones for iPhone?
Creating Ringtones for iPhone is easy and convenient with Dr.Fone - Phone Manager (iOS).
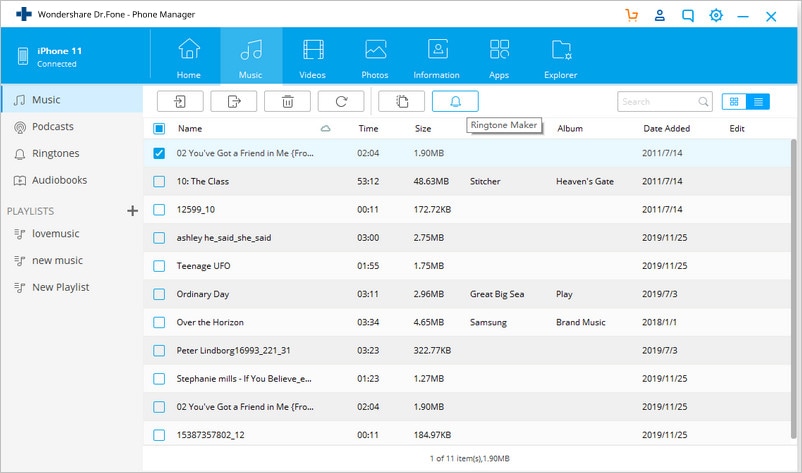
Step 1 Install and run Dr.Fone - Phone Manager (iOS). Connect your device to the computer and click on the “Music” tab.
Step 2 Then click on “Ringtone maker”. Or you can also select individual music file and right click on it to select the “Ringtone Maker”.
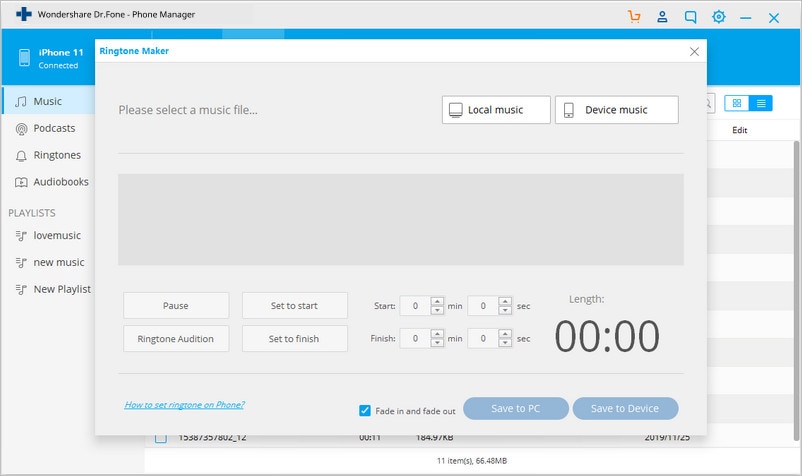
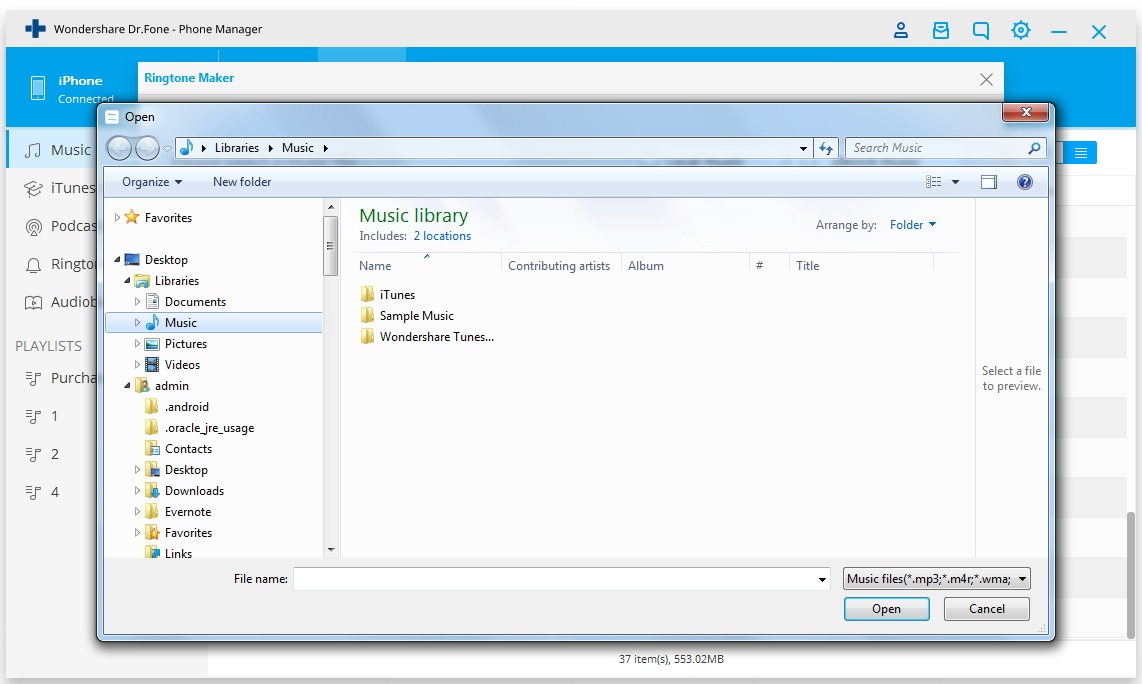
Step 3 A new window will pop up. To select the files from your computer, click on “Local Music”. To select files from your connected device, click “Save to Device”.
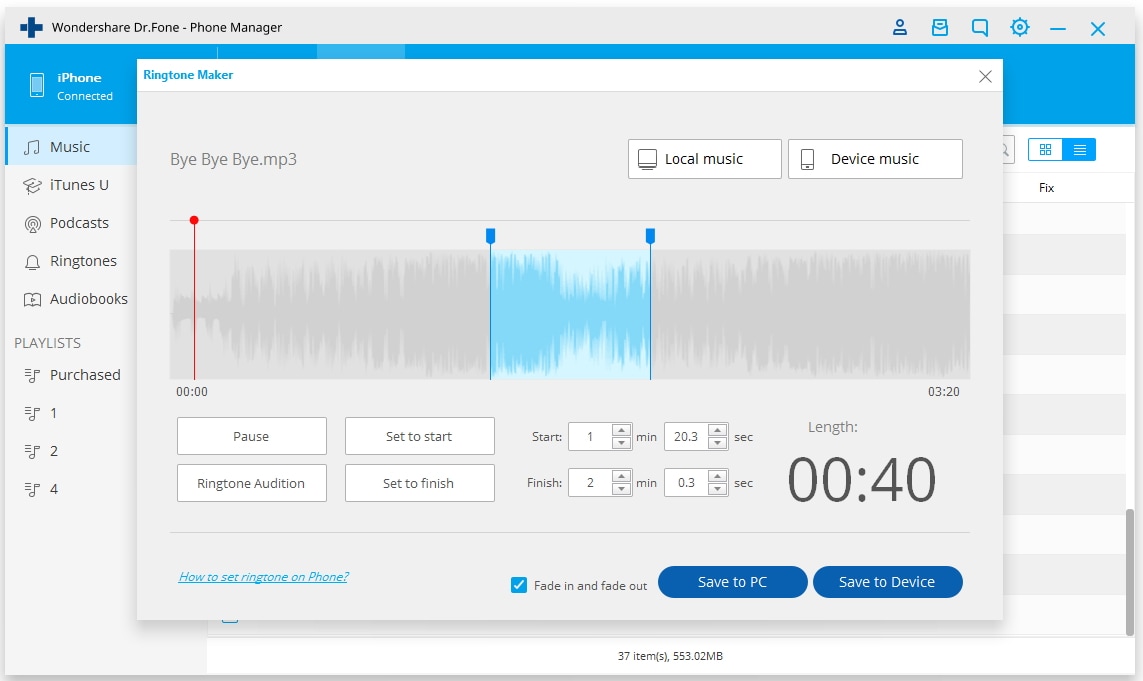
Step 4 You can select the start and finish time for the duration of your ringtone. To preview the ringtone, you need to click on the “Ringtone Audition”. Once you have mentioned the start and finish time, click on “Save to PC” or “Save to Device”.
With so many applications in the market related to services of iTunes, it is hard to try and test each one of them. Placing a high value on User experience and convenience, Dr.Fone - Phone Manager (iOS) was created to offer as many functionalities as possible.
Be it backing up IOS data on your computer or transferring music files from your IOS to Android Device, Dr.Fone - Phone Manager (iOS) does everything. The app is light and does not hog on memory resources. The design and interface is simplistic yet appealing.
Because of the above factors, Dr.Fone - Phone Manager (iOS) is widely used all over the world. Try Dr.Fone - Phone Manager (iOS) for making ringtones in iPhone. The trial version allows you to use the software for limited time. With nominal pricing you will get lifetime license with access to newer updates which would help in improving the efficiency of the product.
In case of technical concern, you can always contact our customer representative. This service is available only to premium customers. We also offer a 30-day money back guarantee.
How to Transfer Everything from Apple iPhone 14 Pro to iPhone 8/X/11

This article guide focuses on the techniques and tools you need to transfer everything from Apple iPhone 14 Pro to iPhone 8/X/11. As we know that most of the iPhone users will be switching their devices because of the new and improved iPhone 8/X/11 device which has to offer more features to the Apple users however, there is always a need for proper tool that can transfer data from the old iPhone device to new iPhone 8/X/11.
We have different kinds of files in our iPhone and almost all of the files are important to us. We would never want to stay out of touch with our important ones, and contacts help us to do that. All of that collection of your favorite music is not east to gather and you would certainly not like it if all of it is gone from your handset, So Contacts, Photos, SMS, Music all of these files are very important to us one can only understand the importance when they have no more access to these contents. Similarly, Photos are also important because they are the proof of our precious memories, and we don’t want to lose them. SMS messages are the records of every conversation we had with our contacts and sometimes we need record to continue the conversation regarding the subject. To transfer all of the content from one phone to another, we need a transfer tool because different handsets have different operating systems. And it is not easy to perform transfer functions between two devices. Most of the people hesitate to switch to a newer device because of the hassle they think they might have to go through to transfer data to new device, including the new iPhone 8/X/11.
How to transfer everything from Apple iPhone 14 Pro to iPhone 8/X/11
If you are looking to transfer everything from your old iPhone to your new iPhone 8/X/11 then Dr.Fone - Phone Transfer is a must get tool. With Dr.Fone application, you can easily transfer your important music, pictures, videos, SMS and much more transfer data to your new iPhone 8/X/11. There are always complications for iPhone users when they want to switch to new and latest device, but it is very easy thanks to Wondershare’s Mobile Trans.
Dr.Fone - Phone Transfer
Transfer Everything from Apple iPhone 14 Pro to iPhone 8/X/11 in 1 Click!.
- Easily transfer photos, videos, calendar, contacts, messages and music from old iPhone to new iPhone 8/X/11.
- Enable to transfer from HTC, Samsung, Nokia, Motorola and more to iPhone 11/X/8/7S/7/6S/6 (Plus)/5s/5c/5/4S/4/3GS.
- Works perfectly with Apple, Samsung, HTC, LG, Sony, Google, HUAWEI, Motorola, ZTE, Nokia and more smartphones and tablets.
- Fully compatible with major providers like AT&T, Verizon, Sprint and T-Mobile.
- Supports iPhone, iPad, iPod touch and the latest iOS version.
- Fully compatible with the latest Windows or Mac version.
3981454 people have downloaded it
This section of the article focuses on the steps through which you can transfer your data from your Apple iPhone 14 Pro to your new iPhone 8/X/11.
Step 1: The first and foremost step includes connecting your devices to your PC. When you are done simply launch the Dr.Fone software click Phone Transfer in the main menu.
Step 2: Right after your devices have been connected simply note the source and destination phone are connected at this moment, you will get a proper tab with source and destination phone images and their connection status.
Step 3: When you are done with selecting the source which in this case would be iPhone 7/7Plus and destination device which in this case would be iPhone 8/X/11 click Start Transfer, you need to specify the data you want to transfer in this case you would select all contents since you want to transfer everything.
Step 4: Simply click start transfer and the transfer process will begin make sure that both of the Apple iPhone 14 Pro devices remain connected throughout the transfer process.

Part 2: How to transfer everything from Apple iPhone 14 Pro to iPhone 8/X/11 with iCloud
Initially signing up for ICloud gets you 5GB of storage, you can use this storage for IOS device backup, iCloud photo library, app data and documents stored in the ICloud. If you feel 5gb storage is not enough you, you can always upgrade your storage but then you will have to pay. iCloud as a backup is a great if anything happens to your phone you can get access to your data anywhere with the internet besides this you can also use this data to switch your new iPhone 8/X/11 device.
Step 1. From your IPhone 7 device connect to a Wi-Fi network. Go to IPhone 7 settings and tap on your name. Scroll down and select the iCloud option.
Step 2. After you have clicked the iCloud option in the backup section enable iCloud backup option. And hit “Backup Now”.
Step 3. You must be connected to the Wi-Fi until the backup process is completed. In ICloud tab select storage to see the details of your backup.

Step 4. Now that your data has been backed up using your iCloud id you can always add this id to your new iPhone 8/X/11 device. Right after you add your iCloud id to your new iPhone 8/X/11, and Restore from iCloud Backup, all of the backed up data from Apple iPhone 14 Pro will be transferred to your new iPhone 8/X/11 device.
Part 3: How to transfer everything from Apple iPhone 14 Pro to iPhone 8/X/11 with iTunes?
You can create a local backup for your Apple iPhone 14 Pro device on your PC through iTunes, and then restore to your new iPhone 8/X/11. So that you sync all data from Apple iPhone 14 Pro to iPhone 8/X/11 with iTunes. If you don’t have iTunes you can download for free from apple’s official website.
Step 1. After you have successfully installed iTunes on your Computer connect the Apple iPhone 14 Pro device to your system and launch the iTunes Application.
Step 2. iTunes will detect your device, simply click summary of your phone, in the Backups tab you must click “Backup Up Now” under the Manually Backup and Restore.
Step 3. The iTunes will back up your iPhone. After the process is complete you can disconnect your Apple iPhone 14 Pro.
Step 4. After you have backed up the data from your old Apple iPhone 14 Pro device, simply connect your new iPhone 8/X/11 and restore the data to your new iPhone 8/X/11 device through iTunes.

With the advancements in the mobile technology we are presented with the new and improved features every year, there is always a point where we need to change our device because we do need those new features. So in one of the cases iPhone users would want to change their device because of the extensive features iPhone 8/X/11 has to offer. So in this case we would want to transfer the data from our Apple iPhone 14 Pro to iPhone 8/X/11. Apple users and techie’s are always up for new handset and they love to get their hands on the newer Apple’s device. This is where there is a need for an effective tool to transfer the data from the old Apple iPhone 14 Pro to iPhone 8/X/11.
After going through this article guide we can conclude that iPhone users can transfer their data to their latest iPhone 8/X/11 with the help of iTunes, iCloud and Dr.Fone - Phone Transfer (iOS & Android). However, Dr.Fone is very effective for data transfer operations. Plus, the iPhone to iPhone Transfer tool is very easy to use because of its user friendly interface design.
Also read:
- 4 Ways to Sync Contacts from Apple iPhone 6s Plus to iPad Easily | Dr.fone
- How To Transfer Data from Apple iPhone 12 Pro Max to New iPhone 15 | Dr.fone
- In 2024, How to Transfer Apple iPhone X Data to iPhone 12 A Complete Guide | Dr.fone
- In 2024, 5 Ways to Send Ringtones from Apple iPhone 6 Plus to iPhone Including iPhone 15 | Dr.fone
- In 2024, 4 Quick Ways to Transfer Contacts from Apple iPhone 15 Plus to iPhone With/Without iTunes | Dr.fone
- 5 Tutorials on How to Transfer Photos From Apple iPhone 15 Pro Max to New iPhone | Dr.fone
- In 2024, How to Transfer/Sync Notes from Apple iPhone SE to iPad | Dr.fone
- In 2024, How To Transfer From Apple iPhone 12 Pro Max to Samsung Simplified Guide | Dr.fone
- In 2024, Solved How To Transfer From Apple iPhone 15 Pro Max to iPhone 15 | Dr.fone
- In 2024, 5 Ways to Send Ringtones from Apple iPhone 6 to iPhone Including iPhone 15 | Dr.fone
- 4 Quick Ways to Transfer Contacts from Apple iPhone 7 Plus to iPhone With/Without iTunes | Dr.fone
- 4 Ways to Transfer Music from Apple iPhone 14 Plus to iPod touch | Dr.fone
- In 2024, How to Transfer from Apple iPhone 13 Pro Max to iPhone 8/11/11 Pro | Dr.fone
- How to Move Custom Ringtones from Apple iPhone 15 Plus to Android? | Dr.fone
- In 2024, 5 Tutorials on How to Transfer Photos From Apple iPhone 11 Pro to New iPhone | Dr.fone
- In 2024, 5 Tutorials on How to Transfer Photos From Apple iPhone SE (2022) to New iPhone | Dr.fone
- 8 Workable Fixes to the SIM not provisioned MM#2 Error on Samsung Galaxy M14 5G | Dr.fone
- How to Reset iPhone 7 Without Apple Password? | Stellar
- In 2024, What You Want To Know About Two-Factor Authentication for iCloud From your iPhone SE (2020)
- Unlock Itel A05s Phone Password Without Factory Reset Full Guide Here
- In 2024, Simple and Effective Ways to Change Your Country on YouTube App Of your Apple iPhone 7 Plus | Dr.fone
- A Guide Samsung Galaxy S24 Wireless and Wired Screen Mirroring | Dr.fone
- How to Unlock iPhone X?
- 4 Ways to Fix Android Blue Screen of Death On Vivo Y100 | Dr.fone
- In 2024, Solutions to Spy on Xiaomi Redmi Note 13 Pro+ 5G with and without jailbreak | Dr.fone
- How to Transfer Videos from Tecno Pova 5 to iPad | Dr.fone
- Title: 5 Easy Ways to Transfer Contacts from Apple iPhone 14 Pro to Android | Dr.fone
- Author: Charlotte
- Created at : 2024-05-19 02:47:36
- Updated at : 2024-05-20 02:47:36
- Link: https://iphone-transfer.techidaily.com/5-easy-ways-to-transfer-contacts-from-apple-iphone-14-pro-to-android-drfone-by-drfone-transfer-from-ios/
- License: This work is licensed under CC BY-NC-SA 4.0.
