
Ultimate Guide, How to Transfer Music From Apple iPhone XR to iPhone | Dr.fone
Ultimate Guide, How to Transfer Music From Apple iPhone XR to iPhone
The evolution of technology continually transforms how we consume and enjoy music. The iPhone stands among the most dominant brands in the smartphone world. Thus, the need for effortless ways to transfer music from iDevices has never been more paramount. In this comprehensive article, we will go through various methods and tools. This guide aims to simplify the process and empower you with the knowledge to transfer your music hassle-free.
It will explore native functionalities provided by Apple and third-party apps. Moreover, it will take you through music transfer employing cloud services. The goal is to equip you with the most effective, efficient, and reliable methods to transfer music from Apple iPhone XR to iPhone.
Part 1: How To Transfer Selective and All Music From Apple iPhone XR to iPhone in One-Click
When it comes to transferring music between iPhones, Wondershare Dr.Fone emerges as a versatile solution. It allows you to move the entire music library or selective tracks with a single click. With its one-click transfer functionality, managing your music collection becomes a smooth experience.
This ensures that your favorite tunes are available on your new iPhone. The following are the detailed methods on how to transfer music from Apple iPhone XR to iPhone using Wondershare Dr.Fone:
Method 1: Transfer Music Using Wondershare Dr.Fone – Phone Manager
Wondershare Dr.Fone offers a comprehensive solution for managing your iPhone. It allows you to handle your iPhone data efficiently. You can perform tasks like importing, exporting, and deleting files. With its intuitive drag-and-drop feature, you can move files into any desired app on your device. You can transfer a variety of data between your iOS device and computer. Here is how to transfer music from Apple iPhone XR to iPhone using the phone manager feature:
- Step 1: Access the Source iPhone in Wondershare Dr.Fone
The first thing you need to do is install and launch Wondershare Dr.Fone. Then, connect both iPhones to the computer and wait for their detection by Dr.Fone. Once detected, click the source iPhone from the left panel.

- Step 2: Transfer the Selected Music Track
From the expanded options for the source iPhone, choose “Music.” Now, go to the track you want to share and select it. Now, tap “To Device” from the top toolbar and select the other iPhone as the destination. As soon as you select the other iPhone, the music file will be transferred.

Method 2: Transfer Music Using Wondershare Dr.Fone – Phone Transfer
Wondershare Dr.Fone - Phone Transfer simplifies transferring different data types between 8000+ devices. It ensures ease of use with a simple click-through process. Moreover, it is compatible with Apple, Samsung, HUAWEI, OPPO, Sony, Google, and more.
You also get full support for the latest iOS and Android versions. It supports the transfer of over 15 types of data between different OS. Here is how to transfer music from iPod to iPhone using the Phone Transfer tool of Wondershare Dr.Fone:
- Step 1: Click Phone Transfer in Wondershare Dr.Fone
To begin, you need to connect both devices to the computer with Wondershare Dr.Fone. Within Dr.Fone, click “Toolbox” from the left panel and choose “Phone Transfer” as the option. It will lead to a new screen where you need to assign the positions to the iPhones.

- Step 2: Select Music and Tap Start Transfer
The iPhone from which you want to transfer the music should be in the “Source” position. Now, give the “Destination” position to the iPhone where you want to transfer music. Then select “Music” from the available data type and click “Start Transfer.” Wait for the transfer process to complete, which will take time, depending on the library size.

Part 2: How To Transfer Music From Apple iPhone XR to iPhone Using iTunes
iTunes remains a reliable and widely used application for managing iOS devices. Many iPhone users prefer this method for transferring music between iOS devices, which is limited to purchased songs. Follow these steps to transfer music from Apple iPhone XR to iPad using iTunes:
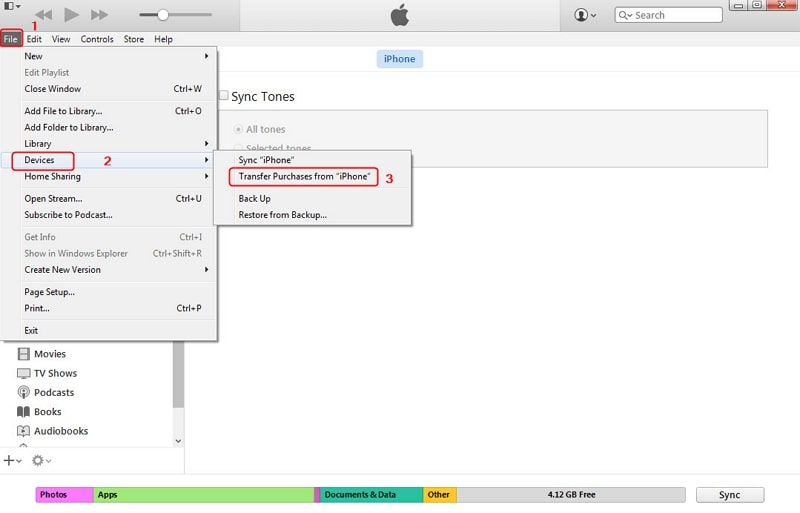
- Step 1. Run the latest version of iTunes on your computer and connect the source iPhone. After accessing iTunes, click on “File,” located in the top left corner, and choose “Devices.” Next, select “Transfer Purchases from iPhone” and let the process finish.
- Step 2. Once all the purchased songs are transferred, disconnect the source iPhone. Now, connect the targeted iPhone and wait for iTunes to recognize it. Then tap the “Device” icon to access the iPhone window.
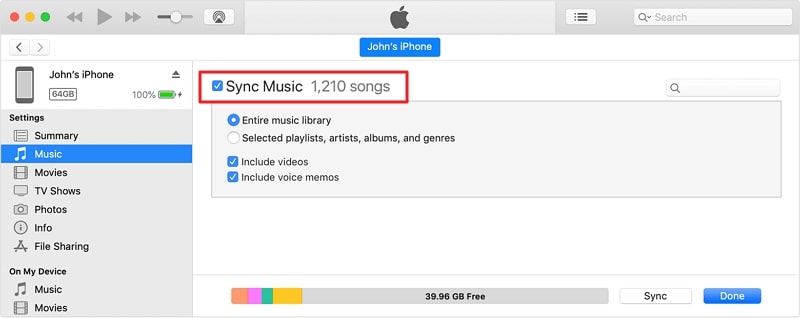
- Step 3. Here, click the “Music” tab from the left side panel. Now check the “Sync Music” box and select “Entire Library” or another option depending on your choice. Finally, press “Sync” to commence the music transfer process.
Part 3: How To Transfer Music From Apple iPhone XR to iPhone via AirDrop
AirDrop provides a convenient and wireless way to transfer music between iPhones. It allows you to share songs, albums, or playlists effortlessly. You don’t need any cable or extra software to use this method. This wireless approach simplifies the process, making it an excellent choice for transferring a few tracks or albums. Follow these steps to transfer music from Apple iPhone XR to iPhone without iTunes:
- Step 1. Start by ensuring that AirDrop is enabled on both devices and its visibility is set to “Everyone.” Moreover, you also need to ensure that both Wi-Fi and Bluetooth are also enabled, as they are essential.
- Step 2. Now open the Music app and find the track you want to transfer to the other iPhone. Tap the three-dots icon and select “Share Song.” From the available options, choose “AirDrop.”
- Step 3. Among the available devices to AirDrop, select the targeted iPhone. Now, you will receive a prompt on the targeted iPhone, which you need to accept to complete the data transfer.

Part 4: How To Transfer Music From Apple iPhone XR to iPhone by Syncing Apple Music Library
Syncing your Apple Music Library across iPhones offers a smooth way to transfer music. It ensures all your favorite tracks, playlists, and albums are available on your new device. This method ensures a consistent music experience. It allows you to enjoy your favorite tunes without the need for manual transfers. Follow these steps to transfer music from iPad to iPhone Apple Music:
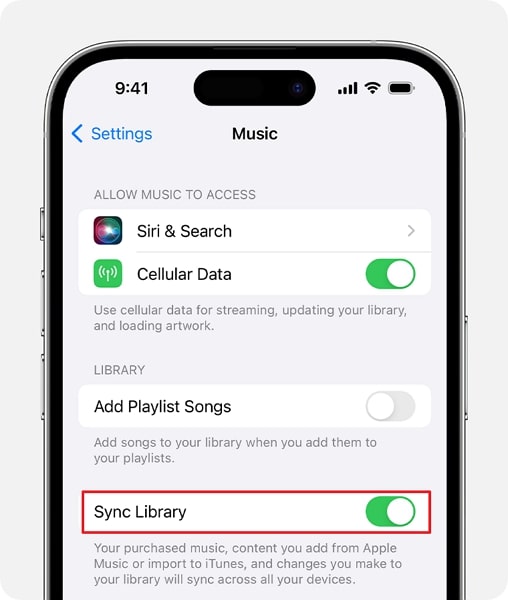
- Step 1. On both of your iPhone devices, log in using the same Apple ID. Then, move to the source iPhone and access the Apple iPhone XR device’s Settings. Here, scroll down to find and tap the “Music” option.
- Step 2. Now, move to toggle on the “Sync Library” option on the following screen. Afterward, repeat the same process on the new iPhone. Give the syncing process some time, and you will be able to access all songs on the new device.
Part 5: How To Transfer Music From Apple iPhone XR to iPhone Using Google Drive
Transferring music via Google Drive offers a convenient way to move your music collection. This allows a music exchange between iPhones without the need for cables. It’s a particularly useful method for transferring a few select songs or albums. With it, you can transfer songs that you have downloaded from the internet. The following are the steps you need to follow to transfer music from iDevices via Google Drive:
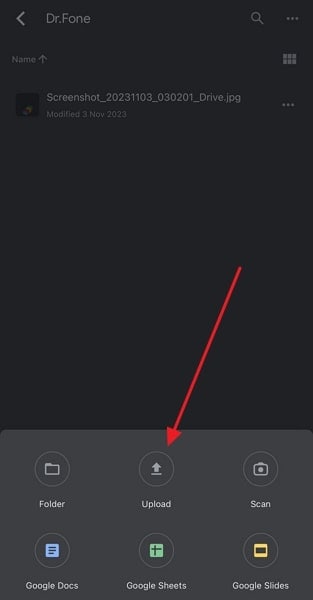
- Step 1. Once you’ve installed the Google Drive app on your iPhone, launch the app, sign in, and tap the “+” icon located at the lower right. Select “Upload” to proceed. Now, tap “Browse” and then go on to locate and select the targeted songs.
- Step 2. Once they are uploaded, move to the new iPhone and install the Google Drive app there. Here, log in using the same Google ID and access the songs you uploaded from the source device. Then tap the “Three dots” icon and select “Make available offline” to complete the process.

Part 6: How To Transfer Music Streaming Services Playlists From Apple iPhone XR to iPhone
Transitioning between music streaming platforms can be challenging. However, with Wondershare MobileTrans, you can effortlessly transfer your beloved playlists. You can move your Spotify playlists to Apple Music, YouTube Music, or between various services hassle-free. Whether you’re tech-savvy or not, its user-friendly interface ensures easy operation. Additionally, it supports more platforms and is completely free to use. Here are the steps you need to follow for playlist transfer:
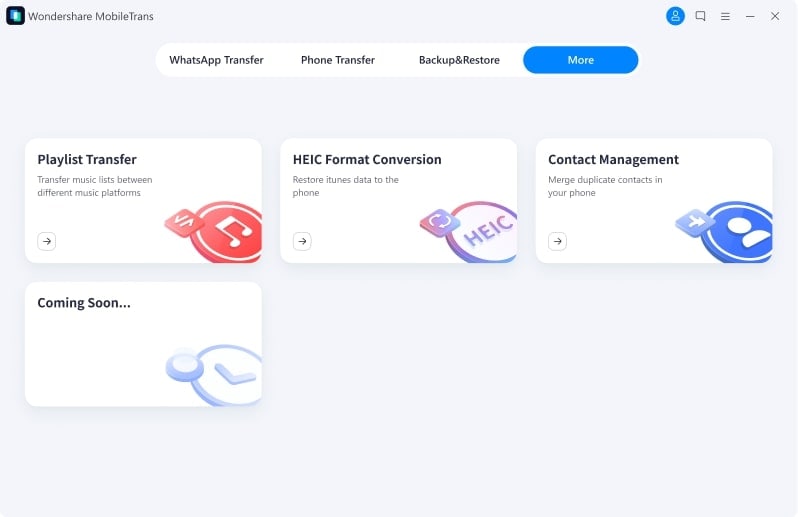
- Step 1. You start the process by installing Wondershare MobileTrans on your computer. Now, launch it and move to the “More” tab. Here, click the first option, “Playlist Transfer” to proceed.
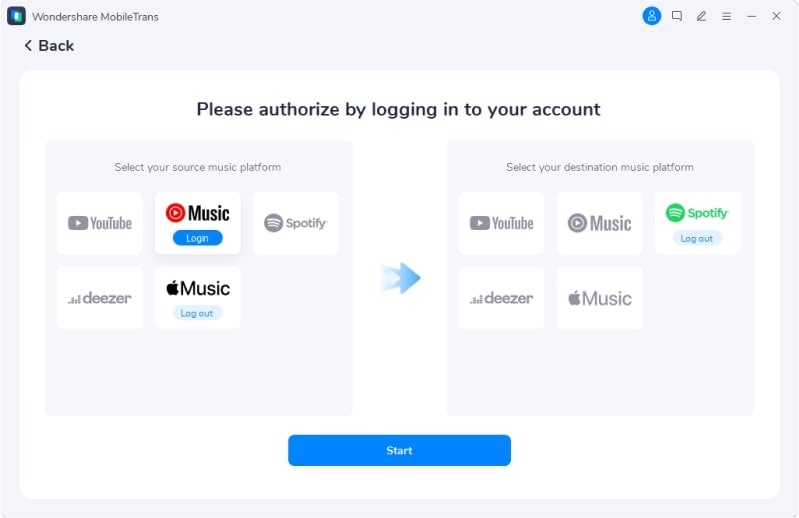
- Step 2. On the following screen, log into both music streaming services. Once you are logged in, tap “Start” to commence the playlist transfer procedure. The time it will take depends upon the number of playlists and songs.
Conclusion
In conclusion, transferring music between iPhones is essential for preserving our musical experiences. Whether using iTunes, AirDrop, cloud services, or specialized tools, the process can be simplified. For a comprehensive and user-friendly solution, consider Wondershare Dr.Fone. Its intuitive interface and versatile functionalities streamline the music transfer process. This makes Dr.Fone an ideal choice for how to transfer music from Apple iPhone XR to iPhone.
How to Transfer Photos from Apple iPhone XR to other iPhone without iCloud
This article’s content focuses on the importance of photos, and the techniques and tools you require to transfer photos from Apple iPhone XR to another iPhone without iCloud including iPhone 15.
Photos are important because they reflect our memories, we have so many memories in our brain and it is not easy to pull them all up when required, but photos can help a lot to remember. Photos invoke emotions, sometimes photos are important to remember details, for example, “What did I wear on my last Christmas?”.
Method 1: How to Transfer Photos from Apple iPhone XR to iPhone without iCloud (All in One Click) [iPhone 15 Included]
The top method to transfer photos from Apple iPhone XR to iPhone without iCloud is to transfer all the photos in one click. With this method, you can complete the photo transfer even within seconds without any photo loss. All you need are two lightning cables to connect both iPhones to your PC or Mac, and the Dr.Fone - Phone Transfer (iOS & Android) software.
Dr.Fone - Phone Transfer
Easiest Way to Transfer Photos from Apple iPhone XR to iPhone without iCloud
- Transfer photos from an old iPhone to a new iPhone within seconds.
- Support the transfer of more data like contacts, messages, files, videos, etc. from phone to phone.
- Transfer everything from Apple iPhone XR to new iPhone , from Android to Android, from Apple iPhone XR to Android, and from Android to iPhone.
- Supports iPhone, iPad, iPod touch, and the latest iOS version.
- Fully compatible with the latest Windows or Mac version.
3981454 people have downloaded it
Here are the simple steps to transfer photos from Apple iPhone XR to iPhone without iCloud:
Step 1: Download the Dr.Fone software, open it, and you can see the following interface.
Step 2: Connect both iPhones to your PC and click “Phone Transfer”.

Note: Confirm which iPhone is your destination device and which one is the source. Click “Flip” to swap their positions if necessary.
Step 3: Select the “Photos” option and click “Start Transfer”. Then you can find all photos are transferred from Apple iPhone XR to iPhone without iCloud.

Video Guide: Transfer photos from Apple iPhone XR to iPhone without iCloud
Method 2: Transfer Photos from Apple iPhone XR to iPhone without iCloud (Selective Transfer) [iPhone 15 Included]
When you want to transfer your photos separately without transferring the other iDevice data, there is a perfect tool for you: Wondershare Dr.Fone . This action takes no time at all, and you can transfer the images within a matter of a few seconds. You can also use this phone manager app to transfer data from Apple iPhone XR to Android and iTunes or vice versa.
In addition, Wondershare Dr.Fone works efficiently without losing data while transferring media files between iOS devices. It can also transfer videos, contacts, messages, etc., from Apple iPhone XR to iPhone. Here is how to selectively transfer photos from Apple iPhone XR to iPhone without transferring the complete iPhone data via Wondershare Dr.Fone:
Step 1: Proceed With the Phone Manager feature
First, you need to install Wondershare Dr.Fone on your computer and connect both your iDevices to the computer using the Apple-certified USB cables. Next, locate the iPhone from which you want to transfer the images and expand it. Choose the “Photos” tab and let Wondershare Dr.Fone load all the pictures.
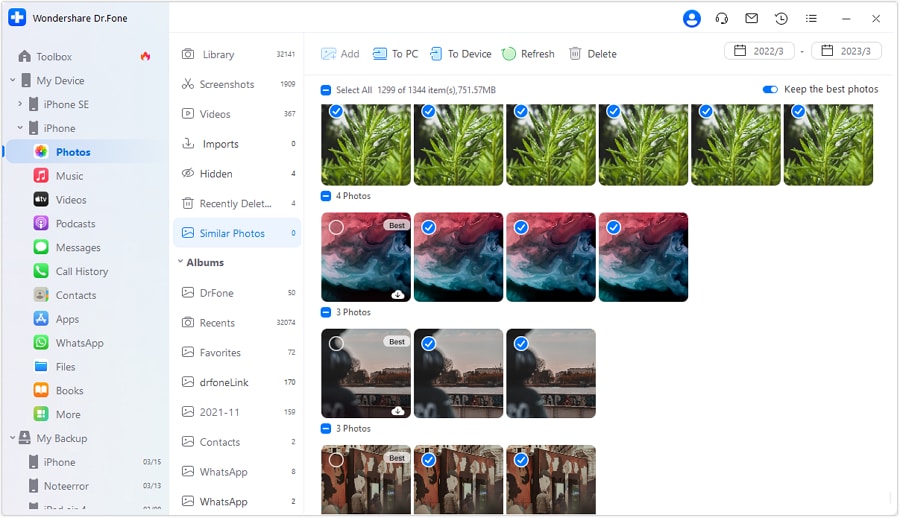
Step 2: Perform the Selective Photos Transfer
Once Dr.Fone detects all the photos in your iPhone, it will categorize them in the albums like they are in your iDevice. Choose the pictures you want to transfer and tap the “To Device” option. Then, click on the iPhone on which you want to send all the selected images and complete the photo transfer process.
Method 3: Transfer Photos from Apple iPhone XR to iPhone without iCloud via iTunes [iPhone 15 Included]
Using iCloud for transferring data is convenient, but it is not always practical due to the limitation of maximum data. In that case, iTunes can be a good option, which is another functional software from Apple. Following are the step-by-step instructions to transfer pictures from Apple iPhone XR to iPhone via iTunes to avoid data storage limitations:
Step 1: To begin with, launch iTunes on your computer and connect your source iPhone. Select the “Phone” icon near the top left corner of iTunes and move to the “Summary” tab. Then, navigate to the “Backups” section and check the “This Computer” option. Then, hit the “Back Up Now” button on the right side to start the backup process of your iDevice.

Step 2: Once the backup process is complete, disconnect the old iDevice. Next, you need to connect your new iPhone and proceed to the “Backups” section in the “Summary” tab. Here, tap “Restore Backup” and go on to choose the most recent backup. To complete the photo transfer process, tap “Restore” and wait for the backup to be restored.

Method 4: Transfer Photos from Apple iPhone XR to iPhone without iCloud via AirDrop [iPhone 15 Included]
AirDrop gives its users the wireless facility to transfer iPhone photos in a quick manner. Unlike iCloud or iTunes, it does not need to sync all the photos. You just have to select the photos from one of your iPhones and AirDrop them to another. However, the other iPhone should be within the Bluetooth and Wi-Fi range of the host iDevice. Here are the instructions you need to follow to AirDrop photos from old iPhone to new iPhone efficiently:
Step 1: On your old iPhone, you need to open the “Photos” app and hop into the desired folder. Next, pick the photos you want to share by tapping the “Select” button in the upper right corner.
Step 2: Following this, you will have to tap the “Share” icon, followed by selecting the targeted “AirDrop” recipient iPhone. Then, on the target iPhone, you have to choose “Accept” to receive them.

Tip: How to Transfer Photos from Apple iPhone XR to iPhone using iCloud
Step 1. To transfer the photos from your iPhone to another iPhone you must make sure that you make a backup through iCloud.
Step 2. On the home screen tap Settings. Once entered in settings tap iCloud.

Step 3. In the iCloud menu, you need to click on photos. Once entered in photos turn on the iCloud Photo Library option along with upload my photostream.
Step 4. When you are done your photos will be uploaded to iCloud and you can restore them by simply adding the iCloud id to the new iPhone device.
Editor’s Picks:
- 5 Ways to Transfer Everything from Old iPhone to your new iPhone
- 5 Ways to Transfer Photos from Apple iPhone XR to PC with/without iTunes
If you do not want to use iCloud for data transfer, run Dr.Fone - Phone Transfer on your computer and transfer data in one click quickly.
How to Transfer Apple iPhone XR Data to iPhone 12: A Complete Guide
Apple announced a line-up of iPhones with four new devices in 2020. The series is called the iPhone 12 series that has four handsets of different sizes and price ranges. The iPhone 12 series include iPhone 12, iPhone 12 Mini, iPhone 12 Pro, and iPhone 12 Pro Max. These are the company’s first-ever 5G devices. They surely took a step into the future of technology with the 12 series.
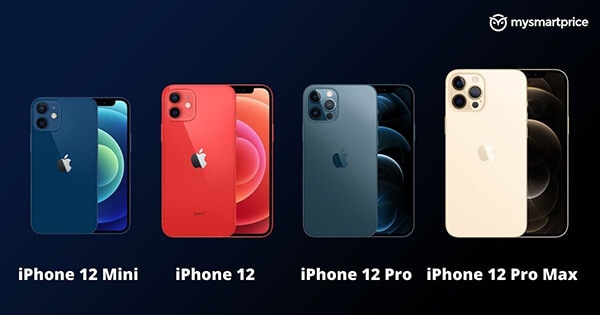
The device is considered lighter than the iPhone SE launched in 2020. iPhone 12 Pro Max holds an outstanding camera system for high-quality image processing. Besides, the introduction of A14 SoC has encouraged the exceptional performance of all four models. Each of the series models is secured with suitable features and new capabilities. Let’s take a glance at the relevant specifications and iPhone 12 price.
Part 1: Apple iPhone 12 Series Specifications
To mention the iPhone 12 series specifications, these models are secured with an SoC of Apple A14 Bionic. All 4 of them consist of DRAM. The displays of these smartphones are quite satisfactory.
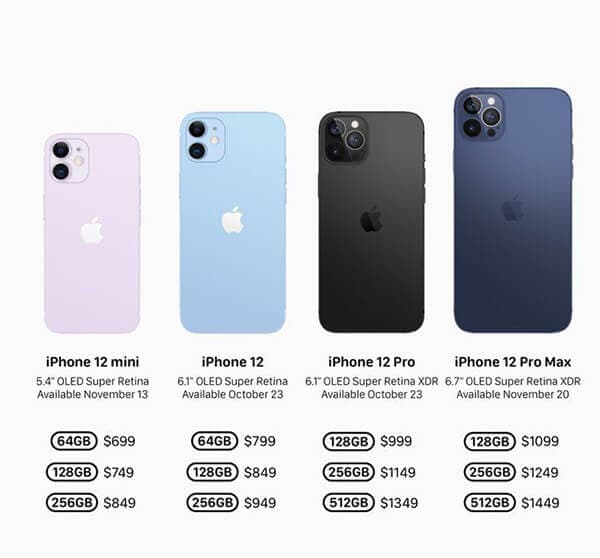
Display: The iPhone 12 Mini and iPhone12 have a display of 5.42” OLED (2340 x 1080) and 6.06” OLED (2532 x 1170). On the other hand, the magnificent iPhone 12 Pro has a display of 6.06” OLED (2532 x 1170) and 6.68” OLED (2778x1284).
Size & Weights: The size concerning height, width, and depth of both iPhone 12 and iPhone 12 pro are the same at 146.7 mm, 71.5 mm, 7.4 mm. Besides, the iPhone Mini stands at a height width and depth of 131.5 mm, 64.2 mm, and 7.4 mm. The iPhone 13 Pro max has a height of 160.8 mm, a width of 78.1 mm, and a depth of 7.4 mm. While the iPhone Mini weighs the lightest with 135g, iPhone 12 max weighs the heaviest (228 g). Both iPhone 12 and iPhone 12 Pro remain at 164g and 189g, respectively.
Wireless Charging: Each of the iPhone 12 series models supports MagSafe Wireless Charging up to 15 W. They are also Qi Compatible (7.5 W). Now, coming to the camera quality, all four models are secured with a front camera of 12 MP f/2.2.In rear camera setup, iPhone 12 Mini, iPhone 12, and iPhone 12 Pro have a main camera of 12 MP 1.4µm, 26mm eq. f/1.6, Optic OIS. iPhone 12 Pro Max comes with the main camera of 12 MP 1.7µm, 26mm eq. f/1.6.
Camera: The high-quality telephoto camera of the iPhone 12 Pro is 12 MP, 52mm eq. f/2.0 OIS. For iPhone 12 Pro Max is 12 MP, 65mm eq. f/2.2 OIS. The entire iPhone series model has an ultra-wide camera of 12 MP 13mm eq. f/2.4. The splash, water, and dust resistance feature with IP68 for up to 6m and 30 minutes keeps the phone durable.
iPhone Series devices hold dual-SIM support with nano-SIM and eSIM. Both iPhone 12 Mini and iPhone 12 come in distinct storage capacities like 64 GB, 128 GB, and 256 FB. The iPhone 12 Pro and Pro Max are available in the storage of 128 GB, 256 GB, and 512 GB.
Part 2: Transfer old iPhone data to iPhone 12
We know that the excitement of buying a new iPhone is real. However, it’s important to do one thing before jumping into the camera quality. And that’s data transfer. You do not want your old phone data to be gone with the old device, do you? We hope not. Here are some of the tactics by which you can transfer the old iPhone data to the new iPhone 12
2.1 Through iCloud
Before transferring, make sure your data is backed up. For that, connect the old iPhone with the WiFi and then go to “Settings.” Next, tap your name and then on “iCloud.” Next, select the “Backup Now” option and wait for the process to get completed. After completing the backup, follow the steps given below.
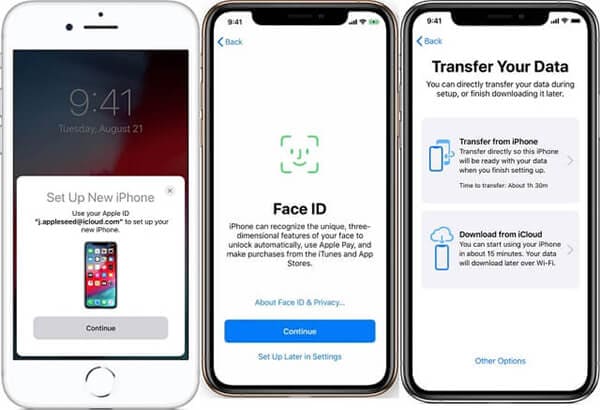
Step 1: First, turn on the new device to see the “Hello” screen. Now, follow the instructions appearing on the screen. Once you notice the WiFi screen, tap a WiFi network to join. Keep following the steps till the “Apps & Data” screen shows up. Tap on “Restore from iCloud.”
Step 2: Sign in to your iCloud with relevant credentials like Apple ID and password. Choose a backup but make sure to check the date and size.
If you have bought iTunes or App store content with multiple IDs, sign in with those accounts too.
Step 3: The restore process will be initiated. Make sure to be connected and wait till the process gets completed successfully. Once done, continue with the other steps to complete the setup process successfully.
2.2 Through iTunes or Finder
Start with the backup process by opening iTunes. Now, connect your iPhone with the PC. After it gets connected, choose your iPhone on the top toolbar. To transfer the data related to Health and Activity/saved passwords, choose the “Encrypt backup” option. Next, input a password and click “Back Up Now.”
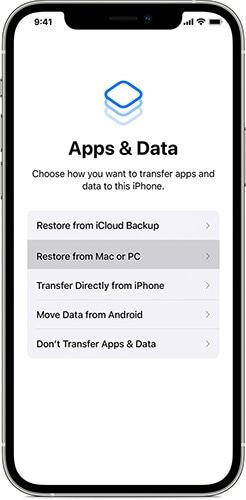
To transfer the data through iTunes or Finder, launch your new device. Once the “Hello” screen appears, follow the instructions appearing on the screen. As soon as you note the “Apps & Data Screen,” tap on “Restore from Mac or PC.” Connect the new device to PC/Mac and open the iTunes/Finder window. Once your device name is visible on the screen, tap it.
Select “Restore Backup” to choose a “Backup.” Ensure that the size and data are accurate. To restore from an encrypted backup, input the password. The restoration process will start. Now, wait for the entire process to get completed and then move on to the remaining setup steps.
Part 3: Transfer Android Data to iPhone 12
The methods mentioned above can be time-consuming. In that case, it’s best to opt for a simple process that does not require too much work. For example, Dr.Fone - Phone Transfer all is an efficient and easy-to-use phone switch app.
As the name signifies, this App can help you with iPhone 12 transfer data in a few minutes. Experienced developers develop it for both iOS and Android users. So, you can transfer data from any of the Apple iPhone XR devices to the new iPhone 12.
With Dr. Fone, you can migrate 13 files of distinct size to the new iPhone 12. Here’s a glimpse of the files below
Contact, photo, videos, voicemail, wallpaper, calendar, and many more
To transfer data through Dr. Fone, follow the easy steps mentioned below.
Step 1: First, connect both the old device and new iPhone 12 to your PC/Mac with USB.
Step 2: Now, launch the Dr. Fone - Phone Transfer and select the app
Step 3: Once the app starts, you will note a device detected as a source. Similarly, there will be other devices detected as destinations. Then, you will be given the option to flip the source and destination. For that, click on the “Flip” option.
Step 4: After selecting the Apple iPhone XR device status, mark the checkboxes beside the files for transferring. Once done, tap on the “Start Transfer” button appearing on the screen.
You can select “Clear data before copy” to delete the data from the destination device before transferring. It will speed up the entire process.
Conclusion
Hopefully, you got a clear idea of how to transfer data to iPhone 12. Dr. Fone - Phone Transfer is one of the finest names for data recovery and data transfer between devices. They have distinct outstanding products that are efficient and useful for the users. One of the best things about the application is that you can transfer the data regardless of the mobile operating system. Be it an iOS or Android device, follow the steps provided above, and that’s it. The iPhone 12 data transfer process is quick, easy, and requires less effort.
Also read:
- [New] Graphical Glimpse Radeon's Resurgence for 2024
- [Updated] In 2024, A List of the Best 8 Sites for Free 3D Text PSD Downloads
- [Updated] Sharing Sites Guide for Instagram Story and Post Links
- Hard Reset Realme 10T 5G in 3 Efficient Ways | Dr.fone
- How To Allow SMS & Call Alerts When Using Do Not Disturb Feature On iPhones - Discover 8 Tips
- How To Check if Your Realme GT 3 Is Unlocked
- How to restore wiped music on Huawei Nova Y71
- How to Transfer from Apple iPhone 15 to iPhone 8/X/11 | Dr.fone
- In 2024, 4 Ways to Sync Contacts from Apple iPhone 15 Plus to iPad Easily | Dr.fone
- In 2024, 4 Ways to Transfer Music from Apple iPhone SE (2022) to iPod touch | Dr.fone
- In 2024, 5 Ways to Send Ringtones from Apple iPhone 12 Pro Max to iPhone Including iPhone 15 | Dr.fone
- In 2024, How to Move Custom Ringtones from Apple iPhone 8 Plus to Android? | Dr.fone
- In 2024, How To Transfer Messages From Apple iPhone SE to other iPhone All iOS Versions | Dr.fone
- Must-Know Aspects: Refurbished Laptop Shopping Guide
- The Sacred Science | Free Book
- Title: Ultimate Guide, How to Transfer Music From Apple iPhone XR to iPhone | Dr.fone
- Author: Charlotte
- Created at : 2025-02-19 02:25:18
- Updated at : 2025-02-19 22:18:54
- Link: https://iphone-transfer.techidaily.com/ultimate-guide-how-to-transfer-music-from-apple-iphone-xr-to-iphone-drfone-by-drfone-transfer-from-ios/
- License: This work is licensed under CC BY-NC-SA 4.0.