
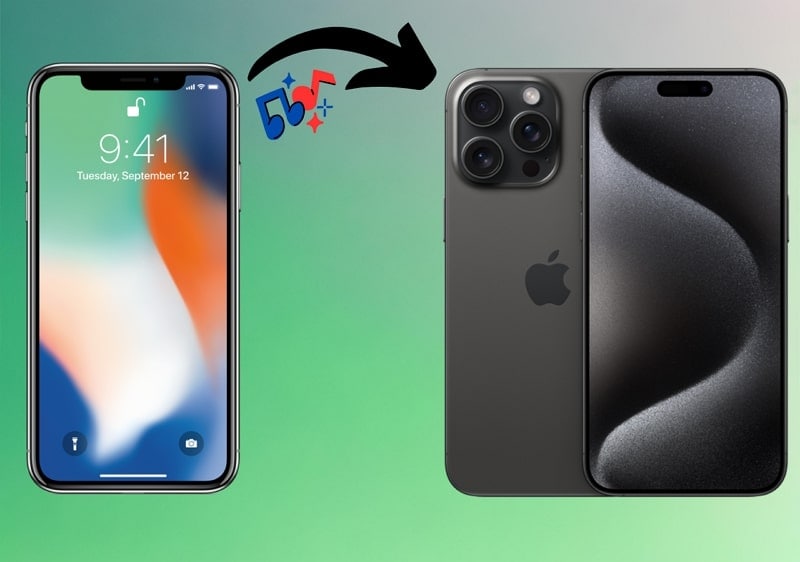
Ultimate Guide, How to Transfer Music From Apple iPhone 6s Plus to iPhone | Dr.fone
Ultimate Guide, How to Transfer Music From Apple iPhone 6s Plus to iPhone
The evolution of technology continually transforms how we consume and enjoy music. The iPhone stands among the most dominant brands in the smartphone world. Thus, the need for effortless ways to transfer music from iDevices has never been more paramount. In this comprehensive article, we will go through various methods and tools. This guide aims to simplify the process and empower you with the knowledge to transfer your music hassle-free.
It will explore native functionalities provided by Apple and third-party apps. Moreover, it will take you through music transfer employing cloud services. The goal is to equip you with the most effective, efficient, and reliable methods to transfer music from Apple iPhone 6s Plus to iPhone.
Part 1: How To Transfer Selective and All Music From Apple iPhone 6s Plus to iPhone in One-Click
When it comes to transferring music between iPhones, Wondershare Dr.Fone emerges as a versatile solution. It allows you to move the entire music library or selective tracks with a single click. With its one-click transfer functionality, managing your music collection becomes a smooth experience.
This ensures that your favorite tunes are available on your new iPhone. The following are the detailed methods on how to transfer music from Apple iPhone 6s Plus to iPhone using Wondershare Dr.Fone:
Method 1: Transfer Music Using Wondershare Dr.Fone – Phone Manager
Wondershare Dr.Fone offers a comprehensive solution for managing your iPhone. It allows you to handle your iPhone data efficiently. You can perform tasks like importing, exporting, and deleting files. With its intuitive drag-and-drop feature, you can move files into any desired app on your device. You can transfer a variety of data between your iOS device and computer. Here is how to transfer music from Apple iPhone 6s Plus to iPhone using the phone manager feature:
- Step 1: Access the Source iPhone in Wondershare Dr.Fone
The first thing you need to do is install and launch Wondershare Dr.Fone. Then, connect both iPhones to the computer and wait for their detection by Dr.Fone. Once detected, click the source iPhone from the left panel.

- Step 2: Transfer the Selected Music Track
From the expanded options for the source iPhone, choose “Music.” Now, go to the track you want to share and select it. Now, tap “To Device” from the top toolbar and select the other iPhone as the destination. As soon as you select the other iPhone, the music file will be transferred.

Method 2: Transfer Music Using Wondershare Dr.Fone – Phone Transfer
Wondershare Dr.Fone - Phone Transfer simplifies transferring different data types between 8000+ devices. It ensures ease of use with a simple click-through process. Moreover, it is compatible with Apple, Samsung, HUAWEI, OPPO, Sony, Google, and more.
You also get full support for the latest iOS and Android versions. It supports the transfer of over 15 types of data between different OS. Here is how to transfer music from iPod to iPhone using the Phone Transfer tool of Wondershare Dr.Fone:
- Step 1: Click Phone Transfer in Wondershare Dr.Fone
To begin, you need to connect both devices to the computer with Wondershare Dr.Fone. Within Dr.Fone, click “Toolbox” from the left panel and choose “Phone Transfer” as the option. It will lead to a new screen where you need to assign the positions to the iPhones.

- Step 2: Select Music and Tap Start Transfer
The iPhone from which you want to transfer the music should be in the “Source” position. Now, give the “Destination” position to the iPhone where you want to transfer music. Then select “Music” from the available data type and click “Start Transfer.” Wait for the transfer process to complete, which will take time, depending on the library size.

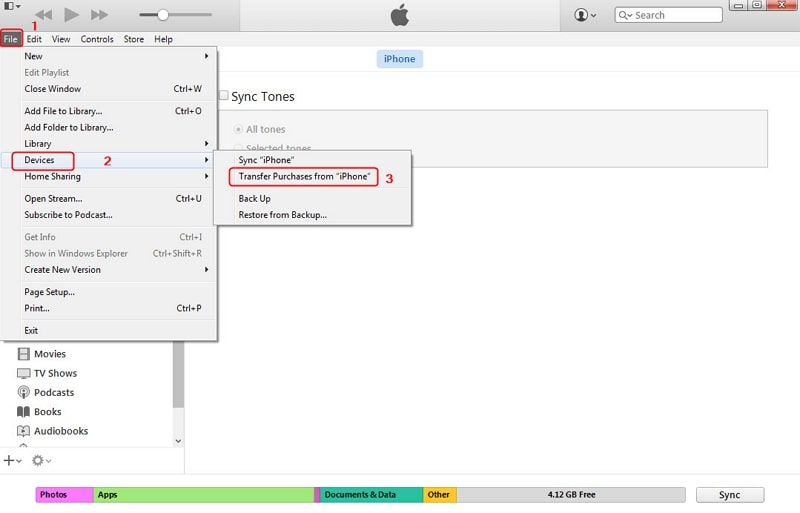
Part 2: How To Transfer Music From Apple iPhone 6s Plus to iPhone Using iTunes
iTunes remains a reliable and widely used application for managing iOS devices. Many iPhone users prefer this method for transferring music between iOS devices, which is limited to purchased songs. Follow these steps to transfer music from Apple iPhone 6s Plus to iPad using iTunes:
- Step 1. Run the latest version of iTunes on your computer and connect the source iPhone. After accessing iTunes, click on “File,” located in the top left corner, and choose “Devices.” Next, select “Transfer Purchases from iPhone” and let the process finish.
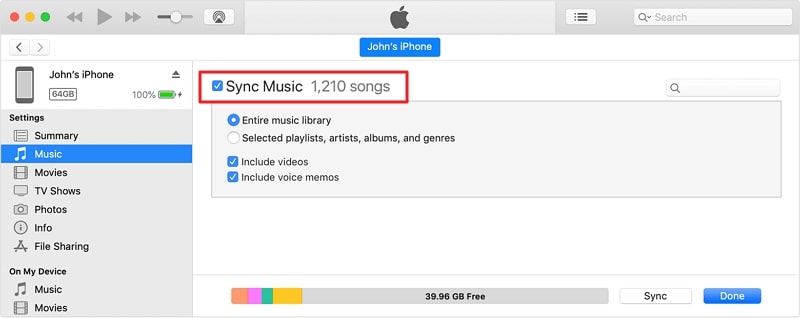
- Step 2. Once all the purchased songs are transferred, disconnect the source iPhone. Now, connect the targeted iPhone and wait for iTunes to recognize it. Then tap the “Device” icon to access the iPhone window.
- Step 3. Here, click the “Music” tab from the left side panel. Now check the “Sync Music” box and select “Entire Library” or another option depending on your choice. Finally, press “Sync” to commence the music transfer process.
Part 3: How To Transfer Music From Apple iPhone 6s Plus to iPhone via AirDrop
AirDrop provides a convenient and wireless way to transfer music between iPhones. It allows you to share songs, albums, or playlists effortlessly. You don’t need any cable or extra software to use this method. This wireless approach simplifies the process, making it an excellent choice for transferring a few tracks or albums. Follow these steps to transfer music from Apple iPhone 6s Plus to iPhone without iTunes:
- Step 1. Start by ensuring that AirDrop is enabled on both devices and its visibility is set to “Everyone.” Moreover, you also need to ensure that both Wi-Fi and Bluetooth are also enabled, as they are essential.
- Step 2. Now open the Music app and find the track you want to transfer to the other iPhone. Tap the three-dots icon and select “Share Song.” From the available options, choose “AirDrop.”
- Step 3. Among the available devices to AirDrop, select the targeted iPhone. Now, you will receive a prompt on the targeted iPhone, which you need to accept to complete the data transfer.

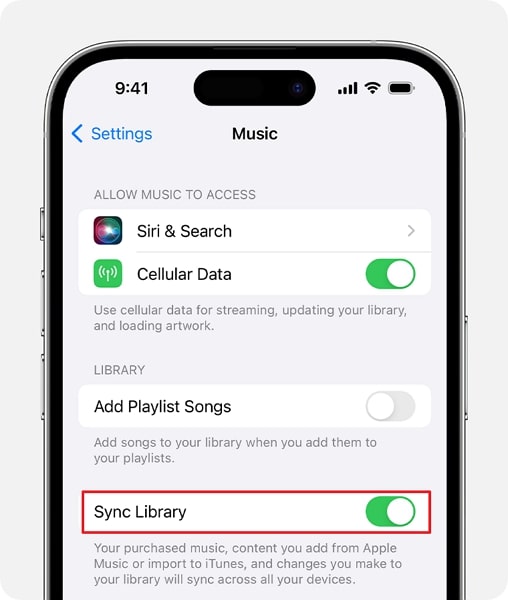
Part 4: How To Transfer Music From Apple iPhone 6s Plus to iPhone by Syncing Apple Music Library
Syncing your Apple Music Library across iPhones offers a smooth way to transfer music. It ensures all your favorite tracks, playlists, and albums are available on your new device. This method ensures a consistent music experience. It allows you to enjoy your favorite tunes without the need for manual transfers. Follow these steps to transfer music from iPad to iPhone Apple Music:
- Step 1. On both of your iPhone devices, log in using the same Apple ID. Then, move to the source iPhone and access the Apple iPhone 6s Plus device’s Settings. Here, scroll down to find and tap the “Music” option.
- Step 2. Now, move to toggle on the “Sync Library” option on the following screen. Afterward, repeat the same process on the new iPhone. Give the syncing process some time, and you will be able to access all songs on the new device.
Part 5: How To Transfer Music From Apple iPhone 6s Plus to iPhone Using Google Drive
Transferring music via Google Drive offers a convenient way to move your music collection. This allows a music exchange between iPhones without the need for cables. It’s a particularly useful method for transferring a few select songs or albums. With it, you can transfer songs that you have downloaded from the internet. The following are the steps you need to follow to transfer music from iDevices via Google Drive:
- Step 1. Once you’ve installed the Google Drive app on your iPhone, launch the app, sign in, and tap the “+” icon located at the lower right. Select “Upload” to proceed. Now, tap “Browse” and then go on to locate and select the targeted songs.
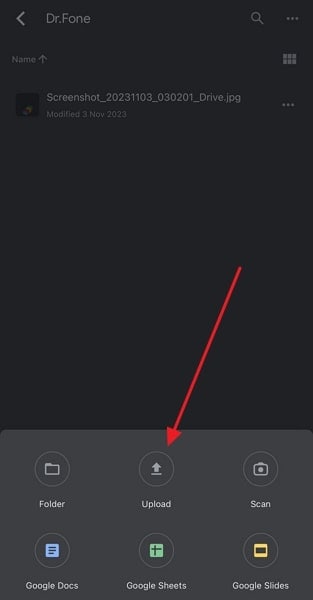
- Step 2. Once they are uploaded, move to the new iPhone and install the Google Drive app there. Here, log in using the same Google ID and access the songs you uploaded from the source device. Then tap the “Three dots” icon and select “Make available offline” to complete the process.

Part 6: How To Transfer Music Streaming Services Playlists From Apple iPhone 6s Plus to iPhone
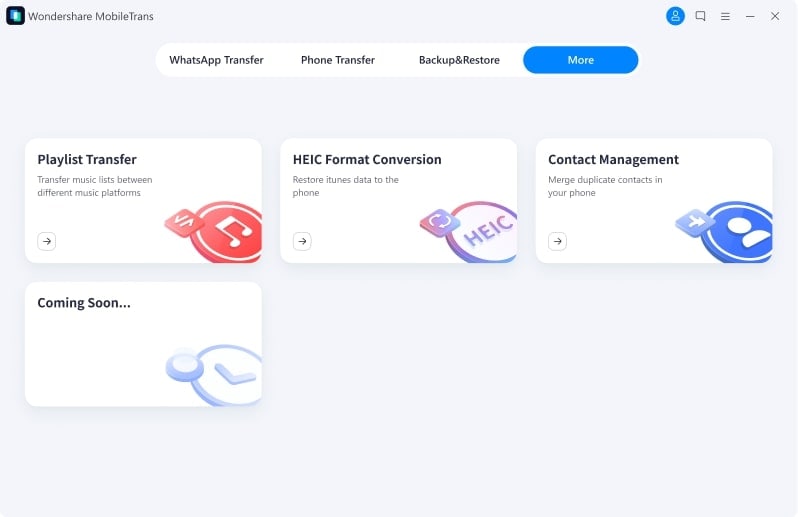
Transitioning between music streaming platforms can be challenging. However, with Wondershare MobileTrans, you can effortlessly transfer your beloved playlists. You can move your Spotify playlists to Apple Music, YouTube Music, or between various services hassle-free. Whether you’re tech-savvy or not, its user-friendly interface ensures easy operation. Additionally, it supports more platforms and is completely free to use. Here are the steps you need to follow for playlist transfer:
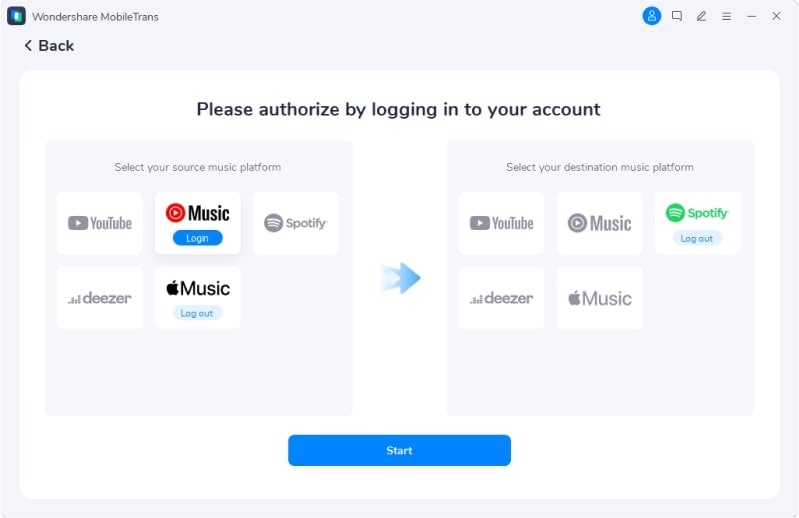
- Step 1. You start the process by installing Wondershare MobileTrans on your computer. Now, launch it and move to the “More” tab. Here, click the first option, “Playlist Transfer” to proceed.
- Step 2. On the following screen, log into both music streaming services. Once you are logged in, tap “Start” to commence the playlist transfer procedure. The time it will take depends upon the number of playlists and songs.
Conclusion
In conclusion, transferring music between iPhones is essential for preserving our musical experiences. Whether using iTunes, AirDrop, cloud services, or specialized tools, the process can be simplified. For a comprehensive and user-friendly solution, consider Wondershare Dr.Fone. Its intuitive interface and versatile functionalities streamline the music transfer process. This makes Dr.Fone an ideal choice for how to transfer music from Apple iPhone 6s Plus to iPhone.
How To Transfer Messages From Apple iPhone 6s Plus to other iPhone [All iOS Versions]
Transferring messages from one iPhone to another is a common necessity. It often arises during device upgrades, replacements, or when sharing information between devices. With the evolution of iOS versions, the methods for transferring messages have also adapted and improved. Regardless of the version, transferring messages between iPhones remains vital and relevant.
This guide will go through many techniques to transfer messages from Apple iPhone 6s Plus to iPhone. Our goal is to provide you with the necessary knowledge for transferring your messages between two iPhones. We will ensure a smooth transition process by offering clear step-by-step guidance and helpful tips.

Part 1: How To Sync Messages Between Two iOS Devices?
Synchronizing messages between two iOS devices is a convenient way. It ensures that conversations and attachments transfer from one iPhone to another smoothly. iOS offers iCloud as the method to achieve this synchronization. It enables users to maintain message continuity across their devices. Here is how to transfer messages from Apple iPhone 6s Plus to iPhone via iCloud sync:
- Step 1. Ensure you’re signed in with the required Apple ID on both devices. Next, navigate to the “Settings” app on the source device and select “Apple ID.” On the following screen, press “iCloud” to proceed.

- Step 2. Here, tap “Show All” under the “Apps Using iCloud” section and press “Messages in iCloud.” On the ensuing screen, toggle on “Use on this iPhone” and then press the “Sync Now” option.

- Step 3. Now, move to the target device and access “iCloud” settings through the Settings app. Here, navigate to “Messages in iCloud,” and on the next screen, enable “Use on this iPhone.” Give it some time, and the messages on both devices will sync.

Part 2. How To Transfer Messages From Apple iPhone 6s Plus to iPhone Using iCloud Backup
Transferring messages between iPhones using iCloud backup offers an efficient method. It guarantees the transfer of all your conversations, attachments, and message history. Nonetheless, a significant limitation of this approach is its exclusive usability during the setup of an iPhone. Moreover, you can’t restore messages selectively with this method. Here is how to transfer text messages from Apple iPhone 6s Plus to iPhone using iCloud backup:
- Step 1. Ensure your old iPhone is linked to a reliable Wi-Fi network. Open “Settings,” tap on your name, and select “iCloud.” Tap “iCloud Backup” and ensure the “Back Up This iPhone” toggle switch is turned on.

- Step 2. Here, press “Back Up Now” to initiate an immediate backup and wait for the process to complete. Afterward, move to the new iPhone and start setting it up until you reach the “Apps & Data” screen.

- Step 3. Next, opt for “Restore from iCloud Backup.” Then, log in to your iCloud account with the identical credentials employed during the backup process. Pick the latest backup from the available options, including the messages you aim to transfer. The restoration process will begin, and once it’s completed, open the Messages app to verify that all your message history has been transferred.

Part 3. How To Transfer Messages From Apple iPhone 6s Plus to iPhone via iTunes/Finder
Using iTunes or Finder provides an alternate method to transfer messages from one iPhone to another. iTunes is available for Windows and on macOS Mojave and earlier. The users of macOS Catalina and later can use the Finder app to use this method. This approach completely restores your previous iPhone’s data, including messages.
Ensure that both iPhones are updated to the latest iOS version and that your computer has the latest version of iTunes or Finder. This is to avoid any compatibility issues during the backup and restoration process. Here is how to transfer messages from Apple iPhone 6s Plus to iPhone via iTunes/Finder backup:
- Step 1. Begin by connecting your old iPhone to the Mac or PC and access it in iTunes or Finder. On iTunes, click the Apple iPhone 6s Plus device to access the “Summary” tab, while in Finder, access the “General” tab. Here, go to “Backups” and choose “Back Up Now” to create a backup for your device. Make sure to select either “This Computer” (for iTunes) or “Backup all data from your iPhone to this Mac” (for Finder).

- Step 2. Once the backup is completed, start setting up your new iPhone. Once you reach the “Apps & Data” screen, select “Restore from Mac or PC,” and follow this guide:
For Finder/iTunes: Link your iPhone to the PC and gain access by clicking on the “Device” icon at the top left corner. This action will lead you to the “Welcome to Your New iPhone” screen, where the “Restore from this backup” option is pre-selected. Here, choose the desired backup and click “Continue” to kickstart the backup restoration process.

Part 4. The Best Way To Transfer Messages From Apple iPhone 6s Plus to iPhone Without Resetting
iCloud and iTunes are viable options for transferring messages, but both need an entire device reset. However, synchronization of devices is limited to those sharing the same Apple ID. Therefore, if you seek a hassle-free method, Wondershare Dr.Fone emerges as your optimal choice. It is a reliable and efficient solution that simplifies transferring data between iPhones.
With Dr.Fone, users can copy all their content from one device to another with just one click. This functionality also extends across different OS, enabling smooth transfers between iOS and Android devices. Users can move various data types, including contacts, SMS, photos, videos, music, etc.
Key Features of Wondershare Dr.Fone
- It is compatible with the latest iOS 17 and new models of iPhone 15.
- This Phone Transfer tool can operate with over 8000 devices, encompassing Apple, Samsung, and an extensive array of others.
- Wondershare Dr.Fone facilitates the transfer of up to 15 different file types between phones.
Steps To Transfer Messages From Apple iPhone 6s Plus to iPhone Without Backup via Dr.Fone
When using Wondershare Dr.Fone for phone-to-phone transfer, the process requires no technical expertise. Here is how to transfer messages from Apple iPhone 6s Plus to iPhone without backup using Dr.Fone:
- Step 1. Initiating Phone Transfer Setup
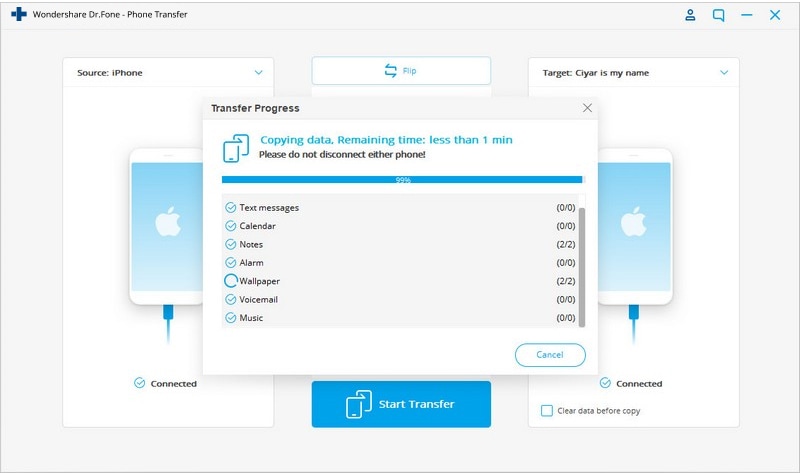
Start by installing and opening Wondershare Dr.Fone on your computer to begin the process. Navigate to “Toolbox” and select “Phone Transfer” to proceed. Now, connect your iOS devices and allow them to load on the following screen. In this step, designate the “Source” and “Destination” for the transfer to specify the direction of the phone transfer. If you need to switch the locations of your iOS devices, utilize the “Flip” button.
- Step 2. Data Type Selection and Transfer Initialization
Once the source and destination are confirmed, choose the particular data types for transfer. Make sure Messages are selected, then mark all other data if you want, and click on “Start Transfer.” Subsequently, a notification will prompt you to turn off the Find My feature on iOS devices.
- Step 3. Disable Find My on iOS Device and Complete Data Transfer
Access the iOS device settings, tap on the name at the top, proceed to iCloud > Find My, and deactivate it. Once the feature is turned off, the data transfer will start, and the progress bar will indicate the completion of the transfer process. After completion, the front window displays the finished phone transfer. Press “OK” to finalize the entire process.
![]()
Pro Tip. How To View and Export Messages of iPhone on Your Computer/MacBook
Looking for a way to view and export your messages from your iPhone to your computer? If yes, Wondershare Dr.Fone has got you covered. Dr.Fone offers a robust iOS phone management tool that enables the export of data from your iOS device.
This functionality empowers you to create a backup of your iPhone messages directly onto your system. Here is how you can view and export your messages via Wondershare Dr.Fone:
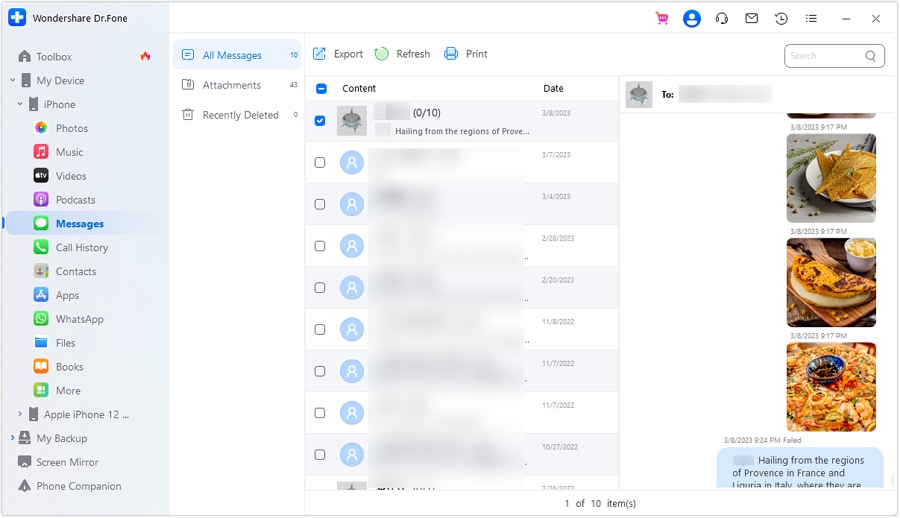
- Step 1. Access the Messages App Data
Start by establishing a link between your iOS device and the computer using a USB connection. After the Apple iPhone 6s Plus device is detected, its specifics will be visible on the home screen. Proceed by selecting the “Messages” option from your device apps on the left side.
- Step 2. Export the Messages From the iPhone
Next, you can view all the messages and their attachments from your iPhone on your computer. If you want to export them, select the messages and press the “Export” button from the top. You can export the messages in Excel, CSV, or PDF format with all the details.
Conclusion
In conclusion, the process of transferring messages from Apple iPhone 6s Plus to iPhone is crucial for maintaining communication continuity. Whether using iCloud, iTunes/Finder, or third-party solutions, each method offers advantages.
Yet, for effortless transfers without device resets, Wondershare Dr.Fone emerges as a standout choice. Its intuitive interface, selective data transfer, and message export capabilities make it an ideal solution. For effortless and efficient iPhone message handling, Dr.Fone proves to be a recommended tool.
4 Quick Ways to Transfer Contacts from Apple iPhone 6s Plus to iPhone With/Without iTunes
“How to transfer contacts from Apple iPhone 6s Plus to iPhone without using iTunes? I have got a new iPhone, but can’t seem to transfer contacts from Apple iPhone 6s Plus to iPhone without iTunes.”
Lately, we have got plenty of queries like this from our readers who like to learn how to transfer contacts from Apple iPhone 6s Plus to iPhone, such as iPhone 12/ 12 Pro (Max)/ 12 Mimi without iTunes. After all, when we get a new iPhone, this is the first thing that comes to our mind. If you are also going through the same dilemma, don’t worry as we have a perfect solution. This post will teach you how to transfer contacts from Apple iPhone 6s Plus to iPhone without iTunes and transfer contacts with iTunes.
Part 1: Transfer Contacts from Apple iPhone 6s Plus to iPhone Including iPhone 12/ 12 Pro (Max)/ 12 Mini with iTunes
To start with, let’s learn how to transfer contacts from Apple iPhone 6s Plus to iPhone using iTunes. If you have an updated version of iTunes, you can transfer and sync your data between various devices. Ideally, you can either sync your contacts or backup and restore them. We have discussed both of these techniques to transfer contacts from Apple iPhone 6s Plus to iPhone with iTunes.
Method 1: Backup and Restore iPhone contacts with iTunes
This is the easiest approach to learn how to transfer contacts from Apple iPhone 6s Plus to iPhone with iTunes. In this, we will first take a backup of our old phone (including contacts) and later restore the backup to a new device. Needless to say, all the existing data on the target device would be erased, and with your contacts, the entire backup will be restored.
- 1. Firstly, connect your existing iPhone to your system and launch iTunes.
- 2. Select your device and visit its Summary section.
- 3. Under the Backups section, choose to take a backup on the local computer.
- 4. In the end, click on the “Backup Now” button and wait for iTunes to backup your device entirely.

- 5. Once you have taken a backup locally, you can connect the target device and go to its Summary.
- 6. From here, click on the “Restore Backup” and select the target backup and device.

In this way, your entire backup (including contacts) would be restored, and you can transfer contacts from Apple iPhone 6s Plus to iPhone with iTunes.
Method 2: Sync Contacts with iTunes
If you only wish to transfer your contacts, then it can be achieved by syncing your device. To learn how to transfer contacts from Apple iPhone 6s Plus to iPhone using iTunes, follow these steps:
- 1. Firstly, connect your existing iPhone to your system and launch an updated version of iTunes.
- 2. Select the Apple iPhone 6s Plus device and go to its “Info” tab. From here, enable the option of “Sync Contacts”. You can either select all contacts or selected groups.
- 3. After making your selection, click on the Sync button and wait for it to complete the process.

- 4. Now, disconnect the Apple iPhone 6s Plus device and connect your target iPhone to it.
- 5. Follow the same drill, go to its Info tab, and enable the option to “Sync Contacts”.
- 6. Additionally, you can visit its Advanced section and replace the old contacts with the new ones as well.
- 7. Once you have selected the option, click on the “Sync” button.

In this way, you would be able to learn how to transfer contacts from Apple iPhone 6s Plus to iPhone with iTunes easily.
Part 2: 1-Click to transfer contacts from Apple iPhone 6s Plus to iPhone, Including iPhone 12/ 12 Pro (Max)/ 12 Mini without iTunes
As you can see, learning how to transfer contacts from Apple iPhone 6s Plus to iPhone using iTunes can be a little complicated. Therefore, we recommend using trying Dr.Fone - Phone Transfer . It provides a one-click solution to transfer the data of your choice from one device to another. The tool comes with an intuitive process and has a free trial as well. It is compatible with every leading iOS device (including devices running on iOS 14).
Besides transferring your contacts, you can also move other data files like photos, videos, calendars, messages, music, etc. It can also transfer data between different platforms (like Android to iOS, iOS to Windows, and more). To learn how to transfer contacts from Apple iPhone 6s Plus to iPhone without iTunes, follow these steps:
Dr.Fone - Phone Transfer
1-Click to Transfer Contacts from Apple iPhone 6s Plus to iPhone without iTunes
Easy, fast, and safe.
Move data between devices with different operating systems, i.e., iOS to Android.
Supports iOS devices that run the latest iOS

Transfer photos, text messages, contacts, notes, and many other file types.
Supports over 8000+ Android devices. Works for all models of iPhone, iPad, and iPod.

4,777,470 people have downloaded it
- 1. To start with, launch Dr.Fone and select the option of “Phone Transfer” from its welcome screen.
- 2. Now, connect the source and the target iOS device to your system and wait for them to be detected.
- 3. Dr.Fone - Phone Transfer follows an intuitive process and automatically lists the Apple iPhone 6s Plus devices as Source and Destination. Though, you can click on the “Flip” button to exchange their positions.

- 4. Now, select the type of data you wish to transfer. For instance, if you want to move only contacts, select “Contacts” and click on the “Start Transfer” button. Additionally, you can select the option of “Clear data before copy” and delete the existing data on the target iPhone.
- 5. This will initiate the process and start the transfer process. You can view the progress from the on-screen indicator. Make sure that both the Apple iPhone 6s Plus devices are connected at this stage.
- 6. Once the process is complete, you will be notified. In the end, you can safely remove both the Apple iPhone 6s Plus devices and use them the way you like.

Here is the video tutorial for you:
Part 3: Transfer iPhone contacts to iPhone Including iPhone 12/ 12 Pro (Max)/ 12 Mini without iTunes using Gmail
As you can see, Dr.Fone Phone Transfer provides a one-click solution to transfer your data from one iPhone to another. Though, if you want to try another option, then you can take the assistance of Gmail. Even though this is a more cumbersome process, it will meet your basic requirements. To learn how to transfer contacts from Apple iPhone 6s Plus to iPhone without iTunes, you can try this approach.
- 1. If you are not using Gmail on your device, go to the Accounts settings and log in to your Gmail.
- 2. Afterwards, go to the Apple iPhone 6s Plus device’s Settings > Mail, Contacts, Calendar > Gmail and turn on the option of Contacts.

- 3. Now, you can follow the same drill on the target device and sync your Gmail contacts.
- 4. Alternatively, you can visit your Gmail account on your desktop and go to its Contacts.
- 5. Select the contacts you wish to transfer and click on the “Export” button.

- 6. Choose to export your contacts to a vCard format. Once a vCard is created, you can manually move it to the target iPhone to import contacts from it.

Part 4: Transfer Contacts from Apple iPhone 6s Plus to iPhone Including iPhone 12/ 12 Pro (Max)/ 12 Mini without iTunes using Bluetooth
If nothing else would work, you can transfer contacts from one iPhone to another using Bluetooth. It might be time-consuming, but it is also one of the easiest ways to learn how to transfer contacts from Apple iPhone 6s Plus to iPhone without iTunes.
- 1. Turn on Bluetooth on both devices and make sure they are nearby.
- 2. You can always go to the Bluetooth settings of the source device and pair both devices.

- 3. Now, go to its Contacts and select the ones you wish to transfer.
- 4. Tap on the Share button and select the target device from the list of options.

- 5. Accept the incoming data on the target iPhone to complete the process.
After following these steps, you can learn how to transfer contacts from Apple iPhone 6s Plus to iPhone with iTunes and without it. Besides these methods, you can also AirDrop the contacts or sync them via iCloud as well. As you can see, there are numerous ways to transfer contacts from Apple iPhone 6s Plus to iPhone with iTunes (and without it) that you can try. We recommend Dr.Fone Phone Transfer as it is one of the easiest and fastest ways to transfer data between different devices.
Also read:
- [Updated] 2024 Approved Launch Your Brand's Professional Chapter with Instagram
- [Updated] Diving Deep YouTube's Best Immersive Experiences for 2024
- [Updated] In 2024, Premium Live Video Conferencing Systems
- 3 Ways to Export Contacts from Apple iPhone 7 to Excel CSV & vCard Easily | Dr.fone
- A Complete Guide To OEM Unlocking on Samsung Galaxy F15 5G
- Explore Enhanced Privacy with GrapheneOS: Why This Android Alternative Is a Must-Try
- In 2024, How to Move Custom Ringtones from Apple iPhone 14 to Android? | Dr.fone
- In 2024, iPhone Transfer Transfer Contact from Apple iPhone 7 Plus to iPhone without iCloud | Dr.fone
- In 2024, Methods to Transfer from Apple iPhone 11 Pro Max to Android | Dr.fone
- In 2024, Solved How To Transfer From Apple iPhone 13 Pro to iPhone 15 | Dr.fone
- In 2024, The Pioneering Path of VR Technology
- Pros in the Field Pick Their Favorite ASMR Mics for 2024
- Streamlining Video Aesthetics Blur Background in Microsoft Teams for 2024
- Title: Ultimate Guide, How to Transfer Music From Apple iPhone 6s Plus to iPhone | Dr.fone
- Author: Charlotte
- Created at : 2025-02-13 22:37:24
- Updated at : 2025-02-20 03:23:09
- Link: https://iphone-transfer.techidaily.com/ultimate-guide-how-to-transfer-music-from-apple-iphone-6s-plus-to-iphone-drfone-by-drfone-transfer-from-ios/
- License: This work is licensed under CC BY-NC-SA 4.0.