
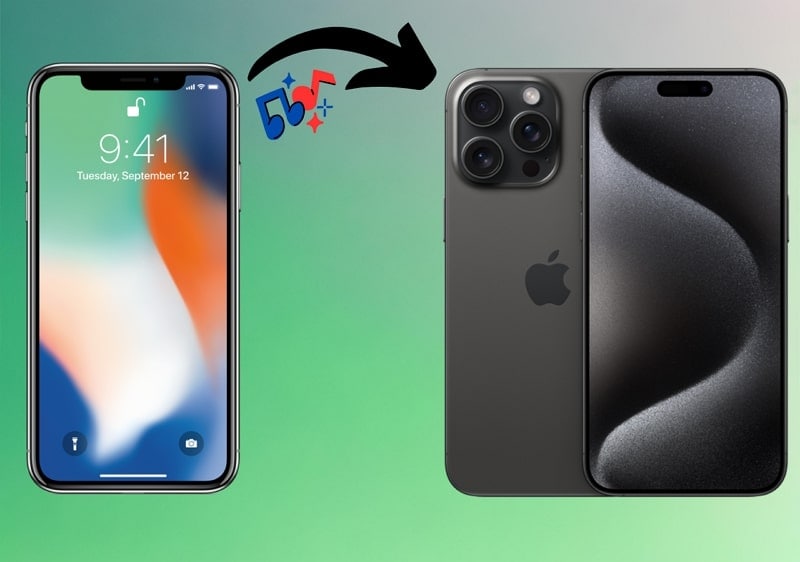
Ultimate Guide, How to Transfer Music From Apple iPhone 6 Plus to iPhone | Dr.fone
Ultimate Guide, How to Transfer Music From Apple iPhone 6 Plus to iPhone
The evolution of technology continually transforms how we consume and enjoy music. The iPhone stands among the most dominant brands in the smartphone world. Thus, the need for effortless ways to transfer music from iDevices has never been more paramount. In this comprehensive article, we will go through various methods and tools. This guide aims to simplify the process and empower you with the knowledge to transfer your music hassle-free.
It will explore native functionalities provided by Apple and third-party apps. Moreover, it will take you through music transfer employing cloud services. The goal is to equip you with the most effective, efficient, and reliable methods to transfer music from Apple iPhone 6 Plus to iPhone.
Part 1: How To Transfer Selective and All Music From Apple iPhone 6 Plus to iPhone in One-Click
When it comes to transferring music between iPhones, Wondershare Dr.Fone emerges as a versatile solution. It allows you to move the entire music library or selective tracks with a single click. With its one-click transfer functionality, managing your music collection becomes a smooth experience.
This ensures that your favorite tunes are available on your new iPhone. The following are the detailed methods on how to transfer music from Apple iPhone 6 Plus to iPhone using Wondershare Dr.Fone:
Method 1: Transfer Music Using Wondershare Dr.Fone – Phone Manager
Wondershare Dr.Fone offers a comprehensive solution for managing your iPhone. It allows you to handle your iPhone data efficiently. You can perform tasks like importing, exporting, and deleting files. With its intuitive drag-and-drop feature, you can move files into any desired app on your device. You can transfer a variety of data between your iOS device and computer. Here is how to transfer music from Apple iPhone 6 Plus to iPhone using the phone manager feature:
- Step 1: Access the Source iPhone in Wondershare Dr.Fone
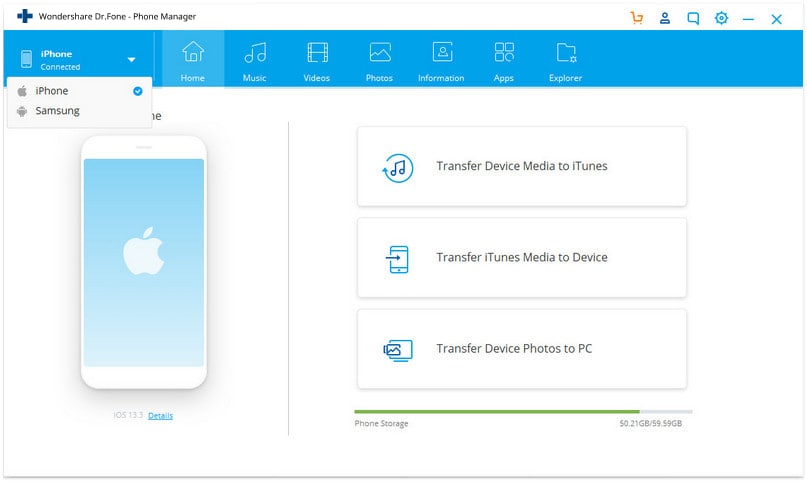
The first thing you need to do is install and launch Wondershare Dr.Fone. Then, connect both iPhones to the computer and wait for their detection by Dr.Fone. Once detected, click the source iPhone from the left panel.

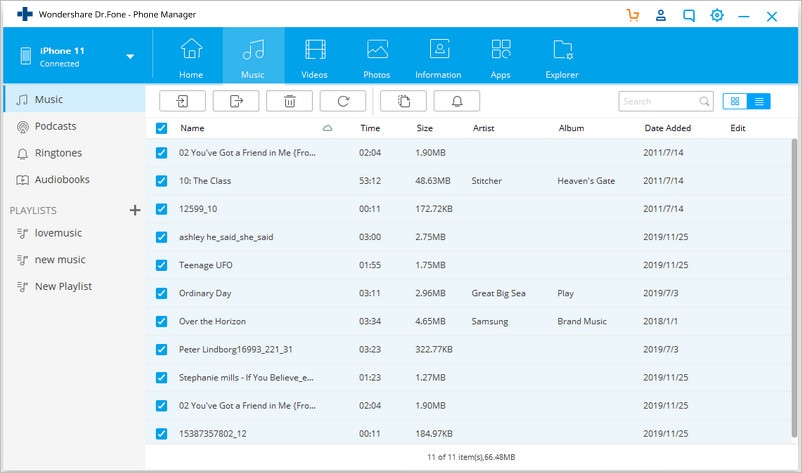
- Step 2: Transfer the Selected Music Track
From the expanded options for the source iPhone, choose “Music.” Now, go to the track you want to share and select it. Now, tap “To Device” from the top toolbar and select the other iPhone as the destination. As soon as you select the other iPhone, the music file will be transferred.

Method 2: Transfer Music Using Wondershare Dr.Fone – Phone Transfer
Wondershare Dr.Fone - Phone Transfer simplifies transferring different data types between 8000+ devices. It ensures ease of use with a simple click-through process. Moreover, it is compatible with Apple, Samsung, HUAWEI, OPPO, Sony, Google, and more.
You also get full support for the latest iOS and Android versions. It supports the transfer of over 15 types of data between different OS. Here is how to transfer music from iPod to iPhone using the Phone Transfer tool of Wondershare Dr.Fone:
- Step 1: Click Phone Transfer in Wondershare Dr.Fone
To begin, you need to connect both devices to the computer with Wondershare Dr.Fone. Within Dr.Fone, click “Toolbox” from the left panel and choose “Phone Transfer” as the option. It will lead to a new screen where you need to assign the positions to the iPhones.

- Step 2: Select Music and Tap Start Transfer
The iPhone from which you want to transfer the music should be in the “Source” position. Now, give the “Destination” position to the iPhone where you want to transfer music. Then select “Music” from the available data type and click “Start Transfer.” Wait for the transfer process to complete, which will take time, depending on the library size.

Part 2: How To Transfer Music From Apple iPhone 6 Plus to iPhone Using iTunes
iTunes remains a reliable and widely used application for managing iOS devices. Many iPhone users prefer this method for transferring music between iOS devices, which is limited to purchased songs. Follow these steps to transfer music from Apple iPhone 6 Plus to iPad using iTunes:
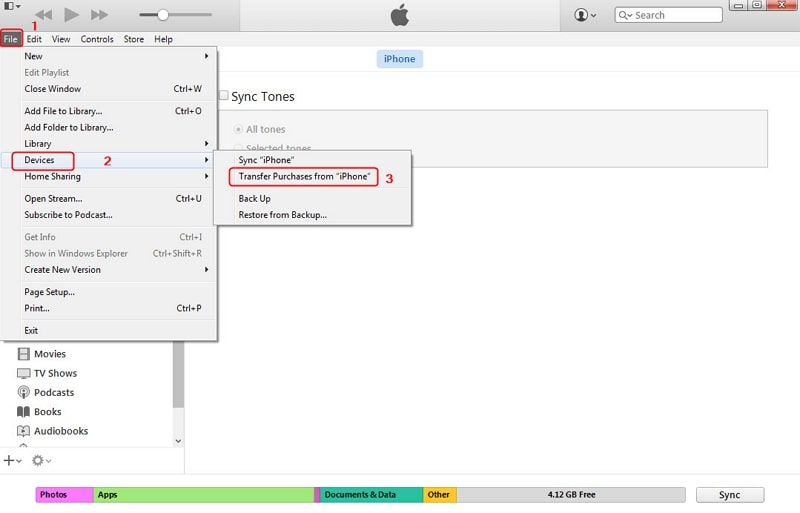
- Step 1. Run the latest version of iTunes on your computer and connect the source iPhone. After accessing iTunes, click on “File,” located in the top left corner, and choose “Devices.” Next, select “Transfer Purchases from iPhone” and let the process finish.
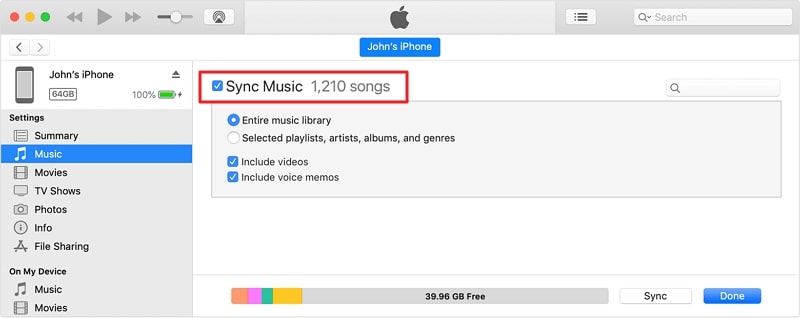
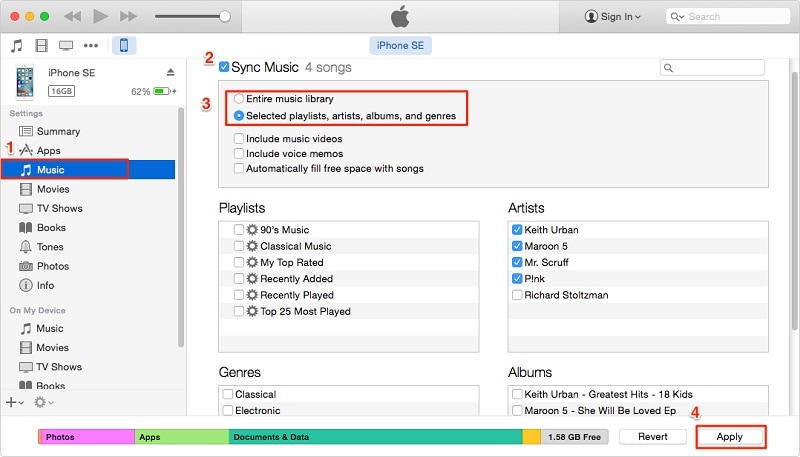
- Step 2. Once all the purchased songs are transferred, disconnect the source iPhone. Now, connect the targeted iPhone and wait for iTunes to recognize it. Then tap the “Device” icon to access the iPhone window.
- Step 3. Here, click the “Music” tab from the left side panel. Now check the “Sync Music” box and select “Entire Library” or another option depending on your choice. Finally, press “Sync” to commence the music transfer process.
Part 3: How To Transfer Music From Apple iPhone 6 Plus to iPhone via AirDrop
AirDrop provides a convenient and wireless way to transfer music between iPhones. It allows you to share songs, albums, or playlists effortlessly. You don’t need any cable or extra software to use this method. This wireless approach simplifies the process, making it an excellent choice for transferring a few tracks or albums. Follow these steps to transfer music from Apple iPhone 6 Plus to iPhone without iTunes:
- Step 1. Start by ensuring that AirDrop is enabled on both devices and its visibility is set to “Everyone.” Moreover, you also need to ensure that both Wi-Fi and Bluetooth are also enabled, as they are essential.
- Step 2. Now open the Music app and find the track you want to transfer to the other iPhone. Tap the three-dots icon and select “Share Song.” From the available options, choose “AirDrop.”
- Step 3. Among the available devices to AirDrop, select the targeted iPhone. Now, you will receive a prompt on the targeted iPhone, which you need to accept to complete the data transfer.

Part 4: How To Transfer Music From Apple iPhone 6 Plus to iPhone by Syncing Apple Music Library
Syncing your Apple Music Library across iPhones offers a smooth way to transfer music. It ensures all your favorite tracks, playlists, and albums are available on your new device. This method ensures a consistent music experience. It allows you to enjoy your favorite tunes without the need for manual transfers. Follow these steps to transfer music from iPad to iPhone Apple Music:
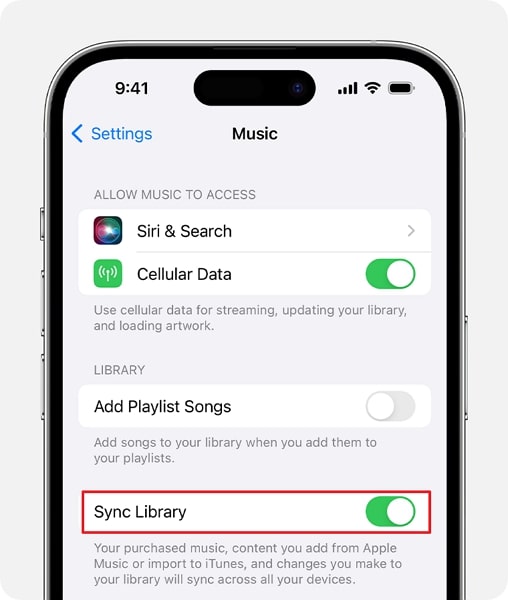
- Step 1. On both of your iPhone devices, log in using the same Apple ID. Then, move to the source iPhone and access the Apple iPhone 6 Plus device’s Settings. Here, scroll down to find and tap the “Music” option.
- Step 2. Now, move to toggle on the “Sync Library” option on the following screen. Afterward, repeat the same process on the new iPhone. Give the syncing process some time, and you will be able to access all songs on the new device.
Part 5: How To Transfer Music From Apple iPhone 6 Plus to iPhone Using Google Drive
Transferring music via Google Drive offers a convenient way to move your music collection. This allows a music exchange between iPhones without the need for cables. It’s a particularly useful method for transferring a few select songs or albums. With it, you can transfer songs that you have downloaded from the internet. The following are the steps you need to follow to transfer music from iDevices via Google Drive:
- Step 1. Once you’ve installed the Google Drive app on your iPhone, launch the app, sign in, and tap the “+” icon located at the lower right. Select “Upload” to proceed. Now, tap “Browse” and then go on to locate and select the targeted songs.
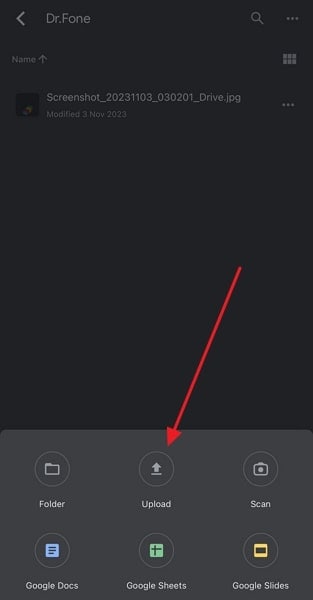
- Step 2. Once they are uploaded, move to the new iPhone and install the Google Drive app there. Here, log in using the same Google ID and access the songs you uploaded from the source device. Then tap the “Three dots” icon and select “Make available offline” to complete the process.

Part 6: How To Transfer Music Streaming Services Playlists From Apple iPhone 6 Plus to iPhone
Transitioning between music streaming platforms can be challenging. However, with Wondershare MobileTrans, you can effortlessly transfer your beloved playlists. You can move your Spotify playlists to Apple Music, YouTube Music, or between various services hassle-free. Whether you’re tech-savvy or not, its user-friendly interface ensures easy operation. Additionally, it supports more platforms and is completely free to use. Here are the steps you need to follow for playlist transfer:
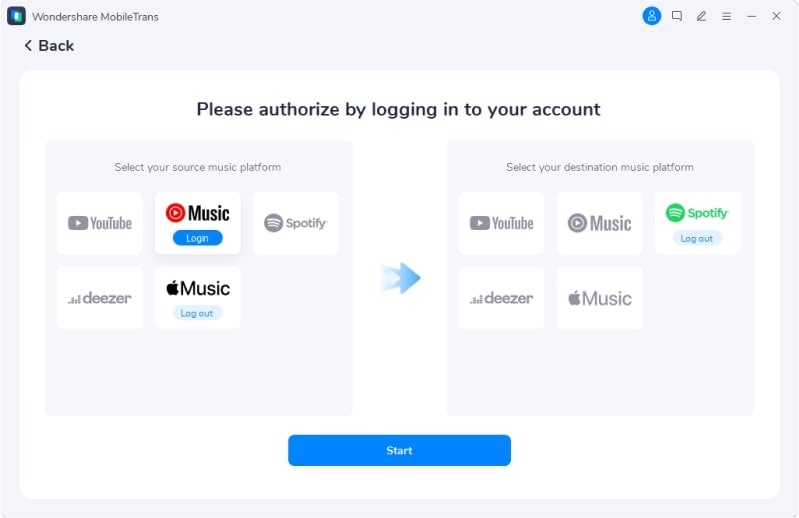
- Step 1. You start the process by installing Wondershare MobileTrans on your computer. Now, launch it and move to the “More” tab. Here, click the first option, “Playlist Transfer” to proceed.
- Step 2. On the following screen, log into both music streaming services. Once you are logged in, tap “Start” to commence the playlist transfer procedure. The time it will take depends upon the number of playlists and songs.
Conclusion
In conclusion, transferring music between iPhones is essential for preserving our musical experiences. Whether using iTunes, AirDrop, cloud services, or specialized tools, the process can be simplified. For a comprehensive and user-friendly solution, consider Wondershare Dr.Fone. Its intuitive interface and versatile functionalities streamline the music transfer process. This makes Dr.Fone an ideal choice for how to transfer music from Apple iPhone 6 Plus to iPhone.
How to Copy Contacts from Apple iPhone 6 Plus to SIM?
“How to copy contacts from Apple iPhone 6 Plus to SIM? I want to use my SIM on another device but can’t seem to export contacts to SIM on iPhone!”
Lately, lots of iPhone users have asked similar questions as they wish to save contacts to SIM card on iPhone. It might sound surprising, but it can be a little complicated to learn how to save contacts to SIM on iPhone. In this tutorial, we will answer the question – how to transfer contacts from Apple iPhone 6 Plus to SIM and provide a foolproof way to save and restore your iPhone contacts. Let’s get it started and learn more about how to export contacts from Apple iPhone 6 Plus to SIM.
Part 1: Is it possible to save contacts to SIM on iPhone?
A lot of users take the assistance of SIM card to save their contacts. If you are also doing the same, then you can easily learn how to import SIM contacts to iPhone. Simply go to your device’s Settings > Mail, Contacts, Calendar and tap on “Import SIM Contacts”.

Though, the problem occurs when users wish to do vice versa and learn how to import contacts from Apple iPhone 6 Plus to SIM. As of now, Apple doesn’t provide a direct solution to export contacts to SIM on iPhone. If you really wish to save contacts to SIM on iPhone, then you have to jailbreak your device once. After jailbreaking your device, you can use certain apps to move contacts to SIM easily.
Though, if your device has not been jailbroken, then you can’t export contacts to SIM on iPhone directly. This is because Apple assumes the transfer of contacts via SIM card is an obsolete method. Don’t worry – you can try an alternative method to save and backup contacts on iPhone. We have discussed it in the next section.
Part 2: How to save iPhone contacts with Dr.Fone?
While we can’t learn how to copy contacts from Apple iPhone 6 Plus to SIM, we can try an alternative method to save our contacts. By taking the assistance of Dr.Fone - Backup & Restore (iOS), you can save your data by taking its backup. Later, you can restore the backup on any other iOS (or Android) device. In this way, you can easily move your contacts and don’t need to learn how to save contacts to SIM on iPhone.
Dr.Fone - Backup & Restore (iOS) is a highly advanced and intuitive tool that can backup and restore all the major data types like contacts, messages, photos, music, etc. It is compatible with every leading version of iOS (including iOS 17). Therefore, instead of learning how to transfer contacts from Apple iPhone 6 Plus to SIM, you can use Dr.Fone Backup & Restore by following these steps:
Dr.Fone - Backup & Restore (iOS)
Save and Backup iPhone Contacts with 1-Click.
- One click to backup the whole iOS device to your computer.
- Support to backup Social apps on iOS devices, such as WhatsApp, LINE, Kik, Viber.
- Allow to preview and restore any item from the backup to a device.
- Export what you want from the backup to your computer.
- No data loss on devices during the restore.
- Selectively backup and restore any data you want.
- Supported iPhone 15/14/13/12/11/X that run iOS 17/16/15/14/13 and former
- Fully compatible with Windows 10 or Mac 14
3981454 people have downloaded it
1. Firstly, download Dr.Fone - Backup & Restore(iOS) on your computer and launch it whenever you wish to learn how to export contacts from iPhone (by taking its backup). From the welcome screen of Dr.Fone toolkit, select the option of “Backup & Restore”.
2. Now, connect your iPhone to the system and wait for the application to detect it automatically.
3. You can see that the tool can backup tons of applications as well. Simply click on the “Backup” button on the right panel to get things started.

4. From the next window, you can select the type of data that you wish to backup. You can also check the “Select all” option to take a comprehensive backup of your data. Additionally, you can alter the backup path from here as well.
5. To backup contacts, make sure the option of “Contacts” (under the Privacy section) is enabled before you click on the Backup button.
6. Wait for a while as Dr.Fone will backup your selected data. Once it is done, you will be notified. You can either view the backup content or go to the Backup location as well.

7. Whenever you need to restore your contacts, you can simply connect the Apple iPhone 6 Plus device and click on the “Restore” option instead.
8. This will automatically display a list of the previous backup files. Select the file you wish to restore and click on the “View” button.

9. Your backup will be listed under different categories here. Go to Privacy > Contacts and select the contacts you wish to restore.
10. After making your selection, you can export this data to your PC or restore it to the connected device. Simply click on the “Restore to Device” and wait for a while.

11. In no time, your contacts would be restored to your device. When the process is completed, you will be notified.
That’s it! After restoring your contacts, you can safely remove the Apple iPhone 6 Plus device and use it as per your wishes. Therefore, if you have Dr.Fone Backup & Restore, then you don’t need to worry about how to import contacts from Apple iPhone 6 Plus to SIM.
Part 3: Other solutions to transfer iPhone contacts
While you can’t learn how to copy contacts from Apple iPhone 6 Plus to SIM directly, you can always move your contacts from one phone to another. We have listed some easy solutions to help you resolve your query on how to save contacts to SIM on iPhone with some alternative methods.
Save your contacts to iCloud
By default, every user gets a free space of 5 GB on iCloud (which can later be expanded). Therefore, you can easily take a backup of your contacts and other important files on iCloud. Just go to your device’s Settings > iCloud and turn the backup option on. Make sure that the backup for Contacts is turned on as well. This will sync your contacts to iCloud, letting you access them on the go. In this way, you don’t have to learn how to transfer contacts from Apple iPhone 6 Plus to SIM.

Export iPhone contacts Via iTunes
Another alternative to learning how to export contacts from Apple iPhone 6 Plus to SIM is by taking the assistance of iTunes. Simply connect your Apple iPhone 6 Plus to the system and launch iTunes. Select your iPhone and go to its “Info” tab. From here, you can sync its contacts with iTunes. This will keep your contacts safe and allow you to sync them with another iOS device.

Copy iPhone Contacts Using Gmail
Just like iCloud, you can also sync your contacts with Gmail. If you don’t use Gmail, then go to your iPhone’s Accounts Settings and set up your Gmail account. Later, you can go to Settings > Mail, Contacts, Calendar > Gmail and toggle on the syncing option for Contacts.

If you want, you can access your Google Contacts and import them to a vCard as well. This would be a perfect alternative to learn how to import contacts from Apple iPhone 6 Plus to SIM.

We hope this guide was able to answer your question of how to copy contacts from Apple iPhone 6 Plus to SIM. Since there is no ideal solution for it, you can try different alternatives. Dr.Fone Backup & Restore is one of the best ways to keep your contacts (and other types of data) safe and will certainly save the day during an emergency situation.
5 Ways to Transfer Music from Apple iPhone 6 Plus to Android
“I have just got a new Android, and I want to transfer music from Apple iPhone 6 Plus to Android. Can anyone help me learn how to send music from Apple iPhone 6 Plus to Android without much hassle?”
Switching from an iPhone to Android can be a tough job. Not only to transfer photos and contacts, but users also need to take some added measures for moving music from Apple iPhone 6 Plus to Android. The good news is that some tools can move data from iOS to Android instantly. You can use iTunes, a dedicated app, or a third-party data transfer tool to do the same. Read on and get to know how to transfer music from Apple iPhone 6 Plus to Android like a pro.
Part 1: How to transfer all music from Apple iPhone 6 Plus to Android in 1 click?
The simplest way of learning how to move music from Apple iPhone 6 Plus to Android is by using Dr.Fone - Phone Transfer . As the name suggests, the tool will make it easier for you to switch from one smartphone to another without losing any data. It is a part of the Dr.Fone toolkit and is compatible with leading iPhone and Android models. Therefore, you can easily perform a cross-platform transfer of data with a single click.
Dr.Fone - Phone Transfer
Transfer Music from Apple iPhone 6 Plus to Android Directly in 1 Click!
- Easily transfer contacts from Apple iPhone 6 Plus to Android phone without any complication.
- Works directly and transfer data between two cross-operating system devices in real-time.
- Works perfectly with Apple, Samsung, HTC, LG, Sony, Google, HUAWEI, Motorola, ZTE, Nokia, and more smartphones and tablets.
- Fully compatible with major providers like AT&T, Verizon, Sprint, and T-Mobile.
- Fully compatible with the latest iOS and Android
- Fully compatible with the latest Windows or Mac version.
3981454 people have downloaded it
Note: If you have no computer at hand, you can also get the Dr.Fone - Phone Transfer (mobile version) from Google Play, with which you could log into your iCloud account to download the data, or transfer from Apple iPhone 6 Plus to Android using an iPhone-to-Android adapter.
Besides music files and formats of different kids, Dr.Fone - Phone Transfer also supports the transfer of contacts, messages, photos, videos, and other types of contact. Therefore, you can move all your data at once using this tool. To learn how to send music from Apple iPhone 6 Plus to Android using Dr.Fone - Phone Transfer, follow these steps.
1. Download Dr.Fone - Phone Transfer on your Windows PC or Mac and launch it whenever you wish to transfer music from Apple iPhone 6 Plus to Android. From its welcome screen, select the “Switch” module.
2. Now, connect both the Apple iPhone 6 Plus devices to your computer and let the application detect them automatically. On the interface, you can see a preview of both the Apple iPhone 6 Plus devices.
3. Since you move your data from an iPhone to Android, your iPhone should be listed as a source while Android should be a destination device. If not, then use the Flip button to interchange their positions.

4. Select the type of data you wish to transfer. For instance, in this scenario, make sure that the option of “Music” is selected. Once you have made the selection, click on the “Start Transfer” button.

5. Sit back and wait for a while as Dr.Fone - Phone Transfer will automatically move the selected content from Apple iPhone 6 Plus to Android.
6. When the process is completed, you will be notified. In the end, you can remove both the Apple iPhone 6 Plus devices safely.

Part 2: How to transfer music from Apple iPhone 6 Plus to Android using Google Music Manager?
Another way to transfer music from Apple iPhone 6 Plus to Android is by using Google Music Manager. Though, unlike Dr.Fone tools, the process can be a bit complicated. Firstly, you need to sync your music between iPhone and iTunes, and then you have to import it from iTunes to Google Music Manager. Sounds complicated, right? In the end, you can access it on your Apple iPhone 6 Plus using the Google Music app. You can follow these steps to learn how to move music from Apple iPhone 6 Plus to Android using Google Music Manager.
1. Firstly, you need to sync music between your iPhone and iTunes. To do this, launch an updated version of iTunes on your system and connect your iPhone to it.
2. Please select your device and go to its Music tab. From here, you can sync your iPhone with iTunes. Click on the “Apply” button and start the syncing process.
3. Once all your music is synced to iTunes, you can disconnect your iPhone.
4. Go to the official website of Google Music and download Google Music Manager on your system.

5. Launch the Music Manager application and choose to upload songs to Google Play.
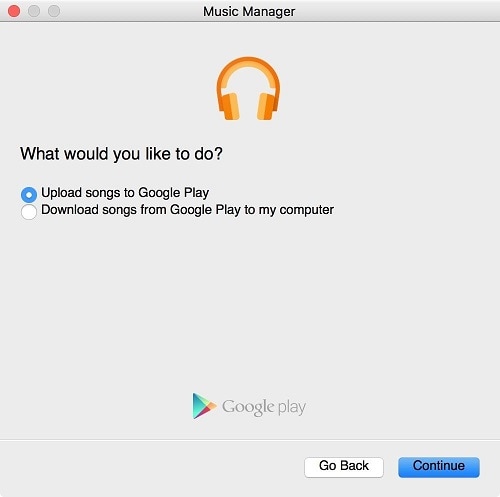
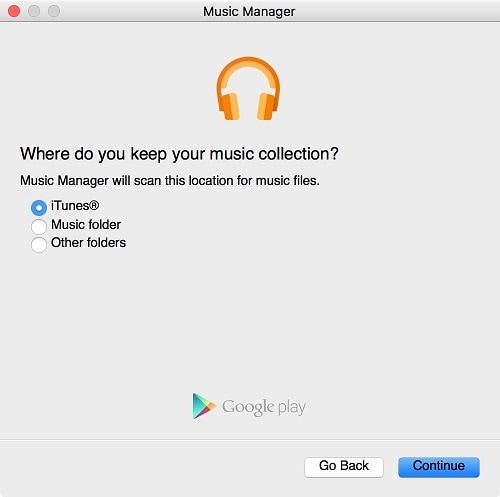
6. Select the source as “iTunes” and click on the “Continue” button.
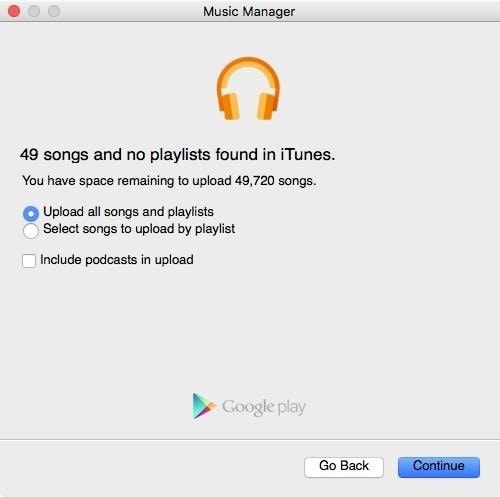
7. The Music Manager will automatically sync your iTunes library and display the available songs. From here, you can choose to upload selected songs or the entire library.
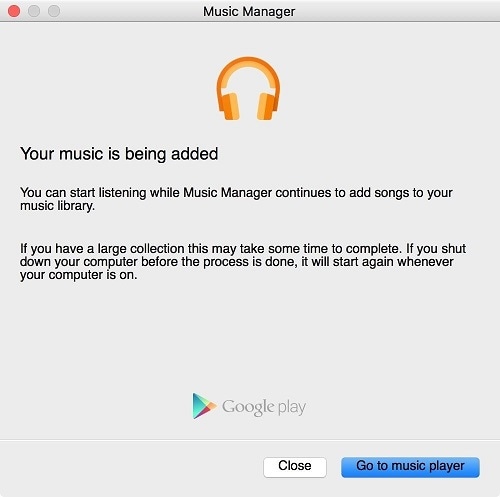
8. Wait for a while for your songs to be imported to Google Music Manager. Once it is done, you will be notified.
9. Great! You are almost there. In the end, you can download the Google Music app on your Android. From here, you can automatically access all the newly transferred songs on your Google Music library.
Part 3: How to transfer music from Apple iPhone 6 Plus to Android selectively?
As you can see, with Dr.Fone - Phone Transfer, all the music files are transferred from one device to another in one go. If you want to transfer music from Apple iPhone 6 Plus to Android selectively, you can take Dr.Fone’s assistance - Phone Manager (iOS) . It is also a part of the Dr.Fone toolkit and is developed by Wondershare.
Dr.Fone - Phone Manager (iOS)
Transfer iPhone/iTunes Media to Android Devices Selectively
- Transfer files between Android and iOS, including contacts, photos, music, SMS, and more.
- Manage, export/import your music, photos, videos, contacts, SMS, Apps etc.
- Transfer iTunes to Android (vice versa).
- Manage your iOS/Android device on computer.
- Fully compatible with the latest iOS and Android
4,335,819 people have downloaded it
With Dr.Fone - Phone Manager (iOS), you can move data between your iOS device and computer and even iPhone to another Android or iOS device. It works with all the leading smartphone models and supports prominent data types like photos, videos, music, contacts, messages, and more. Having a user-friendly interface will make it easier for you to learn how to transfer music from Apple iPhone 6 Plus to Android. All you need to do is follow these steps:
1. Start by launching the Dr.Fone toolkit on your system and visit the “Transfer” tool from its home screen.
2. Connect your iPhone and the target Android device to the system. The interface will automatically detect both the Apple iPhone 6 Plus devices in no time. From the top left option, make sure that you have selected your iPhone as a source device.
3. Great! Now, move to the “Music” tab on the application. Here, you can view all the music files stored on your iPhone, listed in different categories.
4. Just select the files you wish to transfer to your Android and click on the export button on the toolbar.
5. This will display a list of all the connected devices. Select the target Android device to commence the transfer process.
Part 4: How to transfer music from Apple iPhone 6 Plus to Android without computer?
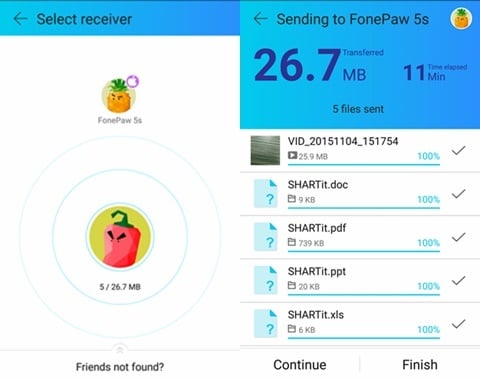
Too often, users don’t wish to use a computer for moving music from Apple iPhone 6 Plus to Android. If you have the same preference, then you use a data transfer app to meet your requirements. Out of all the cross-platform data transfer options, SHAREit is one of the most recommended apps. You can install the app on both the Apple iPhone 6 Plus devices and learn how to transfer music from Apple iPhone 6 Plus to Android without computer by following these steps.
1. Before you proceed, make sure that you have installed the SHAREit app on your iPhone and Android by visiting its Google Play and App Store
2. Launch the app on both the Apple iPhone 6 Plus devices and connect them to the same WiFi network. This is because the transfer of data takes place through WiFi direct.
3. On the source iPhone, choose to “Send” the data. Also, you can browse and select the music files that you wish to send.
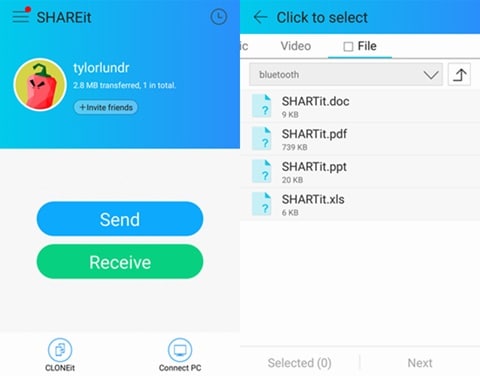
4. Similarly, on your target Android device, mark it as a receiving device. It will automatically start looking for the nearby devices.
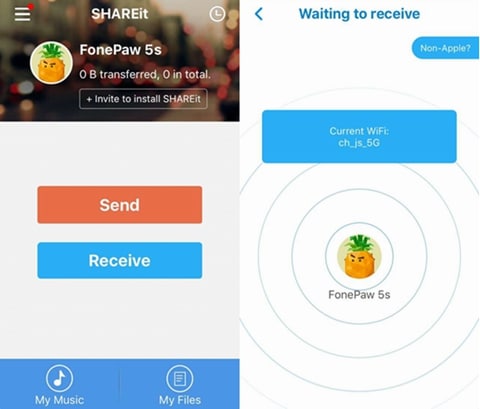
5. On your iPhone, you will be prompted regarding the target device. Select it to initiate the transfer.
6. Accept the incoming data from the source device and start receiving the selected music on your Android.
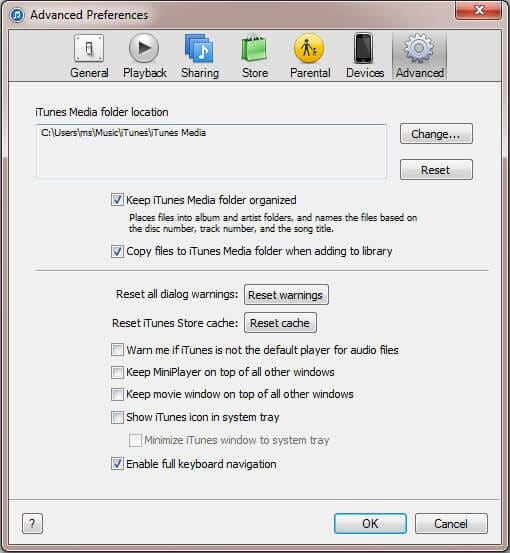
Part 5: How to transfer music from iTunes to Android?
It might surprise you, but there are different ways to learn how to transfer music from Apple iPhone 6 Plus to Android. We have already discussed how to send music from Apple iPhone 6 Plus to Android using iTunes and Google Music Manager. Though, there is another alternative to do the same. Once you have transferred your music from Apple iPhone 6 Plus to iTunes, you can directly move it to an Android device as well.
1. To start with, make sure that you have already synced your iPhone music with iTunes. Once it is done, launch iTunes again.
2. Go to its Preferences > Advanced options and enable the “Copy files to iTunes media folder when adding to library” feature from here.
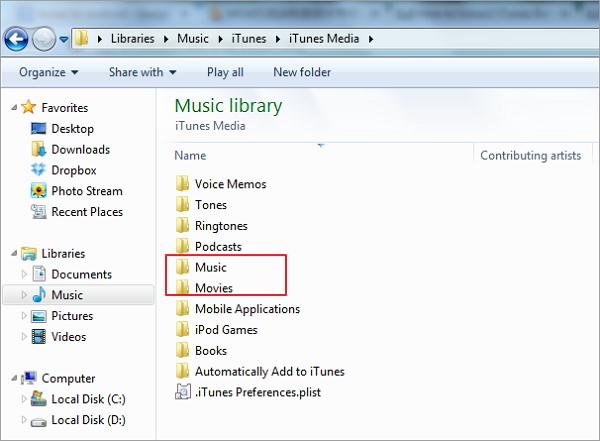
3. Once you apply this change, iTunes will make a dedicated folder with all the music files present in its library. In Windows, you can find it under My Music > iTunes while in Mac, it would be under Music > iTunes.
4. To transfer these music files, connect your Android to the system and choose to use it as a media transfer device.
5. Browse to the iTunes music folder, copy the selected songs, and transfer them to your Apple iPhone 6 Plus. If you have a Mac, then you need to use Android File Transfer to do the same.
After learning different moving music from Apple iPhone 6 Plus to Android, you can certainly pick a preferred method. As you can see, Dr.Fone toolkit provides the fastest and easiest way to transfer music from Apple iPhone 6 Plus to Android. With Dr.Fone - Phone Transfer , you can transfer all the music files from one device to another in a single click. In order to perform a selective transfer of data, you can try Dr.Fone - Phone Manager (iOS) as well. Go ahead and try these tools and teach others how to move music from Apple iPhone 6 Plus to Android by sharing this guide.
Also read:
- [Updated] 2024 Approved Fixing Dark Mode Issues During Recording
- [Updated] 7 Best Budget-Friendly DVD Players for Computers
- [Updated] Enhance Your Experience with Mi 11 Screen Capture Guide for 2024
- [Updated] From Global Reach to Engagement Deciphering IGTV & YouTube’s Strategies
- Connecting Your Fitness Tools: Unleash The Power Of Syncing Oura Rings With Strava - A Comprehensive Tutorial
- Easy Methods How To Transfer Pictures From Apple iPhone XS Max to PC | Dr.fone
- In 2024, 3 Solutions to Find Your Realme GT 5 Pro Current Location of a Mobile Number | Dr.fone
- In 2024, 5 Ways to Transfer Music from Apple iPhone 13 to Android | Dr.fone
- In 2024, Effortless Ways to Transfer Data from Your Apple iPhone 12 mini to iPhone 15 | Dr.fone
- In 2024, How to Transfer Everything from Apple iPhone 11 Pro to iPhone 8/X/11 | Dr.fone
- In 2024, How to Transfer Everything from Apple iPhone 14 Pro Max to iPhone | Dr.fone
- In 2024, Refurbished Apple iPhone 15 Pro Everything You Need to Know | Dr.fone
- Troubleshooting Windows Boot Issues - Expert Advice From YL Computing's Specialists
- Unlocking Exclusive Savings: Preorder Tips for the Latest Tech Marvels, iPhone 15 and Apple Watch S9 Ultra, Perfected by ZDNET Experts
- Title: Ultimate Guide, How to Transfer Music From Apple iPhone 6 Plus to iPhone | Dr.fone
- Author: Charlotte
- Created at : 2025-02-14 19:59:40
- Updated at : 2025-02-19 16:42:55
- Link: https://iphone-transfer.techidaily.com/ultimate-guide-how-to-transfer-music-from-apple-iphone-6-plus-to-iphone-drfone-by-drfone-transfer-from-ios/
- License: This work is licensed under CC BY-NC-SA 4.0.