
Solved How To Transfer From Apple iPhone 13 Pro to iPhone 15 | Dr.fone
[Solved] How To Transfer From Apple iPhone 13 Pro to iPhone 15
Transitioning to a new iPhone is undoubtedly thrilling. Yet, the process of migrating your data from one iOS device to another can appear overwhelming. With every iPhone model update, Apple unveils new features and functionalities. It can potentially complicate the transfer procedure. In this extensive guide, we’ll simplify the process of how to transfer data from Apple iPhone 13 Pro to iPhone.
We’ll offer detailed, step-by-step guidance and explore many methods to ensure an efficient transition. By the end of this guide, you’ll possess the necessary know-how to effortlessly transfer your valuable data.
Part 1. How To Transfer Data From Apple iPhone 13 Pro to iPhone With Apple’s Built-In Methods
Moving data from one iPhone to another can be easier using Apple’s tools. These features are already on your iPhone and make it simple and reliable to transfer your data. Given below are the three built-in solutions from Apple for how to transfer data from Apple iPhone 13 Pro to iPhone:
Method 1. Quick Start
The Quick Start feature from Apple offers a way to transfer data from your previous iPhone to a new device without any hassle. This method utilizes a direct wireless connection between the Apple iPhone 13 Pro devices. That makes the transition swift and efficient. Follow these steps to transfer data from Apple iPhone 13 Pro to iPhone using Quick Start:
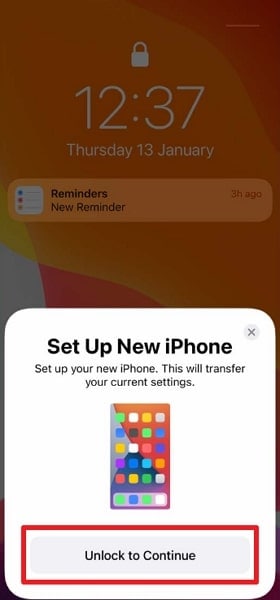
Step 1. Begin by turning on your new iPhone and placing it beside your old iPhone. When the “Set Up New iPhone” prompt appears, tap “Unlock to Continue.” This process will use the Apple ID associated with your old phone, so tap “Continue” if you’re comfortable with that.

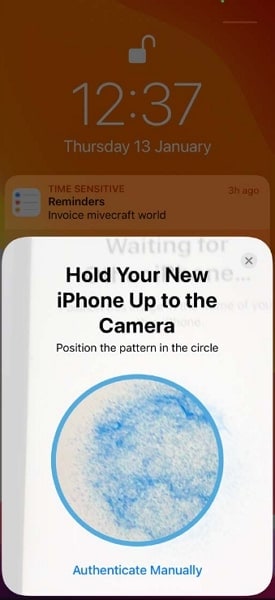
Step 2. An animation will appear on the new iPhone’s screen, and you have to hold this animation up to the camera on your old iPhone. Once the message “Finish on New [Device]“ appears, input your old iPhone’s passcode into the new one and follow the provided setup instructions.
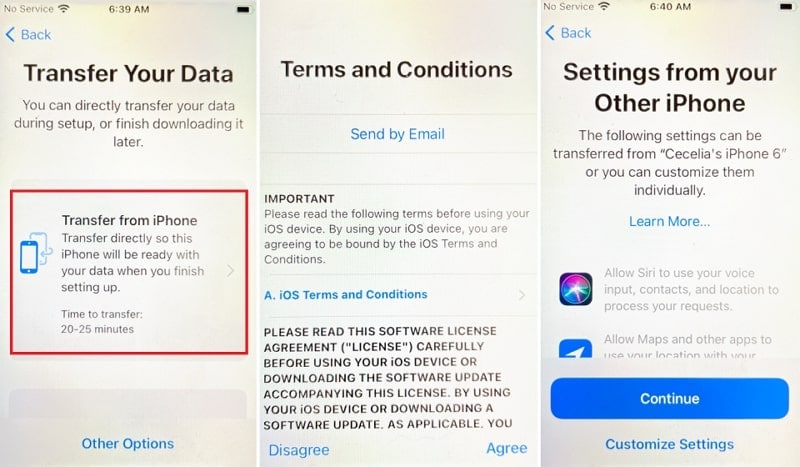
Step 3. When you reach the “Transfer Your Data” screen, opt for “Transfer Directly from iPhone” and confirm the specific settings and data you wish to transfer. This streamlined process ensures a smooth transition to your new device while maintaining the data you want.
Method 2. iTunes/Finder
Another reliable method to transfer data between iPhones is using iTunes/Finder. iTunes is available for Windows or macOS versions before Catalina. The users on macOS Catalina and later versions can use Finder to transfer data. This method allows you to create a backup of your old iPhone and restore that backup to your new device. Here is **how to transfer data to the new iPhone** via iTunes/Finder:
Using iTunes (For Windows or macOS Versions Prior to Catalina)
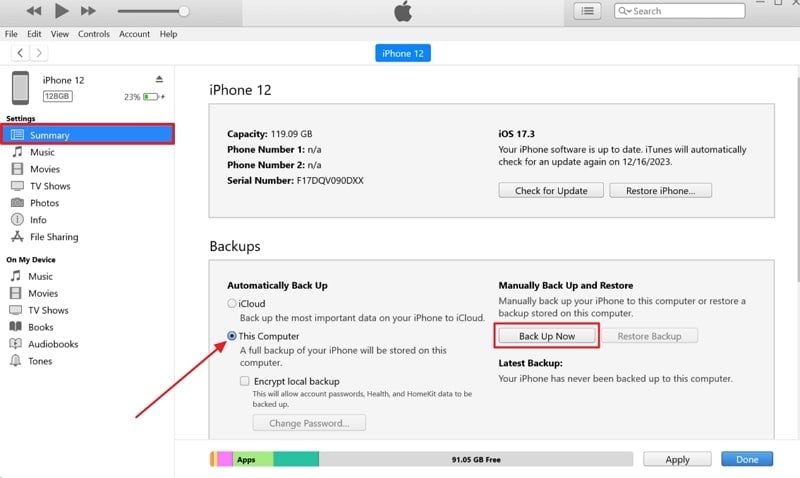
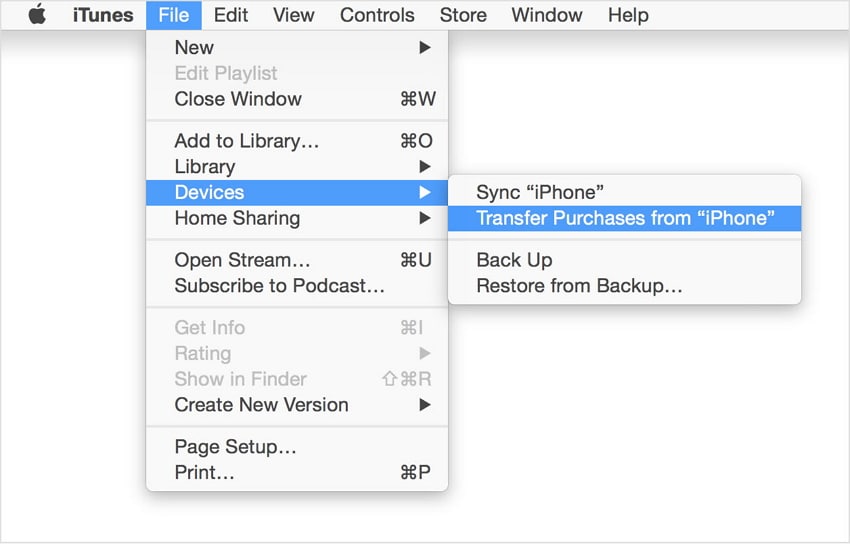
- Step 1. Initiate by connecting your old iPhone to your computer and launching the latest version of iTunes. Once your device is detected by iTunes, click the Apple iPhone 13 Pro device icon to access the “Summary” tab. Here, move to the “Backups” section and click “Back Up Now” to start creating the backup. Before pressing “Back Up Now,” ensure that “This Computer” is selected as a backup location.
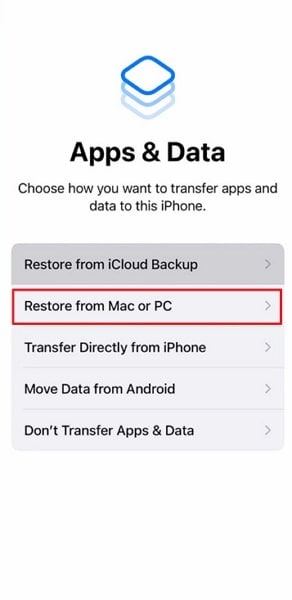
Step 2. Once the backup is completed, disconnect the old device and start setting up the new one. When you reach the “Apps & Data” screen, select “Restore from Mac or PC,” and connect to the computer with iTunes.
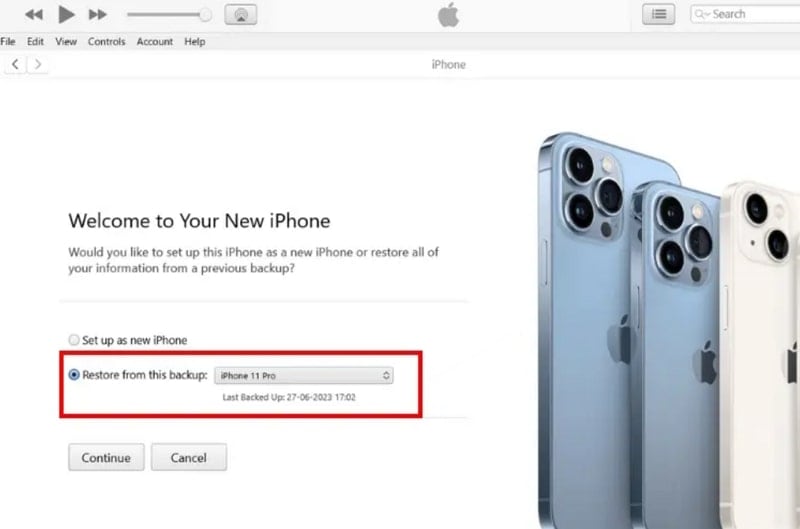
Step 3. Click the “Device” icon in iTunes when it loads the new iPhone, and you will come across the “Welcome to Your New iPhone” screen. Here, select “Restore from this Backup,” select the targeted backup, and click “Continue.” It will commence the backup restoration process, which takes some time, depending on the backup size.

Using Finder (On macOS Catalina and Later Versions)
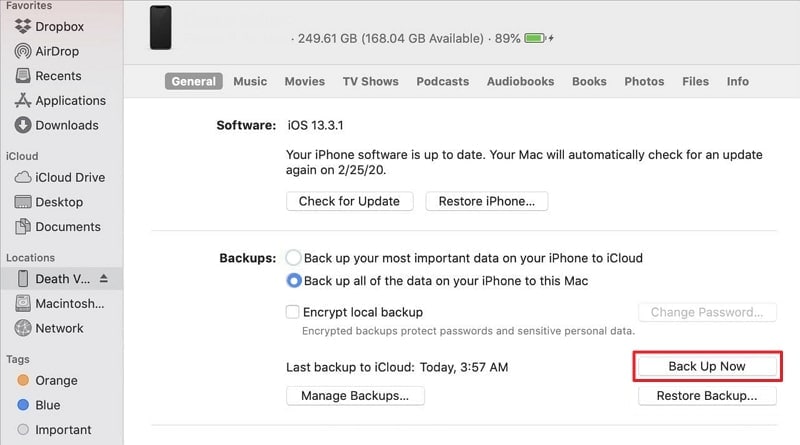
Step 1. To start, use a USB cable to connect your old iPhone to your Mac and open Finder. In Finder, select your iPhone under the “Locations” section. Click “Back Up Now” to create a backup of your old iPhone on your Mac. Ensure that the “Back up all of the data on your iPhone to this Mac” box is checked, and when the process is completed, unplug the old device.
Step 2. Now connect the new iPhone with “Restore from Mac or PC” selected from the “Apps & Data” screen. Choose your device in Finder and click “Restore Backup.” Then, select the targeted backup and wait for the backup restoration process to complete.
Method 3. iCloud Backup
Utilizing iCloud Backup offers a streamlined and wireless approach for transferring data. This method empowers you to generate a backup of your previous iPhone on iCloud. Afterward, it enables you to restore that backup to your new device.

Leveraging iCloud Backup facilitates the transfer of various data types. These include photos, videos, app data, settings, and more. The steps to **transfer data from Apple iPhone 13 Pro to new iPhone** via iCloud Backup are these:
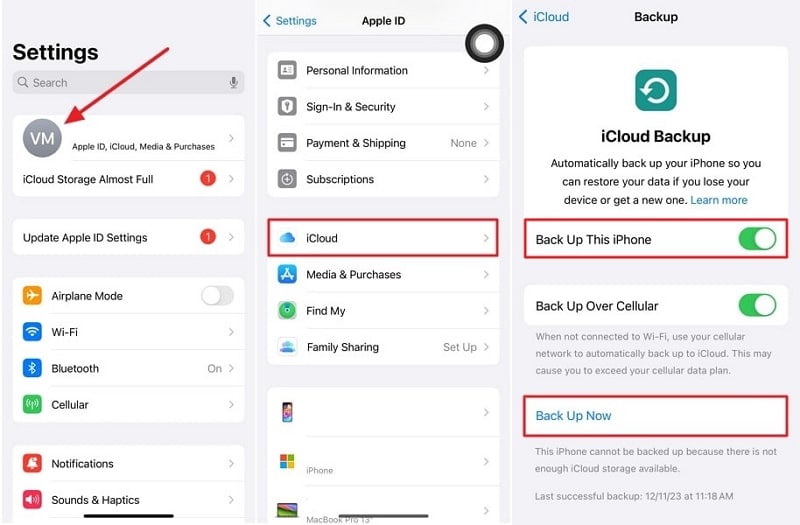
Step 1. Confirm that your former iPhone is connected to a reliable Wi-Fi network. Then, access the Settings app on your previous iPhone and tap your name, which is located at the top of the screen. Select “iCloud” and proceed to choose “iCloud Backup.” Ensure the “iCloud Backup” option is activated if it’s not switched on. Finally, click “Back Up Now” and wait for the backup process to finalize.
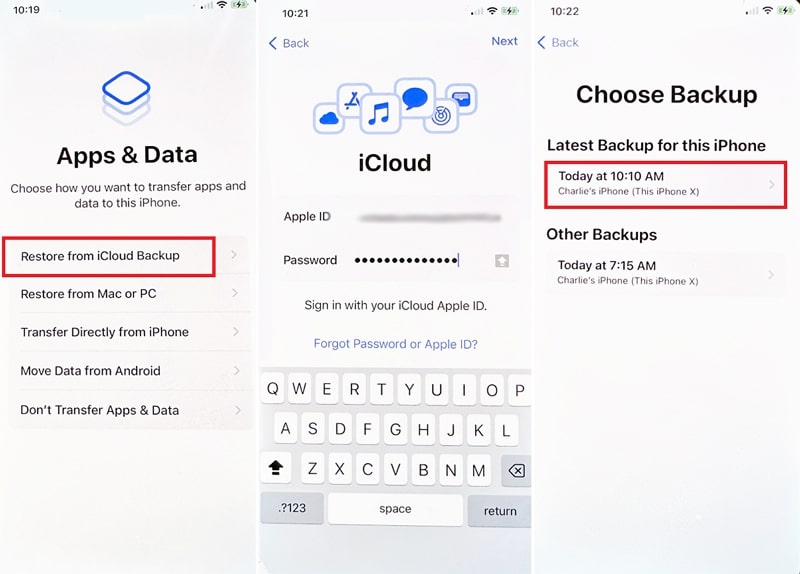
Step 2. Turn on your newly obtained iPhone and follow the initial setup instructions until you reach the “Apps & Data” display. Once there, select “Restore from iCloud Backup” and sign into your iCloud account. Ensure it is the same Apple ID you utilized to back up your previous iPhone. Afterward, select the latest backup of your previous iPhone and follow the on-screen instructions to complete the process.
Part 2. What Are the Drawbacks of Using Official Methods for Transferring Data From Apple iPhone 13 Pro to iPhone
Apple’s official methods to transfer data from Apple iPhone 13 Pro to iPhone offer convenience and reliability. Nevertheless, they do possess specific limitations and disadvantages. Users should consider these limitations to make a well-informed choice. It will help you find the most fitting approach for their requirements. Here are some of the downsides and constraints associated with Apple’s official methods:
1. Entire Devices Backups
A major drawback of using methods like Quick Start, iTunes, and iCloud is that they restore the entire device’s data. Users cannot selectively transfer data using any of these three methods.
2. iPhone Setup Requirement
The transfer methods like iCloud and Quick Start can only be employed when setting up a new iOS device. For old devices, you must factory reset the Apple iPhone 13 Pro device for these methods to work.
3. Internet Dependency
Restoring iCloud Backup on your new iPhone requires a stable and relatively fast internet connection. This can be a limitation in areas with poor connectivity or limited data plans. If the internet is unstable, it could lead to issues during the iCloud backup restoration.
4. Limited Storage on iCloud
iCloud offers 5 GB of free storage, which might not be sufficient for users with large amounts of data. Users might need to buy more iCloud storage to accommodate their backups, incurring extra costs.
5. Compatibility Issues
Older iPhone models might not support the latest iOS versions or certain features. It leads to compatibility issues when transferring data between devices. This is a prominent issue when dealing with different iOS versions.
Part 3. One-Click Alternative to Official Methods To Transfer Data From Apple iPhone 13 Pro to iPhone
Seeking an efficient, all-in-one solution that bypasses the limitations of Apple’s official methods? Wondershare Dr.Fone stands out as a comprehensive alternative. It offers a one-click approach to transferring data between iPhones of various models. This toolkit streamlines the process without relying on iCloud or iTunes/Finder. Dr.Fone also provides a user-friendly interface that simplifies the transfer process.
Its intuitive design allows users to transfer data between iPhones effortlessly. Unlike Apple’s native methods, Dr.Fone enables the transfer of over 15 types of data. This includes contacts, messages, photos, videos, music, call logs, apps, and more. It supports transferring data between different iOS versions and iPhone models.
Key Features of Wondershare Dr.Fone
- Beyond direct transfers, Wondershare Dr.Fone offers backup and restore functionalities.
- Fone – Phone Transfer is compatible with over 8000 devices from various brands.
- This tool enables swift data transfer between phones in under 3 minutes.
Steps to Transfer Data from Apple iPhone 13 Pro to iPhone via Wondershare Dr.Fone
Dr.Fone supports effortless data transfer across devices and platforms. This is how to transfer data from Apple iPhone 13 Pro to iPhone via Wondershare Dr.Fone:
- Step 1. Access Phone Transfer and Connect iOS Devices
Launch Wondershare Dr.Fone after installing it and access the “Toolbox” tab. Here, click “Phone Transfer” and connect both of your iOS devices to the computer. Once they are detected by Dr.Fone, move to assign them to the correct positions.

- Step 2. Pick Source and Destination Positions
Your old iPhone from which you are transferring data will be the “Source” device. Similarly, your new iPhone to which you want to move data will be in the “Destination” position. In case positions are wrong, use the “Flip” button to interchange the positions.

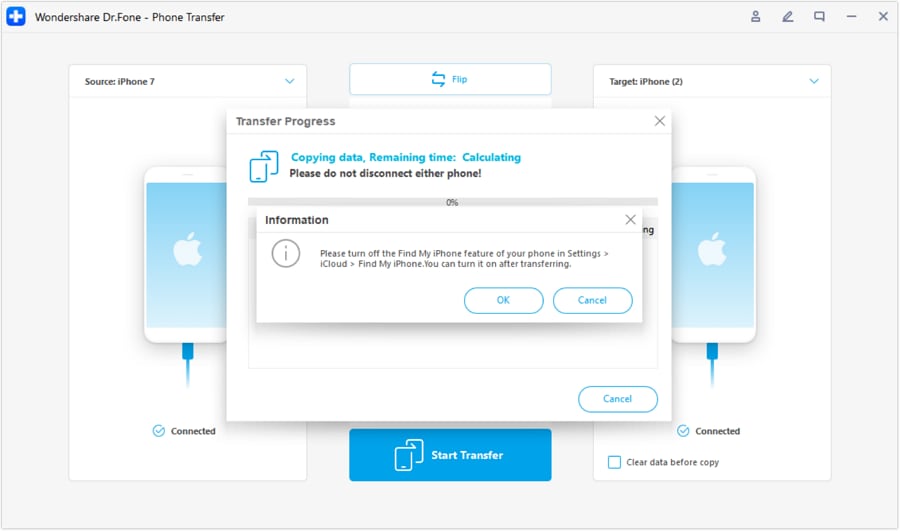
- Step 3. Start and Complete the Data Transfer Process
The last part includes selecting the data you want to transfer. You can select the data within the transfer screen and, upon making your choices, proceed by clicking “Start Transfer.” It’s important to note that during this process, you’ll need to deactivate the “Find My” feature on iOS devices. When done, the data process will commence automatically.
Bonus Tip. Want To Buy a New iPhone? Tips and Tricks To Select the Best iPhone for Your Use
Choosing the right iPhone involves considering various factors. Ensuring alignment with your preferences, needs, and budget is crucial. It requires evaluation of these aspects and conducting comprehensive research. This will enable you to confidently make a knowledgeable choice. Below, discover some helpful tips and tricks to aid in choosing the ideal iPhone:
1. Identify Your Priorities
Determine what matters most to you in an iPhone model. Are you more focused on camera quality, battery life, processers, or other features? Gaining clarity on your priorities will assist in focusing your choices.
2. Consider the Latest Models
Apple releases new iPhone models annually. Consider the latest offerings, as they often feature upgraded hardware. This includes improved cameras, better battery life, and new features.
3. Budget Consideration
Set a budget range for your new iPhone. Apple provides a range of models available at diverse price tiers. These range from flagship iPhones to more budget-friendly options. Consider your budget while weighing the features you need.
4. Size and Display Preferences
iPhones come in different sizes, from compact models like the iPhone 15 to larger models like the iPhone 15 Pro Max. Consider the screen size of your iPhone that suits your preferences. It also depends on if you prefer a more pocket-friendly device or a larger display.
5. Camera Capabilities
If photography holds significance for you, examine the camera capabilities. Seek out attributes such as multiple lenses, improved low-light performance, and advanced camera functionalities.
6. Consider Future Updates and Longevity
Opt for the latest Apple device, as the company provides software updates for its products over an extended period. Selecting a model with longer update support ensures that your device stays compatible with the latest software and features.
Conclusion
In conclusion, knowing how to transfer data from Apple iPhone 13 Pro to iPhone is crucial for a smooth transition. While Apple’s native methods offer reliability, limitations exist. For an efficient, one-click alternative, Wondershare Dr.Fone stands out. Its comprehensive device-to-device transfer and versatile features make it the ideal choice. Embrace Dr.Fone for a hassle-free iPhone data transfer experience. Moreover, you can transfer between iOS devices without erasing the current data.
4 Ways to Transfer Music from Apple iPhone 13 Pro to iPod touch
Although the Apple iPods have been discontinued, many old users still use them as music players. As we all know, if you want to transfer music from Apple iPhone 13 Pro to iPod, you can just log in with the same Apple ID and then download the songs you purchased on the iPod touch. However, how can you transfer the music that is saved on other devices to your iPod? Don’t worry, this detailed guide introduces 4 ways to transfer music from Apple iPhone 13 Pro to iPod touch, just keep reading!
Part 1: Easy and powerful way to transfer music from Apple iPhone 13 Pro to iPod
A great tool for the purpose of easy transfer of music between iOS devices is Dr.Fone - Phone Transfer . This tool makes life easy for people who want to switch to a new smartphone or are looking for solutions to sync not only music but also contacts, messages, call logs, photos, etc. between different smartphones.
Dr.Fone - Phone Transfer
1-Click Phone to Phone Transfer
Easy, fast, and safe.
Move data between devices with different operating systems, i.e iOS to Android.
Supports iOS devices that run the latest iOS version
Transfer photos, text messages, contacts, notes, and many other file types.
Supports over 8000+ Android devices. Works for all models of iPhone, iPad, and iPod.

4,495,115 people have downloaded it
How to use transfer music from Apple iPhone 13 Pro to iPod
Step 1. Download and install Dr.Fone on your computer. Run it and select Phone Transfer. Connect your iPhone and iPod with your computer, and Dr.Fone will detect your iOS devices automatically.

Step 2. Select Music and other file types you would like to transfer and click on Start Transfer.

Step 3. Then just sit and have a cup of coffee. All music files will be transferred from Apple iPhone 13 Pro to iPod successfully.

Part 2: Transfer Music purchased from the iTunes Store from Apple iPhone 13 Pro to iPod using iTunes
In case, you have purchased music from iTunes and want it to transfer from your iPhone to iPod, there is no direct way to the process. For it to be done, you need to re-download previous iTunes Store purchases on your computer. The best thing for this to be done, is that no extra cost is required to be done till the time, the same ID is used for the same purpose.
Then you need to follow the following steps for the process to be done. On the computer, in iTunes, go to the iTunes Store. Then you need to click ‘Purchased’, which is available in the Quick Links on the Home screen. Then you need to find the songs that are on the iPhone, but not in your computer’s iTunes library. Then, click the ‘cloud’ button next to the song name to download it. The last step of syncing remains which can be done as desired. Just sync those songs from your iTunes library to your iPod as desired and you are done with the job of Transfer Music Purchased from the iTunes store from Apple iPhone 13 Pro to iPod.
Part 3: Transfer Music purchased from the iTunes Store from Apple iPhone 13 Pro to iPod using iTunes match
iTunes match is another way to process of transfer music purchased or unpurchased from iTunes from Apple iPhone 13 Pro to iPod. In fact, iTunes match determines the song, which is present in the iCloud and since there are over 43 million songs, iTunes match matches these unpurchased songs with the database and allows playing these music from the iCloud store. Now, you just need to tap the iCloud download button to download music from an artist, album or playlist. Thus, a person has immediate access to a huge music library without having to worry about the storage space on your device.
Part 4: Transfer Music imported from a CD or other source from Apple iPhone 13 Pro to iPod
For this process to complete, you need to import all songs from CD to iTunes at first. Here is the process for the complete transfer of Music from CD and other sources.

Open iTunes and insert the CD that you wish to import into the disc drive
The options might appear in an instant. If you want to import every song on the disc, select yes and click No, in case you want specific music to import.
In case, you clicked on ‘NO’, Select the menu on the top-left side of the iTunes window and select the audio CD in the list.
Then, check the files you want to import to iTunes, then select Import CD.
The preferences option appears and you need to select the preferences and click OK after the preference has been done.
In case, the music library already contains tracks from the album, which you are importing, you will receive a prompt window to overwrite them. You can select either Replace Existing or Don’t Replace as your wish.
Then you have to wait till the music is ripped to the iTunes library.
As soon as the import is complete, attach your device to the computer.
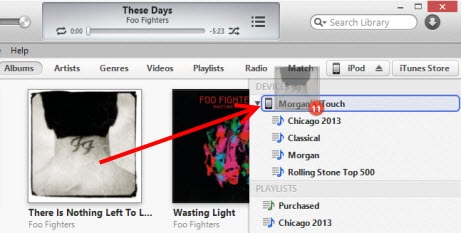
You can now drag the album to the right side of the iTunes window where a pane will appear containing the music on your device. Drop it right on your iPod or other devices.
All remains is to eject the iPod and enjoy your music


Easy Methods: How To Transfer Pictures From Apple iPhone 13 Pro to PC
Photo transfer from your iPhone to your PC is a common practice for various reasons. It can free up your device’s storage space, create backups, or simply edit and organize your photos on a larger screen.
Thankfully, there are various methods to transfer pictures from your iPhone to your PC, providing flexibility to users based on their preferences and convenience. Read our comprehensive guide on how to transfer pictures from Apple iPhone 13 Pro to PC. This article covers step-by-step instructions so you can easily and efficiently manage and transfer your iPhone photos to your computer while preserving your cherished memories.
Part 1: How To Transfer Pictures From Apple iPhone 13 Pro to PC with iCloud
One of the widely used and efficient methods to transfer pictures from your iPhone to a PC is through iCloud, Apple’s cloud-based service. iCloud provides seamless integration across Apple devices, allowing users to sync and access their photos and videos effortlessly.
However, even if your PC is using other operating systems, such as Windows, you can still use iCloud for Windows to save and transfer your iPhone photos from iCloud.
How to transfer iPhone photos to a computer using iCloud:
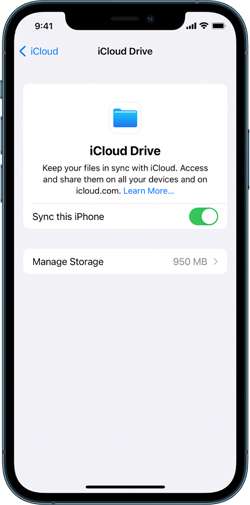
Step 1: Make sure you have synced iCloud photos on your iPhone.
On your iPhone Settings, go to your profile and tap iCloud. Then, select Photos and turn on the switch next to “Sync this [device].” Otherwise, go to iCloud settings > iCloud Drive, and switch on “Sync this iPhone.”
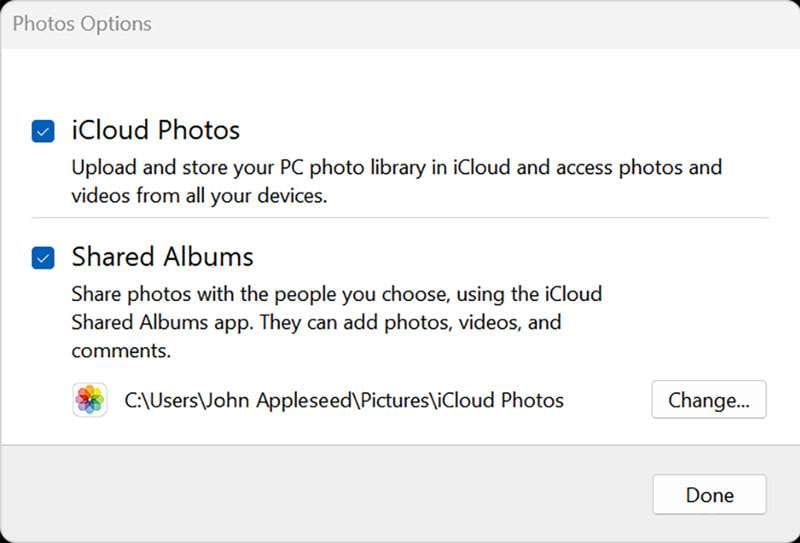
Step 2: Set up your iCloud for Windows.
Open iCloud for Windows and ensure you’re signed in with your Apple ID. Next to Photos, select Options > iCloud Photos. Click “Done” and “Apply” to save the changes and close the window.
Step 3: Keep iPhone photos on PC.
Open iCloud Photos and select the images you want to transfer to your PC. Right-click to open a drop-down menu and choose “Always keep on this device.”
That’s it! Now, you can find your iPhone Photos on your computer.
Part 2: How To Transfer Pictures From iPhone with Google Drive
Another convenient way to transfer iPhone pics to a computer is through Google Drive. As a cloud-based storage solution, Google Drive allows users to seamlessly store, manage, and share files, including photos, across different devices.
If you already have a Google account, you can jump right into Google Drive without signing up. However, be aware that the free version only gives you 15 GB of space. If you need more room, you’ll have to sign up for a subscription.
How to transfer iPhone pictures to a computer with Google Drive:
Step 1: Set up your Google Drive.
Open Google Drive on your iPhone. Once opened, tap the multicolored + symbol and select “Upload” > “Photos and Videos.” If prompted, grant access to all photos by tapping “Allow Access to All Photos.”
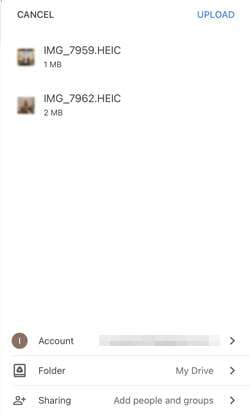
Step 2: Upload your iPhone photos on Google Drive.
Browse through your iPhone albums to locate the specific photos you wish to upload. Hold and tap to select multiple photos. Then, tap “Upload” to upload your iPhone photos to Google Drive.
Optional: Automatic backup or sync with Google Photos
For those seeking automatic backups, open Google Photos, tap your profile image, navigate to “Google Photos settings,” and select “Backup & Sync.” Toggle “Backup & Sync” to On for continuous backups.
Step 3: Transfer your iPhone photos from Google Drive to your PC.
Once your photos are stored on Google Drive, proceed to save and transfer them to your PC. Select the desired photos in Google Drive, and click “Download.”
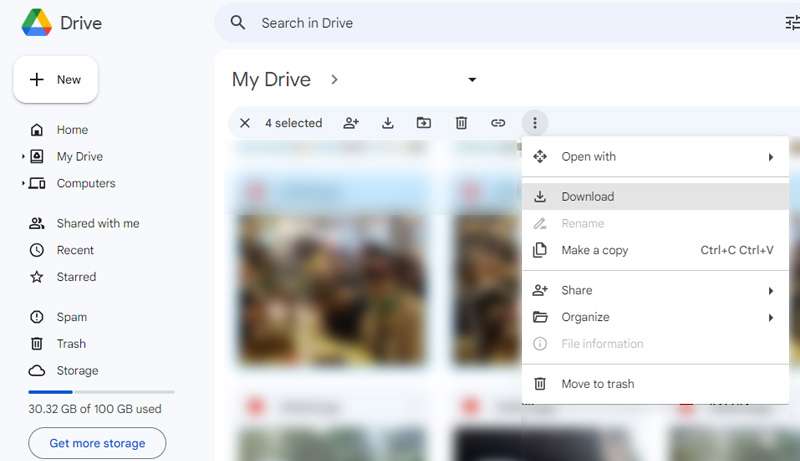
To save all photos from a specific Google Drive folder, open Google Drive and select “My Drive.” Locate the intended folder, and click the three dots to open the drop-down menu. Select “Download,” and all photos and files within the folder will be saved to your computer in ZIP format.
Part 3: How To Transfer Pictures From iPhone with iTunes
You can also make the most of iTunes to secure your iPhone with backups, keep it up-to-date, or synchronize content between your iOS device and your computer in both directions. Even if you’re a Windows PC user, there’s no need to fret. Although iTunes is an Apple product, it’s also available for Windows use.
To get started, make sure that you have iTunes for Windows installed or update your existing version to at least iTunes 12.5.1. Once done, follow the instructions below.
How to transfer iPhone pics to a PC using iTunes:
Step 1: Connect your device to your computer.
Plug in your iPhone to your computer using a USB cable.
Step 2: Grant access to your iPhone Photos.
If your phone is asking you to Trust This Computer, tap “Trust” or “Allow to proceed.”
Step 3: Open your computer’s Photos app.
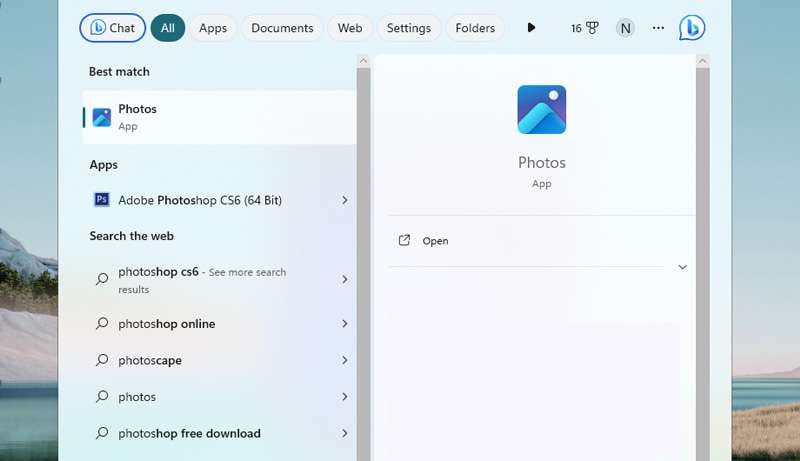
Go to the Start menu on your PC. Search and select Photos to open the Photos app.
Step 4: Import your Photos to your PC.
Within the Photos app, click on Import > From a USB device and follow the instructions on the screen. You can choose specific photos for the transfer and decide where to save them on your PC. Remember to make sure that the photos are saved on the Apple iPhone 13 Pro device rather than stored in the cloud.
Finally, allow a few moments for the system to detect and transfer the selected photos.
Part 4: How To Quick Transfer Pictures From Apple iPhone 13 Pro to PC
If you find the above methods difficult, there is a quick and easy way to transfer photos from your iPhone to a PC with Dr. Fone’s Export All Data feature. With this feature, there’s no need to navigate through various locations to just locate and transfer files from your iPhone.
Dr.Fone - Phone Manager (iOS)
Transfer Photos from Computer to iPod/iPhone/iPad without iTunes
- Transfer, manage, export/import your music, photos, videos, contacts, SMS, Apps, etc.
- Back up your music, photos, videos, contacts, SMS, Apps, etc., to the computer and restore them easily.
- Transfer music, photos, videos, contacts, messages, etc., from one smartphone to another.
- Transfer media files between iOS devices and iTunes.
- Fully compatible with iOS 7 to iOS 15 and iPod.
3981454 people have downloaded it
Dr. Fone’s Export All Data feature offers some great functionalities, including:
- Comprehensive data export, including Photos, Contacts, Messages, Voicemail, and more
- Encrypted data transfer and backups
- Available for iOS and Android devices
- Regular updates to provide an enhanced user experience
To transfer photos from your iPhone to a PC using Dr.Fone, follow the step-by-step below:
Step 1: Launch Dr.Fone and make device connections using a USB cable.
Start by Image nameing your iPhone device to the computer via a USB connection. Launch Dr.Fone and select “Export all data” in the My Device section.

Step 2: Choose file types for export
When a new window appears, select the specific file types you wish to transfer (in this case, your photos). Then, click “Export” at the bottom of the screen to initiate the procedure. Choose the preferred location for saving the exported data.

Step 3: Make a password for the backup file
Next, you will be asked to create an encrypted password for the backup file to be stored on the computer. Set a password, confirm it, and click “Done” to execute the process.

Step 4: Monitor the progress
Your iPhone will start exporting its data to the computer through Dr.Fone. You can wait and monitor the progress on the screen.

Step 5: Successful export of data to the computer
After successful completion of exporting the data, a window will appear on your computer screen. Click “Open” to review the exported data at the specified location.

Conclusion
Before, you must have wondered how do you transfer pictures from Apple iPhone 13 Pro to PC. But after learning from the article above, you now have a variety of straightforward methods in your hand, whether with iCloud, Google Drive, iTunes, or reliable software like Dr.Fone.
If you’re embedded in the Apple ecosystem, iCloud provides seamless integration of your iPhone Photos. Alternatively, Google Drive offers a cross-platform solution, enabling you to upload your iPhone photos to the cloud and access them on your computer browser.
For those who prefer a more traditional approach, iTunes provides a straightforward method via a USB connection. And if you’re looking for a quick and versatile third-party solution, software like Dr.Fone simplifies the data transfer process with its user-friendly interface and robust features.
Also read:
- [New] In 2024, Metaverse Chronicles The Best Sci-Fi Movies to Explore New Universes
- [New] Swiveling Screens Mastering Video Rotation on Instagram
- [New] Unveiling Best Practices in Audio to Text Translation
- [Updated] 2024 Approved Mastering Video Record with VLC
- [Updated] Groundwork on Image Detail A Novice's Reference for 2024
- 2024 Approved Maximize Your TikTok Experience with Updated Numbers
- 4 Ways to Sync Contacts from Apple iPhone SE to iPad Easily | Dr.fone
- 5 Easy Ways to Transfer Contacts from Apple iPhone 7 to Android | Dr.fone
- Crucial Points to Keep in Mind Prior to Investing in a SIM-Free Phone
- Exploring macOS Monterey (Sequoia): Unveiling Launch Timeline, Device Support & Exciting Enhancements
- In 2024, How to Move Custom Ringtones from Apple iPhone 15 Pro to Android? | Dr.fone
- In 2024, How to Transfer Apple iPhone SE (2022) Data to iPhone 12 A Complete Guide | Dr.fone
- In 2024, How to Transfer Data from Apple iPhone 12 to ZTE Phones | Dr.fone
- In 2024, How to Transfer Everything from Apple iPhone SE (2020) to iPhone 8/X/11 | Dr.fone
- In 2024, Solved How To Transfer From Apple iPhone 11 to iPhone 15 | Dr.fone
- In 2024, Ultimate Guide, How to Transfer Music From Apple iPhone 6 to iPhone | Dr.fone
- Rebuilding Scrambled Screenplays: Using Examples
- Refurbished Apple iPhone 6 Everything You Need to Know | Dr.fone
- Step-by-Step Guide: Reinstalling iOS without Using iTunes
- Title: Solved How To Transfer From Apple iPhone 13 Pro to iPhone 15 | Dr.fone
- Author: Charlotte
- Created at : 2025-02-18 16:58:03
- Updated at : 2025-02-20 04:15:35
- Link: https://iphone-transfer.techidaily.com/solved-how-to-transfer-from-apple-iphone-13-pro-to-iphone-15-drfone-by-drfone-transfer-from-ios/
- License: This work is licensed under CC BY-NC-SA 4.0.