
Solved How To Transfer From Apple iPhone 12 mini to iPhone 15 | Dr.fone
[Solved] How To Transfer From Apple iPhone 12 mini to iPhone 15
Transitioning to a new iPhone is undoubtedly thrilling. Yet, the process of migrating your data from one iOS device to another can appear overwhelming. With every iPhone model update, Apple unveils new features and functionalities. It can potentially complicate the transfer procedure. In this extensive guide, we’ll simplify the process of how to transfer data from Apple iPhone 12 mini to iPhone.
We’ll offer detailed, step-by-step guidance and explore many methods to ensure an efficient transition. By the end of this guide, you’ll possess the necessary know-how to effortlessly transfer your valuable data.
Part 1. How To Transfer Data From Apple iPhone 12 mini to iPhone With Apple’s Built-In Methods
Moving data from one iPhone to another can be easier using Apple’s tools. These features are already on your iPhone and make it simple and reliable to transfer your data. Given below are the three built-in solutions from Apple for how to transfer data from Apple iPhone 12 mini to iPhone:
Method 1. Quick Start
The Quick Start feature from Apple offers a way to transfer data from your previous iPhone to a new device without any hassle. This method utilizes a direct wireless connection between the Apple iPhone 12 mini devices. That makes the transition swift and efficient. Follow these steps to transfer data from Apple iPhone 12 mini to iPhone using Quick Start:
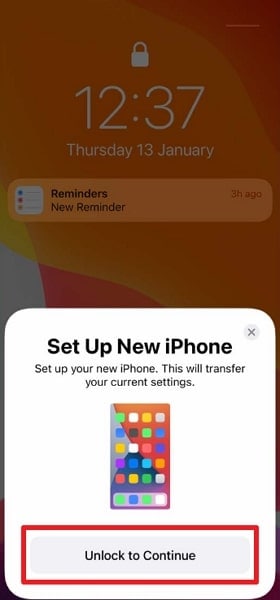
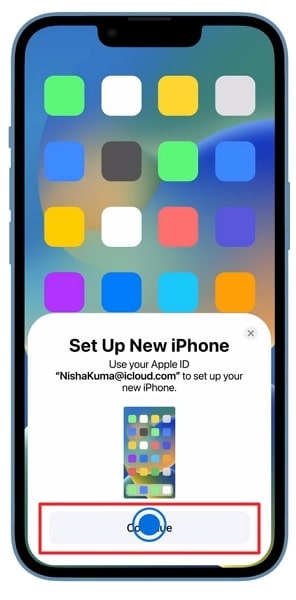
Step 1. Begin by turning on your new iPhone and placing it beside your old iPhone. When the “Set Up New iPhone” prompt appears, tap “Unlock to Continue.” This process will use the Apple ID associated with your old phone, so tap “Continue” if you’re comfortable with that.

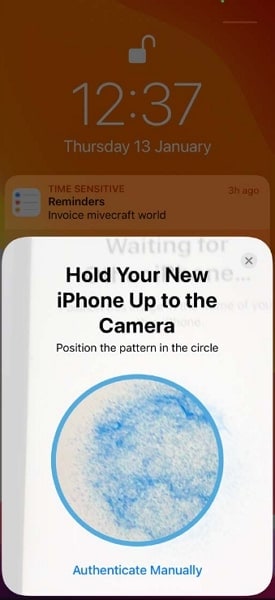
Step 2. An animation will appear on the new iPhone’s screen, and you have to hold this animation up to the camera on your old iPhone. Once the message “Finish on New [Device]“ appears, input your old iPhone’s passcode into the new one and follow the provided setup instructions.
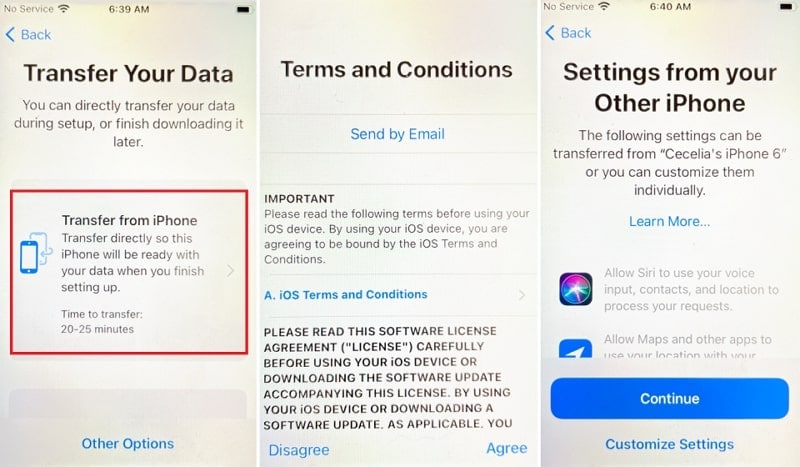
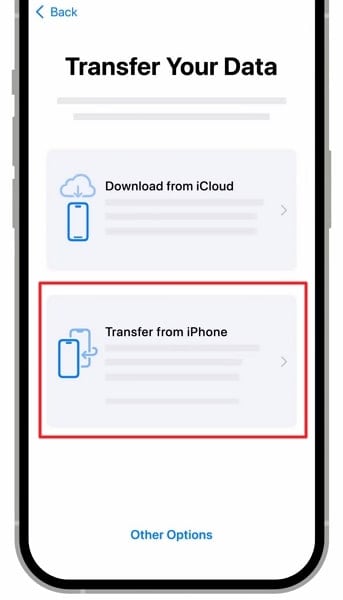
Step 3. When you reach the “Transfer Your Data” screen, opt for “Transfer Directly from iPhone” and confirm the specific settings and data you wish to transfer. This streamlined process ensures a smooth transition to your new device while maintaining the data you want.
Method 2. iTunes/Finder
Another reliable method to transfer data between iPhones is using iTunes/Finder. iTunes is available for Windows or macOS versions before Catalina. The users on macOS Catalina and later versions can use Finder to transfer data. This method allows you to create a backup of your old iPhone and restore that backup to your new device. Here is **how to transfer data to the new iPhone** via iTunes/Finder:
Using iTunes (For Windows or macOS Versions Prior to Catalina)
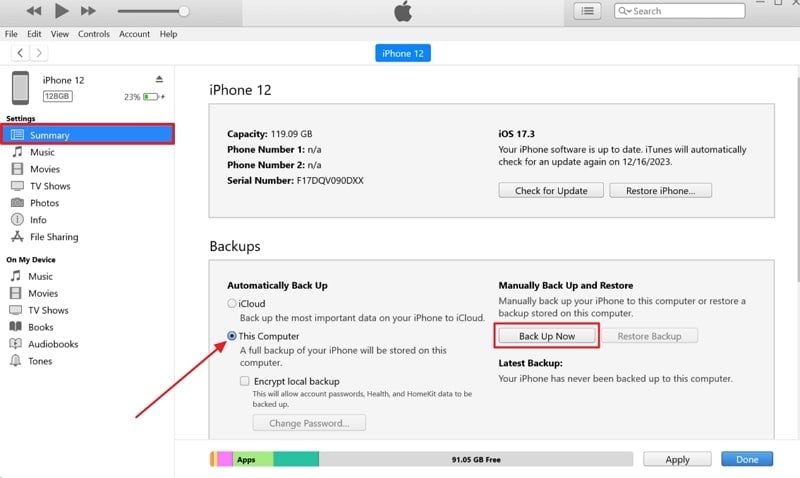
Step 1. Initiate by connecting your old iPhone to your computer and launching the latest version of iTunes. Once your device is detected by iTunes, click the Apple iPhone 12 mini device icon to access the “Summary” tab. Here, move to the “Backups” section and click “Back Up Now” to start creating the backup. Before pressing “Back Up Now,” ensure that “This Computer” is selected as a backup location.
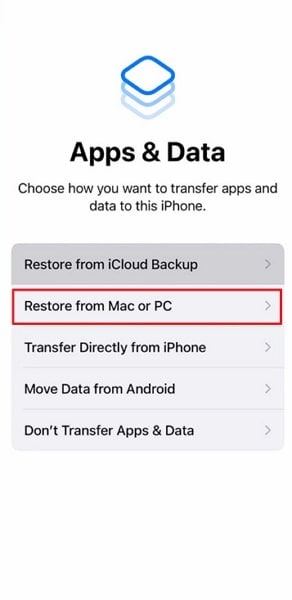
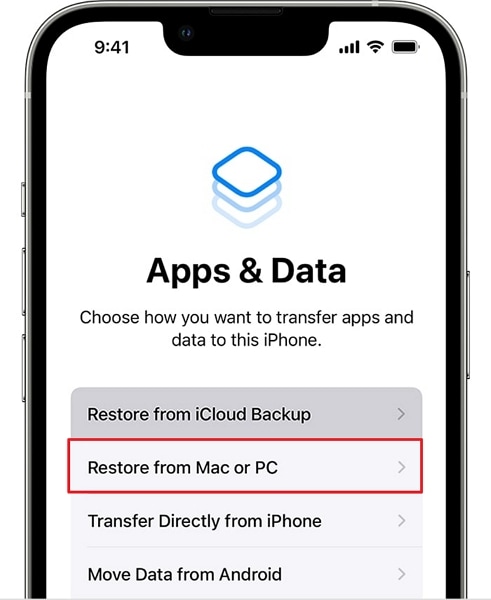
Step 2. Once the backup is completed, disconnect the old device and start setting up the new one. When you reach the “Apps & Data” screen, select “Restore from Mac or PC,” and connect to the computer with iTunes.
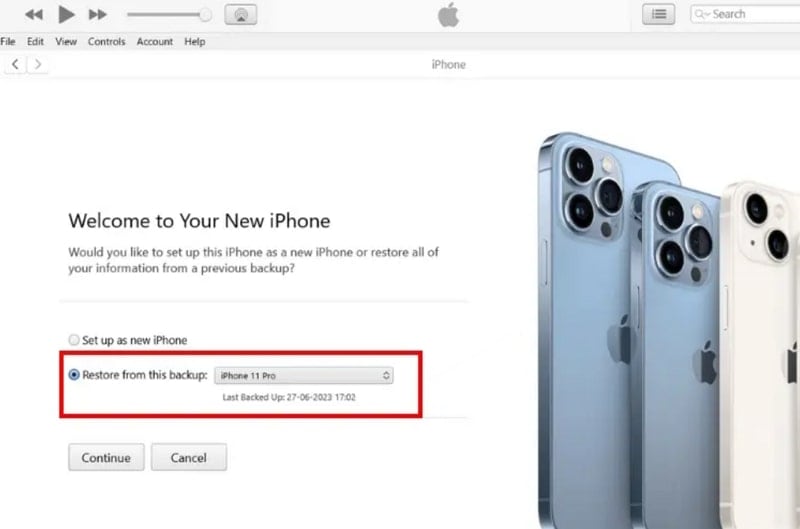
Step 3. Click the “Device” icon in iTunes when it loads the new iPhone, and you will come across the “Welcome to Your New iPhone” screen. Here, select “Restore from this Backup,” select the targeted backup, and click “Continue.” It will commence the backup restoration process, which takes some time, depending on the backup size.

Using Finder (On macOS Catalina and Later Versions)
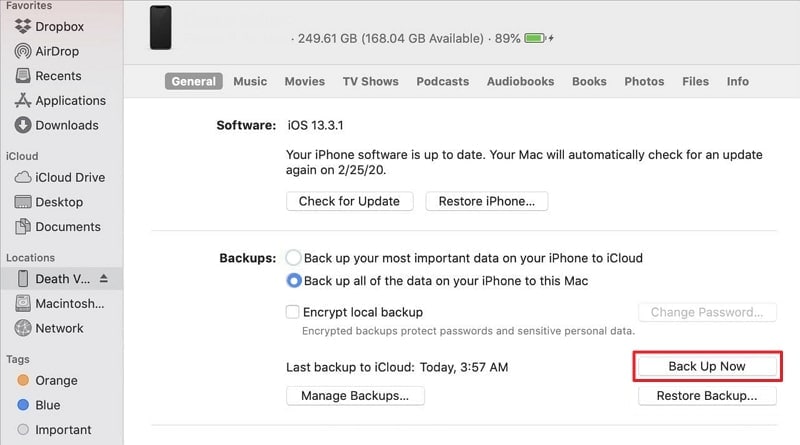
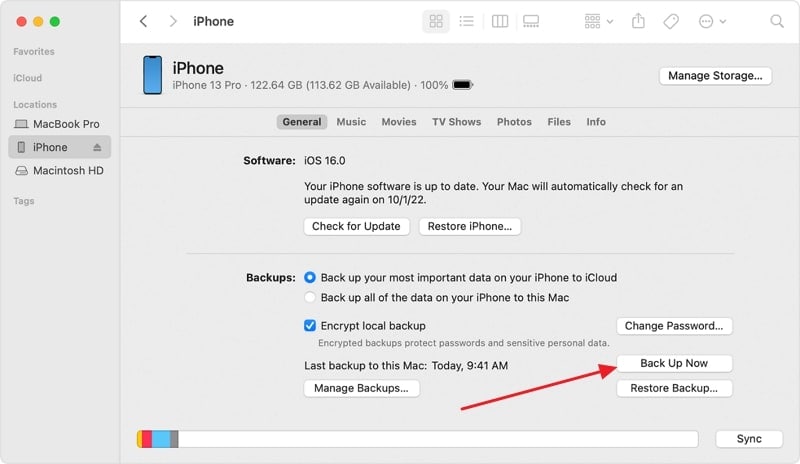
- Step 1. To start, use a USB cable to connect your old iPhone to your Mac and open Finder. In Finder, select your iPhone under the “Locations” section. Click “Back Up Now” to create a backup of your old iPhone on your Mac. Ensure that the “Back up all of the data on your iPhone to this Mac” box is checked, and when the process is completed, unplug the old device.
- Step 2. Now connect the new iPhone with “Restore from Mac or PC” selected from the “Apps & Data” screen. Choose your device in Finder and click “Restore Backup.” Then, select the targeted backup and wait for the backup restoration process to complete.
Method 3. iCloud Backup
Utilizing iCloud Backup offers a streamlined and wireless approach for transferring data. This method empowers you to generate a backup of your previous iPhone on iCloud. Afterward, it enables you to restore that backup to your new device.

Leveraging iCloud Backup facilitates the transfer of various data types. These include photos, videos, app data, settings, and more. The steps to **transfer data from Apple iPhone 12 mini to new iPhone** via iCloud Backup are these:
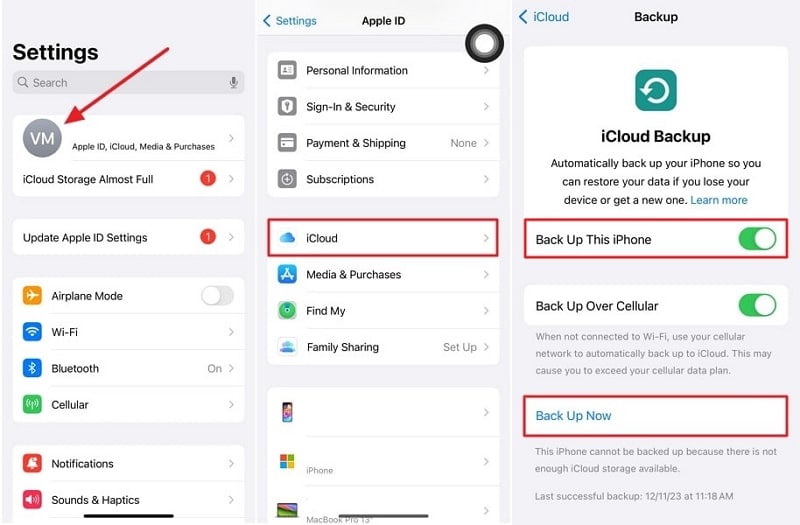
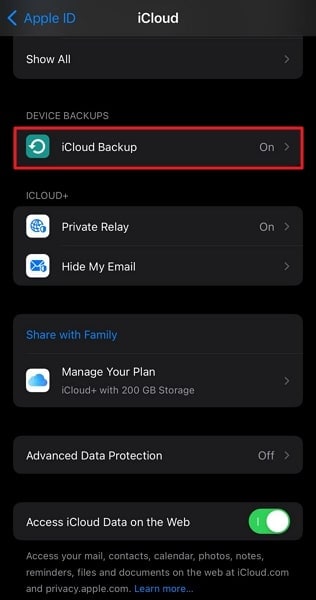
Step 1. Confirm that your former iPhone is connected to a reliable Wi-Fi network. Then, access the Settings app on your previous iPhone and tap your name, which is located at the top of the screen. Select “iCloud” and proceed to choose “iCloud Backup.” Ensure the “iCloud Backup” option is activated if it’s not switched on. Finally, click “Back Up Now” and wait for the backup process to finalize.
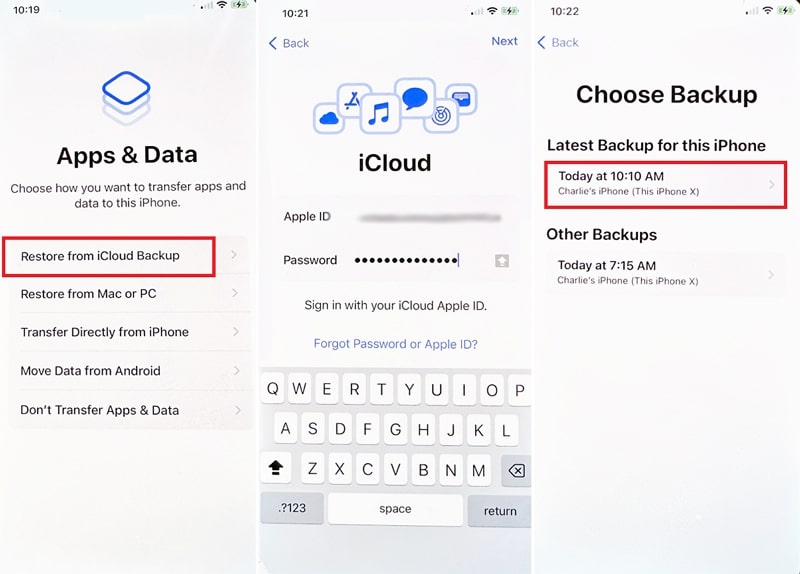
Step 2. Turn on your newly obtained iPhone and follow the initial setup instructions until you reach the “Apps & Data” display. Once there, select “Restore from iCloud Backup” and sign into your iCloud account. Ensure it is the same Apple ID you utilized to back up your previous iPhone. Afterward, select the latest backup of your previous iPhone and follow the on-screen instructions to complete the process.
Part 2. What Are the Drawbacks of Using Official Methods for Transferring Data From Apple iPhone 12 mini to iPhone
Apple’s official methods to transfer data from Apple iPhone 12 mini to iPhone offer convenience and reliability. Nevertheless, they do possess specific limitations and disadvantages. Users should consider these limitations to make a well-informed choice. It will help you find the most fitting approach for their requirements. Here are some of the downsides and constraints associated with Apple’s official methods:
1. Entire Devices Backups
A major drawback of using methods like Quick Start, iTunes, and iCloud is that they restore the entire device’s data. Users cannot selectively transfer data using any of these three methods.
2. iPhone Setup Requirement
The transfer methods like iCloud and Quick Start can only be employed when setting up a new iOS device. For old devices, you must factory reset the Apple iPhone 12 mini device for these methods to work.
3. Internet Dependency
Restoring iCloud Backup on your new iPhone requires a stable and relatively fast internet connection. This can be a limitation in areas with poor connectivity or limited data plans. If the internet is unstable, it could lead to issues during the iCloud backup restoration.
4. Limited Storage on iCloud
iCloud offers 5 GB of free storage, which might not be sufficient for users with large amounts of data. Users might need to buy more iCloud storage to accommodate their backups, incurring extra costs.
5. Compatibility Issues
Older iPhone models might not support the latest iOS versions or certain features. It leads to compatibility issues when transferring data between devices. This is a prominent issue when dealing with different iOS versions.
Part 3. One-Click Alternative to Official Methods To Transfer Data From Apple iPhone 12 mini to iPhone
Seeking an efficient, all-in-one solution that bypasses the limitations of Apple’s official methods? Wondershare Dr.Fone stands out as a comprehensive alternative. It offers a one-click approach to transferring data between iPhones of various models. This toolkit streamlines the process without relying on iCloud or iTunes/Finder. Dr.Fone also provides a user-friendly interface that simplifies the transfer process.
Its intuitive design allows users to transfer data between iPhones effortlessly. Unlike Apple’s native methods, Dr.Fone enables the transfer of over 15 types of data. This includes contacts, messages, photos, videos, music, call logs, apps, and more. It supports transferring data between different iOS versions and iPhone models.
Key Features of Wondershare Dr.Fone
- Beyond direct transfers, Wondershare Dr.Fone offers backup and restore functionalities.
- Fone – Phone Transfer is compatible with over 8000 devices from various brands.
- This tool enables swift data transfer between phones in under 3 minutes.
Steps to Transfer Data from Apple iPhone 12 mini to iPhone via Wondershare Dr.Fone
Dr.Fone supports effortless data transfer across devices and platforms. This is how to transfer data from Apple iPhone 12 mini to iPhone via Wondershare Dr.Fone:
- Step 1. Access Phone Transfer and Connect iOS Devices
Launch Wondershare Dr.Fone after installing it and access the “Toolbox” tab. Here, click “Phone Transfer” and connect both of your iOS devices to the computer. Once they are detected by Dr.Fone, move to assign them to the correct positions.

- Step 2. Pick Source and Destination Positions
Your old iPhone from which you are transferring data will be the “Source” device. Similarly, your new iPhone to which you want to move data will be in the “Destination” position. In case positions are wrong, use the “Flip” button to interchange the positions.

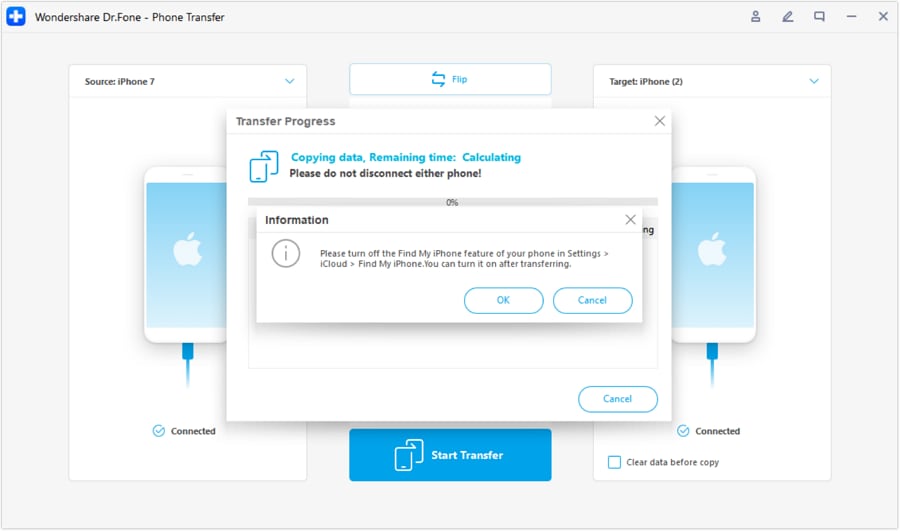
- Step 3. Start and Complete the Data Transfer Process
The last part includes selecting the data you want to transfer. You can select the data within the transfer screen and, upon making your choices, proceed by clicking “Start Transfer.” It’s important to note that during this process, you’ll need to deactivate the “Find My” feature on iOS devices. When done, the data process will commence automatically.
Bonus Tip. Want To Buy a New iPhone? Tips and Tricks To Select the Best iPhone for Your Use
Choosing the right iPhone involves considering various factors. Ensuring alignment with your preferences, needs, and budget is crucial. It requires evaluation of these aspects and conducting comprehensive research. This will enable you to confidently make a knowledgeable choice. Below, discover some helpful tips and tricks to aid in choosing the ideal iPhone:
1. Identify Your Priorities
Determine what matters most to you in an iPhone model. Are you more focused on camera quality, battery life, processers, or other features? Gaining clarity on your priorities will assist in focusing your choices.
2. Consider the Latest Models
Apple releases new iPhone models annually. Consider the latest offerings, as they often feature upgraded hardware. This includes improved cameras, better battery life, and new features.
3. Budget Consideration
Set a budget range for your new iPhone. Apple provides a range of models available at diverse price tiers. These range from flagship iPhones to more budget-friendly options. Consider your budget while weighing the features you need.
4. Size and Display Preferences
iPhones come in different sizes, from compact models like the iPhone 15 to larger models like the iPhone 15 Pro Max. Consider the screen size of your iPhone that suits your preferences. It also depends on if you prefer a more pocket-friendly device or a larger display.
5. Camera Capabilities
If photography holds significance for you, examine the camera capabilities. Seek out attributes such as multiple lenses, improved low-light performance, and advanced camera functionalities.
6. Consider Future Updates and Longevity
Opt for the latest Apple device, as the company provides software updates for its products over an extended period. Selecting a model with longer update support ensures that your device stays compatible with the latest software and features.
Conclusion
In conclusion, knowing how to transfer data from Apple iPhone 12 mini to iPhone is crucial for a smooth transition. While Apple’s native methods offer reliability, limitations exist. For an efficient, one-click alternative, Wondershare Dr.Fone stands out. Its comprehensive device-to-device transfer and versatile features make it the ideal choice. Embrace Dr.Fone for a hassle-free iPhone data transfer experience. Moreover, you can transfer between iOS devices without erasing the current data.
How To Transfer Data from Apple iPhone 12 mini to New iPhone 15
Upgrading to a new iPhone 15 is always an exciting prospect. However, the thought of transferring all your data from your Apple iPhone 12 mini to the new iPhone 15 model might seem like a daunting task. Luckily, there is no need to worry, as this guide will resolve all your concerns on how to transfer to the new iPhone 15.
In this detailed article, we explore the process of transferring data from an old iPhone to a new one. Our step-by-step approach will equip you with the knowledge to move your valuable data.
Part 1: Why Should You Shift From Your Apple iPhone 12 mini to iPhone 15?
In the realm of smartphones, change is not just inevitable; it’s a constant. With the unveiling of the iPhone 15, Apple once again beckons users to take a leap forward. However, you might be wondering why you should bid farewell to your Apple iPhone 12 mini . The answer lies in the myriad of improvements and features that the iPhone 15 brings to the table. Some of these are summarized below:
1. Cutting-Edge Technology
The iPhone 15 is an example of Apple’s commitment to pushing the boundaries of technology. It offers advancements in processing power, camera capabilities, and display technology. This new iPhone promises to redefine what a smartphone can do.
2. Enhanced Camera Systems
For photography fans, the iPhone 15’s camera system is nothing short of revolutionary. From improved low-light performance to detailed zoom capabilities, it reaches a whole new level of quality.
3. Seamless Connectivity
The new iPhone 15 comes integrated with 5G technology. This ensures that you’ll be at the forefront of high-speed connectivity. You can say goodbye to buffering and lag because iPhone 15 promises smoother streaming, faster downloads, and a more responsive online experience.
4. Extended Software Support
With every new iPhone iteration, Apple launches its latest iOS firmware. Upgrading to the iPhone 15 means enjoying the latest iOS 17 updates. It also means getting security enhancements for years to come.
Part 2: How To Transfer Apple iPhone 12 mini iCloud Backup to iPhone 15?
Transitioning to the new iPhone 15 is an exciting experience. It means you need to ensure that your data seamlessly makes the journey to the new iPhone 15. Apple provides a convenient way to transfer your data in the form of iCloud. You can create an iCloud backup of your old device and restore it to the new one. Use the following guide to transfer to iPhone 15 with iCloud:
- Step 1: On your Apple iPhone 12 mini , navigate to “Settings,” tap on your Apple ID, select “iCloud,” and then “iCloud Backup.” Here tap “Back Up Now” to create an iCloud back of your iPhone data.
- Step 2: Power on your iPhone 15 and follow the setup prompts until you reach the “Apps & Data” screen. Then, proceed with the “Restore from iCloud Backup” feature and sign in using your Apple ID credentials.
- Step 3: A list of available iCloud backups will appear on the screen. Here you need to select the most recent backup from your Apple iPhone 12 mini . Keep in mind that a reliable Wi-Fi connection is essential for a smooth and speedy transfer.

Part 3: How To Transfer Apple iPhone 12 mini Data Directly to iPhone 15?
While iCloud offers a seamless way to transfer data, some users prefer a more direct approach. It is especially if internet connectivity is limited or they want to hurry the process. Luckily, Apple provides a method to transfer data directly from your Apple iPhone 12 mini to the new one. It is commonly referred to as the “Quick Start” method, and you can use it by following these steps:
- Step 1: Before initiating the transfer, ensure that your Apple iPhone 12 mini is on the latest version of iOS. You will also need to turn on Bluetooth and Wi-Fi on the old iPhone. Power on both your Apple iPhone 12 mini and your new iPhone 15 and place them side by side.
- Step 2: A pop-up will appear on your Apple iPhone 12 mini , asking if you want to use your Apple ID to set up your new device. Confirm this action by tapping “Continue.” Your iPhone 15 will generate dynamic animation, which the old iPhone needs to capture through its camera.
- Step 3: This animation contains security information and establishes a connection between devices. On the new iPhone, you will be required to provide the old phone passcode. Enter the passcode and log in using your Apple ID. Subsequently, select “Transfer from iPhone” and patiently await the process to finish.
Part 4: How To Transfer Apple iPhone 12 mini iTunes/Finder Backup to iPhone 15?
Looking for a more hands-on approach to data transfer? Using iTunes/Finder can be an effective way in this scenario. It is a recommended way if you have larger backups stored on your computer. To migrate your data from an old iPhone to the new iPhone 15 with iTunes/Finder, you can use the following steps:
- Step 1: Make sure you have the latest version of iTunes/Finder installed on your computer. First, connect your Apple iPhone 12 mini to the computer and create a backup through the “Summary/General” tab. After the backup has finished, proceed to disconnect the old iPhone.
- Step 2: Now start setting up the new iPhone 15 and navigate to the “Apps & Data” screen. Here, choose “Restore from Mac or PC” and connect the Apple iPhone 12 mini device to the computer or MacBook with backup.
- Step 3: Launch iTunes/Finder on the computer after trusting the Apple iPhone 12 mini device and tap the “Device” icon. Then, from the “Welcome to Your New iPhone” screen, enable the “Restore from this backup” option and choose your Apple iPhone 12 mini backup file. Afterward, press the “Continue” button to restore the old iPhone backup to your iPhone 15.

Bonus Tips: Having Trouble When Transferring to iPhone 15 Stucks?
The issue of iPhone 15 getting stuck when users attempt to transfer data from their older devices, like the iPhone 14, to the new iPhone 15 has become a frustrating challenge for many Apple enthusiasts. This problem often arises due to the complex nature of data migration and the high expectations associated with Apple’s seamless ecosystem. When attempting to transfer photos, apps, contacts, and other vital information, users may encounter lengthy delays, frozen screens, or failed transfers.
The possible reasons could be:
- ·Software glitches
- ·Insufficient storage space
- ·Incompatible iOS versions between the old and new devices
The impact of this issue extends beyond mere inconvenience, as it can result in data loss or a less-than-optimal out-of-the-box experience with the latest iPhone. Addressing this problem, you may try:
- ·Updating both devices to the latest iOS version
- ·Ensuring sufficient storage
- ·Seeking assistance from Apple Support
- ·Authorized service providers when necessary
Or, you can also try to ask for help from a third-party application, Dr.Fone - Phone Transfer is always at your service. Dr.Fone - Phone Transfer offers a reliable solution to the iPhone data transfer problem. This user-friendly software is designed to simplify the migration process, making it hassle-free for iPhone users. Here are the steps to get you started:
Step 1 Launch Phone Transfer Tool
Initiate the process by launching Wondershare Dr.Fone on the computer. Continue from Toolbox > Phone Transfer to redirect towards opening the particular tool.
Step 2 Set Data Transfer Path
On accessing the Phone Transfer tool, continue to connect your iOS devices and let them load their data on the next screen. Here, define the Source and Destination of the transfer to specify the direction of the phone transfer. To change locations, use the Flip button on the top.
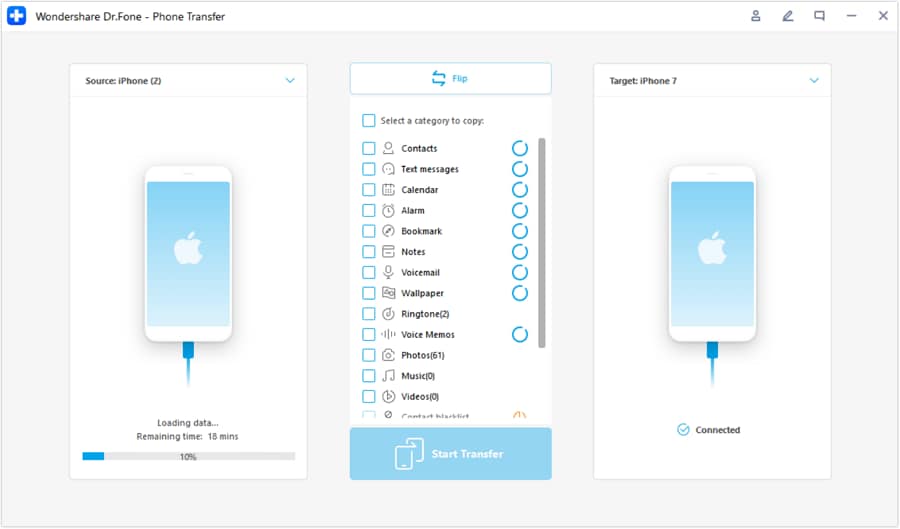
Step 3 Choose Data Types
After successfully determining the source and destination, select the specific data types you want to transfer. Checkmark all data and select Start Transfer to proceed with the operations.
Step 4 Turn Off Find My Feature
Once done, a prompt appears on the front asking to turn off the Find My feature on iOS devices. Open the Settings of the iOS device and proceed further by tapping on the name at the top. Continue from iCloud > Find My feature and turn it off.
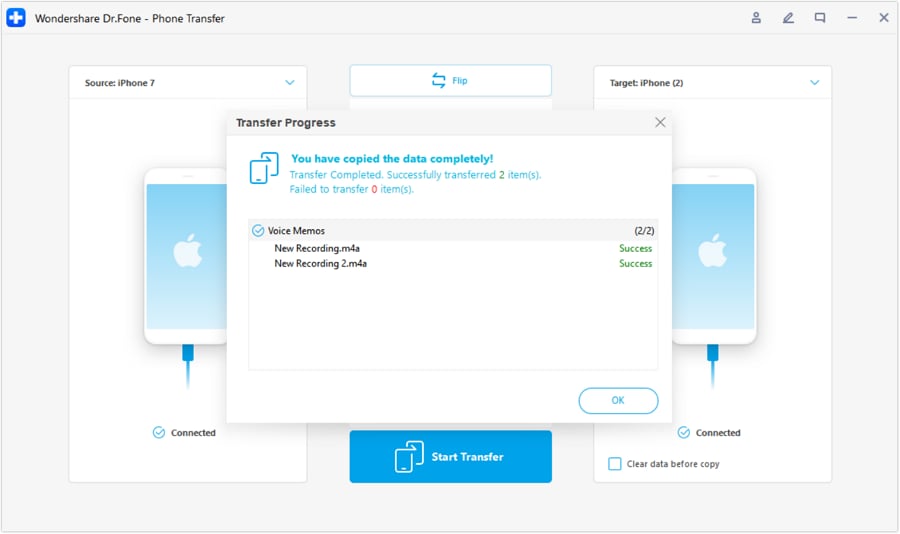
Step 5 Complete Your Transfer
Once done, the window in the front shows the completed phone transfer. Click OK to conclude the process entirely.
Conclusion
In summary, we’ve explored various methods to iPhone 15 transfer data. These ranged from iCloud to direct device-to-device transfers and iTunes/Finder. Each method offers its own advantages, catering to different preferences and circumstances.
However, one solution that truly stands out for its speed, ease, and efficiency is Wondershare Dr.Fone. It provides a fast and direct solution for transferring your data between your Apple iPhone 12 mini and the iPhone 15.
Various Methods to Transfer Pictures from Apple iPhone 12 mini to PC
Capturing life’s precious moments on the latest Apple iPhone 12 mini is a joy in itself. However, transferring them to a PC becomes essential when it comes to organizing, editing, or sharing those photos. That’s why mastering the art of transferring images between devices is a skill worth possessing.
It can be helpful in creating backups, freeing up storage space, and more. In this article, we will describe how to transfer photos from Apple iPhone 12 mini to a PC. It will explore step-by-step guides and tips for accommodating different preferences and comfort levels.
Part 1: How To Transfer Photos From Apple iPhone 12 mini to PC With Windows Features
With the Apple iPhone 12 mini ‘s advanced camera, capturing life’s beautiful moments is second nature. On the other hand, Windows OS has long been the backbone of personal computing. They come equipped with a range of tools to make the photo transfer process smooth and efficient. Explained below are two of the common method to import photos from Apple iPhone 12 mini to PC:
Method 1: File Explorer
When it comes to simplicity and direct control, File Explorer stands out as an excellent option. It is a steadfast companion for transferring photos from your Apple iPhone 12 mini to your Windows PC. This method gives you the freedom to navigate through your device’s internal storage.
Moreover, you can select the images you desire and move them to your computer. Follow these straightforward steps to harness the power of File Explorer:
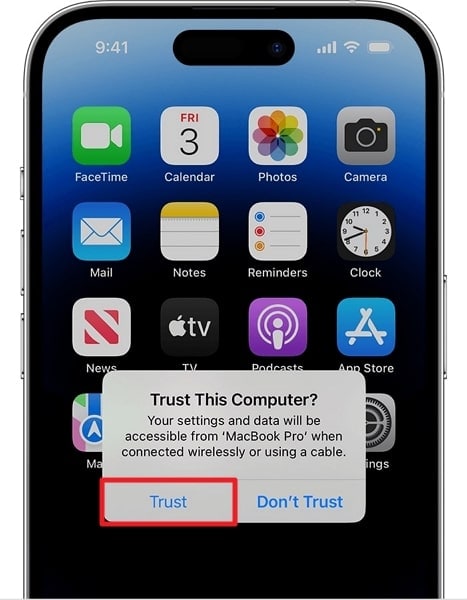
- Step 1: Begin by connecting your Apple iPhone 12 mini to your Windows PC using an Apple-certified USB cable. Ensure that your iPhone is unlocked, and if prompted, tap “Trust This Computer” on your device’s screen.
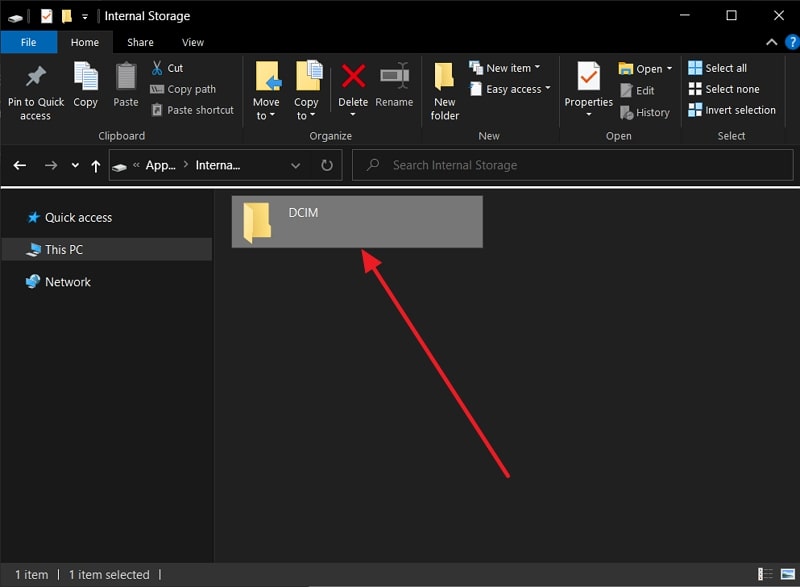
- Step 2: On your Windows PC, press the “File Explorer” icon on your taskbar. In the left-hand panel of File Explorer, locate and click “This PC.” Your connected Apple iPhone 12 mini should appear under the “Devices and Drives” section.
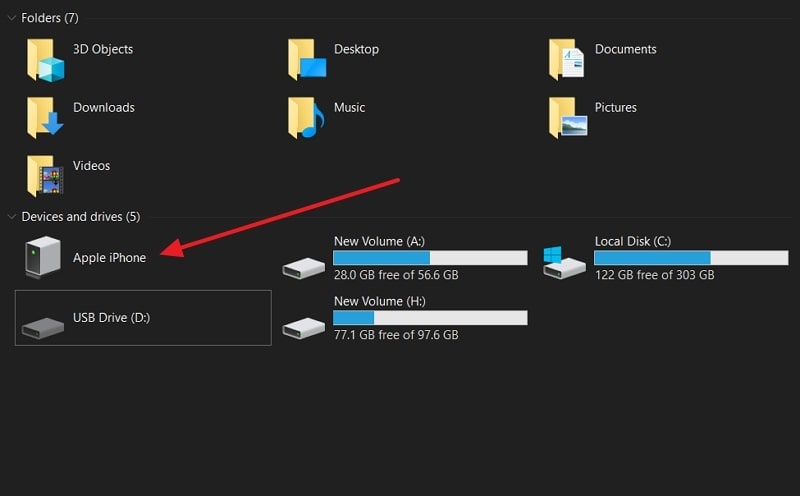
- Step 3: Here, double-click on your iPhone’s icon to access its internal storage. Most of your iPhone’s photos are stored in the “DCIM” folder. Browse the folder to select photos you want to move and copy them to your desired location.
Method 2: Photos App
Available in Windows 10 and later, the Photos app is a prime example of this convenience. It provides an elegant solution for transferring photos from your Apple iPhone 12 mini to your PC. Using this app, you can directly import photos and videos from your iPhone to the computer. Follow these simple instructions to utilize the power of the Photos app to learn how to transfer photos from Apple iPhone 12 mini to PC:
- Step 1: Connect your Apple iPhone 12 mini to your Windows PC using a USB cable, and if prompted, tap “Trust This Computer.” On your Windows PC, locate and open the “Photos” app.

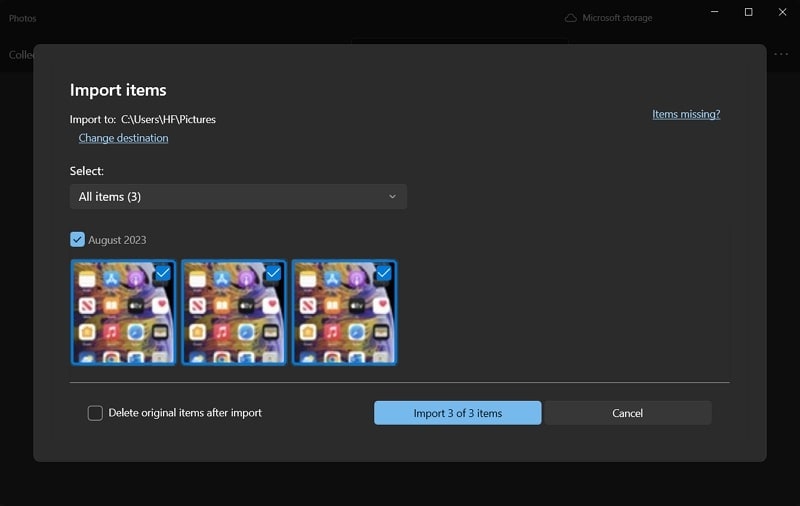
- Step 2: In the Photos app, click on the “Import” button located in the top-right corner. From the available options, choose “From a connected device” and select your iPhone. The Photos app will display the photos on your Apple iPhone 12 mini that are available for import. After selecting the images, select an existing folder or create a new one for the imported photos.
Part 2: How To Transfer Photos From Apple iPhone 12 mini to PC With Cloud Storages
Cloud storage offers a bridge between devices that goes beyond physical limitations. It lets you move photos from your Apple iPhone 12 mini to your desktop computer. This section will explore some of the popular cloud storage platforms since both of them offer their unique set of features and advantages. Described below are two cloud storage services to import photos from Apple iPhone 12 mini to PC:
Method 1: iCloud
iCloud is Apple’s cloud storage service which seamlessly knits together the Apple ecosystem. It offers a harmonious blend of convenience and synchronization. The iCloud interface is intuitive and clean, making it accessible to all individuals. With iCloud, you can easily access your photos across devices in the Apple ecosystem. Use the following steps to transfer photos from Apple iPhone 12 mini to PC via iCloud:
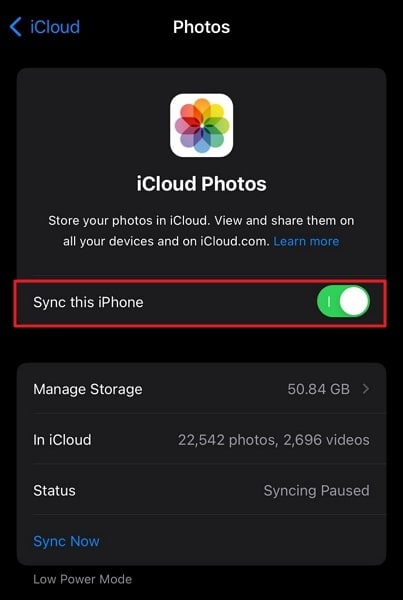
- Step 1: On your Apple iPhone 12 mini , go to “Settings” and tap on your Apple ID. There, select “iCloud,” tap “Photos,” and toggle on “Sync This iPhone” on the next screen. This uploads your photos to iCloud.
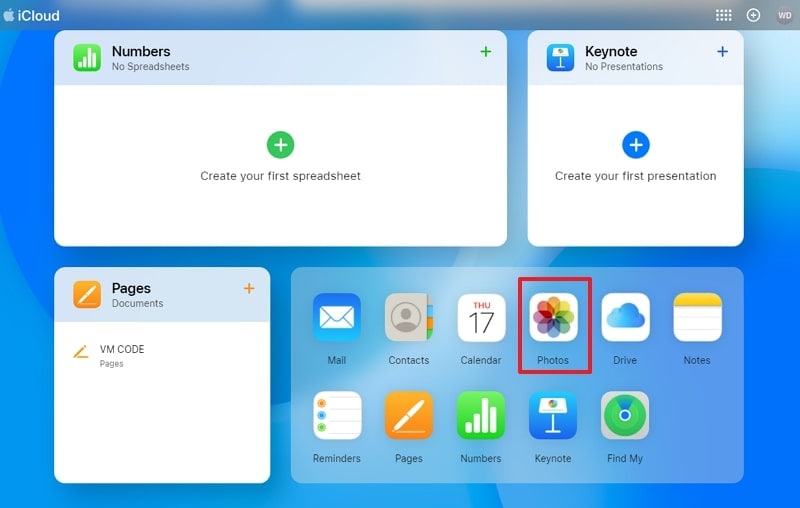
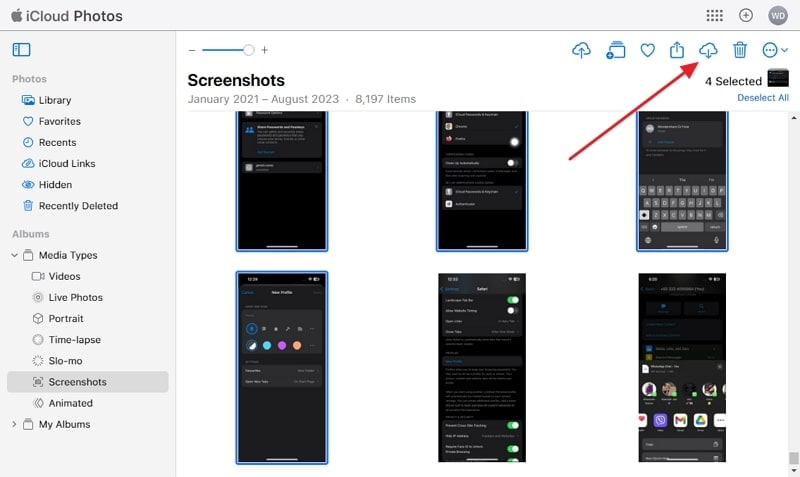
- Step 2: Move to your computer and on your Windows PC, open a web browser, and go to the iCloud website. Log in with your Apple ID and password and click the “Photos” icon to access your iCloud Photo Library.
- Step 3: Browse your photos and select the ones you want to transfer to your PC. Click the “Download” icon (cloud with arrow) to download the selected pictures to your PC.
Pros
- iCloud can automatically back up your photos, ensuring that your memories are safeguarded in the event of device loss or damage.
- Your photos are accessible not only on your PC but also on your other Apple devices.
Con
- The provided 5GB of free cloud storage falls significantly short of meeting the requirements for adequate data backup.
Method 2: Google Drive
In the vast realm of cloud storage solutions, Google Drive emerges as a universal storage for storing data. It is accessible on a multitude of devices and operating systems. This enables easy photo transfer between various platforms. You get 15GB of free storage with Google Drive to store and transfer your data. The steps needed to transfer photos from Apple iPhone 12 mini to PC are given below:
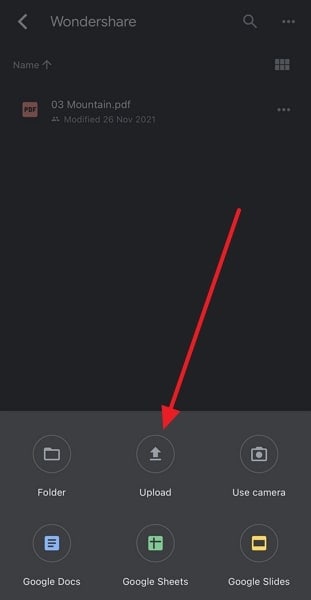
- Step 1: Download the Google Drive app from the App Store and log in using your Google account credentials. Tap the “+” button and select “Upload” to add the targeted photos to Google Drive.
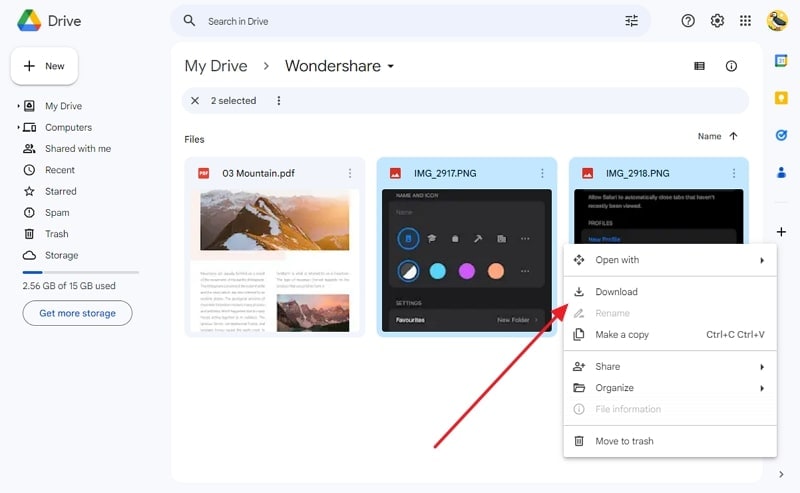
- Step 2: Once photos are uploaded, move to your PC and open Google Drive using a web browser. Locate the folder where you uploaded the pictures from your Apple iPhone 12 mini . Select the photos, right-click, and choose “Download” to initiate the download process.
Pros
- Google Drive permits offline access to your synced photos, even without a constant internet connection.
- It allows you to selectively share photos and albums with specific individuals.
Con
- Unlike iCloud, which automatically backs up photos, you have to upload all images manually to Google Drive.
Part 3: The Best iOS Management Tool To Transfer Photos From Apple iPhone 12 mini to PC
Wondershare Dr.Fone is the ultimate iOS management tool. It promises a harmonious blend of innovation, user-friendliness, and efficiency. This tool is a solution designed to bridge the gap between Apple iPhone 12 mini and PC. It offers a comprehensive suite of features beyond photo transfer, making it a one-stop solution for managing your Apple iPhone 12 mini data. With it, you can transfer data, get device details, view verification reports, and more.
Wondershare Dr.Fone also serves as a great tool to back up your data to your computer. It allows you to create wireless auto-backups on your computer. This backed-up data can be quickly restored to your device at any time. Furthermore, this tool also offers a dedicated iCloud manager to manage your iCloud data.
Key Features of Wondershare Dr.Fone
- If you want to sell your Apple iPhone 12 mini , then with the help of Wondershare Dr.Fone Anti-Recovery Mode, you can ensure that your data is erased properly.
- There is no need to jailbreak your iOS device for updating or downgrading it with the help of Wondershare Dr. Fone.
- Fone is designed so that even a layman can use it easily to manage his iPhone without any technical skill.
- You can use Wondershare Dr.Fone for almost all iOS versions and devices, including iPhone and iPod Touch.
Straightforward Step-by-Step Guide To Transfer Photos From Apple iPhone 12 mini to PC With Wondershare Dr.Fone
Transferring photos from Apple iPhone 12 mini to PC is a breeze with Wondershare Dr.Fone. Follow these steps to finish the transfer procedure:
- Step 1: Choose Export All Data in Wondershare Dr.Fone
With Wondershare Dr.Fone installed on your computer, connect to your Apple iPhone 12 mini . Once the Apple iPhone 12 mini device is detected, tap the Apple iPhone 12 mini device from the left sidebar and click “Export All Data.”

- Step 2: Select Photos for Transfer
Here you will be asked to choose the data you want to export. Select “Photos” and any other data you want to transfer. Once you click “Export,” Wondershare Dr.Fone will ask you to create a password for the backup.

- Step 3: Complete the Photo Transfer Process
Click “Verify” once you have created the process to start the transfer process of photos. The process will require a certain amount of time to finish. Once it is completed, you can click “Open in Folder” to view the backed-up data.

Conclusion
In our journey to uncover the most effective method for how to transfer photos from Apple iPhone 12 mini to PC, we’ve explored a myriad of options. Each method offered a unique blend of convenience and functionality. Among these, one solution stands out as a true game-changer: Wondershare Dr.Fone. As we conclude our guide, we wholeheartedly recommend Wondershare Dr.Fone as the ultimate iOS management tool.
It bridges the gap between devices with unparalleled features. Dr. Fone’s capability to transcend the realm of mere photo transfer sets it apart. Its comprehensive suite of features empowers you to manage your Apple iPhone 12 mini ‘s data with ease.
Also read:
- [New] In 2024, The Best Equipment for Precise Zoom Recording
- 2024 Approved Unleashing Creativity with TikTok Video Tricks
- 5 Tutorials on How to Transfer Photos From Apple iPhone 12 Pro Max to New iPhone | Dr.fone
- 5 Ways to Send Ringtones from Apple iPhone XR to iPhone Including iPhone 15 | Dr.fone
- Easy Methods How To Transfer Pictures From Apple iPhone 14 Pro Max to PC | Dr.fone
- Easy Methods to Incorporate Subtitles on Vimeo for 2024
- Effortless Steps to Stop Windows 11 From Constantly Rebooting
- How to Transfer Apple iPhone 13 mini Data to iPhone 12 A Complete Guide | Dr.fone
- How to Transfer from Apple iPhone 11 Pro to iPhone 8/11/11 Pro | Dr.fone
- In 2024, 5 Ways to Send Ringtones from Apple iPhone XS to iPhone Including iPhone 15 | Dr.fone
- In 2024, Easy Methods How To Transfer Pictures From Apple iPhone 14 to PC | Dr.fone
- Logitech G35 Driver Setup: Compatible with Windows Vista, 7, 8 & 10 - Download Now
- Must-Know Windows 11 Tips and Tricks
- Overcoming the Left Vs. Right Click Discrepancy: Solutions for Windows 11 Users
- Realme Data Recovery – recover lost data from Realme GT 5 (240W)
- Screen Streaming Showdown Face Off Between OBS & ShadowToolKit
- Title: Solved How To Transfer From Apple iPhone 12 mini to iPhone 15 | Dr.fone
- Author: Charlotte
- Created at : 2025-02-16 17:11:52
- Updated at : 2025-02-19 20:52:06
- Link: https://iphone-transfer.techidaily.com/solved-how-to-transfer-from-apple-iphone-12-mini-to-iphone-15-drfone-by-drfone-transfer-from-ios/
- License: This work is licensed under CC BY-NC-SA 4.0.