
Refurbished Apple iPhone 8 Everything You Need to Know | Dr.fone
Refurbished Apple iPhone 8: Everything You Need to Know
Are you planning to buy a new Apple iPhone 8 but feeling a pinch in your wallet? Have you ever wondered if there is a more affordable way to own the latest iPhone? If yes, then you are at the right place.
You must be familiar with the idea of recycled furniture and clothes, but not many of us like the idea of second-hand phones. However, like clothing and furniture, phones can also get repaired and given a whole new life. So, why not consider this option?

In this article, you will explore all about refurbished iPhones. What are they, and how they can be a budget-friendly alternative? We will answer everything you need to know.
But before starting, let’s shed some light on what refurbished iPhones actually are because some people aren’t aware of this term.
Part 1. What does a Refurbished Apple iPhone 8 mean?
Before going further, let’s clarify what exactly a refurbished Apple iPhone 8 is. In simple words, you can say that it is a device that has gone through a series of checks and repairs. So that it can work the same way as a brand-new Apple iPhone 8 does. If everything is done correctly, you can expect the same level of efficiency as one bought straight from the store.
When making a purchase, check the Apple iPhone 8 device to see if all its functions are working. Many times, the repairing process doesn’t go well. It results in causing some of the Apple iPhone 8 device’s functions to stop. Moreover, it’s also important to consider the source of the refurbished iPhone. You need to buy it from a trusted seller.
Let’s shed some light on the benefits of buying a refurbished or second-hand iPhone.
Part 2. What are the Benefits of Buying a Refurbished iPhone?
No doubt, refurbished iPhones are the same as the new ones. So, you will enjoy all the benefits that come with the brand-new Apple iPhone 8 at a lower price. If you are fine with a few scratches, refurbished iPhones have a lot more to offer you. The benefits of buying a used Apple iPhone 8 are as follows:
- Cost Savings
One of the major benefits of purchasing a refurbished Apple iPhone 8 is the cost savings. These devices are more affordable than brand-new ones. You can enjoy the latest features without breaking the bank.

- Quality Assurance
Refurbished iPhones are carefully inspected and tested to ensure that they meet Apple’s high standards. They are also thoroughly repaired and cleaned. Often, a refurbished Apple iPhone 8 will look and perform like a new iPhone.
- Environmental Friendly
When you get a refurbished item, you’re giving it a longer life. This means fewer iPhones end up in the trash, and that’s awesome for our planet. So, be eco-friendly and choose a refurbished iPhone.

- Warranty and Support
If you get a refurbished Apple iPhone 8 from Apple, you get a one-year warranty. You also get 90 days of free technical support. So, this warranty provides you peace of mind, just like you get when you buy a new iPhone.
- Miscellaneous Benefits
Refurbished iPhones are usually available in a variety of models. They also come with the latest software updates so that you can enjoy the newest features. These phones are reliable; you can trust that they will perform well.
Well, we have explored the benefits, but is it safe to buy a refurbished iPhone? Let’s find out!
Part 3. Is It Safe to Buy a Refurbished iPhone?
Safety is a natural concern when buying a pre-owned iPhone. You might wonder if it is a gamble or a secure choice. The answer is that it can be very safe. However, there are a few things that you should consider before making a purchase. If you are buying it from a retailer or third-party source, make sure that they are doing refurbishing in-house. If they are outsourcing it, then it will be less secure.
On the contrary, if you are buying a refurbished Apple iPhone 8 from a private seller, make sure that it’s not a scam. You can take someone who has tech knowledge. Otherwise, make sure that he is offering you a warranty period.
It is always suggested to buy second-hand things, especially tech related, from a legitimate source. If you are about to buy a used iPhone, make sure to follow the factors discussed in the next section.
Part 4. Factors to Consider Before Buying a Refurbished iPhone.
Before you purchase a refurbished iPhone, there are several factors to consider. These factors will help you make the right decision. They will also help to ensure that the Apple iPhone 8 device meets your needs and expectations. The factors that you should consider are as follows:
- Seller Reputation
Before you buy, do some homework on the seller. Go for the big names. They may include Apple’s official refurbishment program, authorized sellers, or trusted online markets.
Compatibility
Ensure the used Apple iPhone 8 you are thinking of buying is compatible with your carrier and region. Different models may not support all networks.
Storage
Choose the Apple iPhone 8 model and storage capacity that best suits your needs. Consider your usage and how much storage you need for apps, photos, and videos.
Warranty Coverage
Check the warranty that comes with the refurbished iPhone. It offers protection in case of unexpected problems. Be aware of the warranty’s duration and what it covers.
Condition and History
Ask questions about the phone’s condition and history. An honest seller would be willing to share everything about any prior issues and the refurbishment process.
Return Policy
Another critical factor is the returns policy. Without the right to return, you might end up with a malfunctioning phone. The duration of the returns policy matters as well.
Original Accessories
Find out if the refurbished Apple iPhone 8 comes with any essential accessories, such as a charger and headphones. Some listings may include these items, while others may not.
Price Comparison
Compare prices among different sellers to ensure you’re getting a competitive deal. Keep in mind that exceptionally low prices may be a red flag.
By considering these factors, you can make the right decision when buying a refurbished iPhone. In the next section, you will explore where you can buy second-hand iPhones.
Part 5. Your One-Stop Solution - Dr.Fone
If you have planned to buy a refurbished iPhone, you must be wondering how to transfer your essential data to your new phone. This is where Dr.Fone comes into play. It is a reliable and powerful tool developed by Wondershare. With this tool, you can transfer your data in just a few clicks.

Dr.Fone’s features are not just limited to transferring your data. There are plenty of other features that can enhance the performance of your iPhone. The best part? It has a user-friendly interface that simplifies all the processes. You can navigate to different features and use them without any tech knowledge.
Key Features of Dr.Fone
Some of the key features of Dr.Fone are as follows:
Data Recovery: Dr.Fone offers a data recovery feature for iOS and Android devices. It helps you retrieve lost or deleted data, including contacts, messages, photos, videos, and more.
Data Transfer: It enables seamless data transfer between different devices. You can easily move data between phones and switch between iOS and Android devices.
System Repair: This feature allows you to fix various iOS and Android system issues. You can fix black screens, boot loops, and more without data loss.
Screen Unlock: It can also help you unlock your device’s screen. Whether you’ve forgotten the password or encountered any other issue, you can easily regain access to your phone.
WhatsApp Transfer: Dr.Fone also enables you to transfer WhatsApp data. You can transfer Whatsapp chats and attachments between iOS and Android devices.
Data eraser: Dr.Fone offers a secure way to delete data from your device permanently. It ensures that it cannot be recovered by any means.
Now that you have been captivated by its features, you must be wondering how to use Dr.Fone. Well, let’s move forward to it!
Steps to Transfer Data Using Dr.Fone
Before starting, download and install the Dr.Fone app on your computer. Then follow the instructions given below:
- Step 1:
Connect your iOS devices (source and target) to your PC via a lightning cable or WiFi. Then, launch the Dr.Fone app and select “Toolbox” from the left side menu.

- Step 2:
Once the Apple iPhone 8 devices are connected, wait and let them load their data. Then, specify the “Source” and “Target” of the data transfer. You can also flip the locations by clicking the “Flio” button.
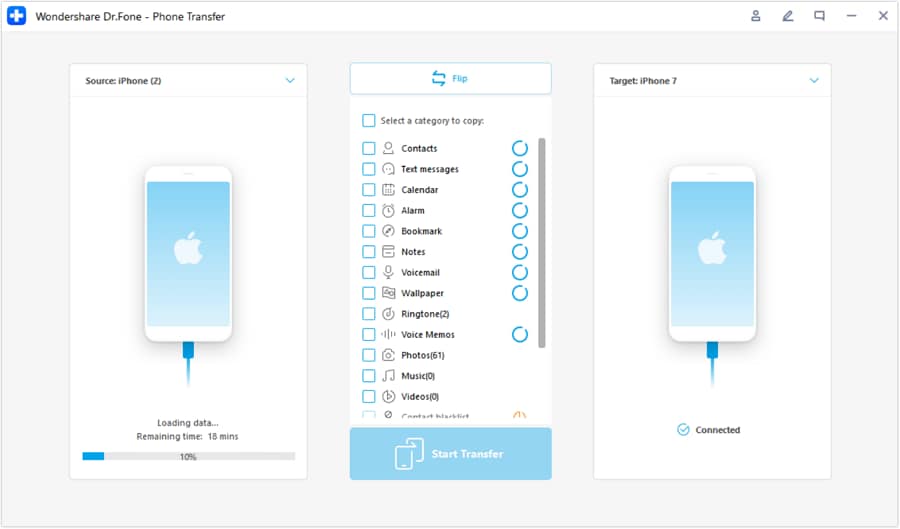
- Step 3:
Now, select the specific data types you want to transfer to your refurbished iPhone. Checkmark all data and select “Start Transfer” to proceed further.

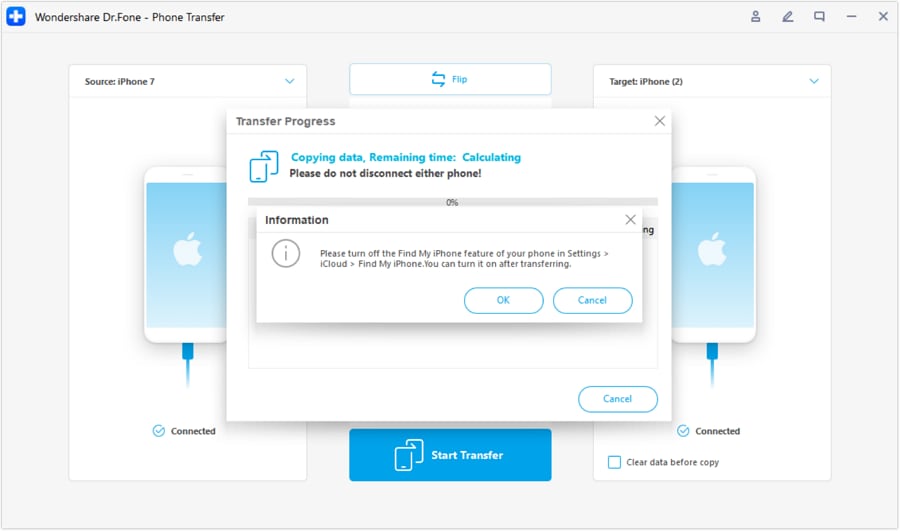
- Step 4:
Once done, you will see a pop-up asking to turn off the Find My feature on iOS devices. Go to “Settings” on the iOS device and click the Apple iPhone 8 device’s name at the top. Then, click “iCloud” > “Find My” feature and turn it off.
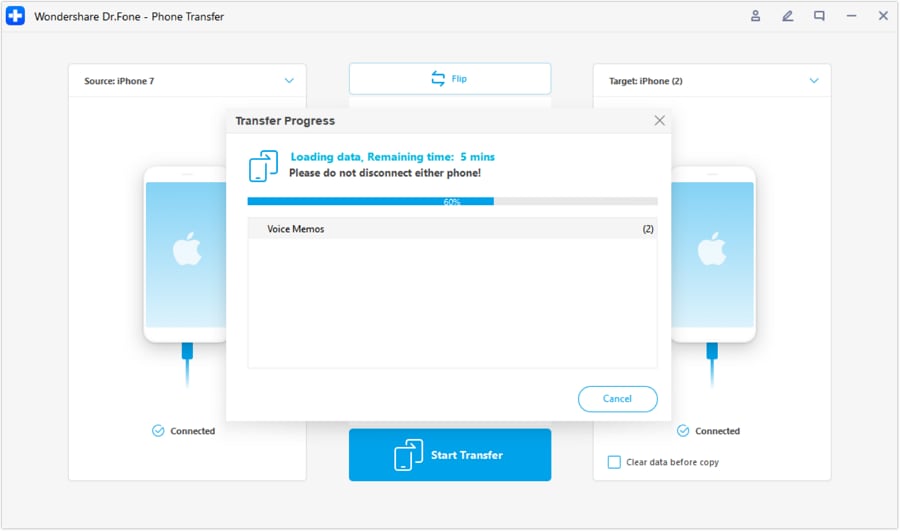
- Step 5:
Once you turn off the feature, the data transfer process will begin. You will also see the progress bar displaying the completion of the process.
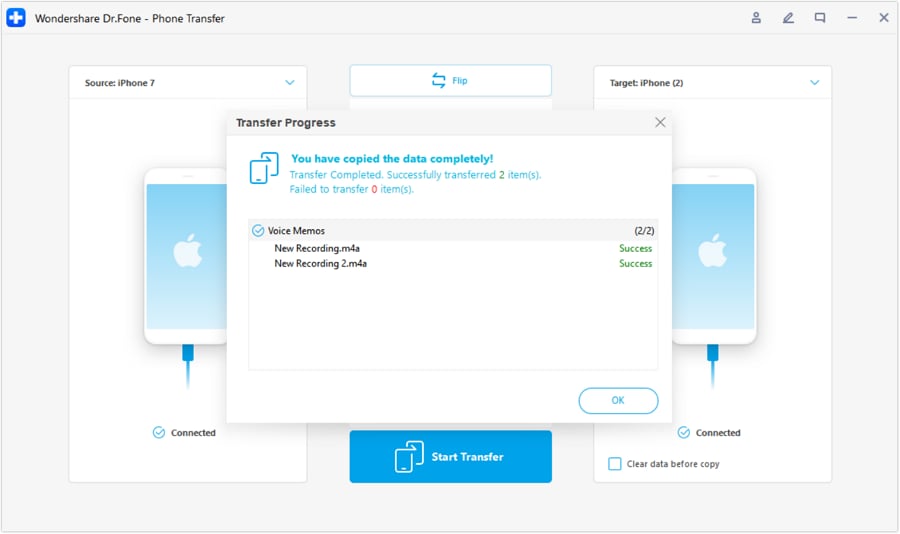
- Step 6:
Once completed, you will see the interface as shown below. Click “OK” to conclude the process entirely.
Similarly, you can also transfer data from Android to Apple iPhone 8 and Apple iPhone 8 to Android. There’s no need to try complex methods when you have Dr.Fone just a click away.
FAQs
1. Can I return a refurbished Apple iPhone 8 if I’m not satisfied with it?
Return policies vary by seller. However, It’s essential to understand the return policy of the seller you choose. It will ensure that you have the option to return the Apple iPhone 8 device if it doesn’t meet your expectations.
2. What’s the difference between a certified refurbished Apple iPhone 8 and a regular refurbished iPhone?
A certified refurbished Apple iPhone 8 is refurbished and certified by the manufacturer. These devices come with a manufacturer’s warranty. Moreover, they are known to be of higher quality compared to non-certified ones.
3. Can I get the latest iOS updates on a refurbished iPhone?
Refurbished iPhones come with the latest iOS software installed. They ensure that you have access to the newest features and security updates.
Final Thought
So, buying a refurbished Apple iPhone 8 is a wise way to get a good-quality Apple iPhone 8 at a lower cost. To make sure you’re getting a good deal, choose trusted sellers and understand the warranty and return policies.
By doing your homework and picking a reliable seller, you can make a safe and money-saving choice. Plus, you’ll be helping the environment by giving a second life to a functional device. It’s a win-win!
However, don’t forget to download Dr.Fone ! It is going to be very helpful to transfer and manage data on your new iPhone.
5 Tutorials on How to Transfer Photos From Apple iPhone 8 to New iPhone
When it comes to camera systems, the iPhone is certainly ahead of others. It has high-performing lenses and professional camera features that support various photography styles. For instance, you may use the Priotize Faster Shooting option to capture multiple photos at a time. Another thing is that you may enable Action Mode when shooting videos to keep the frame stable throughout the duration. Simply put, you can surely do a lot of things using your iPhone camera
Let’s say you’re planning to share your stunning snaps and footage with others. Is it possible to facilitate the transfer with little to no effort? The short answer is absolutely yes. There are many easy ways to move your media files between two iPhones. In no time, you can surely find the best tutorial on how to transfer photos from Apple iPhone 8 to iPhone. Just choose one that matches perfectly your current situation.
In this article, we will talk about the iPhone’s Shared Album feature and its main benefits to users. We will also provide some tutorials on how to transfer pictures from Apple iPhone 8 to iPhone quickly and easily. Continue reading below to learn more.
Everything You Need to Know About Shared Album
The Photos mobile application on iOS devices is a very powerful gallery software. It provides numerous options to help you organize and manage all your media files in one place. When it comes to data transfer, Photos offers users some channels to facilitate such procedures. One of which is through the syncing feature called Shared Album. It’s basically an ordinary folder where you can move and store your media files. But as the name suggests, you can share this folder with others by simply granting them access to it. Don’t worry. Your Shared Albums remain private on the platform. Only the people you add as subscribers can view its content and make changes. Therefore, the Shared Album feature is the best answer to the question: “How to transfer photos from Apple iPhone 8 to iPhone.”
It’s true to say that Shared Album is a great iOS feature. However, it’s important to point out that it also has a few limitations. First on the list is the type of files supported by this feature. For images, Shared Album is compatible with photos in HEIF, JPEG, RAW, PNG, GIF, and TIFF formats. On the one hand, video formats supported by Shared Album include HEVC, MP4, QuickTime, H.264, and MPEG-4. Another thing to consider is the capacity of the Shared Album folder. By default, you can only store up to 5000 photos or videos in the album.
Do you find Shared Album a useful tool, though? If so, here are the tutorials on how to activate this feature and create one in the Photos app.
How to Activate Shared Album?
Here’s how to activate Shared Album on Settings.
- Step 1: Go to Settings.
- Step 2: Click your Apple ID Profile.

- Step 3: Click iCloud.
- Step 4: Click Photos.

- Step 5: Toggle on the radio button next to Shared Albums.

How to Create Shared Albums in Photos
Here’s how to create Shared Albums in Photos.
- Step 1: Go to the Photos.
- Step 2: Click the Album tab.
- Step 3: Click the + icon at the top-left corner of your screen to add a new folder.

- Step 4: Click New Shared Album.

- Step 5: Rename the Shared Album and then click Create.
How to Transfer Photos From Apple iPhone 8 to iPhone in Easy Steps?
Undoubtedly, the Shared Album feature is a very convenient way to move media files from one iPhone to another. Imagine all you have to do is consolidate all the files in a Shared Album folder and add subscribers. From there, you can easily access the album on multiple iOS devices and download the files. But it’s important to note that there are other photo transfer methods you can try apart from using Shared Album. Check out the 5 tutorials below on how to transfer photos from Apple iPhone 8 to iPhone.
Method 1: Transfer photos from Apple iPhone 8 to iPhone by enabling iCloud photos
How do I transfer photos from Apple iPhone 8 to iPhone? Well, the easiest way is to sync the photos to iCloud and enable the iCloud photos on both devices. Don’t worry. It’s very easy to set up. Here’s how to transfer photos from Apple iPhone 8 to iPhone using iCloud.
- Step 1: On your device that contains the files, go to Settings.
- Step 2: Click on the Apple ID Profile.
- Step 3: Click Photos.

- Step 4: Toggle on the radio button next to Sync This iPhone. From then on, your iPhone will sync your photos to iCloud.

- Step 5: Do the same series of steps on the other iPhone. Once the synchronization has been completed, open the Photos app. Find the newly synced iCloud photos on the All Photos album.
Method 2: Transfer photos from Apple iPhone 8 to iPhone using AirDrop
If you’re just sending a few pieces of photos, AirDrop is indeed a great transfer medium. It’s basically a wireless sharing option allowing users to send files between two iOS devices. Do you want to try it? Here’s how to transfer photos from Apple iPhone 8 to iPhone using AirDrop.
- Step 1: Toggle on the Wi-Fi and Bluetooth connectivity on both iPhones. After that, find the AirDrop option on the two devices and then switch it on. Choose Everyone.

- Step 2: On the Apple iPhone 8 device that contains the files, go to Photos. Select the images you want to transfer. After that, click the Share button at the bottom-left corner of your screen.
- Step 3: Choose AirDrop.

- Step 4: Select the recipient from the provided list. After that, accept the AirDrop request on the other device.
Method 3: Transfer photos from Apple iPhone 8 to iPhone via Mail
Another reliable method you can try is to email the photos from one iPhone to another. Like AirDrop, it works great if you’re just moving a few bits of files to another device. Don’t work. The process will not take much time. Here’s how to transfer photos from Apple iPhone 8 to iPhone via Mail.
- Step 1: On the Apple iPhone 8 device containing the files, go to the Photos app.
- Step 2: Select the specific photos you want to transfer. After that, click the Share icon at the bottom-left corner of your screen.
- Step 3: Choose Mail among the given options.

- Step 4: Key in the email address of the recipient. Subsequently, click the Send icon.
- Step 5: Open the email on the other iPhone. Then, download the photos sent as email attachments.
Method 4: Transfer photos from Apple iPhone 8 to iPhone using iCloud Link
Let’s say you’re sending one photo to another iPhone user. What is the best transfer option in this case? If you’re currently using iCloud photos might as well send files through the iCloud link. Don’t worry. It’s not that hard to get such details. Here’s how to transfer photos from Apple iPhone 8 to iPhone using the iCloud link.
- Step 1: On the Apple iPhone 8 device where your files are stored, go to the Photos app.
- Step 2: Select the specific group of images you want to transfer. Right after, click the Share icon at the bottom-left corner of your screen.
- Step 3: Scroll down and find the Copy iCloud Link. Click on it.

- Step 4: Share the iCloud link via Messages, Mail, or internet messaging platform. On the other iPhone device, access the link and then download the photos from there.
Method 5: Transfer photos from Apple iPhone 8 to iPhone using Wondershare Dr.Fone
The first four tutorials above on how to transfer pictures from Apple iPhone 8 to iPhone are very easy to follow. But if you wish to explore another convenient option, Wondershare Dr.Fone can help you with that. Its phone transfer feature has a powerful facility that can move your photos and other files between two mobile devices. Here’s how to use it in easy steps.
- Step 1: Download Wondershare Dr.Fone from its official website. Then, install it on your computer.
- Step 2: Open the newly installed software on your desktop. After it fully loads, connect your two iPhones using a data cable.
- Step 3: Access the left-side panel and then click Toolbox. On the main dashboard, click Phone Transfer.
- Step 4: Set the iPhone that contains the photos as the Source and the other iPhone as the Target. Alternatively, click the Flip button to modify the transfer path according to your liking.

- Step 5: Click Photos as the category of the files. Right after, click Start Transfer to proceed.

- Step 6: Wait while Wondershare Dr.Fone is facilitating the transfer. If you wish to terminate the progress, simply click Cancel.

- Step 7: After completing the process, click OK to wrap it up. Check your files from their respective locations afterward.

BONUS TIP: Back Up Your Photos First
The tutorials above on how to transfer all photos from Apple iPhone 8 to iPhone are safe to initiate. You can be sure about that. But as an additional layer of protection, it’s best to back up your iPhone first before the transfer. Don’t worry. Wondershare Dr.Fone. simplifies the backup process for you. Here’s a quick tutorial to get you started.
- Step 1: Launch the Wondershare Dr.Fone on your computer. After it fully loads up, connect your iPhone using a data cable.
- Step 2: Access the left-side panel and then click My Backup. On the main dashboard, click Back Up Now.

- Step 3: Follow the on-screen instructions for SMS backup. After that, click OK to proceed.

- Step 4: Wait while Wondershare Dr.Fone is backing up your files.

- Step 5: After completing the backup process, click View Backups or Open in Folder to check your files.

Conclusion
Transferring photos between two iOS devices is very easy. In fact, you can instantly complete the migration process with just the snap of a finger. Refer to the five tutorials above on how to transfer photos from Apple iPhone 8 to iPhone enumerated. One of them can certainly fit your situation and help you in this regard. For a more convenient file transfer option, download Wondershare Dr.Fone for free. It has a potent phone transfer feature that can aid in the transfer of your dearly cherished photos.
How to Transfer/Sync Notes from Apple iPhone 8 to iPad
The Notes app comes pre-installed on iPhone and iPad, and it proves to be very handy and useful when you need to jot down some ideas, details, plans, or any other important information which can be reviewed whenever you need. Sometimes you will need more to check your note from your iPhone on iPad. In this case, transferring/syncing notes from Apple iPhone 8 to iPad plays an important role. This article will provide the ways with and without iCloud to transfer notes from Apple iPhone 8 to iPad in detail.
Part 1. Transfer Notes from Apple iPhone 8 to iPad Using iCloud
This part will introduce how to transfer iPhone notes to iPad with iCloud. In fact, this is very easy to be done, and you’ll only need several simple steps. Check it out.
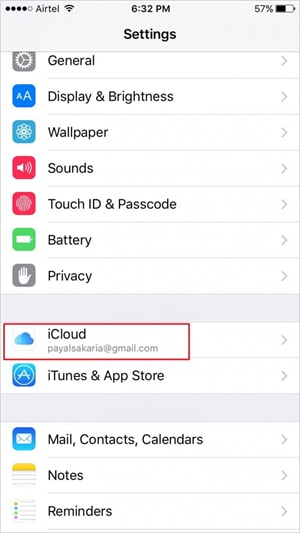
Step 1 Open Settings and select iCloud
Tap Settings > iCloud on both your iPhone and iPad.
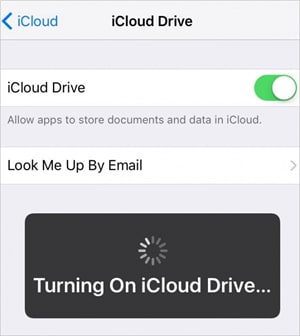
Step 2 Turn on iCloud Drive
Click on iCloud Drive option and then turn it on. You need to turn the option on both your iPhone and iPad.
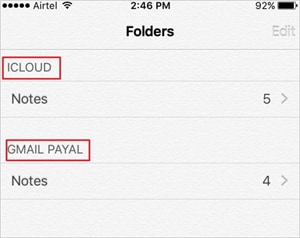
Step 3 Go to Notes App on iPhone
Now go to the Notes app on your iPhone, and you can see a folder named iCloud. Now you can create notes in the iCloud folder on your iPhone, and the notes will be automatically synced to the iPad when the two devices are connected with Wi-Fi connection.
Part 2. Sync Notes from Apple iPhone 8 to iPad Using Third-Party Software
Dr.Fone - Phone Manager (iOS)
Transfer Files Between iPhone and iPad without iTunes
- Transfer, manage, export/import your music, photos, videos, contacts, SMS, Apps, etc.
- Back up your music, photos, videos, contacts, SMS, Apps, etc. to the computer and restore them easily.
- Transfer music, photos, videos, contacts, messages, etc from one smartphone to another.
- Transfer media files between iOS devices and iTunes.
- Fully compatible with the latest iOS version and iPod.
3981454 people have downloaded it
Besides iCloud, there are several third-party softwares that also allow you to sync and transfer notes from Apple iPhone 8 to iPad. This part will introduce the top programs which can help you to get the work done easily.
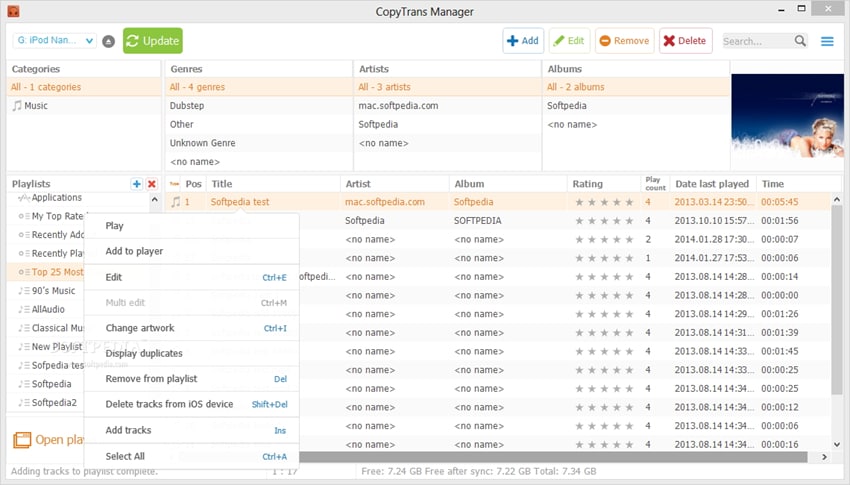
1. CopyTrans
It allows you to transfer apps, notes, photos, videos, and other content between iOS devices, PC, and iTunes. The software also takes backup of data so that it can be restored in case of data loss. CopyTrans also enables you to import the artwork, playlist, and other information into iTunes.
Pros
- Easy-to-use and clean interface
- Provides the option to take back up iOS data
- The app provides multiple guides and tips for the users
Cons
- The time of transfer is long
- Many users have also complained about detecting virus
User reviews
- Thousands of songs can be copied back to iTunes in minutes
- Virus detected by windows 10. Windows 10 detected a virus and removed the download 2x. Never unzipped the file.
2. iExplorer
This is another app that allows you to sync notes from Apple iPhone 8 to iPad. The app allows you to transfer images, music, notes, SMS and all other information respectively without any need to sync the entire file every time. iExplorer helps to manage folders and transfer data for iOS devices, and it is a great iTunes alternative.
Pros
- The app displays the data of the Apple iPhone 8 device in a clear layout
- The detection of the Apple iPhone 8 device by the app is quick and thoroughly
- Allows users to drag and drop files for the transfer
Cons
- Many users complaint of crashing issues
- There are lots of pop-up dialog for full version purchase
- The access to SMS and the contacts information is with jailbreak terminals only
User Reviews
- Amazingly quick! Got the job in very short time. Very user-friendly.
- I forgot my login information for my old iTunes account and had no way of obtaining it since I was also using a new email address. I downloaded this program and it transferred all 600-something of my files within a minute or two. Saved me so much money!
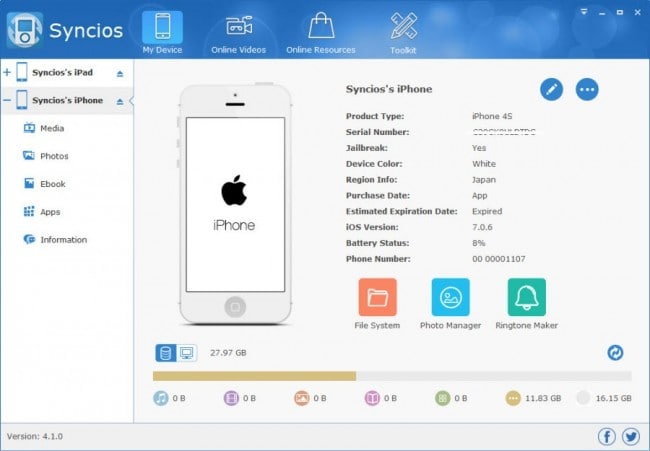
3. Syncios
Syncios also works as a decent iTunes alternative to transfer data between iOS devices and PC. The app allows users to transfer videos, photos, ringtones. TV shows, playlist, notes and all other data between iPhone/iPad/iPod and PC easily and quickly.
Pros
- Comes with easy setup wizard
- Excellent using experience when transfer files
Cons
- Free software does not comes with selected options to choose from
- Some users complain about the software collapse.
User Reviews
- Software crashed and we lost years of family photos, including photos of our kids with nanna who passed away recently. The scam part is this, if you go to the website you will notice they do data recovery, you can also download for free but to actually recover ‘photos’ etc, you have to pay $50.00 USD and there is the scam. They create the issue with the free software and then they sting you to give you back your photos. Warn everybody you know. BEWARE.
- Since I go through lots of music, videos, photos, I had to be able to backup the iPhones and this is where iTunes got kinda complicated for me. SyncIOS make the use of my Apple device much more user-friendly and comfortable.
Also read:
- [Updated] In 2024, Transformative Youtube Decks via Tailored Templates
- 5 Tutorials on How to Transfer Photos From Apple iPhone 11 to New iPhone | Dr.fone
- Fix Apple iPhone 6s Plus Stuck on Data Transfer Verified Solution! | Dr.fone
- Here are Some of the Best Pokemon Discord Servers to Join On Poco X5 | Dr.fone
- How to Unlock Samsung Galaxy A14 5G Phone without PIN
- Identify missing or malfunctioning your drivers with Windows Device Manager in Windows 7
- In 2024, 4 Ways to Sync Contacts from Apple iPhone 7 Plus to iPad Easily | Dr.fone
- In 2024, 4 Ways to Transfer Contacts from Apple iPhone SE (2020) to iPhone Quickly | Dr.fone
- In 2024, Ultimate Guide, How to Transfer Music From Apple iPhone 13 Pro to iPhone | Dr.fone
- Resolved Issue: IgfxEM Chipset Fails to Function - How We Overcame It
- Reviving Your Malfunctional Keyboard: Expert Tips From YL Computing
- The Definitive Fix for Non-Launching Finals - Tips and Solutions for 2^15
- Troubleshooting Guide: Advancing Beyond the Advrcntr2.dll Missing Mishap in Nero Program
- Ultimate Guide, How to Transfer Music From Apple iPhone 13 Pro to iPhone | Dr.fone
- Title: Refurbished Apple iPhone 8 Everything You Need to Know | Dr.fone
- Author: Charlotte
- Created at : 2025-02-12 23:48:27
- Updated at : 2025-02-19 20:37:44
- Link: https://iphone-transfer.techidaily.com/refurbished-apple-iphone-8-everything-you-need-to-know-drfone-by-drfone-transfer-from-ios/
- License: This work is licensed under CC BY-NC-SA 4.0.