
In 2024, Various Methods to Transfer Pictures from Apple iPhone 13 Pro to PC | Dr.fone
Various Methods to Transfer Pictures from Apple iPhone 13 Pro to PC
Capturing life’s precious moments on the latest Apple iPhone 13 Pro is a joy in itself. However, transferring them to a PC becomes essential when it comes to organizing, editing, or sharing those photos. That’s why mastering the art of transferring images between devices is a skill worth possessing.
It can be helpful in creating backups, freeing up storage space, and more. In this article, we will describe how to transfer photos from Apple iPhone 13 Pro to a PC. It will explore step-by-step guides and tips for accommodating different preferences and comfort levels.
Part 1: How To Transfer Photos From Apple iPhone 13 Pro to PC With Windows Features
With the Apple iPhone 13 Pro ‘s advanced camera, capturing life’s beautiful moments is second nature. On the other hand, Windows OS has long been the backbone of personal computing. They come equipped with a range of tools to make the photo transfer process smooth and efficient. Explained below are two of the common method to import photos from Apple iPhone 13 Pro to PC:
Method 1: File Explorer
When it comes to simplicity and direct control, File Explorer stands out as an excellent option. It is a steadfast companion for transferring photos from your Apple iPhone 13 Pro to your Windows PC. This method gives you the freedom to navigate through your device’s internal storage.
Moreover, you can select the images you desire and move them to your computer. Follow these straightforward steps to harness the power of File Explorer:
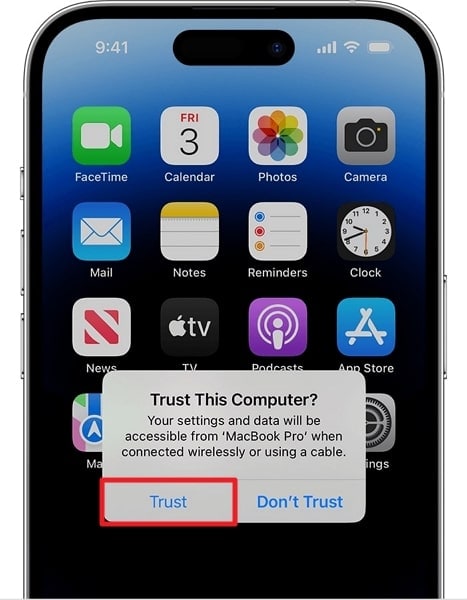
- Step 1: Begin by connecting your Apple iPhone 13 Pro to your Windows PC using an Apple-certified USB cable. Ensure that your iPhone is unlocked, and if prompted, tap “Trust This Computer” on your device’s screen.
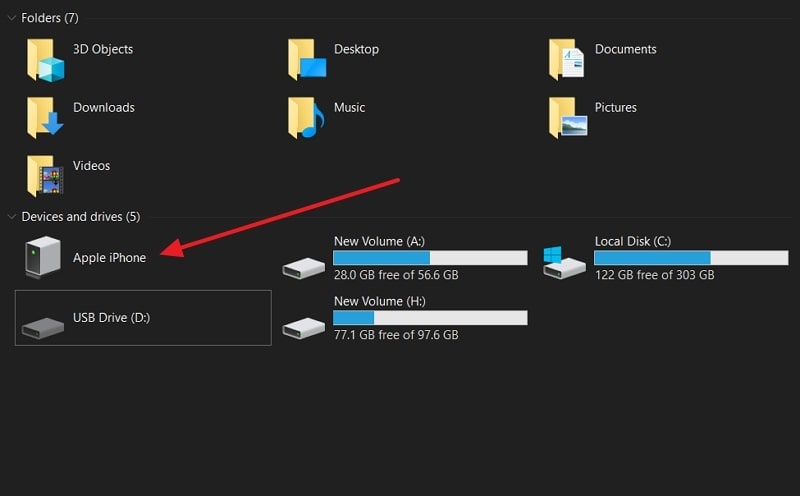
- Step 2: On your Windows PC, press the “File Explorer” icon on your taskbar. In the left-hand panel of File Explorer, locate and click “This PC.” Your connected Apple iPhone 13 Pro should appear under the “Devices and Drives” section.
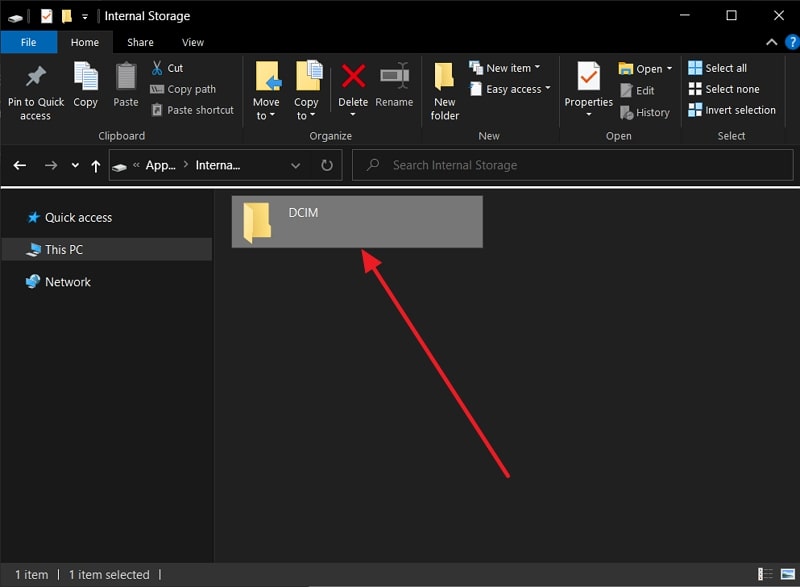
- Step 3: Here, double-click on your iPhone’s icon to access its internal storage. Most of your iPhone’s photos are stored in the “DCIM” folder. Browse the folder to select photos you want to move and copy them to your desired location.
Method 2: Photos App
Available in Windows 10 and later, the Photos app is a prime example of this convenience. It provides an elegant solution for transferring photos from your Apple iPhone 13 Pro to your PC. Using this app, you can directly import photos and videos from your iPhone to the computer. Follow these simple instructions to utilize the power of the Photos app to learn how to transfer photos from Apple iPhone 13 Pro to PC:
- Step 1: Connect your Apple iPhone 13 Pro to your Windows PC using a USB cable, and if prompted, tap “Trust This Computer.” On your Windows PC, locate and open the “Photos” app.

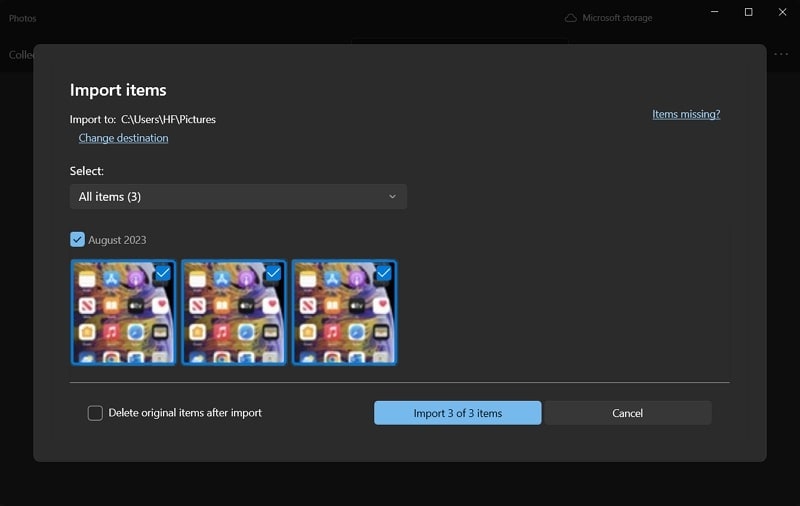
- Step 2: In the Photos app, click on the “Import” button located in the top-right corner. From the available options, choose “From a connected device” and select your iPhone. The Photos app will display the photos on your Apple iPhone 13 Pro that are available for import. After selecting the images, select an existing folder or create a new one for the imported photos.
Part 2: How To Transfer Photos From Apple iPhone 13 Pro to PC With Cloud Storages
Cloud storage offers a bridge between devices that goes beyond physical limitations. It lets you move photos from your Apple iPhone 13 Pro to your desktop computer. This section will explore some of the popular cloud storage platforms since both of them offer their unique set of features and advantages. Described below are two cloud storage services to import photos from Apple iPhone 13 Pro to PC:
Method 1: iCloud
iCloud is Apple’s cloud storage service which seamlessly knits together the Apple ecosystem. It offers a harmonious blend of convenience and synchronization. The iCloud interface is intuitive and clean, making it accessible to all individuals. With iCloud, you can easily access your photos across devices in the Apple ecosystem. Use the following steps to transfer photos from Apple iPhone 13 Pro to PC via iCloud:
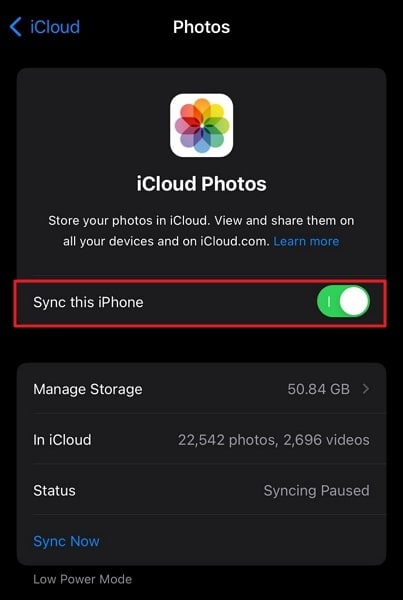
- Step 1: On your Apple iPhone 13 Pro , go to “Settings” and tap on your Apple ID. There, select “iCloud,” tap “Photos,” and toggle on “Sync This iPhone” on the next screen. This uploads your photos to iCloud.
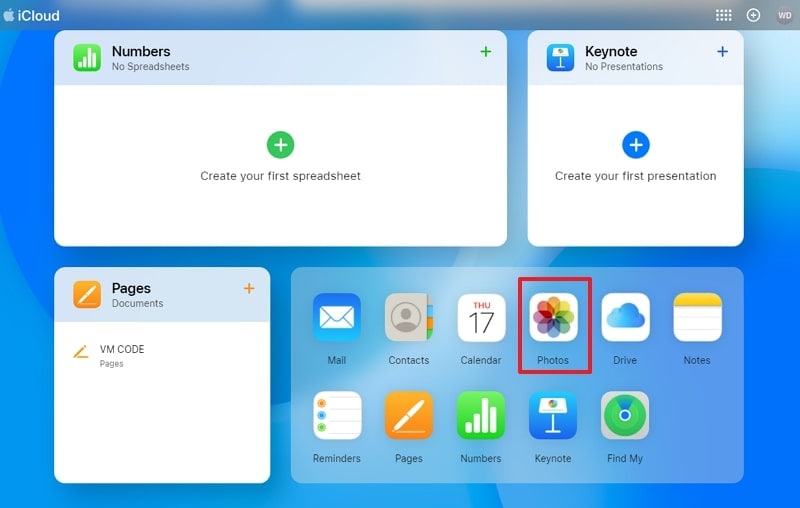
- Step 2: Move to your computer and on your Windows PC, open a web browser, and go to the iCloud website. Log in with your Apple ID and password and click the “Photos” icon to access your iCloud Photo Library.
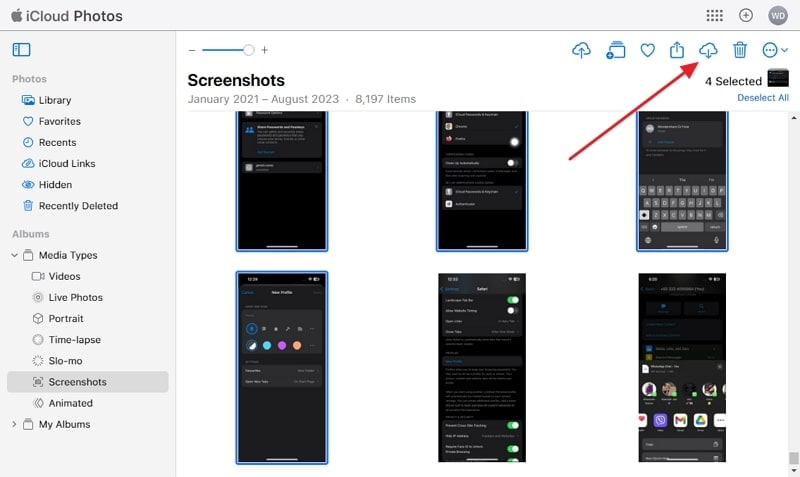
- Step 3: Browse your photos and select the ones you want to transfer to your PC. Click the “Download” icon (cloud with arrow) to download the selected pictures to your PC.
Pros
- iCloud can automatically back up your photos, ensuring that your memories are safeguarded in the event of device loss or damage.
- Your photos are accessible not only on your PC but also on your other Apple devices.
Con
- The provided 5GB of free cloud storage falls significantly short of meeting the requirements for adequate data backup.
Method 2: Google Drive
In the vast realm of cloud storage solutions, Google Drive emerges as a universal storage for storing data. It is accessible on a multitude of devices and operating systems. This enables easy photo transfer between various platforms. You get 15GB of free storage with Google Drive to store and transfer your data. The steps needed to transfer photos from Apple iPhone 13 Pro to PC are given below:
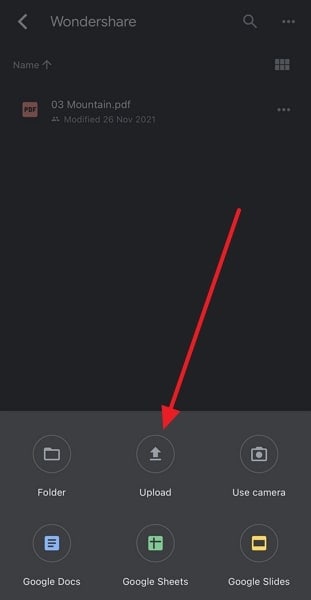
- Step 1: Download the Google Drive app from the App Store and log in using your Google account credentials. Tap the “+” button and select “Upload” to add the targeted photos to Google Drive.
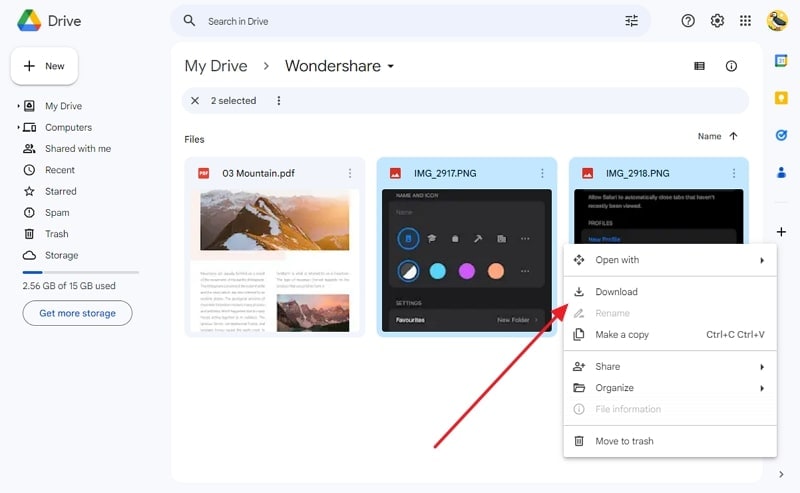
- Step 2: Once photos are uploaded, move to your PC and open Google Drive using a web browser. Locate the folder where you uploaded the pictures from your Apple iPhone 13 Pro . Select the photos, right-click, and choose “Download” to initiate the download process.
Pros
- Google Drive permits offline access to your synced photos, even without a constant internet connection.
- It allows you to selectively share photos and albums with specific individuals.
Con
- Unlike iCloud, which automatically backs up photos, you have to upload all images manually to Google Drive.
Part 3: The Best iOS Management Tool To Transfer Photos From Apple iPhone 13 Pro to PC
Wondershare Dr.Fone is the ultimate iOS management tool. It promises a harmonious blend of innovation, user-friendliness, and efficiency. This tool is a solution designed to bridge the gap between Apple iPhone 13 Pro and PC. It offers a comprehensive suite of features beyond photo transfer, making it a one-stop solution for managing your Apple iPhone 13 Pro data. With it, you can transfer data, get device details, view verification reports, and more.
Wondershare Dr.Fone also serves as a great tool to back up your data to your computer. It allows you to create wireless auto-backups on your computer. This backed-up data can be quickly restored to your device at any time. Furthermore, this tool also offers a dedicated iCloud manager to manage your iCloud data.
Key Features of Wondershare Dr.Fone
- If you want to sell your Apple iPhone 13 Pro , then with the help of Wondershare Dr.Fone Anti-Recovery Mode, you can ensure that your data is erased properly.
- There is no need to jailbreak your iOS device for updating or downgrading it with the help of Wondershare Dr. Fone.
- Fone is designed so that even a layman can use it easily to manage his iPhone without any technical skill.
- You can use Wondershare Dr.Fone for almost all iOS versions and devices, including iPhone and iPod Touch.
Straightforward Step-by-Step Guide To Transfer Photos From Apple iPhone 13 Pro to PC With Wondershare Dr.Fone
Transferring photos from Apple iPhone 13 Pro to PC is a breeze with Wondershare Dr.Fone. Follow these steps to finish the transfer procedure:
- Step 1: Choose Export All Data in Wondershare Dr.Fone
With Wondershare Dr.Fone installed on your computer, connect to your Apple iPhone 13 Pro . Once the Apple iPhone 13 Pro device is detected, tap the Apple iPhone 13 Pro device from the left sidebar and click “Export All Data.”

- Step 2: Select Photos for Transfer
Here you will be asked to choose the data you want to export. Select “Photos” and any other data you want to transfer. Once you click “Export,” Wondershare Dr.Fone will ask you to create a password for the backup.

- Step 3: Complete the Photo Transfer Process
Click “Verify” once you have created the process to start the transfer process of photos. The process will require a certain amount of time to finish. Once it is completed, you can click “Open in Folder” to view the backed-up data.

Conclusion
In our journey to uncover the most effective method for how to transfer photos from Apple iPhone 13 Pro to PC, we’ve explored a myriad of options. Each method offered a unique blend of convenience and functionality. Among these, one solution stands out as a true game-changer: Wondershare Dr.Fone. As we conclude our guide, we wholeheartedly recommend Wondershare Dr.Fone as the ultimate iOS management tool.
It bridges the gap between devices with unparalleled features. Dr. Fone’s capability to transcend the realm of mere photo transfer sets it apart. Its comprehensive suite of features empowers you to manage your Apple iPhone 13 Pro ‘s data with ease.
5 Easy Ways to Transfer Contacts from Apple iPhone 13 Pro to Android
Whenever we move from one device to another, the first thing that we wish to do is transfer our contacts. After all, we can’t communicate with anyone without our list of contacts. Surprisingly, a lot of people find it hard to transfer contacts from Apple iPhone 13 Pro to Android. Truth to be told - there can find countless ways to move contacts from Apple iPhone 13 Pro to Android. You don’t need to worry a lot about the compatibility issues of different systems and can replace old phones at will when there is a new phone release, like the upcoming Samsung Galaxy S22 series. You can use a third-party app, a cloud service (like iCloud), and iTunes. Read on to learn how to transfer contacts from Apple iPhone 13 Pro to Android in 5 different ways.
Part 1: Transfer all contacts from Apple iPhone 13 Pro to Android in 1 click
The easiest way to transfer all the iPhone contacts to Android is by using Dr.Fone - Phone Transfer . A part of the Dr.Fone toolkit can easily transfer all your data from one device to another with a single click. The application is compatible with every leading Android and iPhone model. You can transfer your data from Apple iPhone 13 Pro to Android and vice-versa. Besides a cross-platform transfer of data, iPhone to iPhone and Android to Android transfer is also supported.
The application also supports transferring all the leading data types such as videos, music, photos, messages, and so much more. Extremely easy to use, it is a must-have tool for every smartphone user out there. To learn how to move contacts from Apple iPhone 13 Pro to Android, you can take these steps:
Step 1. First of all, launch the Dr.Fone toolkit on your Mac or Windows PC, and from its welcome screen, visit the “Phone Transfer” module.

Step 2. Connect your Android and iOS devices to the system and let the application detect them automatically. Since you wish to export iPhone contacts to Android, iPhone should be the source while Android should be the destination device. You can use the Flip button to interchange their positions.
Step 3. select the category of data you wish to transfer. Once you have checked the “Contacts” option, click on the “Start Transfer” button to start the process.

Step 4. Sit back and wait for a couple of minutes as the application syncs contacts from Apple iPhone 13 Pro to Android. Make sure that both the Apple iPhone 13 Pro devices are kept connected to the system until the process is completed.

Step 5. Once the transfer completes, you will be shown a message. In the end, you can remove the 2 devices safely from your system.

Part 2: Move contacts from Apple iPhone 13 Pro to Android with Google Account
Another fast and hassle-free way to sync contacts from Apple iPhone 13 Pro to Android is by using your Google Account. Since you can add your Google account on the iPhone, you can also use it to sync your contacts. While setting up your Android, you can use the same Google account. To learn how to import contacts from Apple iPhone 13 Pro to Android using your Google account, these quick steps can be implemented.
Step 1. Unlock your iPhone and go to its Settings > Mail, Contacts, Calendars > Add Account and tap on “Google.”

Step 2. Sign in with your Google account credentials and grant your phone the needed permissions to access your Gmail data.
Step 3. Now, you can go back to your Google account from here and turn on the sync option for “Contacts.”

Step 4. Once your contacts are synced with your Google account, you can easily access them on any Android device. You can use the Google Contacts app or use the same account to set up your device for auto-sync contacts.
Part 3: Import contacts from Apple iPhone 13 Pro to Android with iCloud
Another simple way to sync contacts from Apple iPhone 13 Pro to Android is by using iCloud. Firstly, you need to sync the iPhone contacts with iCloud, and later you can export them a VCF file. To this end, the vCard can be imported to Google Contacts. Yes - it does sound a bit complicated. After all, the Dr.Fone tools provide such a hassle-free way to move contacts from Apple iPhone 13 Pro to Android compared to this technique. Though, this is a free solution and can be your plan B. To learn how to transfer contacts from Apple iPhone 13 Pro to Android via iCloud, follow these steps.
1. Before you proceed, make sure your iPhone contacts are synced with iCloud. To do this, go to the iCloud settings and turn on the sync for 1.Contacts.
2. Great! Once your contacts are synced with iCloud, you can easily access them remotely. Go to iCloud.com and log in with your Apple ID.
3. After logging in to your iCloud account, go to the “Contacts” option from the home screen.
4. This will display a list of all the synced contacts. Select the contacts you wish to move. To select all contacts, click on the gear icon (settings) at the bottom right corner.
5. Once you have made the desired selections, go to its settings again (the gear icon) and choose “Export vCard.” This will save a VCF file having all the contact details.
6. Now, go to Gmail and login with your account details. Select the Contacts option. Alternatively, you can go to the official website of Google Contacts as well.
7. From here, you can choose to Import a file. Click on the vCard option and browse the saved VCF file that you have just exported from iCloud.
8. Once you have imported these contacts to your Google account, you can easily access them on the connected device as well.
Part 4: Copy contacts from Apple iPhone 13 Pro to Android using iTunes
If you are an avid user of iTunes, you can try this technique to export iPhone contacts to Android. Earlier, iTunes has a feature to sync contacts with Google, Outlook, and Windows account. Now, the Google feature has been removed from iTunes. Therefore, you first need to sync your contacts to your Windows account and can later export them into a card. Needless to say, the technique can also be a bit complicated. Though, you can implement these steps to copy contacts from Apple iPhone 13 Pro to Android using iTunes.
1. Launch the latest version of iTunes from your system, and connect your iPhone with a cable.
2. Select your connected device and go to its Info tab. Enable the “Sync Contacts“ option and choose to sync them with Windows Contacts.
3. Ensure that you choose to sync “All Contacts” before clicking on the “Apply” button.
4. Great! Once you have synced your iPhone contacts to your Windows account, you can safely remove the Apple iPhone 13 Pro device. Go to your Account > Contacts and click on the “Export” button on the toolbar.
5. Choose to export the contacts to a vCard and select the location to save the VCF file.

6. In the end, you can manually copy the VCF file to your Apple iPhone 13 Pro or import it to your Google Contacts as well.
Part 5: Switch contacts from Apple iPhone 13 Pro to Android without a computer
Often, users don’t wish to use a computer to export iPhone contacts to Android. If you have the same requirements, then you can use a data transfer app. While there are many apps out there that can help you move contacts from Apple iPhone 13 Pro to Android, I would recommend My Contacts Backup. This is because the app is available on both iOS App Store and Google Play Store . To use this app to transfer contacts from Apple iPhone 13 Pro to Android, follow these steps.
1. Firstly, download the My Contacts app on your iPhone and launch it. Grant the app the needed permissions to access your contacts.
2. The app will automatically detect all the contacts saved on your device and would give you an option to either mail them or save them to its server.
3. You can choose to email the contacts to your own Gmail account as well. A VCF file will be mailed to your account that can later be downloaded and synced.

4. Additionally, you can also upload the contacts to its server.
5. Now, you have to install the My Contacts Backup app on your Apple iPhone 13 Pro and Google Play Store.
6. Launch the app and choose to restore your contacts using an in-app vCard. In this way, all the saved contacts will be exported to your Apple iPhone 13 Pro.

Now that you have learned 7 different ways to move contacts from Apple iPhone 13 Pro to Android, you can easily fulfill your requirements. Out of all the 8 provided options, Dr.Fone - Phone Transfer is the fastest and most convenient option to move all the contacts at once.
4 Ways to Transfer Music from Apple iPhone 13 Pro to iPod touch
Although the Apple iPods have been discontinued, many old users still use them as music players. As we all know, if you want to transfer music from Apple iPhone 13 Pro to iPod, you can just log in with the same Apple ID and then download the songs you purchased on the iPod touch. However, how can you transfer the music that is saved on other devices to your iPod? Don’t worry, this detailed guide introduces 4 ways to transfer music from Apple iPhone 13 Pro to iPod touch, just keep reading!
Part 1: Easy and powerful way to transfer music from Apple iPhone 13 Pro to iPod
A great tool for the purpose of easy transfer of music between iOS devices is Dr.Fone - Phone Transfer . This tool makes life easy for people who want to switch to a new smartphone or are looking for solutions to sync not only music but also contacts, messages, call logs, photos, etc. between different smartphones.
Dr.Fone - Phone Transfer
1-Click Phone to Phone Transfer
- Easy, fast, and safe.
- Move data between devices with different operating systems, i.e iOS to Android.
- Supports iOS devices that run the latest iOS version

- Transfer photos, text messages, contacts, notes, and many other file types.

- Supports over 8000+ Android devices. Works for all models of iPhone, iPad, and iPod.
4,495,115 people have downloaded it
How to use transfer music from Apple iPhone 13 Pro to iPod
Step 1. Download and install Dr.Fone on your computer. Run it and select Phone Transfer. Connect your iPhone and iPod with your computer, and Dr.Fone will detect your iOS devices automatically.

Step 2. Select Music and other file types you would like to transfer and click on Start Transfer.
Step 3. Then just sit and have a cup of coffee. All music files will be transferred from Apple iPhone 13 Pro to iPod successfully.
Part 2: Transfer Music purchased from the iTunes Store from Apple iPhone 13 Pro to iPod using iTunes
In case, you have purchased music from iTunes and want it to transfer from your iPhone to iPod, there is no direct way to the process. For it to be done, you need to re-download previous iTunes Store purchases on your computer. The best thing for this to be done, is that no extra cost is required to be done till the time, the same ID is used for the same purpose.
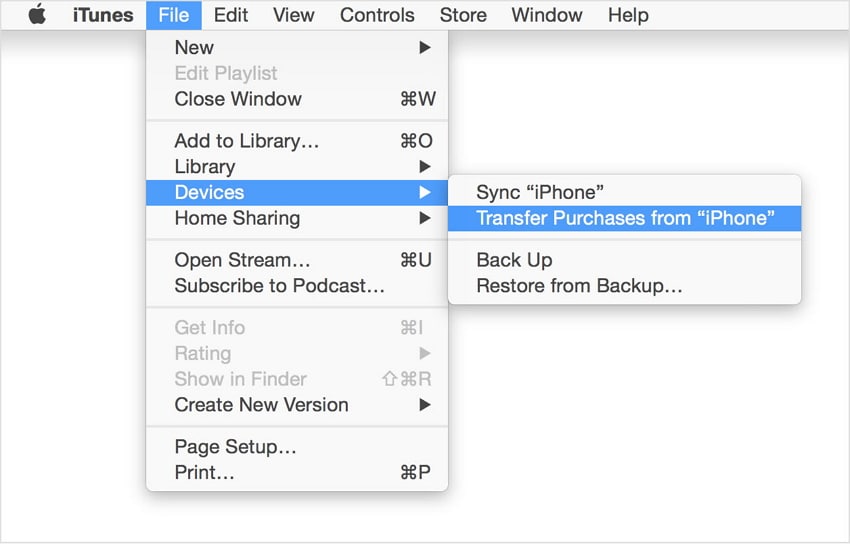
Then you need to follow the following steps for the process to be done. On the computer, in iTunes, go to the iTunes Store. Then you need to click ‘Purchased’, which is available in the Quick Links on the Home screen. Then you need to find the songs that are on the iPhone, but not in your computer’s iTunes library. Then, click the ‘cloud’ button next to the song name to download it. The last step of syncing remains which can be done as desired. Just sync those songs from your iTunes library to your iPod as desired and you are done with the job of Transfer Music Purchased from the iTunes store from Apple iPhone 13 Pro to iPod.
Part 3: Transfer Music purchased from the iTunes Store from Apple iPhone 13 Pro to iPod using iTunes match
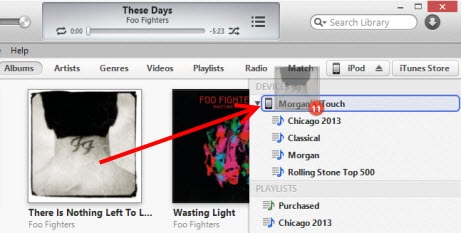
iTunes match is another way to process of transfer music purchased or unpurchased from iTunes from Apple iPhone 13 Pro to iPod. In fact, iTunes match determines the song, which is present in the iCloud and since there are over 43 million songs, iTunes match matches these unpurchased songs with the database and allows playing these music from the iCloud store. Now, you just need to tap the iCloud download button to download music from an artist, album or playlist. Thus, a person has immediate access to a huge music library without having to worry about the storage space on your device.
Part 4: Transfer Music imported from a CD or other source from Apple iPhone 13 Pro to iPod
For this process to complete, you need to import all songs from CD to iTunes at first. Here is the process for the complete transfer of Music from CD and other sources.
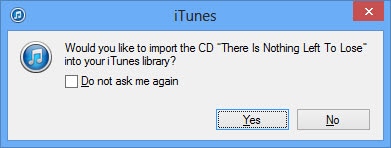
Open iTunes and insert the CD that you wish to import into the disc drive
The options might appear in an instant. If you want to import every song on the disc, select yes and click No, in case you want specific music to import.
In case, you clicked on ‘NO’, Select the menu on the top-left side of the iTunes window and select the audio CD in the list.
Then, check the files you want to import to iTunes, then select Import CD.
The preferences option appears and you need to select the preferences and click OK after the preference has been done.
In case, the music library already contains tracks from the album, which you are importing, you will receive a prompt window to overwrite them. You can select either Replace Existing or Don’t Replace as your wish.
Then you have to wait till the music is ripped to the iTunes library.
As soon as the import is complete, attach your device to the computer.
You can now drag the album to the right side of the iTunes window where a pane will appear containing the music on your device. Drop it right on your iPod or other devices.
All remains is to eject the iPod and enjoy your music


Also read:
- [Updated] Defeating Darkness in Youtube Videos
- 2024 Approved AZ Screen Recorder | Comprehensive App Review & Alternative
- 4 Quick Ways to Transfer Contacts from Apple iPhone XS Max to iPhone With/Without iTunes | Dr.fone
- 5 Easy Ways to Transfer Contacts from Apple iPhone 14 Plus to Android | Dr.fone
- 5 Ways to Send Ringtones from Apple iPhone 12 Pro to iPhone Including iPhone 15 | Dr.fone
- 移動智能:以MOVAVI轉換器無成本地從原始畫面改造成TIFF格式
- Best Sites to Buy Monetized YouTube Channels for Beginners
- Converter Gratuito De Mp3 Para Aac Online: Guia Simples E Rápida
- Enhanced 4K Viewing with Our Best 8 Free Player Picks for 2024
- How to Sync Apple HomePod with Your Television for Enhanced Audio Experience
- How to Transfer Everything from Apple iPhone 6 Plus to iPhone 8/X/11 | Dr.fone
- In 2024, Easy Methods How To Transfer Pictures From Apple iPhone 12 Pro Max to PC | Dr.fone
- In 2024, Effortless Ways to Transfer Data from Your Apple iPhone 6s Plus to iPhone 15 | Dr.fone
- In 2024, How To Transfer Messages From Apple iPhone 15 Pro to other iPhone All iOS Versions | Dr.fone
- iPhone Transfer Transfer Contact from Apple iPhone 14 Pro to iPhone without iCloud | Dr.fone
- Methods to Transfer from Apple iPhone 13 Pro Max to Android | Dr.fone
- Speedy Setup Guide: Unleashing the Power of Live Photos in iOS 15
- Step-by-Step Solution: Dealing with Graphics Driver Error Messages
- Top 15 Apps To Hack WiFi Password On Xiaomi Redmi Note 13 Pro+ 5G
- Title: In 2024, Various Methods to Transfer Pictures from Apple iPhone 13 Pro to PC | Dr.fone
- Author: Charlotte
- Created at : 2025-02-14 17:17:37
- Updated at : 2025-02-20 02:55:30
- Link: https://iphone-transfer.techidaily.com/in-2024-various-methods-to-transfer-pictures-from-apple-iphone-13-pro-to-pc-drfone-by-drfone-transfer-from-ios/
- License: This work is licensed under CC BY-NC-SA 4.0.