
In 2024, Methods to Transfer from Apple iPhone 8 Plus to Android | Dr.fone
Methods to Transfer from Apple iPhone 8 Plus to Android
Ready to switch your old iPhone to an Android smartphone? I’m sure it will bring you some new experience. However, by doing this, you have to face the problem: transfer data from Apple iPhone 8 Plus to Android phone. Since iOS on iPhone and Android on Android phone vary in many aspects, it’s not easy to move from Apple iPhone 8 Plus to Android. If that’s what you’re worried about, you’re in the right place. Here are some useful tutorials that can help you transfer contacts, SMS, photos, video, music, apps, and calendars from your old iPhone to your new Android device without any hassle. Get to know how to transfer data from Apple iPhone 8 Plus to Android now!
Method 1. Transfer All Data from Apple iPhone 8 Plus to Android in 1 Click
The easiest way to transfer data from Apple iPhone 8 Plus to Android is to use the smart iPhone to Android transfer tool, Dr.Fone - Phone Transfer . It enables you to easily transfer all contacts both in phone memory and cloud account, like iCloud, Exchange, and others, text messages, video, photos, and music from iPhone (iPhone 15 included) to Android phone or tablet.
Dr.Fone - Phone Transfer
1-Click Phone to Phone Transfer
- Easily transfer photos, videos, calendars, contacts, messages, and music from Android to iPhone/iPad, or vice versa.
- Takes less than 5 minutes to finish.
- Enable to transfer from HTC, Samsung, Nokia, Motorola, and more to iPhone 15/14/13/12/11/X/8/7/SE/6s (Plus)/6 Plus that run iOS 5 or later.
- Works perfectly with Apple, Samsung, HTC, LG, Sony, Google, HUAWEI, Motorola, ZTE, Nokia, and more smartphones and tablets.
- Fully compatible with major providers like AT&T, Verizon, Sprint, and T-Mobile.
- Fully compatible with the latest Windows or Mac OS.
3981454 people have downloaded it
How to Transfer Data from Apple iPhone 8 Plus to Android
1. Transfer Contacts in accounts: To transfer contacts in Facebook, Twitter, Google and any accounts on your iPhone to Android phone or tablet, you should sign in the accounts on your iPhone.
2. Backup and restore: Your Android phone or tablet is not right now in your hand? Don’t worry. Just use it to backup iPhone data to computer, and then restore to your Apple iPhone 8 Plus or tablet whenever you need.
Step 1. Run iPhone to Android Data Transfer Tool
Launch Dr.Fone - Phone Transfer on your Windows PC or Mac. On its homepage, choose the “Phone Transfer” option and click on it.

Step 2. Connect Your iPhone and Android Device to Computer with USB Cables
Connect your iPhone and Android device to the computer. Two devices will be soon detected and shown in the window below.

Step 3. Start Data Transfer from Apple iPhone 8 Plus to Android
Scan the supported files to ensure what you’re going to transfer. Click “Start Transfer”. If you have many useless files on your Apple iPhone 8 Plus, you can check “Clear data before copy”.

Don’t have a computer at hand? Just try the Android app of Dr.Fone - Phone Transfer , which allows you to directly transfer data from Apple iPhone 8 Plus to Android, and bring iCloud data to Android without any hassle.
Method 2. Transfer Data One by One from Apple iPhone 8 Plus to Android for Free
Besides Dr.Fone - Phone Transfer, there are some useful ways that empower you to transfer files from Apple iPhone 8 Plus to Android. They’re totally free but just take some time.
Part 1. Transfer Apps from Apple iPhone 8 Plus to Android
As you know, apps on iPhone are in .ipa, .pxl, or .deb formats, while Android apps are .apk files. Thus, it’s impossible to directly install iPhone apps on your Apple iPhone 8 Plus or tablet, let alone transfer app data from Apple iPhone 8 Plus to Android. However, many iPhone apps have their corresponding Android versions, which you can download from Google Play Store .
Search Google Play on the internet and then search the apps that you play on your iPhone. Then, download and install the apps on your Apple iPhone 8 Plus or tablet.

Part 2. Transfer Contacts from Apple iPhone 8 Plus to Android via iCloud
When switching from Apple iPhone 8 Plus to Android, one of the most important content you want to transfer is contacts. Unfortunately, the iPhone sim card is smaller than the one on Android phone and iPhone contacts are usually saved in a phone memory card. Although Many Android phones have also the nano sim card for changing sim card between Android and iOS flexibility, there are still some Android phone adapt bigger sim cards. That means, it’s not available to just insert iPhone sim card on Android phone, which usually works in transferring contacts from Android to Android .
Don’t worry. If you like saving iPhone contacts to accounts, like iCloud, and Google, it’s easy to do iPhone to Android contact transfer. Here, I take iCloud as an example.
Step 1. On your iPhone, navigate to Settings and select iCloud.
Step 2. Sign in to your iCloud account and turn on Contacts to sync contacts between iPhone and iCloud. Calendars can also be ticked at the same time, and then sync the calendar from iCloud to Android.

Step 3. Open the browser and land iCloud main page. Then, click Contacts to enter the contact management panel. Click Show Actions Menu and click Export vCard…. Then, contacts in iCloud will be saved as a vCard file on the computer.

Step 4. Plug a USB cable to connect your Apple iPhone 8 Plus or tablet to computer. When it’s recognized, go and open the SD card of your Apple iPhone 8 Plus. Cut and paste the exported vCard file to the SD card folder.
Step 5. Navigate to the Contacts app on your Apple iPhone 8 Plus. Tap the menu icon left to the main button and you get the menu list. Tap Import/Export and choose Import from USB storage. Then, import the vCard file to your Apple iPhone 8 Plus.

Tips: If you want to know more ways to transfer contacts from Apple iPhone 8 Plus to Android, you can find more satisfying answers on ways to transfer contacts from Apple iPhone 8 Plus to Samsung, and switch contacts from Apple iPhone 8 Plus to Android .
Part 3. Transfer iPhone text messages to Android with 2 Android apps
To transfer iPhone SMS to Android, you can turn to two Android apps for help. With them, you can extract iPhone SMS from iTunes backup and transfer to Android phone.
Step 1. Open iTunes and connect your iPhone to the computer via a USB cable. In your iPhone control panel, click Back Up Now to back up your iPhone to the computer.

Step 2. Connect your Apple iPhone 8 Plus to computer with a USB cable. Copy the exported iTunes backup file to the SD card of your Apple iPhone 8 Plus.
Step 3. Go to Google Play on your Apple iPhone 8 Plus or tablet and download iSMS2droid on your Apple iPhone 8 Plus. Open iSMS2droid and tap Select iPhone SMS Database. Then, choose the imported iTunes backup file. Choose all or selected text messages and convert them to an XML file.


Step 4. Download and install SMS Backup & Restore on your Apple iPhone 8 Plus. Use it to restore your iPhone’s SMS in an XML file to the Android’s SMS database.


Part 4. Transfer Photos from Apple iPhone 8 Plus to Android
It’s known that Apple gives you access to iPhone Camera Roll photos. You can copy and paste iPhone photos you take and download from internet to Android phone or tablet with USB cables.
Plug-in USB cables to connect your iPhone and Android phone to computer. Your iPhone and Android phone will be mounted as flash drives. Open your iPhone folder and click Internal Storage > DCIM. Then, choose your wanted photos and copy them to the SD card of your Apple iPhone 8 Plus.
Note: By using this way, you can export photos in iPhone Camera Roll to Android phone. However, as for the photos in the Photo Library, you still have no way to expect using some third-party tool, like Dr.Fone - Phone Transfer .

Part 5. Transfer Video and Music from Apple iPhone 8 Plus to Android
Have purchased hundreds of thousands of songs and videos and now want to transfer to your new Android phone or tablet. It’s a piece of cake. iTunes can do that for you. Just follow the easy tutorial below.
Step 1. Open iTunes. Click Store > Authorize This Computer…. Fill out your Apple ID and password. Get your iPhone and Android phone connected with a USB cable and open iTunes. Right click your iPhone. In the pull-down list, choose Transfer Purchased to transfer iPhone music and video back to iTunes. Navigate to the iTunes media folder on the computer. C: UsersAdministratorMusiciTunesiTunes Media. Find your wanted music and video and copy them to your Apple iPhone 8 Plus SD card.

Part 6. Transfer Calendars from Apple iPhone 8 Plus to Android
It’s easy to sync Calendars from Apple iPhone 8 Plus to Android, as long as you have the Google account sync feature on both iPhone and Android phones.
Step 1. On your iPhone, tap Settings, scroll down the screen to tap Mail, Contacts, Calendars, and then choose Google.
Step 2. Fill in your Google account info: name, email, and password. In the Description screen, enter a description of the calendars.


Step 3. Tap Next and turn on _Calendar_s. Then, tap Save to begin syncing iPhone calendars with Google.
Step 4. On your Apple iPhone 8 Plus or tablet, tap Settings > Account & sync. Select Google account and tap Sync Calendars and Sync Now.


The above methods offer you valuable solutions to transfer data from Apple iPhone 8 Plus to Android. Whether you choose to use Dr.Fone - Phone Transfer, cloud services, or iTunes, these methods cater to a variety of preferences and ensure that your valuable data, including contacts, messages, photos, and apps, can seamlessly migrate to your new Android device. By using Dr.Fone - Phone Transfer, you can make the switch from Apple iPhone 8 Plus to Android with 1 click, try it now!
5 Ways to Send Ringtones from Apple iPhone 8 Plus to iPhone Including iPhone 15
It is a common misconception that sending data from one iPhone to another can be a tedious task. For instance, there are plenty of ways to learn how to send ringtones from Apple iPhone 8 Plus to iPhone without any trouble. You can either perform a direct transfer to your new iPhone , such as iPhone 15, or even take the assistance of your system to do so. In this post, we will teach you in different ways how to transfer ringtones from Apple iPhone 8 Plus to iPhone in a stepwise manner. So let’s get started!
Part 1: How to Send Ringtones to iPhone including iPhone 15 with 1-Click
“How do I send a ringtone to another iPhone without iTunes?” If you want to transfer ringtones from Apple iPhone 8 Plus to iPhone, you can use the help of third-party applications that will get the job done in minutes. These applications are also useful when you are trying to shift content from one Apple device to another. Of course, you will need a computer/Laptop to play the middleman. Dr.Fone - Phone Transfer is the best iPhone transfer tool that lets you transfer your ringtones from Apple iPhone 8 Plus to iPhone.
Here is how:
Step 1: Download Dr.Fone - Phone Transfer application on your computer.

Step 2: Launch the application, and you’ll see options on the screen. Go with Phone Transfer.
Step 3: Then connect both your devices to the computer. In your case, it is the iPhone and the iPhone. You can also make this transfer between iPhone and Android devices.
Step 4: Now select the files that you want to transfer. Here, select all the ringtones that you want to shift. Then, initiate the transfer and don’t disconnect the Apple iPhone 8 Plus devices.

The data will be transferred successfully to the destination device.
Don’t have a laptop? Then you can do this!
Step 1: Download the mobile version of Wondershare Dr. Fone - Phone Transfer. Connect your iPhone and iPad using a suitable cable.

Step 2: The software will start to scan the synced data on your device.

Step 3: After the check, select the contacts you want to shift and click on ‘Start Importing’.

Part 2: How to Send Ringtones to iPhone Including iPhone 15 Using iTunes/Finder?
The traditional method of managing their iOS devices is utilizing iTunes or Finder. It remains a reliable approach for sending ringtones to your iPhone, including the latest iPhone 15. Be aware that iTunes versions 12.6 and earlier are capable of syncing your ringtones. The more recent versions exclusively support music synchronization. Here’s a step-by-step guide on how to transfer ringtones from Apple iPhone 8 Plus to iPhone:
Step 1: Start by installing iTunes version 12.6 or older on your computer and launch it. Now connect your old iPhone with ringtone to the computer. In iTunes, click “Files,” hover over “Devices,” and tap “Transfer Purchases from iPhone.”

Step 2: Press “Sync” and wait for the ringtones to sync. Afterward, disconnect the old iPhone and plug in the new iPhone. Once you’ve selected the Apple iPhone 8 Plus device icon, navigate to the “Tones” tab and mark the “Sync Tones” box. Next, choose either “All Tone” or “Selected Items” and finalize the process by clicking “Apply.”

Part 3: How to Send Ringtones to iPhone including iPhone 15 using OneDrive?
With Dr.Fone - Phone Transfer, you can transfer ringtones from one device to another directly, and that too within seconds. Nevertheless, if you wish to perform a wireless transfer, then you can take the assistance of a cloud service like OneDrive. Besides moving your files from one device to another, you can also keep them safe on the cloud.
To start with, download OneDrive on both iOS devices from App Store. You can also visit its iTunes store page right here .
Open OneDrive on your source device and tap on the “+” icon to add something to the drive. Next, tap on the “Upload” button and locate the ringtone on your device storage to upload it on the drive.


- Now, launch OneDrive on your target device and sign in using the same credentials. Locate the file that you have just added to the drive. Open the folder and download it to your local storage.
- In this way, you can learn how to transfer ringtones from Apple iPhone 8 Plus to iPhone without physically connecting both devices.
Part 4: How to Send Ringtones to iPhone including iPhone 15 using AirDrop?
AirDrop provides a quick and efficient way to transfer ringtones directly between two iOS devices. It allows for a smooth sharing experience without the need for extra software or cloud services. Follow these steps for how to send a ringtone from Apple iPhone 8 Plus to iPhone:
Step 1: Begin by confirming that AirDrop is active on both devices and set to “Everyone” for visibility. Additionally, make sure that Bluetooth and Wi-Fi are turned on for both devices as well.

Step 2: On the source device, move to the “Files” app. Here, navigate to the targeted ringtones and select them. Now, tap the “Share” button and select “AirDrop” as the sharing method. From the available devices for AirDrop, choose the targeted device. On the targeted iPhone, you will receive a prompt for AirDrop. Accept it to complete the ringtone-sharing process.

Part 5: How to Send Ringtones to iPhone including iPhone 15 using Email?
While this is not the most direct method, sending ringtones via email remains a viable option. It can transfer small audio files between iPhones. Follow these steps for how to send ringtones from Apple iPhone 8 Plus to iPhone using email:
Step 1: On the source iPhone, move to the ringtone you want to send and select it. Now, tap “Share” and choose “Email” as the sharing method.

Step 2: Once the ringtone is added as an attachment, add your email address in the recipient field. Afterward, press “Send” to email the selected ringtone. On your target iPhone, open the mail and download the ringtone.

Bonus Tip. How to Make Custom Ringtone on iPhone
Creating custom ringtones for your iPhone allows you to personalize your device even further. This sets it apart from the standard options available. When it comes to finding a reliable and trusted ringtone maker, Wondershare Dr.Fone stands at the top. It allows you to create ringtones by selecting music files directly from the iPhone.
With its advanced features, you can craft unique ringtones from your favorite songs or audio files. Follow these steps to utilize the Dr.Fone Ringtone Maker feature and create your own custom ringtone on your iPhone:
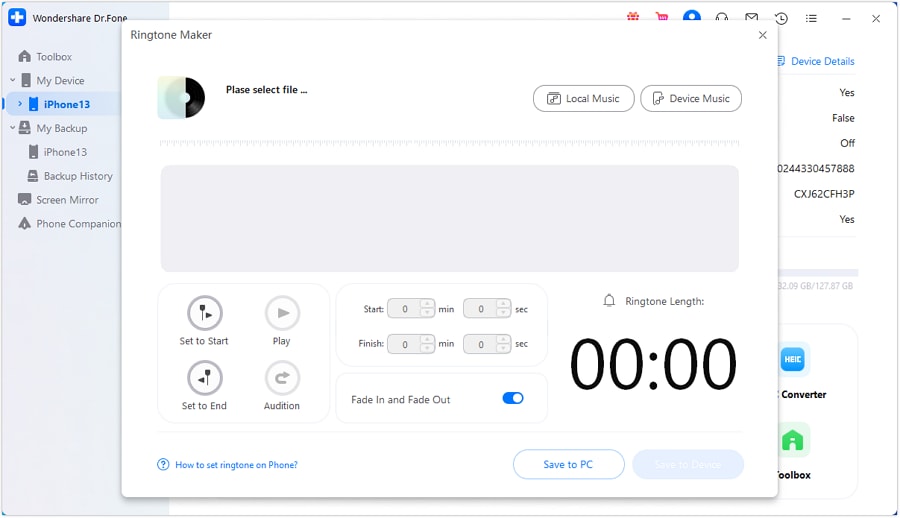
Step 1: Access Ringtone Maker in Wondershare Dr.Fone
After launching Wondershare Dr.Fone on your computer, connect your iPhone to it using the original cable. Once Dr.Fone has detected your device, click “Ringtone Maker” from the available options. On the following window, use “Local Music” or “Device Music” to select an audio file.
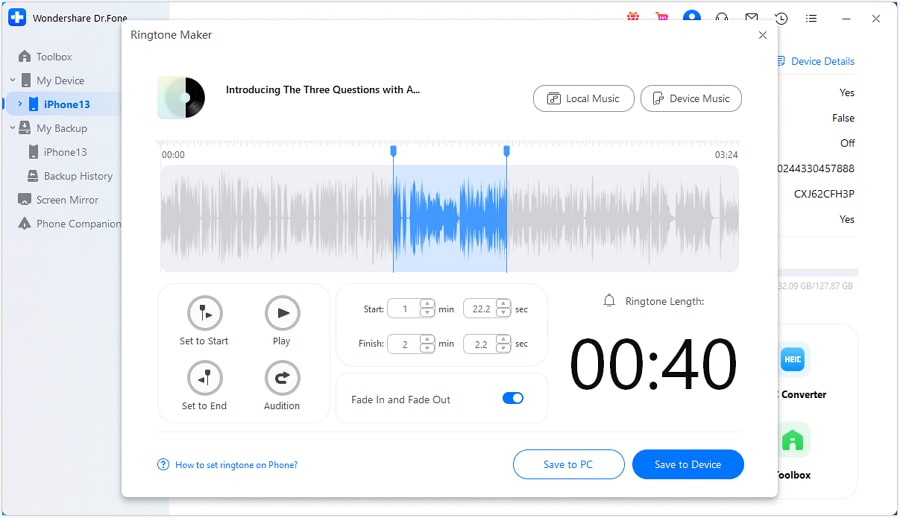
Step 2: Create the Custom iPhone Ringtone
Adjust the appended music to match your desired ringtone length. Employ the “Fade In” and “Fade Out” feature for personalized ringtone customization. Afterward, store the newly created ringtone directly on the iPhone using the “Save to Device” option.
FAQs About Ringtones on iPhone
- Where are my iPhone ringtones stored?
On an iPhone, custom ringtones are typically stored within the Apple iPhone 8 Plus device’s internal storage. Specifically, they are found within the “Settings” application under the “Sounds & Haptics.” Additionally, if you have synced ringtones via iTunes, they might be stored within the iTunes media folder on your computer.
- What if I have a large collection of ringtones to transfer?
For transferring a substantial assortment of ringtones, contemplate leveraging a cloud storage solution. OneDrive and Google Drive are among the options worth exploring. They enable the uploading and storage of significant data volumes. It enables easy access and download from multiple devices. Using a third-party software solution such as Wondershare Dr.Fone can simplify the process of bulk transfers.
- Are there any precautions I should take when transferring ringtones?
When transferring ringtones, ensure that the file formats are compatible. It’s also crucial to use secure and trusted transfer methods to prevent any data loss or security breaches. Additionally, always back up your data before initiating any transfer process. This is to avoid the risk of potential data loss during the transfer.
- What if I encounter issues during the transfer process?
If you encounter any issues during the transfer process, it’s essential to troubleshoot systematically. Check the compatibility of the file formats. In addition, ensure a stable internet connection, and verify that both devices are using the latest software updates. If the issue persists, consult the support documentation for the specific transfer method. Reach out to the customer support of the respective software or service provider for further help.
Now when you know how to send ringtones from Apple iPhone 8 Plus to iPhone in different ways, you can certainly move your data without any trouble. Feel free to give Dr.Fone - Phone Transfer a try and manage your device in no time. It is a complete phone management tool that will certainly come in handy to you on numerous occasions. If you face any setbacks while moving your ringtones from Apple iPhone 8 Plus to iPhone, let us know about them on our official social media.
How to Transfer Apple iPhone 8 Plus Data to iPhone 12: A Complete Guide
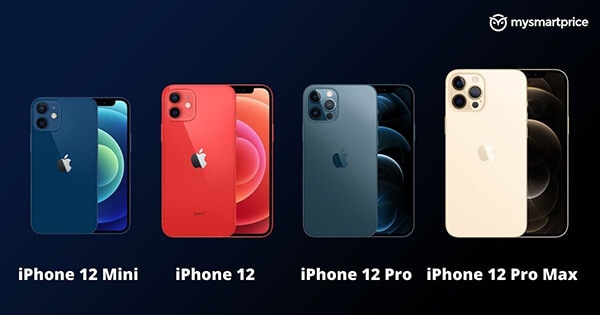
Apple announced a line-up of iPhones with four new devices in 2020. The series is called the iPhone 12 series that has four handsets of different sizes and price ranges. The iPhone 12 series include iPhone 12, iPhone 12 Mini, iPhone 12 Pro, and iPhone 12 Pro Max. These are the company’s first-ever 5G devices. They surely took a step into the future of technology with the 12 series.
The device is considered lighter than the iPhone SE launched in 2020. iPhone 12 Pro Max holds an outstanding camera system for high-quality image processing. Besides, the introduction of A14 SoC has encouraged the exceptional performance of all four models. Each of the series models is secured with suitable features and new capabilities. Let’s take a glance at the relevant specifications and iPhone 12 price.
Part 1: Apple iPhone 12 Series Specifications
To mention the iPhone 12 series specifications, these models are secured with an SoC of Apple A14 Bionic. All 4 of them consist of DRAM. The displays of these smartphones are quite satisfactory.
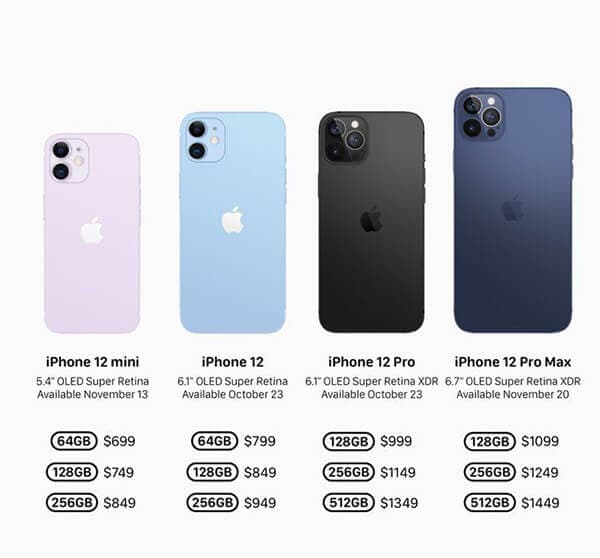
Display: The iPhone 12 Mini and iPhone12 have a display of 5.42” OLED (2340 x 1080) and 6.06” OLED (2532 x 1170). On the other hand, the magnificent iPhone 12 Pro has a display of 6.06” OLED (2532 x 1170) and 6.68” OLED (2778x1284).
Size & Weights: The size concerning height, width, and depth of both iPhone 12 and iPhone 12 pro are the same at 146.7 mm, 71.5 mm, 7.4 mm. Besides, the iPhone Mini stands at a height width and depth of 131.5 mm, 64.2 mm, and 7.4 mm. The iPhone 13 Pro max has a height of 160.8 mm, a width of 78.1 mm, and a depth of 7.4 mm. While the iPhone Mini weighs the lightest with 135g, iPhone 12 max weighs the heaviest (228 g). Both iPhone 12 and iPhone 12 Pro remain at 164g and 189g, respectively.
Wireless Charging: Each of the iPhone 12 series models supports MagSafe Wireless Charging up to 15 W. They are also Qi Compatible (7.5 W). Now, coming to the camera quality, all four models are secured with a front camera of 12 MP f/2.2.In rear camera setup, iPhone 12 Mini, iPhone 12, and iPhone 12 Pro have a main camera of 12 MP 1.4µm, 26mm eq. f/1.6, Optic OIS. iPhone 12 Pro Max comes with the main camera of 12 MP 1.7µm, 26mm eq. f/1.6.
Camera: The high-quality telephoto camera of the iPhone 12 Pro is 12 MP, 52mm eq. f/2.0 OIS. For iPhone 12 Pro Max is 12 MP, 65mm eq. f/2.2 OIS. The entire iPhone series model has an ultra-wide camera of 12 MP 13mm eq. f/2.4. The splash, water, and dust resistance feature with IP68 for up to 6m and 30 minutes keeps the phone durable.
iPhone Series devices hold dual-SIM support with nano-SIM and eSIM. Both iPhone 12 Mini and iPhone 12 come in distinct storage capacities like 64 GB, 128 GB, and 256 FB. The iPhone 12 Pro and Pro Max are available in the storage of 128 GB, 256 GB, and 512 GB.
Part 2: Transfer old iPhone data to iPhone 12
We know that the excitement of buying a new iPhone is real. However, it’s important to do one thing before jumping into the camera quality. And that’s data transfer. You do not want your old phone data to be gone with the old device, do you? We hope not. Here are some of the tactics by which you can transfer the old iPhone data to the new iPhone 12
2.1 Through iCloud
Before transferring, make sure your data is backed up. For that, connect the old iPhone with the WiFi and then go to “Settings.” Next, tap your name and then on “iCloud.” Next, select the “Backup Now” option and wait for the process to get completed. After completing the backup, follow the steps given below.
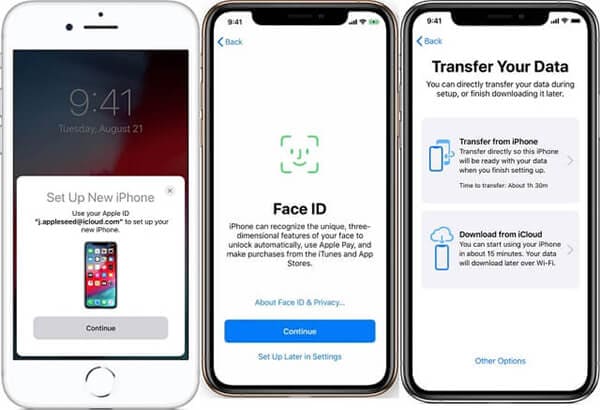
Step 1: First, turn on the new device to see the “Hello” screen. Now, follow the instructions appearing on the screen. Once you notice the WiFi screen, tap a WiFi network to join. Keep following the steps till the “Apps & Data” screen shows up. Tap on “Restore from iCloud.”
Step 2: Sign in to your iCloud with relevant credentials like Apple ID and password. Choose a backup but make sure to check the date and size.
If you have bought iTunes or App store content with multiple IDs, sign in with those accounts too.
Step 3: The restore process will be initiated. Make sure to be connected and wait till the process gets completed successfully. Once done, continue with the other steps to complete the setup process successfully.
2.2 Through iTunes or Finder
Start with the backup process by opening iTunes. Now, connect your iPhone with the PC. After it gets connected, choose your iPhone on the top toolbar. To transfer the data related to Health and Activity/saved passwords, choose the “Encrypt backup” option. Next, input a password and click “Back Up Now.”
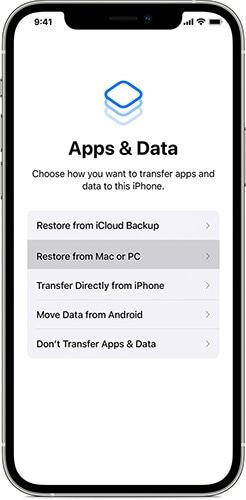
To transfer the data through iTunes or Finder, launch your new device. Once the “Hello” screen appears, follow the instructions appearing on the screen. As soon as you note the “Apps & Data Screen,” tap on “Restore from Mac or PC.” Connect the new device to PC/Mac and open the iTunes/Finder window. Once your device name is visible on the screen, tap it.
Select “Restore Backup” to choose a “Backup.” Ensure that the size and data are accurate. To restore from an encrypted backup, input the password. The restoration process will start. Now, wait for the entire process to get completed and then move on to the remaining setup steps.
Part 3: Transfer Android Data to iPhone 12
The methods mentioned above can be time-consuming. In that case, it’s best to opt for a simple process that does not require too much work. For example, Dr.Fone - Phone Transfer all is an efficient and easy-to-use phone switch app.
As the name signifies, this App can help you with iPhone 12 transfer data in a few minutes. Experienced developers develop it for both iOS and Android users. So, you can transfer data from any of the Apple iPhone 8 Plus devices to the new iPhone 12.
With Dr. Fone, you can migrate 13 files of distinct size to the new iPhone 12. Here’s a glimpse of the files below
Contact, photo, videos, voicemail, wallpaper, calendar, and many more
To transfer data through Dr. Fone, follow the easy steps mentioned below.
Step 1: First, connect both the old device and new iPhone 12 to your PC/Mac with USB.
Step 2: Now, launch the Dr. Fone - Phone Transfer and select the app
Step 3: Once the app starts, you will note a device detected as a source. Similarly, there will be other devices detected as destinations. Then, you will be given the option to flip the source and destination. For that, click on the “Flip” option.
Step 4: After selecting the Apple iPhone 8 Plus device status, mark the checkboxes beside the files for transferring. Once done, tap on the “Start Transfer” button appearing on the screen.
You can select “Clear data before copy” to delete the data from the destination device before transferring. It will speed up the entire process.
Conclusion
Hopefully, you got a clear idea of how to transfer data to iPhone 12. Dr. Fone - Phone Transfer is one of the finest names for data recovery and data transfer between devices. They have distinct outstanding products that are efficient and useful for the users. One of the best things about the application is that you can transfer the data regardless of the mobile operating system. Be it an iOS or Android device, follow the steps provided above, and that’s it. The iPhone 12 data transfer process is quick, easy, and requires less effort.
Also read:
- [New] 2024 Approved The Ultimate Highlight Optimization Checklist for Brands
- [Updated] 2024 Approved IPhone Lens Exploration Key Angles to Elevate Your Photo Game
- 4 Ways to Transfer Contacts from Apple iPhone 13 to iPhone Quickly | Dr.fone
- From Raw to Refined The Ultimate YouTube Studio Editing Journey
- How to Bypass FRP from Itel A60?
- How to recover deleted photos on Oppo
- How to Transfer Everything from Apple iPhone 13 Pro to iPhone | Dr.fone
- How to Transfer from Apple iPhone 13 mini to iPhone 8/11/11 Pro | Dr.fone
- How to Use Google Assistant on Your Lock Screen Of Realme C67 4G Phone
- How to use Snapchat Location Spoofer to Protect Your Privacy On Samsung Galaxy F04? | Dr.fone
- In 2024, 3 Ways to Export Contacts from Apple iPhone 8 Plus to Excel CSV & vCard Easily | Dr.fone
- In 2024, 4 Ways to Transfer Messages from Apple iPhone 15 to iPhone Including iPhone 15 | Dr.fone
- In 2024, Fix Apple iPhone 14 Pro Stuck on Data Transfer Verified Solution! | Dr.fone
- In 2024, How to Transfer Contacts from Samsung Galaxy A25 5G to Other Android Devices Devices? | Dr.fone
- In 2024, iPhone Transfer Transfer Contact from Apple iPhone 15 Plus to iPhone without iCloud | Dr.fone
- In 2024, Refurbished Apple iPhone 12 Pro Max Everything You Need to Know | Dr.fone
- In 2024, Why does the pokemon go battle league not available On Oppo K11x | Dr.fone
- Maximillian's Must-See Documentaries in July 2024: Find Out Which Ones Made the Cut
- Refurbished Apple iPhone 7 Plus Everything You Need to Know | Dr.fone
- Title: In 2024, Methods to Transfer from Apple iPhone 8 Plus to Android | Dr.fone
- Author: Charlotte
- Created at : 2024-09-29 18:48:59
- Updated at : 2024-10-06 17:55:05
- Link: https://iphone-transfer.techidaily.com/in-2024-methods-to-transfer-from-apple-iphone-8-plus-to-android-drfone-by-drfone-transfer-from-ios/
- License: This work is licensed under CC BY-NC-SA 4.0.