
In 2024, How to Transfer/Sync Notes from Apple iPhone 7 to iPad | Dr.fone
How to Transfer/Sync Notes from Apple iPhone 7 to iPad
The Notes app comes pre-installed on iPhone and iPad, and it proves to be very handy and useful when you need to jot down some ideas, details, plans, or any other important information which can be reviewed whenever you need. Sometimes you will need more to check your note from your iPhone on iPad. In this case, transferring/syncing notes from Apple iPhone 7 to iPad plays an important role. This article will provide the ways with and without iCloud to transfer notes from Apple iPhone 7 to iPad in detail.
Part 1. Transfer Notes from Apple iPhone 7 to iPad Using iCloud
This part will introduce how to transfer iPhone notes to iPad with iCloud. In fact, this is very easy to be done, and you’ll only need several simple steps. Check it out.
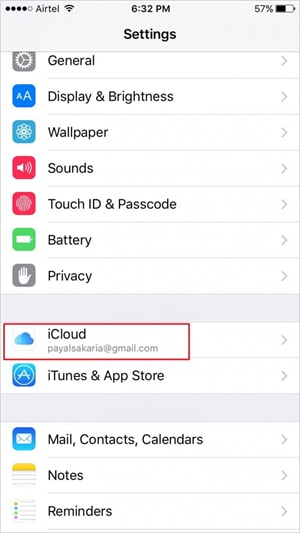
Step 1 Open Settings and select iCloud
Tap Settings > iCloud on both your iPhone and iPad.
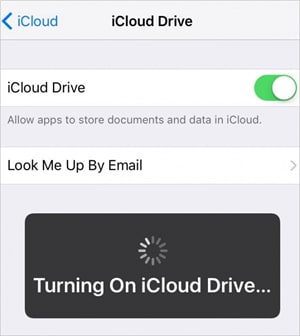
Step 2 Turn on iCloud Drive
Click on iCloud Drive option and then turn it on. You need to turn the option on both your iPhone and iPad.
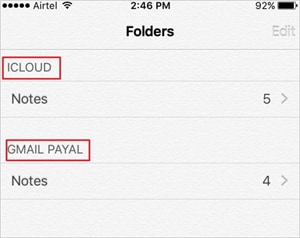
Step 3 Go to Notes App on iPhone
Now go to the Notes app on your iPhone, and you can see a folder named iCloud. Now you can create notes in the iCloud folder on your iPhone, and the notes will be automatically synced to the iPad when the two devices are connected with Wi-Fi connection.
Part 2. Sync Notes from Apple iPhone 7 to iPad Using Third-Party Software

Dr.Fone - Phone Manager (iOS)
Transfer Files Between iPhone and iPad without iTunes
- Transfer, manage, export/import your music, photos, videos, contacts, SMS, Apps, etc.
- Back up your music, photos, videos, contacts, SMS, Apps, etc. to the computer and restore them easily.
- Transfer music, photos, videos, contacts, messages, etc from one smartphone to another.
- Transfer media files between iOS devices and iTunes.
- Fully compatible with the latest iOS version and iPod.
3981454 people have downloaded it
Besides iCloud, there are several third-party softwares that also allow you to sync and transfer notes from Apple iPhone 7 to iPad. This part will introduce the top programs which can help you to get the work done easily.
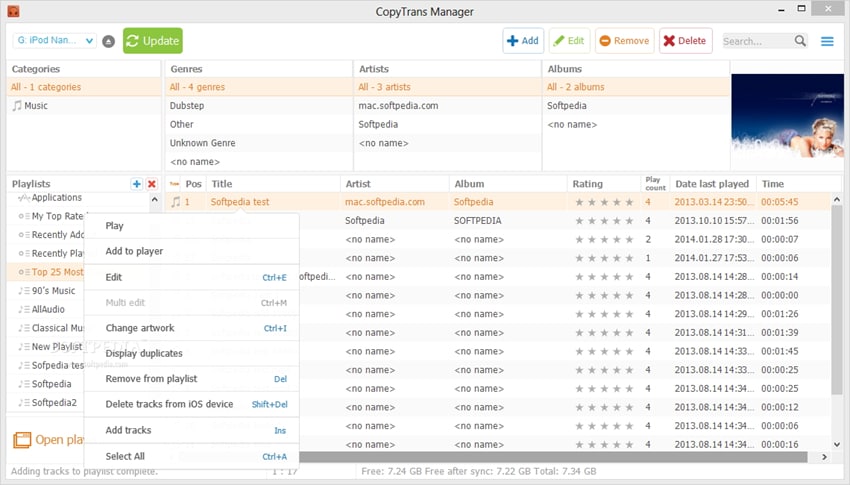
1. CopyTrans
It allows you to transfer apps, notes, photos, videos, and other content between iOS devices, PC, and iTunes. The software also takes backup of data so that it can be restored in case of data loss. CopyTrans also enables you to import the artwork, playlist, and other information into iTunes.
Pros
- Easy-to-use and clean interface
- Provides the option to take back up iOS data
- The app provides multiple guides and tips for the users
Cons
- The time of transfer is long
- Many users have also complained about detecting virus
User reviews
- Thousands of songs can be copied back to iTunes in minutes
- Virus detected by windows 10. Windows 10 detected a virus and removed the download 2x. Never unzipped the file.
2. iExplorer
This is another app that allows you to sync notes from Apple iPhone 7 to iPad. The app allows you to transfer images, music, notes, SMS and all other information respectively without any need to sync the entire file every time. iExplorer helps to manage folders and transfer data for iOS devices, and it is a great iTunes alternative.
Pros
- The app displays the data of the Apple iPhone 7 device in a clear layout
- The detection of the Apple iPhone 7 device by the app is quick and thoroughly
- Allows users to drag and drop files for the transfer
Cons
- Many users complaint of crashing issues
- There are lots of pop-up dialog for full version purchase
- The access to SMS and the contacts information is with jailbreak terminals only
User Reviews
- Amazingly quick! Got the job in very short time. Very user-friendly.
- I forgot my login information for my old iTunes account and had no way of obtaining it since I was also using a new email address. I downloaded this program and it transferred all 600-something of my files within a minute or two. Saved me so much money!
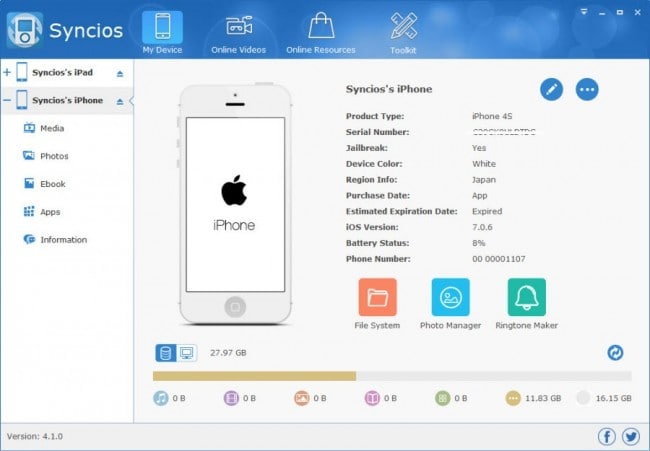
3. Syncios
Syncios also works as a decent iTunes alternative to transfer data between iOS devices and PC. The app allows users to transfer videos, photos, ringtones. TV shows, playlist, notes and all other data between iPhone/iPad/iPod and PC easily and quickly.
Pros
- Comes with easy setup wizard
- Excellent using experience when transfer files
Cons
- Free software does not comes with selected options to choose from
- Some users complain about the software collapse.
User Reviews
- Software crashed and we lost years of family photos, including photos of our kids with nanna who passed away recently. The scam part is this, if you go to the website you will notice they do data recovery, you can also download for free but to actually recover ‘photos’ etc, you have to pay $50.00 USD and there is the scam. They create the issue with the free software and then they sting you to give you back your photos. Warn everybody you know. BEWARE.
- Since I go through lots of music, videos, photos, I had to be able to backup the iPhones and this is where iTunes got kinda complicated for me. SyncIOS make the use of my Apple device much more user-friendly and comfortable.
5 Easy Ways to Transfer Contacts from Apple iPhone 7 to Android
Whenever we move from one device to another, the first thing that we wish to do is transfer our contacts. After all, we can’t communicate with anyone without our list of contacts. Surprisingly, a lot of people find it hard to transfer contacts from Apple iPhone 7 to Android. Truth to be told - there can find countless ways to move contacts from Apple iPhone 7 to Android. You don’t need to worry a lot about the compatibility issues of different systems and can replace old phones at will when there is a new phone release, like the upcoming Samsung Galaxy S22 series. You can use a third-party app, a cloud service (like iCloud), and iTunes. Read on to learn how to transfer contacts from Apple iPhone 7 to Android in 5 different ways.
Part 1: Transfer all contacts from Apple iPhone 7 to Android in 1 click
The easiest way to transfer all the iPhone contacts to Android is by using Dr.Fone - Phone Transfer . A part of the Dr.Fone toolkit can easily transfer all your data from one device to another with a single click. The application is compatible with every leading Android and iPhone model. You can transfer your data from Apple iPhone 7 to Android and vice-versa. Besides a cross-platform transfer of data, iPhone to iPhone and Android to Android transfer is also supported.
The application also supports transferring all the leading data types such as videos, music, photos, messages, and so much more. Extremely easy to use, it is a must-have tool for every smartphone user out there. To learn how to move contacts from Apple iPhone 7 to Android, you can take these steps:
Step 1. First of all, launch the Dr.Fone toolkit on your Mac or Windows PC, and from its welcome screen, visit the “Phone Transfer” module.

Step 2. Connect your Android and iOS devices to the system and let the application detect them automatically. Since you wish to export iPhone contacts to Android, iPhone should be the source while Android should be the destination device. You can use the Flip button to interchange their positions.
Step 3. select the category of data you wish to transfer. Once you have checked the “Contacts” option, click on the “Start Transfer” button to start the process.

Step 4. Sit back and wait for a couple of minutes as the application syncs contacts from Apple iPhone 7 to Android. Make sure that both the Apple iPhone 7 devices are kept connected to the system until the process is completed.

Step 5. Once the transfer completes, you will be shown a message. In the end, you can remove the 2 devices safely from your system.

Part 2: Move contacts from Apple iPhone 7 to Android with Google Account
Another fast and hassle-free way to sync contacts from Apple iPhone 7 to Android is by using your Google Account. Since you can add your Google account on the iPhone, you can also use it to sync your contacts. While setting up your Android, you can use the same Google account. To learn how to import contacts from Apple iPhone 7 to Android using your Google account, these quick steps can be implemented.
Step 1. Unlock your iPhone and go to its Settings > Mail, Contacts, Calendars > Add Account and tap on “Google.”

Step 2. Sign in with your Google account credentials and grant your phone the needed permissions to access your Gmail data.
Step 3. Now, you can go back to your Google account from here and turn on the sync option for “Contacts.”

Step 4. Once your contacts are synced with your Google account, you can easily access them on any Android device. You can use the Google Contacts app or use the same account to set up your device for auto-sync contacts.
Part 3: Import contacts from Apple iPhone 7 to Android with iCloud
Another simple way to sync contacts from Apple iPhone 7 to Android is by using iCloud. Firstly, you need to sync the iPhone contacts with iCloud, and later you can export them a VCF file. To this end, the vCard can be imported to Google Contacts. Yes - it does sound a bit complicated. After all, the Dr.Fone tools provide such a hassle-free way to move contacts from Apple iPhone 7 to Android compared to this technique. Though, this is a free solution and can be your plan B. To learn how to transfer contacts from Apple iPhone 7 to Android via iCloud, follow these steps.
1. Before you proceed, make sure your iPhone contacts are synced with iCloud. To do this, go to the iCloud settings and turn on the sync for 1.Contacts.
2. Great! Once your contacts are synced with iCloud, you can easily access them remotely. Go to iCloud.com and log in with your Apple ID.
3. After logging in to your iCloud account, go to the “Contacts” option from the home screen.
4. This will display a list of all the synced contacts. Select the contacts you wish to move. To select all contacts, click on the gear icon (settings) at the bottom right corner.
5. Once you have made the desired selections, go to its settings again (the gear icon) and choose “Export vCard.” This will save a VCF file having all the contact details.
6. Now, go to Gmail and login with your account details. Select the Contacts option. Alternatively, you can go to the official website of Google Contacts as well.
7. From here, you can choose to Import a file. Click on the vCard option and browse the saved VCF file that you have just exported from iCloud.
8. Once you have imported these contacts to your Google account, you can easily access them on the connected device as well.
Part 4: Copy contacts from Apple iPhone 7 to Android using iTunes
If you are an avid user of iTunes, you can try this technique to export iPhone contacts to Android. Earlier, iTunes has a feature to sync contacts with Google, Outlook, and Windows account. Now, the Google feature has been removed from iTunes. Therefore, you first need to sync your contacts to your Windows account and can later export them into a card. Needless to say, the technique can also be a bit complicated. Though, you can implement these steps to copy contacts from Apple iPhone 7 to Android using iTunes.
1. Launch the latest version of iTunes from your system, and connect your iPhone with a cable.
2. Select your connected device and go to its Info tab. Enable the “Sync Contacts“ option and choose to sync them with Windows Contacts.
3. Ensure that you choose to sync “All Contacts” before clicking on the “Apply” button.
4. Great! Once you have synced your iPhone contacts to your Windows account, you can safely remove the Apple iPhone 7 device. Go to your Account > Contacts and click on the “Export” button on the toolbar.
5. Choose to export the contacts to a vCard and select the location to save the VCF file.

6. In the end, you can manually copy the VCF file to your Apple iPhone 7 or import it to your Google Contacts as well.
Part 5: Switch contacts from Apple iPhone 7 to Android without a computer
Often, users don’t wish to use a computer to export iPhone contacts to Android. If you have the same requirements, then you can use a data transfer app. While there are many apps out there that can help you move contacts from Apple iPhone 7 to Android, I would recommend My Contacts Backup. This is because the app is available on both iOS App Store and Google Play Store . To use this app to transfer contacts from Apple iPhone 7 to Android, follow these steps.
1. Firstly, download the My Contacts app on your iPhone and launch it. Grant the app the needed permissions to access your contacts.
2. The app will automatically detect all the contacts saved on your device and would give you an option to either mail them or save them to its server.
3. You can choose to email the contacts to your own Gmail account as well. A VCF file will be mailed to your account that can later be downloaded and synced.

4. Additionally, you can also upload the contacts to its server.
5. Now, you have to install the My Contacts Backup app on your Apple iPhone 7 and Google Play Store.
6. Launch the app and choose to restore your contacts using an in-app vCard. In this way, all the saved contacts will be exported to your Apple iPhone 7.

Now that you have learned 7 different ways to move contacts from Apple iPhone 7 to Android, you can easily fulfill your requirements. Out of all the 8 provided options, Dr.Fone - Phone Transfer is the fastest and most convenient option to move all the contacts at once.
Transfer your Apple iPhone 7 Apps to New iPhone
We would be very excited to buy a new iPhone like iPhone 15/15 Pro(Max) whenever possible. Just think, what makes us emotional and enthusiastic towards buying and using a new iPhone? Maybe the new and advanced features are better than the old one? Exactly! Once you have bought a new iPhone like iPhone 15/15 Pro(Max), definitely the next step would be to transfer all your applications, games, movies, photos, files, videos, etc. Now the question arises, how to transfer apps from Apple iPhone 7 to iPhone? There must be some solution for every query so, let us research the ways of transfer by using iTunes, iCloud, and the iPhone app store. To know more about the process let us go in-depth.
One-click to transfer apps between iPhone [iPhone 13 Included]
There are so many ways for transferring Apps between iOS devices. If you are searching for a time-saving way to transfer the data. You can try the Dr.Fone - Phone Transfer to help you get the Apps. There is no incompatibility or limitations on iOS models and systems. You can click to transfer one data type from one to another.
Dr.Fone - Phone Transfer
Transfer Apps from Apple iPhone 7 to iPhone in 1 Click Directly!
- Cross-platform data migrating between any devices of your choice from Android and iPhone.
- Support massive data including images, videos, music, messages, contacts, apps, and more.
- Works perfectly with almost mobile phones and tablets, such as iPhones, iPad, Samsung, Huawei, etc.
- Fully work with mobile systems iOS 17 and Android 10.0 and computer systems Windows 10 and Mac 14.
- 100% safe and risk-free, backup & restore data as the original.
3981454 people have downloaded it
Connect both the two iPhones to your computer. Once both the iPhones are connected successfully, all the data from source devices will be detected and listed on the screen. You can adjust the target devices and source devices by clicking the “Flip” button directly.
A more detailed guide can be learned from this user guide. Check it out!
Another way that can assist you to move photos from Android to iPhone is the Dr.Fone - Phone Manager (Android) . What is incredibly convenient about Dr.Fone - Phone Manager (Android) is its ability to transfer photos selectively. You can also use it to transfer contacts, videos, messages, podcasts, and anything else stored on your Android in minutes. Dr.Fone - Phone Manager (Android) is a secure, trustworthy program, hence you can be reassured that your information will be kept safe while transferring from one device to another.
Part 1: How to transfer apps from iPhone apps to the new iPhone via iTunes?
iTunes backup is one of the most commonly used transfer methods. All you have to do is take the backup from the old iPhone and using iTunes you can transfer it to the new iPhone like iPhone 15/15 Pro (Max). Very simply, you can transfer apps from the old iPhone to the iPhone 15/15 Pro(Max) or an earlier model.
The Whole Process is divided into two sections
- A- Backing up old phone data to iTunes.
- B- Transferring backed-up data to a new phone using iTunes.
Section A - To start, you have to start with the backup in iTunes using the old iPhone:
- Firstly, you have to connect the old iPhone and the computer using the USB cable.
- Next, Open the settings and view iTunes. Ensure have the latest version of iTunes.
- Choose the Apple iPhone 7 device.
- Create the passcode in terms of encryption. After that, directly, click the backup now button.

- Once the backup process is finished, you should check whether the backup was done in iTunes preferences in the old iPhone. You can check it by verifying your name, time, and date in the backup.
Note: You have created the backup process on your old iPhone. Now, you should start the next work to transfer apps to the new iPhone like iPhone 15/15 Pro (Max).
Section B - Once you are done with backing up your old phone data with iTunes, now the next process is to transfer apps from Apple iPhone 7 to iPhone using iTunes backed up data:
- The first step is to switch on your new iPhone. The screen “Hello” should be visible to you. If you did the steps already in your new iPhone then you have to remove the entire step out before transferring the apps.
- In your settings, you will have the option Apps & Data. Click it and choose the option “Restore from the iTunes backup” among other options.

- Now, you have to connect the new iPhone device to the PC where the backup from the old iPhone was done.
- View iTunes from the computer and choose your new iPhone like iPhone 15/15 Pro (Max).
- Choose the “Restore backup” and cross-check the date, time, iPhone old name, etc.
- If you set a passcode then enter it. Just wait for a few minutes to get complete the restore process. Keep On the Wifi support to the new iPhone like iPhone 15/15 Pro (Max) and your backup will automatically download to the new iPhone.
Note: You have done the entire process to transfer apps to the new iPhone 15/15 Pro (Max) or an earlier model.
Part 2: How to transfer apps from Apple iPhone 7 to iPhone using iCloud?
The next successful method is an iCloud backup. iCloud the most used application for verification purposes in the iPhone. This method will be very genuine and no complications occur throughout the process when you transfer apps from Apple iPhone 7 to iPhone 15/15 Pro (Max) or an earlier model.
Here also, we have summed up the transferring process via iCloud under two sections
Section A - Backing up the process: Let’s see the steps to take the backup in iCloud using the old iPhone.
- Connect the old iPhone to the Wifi connection.
- Tap the settings and choose iCloud. Click the iCloud and turn ON the iCloud backup.
- Just ensure that you have turned on backup on iCloud.
- Select the backup now button and don’t turn off the wifi till the process gets completed.

Note: You have taken the backup from the old iPhone using the iCloud application.
Section B: Now Let us move ahead to see the steps to transfer apps to the new iPhone like iPhone 15/15 Pro (Max):
1. First, we need to connect the new iPhone and wait for the hello message to receive. If you have completed the set up then you have to remove the setup for the backup process.
2. To remove the setup in the new device – choose settings and then general. From the general choose the reset option. Now select erase all the content and the settings.
Note: Doing so will erase any old setup.
3. Ensure the Wifi is connected to the Apple iPhone 7 device and complete the process to configure the wifi.
4. Open the Apps/Data and select “Restore from the iCloud backup”.

5: You will get the screen to enter the iCloud credential details such as ID/ password.

6: After entering the credentials, you will have the choice to select the backup process. Ensure the date/time of the backup process for verification.
7: The backup process starts on your new phone and you do not interrupt or stop the wifi connection while the backup process continues.
8: Your photos, videos, files, etc will be automatically downloaded into your new Phone using iCloud.
Part 3: How to transfer apps from Apple iPhone 7 to iPhone with the help of the App store?
In this part, we are going to transfer apps from Apple iPhone 7 to iPhone 15/15 Pro (Max) or an earlier model using the iPhone app store. In this method, you do not need to connect to the computer, or no lengthy steps needed. Let us see the steps carefully!
1: You can access the iPhone app store once if you log in to the iCloud account. Click on the settings and choose the “iTunes & App store”. It will ask you to enter the credentials such as Apple ID and password.
2: If you didn’t update the app store then update it by clicking the icon in the lower right corner of the window.

3: Once you tap on the update icon, it will show the option “My Purchase”. It will ask you to sign in the iCloud account.

4: After entering the credential, you have the two options such as all and not on this phone.
5: Select the option “not on this phone” present on the right upper side of the window. You will get the list of applications that you have purchased using the iCloud account.
6: Click the download button next to the icon of the apps. The apps will be installed on your new Phone.

Note: You have completed the installation of apps on your new iPhone.
We have given and explained to you 3 methods to transfer apps from Apple iPhone 7 to iPhone with proper guidance. Each method describes a unique verification process along with the manual setup. You now do not need to wait in a queue to transfer apps to your new iPhone. We can assure you that you would also be in no need of any help from outside. All the best!
Also read:
- [New] Amplify and Transform Changing Your Audible Image on IG
- [Updated] 2024 Approved Breaking Into the World of YouTube Stellar Intros in iMovie
- [Updated] Recovering a Stopped-Up Link to Your OBS Cam
- A Deep Dive Into FreenoCam Software Features
- Effortless Ways to Transfer Data from Your Apple iPhone 12 mini to iPhone 15 | Dr.fone
- Fix Apple iPhone X Stuck on Data Transfer Verified Solution! | Dr.fone
- Flash Toolbar Icon Substitution Guide - FlipBuilder Tutorials
- How To Transfer Data From Apple iPhone X To Others ios devices? | Dr.fone
- In 2024, 6 Methods for Switching from Apple iPhone SE to Samsung | Dr.fone
- In 2024, Fix Apple iPhone 12 Stuck on Data Transfer Verified Solution! | Dr.fone
- In 2024, How to Transfer Data from Apple iPhone 8 Plus to ZTE Phones | Dr.fone
- In 2024, How to Unlock a Network Locked Poco X6 Phone?
- In 2024, iPhone Transfer Transfer Contact from Apple iPhone 14 Pro Max to iPhone without iCloud | Dr.fone
- In 2024, Solved How To Transfer From Apple iPhone 14 Plus to iPhone 15 | Dr.fone
- iPhone Transfer Transfer Contact from Apple iPhone 6 to iPhone without iCloud | Dr.fone
- Methods to Transfer from Apple iPhone 14 Pro to Android | Dr.fone
- Sarah Silverman Joins Legal Battle Against OpenAI & Meta: The Rising Conflict over AI Rights
- Updated The Best Boxing Streaming Websites for the Latest Match Coverage
- Updated Unbiased Comparison Final Cut Pro and LumaFusion for Video Editors for 2024
- Title: In 2024, How to Transfer/Sync Notes from Apple iPhone 7 to iPad | Dr.fone
- Author: Charlotte
- Created at : 2024-10-02 17:43:14
- Updated at : 2024-10-06 17:03:36
- Link: https://iphone-transfer.techidaily.com/in-2024-how-to-transfersync-notes-from-apple-iphone-7-to-ipad-drfone-by-drfone-transfer-from-ios/
- License: This work is licensed under CC BY-NC-SA 4.0.