
In 2024, How To Transfer Messages From Apple iPhone 12 to other iPhone All iOS Versions | Dr.fone
How To Transfer Messages From Apple iPhone 12 to other iPhone [All iOS Versions]
Transferring messages from one iPhone to another is a common necessity. It often arises during device upgrades, replacements, or when sharing information between devices. With the evolution of iOS versions, the methods for transferring messages have also adapted and improved. Regardless of the version, transferring messages between iPhones remains vital and relevant.
This guide will go through many techniques to transfer messages from Apple iPhone 12 to iPhone. Our goal is to provide you with the necessary knowledge for transferring your messages between two iPhones. We will ensure a smooth transition process by offering clear step-by-step guidance and helpful tips.

Part 1: How To Sync Messages Between Two iOS Devices?
Synchronizing messages between two iOS devices is a convenient way. It ensures that conversations and attachments transfer from one iPhone to another smoothly. iOS offers iCloud as the method to achieve this synchronization. It enables users to maintain message continuity across their devices. Here is how to transfer messages from Apple iPhone 12 to iPhone via iCloud sync:
- Step 1. Ensure you’re signed in with the required Apple ID on both devices. Next, navigate to the “Settings” app on the source device and select “Apple ID.” On the following screen, press “iCloud” to proceed.

- Step 2. Here, tap “Show All” under the “Apps Using iCloud” section and press “Messages in iCloud.” On the ensuing screen, toggle on “Use on this iPhone” and then press the “Sync Now” option.

- Step 3. Now, move to the target device and access “iCloud” settings through the Settings app. Here, navigate to “Messages in iCloud,” and on the next screen, enable “Use on this iPhone.” Give it some time, and the messages on both devices will sync.

Part 2. How To Transfer Messages From Apple iPhone 12 to iPhone Using iCloud Backup
Transferring messages between iPhones using iCloud backup offers an efficient method. It guarantees the transfer of all your conversations, attachments, and message history. Nonetheless, a significant limitation of this approach is its exclusive usability during the setup of an iPhone. Moreover, you can’t restore messages selectively with this method. Here is how to transfer text messages from Apple iPhone 12 to iPhone using iCloud backup:
- Step 1. Ensure your old iPhone is linked to a reliable Wi-Fi network. Open “Settings,” tap on your name, and select “iCloud.” Tap “iCloud Backup” and ensure the “Back Up This iPhone” toggle switch is turned on.

- Step 2. Here, press “Back Up Now” to initiate an immediate backup and wait for the process to complete. Afterward, move to the new iPhone and start setting it up until you reach the “Apps & Data” screen.

- Step 3. Next, opt for “Restore from iCloud Backup.” Then, log in to your iCloud account with the identical credentials employed during the backup process. Pick the latest backup from the available options, including the messages you aim to transfer. The restoration process will begin, and once it’s completed, open the Messages app to verify that all your message history has been transferred.

Part 3. How To Transfer Messages From Apple iPhone 12 to iPhone via iTunes/Finder
Using iTunes or Finder provides an alternate method to transfer messages from one iPhone to another. iTunes is available for Windows and on macOS Mojave and earlier. The users of macOS Catalina and later can use the Finder app to use this method. This approach completely restores your previous iPhone’s data, including messages.
Ensure that both iPhones are updated to the latest iOS version and that your computer has the latest version of iTunes or Finder. This is to avoid any compatibility issues during the backup and restoration process. Here is how to transfer messages from Apple iPhone 12 to iPhone via iTunes/Finder backup:
- Step 1. Begin by connecting your old iPhone to the Mac or PC and access it in iTunes or Finder. On iTunes, click the Apple iPhone 12 device to access the “Summary” tab, while in Finder, access the “General” tab. Here, go to “Backups” and choose “Back Up Now” to create a backup for your device. Make sure to select either “This Computer” (for iTunes) or “Backup all data from your iPhone to this Mac” (for Finder).

- Step 2. Once the backup is completed, start setting up your new iPhone. Once you reach the “Apps & Data” screen, select “Restore from Mac or PC,” and follow this guide:
For Finder/iTunes: Link your iPhone to the PC and gain access by clicking on the “Device” icon at the top left corner. This action will lead you to the “Welcome to Your New iPhone” screen, where the “Restore from this backup” option is pre-selected. Here, choose the desired backup and click “Continue” to kickstart the backup restoration process.

Part 4. The Best Way To Transfer Messages From Apple iPhone 12 to iPhone Without Resetting
iCloud and iTunes are viable options for transferring messages, but both need an entire device reset. However, synchronization of devices is limited to those sharing the same Apple ID. Therefore, if you seek a hassle-free method, Wondershare Dr.Fone emerges as your optimal choice. It is a reliable and efficient solution that simplifies transferring data between iPhones.
With Dr.Fone, users can copy all their content from one device to another with just one click. This functionality also extends across different OS, enabling smooth transfers between iOS and Android devices. Users can move various data types, including contacts, SMS, photos, videos, music, etc.
Key Features of Wondershare Dr.Fone
- It is compatible with the latest iOS 17 and new models of iPhone 15.
- This Phone Transfer tool can operate with over 8000 devices, encompassing Apple, Samsung, and an extensive array of others.
- Wondershare Dr.Fone facilitates the transfer of up to 15 different file types between phones.
Steps To Transfer Messages From Apple iPhone 12 to iPhone Without Backup via Dr.Fone
When using Wondershare Dr.Fone for phone-to-phone transfer, the process requires no technical expertise. Here is how to transfer messages from Apple iPhone 12 to iPhone without backup using Dr.Fone:
- Step 1. Initiating Phone Transfer Setup
Start by installing and opening Wondershare Dr.Fone on your computer to begin the process. Navigate to “Toolbox” and select “Phone Transfer” to proceed. Now, connect your iOS devices and allow them to load on the following screen. In this step, designate the “Source” and “Destination” for the transfer to specify the direction of the phone transfer. If you need to switch the locations of your iOS devices, utilize the “Flip” button.

- Step 2. Data Type Selection and Transfer Initialization
Once the source and destination are confirmed, choose the particular data types for transfer. Make sure Messages are selected, then mark all other data if you want, and click on “Start Transfer.” Subsequently, a notification will prompt you to turn off the Find My feature on iOS devices.


- Step 3. Disable Find My on iOS Device and Complete Data Transfer
Access the iOS device settings, tap on the name at the top, proceed to iCloud > Find My, and deactivate it. Once the feature is turned off, the data transfer will start, and the progress bar will indicate the completion of the transfer process. After completion, the front window displays the finished phone transfer. Press “OK” to finalize the entire process.
![]()
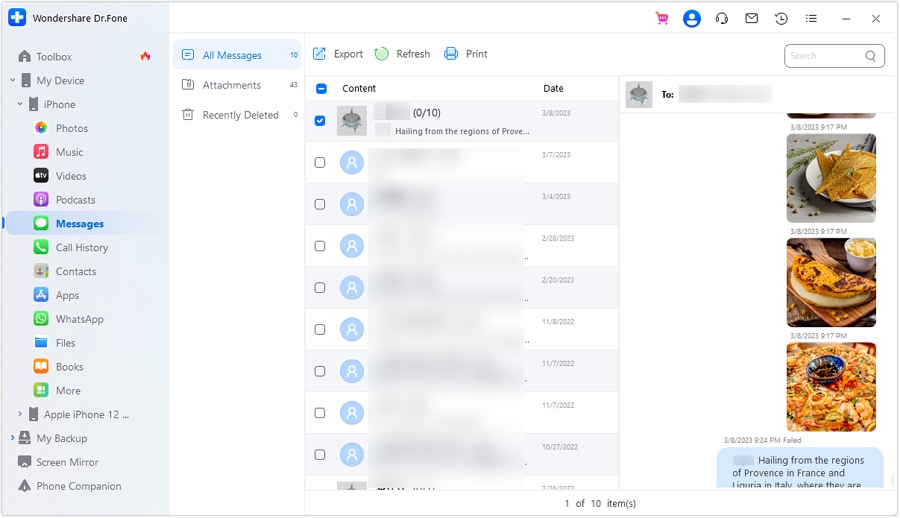
Pro Tip. How To View and Export Messages of iPhone on Your Computer/MacBook
Looking for a way to view and export your messages from your iPhone to your computer? If yes, Wondershare Dr.Fone has got you covered. Dr.Fone offers a robust iOS phone management tool that enables the export of data from your iOS device.
This functionality empowers you to create a backup of your iPhone messages directly onto your system. Here is how you can view and export your messages via Wondershare Dr.Fone:
- Step 1. Access the Messages App Data
Start by establishing a link between your iOS device and the computer using a USB connection. After the Apple iPhone 12 device is detected, its specifics will be visible on the home screen. Proceed by selecting the “Messages” option from your device apps on the left side.

- Step 2. Export the Messages From the iPhone
Next, you can view all the messages and their attachments from your iPhone on your computer. If you want to export them, select the messages and press the “Export” button from the top. You can export the messages in Excel, CSV, or PDF format with all the details.
Conclusion
In conclusion, the process of transferring messages from Apple iPhone 12 to iPhone is crucial for maintaining communication continuity. Whether using iCloud, iTunes/Finder, or third-party solutions, each method offers advantages.
Yet, for effortless transfers without device resets, Wondershare Dr.Fone emerges as a standout choice. Its intuitive interface, selective data transfer, and message export capabilities make it an ideal solution. For effortless and efficient iPhone message handling, Dr.Fone proves to be a recommended tool.
How to Transfer Data from iOS Devices to Motorola Phones
Issues about transferring data from Apple iPhone 12 to Motorola G5/G5Plus
There are several items like contacts and calendar that you could transfer from Apple iPhone 12 to Motorola phone. Usually you can use Migrate application after you downloaded and installed on your phone. After you open the app you should enter your logins for iCloud and the transfer of your data will start when you login into your Google account, too. You should know that several contact and calendar field names differ between iCloud and Google, like “Work – Phone” in iCloud is “Phone” in Google. But probably this is not the big issue.
One bigger problem can be that you could have duplicate contacts after transferring your data. If you have the same contacts for example in your iCloud and in your Google account, those contacts will be duplicated. Even it is a slower way, you could try to merge similar contacts by going to your contacts in Gmail, highlighting your iCloud contact group and select “Find and merge duplicates”.
For calendar, one issue might be that the new calendar data are not shown on your phone. If you cannot find the best method that works for you, like syncing the calendar from iCloud or syncing from your Google account, you should start over with the migration of data. It is a little embarrassing to start over and over again with transferring the data.
Part 1: Easy solution - 1 click to transfer data from Apple iPhone 12 to Motorola G5
Dr.Fone - Phone Transfer can be used for transferring data from to phone to another phone like messages, contacts, call logs, calendar, photos, music, video and apps. Also you can back up your iPhone and save the data on your pc, for example, and restore later when you wish. Basically all your necessary data can be transferred fast from a phone to another phone.
Dr.Fone - Phone Transfer
Transfer Data from iOS Devices to Motorola Phones in 1 click!
- Easily transfer photos, videos, calendar, contacts, messages and music from iOS Devices to Motorola Phones.
- Enable to transfer from HTC, Samsung, Nokia, Motorola and more to iPhone 15/14/13/12/11/X and former.
- Works perfectly with Apple, Samsung, HTC, LG, Sony, Google, HUAWEI, Motorola, ZTE, Nokia and more smartphones and tablets.
- Fully compatible with major providers like AT&T, Verizon, Sprint and T-Mobile.
- Fully compatible with iOS 17 and Android 13
- Fully compatible with Windows 10 and Mac 14.
3,860,614 people have downloaded it
Motorola devices supported by Dr.Fone are Moto G5, Moto G5 Plus, Moto X, MB860, MB525, MB526, XT910, DROID RAZR, DROID3, DROIDX. The actions that you could do with Dr.Fone are transferring data from Android to iOS and to Android, from iOS to Android, from iCloud to Android, converting audio and video, restoring any supported phone from backup files, erasing the Android device, iPhone, iPad and iPod touch.
Steps to transfer data from Apple iPhone 12 to Motorola phones
1. Connect your iPhone and your Motorola phone to the computer
Both your phones should have an USB cable. Take the USB cables and connect your phones to your computer. Open Dr.Fone and enter the Switch window. Dr.Fone detect fast your both phones if they are properly connected.
Tips: Dr.Fone also has an Android app that can transfer iOS data to Motorola phone without relying on a PC. This app even allows you to access and get iCloud data on your Android.
You can choose to flip between the two devices, also. You will see all your data like contacts, text messages, calendar, call logs, apps, photos, music, videos and you can select the data that you need to be transferred. If you wish, you can clean the data before to start copying the new data on your device.

2. Start to transfer the data from your iPhone to your Motorola phone
After you choose the data that you wish to be transferred, all your data or just a few, you must to use the “Start Transfer” button. You will be able to see the data from your source iPhone that can be transferred to your destination Motorola phone.
As you know, iOS operating systems and the Android operating systems are different and the data cannot be shared from one to another of this two different devices. This why, instead using the manually method, you can use Dr.Fone - Phone Transfer to transfer data from an iPhone to a Motorola phone.

Part 2: Which Motorola device do you use?
List at least 10 popular Motorola devices in US.
Moto X, the phone with the 5.2 inches HD display and 1080p you can see all your videos, photos captured with the 13 MP camera, in a good way. Also, the glass is water-resistant and protect your phone.
Moto G (2nd Gen.), the smartphone with the latest Android operating system and stereo sound.
Moto G (1st Gen.), with the 4.5 inches sharp HD display.
Moto E (2nd Gen.), the phone having the fast processor with 3G or 4G LTE, the connection is made easy.
Moto E (1st Gen.), having a long life all-day battery and Android KitKat operating system.
Moto 360, the smart watch displays notifications based on where you are and what you are doing, like flying departures. With the voice control, you can send text messages, check the weather, or ask for directions to the work place or leisure place.
Nexus6, having an amazing 6 inches HD display, offers one of the high quality preview and view of your media files.
From the Motorola DROID category, you can utilize:
Droid Turbo, the smartphone having 21 MP camera lets you shoot amazing photos.
Droid Maxx, is water – resistant and the rain should be no pain for you.
Droid Mini, is the small phone that you can use fast for your needs having Android KitKat.
How to Transfer Photos from Apple iPhone 12 to other iPhone without iCloud
This article’s content focuses on the importance of photos, and the techniques and tools you require to transfer photos from Apple iPhone 12 to another iPhone without iCloud including iPhone 15.
Photos are important because they reflect our memories, we have so many memories in our brain and it is not easy to pull them all up when required, but photos can help a lot to remember. Photos invoke emotions, sometimes photos are important to remember details, for example, “What did I wear on my last Christmas?”.
Method 1: How to Transfer Photos from Apple iPhone 12 to iPhone without iCloud (All in One Click) [iPhone 15 Included]
The top method to transfer photos from Apple iPhone 12 to iPhone without iCloud is to transfer all the photos in one click. With this method, you can complete the photo transfer even within seconds without any photo loss. All you need are two lightning cables to connect both iPhones to your PC or Mac, and the Dr.Fone - Phone Transfer (iOS & Android) software.
Dr.Fone - Phone Transfer
Easiest Way to Transfer Photos from Apple iPhone 12 to iPhone without iCloud
- Transfer photos from an old iPhone to a new iPhone within seconds.
- Support the transfer of more data like contacts, messages, files, videos, etc. from phone to phone.
- Transfer everything from Apple iPhone 12 to new iPhone , from Android to Android, from Apple iPhone 12 to Android, and from Android to iPhone.
- Supports iPhone, iPad, iPod touch, and the latest iOS version.
- Fully compatible with the latest Windows or Mac version.
3981454 people have downloaded it
Here are the simple steps to transfer photos from Apple iPhone 12 to iPhone without iCloud:
Step 1: Download the Dr.Fone software, open it, and you can see the following interface.
Step 2: Connect both iPhones to your PC and click “Phone Transfer”.

Note: Confirm which iPhone is your destination device and which one is the source. Click “Flip” to swap their positions if necessary.
Step 3: Select the “Photos” option and click “Start Transfer”. Then you can find all photos are transferred from Apple iPhone 12 to iPhone without iCloud.

Video Guide: Transfer photos from Apple iPhone 12 to iPhone without iCloud
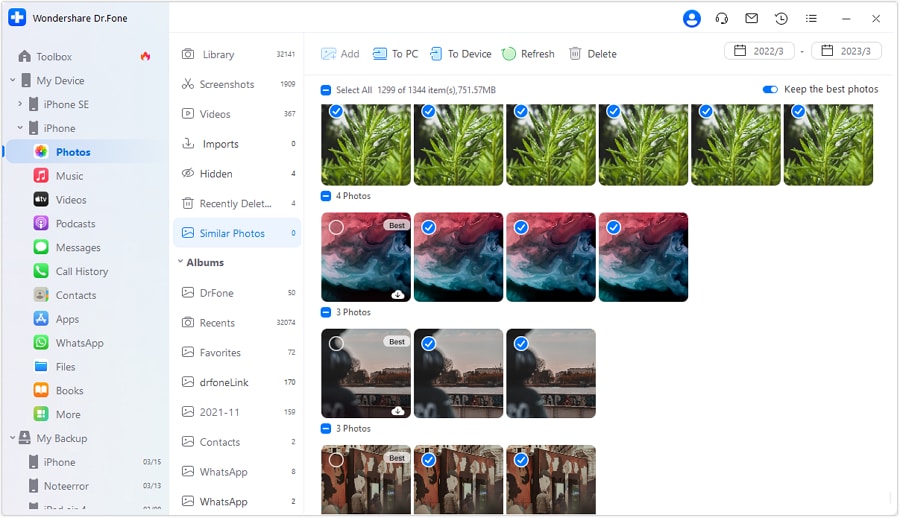
Method 2: Transfer Photos from Apple iPhone 12 to iPhone without iCloud (Selective Transfer) [iPhone 15 Included]
When you want to transfer your photos separately without transferring the other iDevice data, there is a perfect tool for you: Wondershare Dr.Fone . This action takes no time at all, and you can transfer the images within a matter of a few seconds. You can also use this phone manager app to transfer data from Apple iPhone 12 to Android and iTunes or vice versa.
In addition, Wondershare Dr.Fone works efficiently without losing data while transferring media files between iOS devices. It can also transfer videos, contacts, messages, etc., from Apple iPhone 12 to iPhone. Here is how to selectively transfer photos from Apple iPhone 12 to iPhone without transferring the complete iPhone data via Wondershare Dr.Fone:
Step 1: Proceed With the Phone Manager feature
First, you need to install Wondershare Dr.Fone on your computer and connect both your iDevices to the computer using the Apple-certified USB cables. Next, locate the iPhone from which you want to transfer the images and expand it. Choose the “Photos” tab and let Wondershare Dr.Fone load all the pictures.
Step 2: Perform the Selective Photos Transfer
Once Dr.Fone detects all the photos in your iPhone, it will categorize them in the albums like they are in your iDevice. Choose the pictures you want to transfer and tap the “To Device” option. Then, click on the iPhone on which you want to send all the selected images and complete the photo transfer process.
Method 3: Transfer Photos from Apple iPhone 12 to iPhone without iCloud via iTunes [iPhone 15 Included]
Using iCloud for transferring data is convenient, but it is not always practical due to the limitation of maximum data. In that case, iTunes can be a good option, which is another functional software from Apple. Following are the step-by-step instructions to transfer pictures from Apple iPhone 12 to iPhone via iTunes to avoid data storage limitations:
Step 1: To begin with, launch iTunes on your computer and connect your source iPhone. Select the “Phone” icon near the top left corner of iTunes and move to the “Summary” tab. Then, navigate to the “Backups” section and check the “This Computer” option. Then, hit the “Back Up Now” button on the right side to start the backup process of your iDevice.

Step 2: Once the backup process is complete, disconnect the old iDevice. Next, you need to connect your new iPhone and proceed to the “Backups” section in the “Summary” tab. Here, tap “Restore Backup” and go on to choose the most recent backup. To complete the photo transfer process, tap “Restore” and wait for the backup to be restored.

Method 4: Transfer Photos from Apple iPhone 12 to iPhone without iCloud via AirDrop [iPhone 15 Included]
AirDrop gives its users the wireless facility to transfer iPhone photos in a quick manner. Unlike iCloud or iTunes, it does not need to sync all the photos. You just have to select the photos from one of your iPhones and AirDrop them to another. However, the other iPhone should be within the Bluetooth and Wi-Fi range of the host iDevice. Here are the instructions you need to follow to AirDrop photos from old iPhone to new iPhone efficiently:
Step 1: On your old iPhone, you need to open the “Photos” app and hop into the desired folder. Next, pick the photos you want to share by tapping the “Select” button in the upper right corner.
Step 2: Following this, you will have to tap the “Share” icon, followed by selecting the targeted “AirDrop” recipient iPhone. Then, on the target iPhone, you have to choose “Accept” to receive them.

Tip: How to Transfer Photos from Apple iPhone 12 to iPhone using iCloud
Step 1. To transfer the photos from your iPhone to another iPhone you must make sure that you make a backup through iCloud.
Step 2. On the home screen tap Settings. Once entered in settings tap iCloud.

Step 3. In the iCloud menu, you need to click on photos. Once entered in photos turn on the iCloud Photo Library option along with upload my photostream.
Step 4. When you are done your photos will be uploaded to iCloud and you can restore them by simply adding the iCloud id to the new iPhone device.
Editor’s Picks:
- 5 Ways to Transfer Everything from Old iPhone to your new iPhone
- 5 Ways to Transfer Photos from Apple iPhone 12 to PC with/without iTunes
If you do not want to use iCloud for data transfer, run Dr.Fone - Phone Transfer on your computer and transfer data in one click quickly.
Also read:
- [New] 2024 Approved Enhance Visual Narratives Incorporating Titles in Microsoft Photos Win 11
- [New] Capturing Emotion Ensuring Authenticity in Your YouTube Videos for 2024
- [New] Creating Compelling Channel Names Simplified for 2024
- [New] Cutting-Edge Techniques for Outstanding TikTok Video Production Using Templates for 2024
- 2024 Approved Memetic Flesh Eater Artist
- 2024 Approved Overcoming Adversities in Digital Self-Expression
- 5 Ways to Transfer Music from Apple iPhone XS to Android | Dr.fone
- Comparing AVCHD and AVCREC - Clear Insights Into Their Distinct Features
- Easy Methods How To Transfer Pictures From Apple iPhone 12 Pro to PC | Dr.fone
- How To Track IMEI Number Of Poco C51 Through Google Earth?
- How to Transfer Everything from Apple iPhone 7 to iPhone | Dr.fone
- How To Transfer Messages From Apple iPhone 12 to other iPhone All iOS Versions | Dr.fone
- In 2024, 4 Ways to Transfer Contacts from Apple iPhone 8 Plus to iPhone Quickly | Dr.fone
- In 2024, How to Transfer Apple iPhone 13 Pro Max Data to iPhone 12 A Complete Guide | Dr.fone
- In 2024, How To Transfer Messages From Apple iPhone 14 Pro to other iPhone All iOS Versions | Dr.fone
- In 2024, How to Transfer/Sync Notes from Apple iPhone 12 to iPad | Dr.fone
- Optimizing System Performance for God of War with Lowered CPU Usage
- Simplify Tech Transitions Smartphone-VR Integration Guide for 2024
- Ultimate Guide, How to Transfer Music From Apple iPhone 15 Pro to iPhone | Dr.fone
- Title: In 2024, How To Transfer Messages From Apple iPhone 12 to other iPhone All iOS Versions | Dr.fone
- Author: Charlotte
- Created at : 2024-09-30 18:56:35
- Updated at : 2024-10-06 18:41:04
- Link: https://iphone-transfer.techidaily.com/in-2024-how-to-transfer-messages-from-apple-iphone-12-to-other-iphone-all-ios-versions-drfone-by-drfone-transfer-from-ios/
- License: This work is licensed under CC BY-NC-SA 4.0.