
In 2024, How to Transfer from Apple iPhone 13 to Samsung Galaxy S20? | Dr.fone
How to Transfer from Apple iPhone 13 to Samsung Galaxy S20?
If you are willing to switch your phone from an iOS device to an android, the primary issue which restricts you to do so is your data loss and the data transferring from one device to another. In this article, we’ll be learning How to Transfer Data from Apple iPhone 13 to Samsung Galaxy S20, with some easy and best techniques. The discussed techniques will ensure your data from not getting lost.

Part 1: Transfer from Apple iPhone 13 to Samsung Galaxy S20 Directly (Easy and Fast)
Dr.Fone - Phone Transfer program is a phone transfer tool, you can transfer all types of data like photos, music, contacts, messages, calendar, etc. from one phone to another easily.
Let’s see how we can to transfer data from Apple iPhone 13 to Galaxy S20
Dr.Fone - Phone Transfer allows you to transfer data between various phones with one click, including Android, iOS, Symbian, and WinPhone. Use this program to transfer and convey data between any of them.
Down below there’s a detailed step by step process explaining how you can transfer all your data from one phone to another using computer
Step 1. Connect Your Apple iPhone 13 to the computer
After opening Dr.Fone on your computer, select “Phone Transfer” among the modules.

Make sure you have connected both of your devices with it. Here let’s take an iOS and a Samsung Galaxy S20(any Android device) as an example.

The data from the source device will be conveyed/transferred to the destination device. To exchange their position, you can use the “Flip” button too.
Step 2. Select the file and start to transfer
Choose the file types you desire to move. To begin the process, click on-Start Transfer. Until the process is completed, please don’t disconnect the Apple iPhone 13 devices for its maximum efficiency.

Before commencing the data transfer process between both the phones, if you want to erase the data of the destination device-check the “Clear Data before Copy” box.
All the files you selected will be transferred to the targeted phone successfully In a couple of minutes.

Part 2: Transfer from iCloud Backup to Samsung Galaxy S20 (Wireless and Safe)
1. Dr.Fone - Switch App
If you don’t have a computer device and want to transfer data from an iOS device to an Android device, here is an in-depth step by step process guiding you how to do so.
How to sync data from the iCloud account to Android
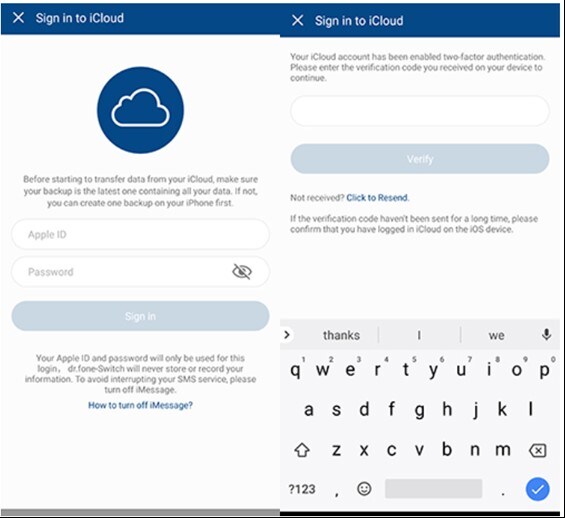
Step 1. Touch “Import from iCloud”, after installing the Android version of Dr.Fone - Switch.

Step 2. With your Apple ID and passcode, log in to the iCloud account.
If you have enabled the two-factor authentication, enter the verification code.
Step 3. On your iCloud account now in a while later, all types of data can be detected.
Touch “Start Importing” after Selecting your desired data or all of these data.
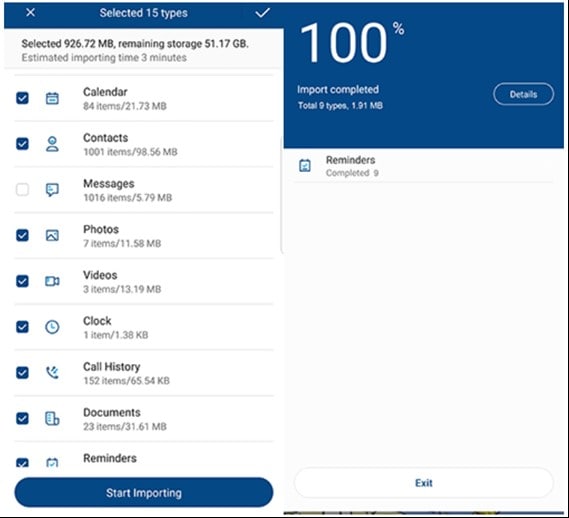
Step 4. Sit back until and unless data importing is fully completed. Then you can exit this app and check the data synced from iCloud on your Apple iPhone 13 or tablet.
Prons:
- Transfer data from Apple iPhone 13 to Android without a PC.
- Support mainstream Android phones (including Xiaomi, Huawei, Samsung, etc.)
Cons:
- For direct data transfer, connect iPhone to Android by using an iOS-to-Android adapter.
2. Samsung Smart Switch App
Export data from iCloud to Samsung S20 with Smart Switch
If you make use of the Samsung Smart Switch app, syncing iTunes with Samsung is just an easy-peasy task.
It has become simpler to sync iCloud to Samsung S20 as it stretches compatibility with iCloud. Here is how-
How to transfer data from iCloud to Samsung S20 with Smart Switch
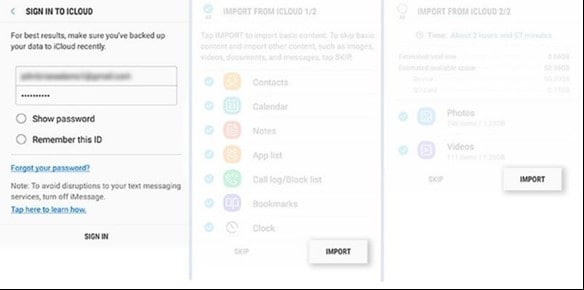
Download Smart Switch from Google Play on your Samsung Device. Open the app, then click on ‘WIRELESS,’ after that tap on ‘RECEIVE’ and select the ‘iOS’ option.
Sign in with your Apple ID and password. Now, select the desired content you want to transfer from iCloud to Samsung Galaxy S20 and press ‘IMPORT.’

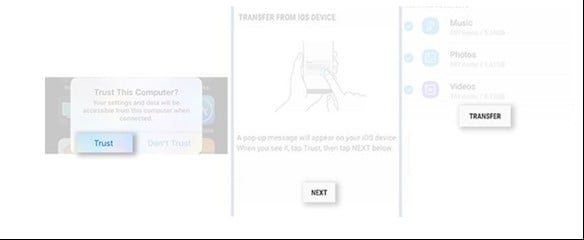
If you are using a USB cable, do keep iOS cable, Mirco USB, and USB Adapter handy. Then, load Smart Switch on your Samsung S20 model and click on ‘USB CABLE.’
Further, connect the two devices by iPhone’s USB cable and the USB-OTG adapter with Samsung S20.
Click on ‘Trust’ followed by pressing ‘Next’ to proceed further. Choose the file and press on ‘TRANSFER’ to convey/Transfer from iCloud to Samsung S20.
Prons:
- Wireless transfer.
Cons:
- Only for Samsung phones.
If you prefer to run a desktop software to transfer data, use Dr.Fone - Phone Transfer. It’s a hassle-free solution. Connect both phones to computer and start to transfer data in one-click.
Part 3: Transfer from iTunes Backup to Samsung Galaxy S20 without iTunes
Step 1. Select the backup file
Launch Dr.Fone and select Phone Backup. Connect your Samsung S20 to the computer. Click on Restore.
It will give the option View backup history if you have used this function to backup your iOS device before. Click on View backup history option to view the backup file index.

After that, Dr.Fone will display the backup history. Just pick the backup file you want and click on the Next on the bottom of the program or view button next to the backup file.

Step 2. View and Restore the backup file
The program will take a few seconds to examine the backup file and display all data in categories in the backup file after you click on View.
After you find the files you require, you can pick a few files or choose them all to move to the next step.

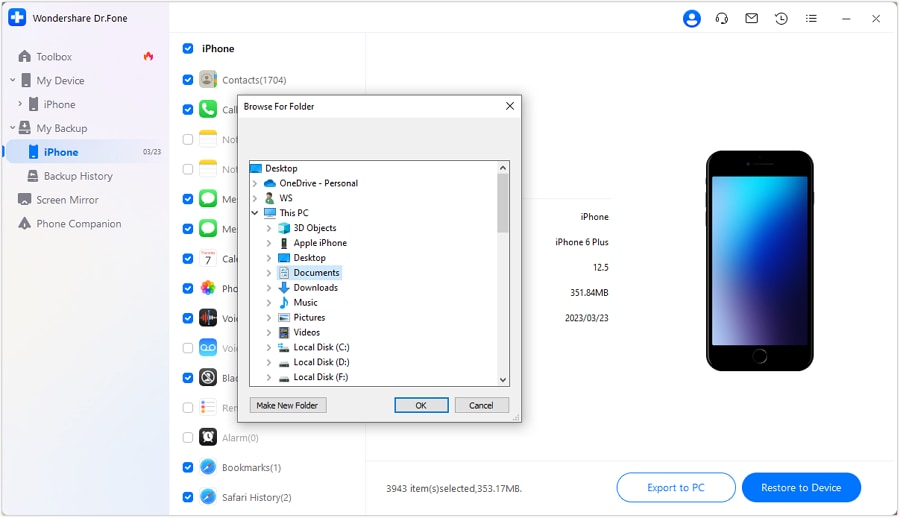
Currently, Dr.Fone supports to restore the music, Safari bookmarks, Call History, Calendar, Voice memo, Notes, Contacts, Messages, Photos, videos to the Apple iPhone 13 device. So you can restore these data to your Samsung device or transfer them all to your computer.
If you want to restore the files to your device, select the files and click on Restore to Device. In a couple of seconds, you will get these files on your Android gadget.
If you want to export the chosen files to your computer, click on Export to PC. Then select the save path to transfer your data.
Final Words
The techniques which are discussed above are meant to solve your problem and let you know How to Transfer from Apple iPhone 13 to Samsung Galaxy S20. These techniques will guide you through transferring your file quickly and swiftly. The method discussed over here is related to both the users- who are willing to transfer their data using a computer and without using it. So, finally, we hope that this article would help you to solve your issue related to data transfer.
How to Transfer Apple iPhone 13 Data to iPhone 12: A Complete Guide
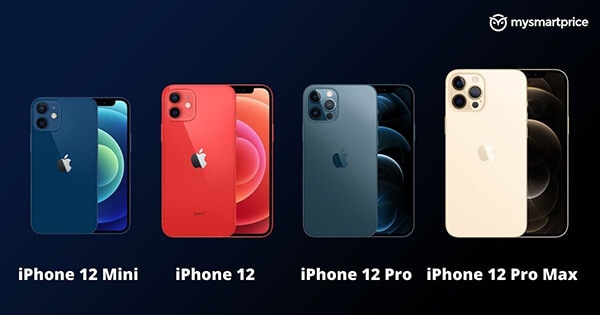
Apple announced a line-up of iPhones with four new devices in 2020. The series is called the iPhone 12 series that has four handsets of different sizes and price ranges. The iPhone 12 series include iPhone 12, iPhone 12 Mini, iPhone 12 Pro, and iPhone 12 Pro Max. These are the company’s first-ever 5G devices. They surely took a step into the future of technology with the 12 series.
The device is considered lighter than the iPhone SE launched in 2020. iPhone 12 Pro Max holds an outstanding camera system for high-quality image processing. Besides, the introduction of A14 SoC has encouraged the exceptional performance of all four models. Each of the series models is secured with suitable features and new capabilities. Let’s take a glance at the relevant specifications and iPhone 12 price.
Part 1: Apple iPhone 12 Series Specifications
To mention the iPhone 12 series specifications, these models are secured with an SoC of Apple A14 Bionic. All 4 of them consist of DRAM. The displays of these smartphones are quite satisfactory.
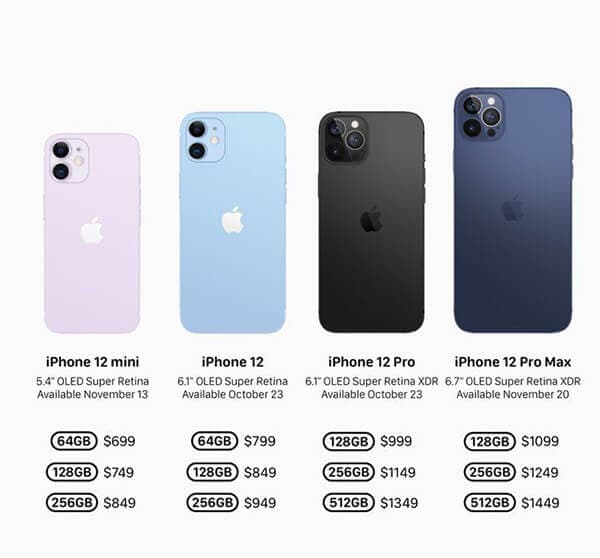
Display: The iPhone 12 Mini and iPhone12 have a display of 5.42” OLED (2340 x 1080) and 6.06” OLED (2532 x 1170). On the other hand, the magnificent iPhone 12 Pro has a display of 6.06” OLED (2532 x 1170) and 6.68” OLED (2778x1284).
Size & Weights: The size concerning height, width, and depth of both iPhone 12 and iPhone 12 pro are the same at 146.7 mm, 71.5 mm, 7.4 mm. Besides, the iPhone Mini stands at a height width and depth of 131.5 mm, 64.2 mm, and 7.4 mm. The iPhone 13 Pro max has a height of 160.8 mm, a width of 78.1 mm, and a depth of 7.4 mm. While the iPhone Mini weighs the lightest with 135g, iPhone 12 max weighs the heaviest (228 g). Both iPhone 12 and iPhone 12 Pro remain at 164g and 189g, respectively.
Wireless Charging: Each of the iPhone 12 series models supports MagSafe Wireless Charging up to 15 W. They are also Qi Compatible (7.5 W). Now, coming to the camera quality, all four models are secured with a front camera of 12 MP f/2.2.In rear camera setup, iPhone 12 Mini, iPhone 12, and iPhone 12 Pro have a main camera of 12 MP 1.4µm, 26mm eq. f/1.6, Optic OIS. iPhone 12 Pro Max comes with the main camera of 12 MP 1.7µm, 26mm eq. f/1.6.
Camera: The high-quality telephoto camera of the iPhone 12 Pro is 12 MP, 52mm eq. f/2.0 OIS. For iPhone 12 Pro Max is 12 MP, 65mm eq. f/2.2 OIS. The entire iPhone series model has an ultra-wide camera of 12 MP 13mm eq. f/2.4. The splash, water, and dust resistance feature with IP68 for up to 6m and 30 minutes keeps the phone durable.
iPhone Series devices hold dual-SIM support with nano-SIM and eSIM. Both iPhone 12 Mini and iPhone 12 come in distinct storage capacities like 64 GB, 128 GB, and 256 FB. The iPhone 12 Pro and Pro Max are available in the storage of 128 GB, 256 GB, and 512 GB.
Part 2: Transfer old iPhone data to iPhone 12
We know that the excitement of buying a new iPhone is real. However, it’s important to do one thing before jumping into the camera quality. And that’s data transfer. You do not want your old phone data to be gone with the old device, do you? We hope not. Here are some of the tactics by which you can transfer the old iPhone data to the new iPhone 12
2.1 Through iCloud
Before transferring, make sure your data is backed up. For that, connect the old iPhone with the WiFi and then go to “Settings.” Next, tap your name and then on “iCloud.” Next, select the “Backup Now” option and wait for the process to get completed. After completing the backup, follow the steps given below.
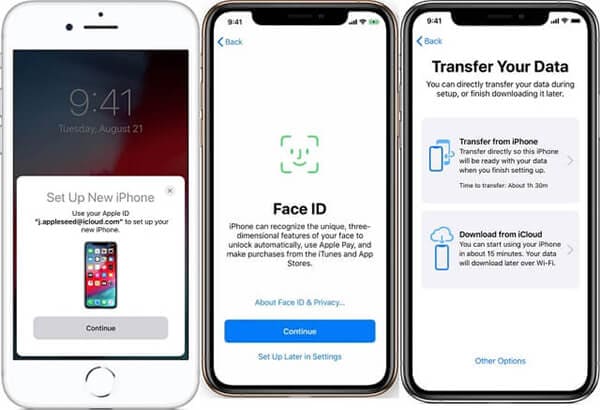
Step 1: First, turn on the new device to see the “Hello” screen. Now, follow the instructions appearing on the screen. Once you notice the WiFi screen, tap a WiFi network to join. Keep following the steps till the “Apps & Data” screen shows up. Tap on “Restore from iCloud.”
Step 2: Sign in to your iCloud with relevant credentials like Apple ID and password. Choose a backup but make sure to check the date and size.
If you have bought iTunes or App store content with multiple IDs, sign in with those accounts too.
Step 3: The restore process will be initiated. Make sure to be connected and wait till the process gets completed successfully. Once done, continue with the other steps to complete the setup process successfully.
2.2 Through iTunes or Finder
Start with the backup process by opening iTunes. Now, connect your iPhone with the PC. After it gets connected, choose your iPhone on the top toolbar. To transfer the data related to Health and Activity/saved passwords, choose the “Encrypt backup” option. Next, input a password and click “Back Up Now.”
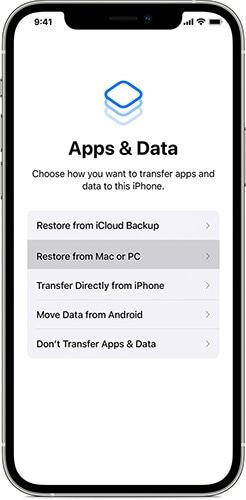
To transfer the data through iTunes or Finder, launch your new device. Once the “Hello” screen appears, follow the instructions appearing on the screen. As soon as you note the “Apps & Data Screen,” tap on “Restore from Mac or PC.” Connect the new device to PC/Mac and open the iTunes/Finder window. Once your device name is visible on the screen, tap it.
Select “Restore Backup” to choose a “Backup.” Ensure that the size and data are accurate. To restore from an encrypted backup, input the password. The restoration process will start. Now, wait for the entire process to get completed and then move on to the remaining setup steps.
Part 3: Transfer Android Data to iPhone 12
The methods mentioned above can be time-consuming. In that case, it’s best to opt for a simple process that does not require too much work. For example, Dr.Fone - Phone Transfer all is an efficient and easy-to-use phone switch app.
As the name signifies, this App can help you with iPhone 12 transfer data in a few minutes. Experienced developers develop it for both iOS and Android users. So, you can transfer data from any of the Apple iPhone 13 devices to the new iPhone 12.
With Dr. Fone, you can migrate 13 files of distinct size to the new iPhone 12. Here’s a glimpse of the files below
Contact, photo, videos, voicemail, wallpaper, calendar, and many more
To transfer data through Dr. Fone, follow the easy steps mentioned below.
Step 1: First, connect both the old device and new iPhone 12 to your PC/Mac with USB.
Step 2: Now, launch the Dr. Fone - Phone Transfer and select the app
Step 3: Once the app starts, you will note a device detected as a source. Similarly, there will be other devices detected as destinations. Then, you will be given the option to flip the source and destination. For that, click on the “Flip” option.
Step 4: After selecting the Apple iPhone 13 device status, mark the checkboxes beside the files for transferring. Once done, tap on the “Start Transfer” button appearing on the screen.
You can select “Clear data before copy” to delete the data from the destination device before transferring. It will speed up the entire process.
Conclusion
Hopefully, you got a clear idea of how to transfer data to iPhone 12. Dr. Fone - Phone Transfer is one of the finest names for data recovery and data transfer between devices. They have distinct outstanding products that are efficient and useful for the users. One of the best things about the application is that you can transfer the data regardless of the mobile operating system. Be it an iOS or Android device, follow the steps provided above, and that’s it. The iPhone 12 data transfer process is quick, easy, and requires less effort.
4 Ways to Sync Contacts from Apple iPhone 13 to iPad Easily
One of the key elements within the Apple ecosystem is its capacity to synchronize data across various devices. In this age of inter connectivity, the importance of harmonizing contacts across multiple devices has emerged as vital. With the prevalence of iPhones and iPads, the demand for an efficient method to sync contacts between these two devices has surged.
For better contact management, the contacts syncing between iPhone and iPad is critical. This article discusses how do you sync contacts from Apple iPhone 13 to iPad. It will go through 4 effective methods to sync contacts from an iPhone to an iPad.
Part 1: Sync Contacts from Apple iPhone 13 to iPad Using Wondershare Dr.Fone
Wondershare Dr.Fone can be used to transfer contacts from Apple iPhone 13 to iPad/iPhone . You can back up iPhone contacts using Dr.Fone and then restore the contacts to the iPad without losing any data.
Wondershare Dr.Fone
Back up & Restore iOS Data Turns Flexible.
- One-click to back up the whole iOS device to your computer.
- Allow to preview and restore any item from the backup to a device.
- Export what you want from the backup to your computer.
- No data loss on devices during the restoration.
- Selectively restore any data you want.
- Supported the newest iPhone and Android phones.
3981454 people have downloaded it
Here’s how to sync iPhone contacts to iPad:
- Step 1: Connect the iPhone to the computer
Launch Wondershare Dr.Fone on the computer and then select “My Backup” from among various options. Now, using a cable, connect the iPhone to the computer and then allow Dr.Fone to automatically detect your connected iPhone device.
- Step 2: Click “Back Up Now” to Back up
After the iPhone is connected successfully, Dr.Fone will automatically detect the file types in it. Click on “Back Up Now” to back up your iPhone.
The backup process will start and take a few minutes to complete depending on the volume of data to be backed up. Dr.Fone will display all the data that are supported after the backup is completed.

Now that you have backed up all the contacts on the iPhone and then restoring them to the iPad is the way to it.
- Step 3: Select Restore to Device
Once the backup is completed, connect your iPad using a USB cable. Select the backup file and hit “Restore to Device”. It’s as simple as it sounds, and anyone can back up your contacts and sync them to your iPad.
In addition to manual backup, you can also back up contacts on iPhone automatically.
How to back up contacts automatically and wirelessly?
Step 1: Click “Backup Preference” to set up the backup frequency and backup period.
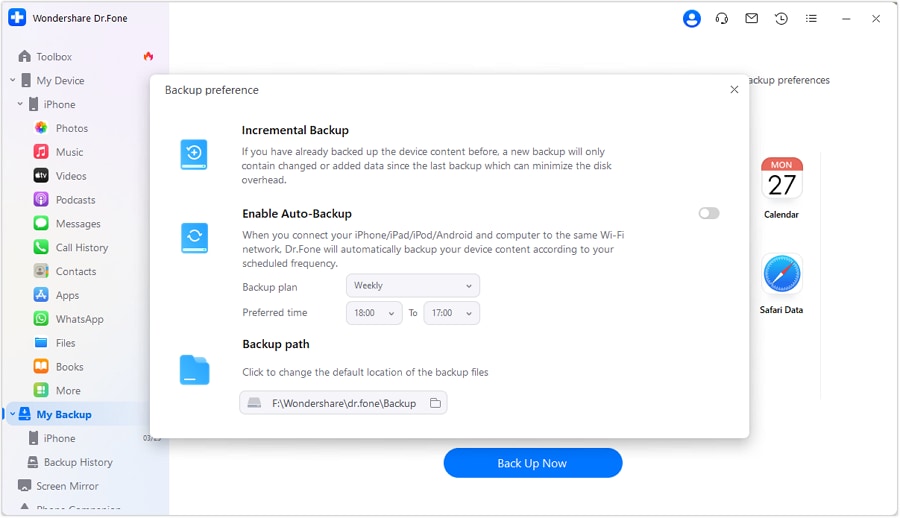
Step 2: Connect your iPhone and PC with the same wifi, the contacts on iPhone will be backed up automatically. You don’t need to use a USB cable to connect the iPhone to the PC in this step. Next time, if you would like to back up contacts again, it will only be for newly added data or modified files, which helps you save storage space and backup time.
Step 3: Restore the backup file to iPad/iPhone. You can preview the backup data and select the data you want to restore.
Bonus Tip: Sync Contacts from Apple iPhone 13 to iPad with 1 Click
Except the Phone Backup feature can help you sync contacts from Apple iPhone 13 to iPad easily, there is another tool that can also help you. If you have downloaded the Wondershare Dr.Fone, you may see this tool on the homepage, too. Yes! It is Dr.Fone - Phone Transfer .
Features of Dr.Fone - Phone Transfer tool:
- Easily share contacts and other types of data on iPhone to iPad/another iPhone.
- Just 1 click to transfer contacts to the iPad.
- Sync the data from Apple iPhone 13 to iPad within less than 3 minutes, the time of a cup of coffee!
Part 2: Sync Contacts from Apple iPhone 13 to iPad Using iCloud
If you’re heavily invested in the Apple environment, choosing iCloud is the optimal route. It serves as a convenient tool for synchronizing contacts between your iPhone and iPad. Leveraging iCloud’s powerful synchronization features, you can effortlessly maintain updated contact lists across all your Apple devices. Follow the simple steps outlined below to sync contacts from Apple iPhone 13 to iPad:
Step 1: After ensuring that the same Apple ID is logged in on both iPhone and iPad, first move to iPhone’s Settings. Here, tap “Apple ID,” and on the following screen, choose “iCloud.” In the “iCloud” tab, move to the “Apps Using iCloud” section and ensure the “Contacts” app is toggled on. Afterward, transfer to your iPad and access the Apple iPhone 13 device’s Settings.

Step 2: Within the Settings app, tap “Apple ID” and follow it by pressing “iCloud” on the following screen. Here, move to the “Apps Using iCloud” section and toggle on the “Contacts” app. Wait a few moments, and your contacts will be synced across devices.

Part 3: Sync Contacts from Apple iPhone 13 to iPad Using AirDrop
AirDrop is a convenient feature native to Apple devices. It presents a convenient wireless solution for seamlessly transferring contacts between an iPhone and an iPad. With its user-friendly configuration, AirDrop enables the easy sharing of diverse data, including contacts, among nearby Apple devices. Follow the instructions below for how do I sync contacts from Apple iPhone 13 to iPad using AirDrop:
Step 1: Begin by ensuring that Bluetooth and Wi-Fi are enabled on both iPhone and iPad. Afterward, access Control Center by swiping down from the top right corner of the Apple iPhone 13 device.

Step 2: Here, enable AirDrop and set its visibility to “Everyone.” Now, open the ‘Contacts’ app on your iPhone, select the contacts you want to transfer and tap the “Share” button.

Step 3: Tap on “AirDrop” from the list of sharing options provided. After selecting “AirDrop,” choose your iPad as the receiving device. A prompt will appear on your iPad to accept the incoming contacts. Tap “Accept” to initiate the transfer.

Part 4: Sync Contacts from Apple iPhone 13 to iPad Using iTunes/Finder
iTunes/Finder serves as a robust option for users who prefer a traditional and reliable method. It is a tested and trusted way of syncing data between their Apple devices. This software offers comprehensive backup and sync functionalities. That’s why iTunes/Finder provides a secure and efficient way to transfer contacts from an iPhone to an iPad. Follow the steps below to sync your contacts using iTunes or Finder:
Step 1. Begin by launching the most recent version of iTunes/Finder on your computer. Connect your iPhone and navigate to the “Summary” tab by clicking the “iPhone” icon. Here, enable the “Sync with this iPhone via Wi-Fi” feature.

Step 2. Subsequently, disconnect the iPhone and link your iPad to the computer. In iTunes/Finder, select the “Device” icon and switch to the “Info” tab. Here, ensure that the “Sync Contacts” box is checked, and then choose either “All Contacts” or “Selected Groups.”

Step 3. Once you have made your selection, click on “Apply” to initiate the contacts synchronization process. Upon completion, you can disconnect the iPad and access the synced contacts from your iPhone.

So, these are four ways in which you can transfer contacts from Apple iPhone 13 to iPad. Since these methods are the outcome of thorough research, all the methods are absolutely safe, and there is absolutely no data loss in the process. However, we would recommend Wondershare Dr.Fone , considering its robust and efficient working design. It is one of the best and most popular tools to transfer data from Apple iPhone 13 to iPad and offers an amazing overall experience with a simple interface and fast process. What’s imperative is to ensure that you follow all the steps properly and that’s all, there you have it; all the contacts on the iPad.
Also read:
- [New] 2024 Approved Game On A Comprehensive Guide to Xbox One Captures
- [New] Top Steadicams to Elevate Your DSLR Filming Capabilities
- [Updated] 2024 Approved Streamline Your Virtual Sessions with These Top 10 Tools
- [Updated] Apex on Ice Olympic Highlights of Short-Track Events
- [Updated] Unleash Potential Secrets for Career Growth in Designing
- 4 Ways to Sync Contacts from Apple iPhone 11 Pro to iPad Easily | Dr.fone
- 5 Easy Ways to Transfer Contacts from Apple iPhone 8 to Android | Dr.fone
- About Oppo Reno 10 Pro+ 5G FRP Bypass
- Best Android Data Recovery - Retrieve Lost Photos from Motorola .
- Discovering Fun and Learning Through Battle - An Insightful Review of DJI's RoboMaster S1 Coding Drone.
- How I Ended My Battle with Fortnite PC Crashes in 2 Cups of Coffee, and How You Can Too!
- How to Copy Contacts from Apple iPhone 12 Pro Max to SIM? | Dr.fone
- How to Transfer from Apple iPhone SE to Samsung Galaxy S20? | Dr.fone
- In 2024, 4 Ways to Transfer Contacts from Apple iPhone 13 Pro Max to iPhone Quickly | Dr.fone
- In 2024, Complete Tutorial Sending Photos From Apple iPhone 12 mini to iPad | Dr.fone
- In 2024, Complete Tutorial Sending Photos From Apple iPhone SE to iPad | Dr.fone
- In 2024, Cross-Platform IPTV Adaptability
- In 2024, How to Transfer from Apple iPhone XS to Samsung Galaxy S20? | Dr.fone
- Solved How To Transfer From Apple iPhone X to iPhone 15 | Dr.fone
- Title: In 2024, How to Transfer from Apple iPhone 13 to Samsung Galaxy S20? | Dr.fone
- Author: Charlotte
- Created at : 2024-09-29 18:17:31
- Updated at : 2024-10-06 18:44:53
- Link: https://iphone-transfer.techidaily.com/in-2024-how-to-transfer-from-apple-iphone-13-to-samsung-galaxy-s20-drfone-by-drfone-transfer-from-ios/
- License: This work is licensed under CC BY-NC-SA 4.0.