
In 2024, How to Transfer from Apple iPhone 13 Pro to Samsung Galaxy S20? | Dr.fone
How to Transfer from Apple iPhone 13 Pro to Samsung Galaxy S20?
If you are willing to switch your phone from an iOS device to an android, the primary issue which restricts you to do so is your data loss and the data transferring from one device to another. In this article, we’ll be learning How to Transfer Data from Apple iPhone 13 Pro to Samsung Galaxy S20, with some easy and best techniques. The discussed techniques will ensure your data from not getting lost.

Part 1: Transfer from Apple iPhone 13 Pro to Samsung Galaxy S20 Directly (Easy and Fast)
Dr.Fone - Phone Transfer program is a phone transfer tool, you can transfer all types of data like photos, music, contacts, messages, calendar, etc. from one phone to another easily.
Let’s see how we can to transfer data from Apple iPhone 13 Pro to Galaxy S20
Dr.Fone - Phone Transfer allows you to transfer data between various phones with one click, including Android, iOS, Symbian, and WinPhone. Use this program to transfer and convey data between any of them.
Down below there’s a detailed step by step process explaining how you can transfer all your data from one phone to another using computer
Step 1. Connect Your Apple iPhone 13 Pro to the computer
After opening Dr.Fone on your computer, select “Phone Transfer” among the modules.

Make sure you have connected both of your devices with it. Here let’s take an iOS and a Samsung Galaxy S20(any Android device) as an example.

The data from the source device will be conveyed/transferred to the destination device. To exchange their position, you can use the “Flip” button too.
Step 2. Select the file and start to transfer
Choose the file types you desire to move. To begin the process, click on-Start Transfer. Until the process is completed, please don’t disconnect the Apple iPhone 13 Pro devices for its maximum efficiency.

Before commencing the data transfer process between both the phones, if you want to erase the data of the destination device-check the “Clear Data before Copy” box.
All the files you selected will be transferred to the targeted phone successfully In a couple of minutes.

Part 2: Transfer from iCloud Backup to Samsung Galaxy S20 (Wireless and Safe)
1. Dr.Fone - Switch App
If you don’t have a computer device and want to transfer data from an iOS device to an Android device, here is an in-depth step by step process guiding you how to do so.
How to sync data from the iCloud account to Android
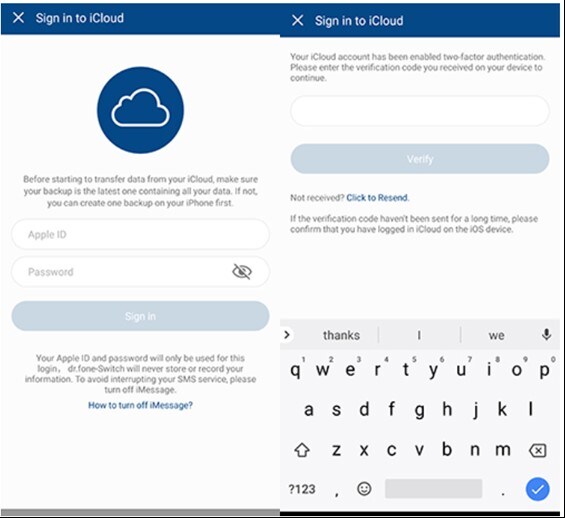
Step 1. Touch “Import from iCloud”, after installing the Android version of Dr.Fone - Switch.

Step 2. With your Apple ID and passcode, log in to the iCloud account.
If you have enabled the two-factor authentication, enter the verification code.
Step 3. On your iCloud account now in a while later, all types of data can be detected.
Touch “Start Importing” after Selecting your desired data or all of these data.
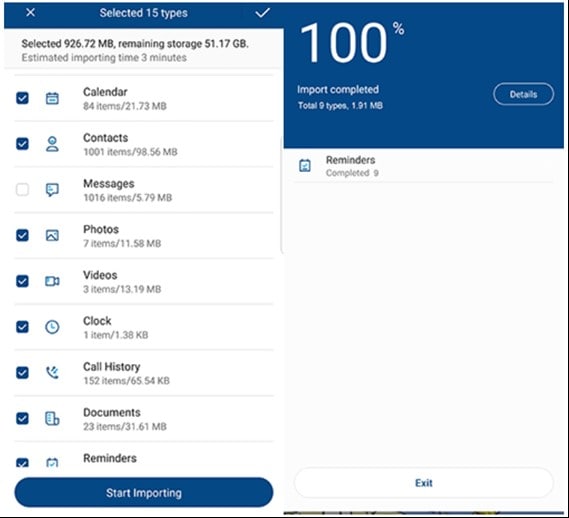
Step 4. Sit back until and unless data importing is fully completed. Then you can exit this app and check the data synced from iCloud on your Apple iPhone 13 Pro or tablet.
Prons:
- Transfer data from Apple iPhone 13 Pro to Android without a PC.
- Support mainstream Android phones (including Xiaomi, Huawei, Samsung, etc.)
Cons:
- For direct data transfer, connect iPhone to Android by using an iOS-to-Android adapter.
2. Samsung Smart Switch App
Export data from iCloud to Samsung S20 with Smart Switch
If you make use of the Samsung Smart Switch app, syncing iTunes with Samsung is just an easy-peasy task.
It has become simpler to sync iCloud to Samsung S20 as it stretches compatibility with iCloud. Here is how-
How to transfer data from iCloud to Samsung S20 with Smart Switch
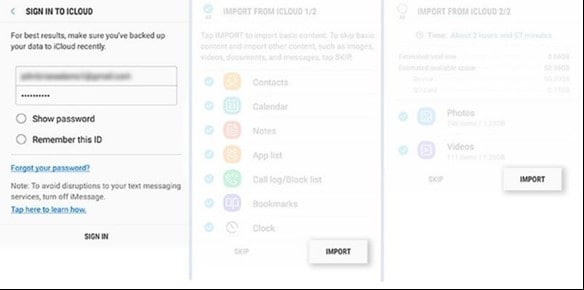
Download Smart Switch from Google Play on your Samsung Device. Open the app, then click on ‘WIRELESS,’ after that tap on ‘RECEIVE’ and select the ‘iOS’ option.
Sign in with your Apple ID and password. Now, select the desired content you want to transfer from iCloud to Samsung Galaxy S20 and press ‘IMPORT.’

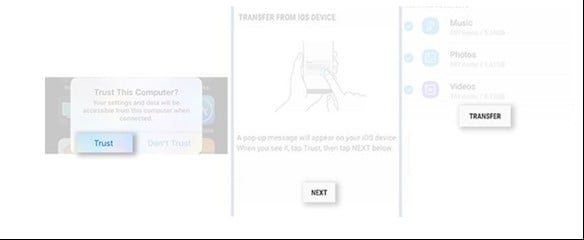
If you are using a USB cable, do keep iOS cable, Mirco USB, and USB Adapter handy. Then, load Smart Switch on your Samsung S20 model and click on ‘USB CABLE.’
Further, connect the two devices by iPhone’s USB cable and the USB-OTG adapter with Samsung S20.
Click on ‘Trust’ followed by pressing ‘Next’ to proceed further. Choose the file and press on ‘TRANSFER’ to convey/Transfer from iCloud to Samsung S20.
Prons:
- Wireless transfer.
Cons:
- Only for Samsung phones.
If you prefer to run a desktop software to transfer data, use Dr.Fone - Phone Transfer. It’s a hassle-free solution. Connect both phones to computer and start to transfer data in one-click.
Part 3: Transfer from iTunes Backup to Samsung Galaxy S20 without iTunes
Step 1. Select the backup file
Launch Dr.Fone and select Phone Backup. Connect your Samsung S20 to the computer. Click on Restore.
It will give the option View backup history if you have used this function to backup your iOS device before. Click on View backup history option to view the backup file index.

After that, Dr.Fone will display the backup history. Just pick the backup file you want and click on the Next on the bottom of the program or view button next to the backup file.

Step 2. View and Restore the backup file
The program will take a few seconds to examine the backup file and display all data in categories in the backup file after you click on View.
After you find the files you require, you can pick a few files or choose them all to move to the next step.

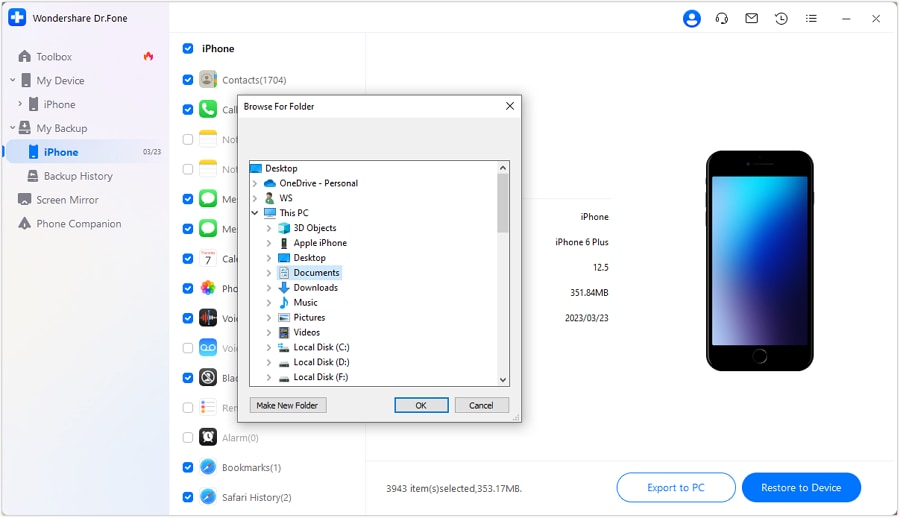
Currently, Dr.Fone supports to restore the music, Safari bookmarks, Call History, Calendar, Voice memo, Notes, Contacts, Messages, Photos, videos to the Apple iPhone 13 Pro device. So you can restore these data to your Samsung device or transfer them all to your computer.
If you want to restore the files to your device, select the files and click on Restore to Device. In a couple of seconds, you will get these files on your Android gadget.
If you want to export the chosen files to your computer, click on Export to PC. Then select the save path to transfer your data.
Final Words
The techniques which are discussed above are meant to solve your problem and let you know How to Transfer from Apple iPhone 13 Pro to Samsung Galaxy S20. These techniques will guide you through transferring your file quickly and swiftly. The method discussed over here is related to both the users- who are willing to transfer their data using a computer and without using it. So, finally, we hope that this article would help you to solve your issue related to data transfer.
Should I Switch From iPhone To Google Pixel?
The battle between smartphone giants has been a consistent source of intrigue for consumers. Through every new launch, tech giants such as Apple and Google introduce impressive functions. These allure users with the prospect of improved efficiency and seamless usability. This prompts the fundamental query of whether one should consider switching from an iPhone to a Pixel.
Amid the ongoing discourse about these two devices, it becomes imperative to go through the advantages and disadvantages inherent to each. This serves to equip you with the necessary insights for making a choice that aligns with your preferences. In this guide, we will explore the key considerations to contemplate when switching from an iPhone to a Google Pixel.
Part 1: What Is The Google Pixel?
An Android smartphone launched by Google in 2016, Google Pixel was designed to replace the Nexus. Similar to Nexus, the Pixel operates a “stock version” of Android, which means that it gets updates as soon as they’re released. Other Android smartphones sometimes delay updates for weeks or even months. The Google Pixel comes with free unlimited photo storage on Google Photos. Additionally, Google Photos for the Pixel doesn’t compromise the photo quality in order to save room. Well, there is much more to explore about Google Pixel.
Key Specifications-
- OS- Android 7.1 and upgradable to Android 10.
- Internal Memory - 32GB 4GB RAM, 128GB 4GB RAM
- Main Camera - 12.3 MP & Selfie Camera - 8 MP.
- Premium design with fingerprint sensors
- Headphone Jack & USB Type -C
- Larger and crisper display
Let’s first have a quick look at all versions of it:
- Google Pixel & Google Pixel XL- Launched in 2016, these come with a circular icon theme and offer free unlimited full-quality photo storage.
- **Google Pixel 2 & Google Pixel 2XL -**The 2nd generation Google Pixel was launched in 2017. The XL version contains very slim bezels, like iPhone X smartphones. It even facilitates a far better camera in comparison to its competitors.
- Google Pixel 3 & Google Pixel 3 XL - Launched in 2018, Google Pixel 3 followed the trends of the first two phones. Enhancements to the display, screen, and camera were made and other improvements as well. The Pixel 3 XL even has entails a top-notch, like the iPhone X. However, you have the choice to remove the notch by disabling the display at the top. It also comes with a wireless charging feature.
- Google Pixel 3a & Google Pixel 3a XL - They are less expensive versions of the 3 and 3 XL. The notable difference is that 3a entails a single selfie camera, whereas 3 has a dual selfie camera.
- Google Pixel 4 & Google Pixel 4 XL - Launched in 2019, the fourth generation drastically enhanced face unlock. A 3rd rear-facing camera was introduced to the Apple iPhone 13 Pro device. On the phone’s front, the notch was substituted by a standard top bezel.
- Google Pixel 4a & Pixel 4a 5G - Released in 2020, the Pixel 4a was a more affordable variant that retained many features from its predecessor. It offered a compact design, a single impressive rear camera, and the latest Android software. The Pixel 4a 5G shared similarities with the Pixel 4a but introduced 5G connectivity and a larger display.
- Google Pixel 5 & Pixel 5a 5G - The Pixel 5, released in 2020, focused on a balance of performance and price. It featured a mid-range Snapdragon processor, 5G capability, and an improved camera system. The Pixel 5a 5G, introduced in 2021, continued the legacy of affordable yet capable Pixel devices, enhancing the camera and offering 5G connectivity.
- Google Pixel 6, Pixel 6 Pro & Pixel 6a - Launched in 2021, the Pixel 6 series marked a significant departure in design and hardware for Google. The devices featured Google’s custom Tensor chip, aiming for enhanced AI capabilities. The Pixel 6 Pro boasted a larger, higher-resolution display and additional camera features than the standard Pixel 6 model. Both phones focused on camera advancements, software enhancements, and unique design aesthetics. The Pixel 6a continued to be the affordable version of the Google Pixel 6 series.
- Google Pixel 7, Pixel 7 Pro & Pixel 7a - Arrived in 2022, the Google Pixel 7 series came equipped with Google’s 5nm Tensor G2 chip and powerful 50MP camera. It also boasts 8 GB of RAM and a long-lasting battery. The Pixel 7 Pro is the higher-end product of the series. It has additional camera enhancements and more RAM or storage options. The Pixel 7a is a more affordable variant with some compromises in hardware specifications compared to the higher-end models.
- Google Pixel 8 & Pixel 8 Pro - Running on a Powerful 4nm Google Tensor G3 chip, Google Pixel 8 and Pixel 8 Pro are the latest devices in the Pixel series. The RAM has increased in these devices, with the Pixel 8 boasting 8 GB RAM and 12 GB for Pixel 8 Pro.
Considering key specifications and features, it is definitely worth switching from Apple iPhone 13 Pro to Pixel, especially if it has been a long time since you’ve been using an Apple device.
Part 2: Notice That You Should Know Before Switching from iPhone To Google Pixel
Before you switch iPhone to Pixel 2, there are certain things to consider or you need to do, so let’s have a look at them-
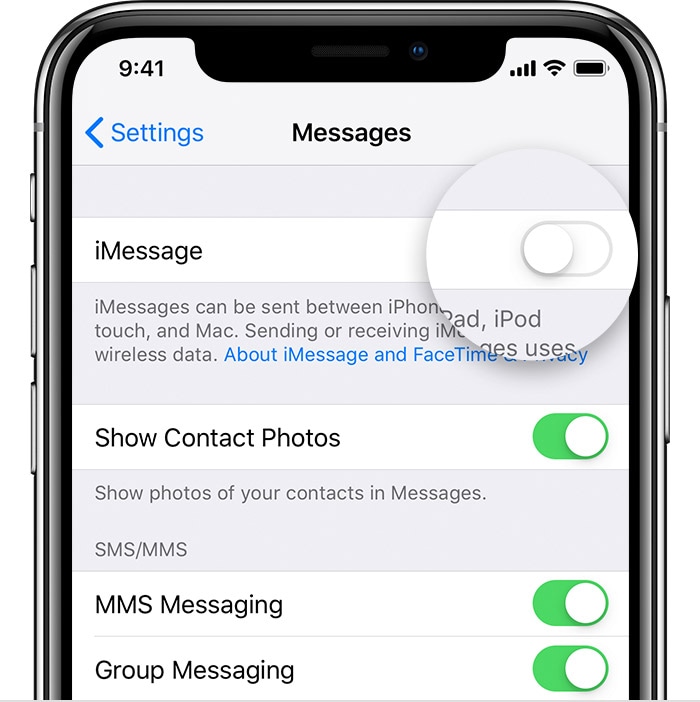
1- Disable iMessage
When messaging other iPhones from your iDevice, they’ll communicate through iMessage when you connect to the internet. That’s different from usual SMS texting. And if you leave iMessage switched on your iPhone, many of your messages will be routed via that service. If you’re on a new Google Pixel smartphone, you won’t get any of those texts. Thus, you need to turn off iMessage before you make that switch. While you’re here, disable FaceTime.
2- You Might Need to Buy Your Apps Again
Have you pay-front apps on your iDevice that you paid for? If so, then you’ll probably need to purchase them again from the Google Play Store if you want those apps on your Google Pixel phone as well. The App Store and Google Play Store are entirely different entities and the housed apps are designed for different platforms. Some apps you had on your iDevice may not even be accessible for your Google Pixel device and vice-versa. However, if you’ve subscribed to a service such as Spotify, you just have to get the app and sign in to your new Android device and that’s it.
3- Re-Sync Your Crucial Data
If you have all of your calendar events, contacts, documents, and photos synced with iCloud and all is on your iPhone, you’ll probably need to re-sync all on your Google Pixel device. Android’s cloud version is housed in Google apps such as Gmail, Contacts, Docs, Drive, etc. When you set up your Google Pixel, you’ll create and set up a Google account. From this point, you can sync some of the iCloud content with the Google account, thus you won’t need to re-enter lots of info.
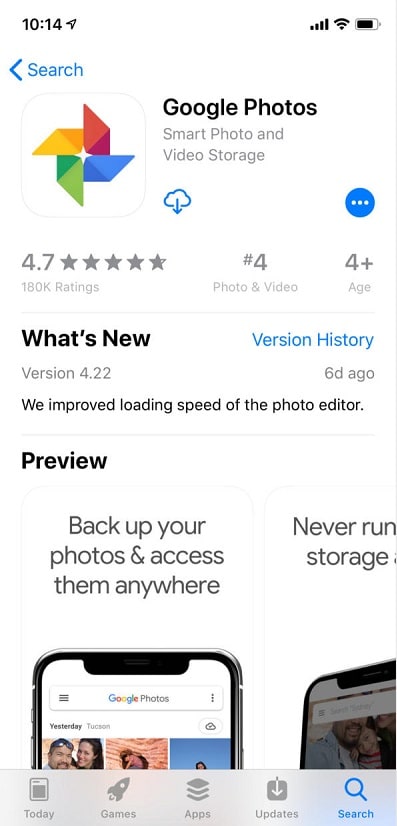
4- Back up Photos to Transfer them from Apple iPhone 13 Pro to Google Pixel with Ease
The easiest way to transfer your pictures from your iPhone to Google Pixel is to use the Google Photos app for iPhone. Log in with your Google account, click the backup and sync option from the menu, and then, get Google Photos on your Google Pixel and log in.
5- Back Up Your iPhone Data to Avoid Data Loss
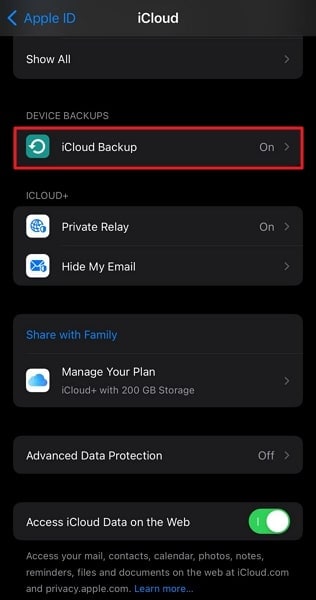
1. Using iCloud Backup
To begin, link your iPhone to a Wi-Fi network. Then, navigate to the Settings app and tap on your name, followed by selecting “iCloud.” Scroll down within the options and locate “iCloud Backup.” Switch on the “iCloud Backup” option and proceed to tap “Back Up Now” to immediately initiate the backup process. Make sure to verify that the backup is fully completed before moving forward.
![]()
2. Using iTunes on a Computer
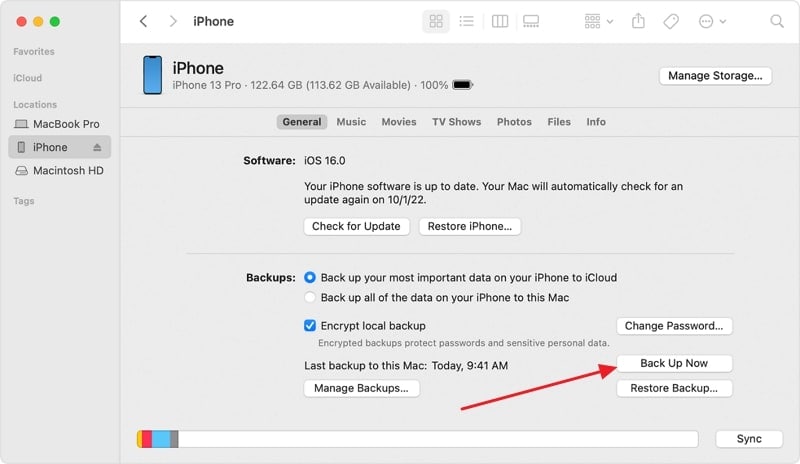
Begin by linking your iPhone to a computer using a USB cable. Launch iTunes and pick your device from the list. Navigate to the “Summary” segment and opt for the “Back Up Now” selection. This action will generate a comprehensive backup of all your iPhone data on the computer.
![]()
3. Wondershare Dr.Fone
![]()
Wondershare Dr.Fone
One click to back up your iPhone data!
- One-click to back up the whole iOS device to your computer.
- Allow previewing and selectively export from Apple iPhone 13 Pro to your computer.
- No data loss on devices during the restoration.
- Works for all iOS devices. Compatible with the latest iOS version.

3981454 people have downloaded it
The most advanced and reliable phone backup toolkit is Wondershare Dr.Fone because it helps you back up data without worrying about storage space. It also provides the Incremental feature through which your iPhone is backed up without connecting to the computer.
Furthermore, you can preview data stored in your iPhone backup file and restore specific data to your iDevice. It can also restore your iCloud/iTunes backup to your iPhone/Google Pixel without factory resetting the Apple iPhone 13 Pro device.
Part 3: How Many Data Can I Email To Google Pixel?
Thinking about transferring data from Apple iPhone 13 Pro to Google Pixel by Email? Well, it is the best option only if you want to transfer small-size files and not much data. And yes, there is a limit to how many or much data can you email to your new Google Pixel device.
The email size limit is 20 MB for some platforms and 25 megabytes for others. For instance, if you want to send a video from your iPhone to your new Google Pixel device, then the video should be less than 15 or 20 seconds long to share via email.
Part 4: One-Stop Solution to Switch Data From iPhone To Google Pixel
If you want a one-stop solution to transfer data from Apple iPhone 13 Pro to Google Pixel, then you need to rely on a powerful phone-to-phone data transfer software like Dr.Fone - Phone Transfer . With its assistance, you can transfer contacts both in a cloud account and phone memory along with videos, photos, text messages, etc from Apple iPhone 13 Pro to Google Pixel in just one click.
To help you learn how to use Dr.Fone - Phone Transfer program for switching iPhone to Google Pixel 3, below is the simple guide-
Step 1: Get the Dr.Fone - Phone Transfer on your computer and then run it. Then, choose the “Phone Transfer” option.
Step 2: After that, connect both of your devices to the computer and let the software detect them. And ensure that iPhone is selected as a source and Google Pixel as the target and select the files you want to transfer.

Step 3: Finally, hit the “Start Transfer” button to begin the transfer and that’s it.
And if you ever want to get back to your iPhone, then you would probably wonder how to switch from Pixel to iPhone. In that case, all you need is a phone-to-phone data transfer app like Dr.Fone - Phone Transfer to make the switch successful with all the data you need on your new device.
The Bottom Line
Switching between the iPhone and Google Pixel demands thoughtful deliberation, as evidenced by the ongoing debate. Factors like OS preferences, app compatibility, and data synchronization need to be considered. While the transition process may seem daunting, many tools can simplify the switch. They ensure a smooth experience of switching from Apple iPhone 13 Pro to Google Pixel.
In this context, Wondershare Dr.Fone emerges as a comprehensive and user-friendly solution. It helps you in transferring data from an iPhone to a Google Pixel. With its versatile data transfer capabilities and emphasis on data security, Dr.Fone offers a reliable and efficient data transfer method.
How To Transfer Data from Apple iPhone 13 Pro to New iPhone 15
Upgrading to a new iPhone 15 is always an exciting prospect. However, the thought of transferring all your data from your Apple iPhone 13 Pro to the new iPhone 15 model might seem like a daunting task. Luckily, there is no need to worry, as this guide will resolve all your concerns on how to transfer to the new iPhone 15.
In this detailed article, we explore the process of transferring data from an old iPhone to a new one. Our step-by-step approach will equip you with the knowledge to move your valuable data.
Part 1: Why Should You Shift From Your Apple iPhone 13 Pro to iPhone 15?
In the realm of smartphones, change is not just inevitable; it’s a constant. With the unveiling of the iPhone 15, Apple once again beckons users to take a leap forward. However, you might be wondering why you should bid farewell to your Apple iPhone 13 Pro . The answer lies in the myriad of improvements and features that the iPhone 15 brings to the table. Some of these are summarized below:
1. Cutting-Edge Technology
The iPhone 15 is an example of Apple’s commitment to pushing the boundaries of technology. It offers advancements in processing power, camera capabilities, and display technology. This new iPhone promises to redefine what a smartphone can do.
2. Enhanced Camera Systems
For photography fans, the iPhone 15’s camera system is nothing short of revolutionary. From improved low-light performance to detailed zoom capabilities, it reaches a whole new level of quality.
3. Seamless Connectivity
The new iPhone 15 comes integrated with 5G technology. This ensures that you’ll be at the forefront of high-speed connectivity. You can say goodbye to buffering and lag because iPhone 15 promises smoother streaming, faster downloads, and a more responsive online experience.
4. Extended Software Support
With every new iPhone iteration, Apple launches its latest iOS firmware. Upgrading to the iPhone 15 means enjoying the latest iOS 17 updates. It also means getting security enhancements for years to come.
Part 2: How To Transfer Apple iPhone 13 Pro iCloud Backup to iPhone 15?
Transitioning to the new iPhone 15 is an exciting experience. It means you need to ensure that your data seamlessly makes the journey to the new iPhone 15. Apple provides a convenient way to transfer your data in the form of iCloud. You can create an iCloud backup of your old device and restore it to the new one. Use the following guide to transfer to iPhone 15 with iCloud:
- Step 1: On your Apple iPhone 13 Pro , navigate to “Settings,” tap on your Apple ID, select “iCloud,” and then “iCloud Backup.” Here tap “Back Up Now” to create an iCloud back of your iPhone data.
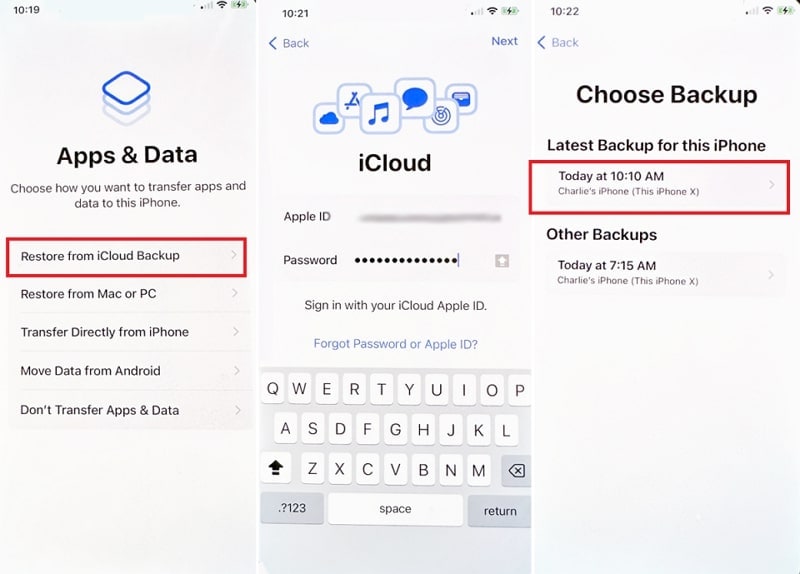
- Step 2: Power on your iPhone 15 and follow the setup prompts until you reach the “Apps & Data” screen. Then, proceed with the “Restore from iCloud Backup” feature and sign in using your Apple ID credentials.
- Step 3: A list of available iCloud backups will appear on the screen. Here you need to select the most recent backup from your Apple iPhone 13 Pro . Keep in mind that a reliable Wi-Fi connection is essential for a smooth and speedy transfer.
Part 3: How To Transfer Apple iPhone 13 Pro Data Directly to iPhone 15?
While iCloud offers a seamless way to transfer data, some users prefer a more direct approach. It is especially if internet connectivity is limited or they want to hurry the process. Luckily, Apple provides a method to transfer data directly from your Apple iPhone 13 Pro to the new one. It is commonly referred to as the “Quick Start” method, and you can use it by following these steps:
- Step 1: Before initiating the transfer, ensure that your Apple iPhone 13 Pro is on the latest version of iOS. You will also need to turn on Bluetooth and Wi-Fi on the old iPhone. Power on both your Apple iPhone 13 Pro and your new iPhone 15 and place them side by side.
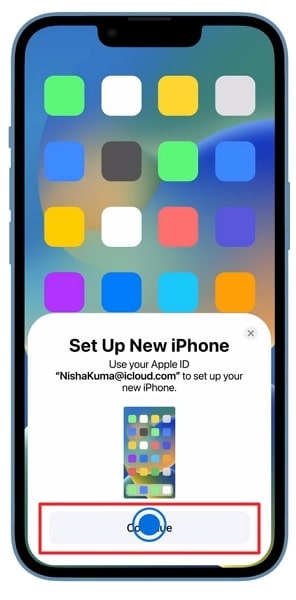
- Step 2: A pop-up will appear on your Apple iPhone 13 Pro , asking if you want to use your Apple ID to set up your new device. Confirm this action by tapping “Continue.” Your iPhone 15 will generate dynamic animation, which the old iPhone needs to capture through its camera.
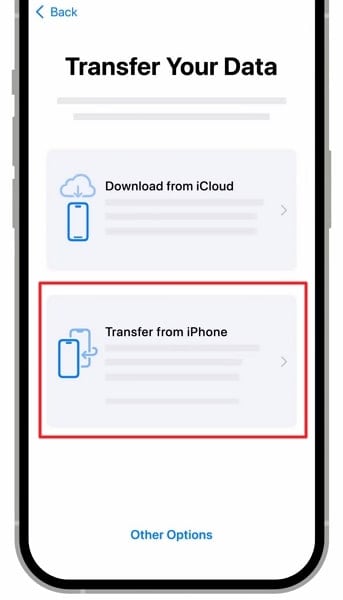
- Step 3: This animation contains security information and establishes a connection between devices. On the new iPhone, you will be required to provide the old phone passcode. Enter the passcode and log in using your Apple ID. Subsequently, select “Transfer from iPhone” and patiently await the process to finish.
Part 4: How To Transfer Apple iPhone 13 Pro iTunes/Finder Backup to iPhone 15?
Looking for a more hands-on approach to data transfer? Using iTunes/Finder can be an effective way in this scenario. It is a recommended way if you have larger backups stored on your computer. To migrate your data from an old iPhone to the new iPhone 15 with iTunes/Finder, you can use the following steps:
- Step 1: Make sure you have the latest version of iTunes/Finder installed on your computer. First, connect your Apple iPhone 13 Pro to the computer and create a backup through the “Summary/General” tab. After the backup has finished, proceed to disconnect the old iPhone.
- Step 2: Now start setting up the new iPhone 15 and navigate to the “Apps & Data” screen. Here, choose “Restore from Mac or PC” and connect the Apple iPhone 13 Pro device to the computer or MacBook with backup.
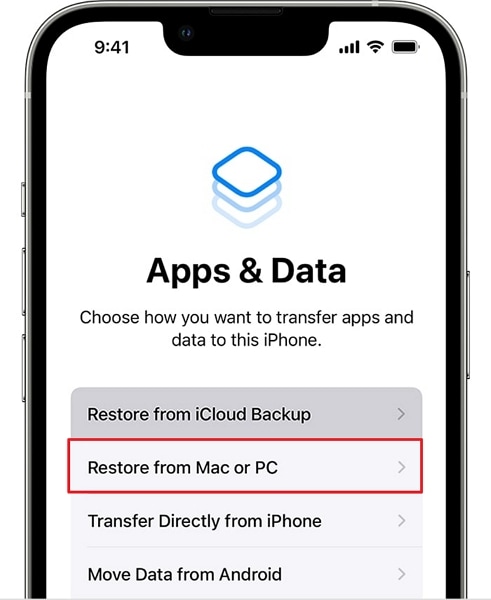
- Step 3: Launch iTunes/Finder on the computer after trusting the Apple iPhone 13 Pro device and tap the “Device” icon. Then, from the “Welcome to Your New iPhone” screen, enable the “Restore from this backup” option and choose your Apple iPhone 13 Pro backup file. Afterward, press the “Continue” button to restore the old iPhone backup to your iPhone 15.

Bonus Tips: Having Trouble When Transferring to iPhone 15 Stucks?
The issue of iPhone 15 getting stuck when users attempt to transfer data from their older devices, like the iPhone 14, to the new iPhone 15 has become a frustrating challenge for many Apple enthusiasts. This problem often arises due to the complex nature of data migration and the high expectations associated with Apple’s seamless ecosystem. When attempting to transfer photos, apps, contacts, and other vital information, users may encounter lengthy delays, frozen screens, or failed transfers.
The possible reasons could be:
- ·Software glitches
- ·Insufficient storage space
- ·Incompatible iOS versions between the old and new devices
The impact of this issue extends beyond mere inconvenience, as it can result in data loss or a less-than-optimal out-of-the-box experience with the latest iPhone. Addressing this problem, you may try:
- ·Updating both devices to the latest iOS version
- ·Ensuring sufficient storage
- ·Seeking assistance from Apple Support
- ·Authorized service providers when necessary
Or, you can also try to ask for help from a third-party application, Dr.Fone - Phone Transfer is always at your service. Dr.Fone - Phone Transfer offers a reliable solution to the iPhone data transfer problem. This user-friendly software is designed to simplify the migration process, making it hassle-free for iPhone users. Here are the steps to get you started:
Step 1 Launch Phone Transfer Tool
Initiate the process by launching Wondershare Dr.Fone on the computer. Continue from Toolbox > Phone Transfer to redirect towards opening the particular tool.
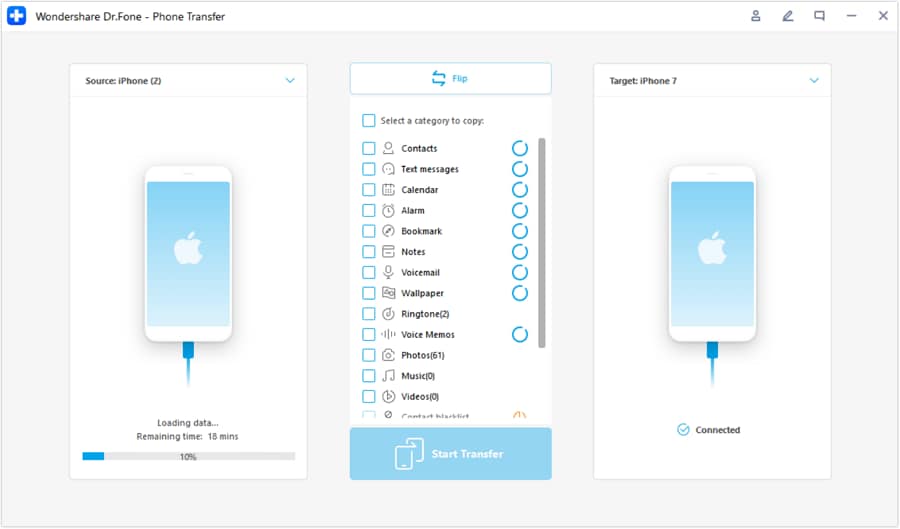
Step 2 Set Data Transfer Path
On accessing the Phone Transfer tool, continue to connect your iOS devices and let them load their data on the next screen. Here, define the Source and Destination of the transfer to specify the direction of the phone transfer. To change locations, use the Flip button on the top.
Step 3 Choose Data Types
After successfully determining the source and destination, select the specific data types you want to transfer. Checkmark all data and select Start Transfer to proceed with the operations.

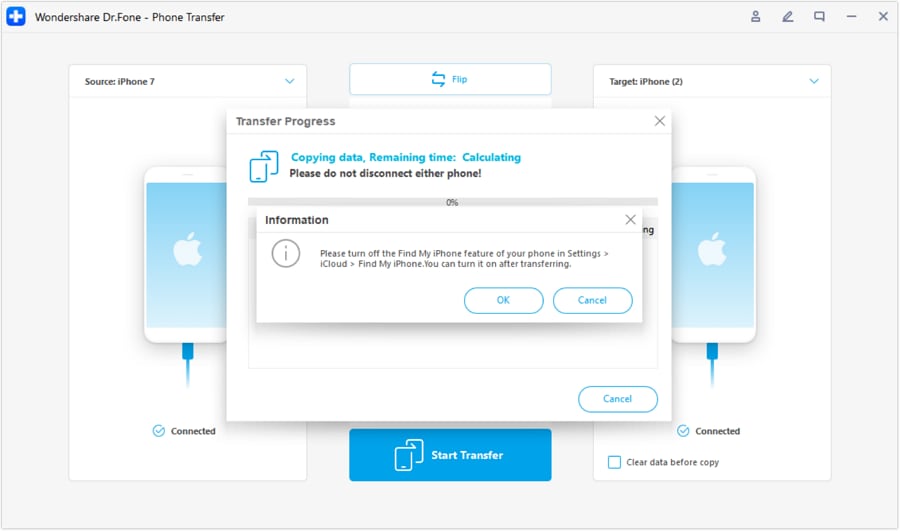
Step 4 Turn Off Find My Feature
Once done, a prompt appears on the front asking to turn off the Find My feature on iOS devices. Open the Settings of the iOS device and proceed further by tapping on the name at the top. Continue from iCloud > Find My feature and turn it off.
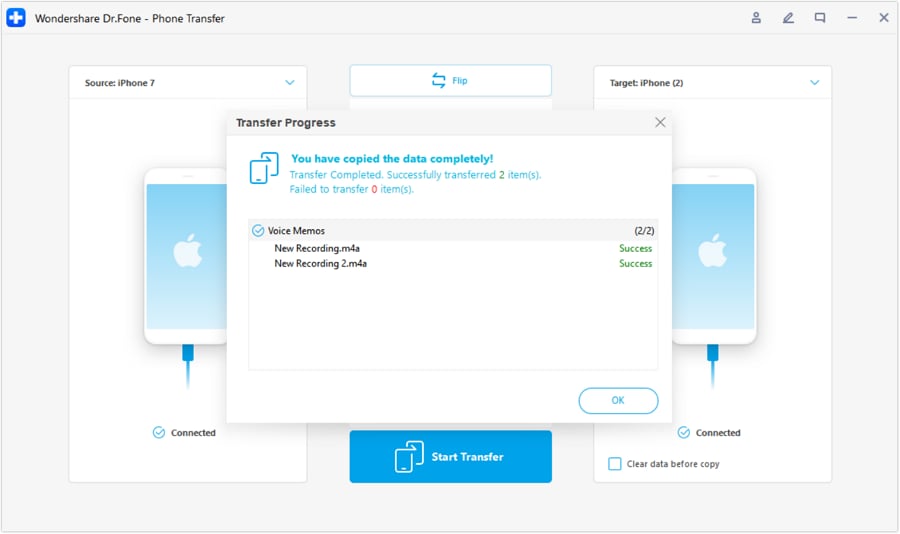
Step 5 Complete Your Transfer
Once done, the window in the front shows the completed phone transfer. Click OK to conclude the process entirely.
Conclusion
In summary, we’ve explored various methods to iPhone 15 transfer data. These ranged from iCloud to direct device-to-device transfers and iTunes/Finder. Each method offers its own advantages, catering to different preferences and circumstances.
However, one solution that truly stands out for its speed, ease, and efficiency is Wondershare Dr.Fone. It provides a fast and direct solution for transferring your data between your Apple iPhone 13 Pro and the iPhone 15.
Also read:
- [New] In 2024, Mastering Instagram's Untapped Potential
- [Updated] In 2024, 8 Mistakes People Should Avoid as a New YouTuber
- [Updated] Secrets of FBX Game Recorder Unveiled
- 10 Fake GPS Location Apps on Android Of your Vivo Y100i Power 5G | Dr.fone
- 6 Methods for Switching from Apple iPhone 13 to Samsung | Dr.fone
- Effortless Ways to Transfer Data from Your Apple iPhone 12 to iPhone 15 | Dr.fone
- Gag Generator for the Web
- How to Transfer Data from Apple iPhone 6s to ZTE Phones | Dr.fone
- How To Transfer WhatsApp From iPhone 13 Pro Max to other iPhone 11 Pro Max devices? | Dr.fone
- In 2024, 4 Ways to Transfer Contacts from Apple iPhone XS Max to iPhone Quickly | Dr.fone
- In 2024, 4 Ways to Transfer Messages from Apple iPhone 13 mini to iPhone Including iPhone 15 | Dr.fone
- PicsArt Revamp Explained In-Depth Review & Step-by-Step Tutorial Update
- Refurbished Apple iPhone 13 Pro Everything You Need to Know | Dr.fone
- Ultimate Selection: Premium iPad Mini Sleeves
- Title: In 2024, How to Transfer from Apple iPhone 13 Pro to Samsung Galaxy S20? | Dr.fone
- Author: Charlotte
- Created at : 2024-09-29 16:37:53
- Updated at : 2024-10-06 17:53:17
- Link: https://iphone-transfer.techidaily.com/in-2024-how-to-transfer-from-apple-iphone-13-pro-to-samsung-galaxy-s20-drfone-by-drfone-transfer-from-ios/
- License: This work is licensed under CC BY-NC-SA 4.0.