
In 2024, How to Transfer Everything from Apple iPhone XS Max to iPhone 8/X/11 | Dr.fone
How to Transfer Everything from Apple iPhone XS Max to iPhone 8/X/11

This article guide focuses on the techniques and tools you need to transfer everything from Apple iPhone XS Max to iPhone 8/X/11. As we know that most of the iPhone users will be switching their devices because of the new and improved iPhone 8/X/11 device which has to offer more features to the Apple users however, there is always a need for proper tool that can transfer data from the old iPhone device to new iPhone 8/X/11.
We have different kinds of files in our iPhone and almost all of the files are important to us. We would never want to stay out of touch with our important ones, and contacts help us to do that. All of that collection of your favorite music is not east to gather and you would certainly not like it if all of it is gone from your handset, So Contacts, Photos, SMS, Music all of these files are very important to us one can only understand the importance when they have no more access to these contents. Similarly, Photos are also important because they are the proof of our precious memories, and we don’t want to lose them. SMS messages are the records of every conversation we had with our contacts and sometimes we need record to continue the conversation regarding the subject. To transfer all of the content from one phone to another, we need a transfer tool because different handsets have different operating systems. And it is not easy to perform transfer functions between two devices. Most of the people hesitate to switch to a newer device because of the hassle they think they might have to go through to transfer data to new device, including the new iPhone 8/X/11.
How to transfer everything from Apple iPhone XS Max to iPhone 8/X/11
If you are looking to transfer everything from your old iPhone to your new iPhone 8/X/11 then Dr.Fone - Phone Transfer is a must get tool. With Dr.Fone application, you can easily transfer your important music, pictures, videos, SMS and much more transfer data to your new iPhone 8/X/11. There are always complications for iPhone users when they want to switch to new and latest device, but it is very easy thanks to Wondershare’s Mobile Trans.
Dr.Fone - Phone Transfer
Transfer Everything from Apple iPhone XS Max to iPhone 8/X/11 in 1 Click!.
- Easily transfer photos, videos, calendar, contacts, messages and music from old iPhone to new iPhone 8/X/11.
- Enable to transfer from HTC, Samsung, Nokia, Motorola and more to iPhone 11/X/8/7S/7/6S/6 (Plus)/5s/5c/5/4S/4/3GS.
- Works perfectly with Apple, Samsung, HTC, LG, Sony, Google, HUAWEI, Motorola, ZTE, Nokia and more smartphones and tablets.
- Fully compatible with major providers like AT&T, Verizon, Sprint and T-Mobile.
- Supports iPhone, iPad, iPod touch and the latest iOS version.
- Fully compatible with the latest Windows or Mac version.
3981454 people have downloaded it
This section of the article focuses on the steps through which you can transfer your data from your Apple iPhone XS Max to your new iPhone 8/X/11.
Step 1: The first and foremost step includes connecting your devices to your PC. When you are done simply launch the Dr.Fone software click Phone Transfer in the main menu.

Step 2: Right after your devices have been connected simply note the source and destination phone are connected at this moment, you will get a proper tab with source and destination phone images and their connection status.
Step 3: When you are done with selecting the source which in this case would be iPhone 7/7Plus and destination device which in this case would be iPhone 8/X/11 click Start Transfer, you need to specify the data you want to transfer in this case you would select all contents since you want to transfer everything.
Step 4: Simply click start transfer and the transfer process will begin make sure that both of the Apple iPhone XS Max devices remain connected throughout the transfer process.

Part 2: How to transfer everything from Apple iPhone XS Max to iPhone 8/X/11 with iCloud
Initially signing up for ICloud gets you 5GB of storage, you can use this storage for IOS device backup, iCloud photo library, app data and documents stored in the ICloud. If you feel 5gb storage is not enough you, you can always upgrade your storage but then you will have to pay. iCloud as a backup is a great if anything happens to your phone you can get access to your data anywhere with the internet besides this you can also use this data to switch your new iPhone 8/X/11 device.
Step 1. From your IPhone 7 device connect to a Wi-Fi network. Go to IPhone 7 settings and tap on your name. Scroll down and select the iCloud option.
Step 2. After you have clicked the iCloud option in the backup section enable iCloud backup option. And hit “Backup Now”.
Step 3. You must be connected to the Wi-Fi until the backup process is completed. In ICloud tab select storage to see the details of your backup.

Step 4. Now that your data has been backed up using your iCloud id you can always add this id to your new iPhone 8/X/11 device. Right after you add your iCloud id to your new iPhone 8/X/11, and Restore from iCloud Backup, all of the backed up data from Apple iPhone XS Max will be transferred to your new iPhone 8/X/11 device.
Part 3: How to transfer everything from Apple iPhone XS Max to iPhone 8/X/11 with iTunes?
You can create a local backup for your Apple iPhone XS Max device on your PC through iTunes, and then restore to your new iPhone 8/X/11. So that you sync all data from Apple iPhone XS Max to iPhone 8/X/11 with iTunes. If you don’t have iTunes you can download for free from apple’s official website.
Step 1. After you have successfully installed iTunes on your Computer connect the Apple iPhone XS Max device to your system and launch the iTunes Application.
Step 2. iTunes will detect your device, simply click summary of your phone, in the Backups tab you must click “Backup Up Now” under the Manually Backup and Restore.
Step 3. The iTunes will back up your iPhone. After the process is complete you can disconnect your Apple iPhone XS Max.
Step 4. After you have backed up the data from your old Apple iPhone XS Max device, simply connect your new iPhone 8/X/11 and restore the data to your new iPhone 8/X/11 device through iTunes.

With the advancements in the mobile technology we are presented with the new and improved features every year, there is always a point where we need to change our device because we do need those new features. So in one of the cases iPhone users would want to change their device because of the extensive features iPhone 8/X/11 has to offer. So in this case we would want to transfer the data from our Apple iPhone XS Max to iPhone 8/X/11. Apple users and techie’s are always up for new handset and they love to get their hands on the newer Apple’s device. This is where there is a need for an effective tool to transfer the data from the old Apple iPhone XS Max to iPhone 8/X/11.
After going through this article guide we can conclude that iPhone users can transfer their data to their latest iPhone 8/X/11 with the help of iTunes, iCloud and Dr.Fone - Phone Transfer (iOS & Android). However, Dr.Fone is very effective for data transfer operations. Plus, the iPhone to iPhone Transfer tool is very easy to use because of its user friendly interface design.
Easy Methods: How To Transfer Pictures From Apple iPhone XS Max to PC
Photo transfer from your iPhone to your PC is a common practice for various reasons. It can free up your device’s storage space, create backups, or simply edit and organize your photos on a larger screen.
Thankfully, there are various methods to transfer pictures from your iPhone to your PC, providing flexibility to users based on their preferences and convenience. Read our comprehensive guide on how to transfer pictures from Apple iPhone XS Max to PC. This article covers step-by-step instructions so you can easily and efficiently manage and transfer your iPhone photos to your computer while preserving your cherished memories.

Part 1: How To Transfer Pictures From Apple iPhone XS Max to PC with iCloud
One of the widely used and efficient methods to transfer pictures from your iPhone to a PC is through iCloud, Apple’s cloud-based service. iCloud provides seamless integration across Apple devices, allowing users to sync and access their photos and videos effortlessly.
However, even if your PC is using other operating systems, such as Windows, you can still use iCloud for Windows to save and transfer your iPhone photos from iCloud.
How to transfer iPhone photos to a computer using iCloud:
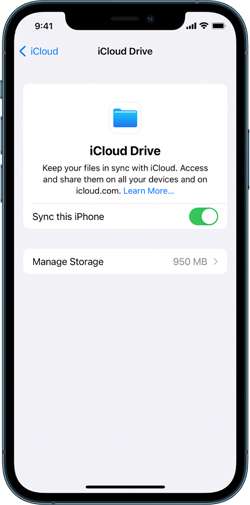
Step 1: Make sure you have synced iCloud photos on your iPhone.
On your iPhone Settings, go to your profile and tap iCloud. Then, select Photos and turn on the switch next to “Sync this [device].” Otherwise, go to iCloud settings > iCloud Drive, and switch on “Sync this iPhone.”
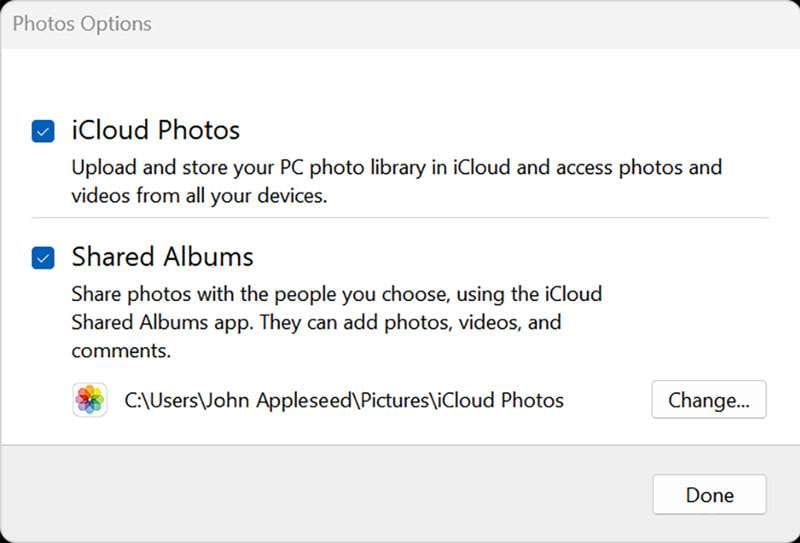
Step 2: Set up your iCloud for Windows.
Open iCloud for Windows and ensure you’re signed in with your Apple ID. Next to Photos, select Options > iCloud Photos. Click “Done” and “Apply” to save the changes and close the window.
Step 3: Keep iPhone photos on PC.
Open iCloud Photos and select the images you want to transfer to your PC. Right-click to open a drop-down menu and choose “Always keep on this device.”
That’s it! Now, you can find your iPhone Photos on your computer.
Part 2: How To Transfer Pictures From iPhone with Google Drive
Another convenient way to transfer iPhone pics to a computer is through Google Drive. As a cloud-based storage solution, Google Drive allows users to seamlessly store, manage, and share files, including photos, across different devices.
If you already have a Google account, you can jump right into Google Drive without signing up. However, be aware that the free version only gives you 15 GB of space. If you need more room, you’ll have to sign up for a subscription.
How to transfer iPhone pictures to a computer with Google Drive:
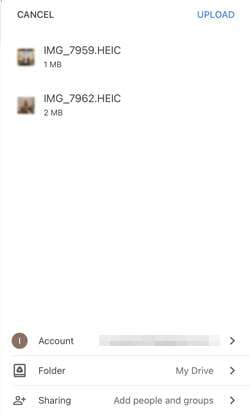
Step 1: Set up your Google Drive.
Open Google Drive on your iPhone. Once opened, tap the multicolored + symbol and select “Upload” > “Photos and Videos.” If prompted, grant access to all photos by tapping “Allow Access to All Photos.”
Step 2: Upload your iPhone photos on Google Drive.
Browse through your iPhone albums to locate the specific photos you wish to upload. Hold and tap to select multiple photos. Then, tap “Upload” to upload your iPhone photos to Google Drive.
Optional: Automatic backup or sync with Google Photos
For those seeking automatic backups, open Google Photos, tap your profile image, navigate to “Google Photos settings,” and select “Backup & Sync.” Toggle “Backup & Sync” to On for continuous backups.
Step 3: Transfer your iPhone photos from Google Drive to your PC.
Once your photos are stored on Google Drive, proceed to save and transfer them to your PC. Select the desired photos in Google Drive, and click “Download.”
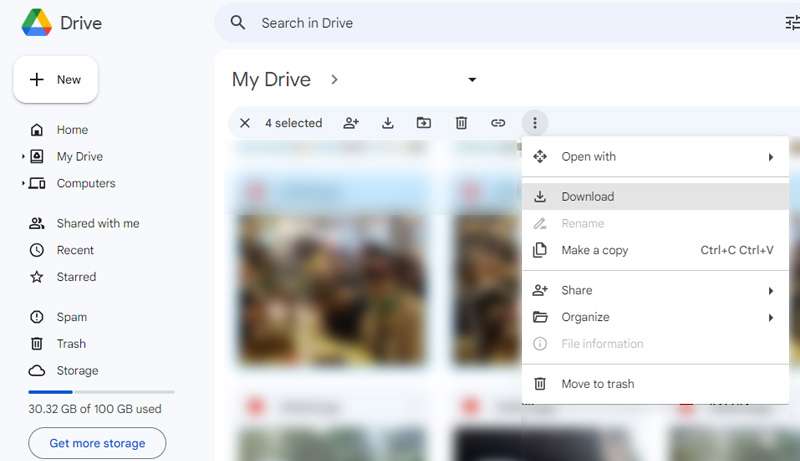
To save all photos from a specific Google Drive folder, open Google Drive and select “My Drive.” Locate the intended folder, and click the three dots to open the drop-down menu. Select “Download,” and all photos and files within the folder will be saved to your computer in ZIP format.
Part 3: How To Transfer Pictures From iPhone with iTunes
You can also make the most of iTunes to secure your iPhone with backups, keep it up-to-date, or synchronize content between your iOS device and your computer in both directions. Even if you’re a Windows PC user, there’s no need to fret. Although iTunes is an Apple product, it’s also available for Windows use.
To get started, make sure that you have iTunes for Windows installed or update your existing version to at least iTunes 12.5.1. Once done, follow the instructions below.
How to transfer iPhone pics to a PC using iTunes:
Step 1: Connect your device to your computer.
Plug in your iPhone to your computer using a USB cable.
Step 2: Grant access to your iPhone Photos.
If your phone is asking you to Trust This Computer, tap “Trust” or “Allow to proceed.”
Step 3: Open your computer’s Photos app.
Go to the Start menu on your PC. Search and select Photos to open the Photos app.
Step 4: Import your Photos to your PC.
Within the Photos app, click on Import > From a USB device and follow the instructions on the screen. You can choose specific photos for the transfer and decide where to save them on your PC. Remember to make sure that the photos are saved on the Apple iPhone XS Max device rather than stored in the cloud.
Finally, allow a few moments for the system to detect and transfer the selected photos.
Part 4: How To Quick Transfer Pictures From Apple iPhone XS Max to PC
If you find the above methods difficult, there is a quick and easy way to transfer photos from your iPhone to a PC with Dr. Fone’s Export All Data feature. With this feature, there’s no need to navigate through various locations to just locate and transfer files from your iPhone.
Dr.Fone - Phone Manager (iOS)
Transfer Photos from Computer to iPod/iPhone/iPad without iTunes
- Transfer, manage, export/import your music, photos, videos, contacts, SMS, Apps, etc.
- Back up your music, photos, videos, contacts, SMS, Apps, etc., to the computer and restore them easily.
- Transfer music, photos, videos, contacts, messages, etc., from one smartphone to another.
- Transfer media files between iOS devices and iTunes.
- Fully compatible with iOS 7 to iOS 15 and iPod.
3981454 people have downloaded it
Dr. Fone’s Export All Data feature offers some great functionalities, including:
- Comprehensive data export, including Photos, Contacts, Messages, Voicemail, and more
- Encrypted data transfer and backups
- Available for iOS and Android devices
- Regular updates to provide an enhanced user experience
To transfer photos from your iPhone to a PC using Dr.Fone, follow the step-by-step below:
Step 1: Launch Dr.Fone and make device connections using a USB cable.
Start by Image nameing your iPhone device to the computer via a USB connection. Launch Dr.Fone and select “Export all data” in the My Device section.

Step 2: Choose file types for export
When a new window appears, select the specific file types you wish to transfer (in this case, your photos). Then, click “Export” at the bottom of the screen to initiate the procedure. Choose the preferred location for saving the exported data.

Step 3: Make a password for the backup file
Next, you will be asked to create an encrypted password for the backup file to be stored on the computer. Set a password, confirm it, and click “Done” to execute the process.

Step 4: Monitor the progress
Your iPhone will start exporting its data to the computer through Dr.Fone. You can wait and monitor the progress on the screen.

Step 5: Successful export of data to the computer
After successful completion of exporting the data, a window will appear on your computer screen. Click “Open” to review the exported data at the specified location.

Conclusion
Before, you must have wondered how do you transfer pictures from Apple iPhone XS Max to PC. But after learning from the article above, you now have a variety of straightforward methods in your hand, whether with iCloud, Google Drive, iTunes, or reliable software like Dr.Fone.
If you’re embedded in the Apple ecosystem, iCloud provides seamless integration of your iPhone Photos. Alternatively, Google Drive offers a cross-platform solution, enabling you to upload your iPhone photos to the cloud and access them on your computer browser.
For those who prefer a more traditional approach, iTunes provides a straightforward method via a USB connection. And if you’re looking for a quick and versatile third-party solution, software like Dr.Fone simplifies the data transfer process with its user-friendly interface and robust features.
4 Ways to Transfer Messages from Apple iPhone XS Max to iPhone Including iPhone 15
“Do text messages transfer to the new iPhone from the old iPhone? I have bought a new iPhone but can’t understand how to transfer messages from Apple iPhone XS Max to iPhone?”
Lately, we have gotten plenty of feedback like this from users who wish to learn how to transfer messages to new iPhone, like iPhone 15/15 Pro (Max), from an existing iOS device. If you have the same doubts, then you have come to the right place.
While it is quite easy to move music, videos, or pictures from one iPhone to another , you might need to walk an extra mile to transfer contacts or messages. To make it easier for our readers, we have come up with three different techniques to transfer messages from an old to a new iPhone effortlessly.
Read on and learn how to transfer messages from Apple iPhone XS Max to iPhone in no time.
Which method to choose?
There are 4 different ways on how to transfer messages to the new iPhone. But which one to choose? Chances are that you might get confused. To make things easier for you, we here provide a quick comparison.
Method 1: How to transfer messages from Apple iPhone XS Max to iPhone including iPhone 15/15 Pro (Max) in one click
If you want to learn how to transfer texts from Apple iPhone XS Max to iPhone seamlessly, then take the assistance of Dr.Fone toolkit. Simply use Dr.Fone - Phone Transfer to move your messages from one iPhone to another. Not only messages, but you can also use it to transfer all data files to new iPhone .
Dr.Fone - Phone Transfer
Quickly Transfer Text Messages /iMessages from Apple iPhone XS Max to iPhone
- Transfer messages from Apple iPhone XS Max to iPhone without backup.
- Support any iDevices including iPhone, iPad, and iPod.
- Transfer everything including contacts, music, video, photo, SMS, app data, and more.
- Can be installed both on Win and Mac computers.
3981454 people have downloaded it
In this technique, the simple process goes as follows to transfer messages to new iPhone:
Open software > Connect iPhones to PC > Select “Messages” > Click “Start Transfer”
Now let’s dive in and learn how to transfer messages to new iPhone:
1. Set up Dr.Fone - Phone Transfer to Windows or Mac computer. Connect and start the application with your iPhone. On the home screen, click the “Phone Transfer” option.
2. Confirm that both iPhones have the correct target and source positions. Or to exchange by clicking “Flip”.

3. Choose the type of information to be transferred. Before clicking on the button “Start Transfer” make sure that the option “Text Messages” is enabled.
4. Wait a while for your old iPhone messages to be transferred to the new iPhone.

5. Once it is done, you can disconnect your iPhones from the PC, and view the messages on the target iPhone.

After following these easy steps, you can learn how to transfer texts from Apple iPhone XS Max to iPhone with Dr.Fone - Phone Transfer.
Video Guide: How to transfer messages from Apple iPhone XS Max to iPhone
You may be interested in:
- _ 4 ways to transfer SMS from Apple iPhone XS Max to Android _
- _ 5 Ways to Transfer WhatsApp Messages from Apple iPhone XS Max to iPhone _
Method 2: How to Transfer Messages from Apple iPhone XS Max to iPhone Including iPhone 15/15 Pro (Max) Using iCloud Backup
Transferring data, including crucial messages, from an old iPhone to a new one is a smooth process using iCloud Backup. It allows you to access your essential conversations and other message data on your new device. Restoring your messages from an iCloud backup is a straightforward process. To effortlessly move your messages from one iPhone to another using an iCloud backup, adhere to the simple steps outlined below:
Step 1: Go to “Settings” on your iPhone, tap your name, and access “iCloud.” Press the “iCloud Backup” option, and on the following screen, ensure “Back Up This iPhone” is enabled. Now, “Back Up Now” to create a backup of your old iPhone’s data, including messages, on iCloud.

Step 2: Afterward, start setting up your new iPhone until you reach the “Apps & Data” screen. Here, choose “Restore from iCloud Backup” and log in using your Apple ID. Then, go on to select the backup you want to restore and complete the process by following the on-screen instructions.

Method 3: How to Transfer Messages from Apple iPhone XS Max to iPhone, including iPhone 15/15 Pro (Max), using iCloud Sync
Ensuring a smooth transition to the latest iPhone is made simple with the aid of iCloud sync. It enables the transfer of essential data, including precious messages, from your old device. With it, you can sync your messages and other crucial data to your new device. This allows continued access to your valuable conversations and attachments. Below are the step-by-step instructions for transferring messages using the iCloud sync feature:
Step 1: On your old iPhone, access phone Settings and tap on your Apple ID. Press “iCloud” on the following screen and move to the “Apps Using iCloud” section.

Step 2: Here, tap “Show All” and go on to press “Messages in iCloud” from the list. On the following screen, enable the “Use on this iPhone” feature. It will sync iMessage with your iCloud account, allowing you to access them on your new iPhone.

Method 4: How to transfer messages from Apple iPhone XS Max to iPhone including iPhone 15/15 Pro (Max) using iTunes/Finder
Besides iCloud, one can also take the assistance of iTunes/Finder to move their content from one iOS device to another. Not only do text messages transfer to new iPhone, other kinds of data files like photos or contacts can also be moved with this method. To learn how to transfer texts from Apple iPhone XS Max to iPhone using iTunes, follow these steps:
1. Connect your source iPhone to your computer and launch iTunes or Finder (Mac Computer).
2. Select the Apple iPhone XS Max device and go to its Summary page.
3. Under the Backups section, click on the “Backup Now” button to take a complete backup of your phone. Make sure that you are taking a backup on the computer instead of iCloud.

4. After taking a backup of your device, disconnect it, and connect the target phone to the computer.
5. Launch iTunes/Finder and wait for it to recognize the new iPhone. From here, you can choose to set up your device while restoring a previous backup.

6. Alternatively, you can also go to its “Summary” page and click on the “Restore Backup” option to restore the existing backup on your target device.

This will let you move not just messages, but all the major data files from one iOS device to another.
You may be interested in:
- _ Does iTunes Backup Text Messages? How to Restore? _
- iTunes Not Working? Here Are All Solutions You Need
Now when you know how to transfer messages from Apple iPhone XS Max to iPhone in different ways, you can simply pick the preferred option. We have also compared these techniques so that you can go with the most suitable alternative.
Go ahead and follow this stepwise tutorial to transfer your messages from one iPhone to another. Whenever someone asks “do text messages transfer to the new iPhone,” make them familiar with an easy solution by sharing this informative post.
Also read:
- 2024 Approved Inside Look 3D LUT Creation Process
- 5 Easy Ways to Transfer Contacts from Apple iPhone 8 Plus to Android | Dr.fone
- 5 Tutorials on How to Transfer Photos From Apple iPhone SE (2020) to New iPhone | Dr.fone
- 6 Solutions to Fix Error 505 in Google Play Store on Motorola Defy 2 | Dr.fone
- How to Fix when Apple Account Locked From Apple iPhone SE?
- How to Transfer Apple iPhone 12 Data to iPhone 12 A Complete Guide | Dr.fone
- How to Transfer Contacts from Xiaomi Redmi 13C to Other Android Devices Devices? | Dr.fone
- How to Transfer from Apple iPhone SE (2022) to iPhone 8/X/11 | Dr.fone
- In 2024, 4 Ways to Transfer Music from Apple iPhone 15 Pro Max to iPod touch | Dr.fone
- In 2024, Various Methods to Transfer Pictures from Apple iPhone SE (2020) to PC | Dr.fone
- New In 2024, Local Video Streaming Made Easy Chromecast Guide for Windows, Mac, Android, and iOS Devices
- Overcoming the Challenge of Playing Diablo II: Resurrected Post-Launch Problems
- Streaming Regional Films via USB on Your Amazon Fire Stick: A Step-by-Step Guide
- Top-Ranked Warner Bros. Film Classics & Exciting 2Amo Releases
- Ultimate Guide, How to Transfer Music From Apple iPhone 15 Pro Max to iPhone | Dr.fone
- Title: In 2024, How to Transfer Everything from Apple iPhone XS Max to iPhone 8/X/11 | Dr.fone
- Author: Charlotte
- Created at : 2024-09-30 16:50:11
- Updated at : 2024-10-06 17:54:03
- Link: https://iphone-transfer.techidaily.com/in-2024-how-to-transfer-everything-from-apple-iphone-xs-max-to-iphone-8x11-drfone-by-drfone-transfer-from-ios/
- License: This work is licensed under CC BY-NC-SA 4.0.