
In 2024, How To Transfer Data from Apple iPhone 13 to New iPhone 15 | Dr.fone
How To Transfer Data from Apple iPhone 13 to New iPhone 15
Upgrading to a new iPhone 15 is always an exciting prospect. However, the thought of transferring all your data from your Apple iPhone 13 to the new iPhone 15 model might seem like a daunting task. Luckily, there is no need to worry, as this guide will resolve all your concerns on how to transfer to the new iPhone 15.
In this detailed article, we explore the process of transferring data from an old iPhone to a new one. Our step-by-step approach will equip you with the knowledge to move your valuable data.
Part 1: Why Should You Shift From Your Apple iPhone 13 to iPhone 15?
In the realm of smartphones, change is not just inevitable; it’s a constant. With the unveiling of the iPhone 15, Apple once again beckons users to take a leap forward. However, you might be wondering why you should bid farewell to your Apple iPhone 13 . The answer lies in the myriad of improvements and features that the iPhone 15 brings to the table. Some of these are summarized below:
1. Cutting-Edge Technology
The iPhone 15 is an example of Apple’s commitment to pushing the boundaries of technology. It offers advancements in processing power, camera capabilities, and display technology. This new iPhone promises to redefine what a smartphone can do.
2. Enhanced Camera Systems
For photography fans, the iPhone 15’s camera system is nothing short of revolutionary. From improved low-light performance to detailed zoom capabilities, it reaches a whole new level of quality.
3. Seamless Connectivity
The new iPhone 15 comes integrated with 5G technology. This ensures that you’ll be at the forefront of high-speed connectivity. You can say goodbye to buffering and lag because iPhone 15 promises smoother streaming, faster downloads, and a more responsive online experience.
4. Extended Software Support
With every new iPhone iteration, Apple launches its latest iOS firmware. Upgrading to the iPhone 15 means enjoying the latest iOS 17 updates. It also means getting security enhancements for years to come.
Part 2: How To Transfer Apple iPhone 13 iCloud Backup to iPhone 15?
Transitioning to the new iPhone 15 is an exciting experience. It means you need to ensure that your data seamlessly makes the journey to the new iPhone 15. Apple provides a convenient way to transfer your data in the form of iCloud. You can create an iCloud backup of your old device and restore it to the new one. Use the following guide to transfer to iPhone 15 with iCloud:
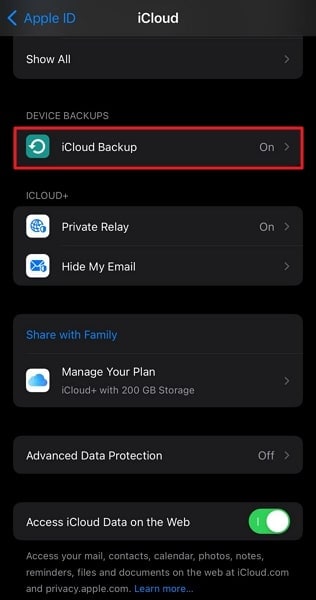
- Step 1: On your Apple iPhone 13 , navigate to “Settings,” tap on your Apple ID, select “iCloud,” and then “iCloud Backup.” Here tap “Back Up Now” to create an iCloud back of your iPhone data.
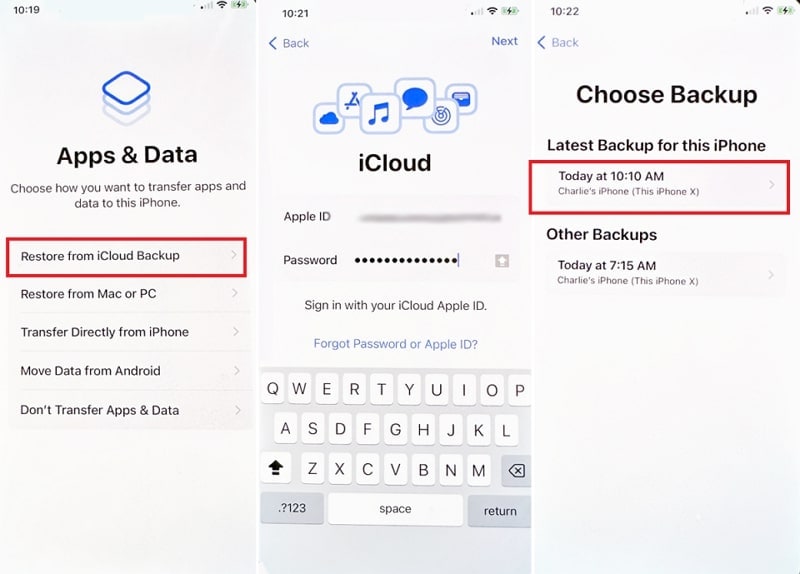
- Step 2: Power on your iPhone 15 and follow the setup prompts until you reach the “Apps & Data” screen. Then, proceed with the “Restore from iCloud Backup” feature and sign in using your Apple ID credentials.
- Step 3: A list of available iCloud backups will appear on the screen. Here you need to select the most recent backup from your Apple iPhone 13 . Keep in mind that a reliable Wi-Fi connection is essential for a smooth and speedy transfer.
Part 3: How To Transfer Apple iPhone 13 Data Directly to iPhone 15?
While iCloud offers a seamless way to transfer data, some users prefer a more direct approach. It is especially if internet connectivity is limited or they want to hurry the process. Luckily, Apple provides a method to transfer data directly from your Apple iPhone 13 to the new one. It is commonly referred to as the “Quick Start” method, and you can use it by following these steps:
- Step 1: Before initiating the transfer, ensure that your Apple iPhone 13 is on the latest version of iOS. You will also need to turn on Bluetooth and Wi-Fi on the old iPhone. Power on both your Apple iPhone 13 and your new iPhone 15 and place them side by side.
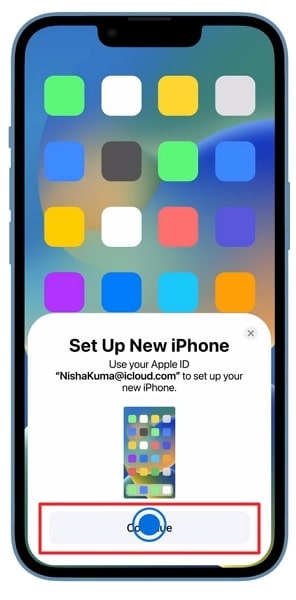
- Step 2: A pop-up will appear on your Apple iPhone 13 , asking if you want to use your Apple ID to set up your new device. Confirm this action by tapping “Continue.” Your iPhone 15 will generate dynamic animation, which the old iPhone needs to capture through its camera.
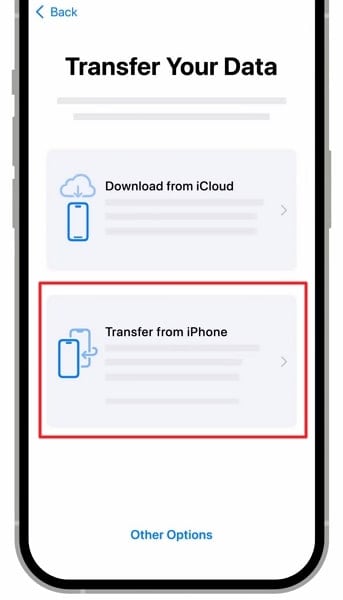
- Step 3: This animation contains security information and establishes a connection between devices. On the new iPhone, you will be required to provide the old phone passcode. Enter the passcode and log in using your Apple ID. Subsequently, select “Transfer from iPhone” and patiently await the process to finish.
Part 4: How To Transfer Apple iPhone 13 iTunes/Finder Backup to iPhone 15?
Looking for a more hands-on approach to data transfer? Using iTunes/Finder can be an effective way in this scenario. It is a recommended way if you have larger backups stored on your computer. To migrate your data from an old iPhone to the new iPhone 15 with iTunes/Finder, you can use the following steps:
- Step 1: Make sure you have the latest version of iTunes/Finder installed on your computer. First, connect your Apple iPhone 13 to the computer and create a backup through the “Summary/General” tab. After the backup has finished, proceed to disconnect the old iPhone.
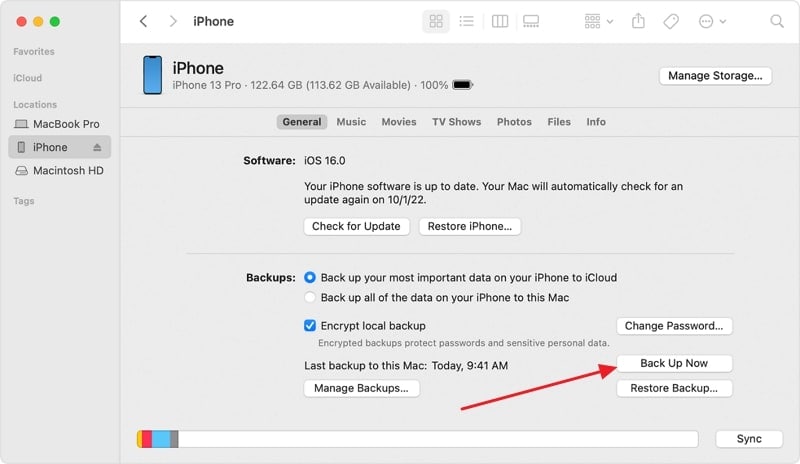
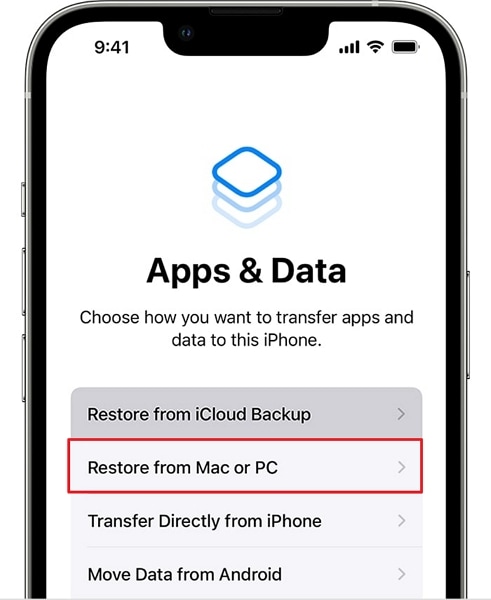
- Step 2: Now start setting up the new iPhone 15 and navigate to the “Apps & Data” screen. Here, choose “Restore from Mac or PC” and connect the Apple iPhone 13 device to the computer or MacBook with backup.
- Step 3: Launch iTunes/Finder on the computer after trusting the Apple iPhone 13 device and tap the “Device” icon. Then, from the “Welcome to Your New iPhone” screen, enable the “Restore from this backup” option and choose your Apple iPhone 13 backup file. Afterward, press the “Continue” button to restore the old iPhone backup to your iPhone 15.

Bonus Tips: Having Trouble When Transferring to iPhone 15 Stucks?
The issue of iPhone 15 getting stuck when users attempt to transfer data from their older devices, like the iPhone 14, to the new iPhone 15 has become a frustrating challenge for many Apple enthusiasts. This problem often arises due to the complex nature of data migration and the high expectations associated with Apple’s seamless ecosystem. When attempting to transfer photos, apps, contacts, and other vital information, users may encounter lengthy delays, frozen screens, or failed transfers.
The possible reasons could be:
- ·Software glitches
- ·Insufficient storage space
- ·Incompatible iOS versions between the old and new devices
The impact of this issue extends beyond mere inconvenience, as it can result in data loss or a less-than-optimal out-of-the-box experience with the latest iPhone. Addressing this problem, you may try:
- ·Updating both devices to the latest iOS version
- ·Ensuring sufficient storage
- ·Seeking assistance from Apple Support
- ·Authorized service providers when necessary
Or, you can also try to ask for help from a third-party application, Dr.Fone - Phone Transfer is always at your service. Dr.Fone - Phone Transfer offers a reliable solution to the iPhone data transfer problem. This user-friendly software is designed to simplify the migration process, making it hassle-free for iPhone users. Here are the steps to get you started:
Step 1 Launch Phone Transfer Tool
Initiate the process by launching Wondershare Dr.Fone on the computer. Continue from Toolbox > Phone Transfer to redirect towards opening the particular tool.

Step 2 Set Data Transfer Path
On accessing the Phone Transfer tool, continue to connect your iOS devices and let them load their data on the next screen. Here, define the Source and Destination of the transfer to specify the direction of the phone transfer. To change locations, use the Flip button on the top.
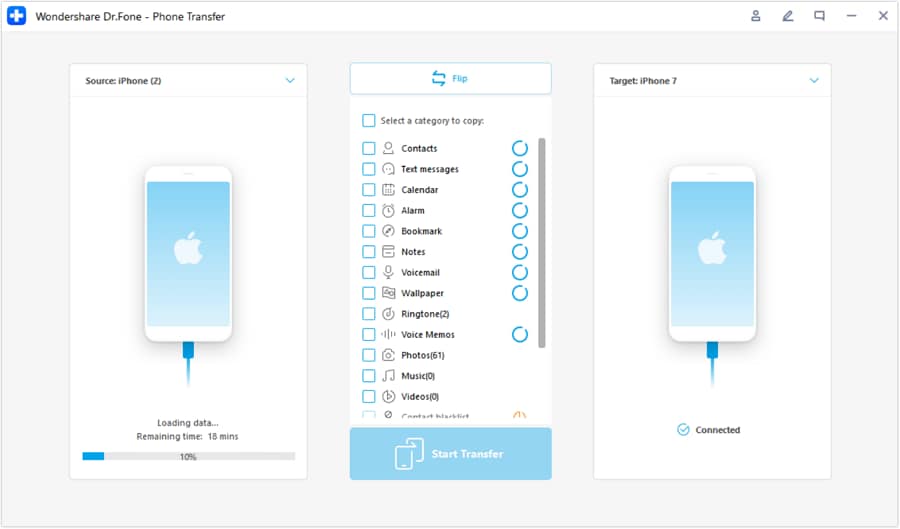
Step 3 Choose Data Types
After successfully determining the source and destination, select the specific data types you want to transfer. Checkmark all data and select Start Transfer to proceed with the operations.

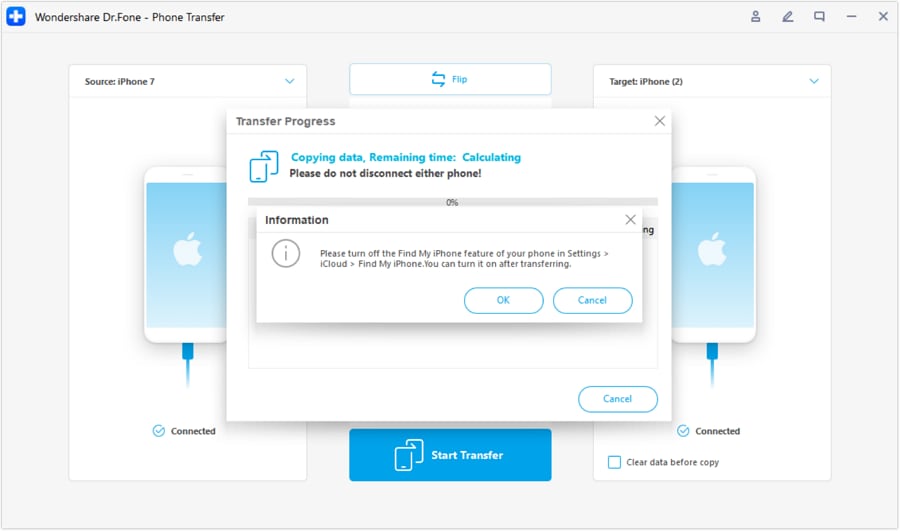
Step 4 Turn Off Find My Feature
Once done, a prompt appears on the front asking to turn off the Find My feature on iOS devices. Open the Settings of the iOS device and proceed further by tapping on the name at the top. Continue from iCloud > Find My feature and turn it off.
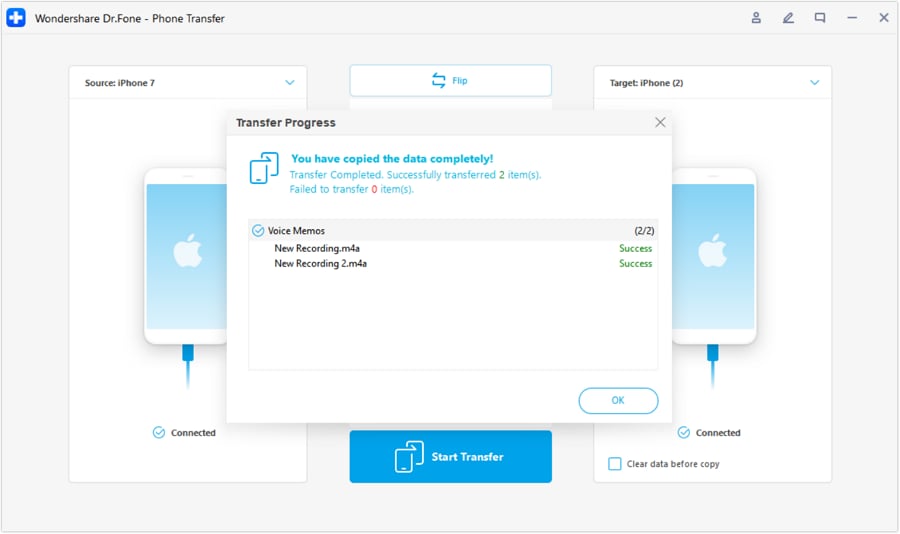
Step 5 Complete Your Transfer
Once done, the window in the front shows the completed phone transfer. Click OK to conclude the process entirely.
Conclusion
In summary, we’ve explored various methods to iPhone 15 transfer data. These ranged from iCloud to direct device-to-device transfers and iTunes/Finder. Each method offers its own advantages, catering to different preferences and circumstances.
However, one solution that truly stands out for its speed, ease, and efficiency is Wondershare Dr.Fone. It provides a fast and direct solution for transferring your data between your Apple iPhone 13 and the iPhone 15.
Transfer your Apple iPhone 13 Apps to New iPhone
We would be very excited to buy a new iPhone like iPhone 15/15 Pro(Max) whenever possible. Just think, what makes us emotional and enthusiastic towards buying and using a new iPhone? Maybe the new and advanced features are better than the old one? Exactly! Once you have bought a new iPhone like iPhone 15/15 Pro(Max), definitely the next step would be to transfer all your applications, games, movies, photos, files, videos, etc. Now the question arises, how to transfer apps from Apple iPhone 13 to iPhone? There must be some solution for every query so, let us research the ways of transfer by using iTunes, iCloud, and the iPhone app store. To know more about the process let us go in-depth.
One-click to transfer apps between iPhone [iPhone 13 Included]
There are so many ways for transferring Apps between iOS devices. If you are searching for a time-saving way to transfer the data. You can try the Dr.Fone - Phone Transfer to help you get the Apps. There is no incompatibility or limitations on iOS models and systems. You can click to transfer one data type from one to another.
Dr.Fone - Phone Transfer
Transfer Apps from Apple iPhone 13 to iPhone in 1 Click Directly!
- Cross-platform data migrating between any devices of your choice from Android and iPhone.
- Support massive data including images, videos, music, messages, contacts, apps, and more.
- Works perfectly with almost mobile phones and tablets, such as iPhones, iPad, Samsung, Huawei, etc.
- Fully work with mobile systems iOS 17 and Android 10.0 and computer systems Windows 10 and Mac 14.
- 100% safe and risk-free, backup & restore data as the original.
3981454 people have downloaded it
Connect both the two iPhones to your computer. Once both the iPhones are connected successfully, all the data from source devices will be detected and listed on the screen. You can adjust the target devices and source devices by clicking the “Flip” button directly.

A more detailed guide can be learned from this user guide. Check it out!
Another way that can assist you to move photos from Android to iPhone is the Dr.Fone - Phone Manager (Android) . What is incredibly convenient about Dr.Fone - Phone Manager (Android) is its ability to transfer photos selectively. You can also use it to transfer contacts, videos, messages, podcasts, and anything else stored on your Android in minutes. Dr.Fone - Phone Manager (Android) is a secure, trustworthy program, hence you can be reassured that your information will be kept safe while transferring from one device to another.
Part 1: How to transfer apps from iPhone apps to the new iPhone via iTunes?
iTunes backup is one of the most commonly used transfer methods. All you have to do is take the backup from the old iPhone and using iTunes you can transfer it to the new iPhone like iPhone 15/15 Pro (Max). Very simply, you can transfer apps from the old iPhone to the iPhone 15/15 Pro(Max) or an earlier model.
The Whole Process is divided into two sections
- A- Backing up old phone data to iTunes.
- B- Transferring backed-up data to a new phone using iTunes.
Section A - To start, you have to start with the backup in iTunes using the old iPhone:
- Firstly, you have to connect the old iPhone and the computer using the USB cable.
- Next, Open the settings and view iTunes. Ensure have the latest version of iTunes.
- Choose the Apple iPhone 13 device.
- Create the passcode in terms of encryption. After that, directly, click the backup now button.

- Once the backup process is finished, you should check whether the backup was done in iTunes preferences in the old iPhone. You can check it by verifying your name, time, and date in the backup.
Note: You have created the backup process on your old iPhone. Now, you should start the next work to transfer apps to the new iPhone like iPhone 15/15 Pro (Max).
Section B - Once you are done with backing up your old phone data with iTunes, now the next process is to transfer apps from Apple iPhone 13 to iPhone using iTunes backed up data:
- The first step is to switch on your new iPhone. The screen “Hello” should be visible to you. If you did the steps already in your new iPhone then you have to remove the entire step out before transferring the apps.
- In your settings, you will have the option Apps & Data. Click it and choose the option “Restore from the iTunes backup” among other options.

- Now, you have to connect the new iPhone device to the PC where the backup from the old iPhone was done.
- View iTunes from the computer and choose your new iPhone like iPhone 15/15 Pro (Max).
- Choose the “Restore backup” and cross-check the date, time, iPhone old name, etc.
- If you set a passcode then enter it. Just wait for a few minutes to get complete the restore process. Keep On the Wifi support to the new iPhone like iPhone 15/15 Pro (Max) and your backup will automatically download to the new iPhone.
Note: You have done the entire process to transfer apps to the new iPhone 15/15 Pro (Max) or an earlier model.
Part 2: How to transfer apps from Apple iPhone 13 to iPhone using iCloud?
The next successful method is an iCloud backup. iCloud the most used application for verification purposes in the iPhone. This method will be very genuine and no complications occur throughout the process when you transfer apps from Apple iPhone 13 to iPhone 15/15 Pro (Max) or an earlier model.
Here also, we have summed up the transferring process via iCloud under two sections
Section A - Backing up the process: Let’s see the steps to take the backup in iCloud using the old iPhone.
- Connect the old iPhone to the Wifi connection.
- Tap the settings and choose iCloud. Click the iCloud and turn ON the iCloud backup.
- Just ensure that you have turned on backup on iCloud.
- Select the backup now button and don’t turn off the wifi till the process gets completed.

Note: You have taken the backup from the old iPhone using the iCloud application.
Section B: Now Let us move ahead to see the steps to transfer apps to the new iPhone like iPhone 15/15 Pro (Max):
1. First, we need to connect the new iPhone and wait for the hello message to receive. If you have completed the set up then you have to remove the setup for the backup process.
2. To remove the setup in the new device – choose settings and then general. From the general choose the reset option. Now select erase all the content and the settings.
Note: Doing so will erase any old setup.
3. Ensure the Wifi is connected to the Apple iPhone 13 device and complete the process to configure the wifi.
4. Open the Apps/Data and select “Restore from the iCloud backup”.

5: You will get the screen to enter the iCloud credential details such as ID/ password.

6: After entering the credentials, you will have the choice to select the backup process. Ensure the date/time of the backup process for verification.
7: The backup process starts on your new phone and you do not interrupt or stop the wifi connection while the backup process continues.
8: Your photos, videos, files, etc will be automatically downloaded into your new Phone using iCloud.
Part 3: How to transfer apps from Apple iPhone 13 to iPhone with the help of the App store?
In this part, we are going to transfer apps from Apple iPhone 13 to iPhone 15/15 Pro (Max) or an earlier model using the iPhone app store. In this method, you do not need to connect to the computer, or no lengthy steps needed. Let us see the steps carefully!
1: You can access the iPhone app store once if you log in to the iCloud account. Click on the settings and choose the “iTunes & App store”. It will ask you to enter the credentials such as Apple ID and password.
2: If you didn’t update the app store then update it by clicking the icon in the lower right corner of the window.

3: Once you tap on the update icon, it will show the option “My Purchase”. It will ask you to sign in the iCloud account.

4: After entering the credential, you have the two options such as all and not on this phone.
5: Select the option “not on this phone” present on the right upper side of the window. You will get the list of applications that you have purchased using the iCloud account.
6: Click the download button next to the icon of the apps. The apps will be installed on your new Phone.

Note: You have completed the installation of apps on your new iPhone.
We have given and explained to you 3 methods to transfer apps from Apple iPhone 13 to iPhone with proper guidance. Each method describes a unique verification process along with the manual setup. You now do not need to wait in a queue to transfer apps to your new iPhone. We can assure you that you would also be in no need of any help from outside. All the best!
4 Ways to Transfer Music from Apple iPhone 13 to iPod touch
Although the Apple iPods have been discontinued, many old users still use them as music players. As we all know, if you want to transfer music from Apple iPhone 13 to iPod, you can just log in with the same Apple ID and then download the songs you purchased on the iPod touch. However, how can you transfer the music that is saved on other devices to your iPod? Don’t worry, this detailed guide introduces 4 ways to transfer music from Apple iPhone 13 to iPod touch, just keep reading!
Part 1: Easy and powerful way to transfer music from Apple iPhone 13 to iPod
A great tool for the purpose of easy transfer of music between iOS devices is Dr.Fone - Phone Transfer . This tool makes life easy for people who want to switch to a new smartphone or are looking for solutions to sync not only music but also contacts, messages, call logs, photos, etc. between different smartphones.
Dr.Fone - Phone Transfer
1-Click Phone to Phone Transfer
- Easy, fast, and safe.
- Move data between devices with different operating systems, i.e iOS to Android.
- Supports iOS devices that run the latest iOS version

- Transfer photos, text messages, contacts, notes, and many other file types.
- Supports over 8000+ Android devices. Works for all models of iPhone, iPad, and iPod.

4,495,115 people have downloaded it
How to use transfer music from Apple iPhone 13 to iPod
Step 1. Download and install Dr.Fone on your computer. Run it and select Phone Transfer. Connect your iPhone and iPod with your computer, and Dr.Fone will detect your iOS devices automatically.

Step 2. Select Music and other file types you would like to transfer and click on Start Transfer.

Step 3. Then just sit and have a cup of coffee. All music files will be transferred from Apple iPhone 13 to iPod successfully.

Part 2: Transfer Music purchased from the iTunes Store from Apple iPhone 13 to iPod using iTunes
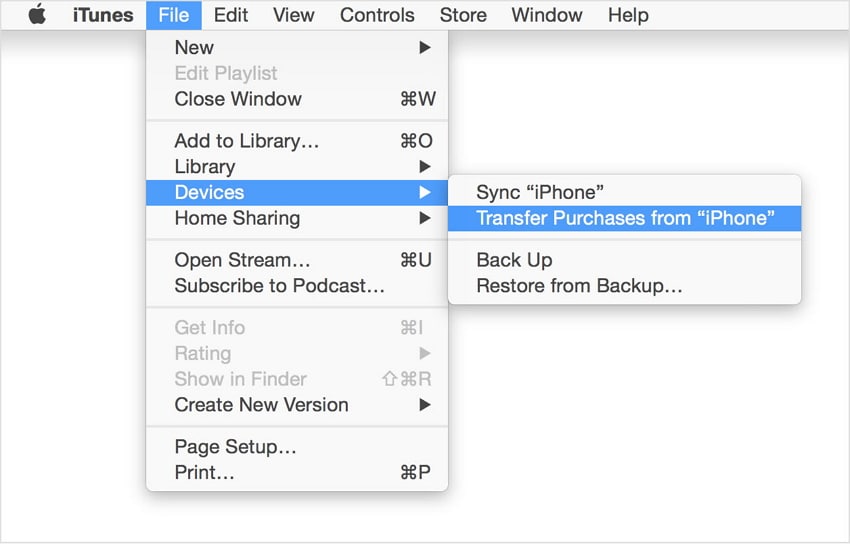
In case, you have purchased music from iTunes and want it to transfer from your iPhone to iPod, there is no direct way to the process. For it to be done, you need to re-download previous iTunes Store purchases on your computer. The best thing for this to be done, is that no extra cost is required to be done till the time, the same ID is used for the same purpose.
Then you need to follow the following steps for the process to be done. On the computer, in iTunes, go to the iTunes Store. Then you need to click ‘Purchased’, which is available in the Quick Links on the Home screen. Then you need to find the songs that are on the iPhone, but not in your computer’s iTunes library. Then, click the ‘cloud’ button next to the song name to download it. The last step of syncing remains which can be done as desired. Just sync those songs from your iTunes library to your iPod as desired and you are done with the job of Transfer Music Purchased from the iTunes store from Apple iPhone 13 to iPod.
Part 3: Transfer Music purchased from the iTunes Store from Apple iPhone 13 to iPod using iTunes match
iTunes match is another way to process of transfer music purchased or unpurchased from iTunes from Apple iPhone 13 to iPod. In fact, iTunes match determines the song, which is present in the iCloud and since there are over 43 million songs, iTunes match matches these unpurchased songs with the database and allows playing these music from the iCloud store. Now, you just need to tap the iCloud download button to download music from an artist, album or playlist. Thus, a person has immediate access to a huge music library without having to worry about the storage space on your device.
Part 4: Transfer Music imported from a CD or other source from Apple iPhone 13 to iPod
For this process to complete, you need to import all songs from CD to iTunes at first. Here is the process for the complete transfer of Music from CD and other sources.
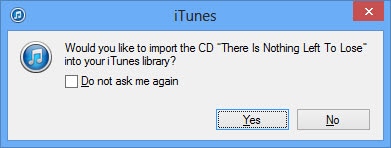
Open iTunes and insert the CD that you wish to import into the disc drive
The options might appear in an instant. If you want to import every song on the disc, select yes and click No, in case you want specific music to import.
In case, you clicked on ‘NO’, Select the menu on the top-left side of the iTunes window and select the audio CD in the list.
Then, check the files you want to import to iTunes, then select Import CD.
The preferences option appears and you need to select the preferences and click OK after the preference has been done.
In case, the music library already contains tracks from the album, which you are importing, you will receive a prompt window to overwrite them. You can select either Replace Existing or Don’t Replace as your wish.
Then you have to wait till the music is ripped to the iTunes library.
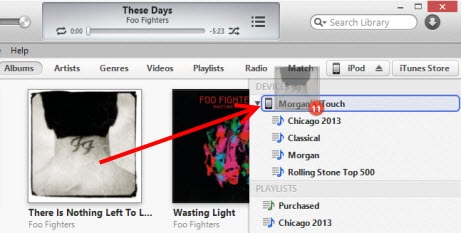
As soon as the import is complete, attach your device to the computer.
You can now drag the album to the right side of the iTunes window where a pane will appear containing the music on your device. Drop it right on your iPod or other devices.
All remains is to eject the iPod and enjoy your music


Also read:
- [Updated] 2024 Approved Streaming Success Top Methods for Online Show Recordings
- [Updated] Find the Disappeared Watch Tile
- [Updated] Template Hacks for Building Professional YouTube Intros
- 2024 Approved The Sound of Success Tailoring Audio for Instagram Content
- 5 Ways to Send Ringtones from Apple iPhone 14 to iPhone Including iPhone 15 | Dr.fone
- Adding Your Company's Logo As A Background Image In FlipBook With FlipBuilder Guide
- How to Move Custom Ringtones from Apple iPhone 13 Pro Max to Android? | Dr.fone
- How to Transfer Apple iPhone 15 Plus Data to iPhone 12 A Complete Guide | Dr.fone
- How to Transfer from Apple iPhone X to iPhone 8/X/11 | Dr.fone
- How to Transfer Photos from Apple iPhone 12 to other iPhone without iCloud | Dr.fone
- How to Unlock Vivo V27 Phone without Any Data Loss
- In 2024, 3 Ways to Export Contacts from Apple iPhone 12 Pro to Excel CSV & vCard Easily | Dr.fone
- In 2024, How to Transfer Everything from Apple iPhone 13 mini to iPhone | Dr.fone
- Insta360's One X2 - Waterproof VR Camera for Adventurers
- The Ultimate Guide to Easy Setup and Seamless Performance with TP-Link's Deco P9
- Title: In 2024, How To Transfer Data from Apple iPhone 13 to New iPhone 15 | Dr.fone
- Author: Charlotte
- Created at : 2024-10-10 19:39:58
- Updated at : 2024-10-11 16:30:05
- Link: https://iphone-transfer.techidaily.com/in-2024-how-to-transfer-data-from-apple-iphone-13-to-new-iphone-15-drfone-by-drfone-transfer-from-ios/
- License: This work is licensed under CC BY-NC-SA 4.0.