
In 2024, How to Copy Contacts from Apple iPhone SE to SIM? | Dr.fone
How to Copy Contacts from Apple iPhone SE to SIM?
“How to copy contacts from Apple iPhone SE to SIM? I want to use my SIM on another device but can’t seem to export contacts to SIM on iPhone!”
Lately, lots of iPhone users have asked similar questions as they wish to save contacts to SIM card on iPhone. It might sound surprising, but it can be a little complicated to learn how to save contacts to SIM on iPhone. In this tutorial, we will answer the question – how to transfer contacts from Apple iPhone SE to SIM and provide a foolproof way to save and restore your iPhone contacts. Let’s get it started and learn more about how to export contacts from Apple iPhone SE to SIM.
Part 1: Is it possible to save contacts to SIM on iPhone?
A lot of users take the assistance of SIM card to save their contacts. If you are also doing the same, then you can easily learn how to import SIM contacts to iPhone. Simply go to your device’s Settings > Mail, Contacts, Calendar and tap on “Import SIM Contacts”.

Though, the problem occurs when users wish to do vice versa and learn how to import contacts from Apple iPhone SE to SIM. As of now, Apple doesn’t provide a direct solution to export contacts to SIM on iPhone. If you really wish to save contacts to SIM on iPhone, then you have to jailbreak your device once. After jailbreaking your device, you can use certain apps to move contacts to SIM easily.
Though, if your device has not been jailbroken, then you can’t export contacts to SIM on iPhone directly. This is because Apple assumes the transfer of contacts via SIM card is an obsolete method. Don’t worry – you can try an alternative method to save and backup contacts on iPhone. We have discussed it in the next section.
Part 2: How to save iPhone contacts with Dr.Fone?
While we can’t learn how to copy contacts from Apple iPhone SE to SIM, we can try an alternative method to save our contacts. By taking the assistance of Dr.Fone - Backup & Restore (iOS), you can save your data by taking its backup. Later, you can restore the backup on any other iOS (or Android) device. In this way, you can easily move your contacts and don’t need to learn how to save contacts to SIM on iPhone.
Dr.Fone - Backup & Restore (iOS) is a highly advanced and intuitive tool that can backup and restore all the major data types like contacts, messages, photos, music, etc. It is compatible with every leading version of iOS (including iOS 17). Therefore, instead of learning how to transfer contacts from Apple iPhone SE to SIM, you can use Dr.Fone Backup & Restore by following these steps:
Dr.Fone - Backup & Restore (iOS)
Save and Backup iPhone Contacts with 1-Click.
- One click to backup the whole iOS device to your computer.
- Support to backup Social apps on iOS devices, such as WhatsApp, LINE, Kik, Viber.
- Allow to preview and restore any item from the backup to a device.
- Export what you want from the backup to your computer.
- No data loss on devices during the restore.
- Selectively backup and restore any data you want.
- Supported iPhone 15/14/13/12/11/X that run iOS 17/16/15/14/13 and former
- Fully compatible with Windows 10 or Mac 14
3981454 people have downloaded it
1. Firstly, download Dr.Fone - Backup & Restore(iOS) on your computer and launch it whenever you wish to learn how to export contacts from iPhone (by taking its backup). From the welcome screen of Dr.Fone toolkit, select the option of “Backup & Restore”.

2. Now, connect your iPhone to the system and wait for the application to detect it automatically.
3. You can see that the tool can backup tons of applications as well. Simply click on the “Backup” button on the right panel to get things started.

4. From the next window, you can select the type of data that you wish to backup. You can also check the “Select all” option to take a comprehensive backup of your data. Additionally, you can alter the backup path from here as well.
5. To backup contacts, make sure the option of “Contacts” (under the Privacy section) is enabled before you click on the Backup button.
6. Wait for a while as Dr.Fone will backup your selected data. Once it is done, you will be notified. You can either view the backup content or go to the Backup location as well.

7. Whenever you need to restore your contacts, you can simply connect the Apple iPhone SE device and click on the “Restore” option instead.
8. This will automatically display a list of the previous backup files. Select the file you wish to restore and click on the “View” button.

9. Your backup will be listed under different categories here. Go to Privacy > Contacts and select the contacts you wish to restore.
10. After making your selection, you can export this data to your PC or restore it to the connected device. Simply click on the “Restore to Device” and wait for a while.

11. In no time, your contacts would be restored to your device. When the process is completed, you will be notified.
That’s it! After restoring your contacts, you can safely remove the Apple iPhone SE device and use it as per your wishes. Therefore, if you have Dr.Fone Backup & Restore, then you don’t need to worry about how to import contacts from Apple iPhone SE to SIM.
Part 3: Other solutions to transfer iPhone contacts
While you can’t learn how to copy contacts from Apple iPhone SE to SIM directly, you can always move your contacts from one phone to another. We have listed some easy solutions to help you resolve your query on how to save contacts to SIM on iPhone with some alternative methods.
Save your contacts to iCloud
By default, every user gets a free space of 5 GB on iCloud (which can later be expanded). Therefore, you can easily take a backup of your contacts and other important files on iCloud. Just go to your device’s Settings > iCloud and turn the backup option on. Make sure that the backup for Contacts is turned on as well. This will sync your contacts to iCloud, letting you access them on the go. In this way, you don’t have to learn how to transfer contacts from Apple iPhone SE to SIM.

Export iPhone contacts Via iTunes
Another alternative to learning how to export contacts from Apple iPhone SE to SIM is by taking the assistance of iTunes. Simply connect your Apple iPhone SE to the system and launch iTunes. Select your iPhone and go to its “Info” tab. From here, you can sync its contacts with iTunes. This will keep your contacts safe and allow you to sync them with another iOS device.

Copy iPhone Contacts Using Gmail
Just like iCloud, you can also sync your contacts with Gmail. If you don’t use Gmail, then go to your iPhone’s Accounts Settings and set up your Gmail account. Later, you can go to Settings > Mail, Contacts, Calendar > Gmail and toggle on the syncing option for Contacts.

If you want, you can access your Google Contacts and import them to a vCard as well. This would be a perfect alternative to learn how to import contacts from Apple iPhone SE to SIM.

We hope this guide was able to answer your question of how to copy contacts from Apple iPhone SE to SIM. Since there is no ideal solution for it, you can try different alternatives. Dr.Fone Backup & Restore is one of the best ways to keep your contacts (and other types of data) safe and will certainly save the day during an emergency situation.
5 Ways to Send Ringtones from Apple iPhone SE to iPhone Including iPhone 15
It is a common misconception that sending data from one iPhone to another can be a tedious task. For instance, there are plenty of ways to learn how to send ringtones from Apple iPhone SE to iPhone without any trouble. You can either perform a direct transfer to your new iPhone , such as iPhone 15, or even take the assistance of your system to do so. In this post, we will teach you in different ways how to transfer ringtones from Apple iPhone SE to iPhone in a stepwise manner. So let’s get started!
Part 1: How to Send Ringtones to iPhone including iPhone 15 with 1-Click
“How do I send a ringtone to another iPhone without iTunes?” If you want to transfer ringtones from Apple iPhone SE to iPhone, you can use the help of third-party applications that will get the job done in minutes. These applications are also useful when you are trying to shift content from one Apple device to another. Of course, you will need a computer/Laptop to play the middleman. Dr.Fone - Phone Transfer is the best iPhone transfer tool that lets you transfer your ringtones from Apple iPhone SE to iPhone.
Here is how:
Step 1: Download Dr.Fone - Phone Transfer application on your computer.

Step 2: Launch the application, and you’ll see options on the screen. Go with Phone Transfer.
Step 3: Then connect both your devices to the computer. In your case, it is the iPhone and the iPhone. You can also make this transfer between iPhone and Android devices.

Step 4: Now select the files that you want to transfer. Here, select all the ringtones that you want to shift. Then, initiate the transfer and don’t disconnect the Apple iPhone SE devices.

The data will be transferred successfully to the destination device.
Don’t have a laptop? Then you can do this!
Step 1: Download the mobile version of Wondershare Dr. Fone - Phone Transfer. Connect your iPhone and iPad using a suitable cable.

Step 2: The software will start to scan the synced data on your device.

Step 3: After the check, select the contacts you want to shift and click on ‘Start Importing’.

Part 2: How to Send Ringtones to iPhone Including iPhone 15 Using iTunes/Finder?
The traditional method of managing their iOS devices is utilizing iTunes or Finder. It remains a reliable approach for sending ringtones to your iPhone, including the latest iPhone 15. Be aware that iTunes versions 12.6 and earlier are capable of syncing your ringtones. The more recent versions exclusively support music synchronization. Here’s a step-by-step guide on how to transfer ringtones from Apple iPhone SE to iPhone:
Step 1: Start by installing iTunes version 12.6 or older on your computer and launch it. Now connect your old iPhone with ringtone to the computer. In iTunes, click “Files,” hover over “Devices,” and tap “Transfer Purchases from iPhone.”

Step 2: Press “Sync” and wait for the ringtones to sync. Afterward, disconnect the old iPhone and plug in the new iPhone. Once you’ve selected the Apple iPhone SE device icon, navigate to the “Tones” tab and mark the “Sync Tones” box. Next, choose either “All Tone” or “Selected Items” and finalize the process by clicking “Apply.”

Part 3: How to Send Ringtones to iPhone including iPhone 15 using OneDrive?
With Dr.Fone - Phone Transfer, you can transfer ringtones from one device to another directly, and that too within seconds. Nevertheless, if you wish to perform a wireless transfer, then you can take the assistance of a cloud service like OneDrive. Besides moving your files from one device to another, you can also keep them safe on the cloud.
To start with, download OneDrive on both iOS devices from App Store. You can also visit its iTunes store page right here .
Open OneDrive on your source device and tap on the “+” icon to add something to the drive. Next, tap on the “Upload” button and locate the ringtone on your device storage to upload it on the drive.

Now, launch OneDrive on your target device and sign in using the same credentials. Locate the file that you have just added to the drive. Open the folder and download it to your local storage.
In this way, you can learn how to transfer ringtones from Apple iPhone SE to iPhone without physically connecting both devices.

Part 4: How to Send Ringtones to iPhone including iPhone 15 using AirDrop?
AirDrop provides a quick and efficient way to transfer ringtones directly between two iOS devices. It allows for a smooth sharing experience without the need for extra software or cloud services. Follow these steps for how to send a ringtone from Apple iPhone SE to iPhone:
Step 1: Begin by confirming that AirDrop is active on both devices and set to “Everyone” for visibility. Additionally, make sure that Bluetooth and Wi-Fi are turned on for both devices as well.

Step 2: On the source device, move to the “Files” app. Here, navigate to the targeted ringtones and select them. Now, tap the “Share” button and select “AirDrop” as the sharing method. From the available devices for AirDrop, choose the targeted device. On the targeted iPhone, you will receive a prompt for AirDrop. Accept it to complete the ringtone-sharing process.

Part 5: How to Send Ringtones to iPhone including iPhone 15 using Email?
While this is not the most direct method, sending ringtones via email remains a viable option. It can transfer small audio files between iPhones. Follow these steps for how to send ringtones from Apple iPhone SE to iPhone using email:
Step 1: On the source iPhone, move to the ringtone you want to send and select it. Now, tap “Share” and choose “Email” as the sharing method.

Step 2: Once the ringtone is added as an attachment, add your email address in the recipient field. Afterward, press “Send” to email the selected ringtone. On your target iPhone, open the mail and download the ringtone.

Bonus Tip. How to Make Custom Ringtone on iPhone
Creating custom ringtones for your iPhone allows you to personalize your device even further. This sets it apart from the standard options available. When it comes to finding a reliable and trusted ringtone maker, Wondershare Dr.Fone stands at the top. It allows you to create ringtones by selecting music files directly from the iPhone.
With its advanced features, you can craft unique ringtones from your favorite songs or audio files. Follow these steps to utilize the Dr.Fone Ringtone Maker feature and create your own custom ringtone on your iPhone:
Step 1: Access Ringtone Maker in Wondershare Dr.Fone
After launching Wondershare Dr.Fone on your computer, connect your iPhone to it using the original cable. Once Dr.Fone has detected your device, click “Ringtone Maker” from the available options. On the following window, use “Local Music” or “Device Music” to select an audio file.
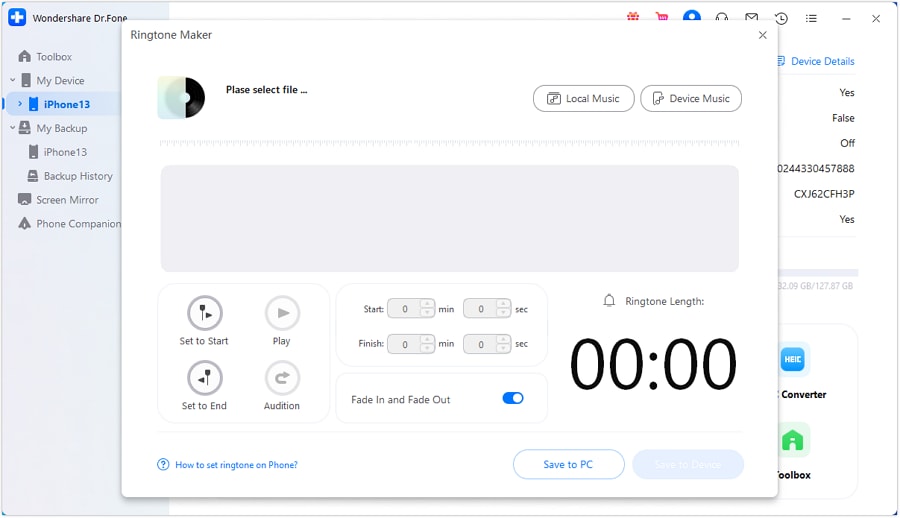
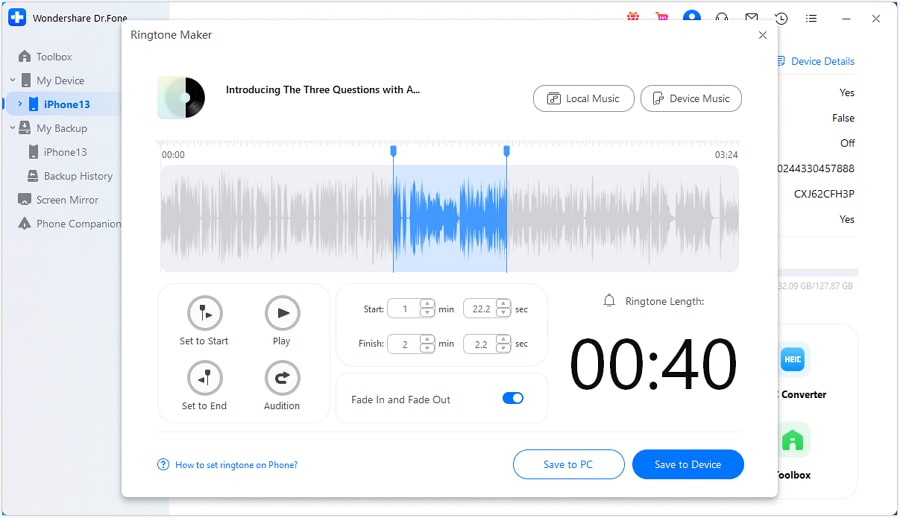
Step 2: Create the Custom iPhone Ringtone
Adjust the appended music to match your desired ringtone length. Employ the “Fade In” and “Fade Out” feature for personalized ringtone customization. Afterward, store the newly created ringtone directly on the iPhone using the “Save to Device” option.
FAQs About Ringtones on iPhone
- Where are my iPhone ringtones stored?
On an iPhone, custom ringtones are typically stored within the Apple iPhone SE device’s internal storage. Specifically, they are found within the “Settings” application under the “Sounds & Haptics.” Additionally, if you have synced ringtones via iTunes, they might be stored within the iTunes media folder on your computer.
- What if I have a large collection of ringtones to transfer?
For transferring a substantial assortment of ringtones, contemplate leveraging a cloud storage solution. OneDrive and Google Drive are among the options worth exploring. They enable the uploading and storage of significant data volumes. It enables easy access and download from multiple devices. Using a third-party software solution such as Wondershare Dr.Fone can simplify the process of bulk transfers.
- Are there any precautions I should take when transferring ringtones?
When transferring ringtones, ensure that the file formats are compatible. It’s also crucial to use secure and trusted transfer methods to prevent any data loss or security breaches. Additionally, always back up your data before initiating any transfer process. This is to avoid the risk of potential data loss during the transfer.
- What if I encounter issues during the transfer process?
If you encounter any issues during the transfer process, it’s essential to troubleshoot systematically. Check the compatibility of the file formats. In addition, ensure a stable internet connection, and verify that both devices are using the latest software updates. If the issue persists, consult the support documentation for the specific transfer method. Reach out to the customer support of the respective software or service provider for further help.
Now when you know how to send ringtones from Apple iPhone SE to iPhone in different ways, you can certainly move your data without any trouble. Feel free to give Dr.Fone - Phone Transfer a try and manage your device in no time. It is a complete phone management tool that will certainly come in handy to you on numerous occasions. If you face any setbacks while moving your ringtones from Apple iPhone SE to iPhone, let us know about them on our official social media.
Methods to Transfer from Apple iPhone SE to Android
Ready to switch your old iPhone to an Android smartphone? I’m sure it will bring you some new experience. However, by doing this, you have to face the problem: transfer data from Apple iPhone SE to Android phone. Since iOS on iPhone and Android on Android phone vary in many aspects, it’s not easy to move from Apple iPhone SE to Android. If that’s what you’re worried about, you’re in the right place. Here are some useful tutorials that can help you transfer contacts, SMS, photos, video, music, apps, and calendars from your old iPhone to your new Android device without any hassle. Get to know how to transfer data from Apple iPhone SE to Android now!
Method 1. Transfer All Data from Apple iPhone SE to Android in 1 Click
The easiest way to transfer data from Apple iPhone SE to Android is to use the smart iPhone to Android transfer tool, Dr.Fone - Phone Transfer . It enables you to easily transfer all contacts both in phone memory and cloud account, like iCloud, Exchange, and others, text messages, video, photos, and music from iPhone (iPhone 15 included) to Android phone or tablet.
Dr.Fone - Phone Transfer
1-Click Phone to Phone Transfer
- Easily transfer photos, videos, calendars, contacts, messages, and music from Android to iPhone/iPad, or vice versa.
- Takes less than 5 minutes to finish.
- Enable to transfer from HTC, Samsung, Nokia, Motorola, and more to iPhone 15/14/13/12/11/X/8/7/SE/6s (Plus)/6 Plus that run iOS 5 or later.
- Works perfectly with Apple, Samsung, HTC, LG, Sony, Google, HUAWEI, Motorola, ZTE, Nokia, and more smartphones and tablets.
- Fully compatible with major providers like AT&T, Verizon, Sprint, and T-Mobile.
- Fully compatible with the latest Windows or Mac OS.
3981454 people have downloaded it
How to Transfer Data from Apple iPhone SE to Android
1. Transfer Contacts in accounts: To transfer contacts in Facebook, Twitter, Google and any accounts on your iPhone to Android phone or tablet, you should sign in the accounts on your iPhone.
2. Backup and restore: Your Android phone or tablet is not right now in your hand? Don’t worry. Just use it to backup iPhone data to computer, and then restore to your Apple iPhone SE or tablet whenever you need.
Step 1. Run iPhone to Android Data Transfer Tool
Launch Dr.Fone - Phone Transfer on your Windows PC or Mac. On its homepage, choose the “Phone Transfer” option and click on it.
Step 2. Connect Your iPhone and Android Device to Computer with USB Cables
Connect your iPhone and Android device to the computer. Two devices will be soon detected and shown in the window below.
Step 3. Start Data Transfer from Apple iPhone SE to Android
Scan the supported files to ensure what you’re going to transfer. Click “Start Transfer”. If you have many useless files on your Apple iPhone SE, you can check “Clear data before copy”.

Don’t have a computer at hand? Just try the Android app of Dr.Fone - Phone Transfer , which allows you to directly transfer data from Apple iPhone SE to Android, and bring iCloud data to Android without any hassle.
Method 2. Transfer Data One by One from Apple iPhone SE to Android for Free
Besides Dr.Fone - Phone Transfer, there are some useful ways that empower you to transfer files from Apple iPhone SE to Android. They’re totally free but just take some time.
Part 1. Transfer Apps from Apple iPhone SE to Android
As you know, apps on iPhone are in .ipa, .pxl, or .deb formats, while Android apps are .apk files. Thus, it’s impossible to directly install iPhone apps on your Apple iPhone SE or tablet, let alone transfer app data from Apple iPhone SE to Android. However, many iPhone apps have their corresponding Android versions, which you can download from Google Play Store .
Search Google Play on the internet and then search the apps that you play on your iPhone. Then, download and install the apps on your Apple iPhone SE or tablet.

Part 2. Transfer Contacts from Apple iPhone SE to Android via iCloud
When switching from Apple iPhone SE to Android, one of the most important content you want to transfer is contacts. Unfortunately, the iPhone sim card is smaller than the one on Android phone and iPhone contacts are usually saved in a phone memory card. Although Many Android phones have also the nano sim card for changing sim card between Android and iOS flexibility, there are still some Android phone adapt bigger sim cards. That means, it’s not available to just insert iPhone sim card on Android phone, which usually works in transferring contacts from Android to Android .
Don’t worry. If you like saving iPhone contacts to accounts, like iCloud, and Google, it’s easy to do iPhone to Android contact transfer. Here, I take iCloud as an example.
Step 1. On your iPhone, navigate to Settings and select iCloud.
Step 2. Sign in to your iCloud account and turn on Contacts to sync contacts between iPhone and iCloud. Calendars can also be ticked at the same time, and then sync the calendar from iCloud to Android.

Step 3. Open the browser and land iCloud main page. Then, click Contacts to enter the contact management panel. Click Show Actions Menu and click Export vCard…. Then, contacts in iCloud will be saved as a vCard file on the computer.

Step 4. Plug a USB cable to connect your Apple iPhone SE or tablet to computer. When it’s recognized, go and open the SD card of your Apple iPhone SE. Cut and paste the exported vCard file to the SD card folder.
Step 5. Navigate to the Contacts app on your Apple iPhone SE. Tap the menu icon left to the main button and you get the menu list. Tap Import/Export and choose Import from USB storage. Then, import the vCard file to your Apple iPhone SE.

Tips: If you want to know more ways to transfer contacts from Apple iPhone SE to Android, you can find more satisfying answers on ways to transfer contacts from Apple iPhone SE to Samsung, and switch contacts from Apple iPhone SE to Android .
Part 3. Transfer iPhone text messages to Android with 2 Android apps
To transfer iPhone SMS to Android, you can turn to two Android apps for help. With them, you can extract iPhone SMS from iTunes backup and transfer to Android phone.
Step 1. Open iTunes and connect your iPhone to the computer via a USB cable. In your iPhone control panel, click Back Up Now to back up your iPhone to the computer.

Step 2. Connect your Apple iPhone SE to computer with a USB cable. Copy the exported iTunes backup file to the SD card of your Apple iPhone SE.
Step 3. Go to Google Play on your Apple iPhone SE or tablet and download iSMS2droid on your Apple iPhone SE. Open iSMS2droid and tap Select iPhone SMS Database. Then, choose the imported iTunes backup file. Choose all or selected text messages and convert them to an XML file.


Step 4. Download and install SMS Backup & Restore on your Apple iPhone SE. Use it to restore your iPhone’s SMS in an XML file to the Android’s SMS database.


Part 4. Transfer Photos from Apple iPhone SE to Android
It’s known that Apple gives you access to iPhone Camera Roll photos. You can copy and paste iPhone photos you take and download from internet to Android phone or tablet with USB cables.
Plug-in USB cables to connect your iPhone and Android phone to computer. Your iPhone and Android phone will be mounted as flash drives. Open your iPhone folder and click Internal Storage > DCIM. Then, choose your wanted photos and copy them to the SD card of your Apple iPhone SE.
Note: By using this way, you can export photos in iPhone Camera Roll to Android phone. However, as for the photos in the Photo Library, you still have no way to expect using some third-party tool, like Dr.Fone - Phone Transfer .

Part 5. Transfer Video and Music from Apple iPhone SE to Android
Have purchased hundreds of thousands of songs and videos and now want to transfer to your new Android phone or tablet. It’s a piece of cake. iTunes can do that for you. Just follow the easy tutorial below.
Step 1. Open iTunes. Click Store > Authorize This Computer…. Fill out your Apple ID and password. Get your iPhone and Android phone connected with a USB cable and open iTunes. Right click your iPhone. In the pull-down list, choose Transfer Purchased to transfer iPhone music and video back to iTunes. Navigate to the iTunes media folder on the computer. C: UsersAdministratorMusiciTunesiTunes Media. Find your wanted music and video and copy them to your Apple iPhone SE SD card.

Part 6. Transfer Calendars from Apple iPhone SE to Android
It’s easy to sync Calendars from Apple iPhone SE to Android, as long as you have the Google account sync feature on both iPhone and Android phones.
Step 1. On your iPhone, tap Settings, scroll down the screen to tap Mail, Contacts, Calendars, and then choose Google.
Step 2. Fill in your Google account info: name, email, and password. In the Description screen, enter a description of the calendars.


Step 3. Tap Next and turn on _Calendar_s. Then, tap Save to begin syncing iPhone calendars with Google.
Step 4. On your Apple iPhone SE or tablet, tap Settings > Account & sync. Select Google account and tap Sync Calendars and Sync Now.


The above methods offer you valuable solutions to transfer data from Apple iPhone SE to Android. Whether you choose to use Dr.Fone - Phone Transfer, cloud services, or iTunes, these methods cater to a variety of preferences and ensure that your valuable data, including contacts, messages, photos, and apps, can seamlessly migrate to your new Android device. By using Dr.Fone - Phone Transfer, you can make the switch from Apple iPhone SE to Android with 1 click, try it now!
Also read:
- [New] Quick Scan Recorder for Chrome Devices
- [Updated] 2024 Approved Concluding Coverage Craftsmanship
- [Updated] 2024 Approved Illuminate Focus Through the Use of Leading Lines in iPhone Photography
- How to Fix the 'Initialization Failed for Vanguard' Issue in Valorant Explained
- How to Repair and Stop Speaker Interference Sounds in Microsoft Windows - Win 10/7 Fixes
- How to Transfer Data from Apple iPhone 8 to ZTE Phones | Dr.fone
- How to Transfer/Sync Notes from Apple iPhone XS Max to iPad | Dr.fone
- In 2024, Capturing Clarity Best Practices for iPhone Photo Cropping
- In 2024, Fix Apple iPhone XS Max Stuck on Data Transfer Verified Solution! | Dr.fone
- In 2024, iPhone Transfer Transfer Contact from Apple iPhone 8 to iPhone without iCloud | Dr.fone
- In 2024, The Ultimate Guide How to Bypass Swipe Screen to Unlock on Lava Yuva 3 Pro Device
- In 2024, Ultimate Guide, How to Transfer Music From Apple iPhone 15 Pro to iPhone | Dr.fone
- The AI Frontier Beckons - Meta Sets New Parameters
- Various Methods to Transfer Pictures from Apple iPhone 6 to PC | Dr.fone
- Title: In 2024, How to Copy Contacts from Apple iPhone SE to SIM? | Dr.fone
- Author: Charlotte
- Created at : 2024-10-07 07:07:45
- Updated at : 2024-10-12 00:55:14
- Link: https://iphone-transfer.techidaily.com/in-2024-how-to-copy-contacts-from-apple-iphone-se-to-sim-drfone-by-drfone-transfer-from-ios/
- License: This work is licensed under CC BY-NC-SA 4.0.