
In 2024, How to Copy Contacts from Apple iPhone 14 Plus to SIM? | Dr.fone
How to Copy Contacts from Apple iPhone 14 Plus to SIM?
“How to copy contacts from Apple iPhone 14 Plus to SIM? I want to use my SIM on another device but can’t seem to export contacts to SIM on iPhone!”
Lately, lots of iPhone users have asked similar questions as they wish to save contacts to SIM card on iPhone. It might sound surprising, but it can be a little complicated to learn how to save contacts to SIM on iPhone. In this tutorial, we will answer the question – how to transfer contacts from Apple iPhone 14 Plus to SIM and provide a foolproof way to save and restore your iPhone contacts. Let’s get it started and learn more about how to export contacts from Apple iPhone 14 Plus to SIM.
Part 1: Is it possible to save contacts to SIM on iPhone?
A lot of users take the assistance of SIM card to save their contacts. If you are also doing the same, then you can easily learn how to import SIM contacts to iPhone. Simply go to your device’s Settings > Mail, Contacts, Calendar and tap on “Import SIM Contacts”.

Though, the problem occurs when users wish to do vice versa and learn how to import contacts from Apple iPhone 14 Plus to SIM. As of now, Apple doesn’t provide a direct solution to export contacts to SIM on iPhone. If you really wish to save contacts to SIM on iPhone, then you have to jailbreak your device once. After jailbreaking your device, you can use certain apps to move contacts to SIM easily.
Though, if your device has not been jailbroken, then you can’t export contacts to SIM on iPhone directly. This is because Apple assumes the transfer of contacts via SIM card is an obsolete method. Don’t worry – you can try an alternative method to save and backup contacts on iPhone. We have discussed it in the next section.
Part 2: How to save iPhone contacts with Dr.Fone?
While we can’t learn how to copy contacts from Apple iPhone 14 Plus to SIM, we can try an alternative method to save our contacts. By taking the assistance of Dr.Fone - Backup & Restore (iOS), you can save your data by taking its backup. Later, you can restore the backup on any other iOS (or Android) device. In this way, you can easily move your contacts and don’t need to learn how to save contacts to SIM on iPhone.
Dr.Fone - Backup & Restore (iOS) is a highly advanced and intuitive tool that can backup and restore all the major data types like contacts, messages, photos, music, etc. It is compatible with every leading version of iOS (including iOS 17). Therefore, instead of learning how to transfer contacts from Apple iPhone 14 Plus to SIM, you can use Dr.Fone Backup & Restore by following these steps:
Dr.Fone - Backup & Restore (iOS)
Save and Backup iPhone Contacts with 1-Click.
- One click to backup the whole iOS device to your computer.
- Support to backup Social apps on iOS devices, such as WhatsApp, LINE, Kik, Viber.
- Allow to preview and restore any item from the backup to a device.
- Export what you want from the backup to your computer.
- No data loss on devices during the restore.
- Selectively backup and restore any data you want.
- Supported iPhone 15/14/13/12/11/X that run iOS 17/16/15/14/13 and former
- Fully compatible with Windows 10 or Mac 14
3981454 people have downloaded it
1. Firstly, download Dr.Fone - Backup & Restore(iOS) on your computer and launch it whenever you wish to learn how to export contacts from iPhone (by taking its backup). From the welcome screen of Dr.Fone toolkit, select the option of “Backup & Restore”.

2. Now, connect your iPhone to the system and wait for the application to detect it automatically.
3. You can see that the tool can backup tons of applications as well. Simply click on the “Backup” button on the right panel to get things started.

4. From the next window, you can select the type of data that you wish to backup. You can also check the “Select all” option to take a comprehensive backup of your data. Additionally, you can alter the backup path from here as well.
5. To backup contacts, make sure the option of “Contacts” (under the Privacy section) is enabled before you click on the Backup button.
6. Wait for a while as Dr.Fone will backup your selected data. Once it is done, you will be notified. You can either view the backup content or go to the Backup location as well.

7. Whenever you need to restore your contacts, you can simply connect the Apple iPhone 14 Plus device and click on the “Restore” option instead.

8. This will automatically display a list of the previous backup files. Select the file you wish to restore and click on the “View” button.

9. Your backup will be listed under different categories here. Go to Privacy > Contacts and select the contacts you wish to restore.
10. After making your selection, you can export this data to your PC or restore it to the connected device. Simply click on the “Restore to Device” and wait for a while.

11. In no time, your contacts would be restored to your device. When the process is completed, you will be notified.
That’s it! After restoring your contacts, you can safely remove the Apple iPhone 14 Plus device and use it as per your wishes. Therefore, if you have Dr.Fone Backup & Restore, then you don’t need to worry about how to import contacts from Apple iPhone 14 Plus to SIM.
Part 3: Other solutions to transfer iPhone contacts
While you can’t learn how to copy contacts from Apple iPhone 14 Plus to SIM directly, you can always move your contacts from one phone to another. We have listed some easy solutions to help you resolve your query on how to save contacts to SIM on iPhone with some alternative methods.
Save your contacts to iCloud
By default, every user gets a free space of 5 GB on iCloud (which can later be expanded). Therefore, you can easily take a backup of your contacts and other important files on iCloud. Just go to your device’s Settings > iCloud and turn the backup option on. Make sure that the backup for Contacts is turned on as well. This will sync your contacts to iCloud, letting you access them on the go. In this way, you don’t have to learn how to transfer contacts from Apple iPhone 14 Plus to SIM.

Export iPhone contacts Via iTunes
Another alternative to learning how to export contacts from Apple iPhone 14 Plus to SIM is by taking the assistance of iTunes. Simply connect your Apple iPhone 14 Plus to the system and launch iTunes. Select your iPhone and go to its “Info” tab. From here, you can sync its contacts with iTunes. This will keep your contacts safe and allow you to sync them with another iOS device.

Copy iPhone Contacts Using Gmail
Just like iCloud, you can also sync your contacts with Gmail. If you don’t use Gmail, then go to your iPhone’s Accounts Settings and set up your Gmail account. Later, you can go to Settings > Mail, Contacts, Calendar > Gmail and toggle on the syncing option for Contacts.

If you want, you can access your Google Contacts and import them to a vCard as well. This would be a perfect alternative to learn how to import contacts from Apple iPhone 14 Plus to SIM.

We hope this guide was able to answer your question of how to copy contacts from Apple iPhone 14 Plus to SIM. Since there is no ideal solution for it, you can try different alternatives. Dr.Fone Backup & Restore is one of the best ways to keep your contacts (and other types of data) safe and will certainly save the day during an emergency situation.
4 Ways to Sync Contacts from Apple iPhone 14 Plus to iPad Easily
One of the key elements within the Apple ecosystem is its capacity to synchronize data across various devices. In this age of inter connectivity, the importance of harmonizing contacts across multiple devices has emerged as vital. With the prevalence of iPhones and iPads, the demand for an efficient method to sync contacts between these two devices has surged.
For better contact management, the contacts syncing between iPhone and iPad is critical. This article discusses how do you sync contacts from Apple iPhone 14 Plus to iPad. It will go through 4 effective methods to sync contacts from an iPhone to an iPad.
Part 1: Sync Contacts from Apple iPhone 14 Plus to iPad Using Wondershare Dr.Fone
Wondershare Dr.Fone can be used to transfer contacts from Apple iPhone 14 Plus to iPad/iPhone . You can back up iPhone contacts using Dr.Fone and then restore the contacts to the iPad without losing any data.
Wondershare Dr.Fone
Back up & Restore iOS Data Turns Flexible.
- One-click to back up the whole iOS device to your computer.
- Allow to preview and restore any item from the backup to a device.
- Export what you want from the backup to your computer.
- No data loss on devices during the restoration.
- Selectively restore any data you want.
- Supported the newest iPhone and Android phones.
3981454 people have downloaded it
Here’s how to sync iPhone contacts to iPad:
- Step 1: Connect the iPhone to the computer
Launch Wondershare Dr.Fone on the computer and then select “My Backup” from among various options. Now, using a cable, connect the iPhone to the computer and then allow Dr.Fone to automatically detect your connected iPhone device.
- Step 2: Click “Back Up Now” to Back up
After the iPhone is connected successfully, Dr.Fone will automatically detect the file types in it. Click on “Back Up Now” to back up your iPhone.
The backup process will start and take a few minutes to complete depending on the volume of data to be backed up. Dr.Fone will display all the data that are supported after the backup is completed.
Now that you have backed up all the contacts on the iPhone and then restoring them to the iPad is the way to it.
- Step 3: Select Restore to Device
Once the backup is completed, connect your iPad using a USB cable. Select the backup file and hit “Restore to Device”. It’s as simple as it sounds, and anyone can back up your contacts and sync them to your iPad.
In addition to manual backup, you can also back up contacts on iPhone automatically.
How to back up contacts automatically and wirelessly?
Step 1: Click “Backup Preference” to set up the backup frequency and backup period.
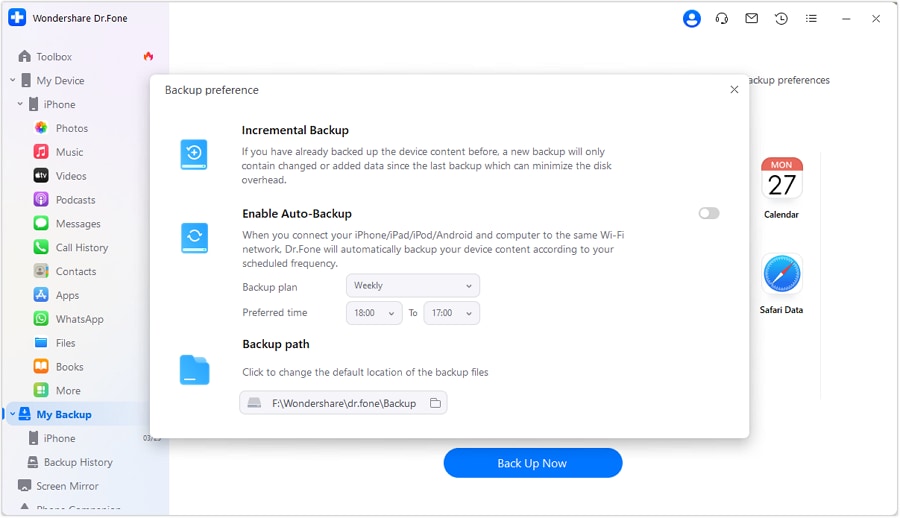
Step 2: Connect your iPhone and PC with the same wifi, the contacts on iPhone will be backed up automatically. You don’t need to use a USB cable to connect the iPhone to the PC in this step. Next time, if you would like to back up contacts again, it will only be for newly added data or modified files, which helps you save storage space and backup time.
Step 3: Restore the backup file to iPad/iPhone. You can preview the backup data and select the data you want to restore.
Bonus Tip: Sync Contacts from Apple iPhone 14 Plus to iPad with 1 Click
Except the Phone Backup feature can help you sync contacts from Apple iPhone 14 Plus to iPad easily, there is another tool that can also help you. If you have downloaded the Wondershare Dr.Fone, you may see this tool on the homepage, too. Yes! It is Dr.Fone - Phone Transfer .
Features of Dr.Fone - Phone Transfer tool:
- Easily share contacts and other types of data on iPhone to iPad/another iPhone.
- Just 1 click to transfer contacts to the iPad.
- Sync the data from Apple iPhone 14 Plus to iPad within less than 3 minutes, the time of a cup of coffee!

Part 2: Sync Contacts from Apple iPhone 14 Plus to iPad Using iCloud
If you’re heavily invested in the Apple environment, choosing iCloud is the optimal route. It serves as a convenient tool for synchronizing contacts between your iPhone and iPad. Leveraging iCloud’s powerful synchronization features, you can effortlessly maintain updated contact lists across all your Apple devices. Follow the simple steps outlined below to sync contacts from Apple iPhone 14 Plus to iPad:
Step 1: After ensuring that the same Apple ID is logged in on both iPhone and iPad, first move to iPhone’s Settings. Here, tap “Apple ID,” and on the following screen, choose “iCloud.” In the “iCloud” tab, move to the “Apps Using iCloud” section and ensure the “Contacts” app is toggled on. Afterward, transfer to your iPad and access the Apple iPhone 14 Plus device’s Settings.

Step 2: Within the Settings app, tap “Apple ID” and follow it by pressing “iCloud” on the following screen. Here, move to the “Apps Using iCloud” section and toggle on the “Contacts” app. Wait a few moments, and your contacts will be synced across devices.

Part 3: Sync Contacts from Apple iPhone 14 Plus to iPad Using AirDrop
AirDrop is a convenient feature native to Apple devices. It presents a convenient wireless solution for seamlessly transferring contacts between an iPhone and an iPad. With its user-friendly configuration, AirDrop enables the easy sharing of diverse data, including contacts, among nearby Apple devices. Follow the instructions below for how do I sync contacts from Apple iPhone 14 Plus to iPad using AirDrop:
Step 1: Begin by ensuring that Bluetooth and Wi-Fi are enabled on both iPhone and iPad. Afterward, access Control Center by swiping down from the top right corner of the Apple iPhone 14 Plus device.

Step 2: Here, enable AirDrop and set its visibility to “Everyone.” Now, open the ‘Contacts’ app on your iPhone, select the contacts you want to transfer and tap the “Share” button.

Step 3: Tap on “AirDrop” from the list of sharing options provided. After selecting “AirDrop,” choose your iPad as the receiving device. A prompt will appear on your iPad to accept the incoming contacts. Tap “Accept” to initiate the transfer.

Part 4: Sync Contacts from Apple iPhone 14 Plus to iPad Using iTunes/Finder
iTunes/Finder serves as a robust option for users who prefer a traditional and reliable method. It is a tested and trusted way of syncing data between their Apple devices. This software offers comprehensive backup and sync functionalities. That’s why iTunes/Finder provides a secure and efficient way to transfer contacts from an iPhone to an iPad. Follow the steps below to sync your contacts using iTunes or Finder:
Step 1. Begin by launching the most recent version of iTunes/Finder on your computer. Connect your iPhone and navigate to the “Summary” tab by clicking the “iPhone” icon. Here, enable the “Sync with this iPhone via Wi-Fi” feature.

Step 2. Subsequently, disconnect the iPhone and link your iPad to the computer. In iTunes/Finder, select the “Device” icon and switch to the “Info” tab. Here, ensure that the “Sync Contacts” box is checked, and then choose either “All Contacts” or “Selected Groups.”

Step 3. Once you have made your selection, click on “Apply” to initiate the contacts synchronization process. Upon completion, you can disconnect the iPad and access the synced contacts from your iPhone.

So, these are four ways in which you can transfer contacts from Apple iPhone 14 Plus to iPad. Since these methods are the outcome of thorough research, all the methods are absolutely safe, and there is absolutely no data loss in the process. However, we would recommend Wondershare Dr.Fone , considering its robust and efficient working design. It is one of the best and most popular tools to transfer data from Apple iPhone 14 Plus to iPad and offers an amazing overall experience with a simple interface and fast process. What’s imperative is to ensure that you follow all the steps properly and that’s all, there you have it; all the contacts on the iPad.
Easy Methods: How To Transfer Pictures From Apple iPhone 14 Plus to PC
Photo transfer from your iPhone to your PC is a common practice for various reasons. It can free up your device’s storage space, create backups, or simply edit and organize your photos on a larger screen.
Thankfully, there are various methods to transfer pictures from your iPhone to your PC, providing flexibility to users based on their preferences and convenience. Read our comprehensive guide on how to transfer pictures from Apple iPhone 14 Plus to PC. This article covers step-by-step instructions so you can easily and efficiently manage and transfer your iPhone photos to your computer while preserving your cherished memories.
Part 1: How To Transfer Pictures From Apple iPhone 14 Plus to PC with iCloud
One of the widely used and efficient methods to transfer pictures from your iPhone to a PC is through iCloud, Apple’s cloud-based service. iCloud provides seamless integration across Apple devices, allowing users to sync and access their photos and videos effortlessly.
However, even if your PC is using other operating systems, such as Windows, you can still use iCloud for Windows to save and transfer your iPhone photos from iCloud.
How to transfer iPhone photos to a computer using iCloud:
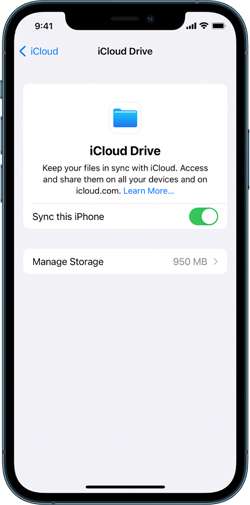
Step 1: Make sure you have synced iCloud photos on your iPhone.
On your iPhone Settings, go to your profile and tap iCloud. Then, select Photos and turn on the switch next to “Sync this [device].” Otherwise, go to iCloud settings > iCloud Drive, and switch on “Sync this iPhone.”
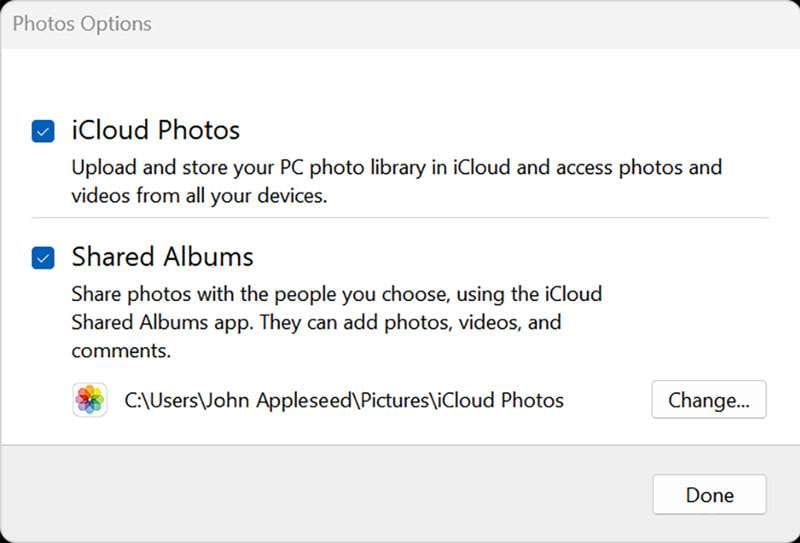
Step 2: Set up your iCloud for Windows.
Open iCloud for Windows and ensure you’re signed in with your Apple ID. Next to Photos, select Options > iCloud Photos. Click “Done” and “Apply” to save the changes and close the window.
Step 3: Keep iPhone photos on PC.
Open iCloud Photos and select the images you want to transfer to your PC. Right-click to open a drop-down menu and choose “Always keep on this device.”
That’s it! Now, you can find your iPhone Photos on your computer.
Part 2: How To Transfer Pictures From iPhone with Google Drive
Another convenient way to transfer iPhone pics to a computer is through Google Drive. As a cloud-based storage solution, Google Drive allows users to seamlessly store, manage, and share files, including photos, across different devices.
If you already have a Google account, you can jump right into Google Drive without signing up. However, be aware that the free version only gives you 15 GB of space. If you need more room, you’ll have to sign up for a subscription.
How to transfer iPhone pictures to a computer with Google Drive:
Step 1: Set up your Google Drive.
Open Google Drive on your iPhone. Once opened, tap the multicolored + symbol and select “Upload” > “Photos and Videos.” If prompted, grant access to all photos by tapping “Allow Access to All Photos.”
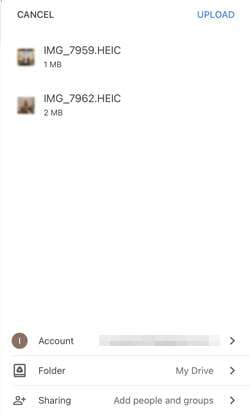
Step 2: Upload your iPhone photos on Google Drive.
Browse through your iPhone albums to locate the specific photos you wish to upload. Hold and tap to select multiple photos. Then, tap “Upload” to upload your iPhone photos to Google Drive.
Optional: Automatic backup or sync with Google Photos
For those seeking automatic backups, open Google Photos, tap your profile image, navigate to “Google Photos settings,” and select “Backup & Sync.” Toggle “Backup & Sync” to On for continuous backups.
Step 3: Transfer your iPhone photos from Google Drive to your PC.
Once your photos are stored on Google Drive, proceed to save and transfer them to your PC. Select the desired photos in Google Drive, and click “Download.”
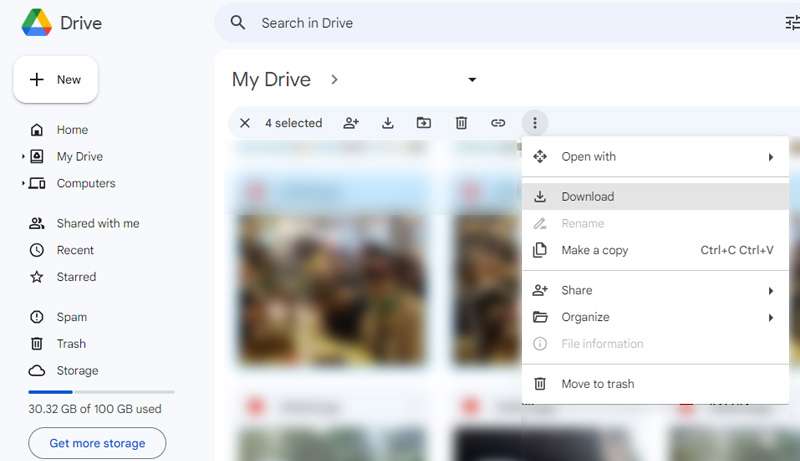
To save all photos from a specific Google Drive folder, open Google Drive and select “My Drive.” Locate the intended folder, and click the three dots to open the drop-down menu. Select “Download,” and all photos and files within the folder will be saved to your computer in ZIP format.
Part 3: How To Transfer Pictures From iPhone with iTunes
You can also make the most of iTunes to secure your iPhone with backups, keep it up-to-date, or synchronize content between your iOS device and your computer in both directions. Even if you’re a Windows PC user, there’s no need to fret. Although iTunes is an Apple product, it’s also available for Windows use.
To get started, make sure that you have iTunes for Windows installed or update your existing version to at least iTunes 12.5.1. Once done, follow the instructions below.
How to transfer iPhone pics to a PC using iTunes:
Step 1: Connect your device to your computer.
Plug in your iPhone to your computer using a USB cable.
Step 2: Grant access to your iPhone Photos.
If your phone is asking you to Trust This Computer, tap “Trust” or “Allow to proceed.”
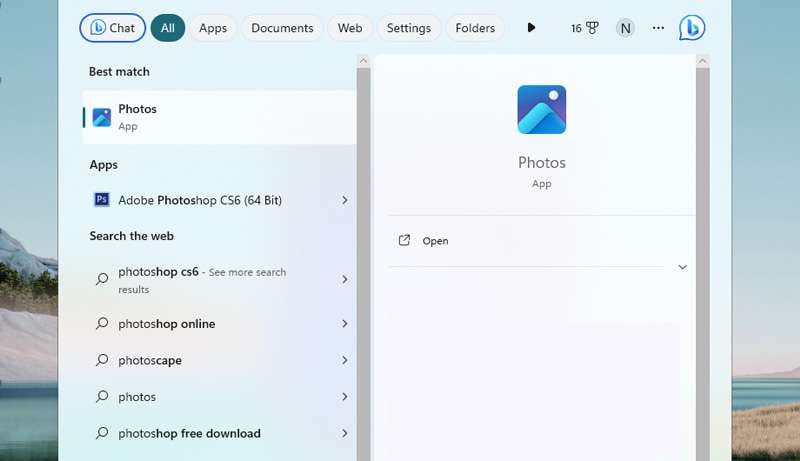
Step 3: Open your computer’s Photos app.
Go to the Start menu on your PC. Search and select Photos to open the Photos app.
Step 4: Import your Photos to your PC.
Within the Photos app, click on Import > From a USB device and follow the instructions on the screen. You can choose specific photos for the transfer and decide where to save them on your PC. Remember to make sure that the photos are saved on the Apple iPhone 14 Plus device rather than stored in the cloud.
Finally, allow a few moments for the system to detect and transfer the selected photos.
Part 4: How To Quick Transfer Pictures From Apple iPhone 14 Plus to PC
If you find the above methods difficult, there is a quick and easy way to transfer photos from your iPhone to a PC with Dr. Fone’s Export All Data feature. With this feature, there’s no need to navigate through various locations to just locate and transfer files from your iPhone.
Dr.Fone - Phone Manager (iOS)
Transfer Photos from Computer to iPod/iPhone/iPad without iTunes
- Transfer, manage, export/import your music, photos, videos, contacts, SMS, Apps, etc.
- Back up your music, photos, videos, contacts, SMS, Apps, etc., to the computer and restore them easily.
- Transfer music, photos, videos, contacts, messages, etc., from one smartphone to another.
- Transfer media files between iOS devices and iTunes.
- Fully compatible with iOS 7 to iOS 15 and iPod.
3981454 people have downloaded it
Dr. Fone’s Export All Data feature offers some great functionalities, including:
- Comprehensive data export, including Photos, Contacts, Messages, Voicemail, and more
- Encrypted data transfer and backups
- Available for iOS and Android devices
- Regular updates to provide an enhanced user experience
To transfer photos from your iPhone to a PC using Dr.Fone, follow the step-by-step below:
Step 1: Launch Dr.Fone and make device connections using a USB cable.
Start by Image nameing your iPhone device to the computer via a USB connection. Launch Dr.Fone and select “Export all data” in the My Device section.

Step 2: Choose file types for export
When a new window appears, select the specific file types you wish to transfer (in this case, your photos). Then, click “Export” at the bottom of the screen to initiate the procedure. Choose the preferred location for saving the exported data.

Step 3: Make a password for the backup file
Next, you will be asked to create an encrypted password for the backup file to be stored on the computer. Set a password, confirm it, and click “Done” to execute the process.

Step 4: Monitor the progress
Your iPhone will start exporting its data to the computer through Dr.Fone. You can wait and monitor the progress on the screen.

Step 5: Successful export of data to the computer
After successful completion of exporting the data, a window will appear on your computer screen. Click “Open” to review the exported data at the specified location.

Conclusion
Before, you must have wondered how do you transfer pictures from Apple iPhone 14 Plus to PC. But after learning from the article above, you now have a variety of straightforward methods in your hand, whether with iCloud, Google Drive, iTunes, or reliable software like Dr.Fone.
If you’re embedded in the Apple ecosystem, iCloud provides seamless integration of your iPhone Photos. Alternatively, Google Drive offers a cross-platform solution, enabling you to upload your iPhone photos to the cloud and access them on your computer browser.
For those who prefer a more traditional approach, iTunes provides a straightforward method via a USB connection. And if you’re looking for a quick and versatile third-party solution, software like Dr.Fone simplifies the data transfer process with its user-friendly interface and robust features.
Also read:
- [Updated] Gaming Without Limits Screen Recorder Alternatives Explained for 2024
- [Updated] In 2024, 8 Free Video Conferencing Software for Windows and Mac
- 2024 Approved Affordable Airborium Wonders Best Bargain Drones List
- 4 Ways to Transfer Music from Apple iPhone SE to iPod touch | Dr.fone
- 5 Ways to Transfer Music from Apple iPhone 7 Plus to Android | Dr.fone
- 9 Solutions to Fix Process System Isnt Responding Error on Motorola Moto G24 | Dr.fone
- In 2024, 4 Ways to Transfer Music from Apple iPhone 11 to iPod touch | Dr.fone
- In 2024, Solved How To Transfer From Apple iPhone 13 to iPhone 15 | Dr.fone
- Resolving Virtualbox's 0X80004005 Failure Message
- Unleashing Full Potential of Zoom with Chromebook
- Youtube's Revenue Revolution A Practical Guide for Monetization
- Title: In 2024, How to Copy Contacts from Apple iPhone 14 Plus to SIM? | Dr.fone
- Author: Charlotte
- Created at : 2024-10-06 05:59:04
- Updated at : 2024-10-12 08:17:19
- Link: https://iphone-transfer.techidaily.com/in-2024-how-to-copy-contacts-from-apple-iphone-14-plus-to-sim-drfone-by-drfone-transfer-from-ios/
- License: This work is licensed under CC BY-NC-SA 4.0.