
In 2024, Fix Apple iPhone 13 Pro Max Stuck on Data Transfer Verified Solution! | Dr.fone
Fix Apple iPhone 13 Pro Max Stuck on Data Transfer [Verified Solution!]

With the release of the new iPhone 15, most iPhone enthusiasts must be looking to shift to the latest version of the Apple iPhone 13 Pro Max device. If you are among these iPhone lovers, we congratulate you in advance for buying the latest iPhone device out there. However, we also want to warn you about some problems while you try to transfer the data from your old iPhone or Android device.
As the full-fledged sale of the Apple iPhone 13 Pro Max began, many people faced the Apple iPhone 13 Pro Max stuck transferring data issues. If you are one of those people, this article will help you identify the problem and provide the best solution to tackle this issue.
Part 1: What Are the Problems Behind Apple iPhone 13 Pro Max Stuck on Data Transfer
In this section, we will try to identify the root cause of the problem. By understanding the cause of the issue, we can better find a suitable solution to your problem.
1. Bugs in the Move to iOS App
It is possible that the Move to iOS app may cause problems while transferring data from your Apple iPhone 13 Pro Max to your iPhone 15. This can happen because of two reasons: you haven’t updated the app for a long time, or the updated version has some bugs in it.

2. iTunes/Finder Backup is Corrupted
Sometimes, the backup stored in the iTunes/Finder turns out to be corrupted due to various issues. If you are restoring data from such a corrupted backup, it can cause the Apple iPhone 13 Pro Max to get stuck while transferring data. You have to identify corrupted backups in order to avoid this issue in your iPhone data process.
3. Poor Wi-Fi Connection
If you are transferring the data to your Apple iPhone 13 Pro Max using iCloud, you need a good Wi-Fi connection to ensure a smooth process. A slow Wi-Fi connection can stop or delay the data transfer process if your iCloud backup is in 100+ GBs.
4. Problem in the iOS Version
When performing iPhone-to-iPhone data transfer, ensure that both iPhones are free from any iOS bugs. For this purpose, update your older iPhone to the latest iOS version to avoid bugs and glitches. If you are using the iOS 17 Beta version on your old iPhone, it can also cause this issue.
Part 2: The Best Way To Fix Apple iPhone 13 Pro Max Stuck on Data Transfer
To cater to all these data transfer issues from Android or old iPhone to iPhone 15/15 Pro/15 Plus, we recommend first setting up your Apple iPhone 13 Pro Max as a new device and then using Wondershare Dr.Fone . This Phone Transfer tool helps you transfer data whenever you want after setting up the new iPhone 15. Moreover, the tool is highly optimized and supports all the old and newest iOS and Android versions, including Android 13 and iOS 17.
It is a single-click data transfer tool that can transfer 12 types of data from iOS to iOS and 8 from Android to iOS. Furthermore, you don’t have to worry about which phone brands this phone transfer app supports because it supports over 8000+ devices, including all iPhone models, Samsung, LG, Huawei, OPPO, Redmi, etc.
Key Features
- •Wondershare Dr.Fone promises to transfer the data within 3 minutes.
- •It doesn’t have the requirement of factory resetting the Apple iPhone 13 Pro Max for transferring the data.
- •Unlike iTunes/Finder, Wondershare Dr.Fone doesn’t overwrite the data saved on your iPhone 15.
Simplified Guide To Transfer Data From Old Smartphone to New iPhone 15
Following are the straightforward step-by-step instructions you need to follow to transfer from your old iPhone or Android to the new Apple iPhone 13 Pro Max series model:
- Step 1: Choose the Robust Phone Transfer Tool
Download and install the latest version of Wondershare Dr.Fone from the official website and access the Toolbox. Afterward, click on the Phone Transfer tool and attach your old phone and Apple iPhone 13 Pro Max with the help of official USB cables.

- Step 2: Initiate the Data Transfer Procedure
Wondershare Dr.Fone will automatically detect the positions of your old smartphone and Apple iPhone 13 Pro Max and assign them the positions. If the positions assigned are incorrect, press the “Flip” option and choose the data you want to transfer to iPhone 15. After this, press the “Start Transfer” button, and the procedure of transferring the data will initiate.

Conclusion
As we have discussed in the article, some initial Apple iPhone 13 Pro Max users are facing this screen stuck issue while transferring data. As explained in the article, you can avoid this problem by identifying the root cause. If you want a tool to prevent all such issues in the future, we have a perfect all-in-one mobile solution provider for you.
Wondershare Dr.Fone will not only solve this Apple iPhone 13 Pro Max stuck on data transfer issue but also deal with any future iPhone problem. So, download Wondershare Dr.Fone now to optimize your Apple iPhone 13 Pro Max using top-notch features.
Transfer your Apple iPhone 13 Pro Max Apps to New iPhone
We would be very excited to buy a new iPhone like iPhone 15/15 Pro(Max) whenever possible. Just think, what makes us emotional and enthusiastic towards buying and using a new iPhone? Maybe the new and advanced features are better than the old one? Exactly! Once you have bought a new iPhone like iPhone 15/15 Pro(Max), definitely the next step would be to transfer all your applications, games, movies, photos, files, videos, etc. Now the question arises, how to transfer apps from Apple iPhone 13 Pro Max to iPhone? There must be some solution for every query so, let us research the ways of transfer by using iTunes, iCloud, and the iPhone app store. To know more about the process let us go in-depth.
One-click to transfer apps between iPhone [iPhone 13 Included]
There are so many ways for transferring Apps between iOS devices. If you are searching for a time-saving way to transfer the data. You can try the Dr.Fone - Phone Transfer to help you get the Apps. There is no incompatibility or limitations on iOS models and systems. You can click to transfer one data type from one to another.
Dr.Fone - Phone Transfer
Transfer Apps from Apple iPhone 13 Pro Max to iPhone in 1 Click Directly!
- Cross-platform data migrating between any devices of your choice from Android and iPhone.
- Support massive data including images, videos, music, messages, contacts, apps, and more.
- Works perfectly with almost mobile phones and tablets, such as iPhones, iPad, Samsung, Huawei, etc.
- Fully work with mobile systems iOS 17 and Android 10.0 and computer systems Windows 10 and Mac 14.
- 100% safe and risk-free, backup & restore data as the original.
3981454 people have downloaded it
Connect both the two iPhones to your computer. Once both the iPhones are connected successfully, all the data from source devices will be detected and listed on the screen. You can adjust the target devices and source devices by clicking the “Flip” button directly.

A more detailed guide can be learned from this user guide. Check it out!
Another way that can assist you to move photos from Android to iPhone is the Dr.Fone - Phone Manager (Android) . What is incredibly convenient about Dr.Fone - Phone Manager (Android) is its ability to transfer photos selectively. You can also use it to transfer contacts, videos, messages, podcasts, and anything else stored on your Android in minutes. Dr.Fone - Phone Manager (Android) is a secure, trustworthy program, hence you can be reassured that your information will be kept safe while transferring from one device to another.
Part 1: How to transfer apps from iPhone apps to the new iPhone via iTunes?
iTunes backup is one of the most commonly used transfer methods. All you have to do is take the backup from the old iPhone and using iTunes you can transfer it to the new iPhone like iPhone 15/15 Pro (Max). Very simply, you can transfer apps from the old iPhone to the iPhone 15/15 Pro(Max) or an earlier model.
The Whole Process is divided into two sections
- A- Backing up old phone data to iTunes.
- B- Transferring backed-up data to a new phone using iTunes.
Section A - To start, you have to start with the backup in iTunes using the old iPhone:
- Firstly, you have to connect the old iPhone and the computer using the USB cable.
- Next, Open the settings and view iTunes. Ensure have the latest version of iTunes.
- Choose the Apple iPhone 13 Pro Max device.
- Create the passcode in terms of encryption. After that, directly, click the backup now button.

- Once the backup process is finished, you should check whether the backup was done in iTunes preferences in the old iPhone. You can check it by verifying your name, time, and date in the backup.
Note: You have created the backup process on your old iPhone. Now, you should start the next work to transfer apps to the new iPhone like iPhone 15/15 Pro (Max).
Section B - Once you are done with backing up your old phone data with iTunes, now the next process is to transfer apps from Apple iPhone 13 Pro Max to iPhone using iTunes backed up data:
- The first step is to switch on your new iPhone. The screen “Hello” should be visible to you. If you did the steps already in your new iPhone then you have to remove the entire step out before transferring the apps.
- In your settings, you will have the option Apps & Data. Click it and choose the option “Restore from the iTunes backup” among other options.

- Now, you have to connect the new iPhone device to the PC where the backup from the old iPhone was done.
- View iTunes from the computer and choose your new iPhone like iPhone 15/15 Pro (Max).
- Choose the “Restore backup” and cross-check the date, time, iPhone old name, etc.
- If you set a passcode then enter it. Just wait for a few minutes to get complete the restore process. Keep On the Wifi support to the new iPhone like iPhone 15/15 Pro (Max) and your backup will automatically download to the new iPhone.
Note: You have done the entire process to transfer apps to the new iPhone 15/15 Pro (Max) or an earlier model.
Part 2: How to transfer apps from Apple iPhone 13 Pro Max to iPhone using iCloud?
The next successful method is an iCloud backup. iCloud the most used application for verification purposes in the iPhone. This method will be very genuine and no complications occur throughout the process when you transfer apps from Apple iPhone 13 Pro Max to iPhone 15/15 Pro (Max) or an earlier model.
Here also, we have summed up the transferring process via iCloud under two sections
Section A - Backing up the process: Let’s see the steps to take the backup in iCloud using the old iPhone.
- Connect the old iPhone to the Wifi connection.
- Tap the settings and choose iCloud. Click the iCloud and turn ON the iCloud backup.
- Just ensure that you have turned on backup on iCloud.
- Select the backup now button and don’t turn off the wifi till the process gets completed.

Note: You have taken the backup from the old iPhone using the iCloud application.
Section B: Now Let us move ahead to see the steps to transfer apps to the new iPhone like iPhone 15/15 Pro (Max):
1. First, we need to connect the new iPhone and wait for the hello message to receive. If you have completed the set up then you have to remove the setup for the backup process.
2. To remove the setup in the new device – choose settings and then general. From the general choose the reset option. Now select erase all the content and the settings.
Note: Doing so will erase any old setup.
3. Ensure the Wifi is connected to the Apple iPhone 13 Pro Max device and complete the process to configure the wifi.
4. Open the Apps/Data and select “Restore from the iCloud backup”.

5: You will get the screen to enter the iCloud credential details such as ID/ password.

6: After entering the credentials, you will have the choice to select the backup process. Ensure the date/time of the backup process for verification.
7: The backup process starts on your new phone and you do not interrupt or stop the wifi connection while the backup process continues.
8: Your photos, videos, files, etc will be automatically downloaded into your new Phone using iCloud.
Part 3: How to transfer apps from Apple iPhone 13 Pro Max to iPhone with the help of the App store?
In this part, we are going to transfer apps from Apple iPhone 13 Pro Max to iPhone 15/15 Pro (Max) or an earlier model using the iPhone app store. In this method, you do not need to connect to the computer, or no lengthy steps needed. Let us see the steps carefully!
1: You can access the iPhone app store once if you log in to the iCloud account. Click on the settings and choose the “iTunes & App store”. It will ask you to enter the credentials such as Apple ID and password.
2: If you didn’t update the app store then update it by clicking the icon in the lower right corner of the window.

3: Once you tap on the update icon, it will show the option “My Purchase”. It will ask you to sign in the iCloud account.

4: After entering the credential, you have the two options such as all and not on this phone.
5: Select the option “not on this phone” present on the right upper side of the window. You will get the list of applications that you have purchased using the iCloud account.
6: Click the download button next to the icon of the apps. The apps will be installed on your new Phone.

Note: You have completed the installation of apps on your new iPhone.
We have given and explained to you 3 methods to transfer apps from Apple iPhone 13 Pro Max to iPhone with proper guidance. Each method describes a unique verification process along with the manual setup. You now do not need to wait in a queue to transfer apps to your new iPhone. We can assure you that you would also be in no need of any help from outside. All the best!
Easy Methods: How To Transfer Pictures From Apple iPhone 13 Pro Max to PC
Photo transfer from your iPhone to your PC is a common practice for various reasons. It can free up your device’s storage space, create backups, or simply edit and organize your photos on a larger screen.
Thankfully, there are various methods to transfer pictures from your iPhone to your PC, providing flexibility to users based on their preferences and convenience. Read our comprehensive guide on how to transfer pictures from Apple iPhone 13 Pro Max to PC. This article covers step-by-step instructions so you can easily and efficiently manage and transfer your iPhone photos to your computer while preserving your cherished memories.
Part 1: How To Transfer Pictures From Apple iPhone 13 Pro Max to PC with iCloud
One of the widely used and efficient methods to transfer pictures from your iPhone to a PC is through iCloud, Apple’s cloud-based service. iCloud provides seamless integration across Apple devices, allowing users to sync and access their photos and videos effortlessly.
However, even if your PC is using other operating systems, such as Windows, you can still use iCloud for Windows to save and transfer your iPhone photos from iCloud.
How to transfer iPhone photos to a computer using iCloud:
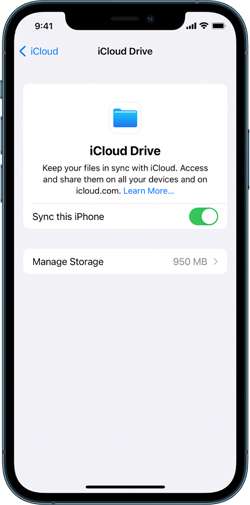
Step 1: Make sure you have synced iCloud photos on your iPhone.
On your iPhone Settings, go to your profile and tap iCloud. Then, select Photos and turn on the switch next to “Sync this [device].” Otherwise, go to iCloud settings > iCloud Drive, and switch on “Sync this iPhone.”
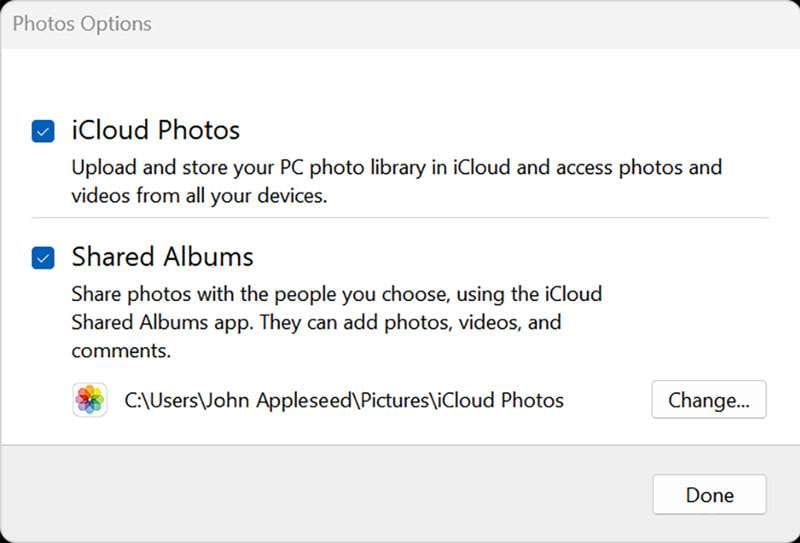
Step 2: Set up your iCloud for Windows.
Open iCloud for Windows and ensure you’re signed in with your Apple ID. Next to Photos, select Options > iCloud Photos. Click “Done” and “Apply” to save the changes and close the window.
Step 3: Keep iPhone photos on PC.
Open iCloud Photos and select the images you want to transfer to your PC. Right-click to open a drop-down menu and choose “Always keep on this device.”
That’s it! Now, you can find your iPhone Photos on your computer.
Part 2: How To Transfer Pictures From iPhone with Google Drive
Another convenient way to transfer iPhone pics to a computer is through Google Drive. As a cloud-based storage solution, Google Drive allows users to seamlessly store, manage, and share files, including photos, across different devices.
If you already have a Google account, you can jump right into Google Drive without signing up. However, be aware that the free version only gives you 15 GB of space. If you need more room, you’ll have to sign up for a subscription.
How to transfer iPhone pictures to a computer with Google Drive:
Step 1: Set up your Google Drive.
Open Google Drive on your iPhone. Once opened, tap the multicolored + symbol and select “Upload” > “Photos and Videos.” If prompted, grant access to all photos by tapping “Allow Access to All Photos.”
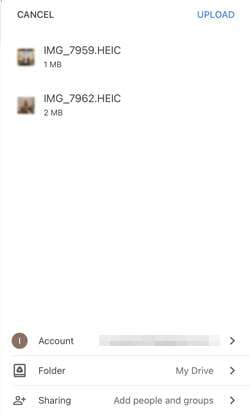
Step 2: Upload your iPhone photos on Google Drive.
Browse through your iPhone albums to locate the specific photos you wish to upload. Hold and tap to select multiple photos. Then, tap “Upload” to upload your iPhone photos to Google Drive.
Optional: Automatic backup or sync with Google Photos
For those seeking automatic backups, open Google Photos, tap your profile image, navigate to “Google Photos settings,” and select “Backup & Sync.” Toggle “Backup & Sync” to On for continuous backups.
Step 3: Transfer your iPhone photos from Google Drive to your PC.
Once your photos are stored on Google Drive, proceed to save and transfer them to your PC. Select the desired photos in Google Drive, and click “Download.”
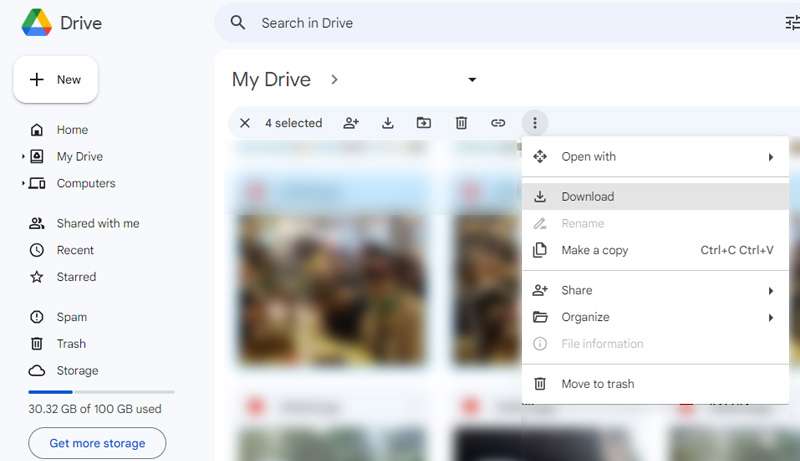
To save all photos from a specific Google Drive folder, open Google Drive and select “My Drive.” Locate the intended folder, and click the three dots to open the drop-down menu. Select “Download,” and all photos and files within the folder will be saved to your computer in ZIP format.
Part 3: How To Transfer Pictures From iPhone with iTunes
You can also make the most of iTunes to secure your iPhone with backups, keep it up-to-date, or synchronize content between your iOS device and your computer in both directions. Even if you’re a Windows PC user, there’s no need to fret. Although iTunes is an Apple product, it’s also available for Windows use.
To get started, make sure that you have iTunes for Windows installed or update your existing version to at least iTunes 12.5.1. Once done, follow the instructions below.
How to transfer iPhone pics to a PC using iTunes:
Step 1: Connect your device to your computer.
Plug in your iPhone to your computer using a USB cable.
Step 2: Grant access to your iPhone Photos.
If your phone is asking you to Trust This Computer, tap “Trust” or “Allow to proceed.”
Step 3: Open your computer’s Photos app.
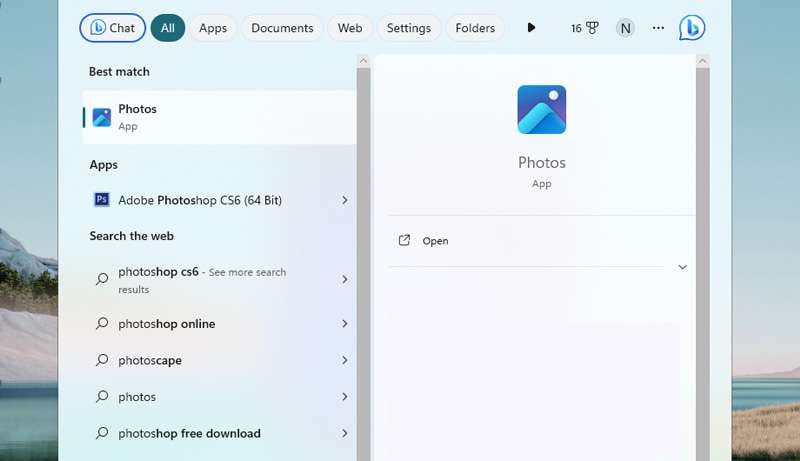
Go to the Start menu on your PC. Search and select Photos to open the Photos app.
Step 4: Import your Photos to your PC.
Within the Photos app, click on Import > From a USB device and follow the instructions on the screen. You can choose specific photos for the transfer and decide where to save them on your PC. Remember to make sure that the photos are saved on the Apple iPhone 13 Pro Max device rather than stored in the cloud.
Finally, allow a few moments for the system to detect and transfer the selected photos.
Part 4: How To Quick Transfer Pictures From Apple iPhone 13 Pro Max to PC
If you find the above methods difficult, there is a quick and easy way to transfer photos from your iPhone to a PC with Dr. Fone’s Export All Data feature. With this feature, there’s no need to navigate through various locations to just locate and transfer files from your iPhone.
Dr.Fone - Phone Manager (iOS)
Transfer Photos from Computer to iPod/iPhone/iPad without iTunes
- Transfer, manage, export/import your music, photos, videos, contacts, SMS, Apps, etc.
- Back up your music, photos, videos, contacts, SMS, Apps, etc., to the computer and restore them easily.
- Transfer music, photos, videos, contacts, messages, etc., from one smartphone to another.
- Transfer media files between iOS devices and iTunes.
- Fully compatible with iOS 7 to iOS 15 and iPod.
3981454 people have downloaded it
Dr. Fone’s Export All Data feature offers some great functionalities, including:
- Comprehensive data export, including Photos, Contacts, Messages, Voicemail, and more
- Encrypted data transfer and backups
- Available for iOS and Android devices
- Regular updates to provide an enhanced user experience
To transfer photos from your iPhone to a PC using Dr.Fone, follow the step-by-step below:
Step 1: Launch Dr.Fone and make device connections using a USB cable.
Start by Image nameing your iPhone device to the computer via a USB connection. Launch Dr.Fone and select “Export all data” in the My Device section.

Step 2: Choose file types for export
When a new window appears, select the specific file types you wish to transfer (in this case, your photos). Then, click “Export” at the bottom of the screen to initiate the procedure. Choose the preferred location for saving the exported data.

Step 3: Make a password for the backup file
Next, you will be asked to create an encrypted password for the backup file to be stored on the computer. Set a password, confirm it, and click “Done” to execute the process.

Step 4: Monitor the progress
Your iPhone will start exporting its data to the computer through Dr.Fone. You can wait and monitor the progress on the screen.

Step 5: Successful export of data to the computer
After successful completion of exporting the data, a window will appear on your computer screen. Click “Open” to review the exported data at the specified location.

Conclusion
Before, you must have wondered how do you transfer pictures from Apple iPhone 13 Pro Max to PC. But after learning from the article above, you now have a variety of straightforward methods in your hand, whether with iCloud, Google Drive, iTunes, or reliable software like Dr.Fone.
If you’re embedded in the Apple ecosystem, iCloud provides seamless integration of your iPhone Photos. Alternatively, Google Drive offers a cross-platform solution, enabling you to upload your iPhone photos to the cloud and access them on your computer browser.
For those who prefer a more traditional approach, iTunes provides a straightforward method via a USB connection. And if you’re looking for a quick and versatile third-party solution, software like Dr.Fone simplifies the data transfer process with its user-friendly interface and robust features.
Also read:
- [New] 2024 Approved A Step-by-Step Expedition to YouTube's Unseen Layers
- [New] 2024 Approved Mastering FB Live 4 Key Recording Techniques
- [New] Enhance Your Content Creating Engaging Loop Videos for IG
- 4 Ways to Transfer Messages from Apple iPhone 12 Pro Max to iPhone Including iPhone 15 | Dr.fone
- 4 Ways to Transfer Messages from Apple iPhone 15 to iPhone Including iPhone 15 | Dr.fone
- 4 Ways to Transfer Messages from Apple iPhone SE (2020) to iPhone Including iPhone 15 | Dr.fone
- Complete Tutorial Sending Photos From Apple iPhone 14 Pro to iPad | Dr.fone
- Conquering Hangul: Your Pathway to Language Excellence
- Ensure Smooth Operation of Your Canon MX340 with Updated Windows Drivers (Win 10/8/7)
- Essential Tactics for YouTube Short Troubleshooting for 2024
- In 2024, 10 Free Location Spoofers to Fake GPS Location on your OnePlus Nord N30 5G | Dr.fone
- In 2024, Complete Tutorial Sending Photos From Apple iPhone 11 Pro Max to iPad | Dr.fone
- In 2024, High-Resolution Horizons An In-Depth Look at the ASUS MG28UQ
- In 2024, How to Move Custom Ringtones from Apple iPhone SE (2020) to Android? | Dr.fone
- In 2024, How to Transfer Apple iPhone 14 Data to iPhone 12 A Complete Guide | Dr.fone
- In 2024, How to Transfer Apple iPhone SE Data to iPhone 12 A Complete Guide | Dr.fone
- In 2024, How to Transfer from Apple iPhone 12 to iPhone 8/X/11 | Dr.fone
- Online Gratis WAV-Format Voltooien Voor Je MOV-Videovormatief - Movavi
- Team Fortress Not Launching? Here's How You Can Get It Running Again!
- Title: In 2024, Fix Apple iPhone 13 Pro Max Stuck on Data Transfer Verified Solution! | Dr.fone
- Author: Charlotte
- Created at : 2024-10-05 00:51:00
- Updated at : 2024-10-12 11:24:33
- Link: https://iphone-transfer.techidaily.com/in-2024-fix-apple-iphone-13-pro-max-stuck-on-data-transfer-verified-solution-drfone-by-drfone-transfer-from-ios/
- License: This work is licensed under CC BY-NC-SA 4.0.