
In 2024, Effortless Ways to Transfer Data from Your Apple iPhone SE (2022) to iPhone 15 | Dr.fone
Effortless Ways to Transfer Data from Your Apple iPhone SE (2022) to iPhone 15
With the arrival of the iPhone 15, Apple continues to redefine technological boundaries. It offers users a device that combines innovation and elegance. If you are also switching to iPhone 15 from your Apple iPhone SE (2022), you will need to move data from one device to another. In this comprehensive guide, we explore iPhone 15 transfer data from your old phone.
This guide will decode the process, ensuring your valuable data finds its new home in the iPhone 15 without a hitch. Stick with the article to find different ways for data transfer to the new iPhone 15.
Part 1: How To Perform iPhone 15 Data Transfer With Official Methods
When it comes to data transfer to iPhone 15 from your old phone, there are multiple options available. There are four official methods available to transfer data from an old phone to a new iPhone. These range from using backups like iCloud and iTunes to direct transfer. Given below are the 4 official methods to transfer your data to the new iPhone 15:
Method 1: Using iCloud Backup
iCloud Backup emerges as a powerful solution when it comes to transferring your data to the iPhone 15. Apple’s cloud-based ecosystem enables you to migrate your essential information seamlessly. It ensures that your new device is an extension of your digital world. Follow these steps to use iCloud Backup for a smooth transition:
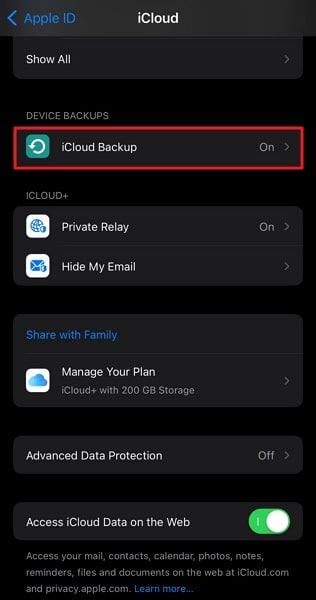
- Step 1: First, we begin with creating a backup of your old iPhone. To do that, you need to navigate to Settings and tap Apple ID. Here choose “iCloud” and follow it by tapping “iCloud Backup.” Ensure it is toggled on, and use “Back Up Now” to create an iCloud backup.
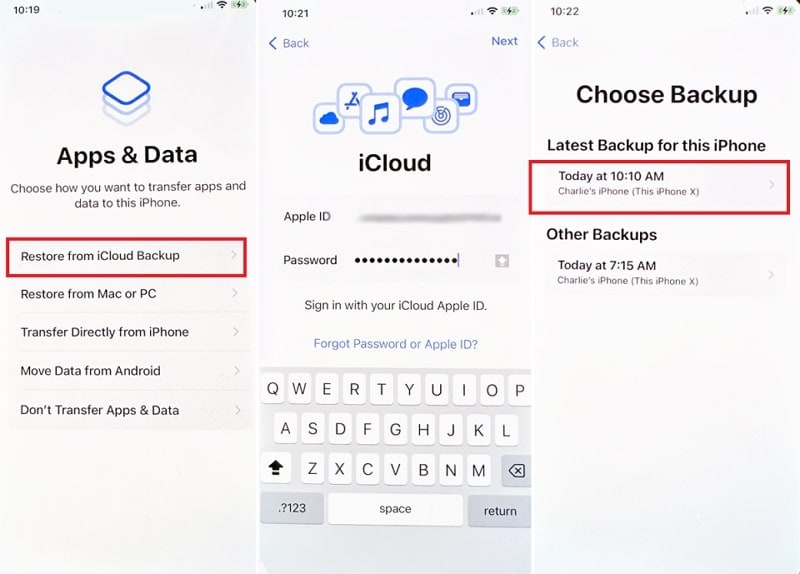
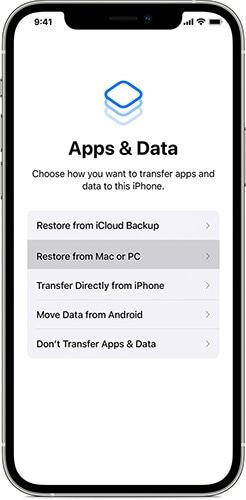
- Step 2: Now move to your new iPhone 15 and start setting it up. When you reach the “Apps & Data” screen, tap “Restore from iCloud Backup.” Here, log in using your Apple ID and choose the most recent backup file to restore data.

Method 2: Use the iTunes/Finder Backup
iTunes/Finder presents a reliable and customizable option for data transfer to a new iPhone. It is great for those who prefer a more hands-on approach to data transfer. You can create a backup of your Apple iPhone SE (2022) on your computer. Later this backup is used to transfer your Apple iPhone SE (2022) data to the new one. Follow these steps to transfer your data using iTunes or Finder:
- Step 1: Begin by connecting your previous device to your computer using a USB cable. If you’re using macOS Catalina or a later version, open Finder; otherwise, open iTunes. When your device is detected, ensure it’s selected in iTunes or Finder.
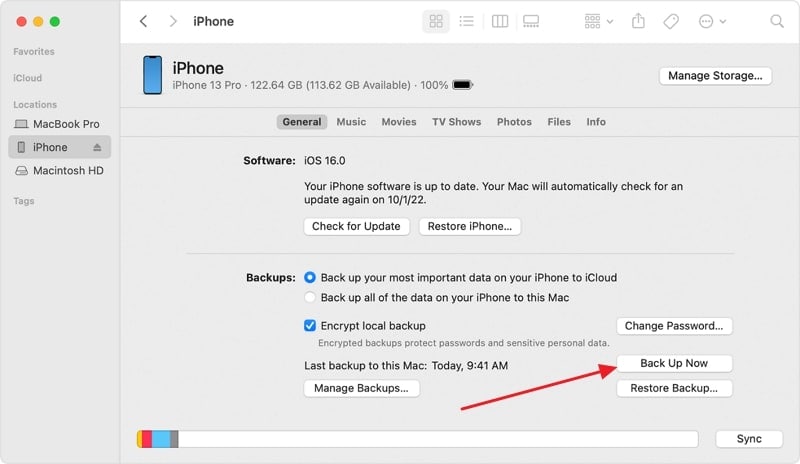
- Step 2: Navigate to the “Summary” section and locate the “Back Up Now” option. Click on it to commence a comprehensive backup of your Apple iPhone SE (2022). The duration of this process depends on the volume of your data and may require some time.
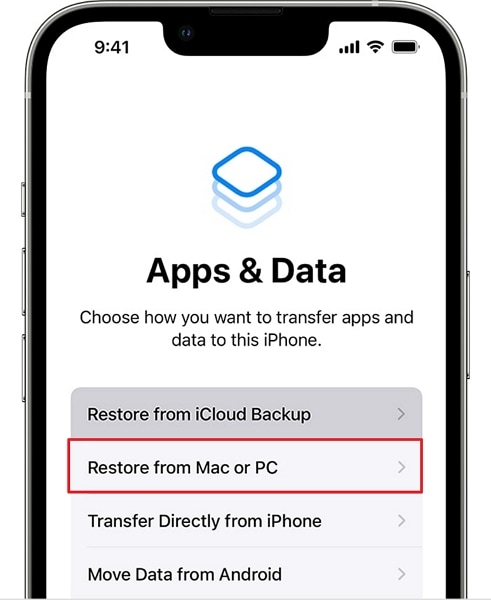
- Step 3: Power up your iPhone 15 and follow the initial setup prompts until you reach the “Apps & Data” display. Here opt for the “Restore from Mac or PC” and connect your iPhone 15 to the same computer where you performed the backup.
- Step 4: In Finder or iTunes, select your iPhone 15 from the sidebar or top. Enable the “Restore from this Backup” option and choose the most recent backup you created. Afterward, click “Continue” to begin the process of transferring the old iPhone data to iPhone 15.

Method 3: Transfer Directly Through Another iPhone
When setting up a new iPhone 15, transferring data directly from the Apple iPhone SE (2022) to the new one is possible. Transferring data directly from one device to another is also known as the Quick Start method. It requires minimal equipment and promises a swift and efficient data migration process. Follow these steps to execute a direct transfer between iPhones:
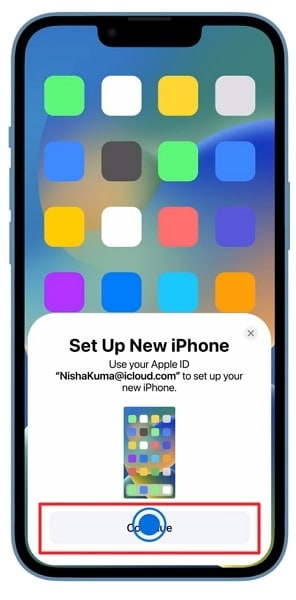
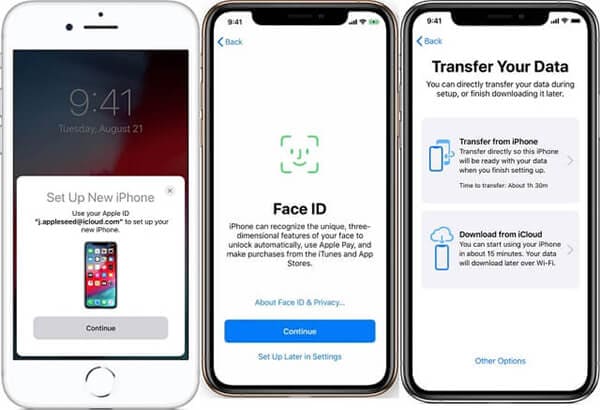
- Step 1: Ensure the Bluetooth and Wi-Fi are enabled on the old iPhone. Now turn on the new iPhone and place it near the Apple iPhone SE (2022). Press “Continue” when a prompt appears on the old iPhone about setting up the new iPhone 15.
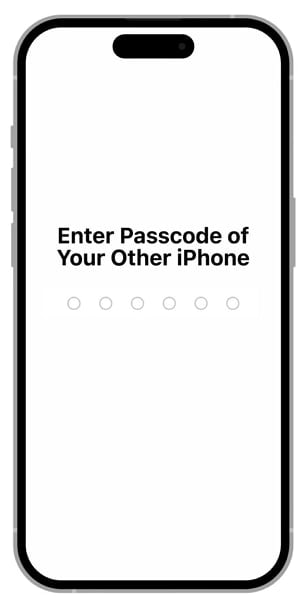
- Step 2: An animation will appear on the screen of the new iPhone 15. Scan it using the old iPhone, and afterward, enter the 6-digit passcode of the Apple iPhone SE (2022) on the new iPhone 15. Log in using your Apple ID and set up your Face ID.
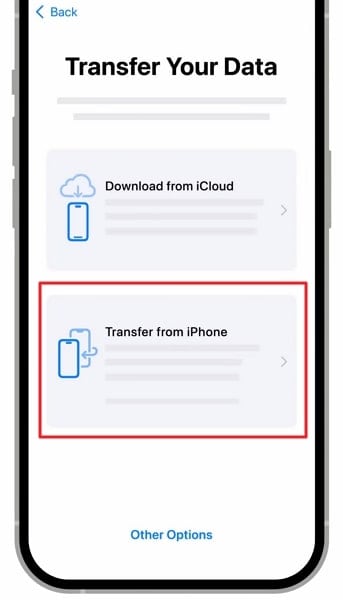
- Step 3: When it asks you to choose a data transfer method, select “Transfer from iPhone.” It will kickstart the process of transferring your Apple iPhone SE (2022) data to the new one. Keep the Apple iPhone SE (2022) devices close to each other to avoid any complications.
Method 4: Transfer Data from Android to iPhone 15
Transitioning from an Android device to the iPhone 15 is now a seamless process. It is mainly thanks to Apple’s “Move to iOS” app. Designed to simplify the transfer of your data, this app ensures that your switch to the iPhone 15 is smooth and hassle-free. Use the simplified steps given below to transfer data to iPhone 15:
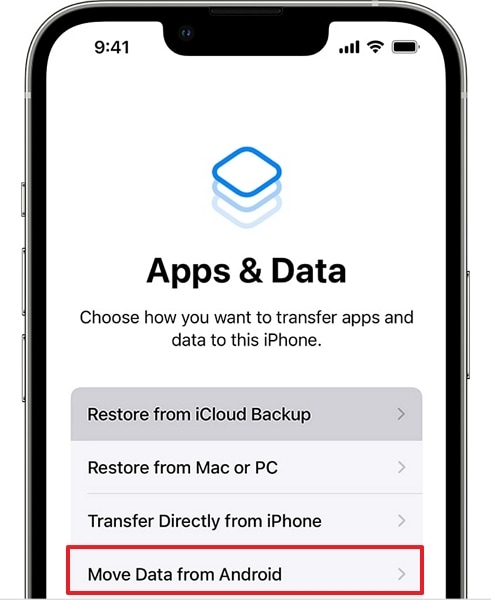
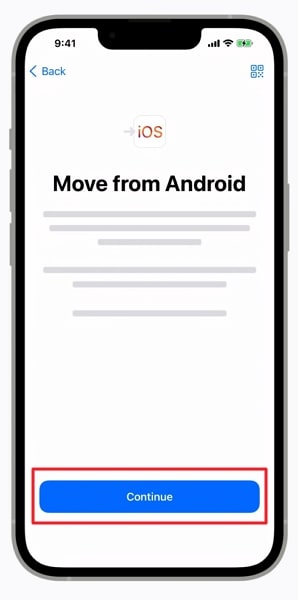
- Step 1: Turn on your new iPhone and set it up until you reach the “Apps & Data” screen. Here, tap “Move Data from Android” and move to the Android device.
- Step 2: On your Apple iPhone SE (2022), install and launch the Move to iOS app. Agree to the terms and conditions, and on the iOS device, press “Continue” once the Move to Android screen appears. It will display a code that you need to put on the Android device to establish a connection.
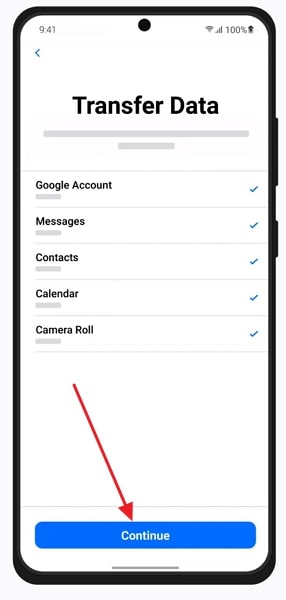
- Step 3: Once both devices are connected to the temporary Wi-Fi network, wait for the data transfer screen to appear on the Android. Then, choose the old Android device data you want to transfer. Lastly, press “Continue” to start the Android to iPhone 15 transfer process.
Part 2: The Blazing Fast and Efficient Phone Transfer Tool for iPhone 15
Whenever you switch from one device to another, data transfer stands out as the main hurdle. It makes you want to have a tool that can simplify the process and be quick at your disposal. Luckily, there is one such tool, and that is Dr.Fone - Phone Transfer . This software allows you to transfer data between Android and iOS devices with ease.
Main Features of Wondershare Dr.Fone
- Wondershare Dr.Fone supports data transfer over 12 types of data between different devices.
- It is a blazing-fast tool with a much higher data transfer speed than most official transfer tools.
- This software supports over 8000 smartphones for data transfer across all major brands.
Steps To Use Wondershare Dr.Fone To Transfer Old Device Data to iPhone 15
Given below are the detailed steps to use Wondershare Dr.Fone to transfer data to iPhone 15:
- Step 1: Connect the Respective Devices
To transfer data from your old phone to iPhone 15, start with launching Wondershare Dr.Fone on your computer. Next, head towards the “Toolbox” option and tap on it. It will show you a list of options from which you need to select the “Phone Transfer” option. Besides this, connect your old and new devices to your computer.

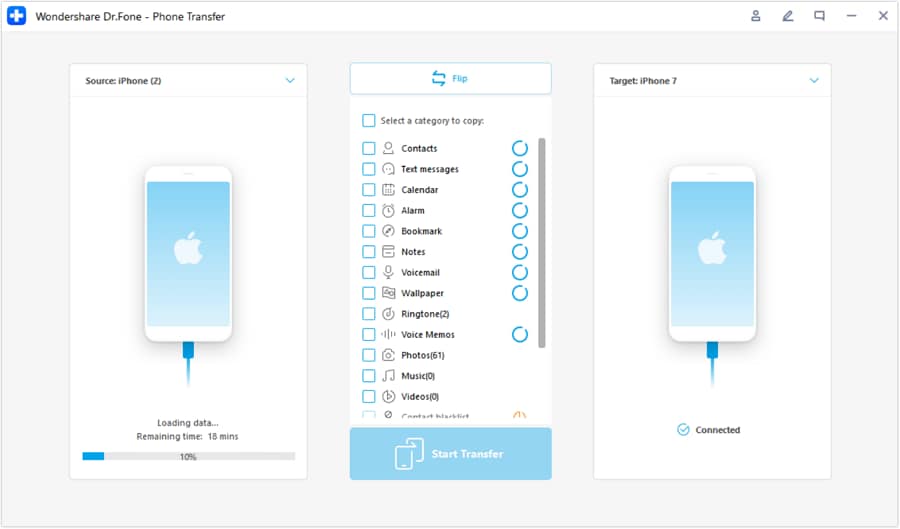
- Step 2: Assign Correct Positions to the Apple iPhone SE (2022) devices
So that platform can automatically detect them and give them respective positions as “Source” and “Destination.” Your old phone would be the “Source,” while the new iPhone 15 is the “Destination.” Here, if the position of the Apple iPhone SE (2022) devices is incorrect, use the “Flip” button to change the position between devices.

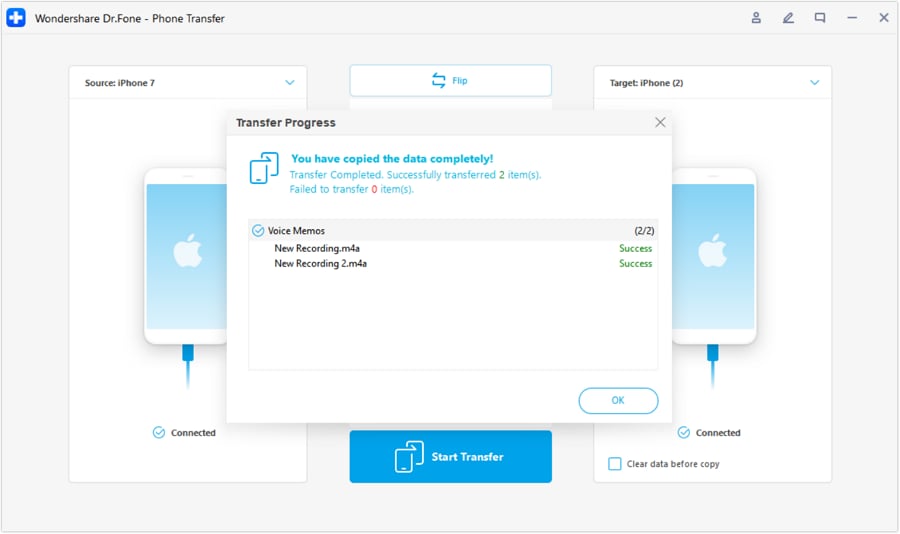
- Step 3: Start the iPhone 15 Transfer Process
After this, select the data types on the platform you want to transfer and click the “Start Transfer” option. This will initiate the process of transferring data from source to destination, which you can track on the progress bar in the new window. Once the process is completed, click the “OK” button to conclude the process.
Part 3: Having Trouble When Transferring to iPhone 15 Stucks?
The issue of iPhone 15 getting stuck when users attempt to transfer data from their older devices, like the iPhone 14, to the new iPhone 15 has become a frustrating challenge for many Apple enthusiasts. This problem often arises due to the complex nature of data migration and the high expectations associated with Apple’s seamless ecosystem. When attempting to transfer photos, apps, contacts, and other vital information, users may encounter lengthy delays, frozen screens, or failed transfers.
The possible reasons could be:
- ·Software glitches
- ·Insufficient storage space
- ·Incompatible iOS versions between the old and new devices
The impact of this issue extends beyond mere inconvenience, as it can result in data loss or a less-than-optimal out-of-the-box experience with the latest iPhone. Addressing this problem, you may try:
- ·Updating both devices to the latest iOS version
- ·Ensuring sufficient storage
- ·Seeking assistance from Apple Support
- ·Authorized service providers when necessary
Or, you can also try to ask for help from a third-party application, Dr.Fone - Phone Transfer is always at your service. Dr.Fone - Phone Transfer offers a reliable solution to the iPhone data transfer problem. This user-friendly software is designed to simplify the migration process, making it hassle-free for iPhone users. Here are the steps to get you started:
Step 1 Launch Phone Transfer Tool
Initiate the process by launching Wondershare Dr.Fone on the computer. Continue from Toolbox > Phone Transfer to redirect towards opening the particular tool.
Step 2 Set Data Transfer Path
On accessing the Phone Transfer tool, continue to connect your iOS devices and let them load their data on the next screen. Here, define the Source and Destination of the transfer to specify the direction of the phone transfer. To change locations, use the Flip button on the top.
Step 3 Choose Data Types
After successfully determining the source and destination, select the specific data types you want to transfer. Checkmark all data and select Start Transfer to proceed with the operations.
Step 4 Turn Off Find My Feature
Once done, a prompt appears on the front asking to turn off the Find My feature on iOS devices. Open the Settings of the iOS device and proceed further by tapping on the name at the top. Continue from iCloud > Find My feature and turn it off.
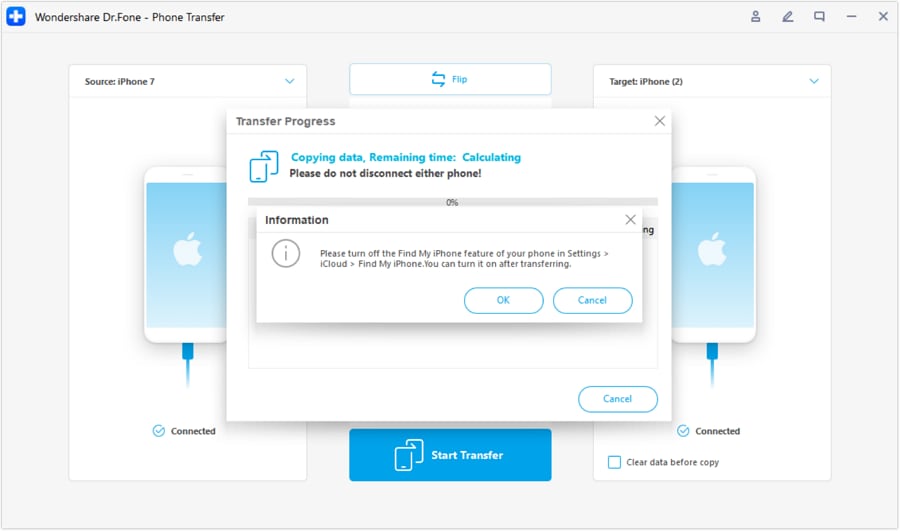
Step 5 Complete Your Transfer
Once done, the window in the front shows the completed phone transfer. Click OK to conclude the process entirely.
Bonus Tip: The Best Data Eraser To Make Apple iPhone SE (2022) Data Unrecoverable
Nowadays, data privacy is paramount. That’s why ensuring your old phone’s sensitive information remains unrecoverable is crucial. Before you part ways with your device, just deleting the data or factory resetting your device isn’t enough. Wondershare Dr.Fone doesn’t stop at facilitating seamless data transfer. It also offers an exceptional data eraser feature.
This ensures your data is permanently wiped from your old phone, leaving no traces behind. Moreover, it consists of a private data eraser through which you can erase your data and make it unrecoverable. You can also use its Space Saver feature to erase junk data to speed up your old or new device.
Conclusion
In summary, the realm of mobile technology continues to evolve. It has increased the importance of smooth and efficient data transfer. With the arrival of the iPhone 15, a new world of possibilities opens up. The journey of iPhone 15 data transfer should be a seamless transition. In this guide, we’ve explored a range of methods, both official and third-party.
These empower you to transfer your cherished data to the iPhone 15 easily. While Apple’s official methods offer solid data migration, Wondershare Dr.Fone emerges as the ultimate solution that goes beyond the ordinary. Its unparalleled data transfer and erasure capabilities make it a game-changer.
5 Tutorials on How to Transfer Photos From Apple iPhone SE (2022) to New iPhone
When it comes to camera systems, the iPhone is certainly ahead of others. It has high-performing lenses and professional camera features that support various photography styles. For instance, you may use the Priotize Faster Shooting option to capture multiple photos at a time. Another thing is that you may enable Action Mode when shooting videos to keep the frame stable throughout the duration. Simply put, you can surely do a lot of things using your iPhone camera
Let’s say you’re planning to share your stunning snaps and footage with others. Is it possible to facilitate the transfer with little to no effort? The short answer is absolutely yes. There are many easy ways to move your media files between two iPhones. In no time, you can surely find the best tutorial on how to transfer photos from Apple iPhone SE (2022) to iPhone. Just choose one that matches perfectly your current situation.
In this article, we will talk about the iPhone’s Shared Album feature and its main benefits to users. We will also provide some tutorials on how to transfer pictures from Apple iPhone SE (2022) to iPhone quickly and easily. Continue reading below to learn more.
Everything You Need to Know About Shared Album
The Photos mobile application on iOS devices is a very powerful gallery software. It provides numerous options to help you organize and manage all your media files in one place. When it comes to data transfer, Photos offers users some channels to facilitate such procedures. One of which is through the syncing feature called Shared Album. It’s basically an ordinary folder where you can move and store your media files. But as the name suggests, you can share this folder with others by simply granting them access to it. Don’t worry. Your Shared Albums remain private on the platform. Only the people you add as subscribers can view its content and make changes. Therefore, the Shared Album feature is the best answer to the question: “How to transfer photos from Apple iPhone SE (2022) to iPhone.”
It’s true to say that Shared Album is a great iOS feature. However, it’s important to point out that it also has a few limitations. First on the list is the type of files supported by this feature. For images, Shared Album is compatible with photos in HEIF, JPEG, RAW, PNG, GIF, and TIFF formats. On the one hand, video formats supported by Shared Album include HEVC, MP4, QuickTime, H.264, and MPEG-4. Another thing to consider is the capacity of the Shared Album folder. By default, you can only store up to 5000 photos or videos in the album.
Do you find Shared Album a useful tool, though? If so, here are the tutorials on how to activate this feature and create one in the Photos app.
How to Activate Shared Album?
Here’s how to activate Shared Album on Settings.
- Step 1: Go to Settings.
- Step 2: Click your Apple ID Profile.

- Step 3: Click iCloud.
- Step 4: Click Photos.

- Step 5: Toggle on the radio button next to Shared Albums.

How to Create Shared Albums in Photos
Here’s how to create Shared Albums in Photos.
- Step 1: Go to the Photos.
- Step 2: Click the Album tab.
- Step 3: Click the + icon at the top-left corner of your screen to add a new folder.

- Step 4: Click New Shared Album.

- Step 5: Rename the Shared Album and then click Create.
How to Transfer Photos From Apple iPhone SE (2022) to iPhone in Easy Steps?
Undoubtedly, the Shared Album feature is a very convenient way to move media files from one iPhone to another. Imagine all you have to do is consolidate all the files in a Shared Album folder and add subscribers. From there, you can easily access the album on multiple iOS devices and download the files. But it’s important to note that there are other photo transfer methods you can try apart from using Shared Album. Check out the 5 tutorials below on how to transfer photos from Apple iPhone SE (2022) to iPhone.
Method 1: Transfer photos from Apple iPhone SE (2022) to iPhone by enabling iCloud photos
How do I transfer photos from Apple iPhone SE (2022) to iPhone? Well, the easiest way is to sync the photos to iCloud and enable the iCloud photos on both devices. Don’t worry. It’s very easy to set up. Here’s how to transfer photos from Apple iPhone SE (2022) to iPhone using iCloud.
- Step 1: On your device that contains the files, go to Settings.
- Step 2: Click on the Apple ID Profile.
- Step 3: Click Photos.

- Step 4: Toggle on the radio button next to Sync This iPhone. From then on, your iPhone will sync your photos to iCloud.

- Step 5: Do the same series of steps on the other iPhone. Once the synchronization has been completed, open the Photos app. Find the newly synced iCloud photos on the All Photos album.
Method 2: Transfer photos from Apple iPhone SE (2022) to iPhone using AirDrop
If you’re just sending a few pieces of photos, AirDrop is indeed a great transfer medium. It’s basically a wireless sharing option allowing users to send files between two iOS devices. Do you want to try it? Here’s how to transfer photos from Apple iPhone SE (2022) to iPhone using AirDrop.
- Step 1: Toggle on the Wi-Fi and Bluetooth connectivity on both iPhones. After that, find the AirDrop option on the two devices and then switch it on. Choose Everyone.

- Step 2: On the Apple iPhone SE (2022) device that contains the files, go to Photos. Select the images you want to transfer. After that, click the Share button at the bottom-left corner of your screen.
- Step 3: Choose AirDrop.

- Step 4: Select the recipient from the provided list. After that, accept the AirDrop request on the other device.
Method 3: Transfer photos from Apple iPhone SE (2022) to iPhone via Mail
Another reliable method you can try is to email the photos from one iPhone to another. Like AirDrop, it works great if you’re just moving a few bits of files to another device. Don’t work. The process will not take much time. Here’s how to transfer photos from Apple iPhone SE (2022) to iPhone via Mail.
- Step 1: On the Apple iPhone SE (2022) device containing the files, go to the Photos app.
- Step 2: Select the specific photos you want to transfer. After that, click the Share icon at the bottom-left corner of your screen.
- Step 3: Choose Mail among the given options.

- Step 4: Key in the email address of the recipient. Subsequently, click the Send icon.
- Step 5: Open the email on the other iPhone. Then, download the photos sent as email attachments.
Method 4: Transfer photos from Apple iPhone SE (2022) to iPhone using iCloud Link
Let’s say you’re sending one photo to another iPhone user. What is the best transfer option in this case? If you’re currently using iCloud photos might as well send files through the iCloud link. Don’t worry. It’s not that hard to get such details. Here’s how to transfer photos from Apple iPhone SE (2022) to iPhone using the iCloud link.
- Step 1: On the Apple iPhone SE (2022) device where your files are stored, go to the Photos app.
- Step 2: Select the specific group of images you want to transfer. Right after, click the Share icon at the bottom-left corner of your screen.
- Step 3: Scroll down and find the Copy iCloud Link. Click on it.

- Step 4: Share the iCloud link via Messages, Mail, or internet messaging platform. On the other iPhone device, access the link and then download the photos from there.
Method 5: Transfer photos from Apple iPhone SE (2022) to iPhone using Wondershare Dr.Fone
The first four tutorials above on how to transfer pictures from Apple iPhone SE (2022) to iPhone are very easy to follow. But if you wish to explore another convenient option, Wondershare Dr.Fone can help you with that. Its phone transfer feature has a powerful facility that can move your photos and other files between two mobile devices. Here’s how to use it in easy steps.
- Step 1: Download Wondershare Dr.Fone from its official website. Then, install it on your computer.
- Step 2: Open the newly installed software on your desktop. After it fully loads, connect your two iPhones using a data cable.
- Step 3: Access the left-side panel and then click Toolbox. On the main dashboard, click Phone Transfer.
- Step 4: Set the iPhone that contains the photos as the Source and the other iPhone as the Target. Alternatively, click the Flip button to modify the transfer path according to your liking.

- Step 5: Click Photos as the category of the files. Right after, click Start Transfer to proceed.

- Step 6: Wait while Wondershare Dr.Fone is facilitating the transfer. If you wish to terminate the progress, simply click Cancel.

- Step 7: After completing the process, click OK to wrap it up. Check your files from their respective locations afterward.

BONUS TIP: Back Up Your Photos First
The tutorials above on how to transfer all photos from Apple iPhone SE (2022) to iPhone are safe to initiate. You can be sure about that. But as an additional layer of protection, it’s best to back up your iPhone first before the transfer. Don’t worry. Wondershare Dr.Fone. simplifies the backup process for you. Here’s a quick tutorial to get you started.
- Step 1: Launch the Wondershare Dr.Fone on your computer. After it fully loads up, connect your iPhone using a data cable.
- Step 2: Access the left-side panel and then click My Backup. On the main dashboard, click Back Up Now.

- Step 3: Follow the on-screen instructions for SMS backup. After that, click OK to proceed.

- Step 4: Wait while Wondershare Dr.Fone is backing up your files.

- Step 5: After completing the backup process, click View Backups or Open in Folder to check your files.

Conclusion
Transferring photos between two iOS devices is very easy. In fact, you can instantly complete the migration process with just the snap of a finger. Refer to the five tutorials above on how to transfer photos from Apple iPhone SE (2022) to iPhone enumerated. One of them can certainly fit your situation and help you in this regard. For a more convenient file transfer option, download Wondershare Dr.Fone for free. It has a potent phone transfer feature that can aid in the transfer of your dearly cherished photos.
How to Transfer Apple iPhone SE (2022) Data to iPhone 12: A Complete Guide
Apple announced a line-up of iPhones with four new devices in 2020. The series is called the iPhone 12 series that has four handsets of different sizes and price ranges. The iPhone 12 series include iPhone 12, iPhone 12 Mini, iPhone 12 Pro, and iPhone 12 Pro Max. These are the company’s first-ever 5G devices. They surely took a step into the future of technology with the 12 series.
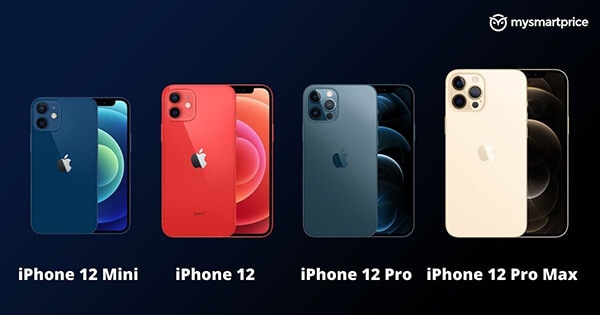
The device is considered lighter than the iPhone SE launched in 2020. iPhone 12 Pro Max holds an outstanding camera system for high-quality image processing. Besides, the introduction of A14 SoC has encouraged the exceptional performance of all four models. Each of the series models is secured with suitable features and new capabilities. Let’s take a glance at the relevant specifications and iPhone 12 price.
Part 1: Apple iPhone 12 Series Specifications
To mention the iPhone 12 series specifications, these models are secured with an SoC of Apple A14 Bionic. All 4 of them consist of DRAM. The displays of these smartphones are quite satisfactory.
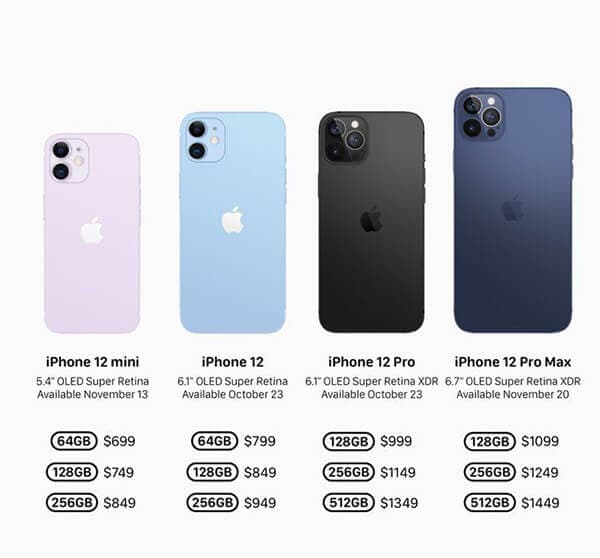
Display: The iPhone 12 Mini and iPhone12 have a display of 5.42” OLED (2340 x 1080) and 6.06” OLED (2532 x 1170). On the other hand, the magnificent iPhone 12 Pro has a display of 6.06” OLED (2532 x 1170) and 6.68” OLED (2778x1284).
Size & Weights: The size concerning height, width, and depth of both iPhone 12 and iPhone 12 pro are the same at 146.7 mm, 71.5 mm, 7.4 mm. Besides, the iPhone Mini stands at a height width and depth of 131.5 mm, 64.2 mm, and 7.4 mm. The iPhone 13 Pro max has a height of 160.8 mm, a width of 78.1 mm, and a depth of 7.4 mm. While the iPhone Mini weighs the lightest with 135g, iPhone 12 max weighs the heaviest (228 g). Both iPhone 12 and iPhone 12 Pro remain at 164g and 189g, respectively.
Wireless Charging: Each of the iPhone 12 series models supports MagSafe Wireless Charging up to 15 W. They are also Qi Compatible (7.5 W). Now, coming to the camera quality, all four models are secured with a front camera of 12 MP f/2.2.In rear camera setup, iPhone 12 Mini, iPhone 12, and iPhone 12 Pro have a main camera of 12 MP 1.4µm, 26mm eq. f/1.6, Optic OIS. iPhone 12 Pro Max comes with the main camera of 12 MP 1.7µm, 26mm eq. f/1.6.
Camera: The high-quality telephoto camera of the iPhone 12 Pro is 12 MP, 52mm eq. f/2.0 OIS. For iPhone 12 Pro Max is 12 MP, 65mm eq. f/2.2 OIS. The entire iPhone series model has an ultra-wide camera of 12 MP 13mm eq. f/2.4. The splash, water, and dust resistance feature with IP68 for up to 6m and 30 minutes keeps the phone durable.
iPhone Series devices hold dual-SIM support with nano-SIM and eSIM. Both iPhone 12 Mini and iPhone 12 come in distinct storage capacities like 64 GB, 128 GB, and 256 FB. The iPhone 12 Pro and Pro Max are available in the storage of 128 GB, 256 GB, and 512 GB.
Part 2: Transfer old iPhone data to iPhone 12
We know that the excitement of buying a new iPhone is real. However, it’s important to do one thing before jumping into the camera quality. And that’s data transfer. You do not want your old phone data to be gone with the old device, do you? We hope not. Here are some of the tactics by which you can transfer the old iPhone data to the new iPhone 12
2.1 Through iCloud
Before transferring, make sure your data is backed up. For that, connect the old iPhone with the WiFi and then go to “Settings.” Next, tap your name and then on “iCloud.” Next, select the “Backup Now” option and wait for the process to get completed. After completing the backup, follow the steps given below.
Step 1: First, turn on the new device to see the “Hello” screen. Now, follow the instructions appearing on the screen. Once you notice the WiFi screen, tap a WiFi network to join. Keep following the steps till the “Apps & Data” screen shows up. Tap on “Restore from iCloud.”
Step 2: Sign in to your iCloud with relevant credentials like Apple ID and password. Choose a backup but make sure to check the date and size.
If you have bought iTunes or App store content with multiple IDs, sign in with those accounts too.
Step 3: The restore process will be initiated. Make sure to be connected and wait till the process gets completed successfully. Once done, continue with the other steps to complete the setup process successfully.
2.2 Through iTunes or Finder
Start with the backup process by opening iTunes. Now, connect your iPhone with the PC. After it gets connected, choose your iPhone on the top toolbar. To transfer the data related to Health and Activity/saved passwords, choose the “Encrypt backup” option. Next, input a password and click “Back Up Now.”
To transfer the data through iTunes or Finder, launch your new device. Once the “Hello” screen appears, follow the instructions appearing on the screen. As soon as you note the “Apps & Data Screen,” tap on “Restore from Mac or PC.” Connect the new device to PC/Mac and open the iTunes/Finder window. Once your device name is visible on the screen, tap it.
Select “Restore Backup” to choose a “Backup.” Ensure that the size and data are accurate. To restore from an encrypted backup, input the password. The restoration process will start. Now, wait for the entire process to get completed and then move on to the remaining setup steps.
Part 3: Transfer Android Data to iPhone 12
The methods mentioned above can be time-consuming. In that case, it’s best to opt for a simple process that does not require too much work. For example, Dr.Fone - Phone Transfer all is an efficient and easy-to-use phone switch app.
As the name signifies, this App can help you with iPhone 12 transfer data in a few minutes. Experienced developers develop it for both iOS and Android users. So, you can transfer data from any of the Apple iPhone SE (2022) devices to the new iPhone 12.
With Dr. Fone, you can migrate 13 files of distinct size to the new iPhone 12. Here’s a glimpse of the files below
Contact, photo, videos, voicemail, wallpaper, calendar, and many more
To transfer data through Dr. Fone, follow the easy steps mentioned below.
Step 1: First, connect both the old device and new iPhone 12 to your PC/Mac with USB.
Step 2: Now, launch the Dr. Fone - Phone Transfer and select the app
Step 3: Once the app starts, you will note a device detected as a source. Similarly, there will be other devices detected as destinations. Then, you will be given the option to flip the source and destination. For that, click on the “Flip” option.
Step 4: After selecting the Apple iPhone SE (2022) device status, mark the checkboxes beside the files for transferring. Once done, tap on the “Start Transfer” button appearing on the screen.
You can select “Clear data before copy” to delete the data from the destination device before transferring. It will speed up the entire process.
Conclusion
Hopefully, you got a clear idea of how to transfer data to iPhone 12. Dr. Fone - Phone Transfer is one of the finest names for data recovery and data transfer between devices. They have distinct outstanding products that are efficient and useful for the users. One of the best things about the application is that you can transfer the data regardless of the mobile operating system. Be it an iOS or Android device, follow the steps provided above, and that’s it. The iPhone 12 data transfer process is quick, easy, and requires less effort.
Also read:
- [New] 2024 Approved Integrating Masks and Filters to Improve Google Meet Engagement
- [New] 2024 Approved The Essential Guide to Podcast Title Selection Strategies & Examples
- 2024 Approved GIF Wizardry 10 Tools to Ignite Your Creative Spark
- 2024 Approved Streamer's Dilemma Choose Between OBS & Twitch
- 4 Ways to Transfer Contacts from Apple iPhone X to iPhone Quickly | Dr.fone
- Flavorful Funnels Catchy Recipe Channels That Work
- How Tecno Pop 7 Pro Mirror Screen to PC? | Dr.fone
- How to Transfer Everything from Apple iPhone 11 Pro to iPhone 8/X/11 | Dr.fone
- How To Transfer From Apple iPhone 14 Pro Max to Samsung Simplified Guide | Dr.fone
- How to Transfer/Sync Notes from Apple iPhone 12 to iPad | Dr.fone
- In 2024, 5 Tutorials on How to Transfer Photos From Apple iPhone 12 Pro Max to New iPhone | Dr.fone
- In 2024, How Can I Catch the Regional Pokémon without Traveling On Vivo Y78+ (T1) Edition | Dr.fone
- In 2024, How to Transfer Everything from Apple iPhone 14 Pro to iPhone 8/X/11 | Dr.fone
- In 2024, iPhone Transfer Transfer Contact from Apple iPhone 15 Pro to iPhone without iCloud | Dr.fone
- In 2024, Ranking of Free, Easy-to-Use Image Overlay Apps on Smartphones
- Troubleshooting Guide: Starting Dolby Digital and Dolby Pro Logic II Sound in Windows 11 Systems
- Title: In 2024, Effortless Ways to Transfer Data from Your Apple iPhone SE (2022) to iPhone 15 | Dr.fone
- Author: Charlotte
- Created at : 2024-10-05 07:42:32
- Updated at : 2024-10-11 23:19:59
- Link: https://iphone-transfer.techidaily.com/in-2024-effortless-ways-to-transfer-data-from-your-apple-iphone-se-2022-to-iphone-15-drfone-by-drfone-transfer-from-ios/
- License: This work is licensed under CC BY-NC-SA 4.0.