
In 2024, Easy Methods How To Transfer Pictures From Apple iPhone 6s to PC | Dr.fone
Easy Methods: How To Transfer Pictures From Apple iPhone 6s to PC
Photo transfer from your iPhone to your PC is a common practice for various reasons. It can free up your device’s storage space, create backups, or simply edit and organize your photos on a larger screen.
Thankfully, there are various methods to transfer pictures from your iPhone to your PC, providing flexibility to users based on their preferences and convenience. Read our comprehensive guide on how to transfer pictures from Apple iPhone 6s to PC. This article covers step-by-step instructions so you can easily and efficiently manage and transfer your iPhone photos to your computer while preserving your cherished memories.
Part 1: How To Transfer Pictures From Apple iPhone 6s to PC with iCloud
One of the widely used and efficient methods to transfer pictures from your iPhone to a PC is through iCloud, Apple’s cloud-based service. iCloud provides seamless integration across Apple devices, allowing users to sync and access their photos and videos effortlessly.
However, even if your PC is using other operating systems, such as Windows, you can still use iCloud for Windows to save and transfer your iPhone photos from iCloud.
How to transfer iPhone photos to a computer using iCloud:
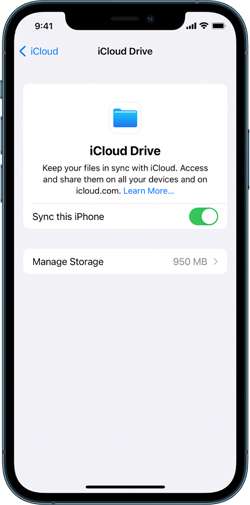
Step 1: Make sure you have synced iCloud photos on your iPhone.
On your iPhone Settings, go to your profile and tap iCloud. Then, select Photos and turn on the switch next to “Sync this [device].” Otherwise, go to iCloud settings > iCloud Drive, and switch on “Sync this iPhone.”
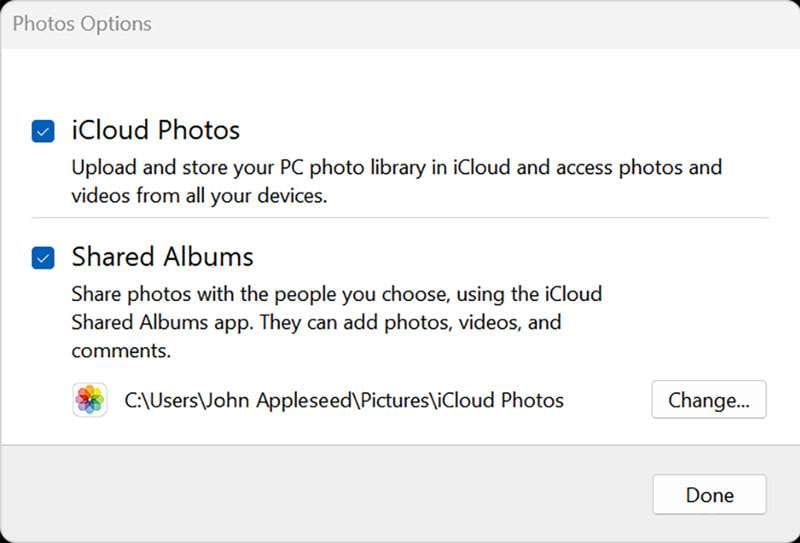
Step 2: Set up your iCloud for Windows.
Open iCloud for Windows and ensure you’re signed in with your Apple ID. Next to Photos, select Options > iCloud Photos. Click “Done” and “Apply” to save the changes and close the window.
Step 3: Keep iPhone photos on PC.
Open iCloud Photos and select the images you want to transfer to your PC. Right-click to open a drop-down menu and choose “Always keep on this device.”
That’s it! Now, you can find your iPhone Photos on your computer.
Part 2: How To Transfer Pictures From iPhone with Google Drive
Another convenient way to transfer iPhone pics to a computer is through Google Drive. As a cloud-based storage solution, Google Drive allows users to seamlessly store, manage, and share files, including photos, across different devices.
If you already have a Google account, you can jump right into Google Drive without signing up. However, be aware that the free version only gives you 15 GB of space. If you need more room, you’ll have to sign up for a subscription.
How to transfer iPhone pictures to a computer with Google Drive:
Step 1: Set up your Google Drive.
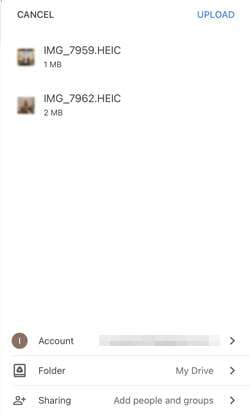
Open Google Drive on your iPhone. Once opened, tap the multicolored + symbol and select “Upload” > “Photos and Videos.” If prompted, grant access to all photos by tapping “Allow Access to All Photos.”
Step 2: Upload your iPhone photos on Google Drive.
Browse through your iPhone albums to locate the specific photos you wish to upload. Hold and tap to select multiple photos. Then, tap “Upload” to upload your iPhone photos to Google Drive.
Optional: Automatic backup or sync with Google Photos
For those seeking automatic backups, open Google Photos, tap your profile image, navigate to “Google Photos settings,” and select “Backup & Sync.” Toggle “Backup & Sync” to On for continuous backups.
Step 3: Transfer your iPhone photos from Google Drive to your PC.
Once your photos are stored on Google Drive, proceed to save and transfer them to your PC. Select the desired photos in Google Drive, and click “Download.”
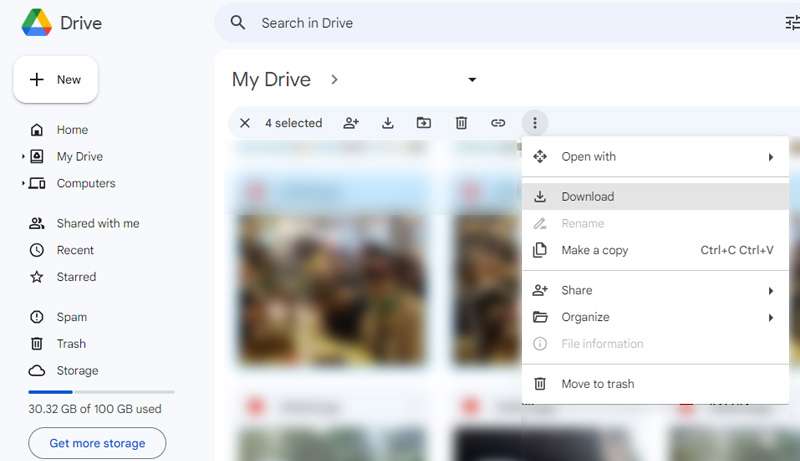
To save all photos from a specific Google Drive folder, open Google Drive and select “My Drive.” Locate the intended folder, and click the three dots to open the drop-down menu. Select “Download,” and all photos and files within the folder will be saved to your computer in ZIP format.
Part 3: How To Transfer Pictures From iPhone with iTunes
You can also make the most of iTunes to secure your iPhone with backups, keep it up-to-date, or synchronize content between your iOS device and your computer in both directions. Even if you’re a Windows PC user, there’s no need to fret. Although iTunes is an Apple product, it’s also available for Windows use.
To get started, make sure that you have iTunes for Windows installed or update your existing version to at least iTunes 12.5.1. Once done, follow the instructions below.
How to transfer iPhone pics to a PC using iTunes:
Step 1: Connect your device to your computer.
Plug in your iPhone to your computer using a USB cable.
Step 2: Grant access to your iPhone Photos.
If your phone is asking you to Trust This Computer, tap “Trust” or “Allow to proceed.”
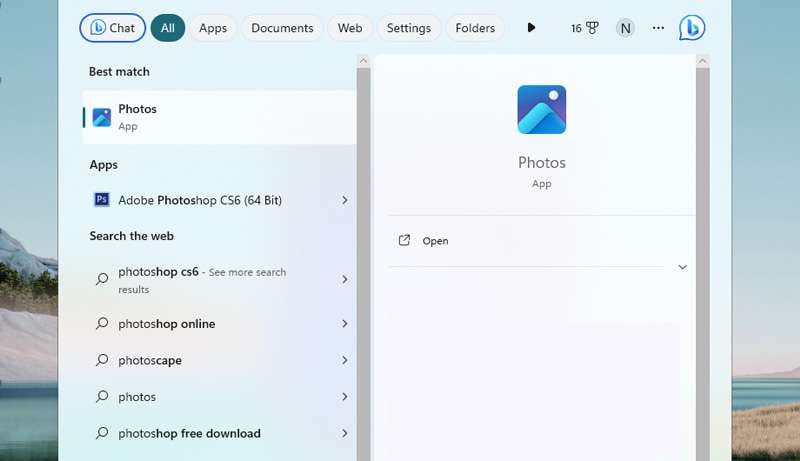
Step 3: Open your computer’s Photos app.
Go to the Start menu on your PC. Search and select Photos to open the Photos app.
Step 4: Import your Photos to your PC.
Within the Photos app, click on Import > From a USB device and follow the instructions on the screen. You can choose specific photos for the transfer and decide where to save them on your PC. Remember to make sure that the photos are saved on the Apple iPhone 6s device rather than stored in the cloud.
Finally, allow a few moments for the system to detect and transfer the selected photos.
Part 4: How To Quick Transfer Pictures From Apple iPhone 6s to PC
If you find the above methods difficult, there is a quick and easy way to transfer photos from your iPhone to a PC with Dr. Fone’s Export All Data feature. With this feature, there’s no need to navigate through various locations to just locate and transfer files from your iPhone.
Dr.Fone - Phone Manager (iOS)
Transfer Photos from Computer to iPod/iPhone/iPad without iTunes
- Transfer, manage, export/import your music, photos, videos, contacts, SMS, Apps, etc.
- Back up your music, photos, videos, contacts, SMS, Apps, etc., to the computer and restore them easily.
- Transfer music, photos, videos, contacts, messages, etc., from one smartphone to another.
- Transfer media files between iOS devices and iTunes.
- Fully compatible with iOS 7 to iOS 15 and iPod.
3981454 people have downloaded it
Dr. Fone’s Export All Data feature offers some great functionalities, including:
- Comprehensive data export, including Photos, Contacts, Messages, Voicemail, and more
- Encrypted data transfer and backups
- Available for iOS and Android devices
- Regular updates to provide an enhanced user experience
To transfer photos from your iPhone to a PC using Dr.Fone, follow the step-by-step below:
Step 1: Launch Dr.Fone and make device connections using a USB cable.
Start by Image nameing your iPhone device to the computer via a USB connection. Launch Dr.Fone and select “Export all data” in the My Device section.

Step 2: Choose file types for export
When a new window appears, select the specific file types you wish to transfer (in this case, your photos). Then, click “Export” at the bottom of the screen to initiate the procedure. Choose the preferred location for saving the exported data.

Step 3: Make a password for the backup file
Next, you will be asked to create an encrypted password for the backup file to be stored on the computer. Set a password, confirm it, and click “Done” to execute the process.

Step 4: Monitor the progress
Your iPhone will start exporting its data to the computer through Dr.Fone. You can wait and monitor the progress on the screen.

Step 5: Successful export of data to the computer
After successful completion of exporting the data, a window will appear on your computer screen. Click “Open” to review the exported data at the specified location.


Conclusion
Before, you must have wondered how do you transfer pictures from Apple iPhone 6s to PC. But after learning from the article above, you now have a variety of straightforward methods in your hand, whether with iCloud, Google Drive, iTunes, or reliable software like Dr.Fone.
If you’re embedded in the Apple ecosystem, iCloud provides seamless integration of your iPhone Photos. Alternatively, Google Drive offers a cross-platform solution, enabling you to upload your iPhone photos to the cloud and access them on your computer browser.
For those who prefer a more traditional approach, iTunes provides a straightforward method via a USB connection. And if you’re looking for a quick and versatile third-party solution, software like Dr.Fone simplifies the data transfer process with its user-friendly interface and robust features.
5 Easy Ways to Transfer Contacts from Apple iPhone 6s to Android
Whenever we move from one device to another, the first thing that we wish to do is transfer our contacts. After all, we can’t communicate with anyone without our list of contacts. Surprisingly, a lot of people find it hard to transfer contacts from Apple iPhone 6s to Android. Truth to be told - there can find countless ways to move contacts from Apple iPhone 6s to Android. You don’t need to worry a lot about the compatibility issues of different systems and can replace old phones at will when there is a new phone release, like the upcoming Samsung Galaxy S22 series. You can use a third-party app, a cloud service (like iCloud), and iTunes. Read on to learn how to transfer contacts from Apple iPhone 6s to Android in 5 different ways.
Part 1: Transfer all contacts from Apple iPhone 6s to Android in 1 click
The easiest way to transfer all the iPhone contacts to Android is by using Dr.Fone - Phone Transfer . A part of the Dr.Fone toolkit can easily transfer all your data from one device to another with a single click. The application is compatible with every leading Android and iPhone model. You can transfer your data from Apple iPhone 6s to Android and vice-versa. Besides a cross-platform transfer of data, iPhone to iPhone and Android to Android transfer is also supported.
The application also supports transferring all the leading data types such as videos, music, photos, messages, and so much more. Extremely easy to use, it is a must-have tool for every smartphone user out there. To learn how to move contacts from Apple iPhone 6s to Android, you can take these steps:
Step 1. First of all, launch the Dr.Fone toolkit on your Mac or Windows PC, and from its welcome screen, visit the “Phone Transfer” module.

Step 2. Connect your Android and iOS devices to the system and let the application detect them automatically. Since you wish to export iPhone contacts to Android, iPhone should be the source while Android should be the destination device. You can use the Flip button to interchange their positions.
Step 3. select the category of data you wish to transfer. Once you have checked the “Contacts” option, click on the “Start Transfer” button to start the process.

Step 4. Sit back and wait for a couple of minutes as the application syncs contacts from Apple iPhone 6s to Android. Make sure that both the Apple iPhone 6s devices are kept connected to the system until the process is completed.

Step 5. Once the transfer completes, you will be shown a message. In the end, you can remove the 2 devices safely from your system.

Part 2: Move contacts from Apple iPhone 6s to Android with Google Account
Another fast and hassle-free way to sync contacts from Apple iPhone 6s to Android is by using your Google Account. Since you can add your Google account on the iPhone, you can also use it to sync your contacts. While setting up your Android, you can use the same Google account. To learn how to import contacts from Apple iPhone 6s to Android using your Google account, these quick steps can be implemented.
Step 1. Unlock your iPhone and go to its Settings > Mail, Contacts, Calendars > Add Account and tap on “Google.”

Step 2. Sign in with your Google account credentials and grant your phone the needed permissions to access your Gmail data.
Step 3. Now, you can go back to your Google account from here and turn on the sync option for “Contacts.”

Step 4. Once your contacts are synced with your Google account, you can easily access them on any Android device. You can use the Google Contacts app or use the same account to set up your device for auto-sync contacts.
Part 3: Import contacts from Apple iPhone 6s to Android with iCloud
Another simple way to sync contacts from Apple iPhone 6s to Android is by using iCloud. Firstly, you need to sync the iPhone contacts with iCloud, and later you can export them a VCF file. To this end, the vCard can be imported to Google Contacts. Yes - it does sound a bit complicated. After all, the Dr.Fone tools provide such a hassle-free way to move contacts from Apple iPhone 6s to Android compared to this technique. Though, this is a free solution and can be your plan B. To learn how to transfer contacts from Apple iPhone 6s to Android via iCloud, follow these steps.
1. Before you proceed, make sure your iPhone contacts are synced with iCloud. To do this, go to the iCloud settings and turn on the sync for 1.Contacts.
2. Great! Once your contacts are synced with iCloud, you can easily access them remotely. Go to iCloud.com and log in with your Apple ID.
3. After logging in to your iCloud account, go to the “Contacts” option from the home screen.
4. This will display a list of all the synced contacts. Select the contacts you wish to move. To select all contacts, click on the gear icon (settings) at the bottom right corner.
5. Once you have made the desired selections, go to its settings again (the gear icon) and choose “Export vCard.” This will save a VCF file having all the contact details.
6. Now, go to Gmail and login with your account details. Select the Contacts option. Alternatively, you can go to the official website of Google Contacts as well.
7. From here, you can choose to Import a file. Click on the vCard option and browse the saved VCF file that you have just exported from iCloud.
8. Once you have imported these contacts to your Google account, you can easily access them on the connected device as well.
Part 4: Copy contacts from Apple iPhone 6s to Android using iTunes
If you are an avid user of iTunes, you can try this technique to export iPhone contacts to Android. Earlier, iTunes has a feature to sync contacts with Google, Outlook, and Windows account. Now, the Google feature has been removed from iTunes. Therefore, you first need to sync your contacts to your Windows account and can later export them into a card. Needless to say, the technique can also be a bit complicated. Though, you can implement these steps to copy contacts from Apple iPhone 6s to Android using iTunes.
1. Launch the latest version of iTunes from your system, and connect your iPhone with a cable.
2. Select your connected device and go to its Info tab. Enable the “Sync Contacts“ option and choose to sync them with Windows Contacts.
3. Ensure that you choose to sync “All Contacts” before clicking on the “Apply” button.
4. Great! Once you have synced your iPhone contacts to your Windows account, you can safely remove the Apple iPhone 6s device. Go to your Account > Contacts and click on the “Export” button on the toolbar.
5. Choose to export the contacts to a vCard and select the location to save the VCF file.

6. In the end, you can manually copy the VCF file to your Apple iPhone 6s or import it to your Google Contacts as well.
Part 5: Switch contacts from Apple iPhone 6s to Android without a computer
Often, users don’t wish to use a computer to export iPhone contacts to Android. If you have the same requirements, then you can use a data transfer app. While there are many apps out there that can help you move contacts from Apple iPhone 6s to Android, I would recommend My Contacts Backup. This is because the app is available on both iOS App Store and Google Play Store . To use this app to transfer contacts from Apple iPhone 6s to Android, follow these steps.
1. Firstly, download the My Contacts app on your iPhone and launch it. Grant the app the needed permissions to access your contacts.
2. The app will automatically detect all the contacts saved on your device and would give you an option to either mail them or save them to its server.
3. You can choose to email the contacts to your own Gmail account as well. A VCF file will be mailed to your account that can later be downloaded and synced.

4. Additionally, you can also upload the contacts to its server.
5. Now, you have to install the My Contacts Backup app on your Apple iPhone 6s and Google Play Store.
6. Launch the app and choose to restore your contacts using an in-app vCard. In this way, all the saved contacts will be exported to your Apple iPhone 6s.

Now that you have learned 7 different ways to move contacts from Apple iPhone 6s to Android, you can easily fulfill your requirements. Out of all the 8 provided options, Dr.Fone - Phone Transfer is the fastest and most convenient option to move all the contacts at once.
5 Ways to Transfer Music from Apple iPhone 6s to Android
“I have just got a new Android, and I want to transfer music from Apple iPhone 6s to Android. Can anyone help me learn how to send music from Apple iPhone 6s to Android without much hassle?”
Switching from an iPhone to Android can be a tough job. Not only to transfer photos and contacts, but users also need to take some added measures for moving music from Apple iPhone 6s to Android. The good news is that some tools can move data from iOS to Android instantly. You can use iTunes, a dedicated app, or a third-party data transfer tool to do the same. Read on and get to know how to transfer music from Apple iPhone 6s to Android like a pro.
Part 1: How to transfer all music from Apple iPhone 6s to Android in 1 click?
The simplest way of learning how to move music from Apple iPhone 6s to Android is by using Dr.Fone - Phone Transfer . As the name suggests, the tool will make it easier for you to switch from one smartphone to another without losing any data. It is a part of the Dr.Fone toolkit and is compatible with leading iPhone and Android models. Therefore, you can easily perform a cross-platform transfer of data with a single click.
Dr.Fone - Phone Transfer
Transfer Music from Apple iPhone 6s to Android Directly in 1 Click!
- Easily transfer contacts from Apple iPhone 6s to Android phone without any complication.
- Works directly and transfer data between two cross-operating system devices in real-time.
- Works perfectly with Apple, Samsung, HTC, LG, Sony, Google, HUAWEI, Motorola, ZTE, Nokia, and more smartphones and tablets.
- Fully compatible with major providers like AT&T, Verizon, Sprint, and T-Mobile.
- Fully compatible with the latest iOS and Android
- Fully compatible with the latest Windows or Mac version.
3981454 people have downloaded it
Note: If you have no computer at hand, you can also get the Dr.Fone - Phone Transfer (mobile version) from Google Play, with which you could log into your iCloud account to download the data, or transfer from Apple iPhone 6s to Android using an iPhone-to-Android adapter.
Besides music files and formats of different kids, Dr.Fone - Phone Transfer also supports the transfer of contacts, messages, photos, videos, and other types of contact. Therefore, you can move all your data at once using this tool. To learn how to send music from Apple iPhone 6s to Android using Dr.Fone - Phone Transfer, follow these steps.
1. Download Dr.Fone - Phone Transfer on your Windows PC or Mac and launch it whenever you wish to transfer music from Apple iPhone 6s to Android. From its welcome screen, select the “Switch” module.
2. Now, connect both the Apple iPhone 6s devices to your computer and let the application detect them automatically. On the interface, you can see a preview of both the Apple iPhone 6s devices.
3. Since you move your data from an iPhone to Android, your iPhone should be listed as a source while Android should be a destination device. If not, then use the Flip button to interchange their positions.
4. Select the type of data you wish to transfer. For instance, in this scenario, make sure that the option of “Music” is selected. Once you have made the selection, click on the “Start Transfer” button.
5. Sit back and wait for a while as Dr.Fone - Phone Transfer will automatically move the selected content from Apple iPhone 6s to Android.
6. When the process is completed, you will be notified. In the end, you can remove both the Apple iPhone 6s devices safely.
Part 2: How to transfer music from Apple iPhone 6s to Android using Google Music Manager?
Another way to transfer music from Apple iPhone 6s to Android is by using Google Music Manager. Though, unlike Dr.Fone tools, the process can be a bit complicated. Firstly, you need to sync your music between iPhone and iTunes, and then you have to import it from iTunes to Google Music Manager. Sounds complicated, right? In the end, you can access it on your Apple iPhone 6s using the Google Music app. You can follow these steps to learn how to move music from Apple iPhone 6s to Android using Google Music Manager.
1. Firstly, you need to sync music between your iPhone and iTunes. To do this, launch an updated version of iTunes on your system and connect your iPhone to it.
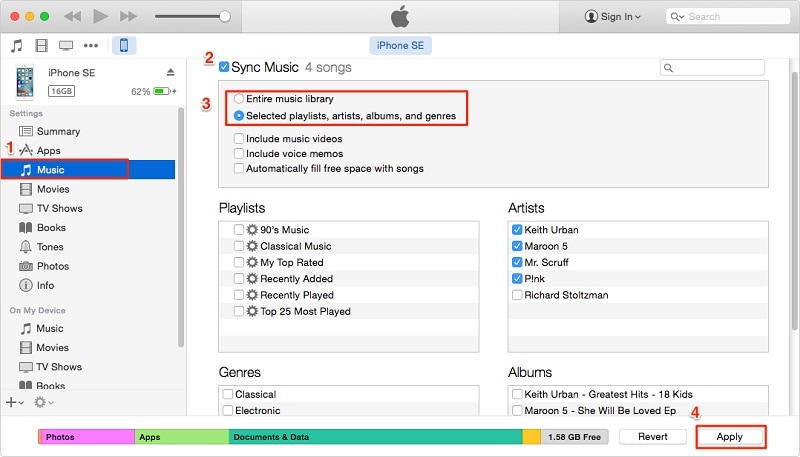
2. Please select your device and go to its Music tab. From here, you can sync your iPhone with iTunes. Click on the “Apply” button and start the syncing process.
3. Once all your music is synced to iTunes, you can disconnect your iPhone.
4. Go to the official website of Google Music and download Google Music Manager on your system.

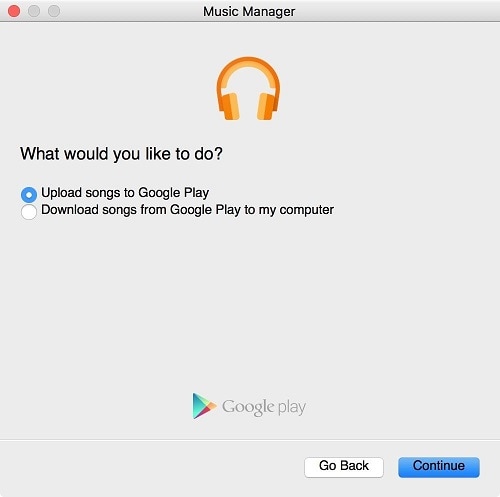
5. Launch the Music Manager application and choose to upload songs to Google Play.
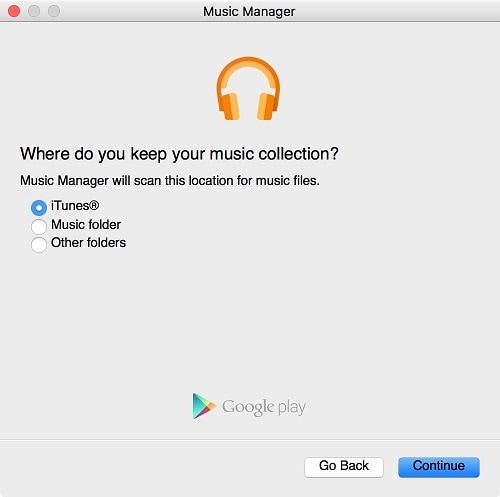
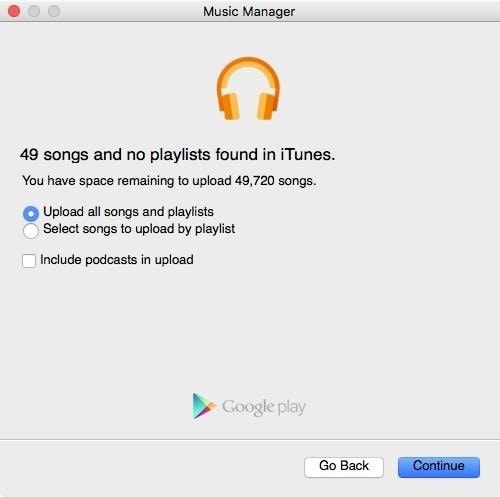
6. Select the source as “iTunes” and click on the “Continue” button.
7. The Music Manager will automatically sync your iTunes library and display the available songs. From here, you can choose to upload selected songs or the entire library.
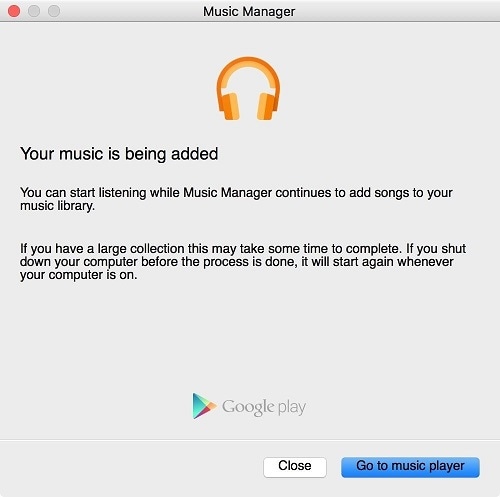
8. Wait for a while for your songs to be imported to Google Music Manager. Once it is done, you will be notified.
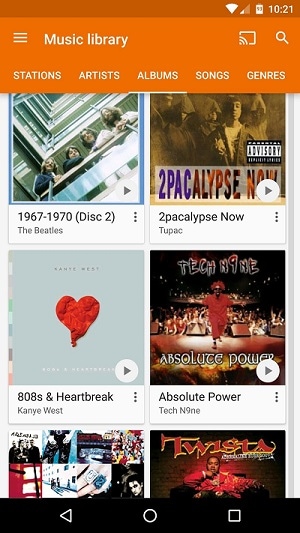
9. Great! You are almost there. In the end, you can download the Google Music app on your Android. From here, you can automatically access all the newly transferred songs on your Google Music library.
Part 3: How to transfer music from Apple iPhone 6s to Android selectively?
As you can see, with Dr.Fone - Phone Transfer, all the music files are transferred from one device to another in one go. If you want to transfer music from Apple iPhone 6s to Android selectively, you can take Dr.Fone’s assistance - Phone Manager (iOS) . It is also a part of the Dr.Fone toolkit and is developed by Wondershare.
Dr.Fone - Phone Manager (iOS)
Transfer iPhone/iTunes Media to Android Devices Selectively
- Transfer files between Android and iOS, including contacts, photos, music, SMS, and more.
- Manage, export/import your music, photos, videos, contacts, SMS, Apps etc.
- Transfer iTunes to Android (vice versa).
- Manage your iOS/Android device on computer.
- Fully compatible with the latest iOS and Android
4,335,819 people have downloaded it
With Dr.Fone - Phone Manager (iOS), you can move data between your iOS device and computer and even iPhone to another Android or iOS device. It works with all the leading smartphone models and supports prominent data types like photos, videos, music, contacts, messages, and more. Having a user-friendly interface will make it easier for you to learn how to transfer music from Apple iPhone 6s to Android. All you need to do is follow these steps:
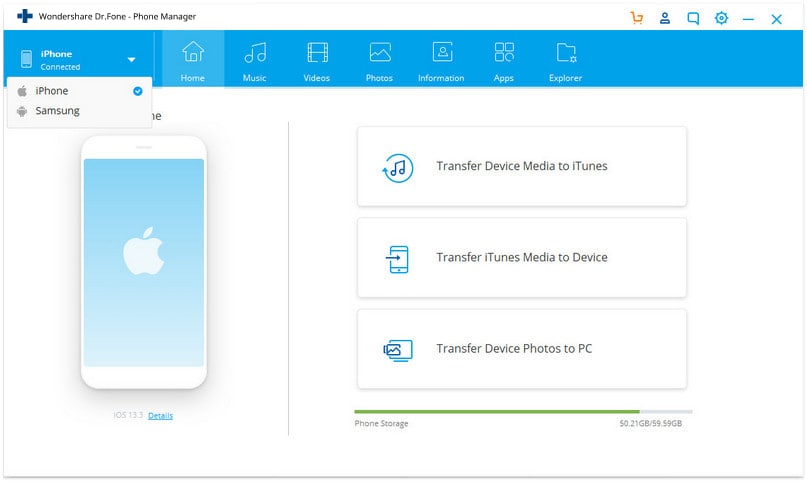
1. Start by launching the Dr.Fone toolkit on your system and visit the “Transfer” tool from its home screen.
2. Connect your iPhone and the target Android device to the system. The interface will automatically detect both the Apple iPhone 6s devices in no time. From the top left option, make sure that you have selected your iPhone as a source device.
3. Great! Now, move to the “Music” tab on the application. Here, you can view all the music files stored on your iPhone, listed in different categories.
4. Just select the files you wish to transfer to your Android and click on the export button on the toolbar.
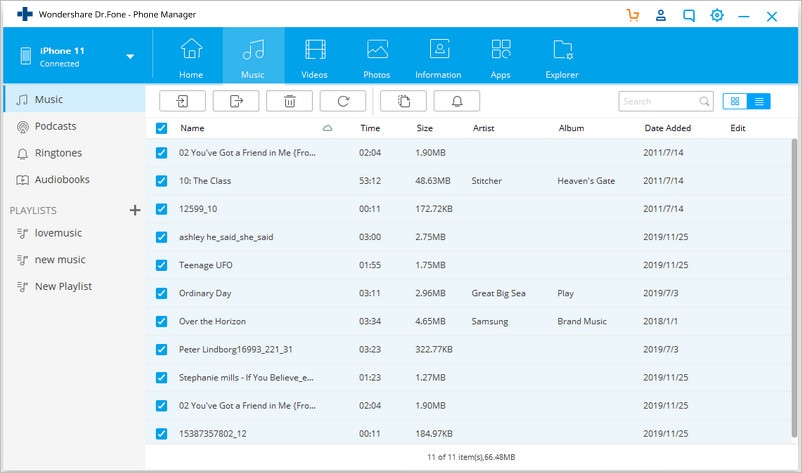
5. This will display a list of all the connected devices. Select the target Android device to commence the transfer process.
Part 4: How to transfer music from Apple iPhone 6s to Android without computer?
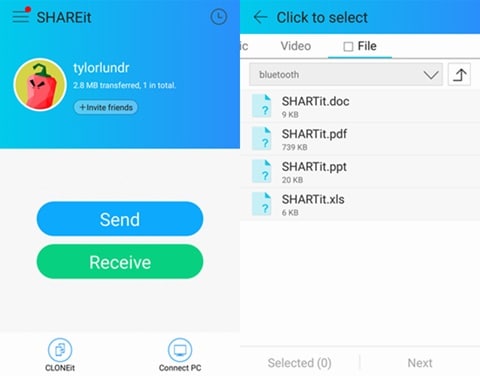
Too often, users don’t wish to use a computer for moving music from Apple iPhone 6s to Android. If you have the same preference, then you use a data transfer app to meet your requirements. Out of all the cross-platform data transfer options, SHAREit is one of the most recommended apps. You can install the app on both the Apple iPhone 6s devices and learn how to transfer music from Apple iPhone 6s to Android without computer by following these steps.
1. Before you proceed, make sure that you have installed the SHAREit app on your iPhone and Android by visiting its Google Play and App Store
2. Launch the app on both the Apple iPhone 6s devices and connect them to the same WiFi network. This is because the transfer of data takes place through WiFi direct.
3. On the source iPhone, choose to “Send” the data. Also, you can browse and select the music files that you wish to send.
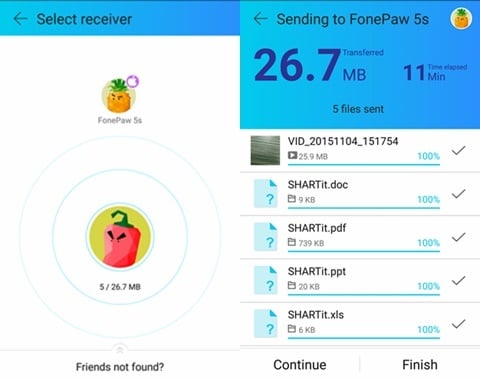
4. Similarly, on your target Android device, mark it as a receiving device. It will automatically start looking for the nearby devices.
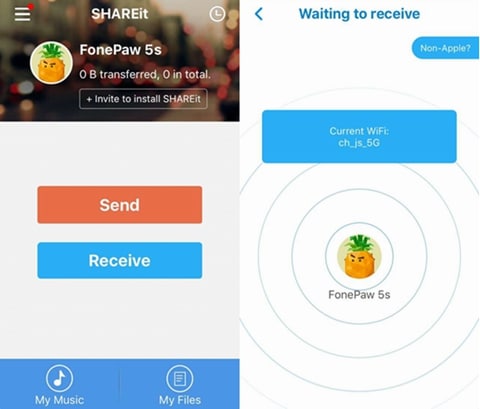
5. On your iPhone, you will be prompted regarding the target device. Select it to initiate the transfer.
6. Accept the incoming data from the source device and start receiving the selected music on your Android.
Part 5: How to transfer music from iTunes to Android?
It might surprise you, but there are different ways to learn how to transfer music from Apple iPhone 6s to Android. We have already discussed how to send music from Apple iPhone 6s to Android using iTunes and Google Music Manager. Though, there is another alternative to do the same. Once you have transferred your music from Apple iPhone 6s to iTunes, you can directly move it to an Android device as well.
1. To start with, make sure that you have already synced your iPhone music with iTunes. Once it is done, launch iTunes again.
2. Go to its Preferences > Advanced options and enable the “Copy files to iTunes media folder when adding to library” feature from here.
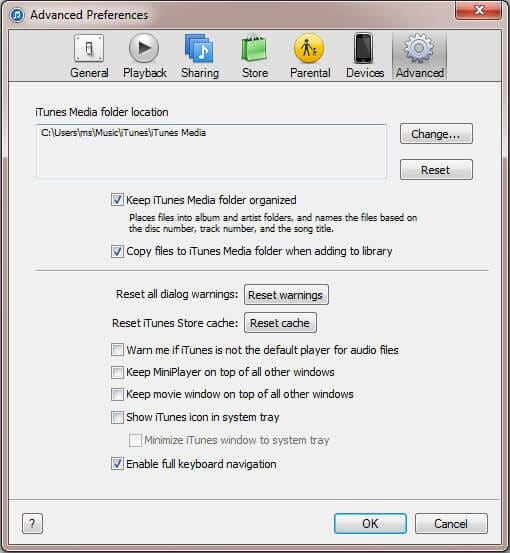
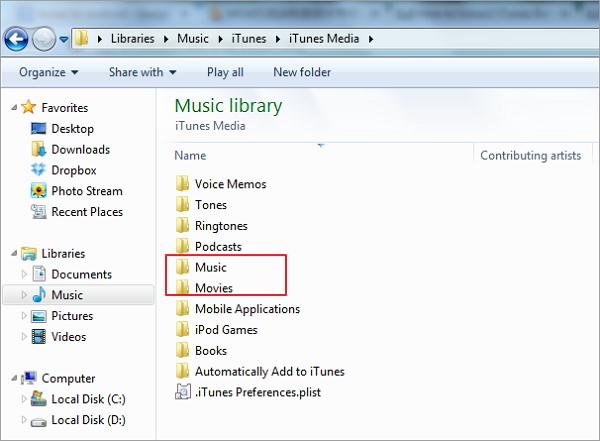
3. Once you apply this change, iTunes will make a dedicated folder with all the music files present in its library. In Windows, you can find it under My Music > iTunes while in Mac, it would be under Music > iTunes.
4. To transfer these music files, connect your Android to the system and choose to use it as a media transfer device.
5. Browse to the iTunes music folder, copy the selected songs, and transfer them to your Apple iPhone 6s. If you have a Mac, then you need to use Android File Transfer to do the same.
After learning different moving music from Apple iPhone 6s to Android, you can certainly pick a preferred method. As you can see, Dr.Fone toolkit provides the fastest and easiest way to transfer music from Apple iPhone 6s to Android. With Dr.Fone - Phone Transfer , you can transfer all the music files from one device to another in a single click. In order to perform a selective transfer of data, you can try Dr.Fone - Phone Manager (iOS) as well. Go ahead and try these tools and teach others how to move music from Apple iPhone 6s to Android by sharing this guide.
Also read:
- [New] 2024 Approved How to Play YouTube in Background on iPhone and Android
- [New] Chorus Chronicles New Speaker Insights for 2024
- 1. Comprehensive Guide: Capturing In-Game Sounds & Vocal Commentary During Live Play
- 2024 Approved Elite Exploration The New Parrot AR Edition
- 3 Ways to Export Contacts from Apple iPhone 7 to Excel CSV & vCard Easily | Dr.fone
- Discovering TikTok's Most Shared Meals
- In 2024, 4 Ways to Transfer Music from Apple iPhone 6 to iPod touch | Dr.fone
- In 2024, How to Detect and Remove Spyware on Samsung Galaxy M54 5G? | Dr.fone
- In 2024, How to Move Custom Ringtones from Apple iPhone 14 to Android? | Dr.fone
- In 2024, iPhone Transfer Transfer Contact from Apple iPhone 7 Plus to iPhone without iCloud | Dr.fone
- In 2024, Methods to Transfer from Apple iPhone 11 Pro Max to Android | Dr.fone
- In 2024, PassFab Apple iPhone 13 mini Backup Unlocker Top 4 Alternatives
- In 2024, Solved How To Transfer From Apple iPhone 13 Pro to iPhone 15 | Dr.fone
- Overcoming Issues with Windows & Steam Remote Play
- Step-by-Step Tutorial on Repairing a Failed Remote Server Link
- Switch Cards Between Apple iPhone 7 Plus and other iPhones Will Move All Phone Services? | Dr.fone
- Title: In 2024, Easy Methods How To Transfer Pictures From Apple iPhone 6s to PC | Dr.fone
- Author: Charlotte
- Created at : 2024-10-07 21:04:12
- Updated at : 2024-10-11 20:44:05
- Link: https://iphone-transfer.techidaily.com/in-2024-easy-methods-how-to-transfer-pictures-from-apple-iphone-6s-to-pc-drfone-by-drfone-transfer-from-ios/
- License: This work is licensed under CC BY-NC-SA 4.0.