
In 2024, Complete Tutorial Sending Photos From Apple iPhone 6 to iPad | Dr.fone
Complete Tutorial: Sending Photos From Apple iPhone 6 to iPad
Among the array of iOS devices, the iPhone and iPad stand as popular companions for capturing and storing precious moments. However, navigating the process of transferring photos from Apple iPhone 6 to iPad can sometimes feel daunting. Fortunately, with the evolution of Apple’s ecosystem, it has become a straightforward task.
Now, the process can be managed with various methods and tools available at your disposal. The guide aims to effortlessly transfer your photos from an iPhone to an iPad. From utilizing iCloud and AirDrop to exploring third-party applications, we’ll cover step-by-step instructions.

Part 1: How To Transfer Photos From Apple iPhone 6 to iPad Using AirDrop
AirDrop stands as one of the most convenient and straightforward methods. It can transfer photos between Apple devices wirelessly. This functionality employs Bluetooth and Wi-Fi to establish a direct link between your iPhone and iPad. That enables smooth photo sharing without requiring additional cables or an internet connection. Here’s a detailed guide outlining the process of how to transfer photos from Apple iPhone 6 to iPad using AirDrop:
- Step 1. On your iPhone and iPad, swipe down from the top right corner to open the Control Center. Tap and hold the connectivity panel; within, press and hold the network connectivity box that includes AirDrop. Choose “Contacts Only” or “Everyone” to enable AirDrop visibility.

- Step 2. To begin, access the Photos app on your iPhone and pick the photos you’d like to transfer to your iPad. Afterward, select the “Share” icon within the app, and from the available options, opt for “AirDrop.” Look for your iPad in the AirDrop panel displayed and tap on it to start the transfer process.

- Step 3. When your iPad receives the notification prompting you to accept the incoming photos from the iPhone, tap “Accept.” The selected images will be saved to your iPad’s Photos app.

Part 2: How To Transfer Photos From Apple iPhone 6 to iPad Using iCloud Sync
iCloud offers a smooth way to synchronize photos across your Apple devices. It ensures your photo library remains up-to-date without manual intervention. Enabling iCloud Photos automatically uploads your images to iCloud, allowing access from any device linked to the same Apple ID. Here’s a guide to transfer photos from Apple iPhone 6 to iPad automatically via iCloud:
- Step 1. Begin by accessing your iPhone’s Settings and tapping your name at the top. On the following screen, choose “iCloud” followed by “Photos” on the next window. Here, ensure that “Sync this iPhone” is toggled for iCloud Photos.

- Step 2. Now, move to iPad and ensure you are logged in with the same Apple ID. Then, go to “Settings,” tap the name, press “iCloud,” and tap “Photos.” Here, you need to toggle on the “Sync this iPad” option. Afterward, wait for some time to let the syncing process complete. The speed of synchronization depends on your internet connection and the number of photos being uploaded.

Part 3: One-Click Innovative Solution To Transfer Photos From Apple iPhone 6 to iPad
Wondershare Dr.Fone presents an innovative and user-friendly solution. It offers a comprehensive way to transfer photos between your iPhone and iPad. This software provides a straightforward method to transfer photos selectively or entirely. Moreover, when using it, you are no longer bound by the constraints of iCloud or AirDrop. The following are the detailed guides for transferring photos using Wondershare Dr.Fone:
3.1 Transfer Selective Photos from Apple iPhone 6 to iPad
Wondershare Dr.Fone is an intelligent iPhone transfer and management solution. It is designed to streamline your data handling. With its array of functions, you can manage your data through importing, exporting, and deletion processes. This tool offers the convenience of quick file transfers by simply dragging and dropping files. Here is how to add photos from Apple iPhone 6 to iPad using Wondershare Dr.Fone:
- Step 1: Install and Open the Latest Wondershare Dr.Fone App
You can begin by installing the latest version of Wondershare Dr.Fone from its official website. Once installed, launch it and connect your iPhone and iPad to the computer. When the Apple iPhone 6 devices are detected by Dr.Fone, click on the “iPhone” name to expand it in the left panel.

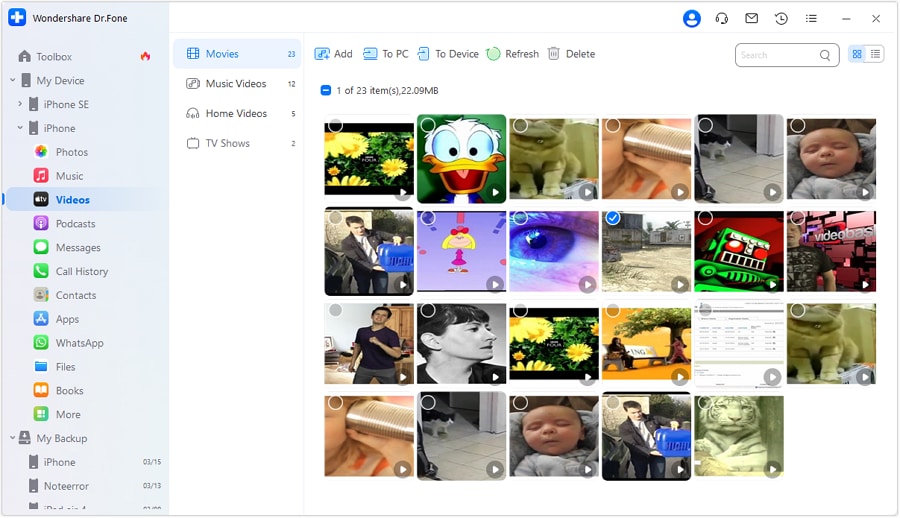
- Step 2: Transfer the Photos to the iPad from the iPhone
From the expanded options, choose “Photos” to access your iPhone’s photos. Here, select the files you want to transfer and click “To Device.” Now, choose the “iPad” from the available options, and the photos will be transferred in no time. You can send as many as you like without any constraints.
3.2 Transfer All Photos From Apple iPhone 6 to iPad
When moving photos in bulk from Apple iPhone 6 to iPad, Wondershare Dr.Fone also got you covered. It offers a powerful phone transfer feature that can transfer over 18 types of data from one device to another. Dr.Fone simplifies the process of transferring data between phones with just one click. It facilitates the smooth transfer of various data types, like photos. You can follow these simplified steps to transfer photos from Apple iPhone 6 to iPad:
- Step 1: Navigate to Phone Transfer within Wondershare Dr.Fone
Once you have launched Wondershare Dr.Fone, connect the iPhone and iPad to the computer. Then, click “Toolbox” from the left side panel and tap the “Phone Transfer” option from the available choices. Then, you will be asked to position your devices correctly for data transfer.

- Step 2: Successfully Complete the Photos Transfer Process
When assigning positions, the iPhone will be the “Source” device. On the other hand, the iPad will become the “Destination” device. You can use the “Flip” to change the Apple iPhone 6 devices’ positions. Afterward, select “Photos” from the data and click “Start Transfer” to initiate the process.

Part 4: How To Transfer Photos From Apple iPhone 6 to iPad Using iTunes/Finder
iTunes or Finder can also be used to transfer photos from your iPhone to your iPad. It is the official Apple software for music, media, and backup management. Yet, iTunes/Finder can assist in manually syncing photos between your iOS devices. The steps needed to transfer photos from Apple iPhone 6 to iPad automatically are given below:
- Step 1. Connect your iPhone to the PC or Mac and open the Photos app. In the Photos app, tap “Import,” select your iPhone, and wait for the computer to load photos from the iPhone. Once they are loaded, choose to transfer the targeted to the computer.

- Step 2. When photos are moved to your computer, unplug the iPhone and link your iPad. Now run the latest version of iTunes/Finder on your PC/Mac and tap the Apple iPhone 6 device icon. Here, choose “Photos” from the left panel and check the box next to “Sync Photos.”

- Step 3. Now, choose the folder where you moved photos from the iPhone in the drop-down box. After that, hit the “Apply” button and wait for the images to sync with the iPad.

Part 5: How To Transfer Photos From Apple iPhone 6 to iPad Using Social Media Apps
Social media apps can serve as a convenient platform for transferring photos. Numerous options are available for transferring pictures, and one of the widely used applications is WhatsApp. It is known for its communication features. Moreover, it enables users to share images and media files across various devices. Here’s a guide on how to transfer photos from Apple iPhone 6 to iPad via WhatsApp:
- Step 1. After ensuring WhatsApp is running on both devices, open WhatsApp on iPhone. Tap the new chat icon to start a conversation with a WhatsApp account logged in on the iPad. Now, tap the “+” icon and choose either “Document,” “Camera,” or “Gallery” and pick the desired images. After selecting the photos, tap “Send” to transfer them to iPad.

- Step 2. Proceed to the iPad and launch the “WhatsApp Web” on Safari. Following this, access your conversations and download the images you received to complete the transfer process.

Part 6: How To Transfer Photos From Apple iPhone 6 to iPad Using Email
Utilizing email provides a direct and frequently used approach for transferring photos between your iPhone and iPad. However, it might not be suitable for larger quantities of high-resolution images due to attachment size limits. Nevertheless, it is effective for smaller batches of images. Here’s a detailed guide on how to utilize email for transferring photos between your iPhone and iPad:
- Step 1. Access the email app on your iPhone and initiate a new email. Input your iPad email address in the recipient field. Next, tap on the “Attachment” icon to select the images you want to send.

- Step 2. Move to your iPad and on the “Mail” app there. Now navigate to “Inbox” and open the newly received email. Tap the attachments and save them to your device to complete the transfer process.

Conclusion
Transferring photos between your iPhone and iPad is an essential task for many users. Throughout this guide, we’ve explored various methods to transfer photos from Apple iPhone 6 to iPad. These ranged from native Apple services like AirDrop, iCloud, and iTunes/Finder to unconventional approaches such as social media apps and email. Each method offers its advantages.
Yet, considering factors like convenience, ease of use, and efficiency, one option stands out as a versatile and user-friendly solution: Wondershare Dr.Fone. This innovative third-party software provides a hassle-free way to transfer photos between iOS devices. It offers both selective and bulk transfer options with a straightforward interface.
4 Ways to Transfer Music from Apple iPhone 6 to iPod touch
Although the Apple iPods have been discontinued, many old users still use them as music players. As we all know, if you want to transfer music from Apple iPhone 6 to iPod, you can just log in with the same Apple ID and then download the songs you purchased on the iPod touch. However, how can you transfer the music that is saved on other devices to your iPod? Don’t worry, this detailed guide introduces 4 ways to transfer music from Apple iPhone 6 to iPod touch, just keep reading!
Part 1: Easy and powerful way to transfer music from Apple iPhone 6 to iPod
A great tool for the purpose of easy transfer of music between iOS devices is Dr.Fone - Phone Transfer . This tool makes life easy for people who want to switch to a new smartphone or are looking for solutions to sync not only music but also contacts, messages, call logs, photos, etc. between different smartphones.
Dr.Fone - Phone Transfer
1-Click Phone to Phone Transfer
- Easy, fast, and safe.
- Move data between devices with different operating systems, i.e iOS to Android.
- Supports iOS devices that run the latest iOS version

- Transfer photos, text messages, contacts, notes, and many other file types.
- Supports over 8000+ Android devices. Works for all models of iPhone, iPad, and iPod.

4,495,115 people have downloaded it
How to use transfer music from Apple iPhone 6 to iPod
Step 1. Download and install Dr.Fone on your computer. Run it and select Phone Transfer. Connect your iPhone and iPod with your computer, and Dr.Fone will detect your iOS devices automatically.

Step 2. Select Music and other file types you would like to transfer and click on Start Transfer.

Step 3. Then just sit and have a cup of coffee. All music files will be transferred from Apple iPhone 6 to iPod successfully.

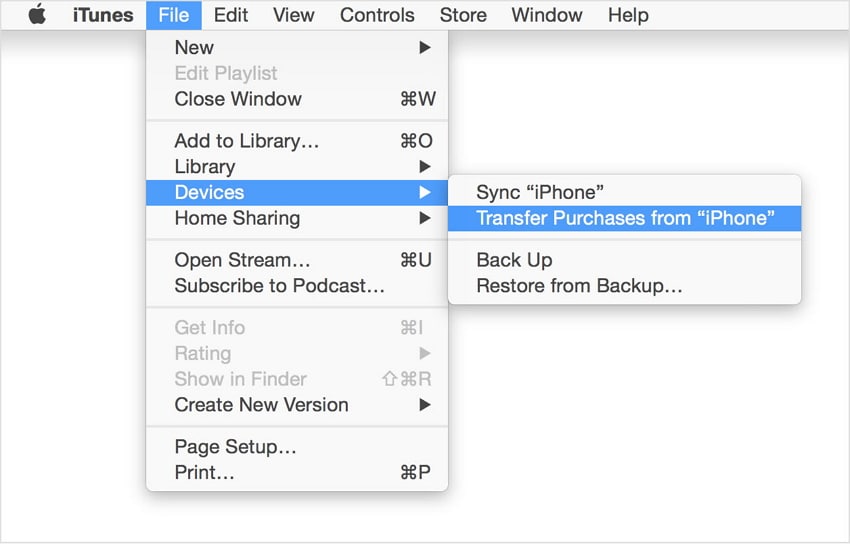
Part 2: Transfer Music purchased from the iTunes Store from Apple iPhone 6 to iPod using iTunes
In case, you have purchased music from iTunes and want it to transfer from your iPhone to iPod, there is no direct way to the process. For it to be done, you need to re-download previous iTunes Store purchases on your computer. The best thing for this to be done, is that no extra cost is required to be done till the time, the same ID is used for the same purpose.
Then you need to follow the following steps for the process to be done. On the computer, in iTunes, go to the iTunes Store. Then you need to click ‘Purchased’, which is available in the Quick Links on the Home screen. Then you need to find the songs that are on the iPhone, but not in your computer’s iTunes library. Then, click the ‘cloud’ button next to the song name to download it. The last step of syncing remains which can be done as desired. Just sync those songs from your iTunes library to your iPod as desired and you are done with the job of Transfer Music Purchased from the iTunes store from Apple iPhone 6 to iPod.
Part 3: Transfer Music purchased from the iTunes Store from Apple iPhone 6 to iPod using iTunes match
iTunes match is another way to process of transfer music purchased or unpurchased from iTunes from Apple iPhone 6 to iPod. In fact, iTunes match determines the song, which is present in the iCloud and since there are over 43 million songs, iTunes match matches these unpurchased songs with the database and allows playing these music from the iCloud store. Now, you just need to tap the iCloud download button to download music from an artist, album or playlist. Thus, a person has immediate access to a huge music library without having to worry about the storage space on your device.
Part 4: Transfer Music imported from a CD or other source from Apple iPhone 6 to iPod
For this process to complete, you need to import all songs from CD to iTunes at first. Here is the process for the complete transfer of Music from CD and other sources.
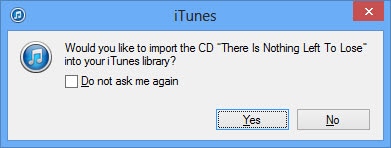
Open iTunes and insert the CD that you wish to import into the disc drive
The options might appear in an instant. If you want to import every song on the disc, select yes and click No, in case you want specific music to import.
In case, you clicked on ‘NO’, Select the menu on the top-left side of the iTunes window and select the audio CD in the list.
Then, check the files you want to import to iTunes, then select Import CD.
The preferences option appears and you need to select the preferences and click OK after the preference has been done.
In case, the music library already contains tracks from the album, which you are importing, you will receive a prompt window to overwrite them. You can select either Replace Existing or Don’t Replace as your wish.
Then you have to wait till the music is ripped to the iTunes library.
As soon as the import is complete, attach your device to the computer.
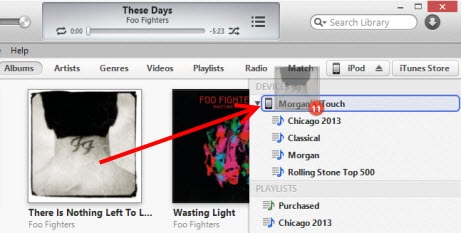
You can now drag the album to the right side of the iTunes window where a pane will appear containing the music on your device. Drop it right on your iPod or other devices.
All remains is to eject the iPod and enjoy your music


How to Transfer Data from iOS Devices to Motorola Phones
Issues about transferring data from Apple iPhone 6 to Motorola G5/G5Plus
There are several items like contacts and calendar that you could transfer from Apple iPhone 6 to Motorola phone. Usually you can use Migrate application after you downloaded and installed on your phone. After you open the app you should enter your logins for iCloud and the transfer of your data will start when you login into your Google account, too. You should know that several contact and calendar field names differ between iCloud and Google, like “Work – Phone” in iCloud is “Phone” in Google. But probably this is not the big issue.
One bigger problem can be that you could have duplicate contacts after transferring your data. If you have the same contacts for example in your iCloud and in your Google account, those contacts will be duplicated. Even it is a slower way, you could try to merge similar contacts by going to your contacts in Gmail, highlighting your iCloud contact group and select “Find and merge duplicates”.
For calendar, one issue might be that the new calendar data are not shown on your phone. If you cannot find the best method that works for you, like syncing the calendar from iCloud or syncing from your Google account, you should start over with the migration of data. It is a little embarrassing to start over and over again with transferring the data.
Part 1: Easy solution - 1 click to transfer data from Apple iPhone 6 to Motorola G5
Dr.Fone - Phone Transfer can be used for transferring data from to phone to another phone like messages, contacts, call logs, calendar, photos, music, video and apps. Also you can back up your iPhone and save the data on your pc, for example, and restore later when you wish. Basically all your necessary data can be transferred fast from a phone to another phone.
Dr.Fone - Phone Transfer
Transfer Data from iOS Devices to Motorola Phones in 1 click!
- Easily transfer photos, videos, calendar, contacts, messages and music from iOS Devices to Motorola Phones.
- Enable to transfer from HTC, Samsung, Nokia, Motorola and more to iPhone 15/14/13/12/11/X and former.
- Works perfectly with Apple, Samsung, HTC, LG, Sony, Google, HUAWEI, Motorola, ZTE, Nokia and more smartphones and tablets.
- Fully compatible with major providers like AT&T, Verizon, Sprint and T-Mobile.
- Fully compatible with iOS 17 and Android 13
- Fully compatible with Windows 10 and Mac 14.
3,860,614 people have downloaded it
Motorola devices supported by Dr.Fone are Moto G5, Moto G5 Plus, Moto X, MB860, MB525, MB526, XT910, DROID RAZR, DROID3, DROIDX. The actions that you could do with Dr.Fone are transferring data from Android to iOS and to Android, from iOS to Android, from iCloud to Android, converting audio and video, restoring any supported phone from backup files, erasing the Android device, iPhone, iPad and iPod touch.
Steps to transfer data from Apple iPhone 6 to Motorola phones
1. Connect your iPhone and your Motorola phone to the computer
Both your phones should have an USB cable. Take the USB cables and connect your phones to your computer. Open Dr.Fone and enter the Switch window. Dr.Fone detect fast your both phones if they are properly connected.
Tips: Dr.Fone also has an Android app that can transfer iOS data to Motorola phone without relying on a PC. This app even allows you to access and get iCloud data on your Android.
You can choose to flip between the two devices, also. You will see all your data like contacts, text messages, calendar, call logs, apps, photos, music, videos and you can select the data that you need to be transferred. If you wish, you can clean the data before to start copying the new data on your device.

2. Start to transfer the data from your iPhone to your Motorola phone
After you choose the data that you wish to be transferred, all your data or just a few, you must to use the “Start Transfer” button. You will be able to see the data from your source iPhone that can be transferred to your destination Motorola phone.
As you know, iOS operating systems and the Android operating systems are different and the data cannot be shared from one to another of this two different devices. This why, instead using the manually method, you can use Dr.Fone - Phone Transfer to transfer data from an iPhone to a Motorola phone.
Part 2: Which Motorola device do you use?
List at least 10 popular Motorola devices in US.
Moto X, the phone with the 5.2 inches HD display and 1080p you can see all your videos, photos captured with the 13 MP camera, in a good way. Also, the glass is water-resistant and protect your phone.
Moto G (2nd Gen.), the smartphone with the latest Android operating system and stereo sound.
Moto G (1st Gen.), with the 4.5 inches sharp HD display.
Moto E (2nd Gen.), the phone having the fast processor with 3G or 4G LTE, the connection is made easy.
Moto E (1st Gen.), having a long life all-day battery and Android KitKat operating system.
Moto 360, the smart watch displays notifications based on where you are and what you are doing, like flying departures. With the voice control, you can send text messages, check the weather, or ask for directions to the work place or leisure place.
Nexus6, having an amazing 6 inches HD display, offers one of the high quality preview and view of your media files.
From the Motorola DROID category, you can utilize:
Droid Turbo, the smartphone having 21 MP camera lets you shoot amazing photos.
Droid Maxx, is water – resistant and the rain should be no pain for you.
Droid Mini, is the small phone that you can use fast for your needs having Android KitKat.
Also read:
- [Updated] Unveiling the Past Essential Historical YT Creators for Students for 2024
- 2024 Approved Comprehensive Techniques to Download Thousands of TikTok Videos
- 網路直接 VOB 到 ASF 無成本轉化 - 使用 Movavi 視頻工具
- 網路直接無成本改變TS文件成VOB格式 - 使用Movavi轉換器
- Complete Tutorial to Use VPNa to Fake GPS Location On Nokia G22 | Dr.fone
- Easy Methods How To Transfer Pictures From Apple iPhone 6s Plus to PC | Dr.fone
- How To Transfer Data from Apple iPhone 6s to New iPhone 15 | Dr.fone
- In 2024, 4 Ways to Transfer Music from Apple iPhone 11 Pro to iPod touch | Dr.fone
- In 2024, 6 Methods for Switching from Apple iPhone 15 Pro to Samsung | Dr.fone
- In 2024, Complete Tutorial Sending Photos From Apple iPhone 13 Pro Max to iPad | Dr.fone
- In 2024, How to Change your Apple iPhone 12 Pro Location on Twitter | Dr.fone
- In 2024, How to Copy Contacts from Apple iPhone 13 to SIM? | Dr.fone
- In 2024, Pinnacle Workshop Moniker Composer
- In 2024, Switch Cards Between Apple iPhone XS and other iPhones Will Move All Phone Services? | Dr.fone
- Solutions for Fixing Detroit: Become Human PC Malfunctions and Crashes
- Strategies to Correct Token Misreference Errors on Win10/Win11
- Title: In 2024, Complete Tutorial Sending Photos From Apple iPhone 6 to iPad | Dr.fone
- Author: Charlotte
- Created at : 2024-10-16 11:37:18
- Updated at : 2024-10-18 07:07:34
- Link: https://iphone-transfer.techidaily.com/in-2024-complete-tutorial-sending-photos-from-apple-iphone-6-to-ipad-drfone-by-drfone-transfer-from-ios/
- License: This work is licensed under CC BY-NC-SA 4.0.