
In 2024, Complete Tutorial Sending Photos From Apple iPhone 14 Pro to iPad | Dr.fone
Complete Tutorial: Sending Photos From Apple iPhone 14 Pro to iPad
Among the array of iOS devices, the iPhone and iPad stand as popular companions for capturing and storing precious moments. However, navigating the process of transferring photos from Apple iPhone 14 Pro to iPad can sometimes feel daunting. Fortunately, with the evolution of Apple’s ecosystem, it has become a straightforward task.
Now, the process can be managed with various methods and tools available at your disposal. The guide aims to effortlessly transfer your photos from an iPhone to an iPad. From utilizing iCloud and AirDrop to exploring third-party applications, we’ll cover step-by-step instructions.

Part 1: How To Transfer Photos From Apple iPhone 14 Pro to iPad Using AirDrop
AirDrop stands as one of the most convenient and straightforward methods. It can transfer photos between Apple devices wirelessly. This functionality employs Bluetooth and Wi-Fi to establish a direct link between your iPhone and iPad. That enables smooth photo sharing without requiring additional cables or an internet connection. Here’s a detailed guide outlining the process of how to transfer photos from Apple iPhone 14 Pro to iPad using AirDrop:
- Step 1. On your iPhone and iPad, swipe down from the top right corner to open the Control Center. Tap and hold the connectivity panel; within, press and hold the network connectivity box that includes AirDrop. Choose “Contacts Only” or “Everyone” to enable AirDrop visibility.

- Step 2. To begin, access the Photos app on your iPhone and pick the photos you’d like to transfer to your iPad. Afterward, select the “Share” icon within the app, and from the available options, opt for “AirDrop.” Look for your iPad in the AirDrop panel displayed and tap on it to start the transfer process.

- Step 3. When your iPad receives the notification prompting you to accept the incoming photos from the iPhone, tap “Accept.” The selected images will be saved to your iPad’s Photos app.

Part 2: How To Transfer Photos From Apple iPhone 14 Pro to iPad Using iCloud Sync
iCloud offers a smooth way to synchronize photos across your Apple devices. It ensures your photo library remains up-to-date without manual intervention. Enabling iCloud Photos automatically uploads your images to iCloud, allowing access from any device linked to the same Apple ID. Here’s a guide to transfer photos from Apple iPhone 14 Pro to iPad automatically via iCloud:
- Step 1. Begin by accessing your iPhone’s Settings and tapping your name at the top. On the following screen, choose “iCloud” followed by “Photos” on the next window. Here, ensure that “Sync this iPhone” is toggled for iCloud Photos.

- Step 2. Now, move to iPad and ensure you are logged in with the same Apple ID. Then, go to “Settings,” tap the name, press “iCloud,” and tap “Photos.” Here, you need to toggle on the “Sync this iPad” option. Afterward, wait for some time to let the syncing process complete. The speed of synchronization depends on your internet connection and the number of photos being uploaded.

Part 3: One-Click Innovative Solution To Transfer Photos From Apple iPhone 14 Pro to iPad
Wondershare Dr.Fone presents an innovative and user-friendly solution. It offers a comprehensive way to transfer photos between your iPhone and iPad. This software provides a straightforward method to transfer photos selectively or entirely. Moreover, when using it, you are no longer bound by the constraints of iCloud or AirDrop. The following are the detailed guides for transferring photos using Wondershare Dr.Fone:
3.1 Transfer Selective Photos from Apple iPhone 14 Pro to iPad
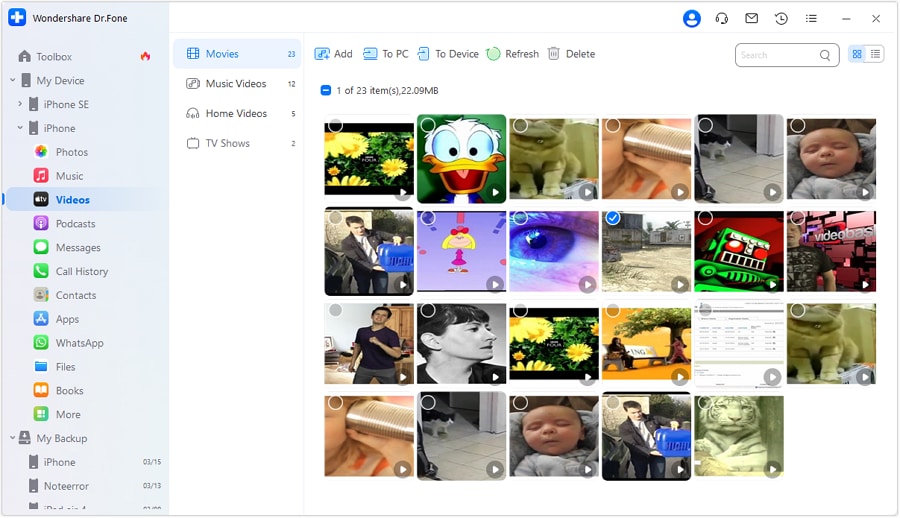
Wondershare Dr.Fone is an intelligent iPhone transfer and management solution. It is designed to streamline your data handling. With its array of functions, you can manage your data through importing, exporting, and deletion processes. This tool offers the convenience of quick file transfers by simply dragging and dropping files. Here is how to add photos from Apple iPhone 14 Pro to iPad using Wondershare Dr.Fone:
- Step 1: Install and Open the Latest Wondershare Dr.Fone App
You can begin by installing the latest version of Wondershare Dr.Fone from its official website. Once installed, launch it and connect your iPhone and iPad to the computer. When the Apple iPhone 14 Pro devices are detected by Dr.Fone, click on the “iPhone” name to expand it in the left panel.

- Step 2: Transfer the Photos to the iPad from the iPhone
From the expanded options, choose “Photos” to access your iPhone’s photos. Here, select the files you want to transfer and click “To Device.” Now, choose the “iPad” from the available options, and the photos will be transferred in no time. You can send as many as you like without any constraints.
3.2 Transfer All Photos From Apple iPhone 14 Pro to iPad
When moving photos in bulk from Apple iPhone 14 Pro to iPad, Wondershare Dr.Fone also got you covered. It offers a powerful phone transfer feature that can transfer over 18 types of data from one device to another. Dr.Fone simplifies the process of transferring data between phones with just one click. It facilitates the smooth transfer of various data types, like photos. You can follow these simplified steps to transfer photos from Apple iPhone 14 Pro to iPad:
- Step 1: Navigate to Phone Transfer within Wondershare Dr.Fone
Once you have launched Wondershare Dr.Fone, connect the iPhone and iPad to the computer. Then, click “Toolbox” from the left side panel and tap the “Phone Transfer” option from the available choices. Then, you will be asked to position your devices correctly for data transfer.

- Step 2: Successfully Complete the Photos Transfer Process
When assigning positions, the iPhone will be the “Source” device. On the other hand, the iPad will become the “Destination” device. You can use the “Flip” to change the Apple iPhone 14 Pro devices’ positions. Afterward, select “Photos” from the data and click “Start Transfer” to initiate the process.

Part 4: How To Transfer Photos From Apple iPhone 14 Pro to iPad Using iTunes/Finder
iTunes or Finder can also be used to transfer photos from your iPhone to your iPad. It is the official Apple software for music, media, and backup management. Yet, iTunes/Finder can assist in manually syncing photos between your iOS devices. The steps needed to transfer photos from Apple iPhone 14 Pro to iPad automatically are given below:
- Step 1. Connect your iPhone to the PC or Mac and open the Photos app. In the Photos app, tap “Import,” select your iPhone, and wait for the computer to load photos from the iPhone. Once they are loaded, choose to transfer the targeted to the computer.

- Step 2. When photos are moved to your computer, unplug the iPhone and link your iPad. Now run the latest version of iTunes/Finder on your PC/Mac and tap the Apple iPhone 14 Pro device icon. Here, choose “Photos” from the left panel and check the box next to “Sync Photos.”

- Step 3. Now, choose the folder where you moved photos from the iPhone in the drop-down box. After that, hit the “Apply” button and wait for the images to sync with the iPad.

Part 5: How To Transfer Photos From Apple iPhone 14 Pro to iPad Using Social Media Apps
Social media apps can serve as a convenient platform for transferring photos. Numerous options are available for transferring pictures, and one of the widely used applications is WhatsApp. It is known for its communication features. Moreover, it enables users to share images and media files across various devices. Here’s a guide on how to transfer photos from Apple iPhone 14 Pro to iPad via WhatsApp:
- Step 1. After ensuring WhatsApp is running on both devices, open WhatsApp on iPhone. Tap the new chat icon to start a conversation with a WhatsApp account logged in on the iPad. Now, tap the “+” icon and choose either “Document,” “Camera,” or “Gallery” and pick the desired images. After selecting the photos, tap “Send” to transfer them to iPad.


- Step 2. Proceed to the iPad and launch the “WhatsApp Web” on Safari. Following this, access your conversations and download the images you received to complete the transfer process.

Part 6: How To Transfer Photos From Apple iPhone 14 Pro to iPad Using Email
Utilizing email provides a direct and frequently used approach for transferring photos between your iPhone and iPad. However, it might not be suitable for larger quantities of high-resolution images due to attachment size limits. Nevertheless, it is effective for smaller batches of images. Here’s a detailed guide on how to utilize email for transferring photos between your iPhone and iPad:
- Step 1. Access the email app on your iPhone and initiate a new email. Input your iPad email address in the recipient field. Next, tap on the “Attachment” icon to select the images you want to send.

- Step 2. Move to your iPad and on the “Mail” app there. Now navigate to “Inbox” and open the newly received email. Tap the attachments and save them to your device to complete the transfer process.

Conclusion
Transferring photos between your iPhone and iPad is an essential task for many users. Throughout this guide, we’ve explored various methods to transfer photos from Apple iPhone 14 Pro to iPad. These ranged from native Apple services like AirDrop, iCloud, and iTunes/Finder to unconventional approaches such as social media apps and email. Each method offers its advantages.
Yet, considering factors like convenience, ease of use, and efficiency, one option stands out as a versatile and user-friendly solution: Wondershare Dr.Fone. This innovative third-party software provides a hassle-free way to transfer photos between iOS devices. It offers both selective and bulk transfer options with a straightforward interface.
How To Transfer Data from Apple iPhone 14 Pro to New iPhone 15
Upgrading to a new iPhone 15 is always an exciting prospect. However, the thought of transferring all your data from your Apple iPhone 14 Pro to the new iPhone 15 model might seem like a daunting task. Luckily, there is no need to worry, as this guide will resolve all your concerns on how to transfer to the new iPhone 15.
In this detailed article, we explore the process of transferring data from an old iPhone to a new one. Our step-by-step approach will equip you with the knowledge to move your valuable data.
Part 1: Why Should You Shift From Your Apple iPhone 14 Pro to iPhone 15?
In the realm of smartphones, change is not just inevitable; it’s a constant. With the unveiling of the iPhone 15, Apple once again beckons users to take a leap forward. However, you might be wondering why you should bid farewell to your Apple iPhone 14 Pro . The answer lies in the myriad of improvements and features that the iPhone 15 brings to the table. Some of these are summarized below:
1. Cutting-Edge Technology
The iPhone 15 is an example of Apple’s commitment to pushing the boundaries of technology. It offers advancements in processing power, camera capabilities, and display technology. This new iPhone promises to redefine what a smartphone can do.
2. Enhanced Camera Systems
For photography fans, the iPhone 15’s camera system is nothing short of revolutionary. From improved low-light performance to detailed zoom capabilities, it reaches a whole new level of quality.
3. Seamless Connectivity
The new iPhone 15 comes integrated with 5G technology. This ensures that you’ll be at the forefront of high-speed connectivity. You can say goodbye to buffering and lag because iPhone 15 promises smoother streaming, faster downloads, and a more responsive online experience.
4. Extended Software Support
With every new iPhone iteration, Apple launches its latest iOS firmware. Upgrading to the iPhone 15 means enjoying the latest iOS 17 updates. It also means getting security enhancements for years to come.
Part 2: How To Transfer Apple iPhone 14 Pro iCloud Backup to iPhone 15?
Transitioning to the new iPhone 15 is an exciting experience. It means you need to ensure that your data seamlessly makes the journey to the new iPhone 15. Apple provides a convenient way to transfer your data in the form of iCloud. You can create an iCloud backup of your old device and restore it to the new one. Use the following guide to transfer to iPhone 15 with iCloud:
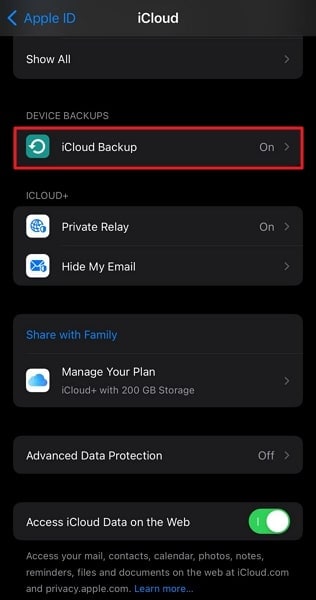
- Step 1: On your Apple iPhone 14 Pro , navigate to “Settings,” tap on your Apple ID, select “iCloud,” and then “iCloud Backup.” Here tap “Back Up Now” to create an iCloud back of your iPhone data.
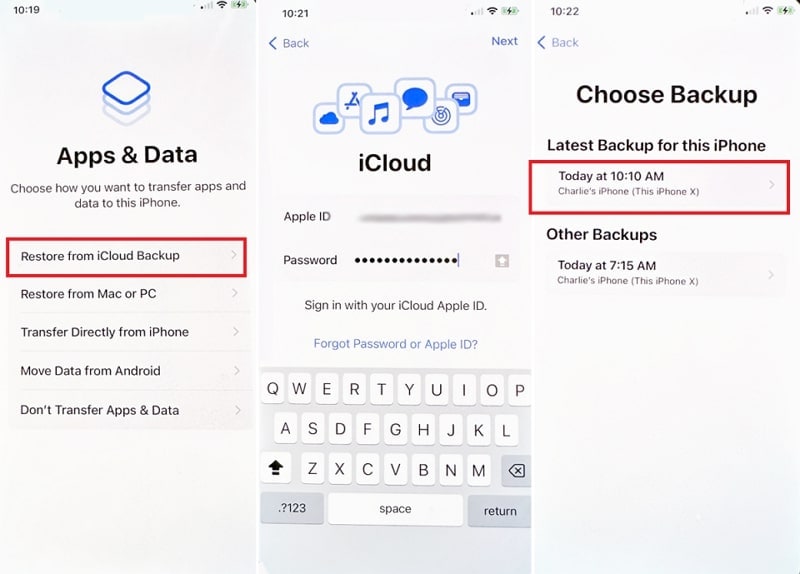
- Step 2: Power on your iPhone 15 and follow the setup prompts until you reach the “Apps & Data” screen. Then, proceed with the “Restore from iCloud Backup” feature and sign in using your Apple ID credentials.
- Step 3: A list of available iCloud backups will appear on the screen. Here you need to select the most recent backup from your Apple iPhone 14 Pro . Keep in mind that a reliable Wi-Fi connection is essential for a smooth and speedy transfer.
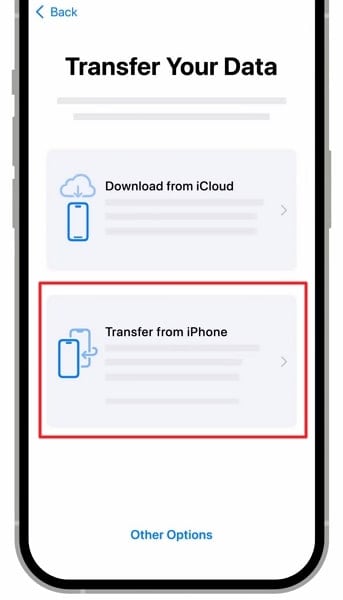
Part 3: How To Transfer Apple iPhone 14 Pro Data Directly to iPhone 15?
While iCloud offers a seamless way to transfer data, some users prefer a more direct approach. It is especially if internet connectivity is limited or they want to hurry the process. Luckily, Apple provides a method to transfer data directly from your Apple iPhone 14 Pro to the new one. It is commonly referred to as the “Quick Start” method, and you can use it by following these steps:
- Step 1: Before initiating the transfer, ensure that your Apple iPhone 14 Pro is on the latest version of iOS. You will also need to turn on Bluetooth and Wi-Fi on the old iPhone. Power on both your Apple iPhone 14 Pro and your new iPhone 15 and place them side by side.
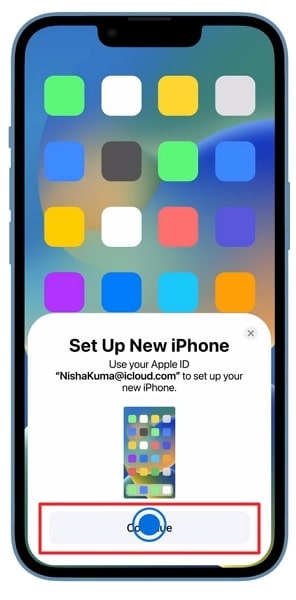
- Step 2: A pop-up will appear on your Apple iPhone 14 Pro , asking if you want to use your Apple ID to set up your new device. Confirm this action by tapping “Continue.” Your iPhone 15 will generate dynamic animation, which the old iPhone needs to capture through its camera.
- Step 3: This animation contains security information and establishes a connection between devices. On the new iPhone, you will be required to provide the old phone passcode. Enter the passcode and log in using your Apple ID. Subsequently, select “Transfer from iPhone” and patiently await the process to finish.
Part 4: How To Transfer Apple iPhone 14 Pro iTunes/Finder Backup to iPhone 15?
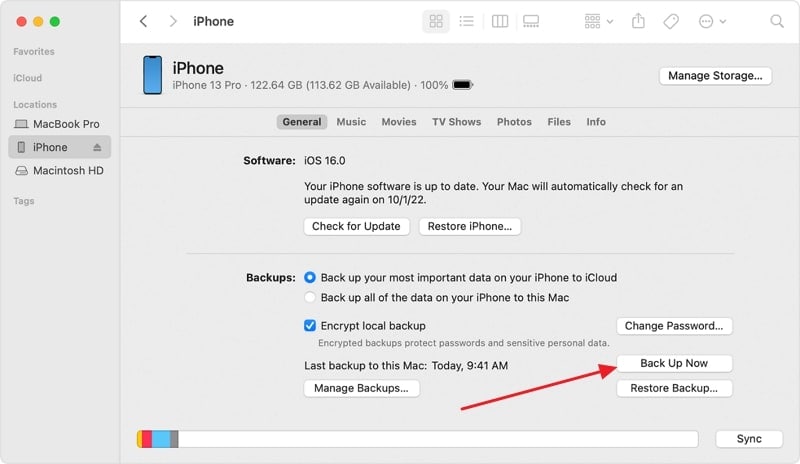
Looking for a more hands-on approach to data transfer? Using iTunes/Finder can be an effective way in this scenario. It is a recommended way if you have larger backups stored on your computer. To migrate your data from an old iPhone to the new iPhone 15 with iTunes/Finder, you can use the following steps:
- Step 1: Make sure you have the latest version of iTunes/Finder installed on your computer. First, connect your Apple iPhone 14 Pro to the computer and create a backup through the “Summary/General” tab. After the backup has finished, proceed to disconnect the old iPhone.
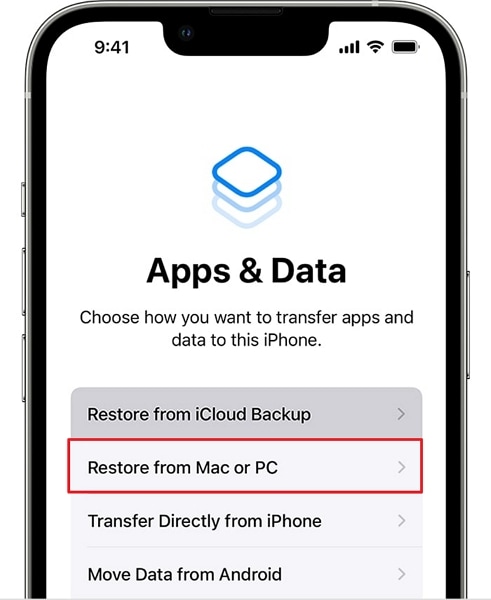
- Step 2: Now start setting up the new iPhone 15 and navigate to the “Apps & Data” screen. Here, choose “Restore from Mac or PC” and connect the Apple iPhone 14 Pro device to the computer or MacBook with backup.
- Step 3: Launch iTunes/Finder on the computer after trusting the Apple iPhone 14 Pro device and tap the “Device” icon. Then, from the “Welcome to Your New iPhone” screen, enable the “Restore from this backup” option and choose your Apple iPhone 14 Pro backup file. Afterward, press the “Continue” button to restore the old iPhone backup to your iPhone 15.

Bonus Tips: Having Trouble When Transferring to iPhone 15 Stucks?
The issue of iPhone 15 getting stuck when users attempt to transfer data from their older devices, like the iPhone 14, to the new iPhone 15 has become a frustrating challenge for many Apple enthusiasts. This problem often arises due to the complex nature of data migration and the high expectations associated with Apple’s seamless ecosystem. When attempting to transfer photos, apps, contacts, and other vital information, users may encounter lengthy delays, frozen screens, or failed transfers.
The possible reasons could be:
- ·Software glitches
- ·Insufficient storage space
- ·Incompatible iOS versions between the old and new devices
The impact of this issue extends beyond mere inconvenience, as it can result in data loss or a less-than-optimal out-of-the-box experience with the latest iPhone. Addressing this problem, you may try:
- ·Updating both devices to the latest iOS version
- ·Ensuring sufficient storage
- ·Seeking assistance from Apple Support
- ·Authorized service providers when necessary
Or, you can also try to ask for help from a third-party application, Dr.Fone - Phone Transfer is always at your service. Dr.Fone - Phone Transfer offers a reliable solution to the iPhone data transfer problem. This user-friendly software is designed to simplify the migration process, making it hassle-free for iPhone users. Here are the steps to get you started:
Step 1 Launch Phone Transfer Tool
Initiate the process by launching Wondershare Dr.Fone on the computer. Continue from Toolbox > Phone Transfer to redirect towards opening the particular tool.
Step 2 Set Data Transfer Path
On accessing the Phone Transfer tool, continue to connect your iOS devices and let them load their data on the next screen. Here, define the Source and Destination of the transfer to specify the direction of the phone transfer. To change locations, use the Flip button on the top.
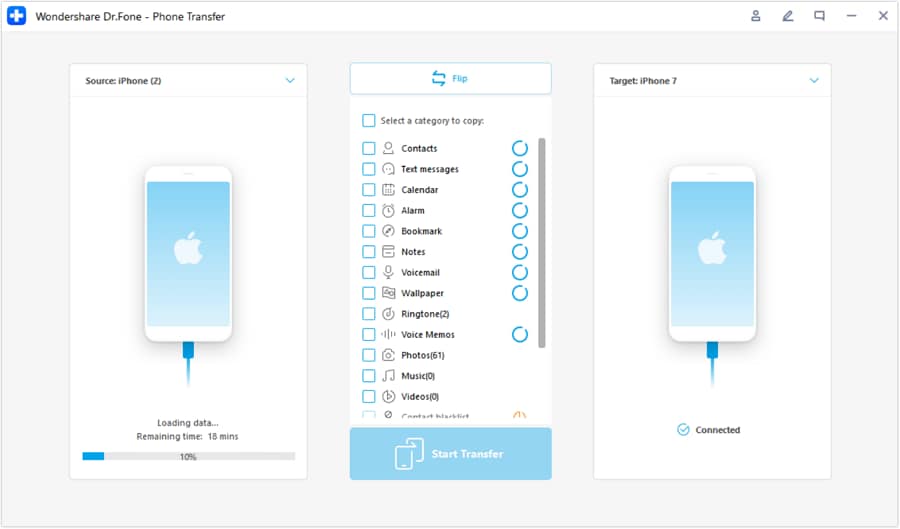
Step 3 Choose Data Types
After successfully determining the source and destination, select the specific data types you want to transfer. Checkmark all data and select Start Transfer to proceed with the operations.
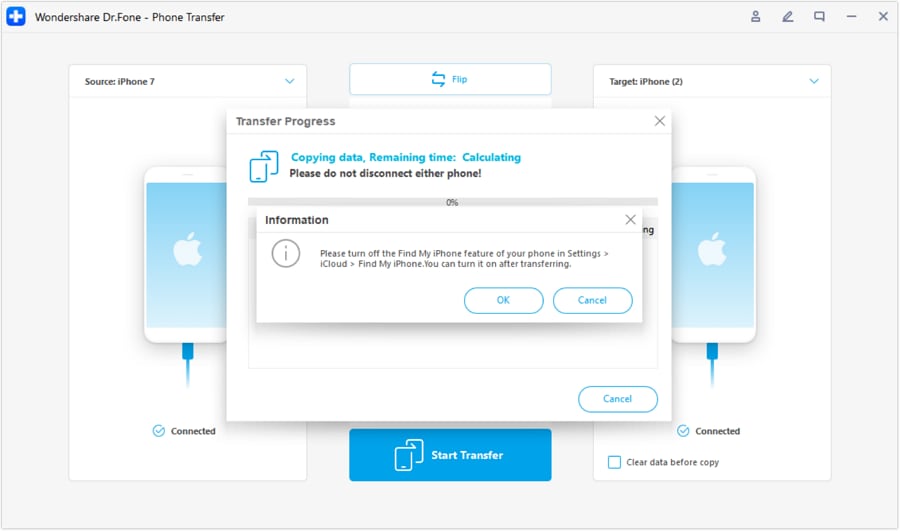
Step 4 Turn Off Find My Feature
Once done, a prompt appears on the front asking to turn off the Find My feature on iOS devices. Open the Settings of the iOS device and proceed further by tapping on the name at the top. Continue from iCloud > Find My feature and turn it off.
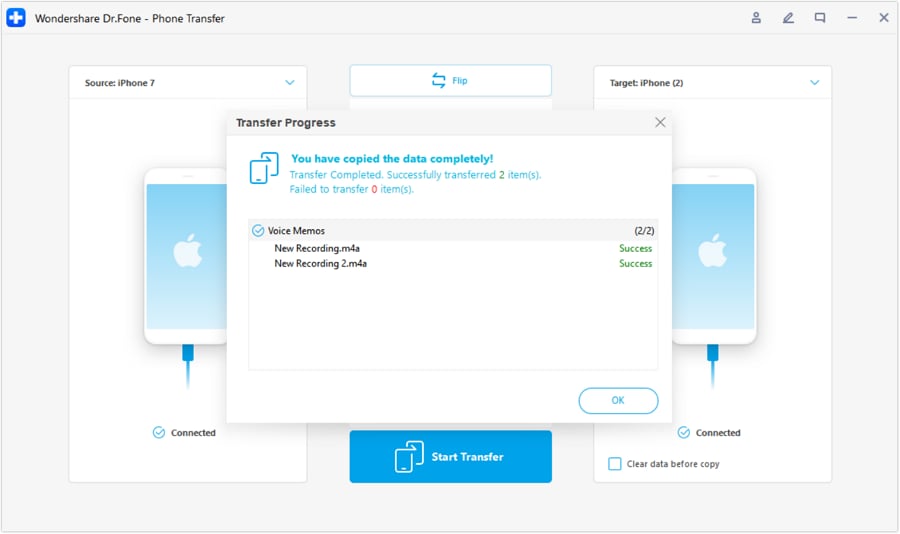
Step 5 Complete Your Transfer
Once done, the window in the front shows the completed phone transfer. Click OK to conclude the process entirely.
Conclusion
In summary, we’ve explored various methods to iPhone 15 transfer data. These ranged from iCloud to direct device-to-device transfers and iTunes/Finder. Each method offers its own advantages, catering to different preferences and circumstances.
However, one solution that truly stands out for its speed, ease, and efficiency is Wondershare Dr.Fone. It provides a fast and direct solution for transferring your data between your Apple iPhone 14 Pro and the iPhone 15.
How to Transfer Everything from Apple iPhone 14 Pro to iPhone
Well, you all know already from experience that transferring to an iPhone device from an Android phone is an uphill task, especially if you have no idea about the right way or the tool you should use. Transferring photos from one device to another one, should be done extra care as you wouldn’t want to lose your beloved memories, right?
Therefore, to transfer photos from Android to iPhone, such as iPhone 15, you will need third-party software, which is easy to access the application as well. Now, both Android and iPhone devices have different operating systems, which make it impossible to do direct transfers.
However, fortunately, there are plenty of high-quality third-party programs that can help you enable Android to iPhone photo transfer. So, start reading the guide below and choose the option that best suits you.
Part 1: How to transfer photos from Android to iPhone including iPhone 15/15 Pro(Max) with Dr.Fone?
If you are confused over which method you should choose for transferring photos from Android to iPhone, then compare the quality and the quickness of the chosen method. Well, to be frank, the tool that qualifies all these criteria is the Dr.Fone toolkit, which is a comprehensive solution that is well designed to tackle all mobile-related issues and tasks.
Dr.Fone is perfect because you can transfer across multiple devices regardless of OS. As an example, if you want to transfer photos from Android to iPad /iPhone and vice versa, it can be done easily by following two ways as mentioned below:
Method 1.1 One-click to Transfer Photos from Android to iPhone using Dr.Fone - Phone Transfer
Dr.Fone - Phone Transfer is a software package that facilitates cross-device transactions such as transferring photos from Android to iPhone. If you are in the process of replacing your Android with a new iPhone, then use Dr.Fone to transfer all contents to the new phone. The content can include photos, contacts, videos, and social media messages.
Dr.Fone - Phone Transfer
Transfer Data from Android to iPhone in 1 Click Directly!
- Cross-platform data shift between any device of your choice from Android and iPhone.
- Support massive data, including images, videos, music, messages, contacts, apps, and more.
- Works perfectly with almost mobile phones and tablets, such as iPhone, iPad, Samsung, Huawei, etc.
- Fully work with mobile system iOS 17 and Android 13 and computer system Windows 10 and Mac 14.
- 100% safe and risk-free, backup & restore data as the original.
3981454 people have downloaded it
Let us see the steps on how to transfer photos from Android to iPhone using Dr.Fone - Phone Transfer.
Step 1. Download and install Dr.Fone - Phone Transfer and launch it. Then select the Switch option from the main interface.
Step 2. Now, connect your Android and iPhone to the computer.
Step 3. As soon as you connect the Apple iPhone 14 Pro device, it will start recognizing it and mentioned it as the ‘Source’ phone or ‘Destination’ phone accordingly. In this case, make sure the Android phone is the Source, and the iPhone is the Destination. You can change their position using the Flip button.

Step 4. Finally, select the files you want to transfer (photos) and click on ‘Start Transfer’.

That was it. Soon, it will transfer pictures from Android to iPhone.
Method 1.2 Selectively Transfer photos from Android to iPhone using Dr.Fone - Phone Manager (Android)
Another way that can assist you in moving photos from Android to iPhone is the Dr.Fone - Phone Manager (Android) . What is incredibly convenient about Dr.Fone - Phone Manager (Android) is its ability to transfer photos selectively. You can also use it to transfer contacts, videos, messages, podcasts, and anything else stored on your Android in minutes. Dr.Fone - Phone Manager (Android) is a secure, trustworthy program. Hence you can be reassured that your information will be kept safe while transferring from one device to another.
Dr.Fone - Phone Manager (Android)
All in one Solution to Transfer Photos from Android to iPhone
- Transfer, backup, edit, export, import & view the data on your phone easily.
- Support multiple data on your phone: music, photos, videos, contacts, SMS, Apps, etc.
- Copy data from one phone to another phone without any data loss.
- Additional features to help you root your device, make gif image, and ringtone.
- Compatible with more than 3,000 Android phones ranging from Samsung to LG, HTC, Huawei, Motorola, Sony, etc.
3981454 people have downloaded it
Here either you can select the photos that you wish to transfer selectively or select all the photos at once. Now, as you wish to transfer photos to an iPhone device, connect your iPhone as the Target phone and then click on the box with the export symbol > Select Export to Device. The name of your iOS device should appear. Click on the Apple iPhone 14 Pro device to start transferring photos.
Part 2: Transfer photos from Android to iPhone including iPhone 15/15 Pro(Max) using Move to iOS App?
Now, to answer how to transfer photos from Android to iPhone, there is another simple solution that you can make use of. It is called the “Move to iOS app,” which you can download freely from the Google Play store.
Note: This solution only works when you set up the iPhone. If the iPhone is already set up, you need to factory reset it and set it up to restore photos with this App.
Now to proceed, first of all, you need to do some settings on your iPhone device as follows:
On your iPhone, go to a screen called ‘Apps & Data’ > choose ‘Move Data from Android’ option.


The next step is to take your Apple iPhone 14 Pro to complete the transfer process with the “Move to iOS” app.
- Switch to your Apple iPhone 14 Pro, open Google Play Store, and search for ‘Move to iOS’ app.
- Open the ‘Move to iOS’ app to accept permission requests, install it, and open the app.
- At this point, tap Continue on both your iOS and Android device.

- On your Apple iPhone 14 Pro, enter the 12-digit code of the iPhone. This is so that the ‘Move to iOS’ app knows which iOS device it has to transfer the data to.

Before the transfer starts, you will be asked a number of questions, like do you want to transfer Google Account information, Bookmarks, etc. Now, since you only want videos and photos, deselect the other options except ‘Camera Roll’
The above process to transfer pictures from Android to iPhone is good for mobile users who are unwilling to invest money in software. However, the method is not perfect because it is time-consuming. The transaction can neither be done quickly nor can it be done with a single click.
Part 3: How to transfer photos from Android to iPhone using Google Drive?
Google Drive is cloud storage that is available to those who have a Gmail address. It can store anything ranging from Word Documents to photos and videos. Hence, if you are wondering how to move photos from Android to iPhone, then Google Drive is your answer.
To go with the transfer of photos and videos from Android to iPhone with Google Drive, follow the steps outlined below:
- First, make sure Google Drive is already installed on the Android device. If not, visit the Play Store to download Google drive. Then, on your Apple iPhone 14 Pro, visit the Gallery section> select the images> tap on Share button> and finally choose Share via Drive.
- Soon the file will get uploaded.
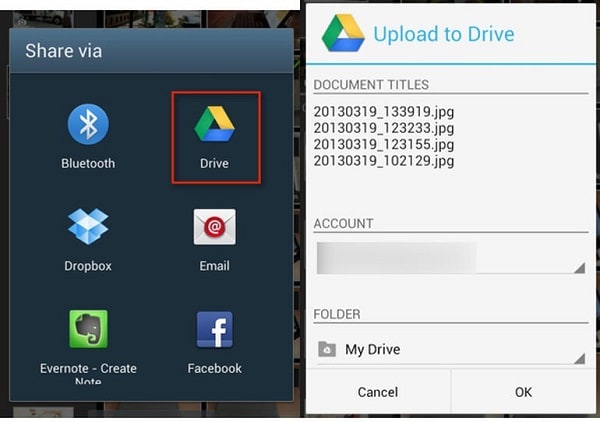
- Now, move to your iPhone.
- Here, download and install the Google Drive app onto your iPhone.
- Open the Drive (you must log in with the same Google ID). There you will see all the uploaded media files (Photos). Now, select ‘Save Image’ or ‘Save Video’ depending on your file type.
Part 4: Top 3 Android to iPhone photo transfer Apps
There are several apps that are specifically designed for storing and transferring images from an Android device to an iPhone. We have found the three best apps based on ease of use and accessibility.
PhotoSync
PhotoSync is a free photo-sharing app available on both Android and iOS devices. The app lets you store all your photos on one device and then transfer it to another device through Wi-Fi. PhotoSync is designed to work with several devices besides Android and iOS devices. It works on different platforms, including desktop computers, NAS, and Cloud Services.
You can extract videos and photos directly from the camera and transfer them to another device. You can even access the photos/videos via a web browser. PhotoSync is regularly updated with features to make the experience better support for RAW files and preserves for EXIF-data.
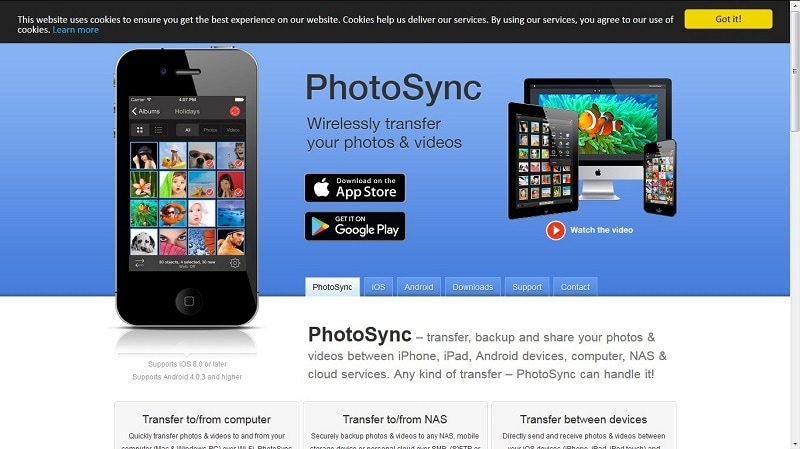
Photo Transfer
The photo transfer app is an incredibly popular app and with a good reason. You can perform Android to iPhone photo transfer without any cables. You can access Photo Transfer on different platforms, including desktop computers. It allows you to access your photos stored on the app via a web browser. You can easily download multiple photos for storage and exchange these photos across multiple platforms. If you are in need of an intuitive, easy to use app transfer photos to iPhone from Android, then consider using the Photo Transfer app.

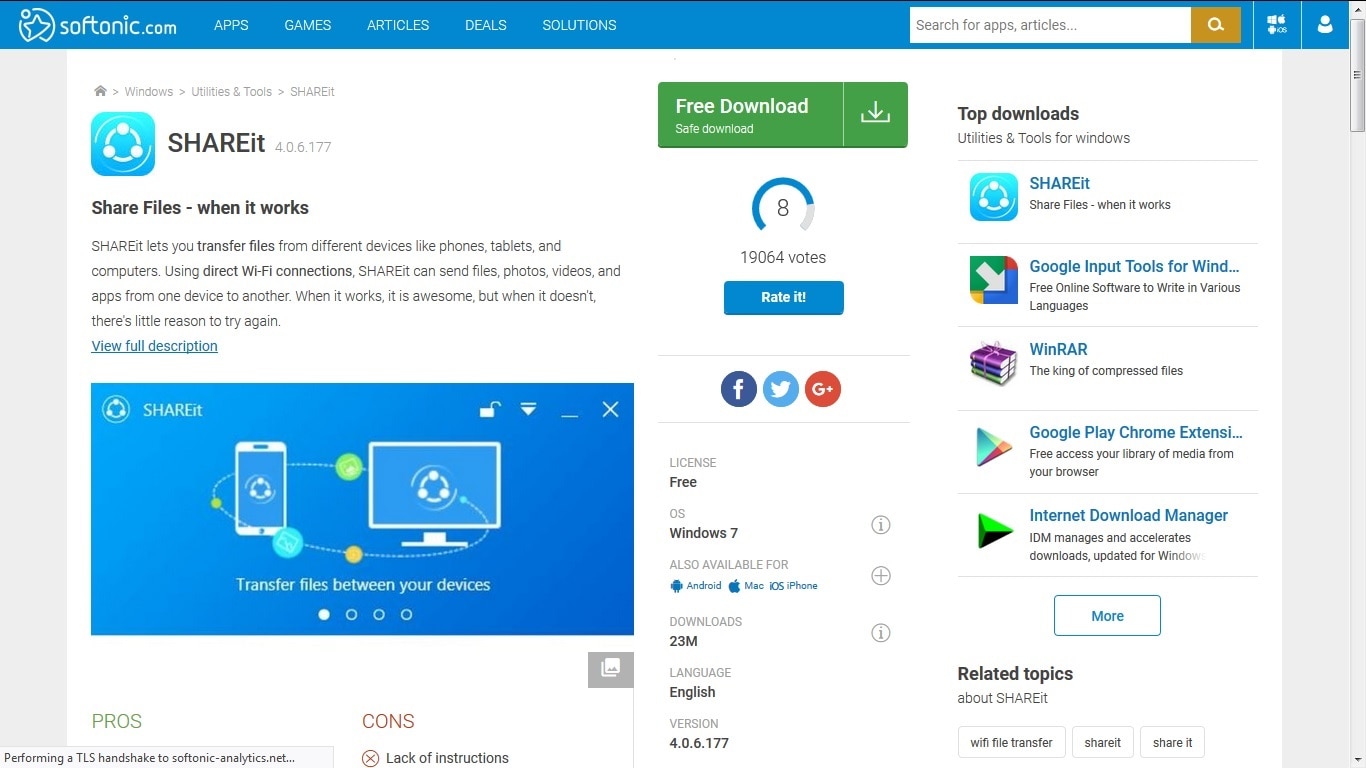
Shareit
Shareit is a special application developed to transfer files between two devices. You can use Shareit to transfer pictures from Android to iPhone in seconds. The software is free and completely secure, so you do not have to worry about how to transfer photos from one device to another. You can share individual photos or entire folders on Shareit. However, it should be noted that sharing folders can make slow down the process.
The best part of Shareit is the freedom allowed to users because you can transfer different file types besides photos. Hence, if you are wondering how to transfer video from Android to iPhone, then Shareit is your answer. The software is constantly being updated to make sure it is safe. Therefore, if users need to transfer more than just photos like sensitive information, they can rest assured about Shareit’s reliability.
Thus, after going through the article, we are sure that you got a wide range of options to choose from to transfer your Apple iPhone 14 Pro photos to the iPhone. Well, every method is good in itself; however, we would like to say that one of the best options for you would be the Dr.Fone tool without a doubt.
Also read:
- [New] Capturing Instagram Content on Computers Techniques and Tools for 2024
- [Updated] Influential VR Development Studios
- 2024 Approved Can Instagram's Video Selfies Be Trusted?
- 2024 Approved Ultimate Gadget Challenge GoPro Hero5 Black Vs. VIRB Ultra
- 5 Easy Ways to Transfer Contacts from Apple iPhone 13 Pro Max to Android | Dr.fone
- Activate or Deactivate PC Visibility in Your Local Network Using Windows 11
- Improving Video Clarity: Transform Standard Footage Into High Definition (HD) or Ultra HD (4K) Using Windows and macOS Techniques
- In 2024, 5 Easy Ways to Transfer Contacts from Apple iPhone 12 mini to Android | Dr.fone
- In 2024, A Step-by-Step Guide on Using ADB and Fastboot to Remove FRP Lock from your Oppo Reno 8T
- In 2024, Easy Methods How To Transfer Pictures From Apple iPhone XS Max to PC | Dr.fone
- In 2024, Switch Cards Between Apple iPhone 6 and other iPhones Will Move All Phone Services? | Dr.fone
- Swift Solutions for Disabling iPhone Activation via Apple's iCloud Service
- Top 5 Vivo X Flip Bypass FRP Tools for PC That Actually Work
- Title: In 2024, Complete Tutorial Sending Photos From Apple iPhone 14 Pro to iPad | Dr.fone
- Author: Charlotte
- Created at : 2024-10-10 09:50:58
- Updated at : 2024-10-11 22:52:36
- Link: https://iphone-transfer.techidaily.com/in-2024-complete-tutorial-sending-photos-from-apple-iphone-14-pro-to-ipad-drfone-by-drfone-transfer-from-ios/
- License: This work is licensed under CC BY-NC-SA 4.0.