
In 2024, 6 Methods for Switching from Apple iPhone 11 Pro to Samsung | Dr.fone
6 Methods for Switching from Apple iPhone 11 Pro to Samsung
Apple and Samsung are the most successful tech giant companies in the world. There are a huge number of people around the world who use devices from both of these tech giants. So it’s really obvious when anyone would want to switch their phone sometimes, just to enjoy and check out a device from Apple or Samsung. Each device has its new and great features with the latest upgrades every time. So who wouldn’t want to check out any latest device released by Apple or Samsung?
But what if you are already an iPhone user and you want to switch from Apple iPhone 11 Pro to Samsung, like the new release Samsung S21 FE or Samsung S22 series? Yes, it’s really possible to switch from Apple iPhone 11 Pro to Samsung. For example, switch to Samsung Galaxy S20/S21/S22. With the help of this article, you can learn how to transfer data from Apple iPhone 11 Pro to Samsung with a single click. After reading this article, you will definitely say that moving from Apple iPhone 11 Pro to Samsung is really easy. You’ll get the best 4 methods to transfer data from Apple iPhone 11 Pro to Samsung and start using your Samsung phone right away!
The Preparation before transferring from Apple iPhone 11 Pro to Samsung
Proper preparation before switching from an iPhone to a Samsung device is essential to ensure a seamless transition and safeguard your crucial data. Here are key steps to follow beforehand:
- Sync Contacts and Calendars: Confirm that your contacts and calendars are synced with your iCloud account. This synchronization will facilitate the transfer of these vital details to your new Samsung phone.
- Disable iMessage and FaceTime: Prevent issues with receiving text messages by deactivating iMessage and FaceTime. This action will ensure a smooth transition to your new Samsung device.
- Deactivate Find My iPhone: Navigate to “Settings > [Your Name] > Find My > Find My iPhone” and turn it off. This step is crucial to unlink your iPhone from your Apple ID before transitioning to a different device.
- Prepare Your Samsung Device: Charge your new Samsung phone fully and ensure it’s updated to the latest operating system version. Acquaint yourself with its interface and settings to streamline the transition process.
- Back up Your iPhone: You have the option of utilizing iCloud or iTunes to generate a comprehensive backup of your iPhone’s data, encompassing contacts, photos, videos, apps, messages, and settings. This backup is the primary source for transferring data to your new Samsung device.
Part 1: How to transfer from Apple iPhone 11 Pro to Samsung in 1 click?
If you don’t know how to transfer data from Apple iPhone 11 Pro to Samsung, then this part is perfect for you. You can easily transfer data from Apple iPhone 11 Pro to Samsung in 1 click with the help of Dr.Fone - Phone Transfer . It’s a great software that can help you when you are switching from Apple iPhone 11 Pro to Samsung. Dr.Fone - Phone Transfer will help you to transfer pictures , music, contacts, apps, videos, call logs, etc. from Apple iPhone 11 Pro to Samsung in a very short time. It supports various mobile brands that have been ruling the mobile industry nowadays and it’s fully compatible with iOS 17 and Android 14. With all the useful features, here is how to transfer from Apple iPhone 11 Pro to Samsung in 1 click by using Dr.Fone –
Dr.Fone - Phone Transfer
Transfer Data from Apple iPhone 11 Pro to Samsung in 1 Click!
- Easy, fast, and safe.
- Move data between devices with different operating systems, i.e. iOS to Android.
- Supports iOS devices that run the latest iOS version

- Transfer photos, text messages, contacts, notes, and many other file types.
- Supports over 6000+ Android devices. Works for all models of iPhone, iPad, and iPod.

3981454 people have downloaded it
Step 1. First, you need to download and install Dr.Fone - Phone Transfer on your Windows or Mac PC and launch it. When the homepage interface is in front of you, click on the “Phone Transfer” button.
Tips: Want to transfer without a PC? Just install the Android version of Dr.Fone - Phone Transfer on your Samsung phone. Then this app will allow you to transfer data from Apple iPhone 11 Pro to Samsung S21 FE/S22 directly, and get iCloud data on Samsung wirelessly.

Step 2. Now you need to connect both of your iPhone and Samsung phones to your PC by using 2 good quality USB cables. Then Dr.Fone will automatically detect your devices immediately. You need to make sure that your old iPhone is on the left side of the switch option and your new Samsung Galaxy S21 FE/S22 is on the right side. Now select the file types you want to transfer from Apple iPhone 11 Pro to Samsung and then click on the “Start Transfer” button.

Step 3. After a few minutes, all your data will be transferred to Samsung by using an iPhone.

Switch Data Now Switch Data Now
Part 2: How to transfer data from iCloud to Samsung?
If you don’t know anything about transferring data from Apple iPhone 11 Pro to Samsung using iCloud backup, then this part is perfectly described for you. With the help of Wondershare Dr.Fone , you can easily download, preview, and restore the iCloud backup to the Samsung phone in a very short time. So just don’t worry at all if you don’t have any idea about the iCloud transfer in iPhone to Samsung. Here is how you can transfer the iCloud backup to a Samsung phone.
Wondershare Dr.Fone
Restore iCloud/iTunes Backup to Samsung Selectively.
- Back up Android data to the computer with one click.
- Preview and selectively restore the backup to any Android device.
- Supports 6000+ Android devices.
- There is no data lost during backup, export, or restoration.
3,981,454 people have downloaded it
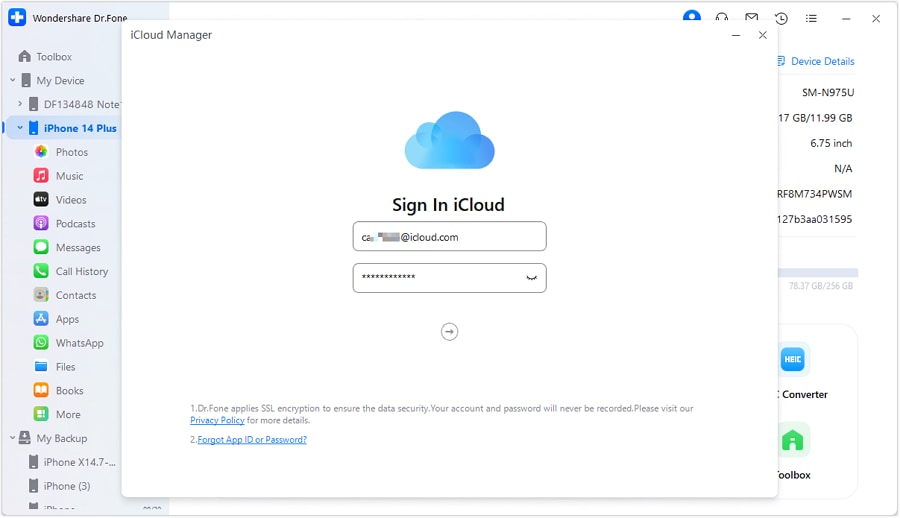
Step 1. First, you need to download and install Dr.Fone on your PC and launch it. Connect your Samsung device to your PC using a good-quality USB cable. Now click on the “iCloud Manager” button from the below page.

Step 2. From the next page, you need to log into your iCloud account.
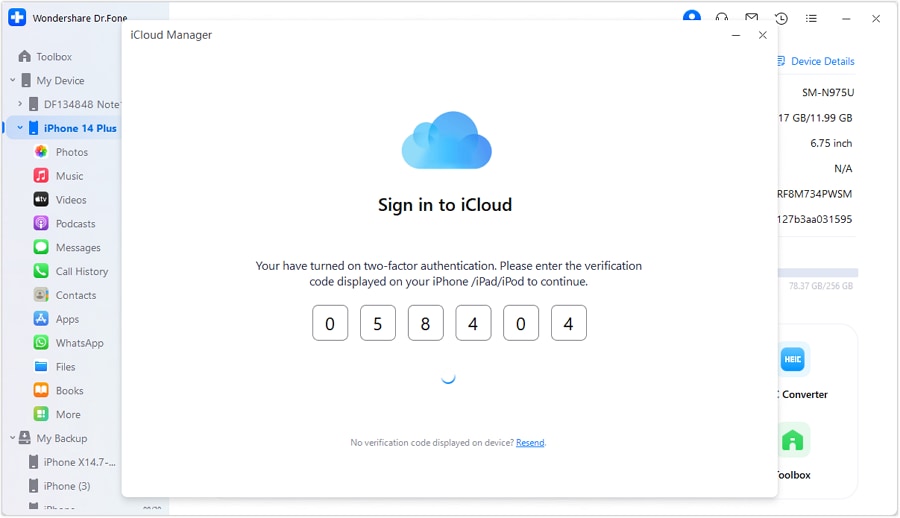
Step 3. If you have two-factor authentication enabled in your account then you will get a text message with a verification code on your phone. Use the code on the verification page and click on the “Verify” button.
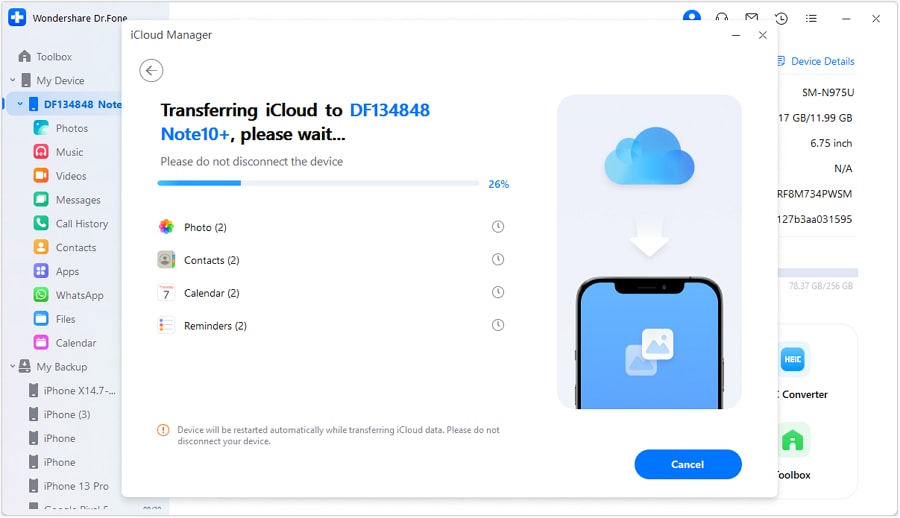
Step 4. After signing into your iCloud account, Dr.Fone will show you all the data inside the backup file. You can choose any specific data to restore or you can choose them all to restore the full backup file in your Apple iPhone 11 Pro by clicking on the “Restore to Device” button.

Step 5. Now Dr.Fone will transfer data on iCloud to your Samsung phone. Wait for the restore process to complete.
Restore iCloud Data to Samsung Restore iCloud Data to Samsungr
Part 3: How to switch from Apple iPhone 11 Pro to Samsung using Smart Switch?
Switching from Apple iPhone 11 Pro to Samsung can seem difficult. But with the help of the Samsung Smart Switch, you can switch from almost any smartphone, including an iOS device to a new Samsung smartphone efficiently. Samsung Smart Switch provides 3 ways to transfer data from Apple iPhone 11 Pro to Samsung: Restore from iCloud, USB-OTG adapter, and restore from iTunes backup. Here is how you can transfer from Apple iPhone 11 Pro to Samsung using Smart Switch.
3.1 How to restore from iCloud to Samsung?
- First, from your iPhone, go to the “Settings” option and then choose “iCloud”.
- Now swipe to and tap on Backup.
- If iCloud Backup is already turned off in your iPhone, tap on the slider, and then tap on the “Back Up Now” option.
- Now you need to open the “Smart Switch” app on your Samsung device and then tap on the “WIRELESS” button.
- Tap on the “RECEIVE” option and then choose “iOS”.
- Now provide your Apple ID and password and then tap on “SIGN IN”.
- Choose any of the basic files you want to transfer and then tap on the “IMPORT” button.
- Now choose any extra files you want to move and then tap on the “IMPORT” button.


Remember, you can’t transfer iTunes music and videos from iCloud. You need to use Smart Switch for PC or Mac to transfer iTunes music from Apple iPhone 11 Pro to Samsung. But iTunes videos are encrypted and cannot transfer them.
3.2 How to restore from iTunes backup to Samsung?
- First, you need to connect your iPhone to a PC and back up all the data on iTunes.
- Now download and install Smart Switch on your PC and restart your PC.
- Now connect your Samsung device to your PC and launch Smart Switch. Now click on the “Restore” button on the Smart Switch.
- On this final page, click on the “Restore Now” option to transfer data to your Samsung device.
3.3 How to transfer to Samsung using a USB-OTG adapter?
- Launch the Smart Switch app on both of your devices and choose the “USB CABLE” option.
- Now, connect the two devices using your iPhone’s USB cable and the USB-OTG adapter from your Samsung device.
- Tap on the “Trust” button on your iPhone.
- Now tap “NEXT” on your Samsung device.
- Choose the files you want to transfer and then tap on “TRANSFER”.

Your files will be transferred to the Samsung device.
Data Can Be Transferred: Contacts, Schedules, Calendar, Notes, Call History, Bookmarks, Live Photos, Photos, Documents, Recommended Apps, Videos (DRM-free content only), Voice Memos, Wi-Fi, and Alarms.
Part 4: How to Switch from Apple iPhone 11 Pro to Samsung via USB cable?
Migrating from an iPhone to a Samsung device using a USB cable presents a straightforward data transfer method. By using this method, you can transition from iOS to Android effortlessly. This even ensures that your important contacts, messages, and media move to your new Samsung device. The step-by-step process below outlines the detailed procedure for the hassle-free transfer of your data:
Step 1. Ensure both devices are charged, and then turn on your Samsung device. Insert a SIM card, connect the Apple iPhone 11 Pro device to a Wi-Fi network, and set it up until it asks you to connect the Apple iPhone 11 Pro devices.

Step 2. Now, connect both devices with a compatible USB cable and choose the “Trust” option on your iPhone. You might be required to enter your iPhone passcode a few times. Then, log into your Google account on the Samsung device.

Step 3. After logging in, it is time to choose the data you want to transfer from your iPhone. Choose the data on your Samsung device and hit the “Copy” button to begin the process. Once data has been transferred, don’t forget to turn off iMessage on your iPhone when prompted by hitting the “Done” button.

Data Can Be Transferred: Contacts, Photos, Videos, Calendar Events, Messages, Apps, Music, Call Logs, Alarms, and more.
Part 5: How to transfer from Apple iPhone 11 Pro to Samsung using email?
When manually migrating data from an iPhone to a Samsung device, email can be a viable option. This method is best suited for smaller quantities of data due to email attachment limitations. It’s effective for transferring photos, documents, contacts, or smaller files. Here’s a step-by-step guide to help with this method:
Step 1. On your iPhone, navigate to the data you want to transfer and long-press to select it. Then, tap the “Share” icon in the drop-down list and choose to send via “Email.” Open your email app on your iPhone and create a new email. Following this, type your email address in the “To” field to proceed further.

Step 2. Attach the selected files to the email. Once all the files are attached, send the email to yourself. Open the “Gmail” app on your Samsung device and access the email you sent yourself from the iPhone. Next, open the email and download the attached files to your Samsung device. You can download them by tapping the “Download” icon.

Data Can Be Transferred: Photos, Documents (PDFs, Word files, etc.), Contact vCards (individual contacts), Notes or Text-based Information, Small Video Files, or Audio Recordings.
Part 6: How to transfer from Apple iPhone 11 Pro to Samsung manually?
If you are interested in moving from Apple iPhone 11 Pro to Samsung, then you can easily follow this part. This part is about one of the easiest ways to send data from the iPhone to Samsung. You don’t have to follow any kind of confusing or long process and it’s really simple if you follow the guideline properly. If you don’t want to use any third-party software or app to move data from Apple iPhone 11 Pro to Samsung, then you can follow the below guidelines to transfer data manually.
- For this process, at first, you need 2 lightning USB cables. You need to connect both of your devices to your PC.
- Now you will see a pop-up on both devices and you need to tap on the “Trust” button to trust the PC on both devices.
- Next, you need to enter your iPhone folder from your PC and copy all the files/folders that you want to transfer.
- After that, you need to go to your Samsung device folder and choose any folder to paste all the copied files from your iPhone.
- You need to wait for a while until the process finishes because it can take some time to finish.
Remember, transferring data manually actually can only work for Photos. So if you want to transfer all of your photos, videos, music, call logs, messages, apps, etc. you need to choose Dr.Fone - Phone Transfer for this task.
FAQS
- How to Transfer WhatsApp data from Apple iPhone 11 Pro to Samsung?
Wondershare Dr.Fone is the best option for transferring WhatsApp data from an iPhone to a Samsung device. Dr. Fone simplifies the process with its user-friendly interface and dedicated “WhatsApp Transfer” feature. Simply connect both devices to your computer, select the “WhatsApp Transfer” option, and initiate the transfer. Dr.Fone efficiently moves WhatsApp chats, messages, and media from your iPhone to the Samsung device, ensuring a seamless transition of your conversations without compromising data integrity.
- Do I need to deactivate iMessage before switching?
Before transitioning from an iPhone to a non-Apple device, such as a Samsung phone, it is recommended to disable iMessage. This step is crucial as it prevents text messages intended for your phone number from being directed solely through iMessage. By deactivating iMessage, you facilitate the reception of SMS messages on your new Samsung device without any interference.
- What if I face issues during the transfer process?
In case you face any challenges while transferring data, consider these steps:
- Confirm that both devices have ample battery life and a reliable internet connection.
- Verify for any pending software updates on both devices and proceed with their installation if available.
- Review the chosen transfer method and follow the instructions to ensure accuracy and completeness.
- Refer to their troubleshooting guides or customer support for assistance if using specialized apps or services.
- For complex issues, consider seeking help from authorized service centers or tech support for both iPhone and Samsung.
- Can I still use my Apple Watch with my Samsung phone?
Apple Watch is designed to work seamlessly with iPhones and the Apple ecosystem. Unfortunately, you cannot directly pair an Apple Watch with a Samsung phone or use its full features, as it requires an iPhone for initial setup, updates, and functionality. The Apple Watch is incompatible with Android devices like Samsung phones beyond basic functionalities like displaying time.
Learning about the iPhone to Samsung transfer is easy when you have a clear and precise guideline. With the help of this article, you will not only be able to transfer data from Apple iPhone 11 Pro to Samsung but also completely switch your device in a very short time. These 6 methods can help you solve all your confusion on how to switch from Apple iPhone 11 Pro to Samsung easily. But if you ask me which method is the best for you that can ensure a 100% successful transfer and no data loss during the process, then I would blindly suggest you use Dr.Fone - Phone Transfer. This amazing software can simply transfer all types of data from your old iPhone device to your new Samsung device. There is no other software or app that can give you so many options in just 1 click! So if you have already become fed up trying a whole lot of software and apps or you are confused about choosing a third-party transfer app, then you should choose Dr.Fone - Phone Transfer for this.
5 Ways to Transfer Music from Apple iPhone 11 Pro to Android
“I have just got a new Android, and I want to transfer music from Apple iPhone 11 Pro to Android. Can anyone help me learn how to send music from Apple iPhone 11 Pro to Android without much hassle?”
Switching from an iPhone to Android can be a tough job. Not only to transfer photos and contacts, but users also need to take some added measures for moving music from Apple iPhone 11 Pro to Android. The good news is that some tools can move data from iOS to Android instantly. You can use iTunes, a dedicated app, or a third-party data transfer tool to do the same. Read on and get to know how to transfer music from Apple iPhone 11 Pro to Android like a pro.
Part 1: How to transfer all music from Apple iPhone 11 Pro to Android in 1 click?
The simplest way of learning how to move music from Apple iPhone 11 Pro to Android is by using Dr.Fone - Phone Transfer . As the name suggests, the tool will make it easier for you to switch from one smartphone to another without losing any data. It is a part of the Dr.Fone toolkit and is compatible with leading iPhone and Android models. Therefore, you can easily perform a cross-platform transfer of data with a single click.
Dr.Fone - Phone Transfer
Transfer Music from Apple iPhone 11 Pro to Android Directly in 1 Click!
- Easily transfer contacts from Apple iPhone 11 Pro to Android phone without any complication.
- Works directly and transfer data between two cross-operating system devices in real-time.
- Works perfectly with Apple, Samsung, HTC, LG, Sony, Google, HUAWEI, Motorola, ZTE, Nokia, and more smartphones and tablets.
- Fully compatible with major providers like AT&T, Verizon, Sprint, and T-Mobile.
- Fully compatible with the latest iOS and Android
- Fully compatible with the latest Windows or Mac version.
3981454 people have downloaded it
Note: If you have no computer at hand, you can also get the Dr.Fone - Phone Transfer (mobile version) from Google Play, with which you could log into your iCloud account to download the data, or transfer from Apple iPhone 11 Pro to Android using an iPhone-to-Android adapter.
Besides music files and formats of different kids, Dr.Fone - Phone Transfer also supports the transfer of contacts, messages, photos, videos, and other types of contact. Therefore, you can move all your data at once using this tool. To learn how to send music from Apple iPhone 11 Pro to Android using Dr.Fone - Phone Transfer, follow these steps.
1. Download Dr.Fone - Phone Transfer on your Windows PC or Mac and launch it whenever you wish to transfer music from Apple iPhone 11 Pro to Android. From its welcome screen, select the “Switch” module.
2. Now, connect both the Apple iPhone 11 Pro devices to your computer and let the application detect them automatically. On the interface, you can see a preview of both the Apple iPhone 11 Pro devices.
3. Since you move your data from an iPhone to Android, your iPhone should be listed as a source while Android should be a destination device. If not, then use the Flip button to interchange their positions.
4. Select the type of data you wish to transfer. For instance, in this scenario, make sure that the option of “Music” is selected. Once you have made the selection, click on the “Start Transfer” button.

5. Sit back and wait for a while as Dr.Fone - Phone Transfer will automatically move the selected content from Apple iPhone 11 Pro to Android.
6. When the process is completed, you will be notified. In the end, you can remove both the Apple iPhone 11 Pro devices safely.
Part 2: How to transfer music from Apple iPhone 11 Pro to Android using Google Music Manager?
Another way to transfer music from Apple iPhone 11 Pro to Android is by using Google Music Manager. Though, unlike Dr.Fone tools, the process can be a bit complicated. Firstly, you need to sync your music between iPhone and iTunes, and then you have to import it from iTunes to Google Music Manager. Sounds complicated, right? In the end, you can access it on your Apple iPhone 11 Pro using the Google Music app. You can follow these steps to learn how to move music from Apple iPhone 11 Pro to Android using Google Music Manager.
1. Firstly, you need to sync music between your iPhone and iTunes. To do this, launch an updated version of iTunes on your system and connect your iPhone to it.
2. Please select your device and go to its Music tab. From here, you can sync your iPhone with iTunes. Click on the “Apply” button and start the syncing process.
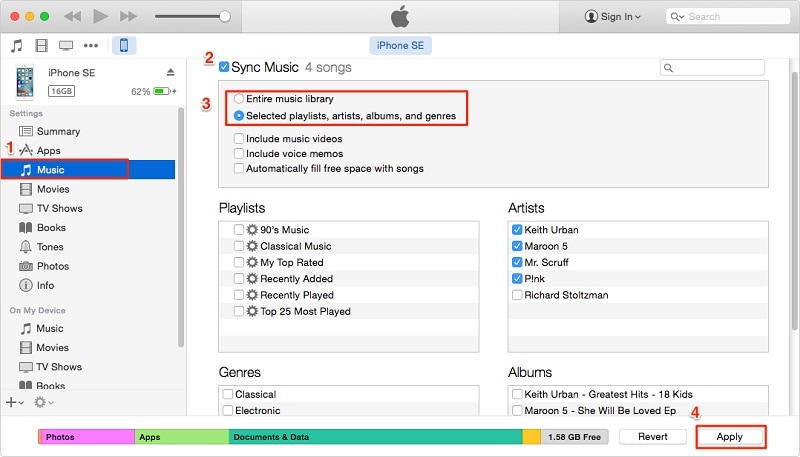
3. Once all your music is synced to iTunes, you can disconnect your iPhone.
4. Go to the official website of Google Music and download Google Music Manager on your system.

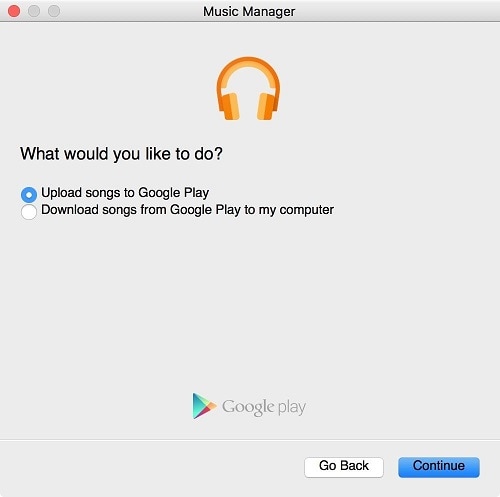
5. Launch the Music Manager application and choose to upload songs to Google Play.
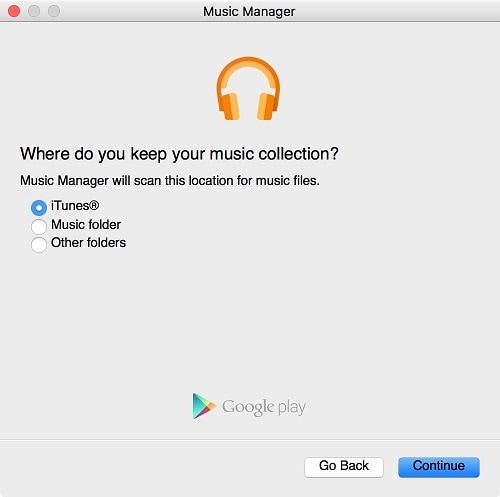
6. Select the source as “iTunes” and click on the “Continue” button.
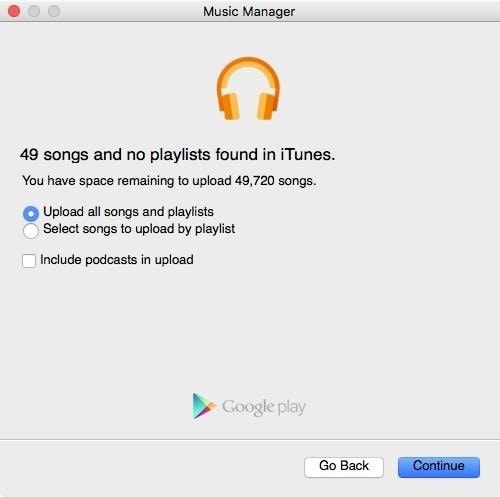
7. The Music Manager will automatically sync your iTunes library and display the available songs. From here, you can choose to upload selected songs or the entire library.
8. Wait for a while for your songs to be imported to Google Music Manager. Once it is done, you will be notified.
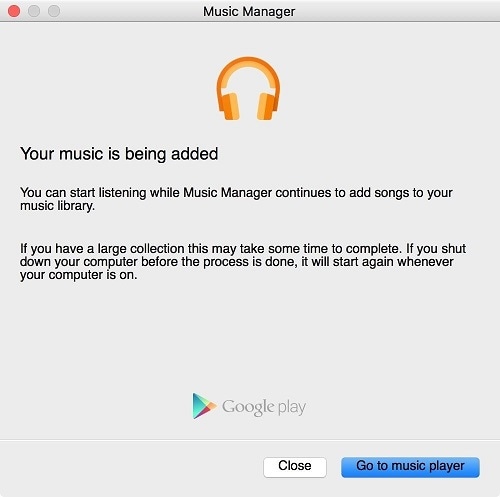
9. Great! You are almost there. In the end, you can download the Google Music app on your Android. From here, you can automatically access all the newly transferred songs on your Google Music library.
Part 3: How to transfer music from Apple iPhone 11 Pro to Android selectively?
As you can see, with Dr.Fone - Phone Transfer, all the music files are transferred from one device to another in one go. If you want to transfer music from Apple iPhone 11 Pro to Android selectively, you can take Dr.Fone’s assistance - Phone Manager (iOS) . It is also a part of the Dr.Fone toolkit and is developed by Wondershare.
Dr.Fone - Phone Manager (iOS)
Transfer iPhone/iTunes Media to Android Devices Selectively
- Transfer files between Android and iOS, including contacts, photos, music, SMS, and more.
- Manage, export/import your music, photos, videos, contacts, SMS, Apps etc.
- Transfer iTunes to Android (vice versa).
- Manage your iOS/Android device on computer.
- Fully compatible with the latest iOS and Android
4,335,819 people have downloaded it
With Dr.Fone - Phone Manager (iOS), you can move data between your iOS device and computer and even iPhone to another Android or iOS device. It works with all the leading smartphone models and supports prominent data types like photos, videos, music, contacts, messages, and more. Having a user-friendly interface will make it easier for you to learn how to transfer music from Apple iPhone 11 Pro to Android. All you need to do is follow these steps:
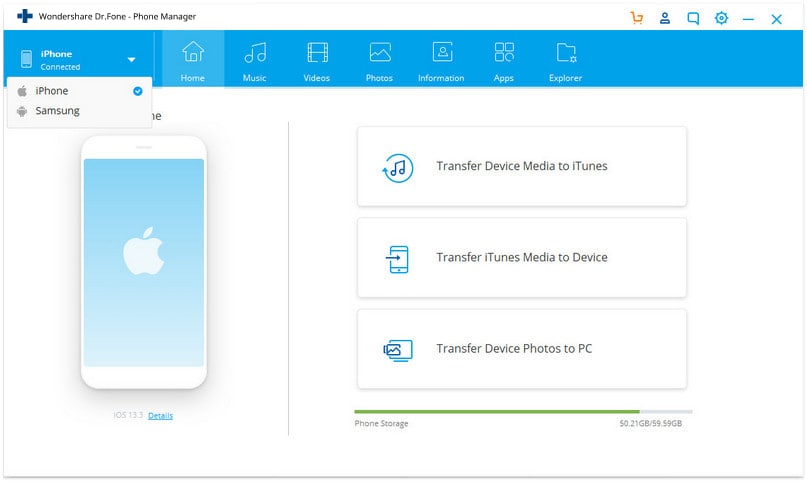
1. Start by launching the Dr.Fone toolkit on your system and visit the “Transfer” tool from its home screen.
2. Connect your iPhone and the target Android device to the system. The interface will automatically detect both the Apple iPhone 11 Pro devices in no time. From the top left option, make sure that you have selected your iPhone as a source device.
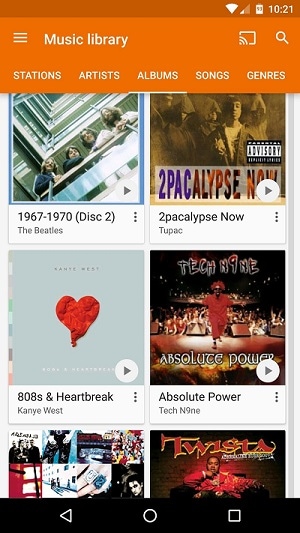
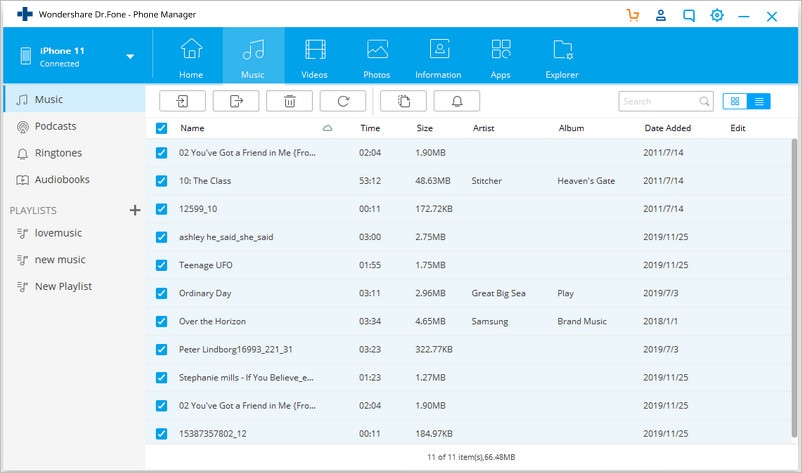
3. Great! Now, move to the “Music” tab on the application. Here, you can view all the music files stored on your iPhone, listed in different categories.
4. Just select the files you wish to transfer to your Android and click on the export button on the toolbar.
5. This will display a list of all the connected devices. Select the target Android device to commence the transfer process.
Part 4: How to transfer music from Apple iPhone 11 Pro to Android without computer?
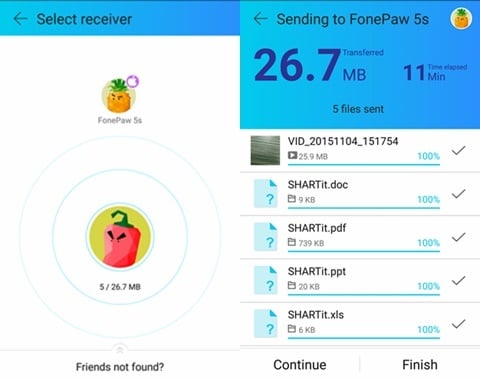
Too often, users don’t wish to use a computer for moving music from Apple iPhone 11 Pro to Android. If you have the same preference, then you use a data transfer app to meet your requirements. Out of all the cross-platform data transfer options, SHAREit is one of the most recommended apps. You can install the app on both the Apple iPhone 11 Pro devices and learn how to transfer music from Apple iPhone 11 Pro to Android without computer by following these steps.
1. Before you proceed, make sure that you have installed the SHAREit app on your iPhone and Android by visiting its Google Play and App Store
2. Launch the app on both the Apple iPhone 11 Pro devices and connect them to the same WiFi network. This is because the transfer of data takes place through WiFi direct.
3. On the source iPhone, choose to “Send” the data. Also, you can browse and select the music files that you wish to send.
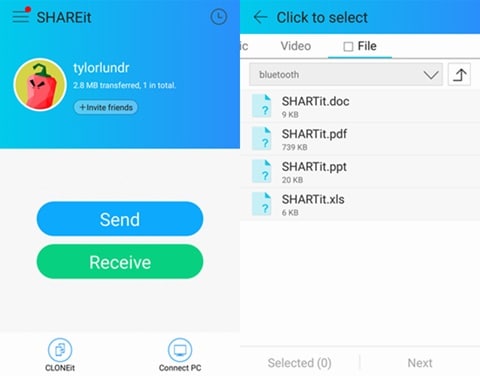
4. Similarly, on your target Android device, mark it as a receiving device. It will automatically start looking for the nearby devices.
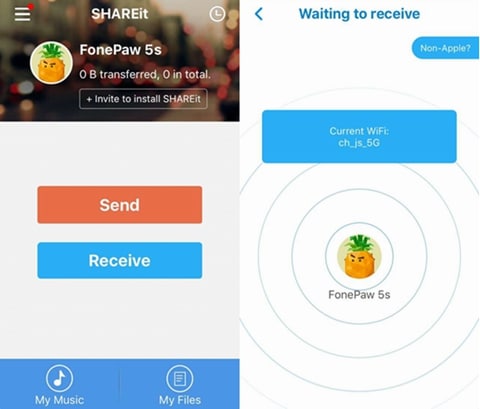
5. On your iPhone, you will be prompted regarding the target device. Select it to initiate the transfer.
6. Accept the incoming data from the source device and start receiving the selected music on your Android.
Part 5: How to transfer music from iTunes to Android?
It might surprise you, but there are different ways to learn how to transfer music from Apple iPhone 11 Pro to Android. We have already discussed how to send music from Apple iPhone 11 Pro to Android using iTunes and Google Music Manager. Though, there is another alternative to do the same. Once you have transferred your music from Apple iPhone 11 Pro to iTunes, you can directly move it to an Android device as well.
1. To start with, make sure that you have already synced your iPhone music with iTunes. Once it is done, launch iTunes again.
2. Go to its Preferences > Advanced options and enable the “Copy files to iTunes media folder when adding to library” feature from here.
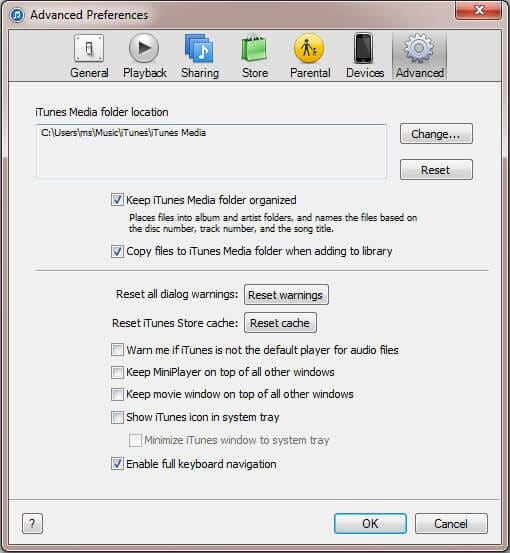
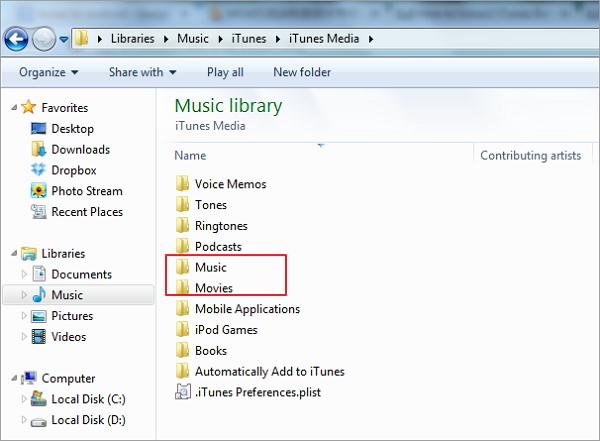
3. Once you apply this change, iTunes will make a dedicated folder with all the music files present in its library. In Windows, you can find it under My Music > iTunes while in Mac, it would be under Music > iTunes.
4. To transfer these music files, connect your Android to the system and choose to use it as a media transfer device.
5. Browse to the iTunes music folder, copy the selected songs, and transfer them to your Apple iPhone 11 Pro. If you have a Mac, then you need to use Android File Transfer to do the same.
After learning different moving music from Apple iPhone 11 Pro to Android, you can certainly pick a preferred method. As you can see, Dr.Fone toolkit provides the fastest and easiest way to transfer music from Apple iPhone 11 Pro to Android. With Dr.Fone - Phone Transfer , you can transfer all the music files from one device to another in a single click. In order to perform a selective transfer of data, you can try Dr.Fone - Phone Manager (iOS) as well. Go ahead and try these tools and teach others how to move music from Apple iPhone 11 Pro to Android by sharing this guide.
5 Tutorials on How to Transfer Photos From Apple iPhone 11 Pro to New iPhone
When it comes to camera systems, the iPhone is certainly ahead of others. It has high-performing lenses and professional camera features that support various photography styles. For instance, you may use the Priotize Faster Shooting option to capture multiple photos at a time. Another thing is that you may enable Action Mode when shooting videos to keep the frame stable throughout the duration. Simply put, you can surely do a lot of things using your iPhone camera
Let’s say you’re planning to share your stunning snaps and footage with others. Is it possible to facilitate the transfer with little to no effort? The short answer is absolutely yes. There are many easy ways to move your media files between two iPhones. In no time, you can surely find the best tutorial on how to transfer photos from Apple iPhone 11 Pro to iPhone. Just choose one that matches perfectly your current situation.
In this article, we will talk about the iPhone’s Shared Album feature and its main benefits to users. We will also provide some tutorials on how to transfer pictures from Apple iPhone 11 Pro to iPhone quickly and easily. Continue reading below to learn more.
Everything You Need to Know About Shared Album
The Photos mobile application on iOS devices is a very powerful gallery software. It provides numerous options to help you organize and manage all your media files in one place. When it comes to data transfer, Photos offers users some channels to facilitate such procedures. One of which is through the syncing feature called Shared Album. It’s basically an ordinary folder where you can move and store your media files. But as the name suggests, you can share this folder with others by simply granting them access to it. Don’t worry. Your Shared Albums remain private on the platform. Only the people you add as subscribers can view its content and make changes. Therefore, the Shared Album feature is the best answer to the question: “How to transfer photos from Apple iPhone 11 Pro to iPhone.”
It’s true to say that Shared Album is a great iOS feature. However, it’s important to point out that it also has a few limitations. First on the list is the type of files supported by this feature. For images, Shared Album is compatible with photos in HEIF, JPEG, RAW, PNG, GIF, and TIFF formats. On the one hand, video formats supported by Shared Album include HEVC, MP4, QuickTime, H.264, and MPEG-4. Another thing to consider is the capacity of the Shared Album folder. By default, you can only store up to 5000 photos or videos in the album.
Do you find Shared Album a useful tool, though? If so, here are the tutorials on how to activate this feature and create one in the Photos app.
How to Activate Shared Album?
Here’s how to activate Shared Album on Settings.
- Step 1: Go to Settings.
- Step 2: Click your Apple ID Profile.

- Step 3: Click iCloud.
- Step 4: Click Photos.

- Step 5: Toggle on the radio button next to Shared Albums.

How to Create Shared Albums in Photos
Here’s how to create Shared Albums in Photos.
- Step 1: Go to the Photos.
- Step 2: Click the Album tab.
- Step 3: Click the + icon at the top-left corner of your screen to add a new folder.

- Step 4: Click New Shared Album.

- Step 5: Rename the Shared Album and then click Create.
How to Transfer Photos From Apple iPhone 11 Pro to iPhone in Easy Steps?
Undoubtedly, the Shared Album feature is a very convenient way to move media files from one iPhone to another. Imagine all you have to do is consolidate all the files in a Shared Album folder and add subscribers. From there, you can easily access the album on multiple iOS devices and download the files. But it’s important to note that there are other photo transfer methods you can try apart from using Shared Album. Check out the 5 tutorials below on how to transfer photos from Apple iPhone 11 Pro to iPhone.
Method 1: Transfer photos from Apple iPhone 11 Pro to iPhone by enabling iCloud photos
How do I transfer photos from Apple iPhone 11 Pro to iPhone? Well, the easiest way is to sync the photos to iCloud and enable the iCloud photos on both devices. Don’t worry. It’s very easy to set up. Here’s how to transfer photos from Apple iPhone 11 Pro to iPhone using iCloud.
- Step 1: On your device that contains the files, go to Settings.
- Step 2: Click on the Apple ID Profile.
- Step 3: Click Photos.

- Step 4: Toggle on the radio button next to Sync This iPhone. From then on, your iPhone will sync your photos to iCloud.

- Step 5: Do the same series of steps on the other iPhone. Once the synchronization has been completed, open the Photos app. Find the newly synced iCloud photos on the All Photos album.
Method 2: Transfer photos from Apple iPhone 11 Pro to iPhone using AirDrop
If you’re just sending a few pieces of photos, AirDrop is indeed a great transfer medium. It’s basically a wireless sharing option allowing users to send files between two iOS devices. Do you want to try it? Here’s how to transfer photos from Apple iPhone 11 Pro to iPhone using AirDrop.
- Step 1: Toggle on the Wi-Fi and Bluetooth connectivity on both iPhones. After that, find the AirDrop option on the two devices and then switch it on. Choose Everyone.

- Step 2: On the Apple iPhone 11 Pro device that contains the files, go to Photos. Select the images you want to transfer. After that, click the Share button at the bottom-left corner of your screen.
- Step 3: Choose AirDrop.

- Step 4: Select the recipient from the provided list. After that, accept the AirDrop request on the other device.
Method 3: Transfer photos from Apple iPhone 11 Pro to iPhone via Mail
Another reliable method you can try is to email the photos from one iPhone to another. Like AirDrop, it works great if you’re just moving a few bits of files to another device. Don’t work. The process will not take much time. Here’s how to transfer photos from Apple iPhone 11 Pro to iPhone via Mail.
- Step 1: On the Apple iPhone 11 Pro device containing the files, go to the Photos app.
- Step 2: Select the specific photos you want to transfer. After that, click the Share icon at the bottom-left corner of your screen.
- Step 3: Choose Mail among the given options.

- Step 4: Key in the email address of the recipient. Subsequently, click the Send icon.
- Step 5: Open the email on the other iPhone. Then, download the photos sent as email attachments.
Method 4: Transfer photos from Apple iPhone 11 Pro to iPhone using iCloud Link
Let’s say you’re sending one photo to another iPhone user. What is the best transfer option in this case? If you’re currently using iCloud photos might as well send files through the iCloud link. Don’t worry. It’s not that hard to get such details. Here’s how to transfer photos from Apple iPhone 11 Pro to iPhone using the iCloud link.
- Step 1: On the Apple iPhone 11 Pro device where your files are stored, go to the Photos app.
- Step 2: Select the specific group of images you want to transfer. Right after, click the Share icon at the bottom-left corner of your screen.
- Step 3: Scroll down and find the Copy iCloud Link. Click on it.

- Step 4: Share the iCloud link via Messages, Mail, or internet messaging platform. On the other iPhone device, access the link and then download the photos from there.
Method 5: Transfer photos from Apple iPhone 11 Pro to iPhone using Wondershare Dr.Fone
The first four tutorials above on how to transfer pictures from Apple iPhone 11 Pro to iPhone are very easy to follow. But if you wish to explore another convenient option, Wondershare Dr.Fone can help you with that. Its phone transfer feature has a powerful facility that can move your photos and other files between two mobile devices. Here’s how to use it in easy steps.
- Step 1: Download Wondershare Dr.Fone from its official website. Then, install it on your computer.
- Step 2: Open the newly installed software on your desktop. After it fully loads, connect your two iPhones using a data cable.
- Step 3: Access the left-side panel and then click Toolbox. On the main dashboard, click Phone Transfer.
- Step 4: Set the iPhone that contains the photos as the Source and the other iPhone as the Target. Alternatively, click the Flip button to modify the transfer path according to your liking.

- Step 5: Click Photos as the category of the files. Right after, click Start Transfer to proceed.

- Step 6: Wait while Wondershare Dr.Fone is facilitating the transfer. If you wish to terminate the progress, simply click Cancel.

- Step 7: After completing the process, click OK to wrap it up. Check your files from their respective locations afterward.

BONUS TIP: Back Up Your Photos First
The tutorials above on how to transfer all photos from Apple iPhone 11 Pro to iPhone are safe to initiate. You can be sure about that. But as an additional layer of protection, it’s best to back up your iPhone first before the transfer. Don’t worry. Wondershare Dr.Fone. simplifies the backup process for you. Here’s a quick tutorial to get you started.
- Step 1: Launch the Wondershare Dr.Fone on your computer. After it fully loads up, connect your iPhone using a data cable.
- Step 2: Access the left-side panel and then click My Backup. On the main dashboard, click Back Up Now.

- Step 3: Follow the on-screen instructions for SMS backup. After that, click OK to proceed.

- Step 4: Wait while Wondershare Dr.Fone is backing up your files.

- Step 5: After completing the backup process, click View Backups or Open in Folder to check your files.

Conclusion
Transferring photos between two iOS devices is very easy. In fact, you can instantly complete the migration process with just the snap of a finger. Refer to the five tutorials above on how to transfer photos from Apple iPhone 11 Pro to iPhone enumerated. One of them can certainly fit your situation and help you in this regard. For a more convenient file transfer option, download Wondershare Dr.Fone for free. It has a potent phone transfer feature that can aid in the transfer of your dearly cherished photos.
Also read:
- [New] 2024 Approved Facebook's A+ Covers Ranking the Best Photo Making Websites
- [New] In 2024, YouTube's Best Love Stories Perfectly Captured Weddings
- [Updated] Brand Your Content Download Complimentary Templates for YouTube Makers for 2024
- [Updated] Mastering PS3 Gaming Capture Step-by-Step Guide
- [Updated] Photographic Fundamentals in 5 Minutes with Snapseed for 2024
- 5 Ways to Transfer Music from Apple iPhone SE to Android | Dr.fone
- Conversione Gratuita Da M4A a WAV Su Internet Utilizzando Movavi
- Getting Started with Dependency Management in the Setup Files Pane
- How to Transfer/Sync Notes from Apple iPhone 11 Pro Max to iPad | Dr.fone
- In 2024, Complete Tutorial Sending Photos From Apple iPhone 12 to iPad | Dr.fone
- In 2024, How to Transfer from Apple iPhone 13 Pro Max to iPhone 8/11/11 Pro | Dr.fone
- In 2024, How to Transfer from Apple iPhone 8 to iPhone 8/11/11 Pro | Dr.fone
- In 2024, Methods to Transfer from Apple iPhone 6 to Android | Dr.fone
- iPhone Transfer Transfer Contact from Apple iPhone 13 to iPhone without iCloud | Dr.fone
- Solved How To Transfer From Apple iPhone 12 Pro Max to iPhone 15 | Dr.fone
- Synchroniser Des Fichiers Sur Microsoft OneDrive Sans Utiliser Le Glossaire De Transfert : Guide Complet
- Troubleshooting Black Ops Cold War: Overcome the ERROR_CODE 0xC0000005 Issue Now
- Title: In 2024, 6 Methods for Switching from Apple iPhone 11 Pro to Samsung | Dr.fone
- Author: Charlotte
- Created at : 2024-10-17 05:24:49
- Updated at : 2024-10-18 03:52:43
- Link: https://iphone-transfer.techidaily.com/in-2024-6-methods-for-switching-from-apple-iphone-11-pro-to-samsung-drfone-by-drfone-transfer-from-ios/
- License: This work is licensed under CC BY-NC-SA 4.0.