
In 2024, 5 Ways to Transfer Music from Apple iPhone 7 Plus to Android | Dr.fone
5 Ways to Transfer Music from Apple iPhone 7 Plus to Android
“I have just got a new Android, and I want to transfer music from Apple iPhone 7 Plus to Android. Can anyone help me learn how to send music from Apple iPhone 7 Plus to Android without much hassle?”
Switching from an iPhone to Android can be a tough job. Not only to transfer photos and contacts, but users also need to take some added measures for moving music from Apple iPhone 7 Plus to Android. The good news is that some tools can move data from iOS to Android instantly. You can use iTunes, a dedicated app, or a third-party data transfer tool to do the same. Read on and get to know how to transfer music from Apple iPhone 7 Plus to Android like a pro.
Part 1: How to transfer all music from Apple iPhone 7 Plus to Android in 1 click?
The simplest way of learning how to move music from Apple iPhone 7 Plus to Android is by using Dr.Fone - Phone Transfer . As the name suggests, the tool will make it easier for you to switch from one smartphone to another without losing any data. It is a part of the Dr.Fone toolkit and is compatible with leading iPhone and Android models. Therefore, you can easily perform a cross-platform transfer of data with a single click.
Dr.Fone - Phone Transfer
Transfer Music from Apple iPhone 7 Plus to Android Directly in 1 Click!
- Easily transfer contacts from Apple iPhone 7 Plus to Android phone without any complication.
- Works directly and transfer data between two cross-operating system devices in real-time.
- Works perfectly with Apple, Samsung, HTC, LG, Sony, Google, HUAWEI, Motorola, ZTE, Nokia, and more smartphones and tablets.
- Fully compatible with major providers like AT&T, Verizon, Sprint, and T-Mobile.
- Fully compatible with the latest iOS and Android
- Fully compatible with the latest Windows or Mac version.
3981454 people have downloaded it
Note: If you have no computer at hand, you can also get the Dr.Fone - Phone Transfer (mobile version) from Google Play, with which you could log into your iCloud account to download the data, or transfer from Apple iPhone 7 Plus to Android using an iPhone-to-Android adapter.
Besides music files and formats of different kids, Dr.Fone - Phone Transfer also supports the transfer of contacts, messages, photos, videos, and other types of contact. Therefore, you can move all your data at once using this tool. To learn how to send music from Apple iPhone 7 Plus to Android using Dr.Fone - Phone Transfer, follow these steps.
1. Download Dr.Fone - Phone Transfer on your Windows PC or Mac and launch it whenever you wish to transfer music from Apple iPhone 7 Plus to Android. From its welcome screen, select the “Switch” module.

2. Now, connect both the Apple iPhone 7 Plus devices to your computer and let the application detect them automatically. On the interface, you can see a preview of both the Apple iPhone 7 Plus devices.
3. Since you move your data from an iPhone to Android, your iPhone should be listed as a source while Android should be a destination device. If not, then use the Flip button to interchange their positions.

4. Select the type of data you wish to transfer. For instance, in this scenario, make sure that the option of “Music” is selected. Once you have made the selection, click on the “Start Transfer” button.

5. Sit back and wait for a while as Dr.Fone - Phone Transfer will automatically move the selected content from Apple iPhone 7 Plus to Android.
6. When the process is completed, you will be notified. In the end, you can remove both the Apple iPhone 7 Plus devices safely.

Part 2: How to transfer music from Apple iPhone 7 Plus to Android using Google Music Manager?
Another way to transfer music from Apple iPhone 7 Plus to Android is by using Google Music Manager. Though, unlike Dr.Fone tools, the process can be a bit complicated. Firstly, you need to sync your music between iPhone and iTunes, and then you have to import it from iTunes to Google Music Manager. Sounds complicated, right? In the end, you can access it on your Apple iPhone 7 Plus using the Google Music app. You can follow these steps to learn how to move music from Apple iPhone 7 Plus to Android using Google Music Manager.
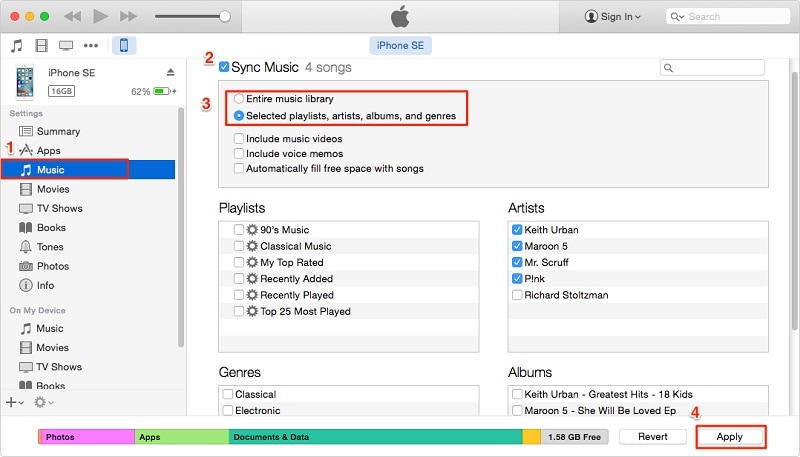
1. Firstly, you need to sync music between your iPhone and iTunes. To do this, launch an updated version of iTunes on your system and connect your iPhone to it.
2. Please select your device and go to its Music tab. From here, you can sync your iPhone with iTunes. Click on the “Apply” button and start the syncing process.
3. Once all your music is synced to iTunes, you can disconnect your iPhone.
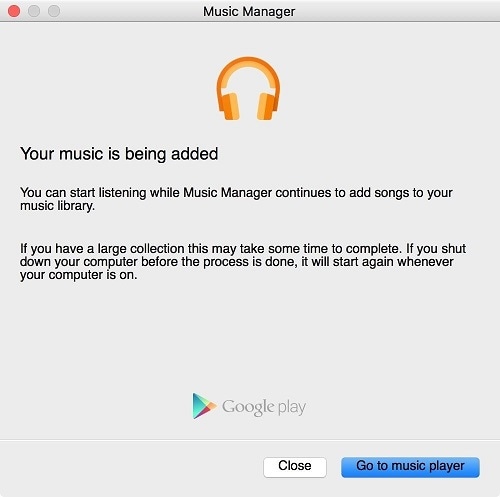
4. Go to the official website of Google Music and download Google Music Manager on your system.

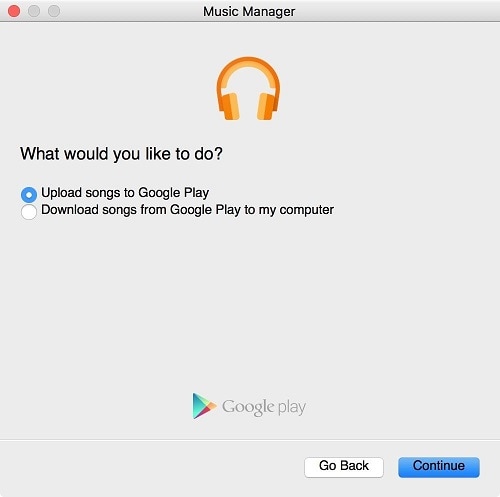
5. Launch the Music Manager application and choose to upload songs to Google Play.
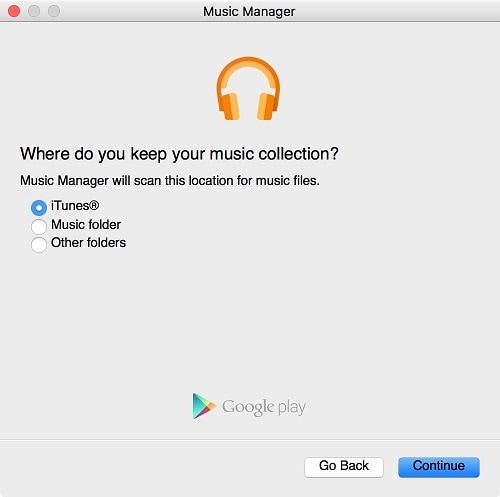
6. Select the source as “iTunes” and click on the “Continue” button.
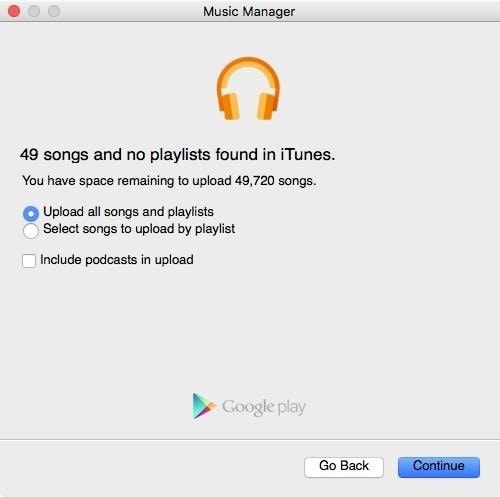
7. The Music Manager will automatically sync your iTunes library and display the available songs. From here, you can choose to upload selected songs or the entire library.
8. Wait for a while for your songs to be imported to Google Music Manager. Once it is done, you will be notified.
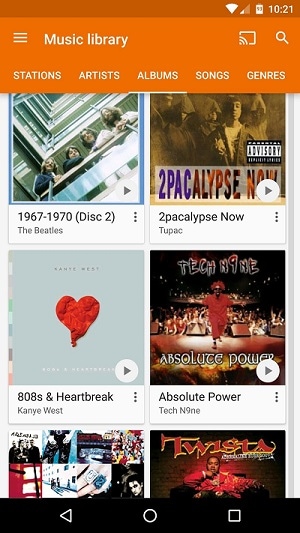
9. Great! You are almost there. In the end, you can download the Google Music app on your Android. From here, you can automatically access all the newly transferred songs on your Google Music library.
Part 3: How to transfer music from Apple iPhone 7 Plus to Android selectively?
As you can see, with Dr.Fone - Phone Transfer, all the music files are transferred from one device to another in one go. If you want to transfer music from Apple iPhone 7 Plus to Android selectively, you can take Dr.Fone’s assistance - Phone Manager (iOS) . It is also a part of the Dr.Fone toolkit and is developed by Wondershare.
Dr.Fone - Phone Manager (iOS)
Transfer iPhone/iTunes Media to Android Devices Selectively
- Transfer files between Android and iOS, including contacts, photos, music, SMS, and more.
- Manage, export/import your music, photos, videos, contacts, SMS, Apps etc.
- Transfer iTunes to Android (vice versa).
- Manage your iOS/Android device on computer.
- Fully compatible with the latest iOS and Android
4,335,819 people have downloaded it
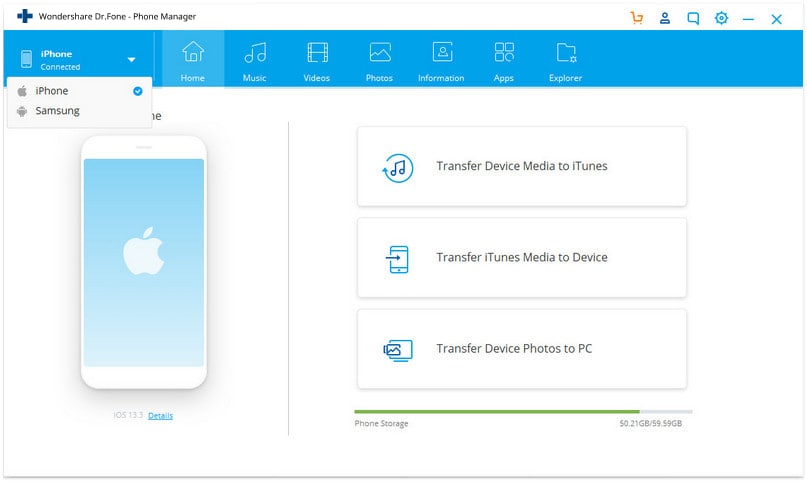
With Dr.Fone - Phone Manager (iOS), you can move data between your iOS device and computer and even iPhone to another Android or iOS device. It works with all the leading smartphone models and supports prominent data types like photos, videos, music, contacts, messages, and more. Having a user-friendly interface will make it easier for you to learn how to transfer music from Apple iPhone 7 Plus to Android. All you need to do is follow these steps:
1. Start by launching the Dr.Fone toolkit on your system and visit the “Transfer” tool from its home screen.
2. Connect your iPhone and the target Android device to the system. The interface will automatically detect both the Apple iPhone 7 Plus devices in no time. From the top left option, make sure that you have selected your iPhone as a source device.
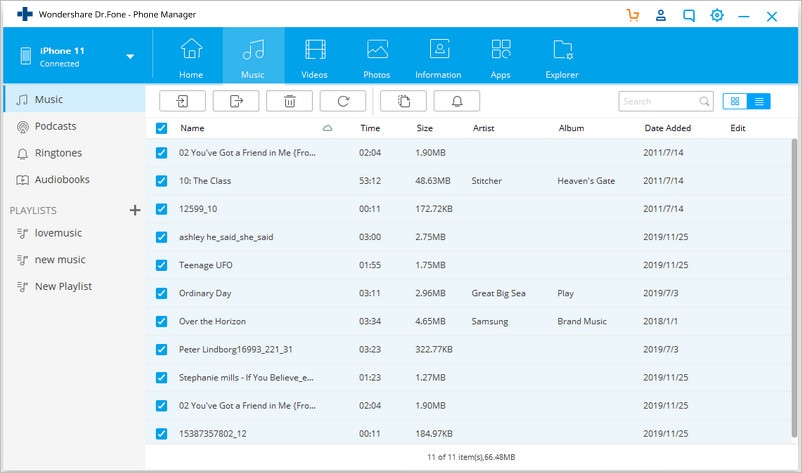
3. Great! Now, move to the “Music” tab on the application. Here, you can view all the music files stored on your iPhone, listed in different categories.
4. Just select the files you wish to transfer to your Android and click on the export button on the toolbar.
5. This will display a list of all the connected devices. Select the target Android device to commence the transfer process.
Part 4: How to transfer music from Apple iPhone 7 Plus to Android without computer?
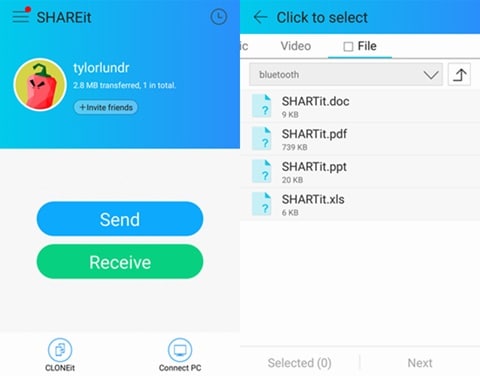
Too often, users don’t wish to use a computer for moving music from Apple iPhone 7 Plus to Android. If you have the same preference, then you use a data transfer app to meet your requirements. Out of all the cross-platform data transfer options, SHAREit is one of the most recommended apps. You can install the app on both the Apple iPhone 7 Plus devices and learn how to transfer music from Apple iPhone 7 Plus to Android without computer by following these steps.
1. Before you proceed, make sure that you have installed the SHAREit app on your iPhone and Android by visiting its Google Play and App Store
2. Launch the app on both the Apple iPhone 7 Plus devices and connect them to the same WiFi network. This is because the transfer of data takes place through WiFi direct.
3. On the source iPhone, choose to “Send” the data. Also, you can browse and select the music files that you wish to send.
4. Similarly, on your target Android device, mark it as a receiving device. It will automatically start looking for the nearby devices.
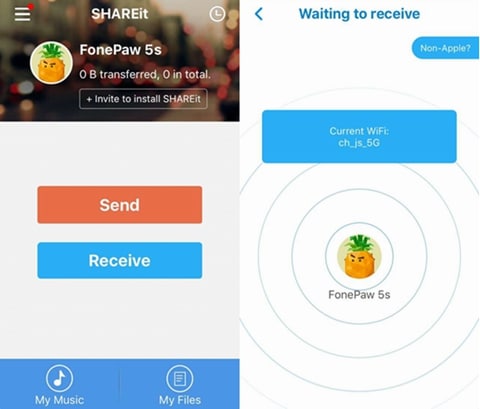
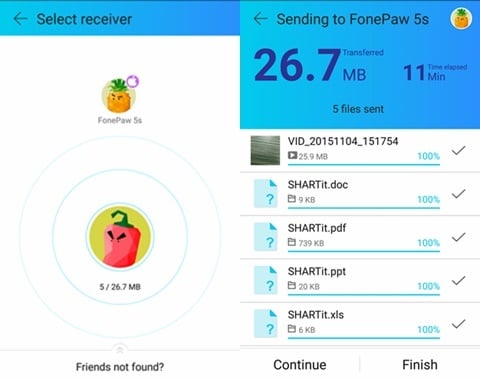
5. On your iPhone, you will be prompted regarding the target device. Select it to initiate the transfer.
6. Accept the incoming data from the source device and start receiving the selected music on your Android.
Part 5: How to transfer music from iTunes to Android?
It might surprise you, but there are different ways to learn how to transfer music from Apple iPhone 7 Plus to Android. We have already discussed how to send music from Apple iPhone 7 Plus to Android using iTunes and Google Music Manager. Though, there is another alternative to do the same. Once you have transferred your music from Apple iPhone 7 Plus to iTunes, you can directly move it to an Android device as well.
1. To start with, make sure that you have already synced your iPhone music with iTunes. Once it is done, launch iTunes again.
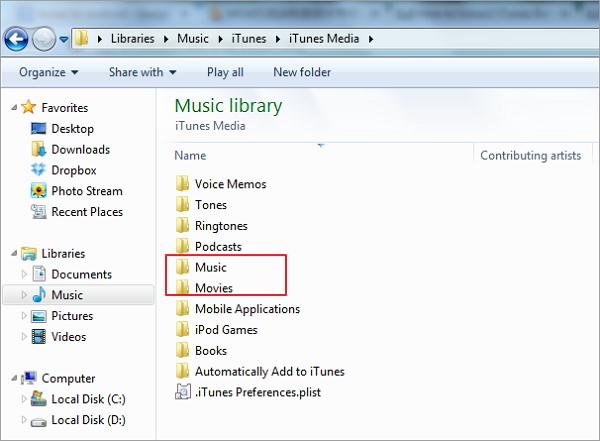
2. Go to its Preferences > Advanced options and enable the “Copy files to iTunes media folder when adding to library” feature from here.
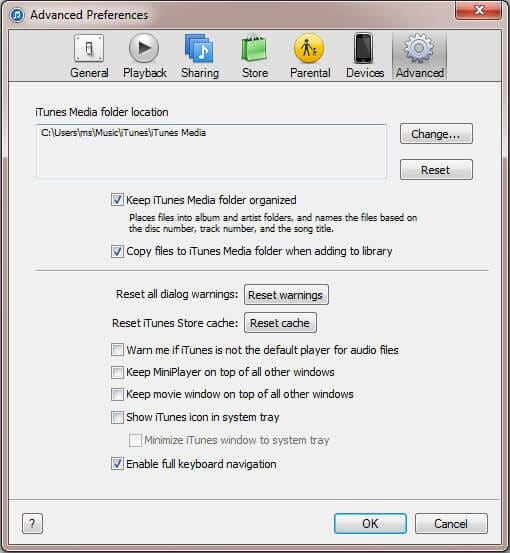
3. Once you apply this change, iTunes will make a dedicated folder with all the music files present in its library. In Windows, you can find it under My Music > iTunes while in Mac, it would be under Music > iTunes.
4. To transfer these music files, connect your Android to the system and choose to use it as a media transfer device.
5. Browse to the iTunes music folder, copy the selected songs, and transfer them to your Apple iPhone 7 Plus. If you have a Mac, then you need to use Android File Transfer to do the same.
After learning different moving music from Apple iPhone 7 Plus to Android, you can certainly pick a preferred method. As you can see, Dr.Fone toolkit provides the fastest and easiest way to transfer music from Apple iPhone 7 Plus to Android. With Dr.Fone - Phone Transfer , you can transfer all the music files from one device to another in a single click. In order to perform a selective transfer of data, you can try Dr.Fone - Phone Manager (iOS) as well. Go ahead and try these tools and teach others how to move music from Apple iPhone 7 Plus to Android by sharing this guide.
4 Ways to Transfer Contacts from Apple iPhone 7 Plus to iPhone Quickly
Thought changing into a new phone is exciting, but changing phones can be a real pain because you have to move all your data into your new phone like iPhone 15 or iPhone 15 Pro (Max). Contacts are very important data on your phone because you won’t be able to make any calls or send texts to your known persons or friends and family without them. If you are an iPhone user, you need to follow some processes to transfer contacts from Apple iPhone 7 Plus to iPhone. Also, you may want to import contacts from excel to iPhone . This article will give you all the information you need about how you can transfer contacts from Apple iPhone 7 Plus to new iPhone like iPhone 15 or iPhone 15 Pro (Max).
Part 1. Transfer Contacts from Apple iPhone 7 Plus to iPhone Including iPhone 15 with Dr.Fone (1- click solution)
Dr.Fone is a perfect tool for transferring contacts from Apple iPhone 7 Plus to iPhone. It can transfer contacts and all kinds of data and media files from your iPhone to iPhone or Android and vice-versa. Dr.Fone - Phone Transfer is a great tool that supports all the latest iOS and Android-based smartphones; it also works smoothly on Windows and Mac. It’s the easiest, fastest, and safest way to transfer contacts from Apple iPhone 7 Plus to iPhone.
Dr.Fone - Phone Transfer
1-Click Phone to Phone Transfer
- Easy, fast, and safe.
- Move data between devices with different operating systems, i.e., iOS to Android.
- Supports iOS devices that run the latest iOS

- Transfer photos, text messages, contacts, notes, and many other file types.
- Supports over 8000+ Android devices. Works for all models of iPhone, iPad, and iPod.

Follow these steps to learn how to transfer contacts from one iPhone to another.
Start The Process
First, you need to download dr. Fone on your computer and install it. Run the program and connect both of your iPhones to your computer with good-quality data cables. You will be able to see the home screen of Dr.Fone in front of you, and you will have to choose the option named “Phone Transfer.”
Transfer Contacts
Dr.Fone will show you both iPhones on your screen, and you will have to choose the “Contacts” option and click on the “Start Transfer” button.

Finish The Process
Your contacts will be transferred from the source iPhone to the target iPhone within a very short time.

Transferring contacts is easy with Dr.Fone - Phone Transfer. This doesn’t overwrite any data on your phone or doesn’t cause any data loss problem. Just follow the process to learn how to copy contacts from iPhone with the help of Dr.Fone - Phone Transfer.
Part 2. Transfer Contacts from Apple iPhone 7 Plus to iPhone Including iPhone 15 by restoring from iCloud backup
You can easily transfer your contacts using iCloud backup without factory resetting the entire device and starting again. Just follow this process-
Log in to iCloud
You need to connect both your iPhones to Wi-Fi and log into your iCloud account from both of your iPhones.
Sync Contacts and Backup
Now you need to take your source iPhone and go to the Settings option. Then you need to tap the name at the top, go to the iCloud option, scroll down and make sure the option for Contact is toggled on. If you have iOS 10.2 and earlier on your phone, you will find it in Settings > iCloud.

After syncing the contacts, you need to scroll down to the iCloud Backup option and choose the Backup Now option.

Refresh Contacts
Ensure that the syncing contact option on your target iPhone is enabled from the settings option, and then open the contact app to swipe down and refresh it. Within a very short time, your contacts will start appearing on your target iPhone.
Part 3. Sync contacts from Apple iPhone 7 Plus to iPhone Including iPhone 15 by iCloud syncing
You can easily learn how to transfer contacts from one iPhone to another (like iPhone 15 or iPhone 15 Pro) using iCloud syncing. It takes very little time, and all it needs is one apple account signed in to both your source and target iPhones at a time. Just follow these steps properly-
Merge Contacts
You need to go to the “Settings” option of your source iPhone and tap on your name at the top of the settings screen. Check the “Contacts” option is toggled on or not from the “iCloud” option. After that, hit merge to upload your contacts on iCloud.

You need to use the Apple ID and password on your target phone and do the same thing to toggle on the “Contacts” option from “iCloud” and wait until your iPhone asks you to merge contacts.

Refresh Contacts
After choosing the “Merge” option, you will see that existing contacts and previous contacts from the source iPhone will merge on your target iPhone. Now you need to refresh the contact list, which will allow you to find all the old contacts to your target iPhone.

Part 4. Move Contacts from Apple iPhone 7 Plus to iPhone Including iPhone 15 using iTunes
iTunes is a great solution to transfer iPhone contacts. Many users prefer iTunes while transferring contacts because it comes directly from Apple, and it takes care of all your iOS device management needs. These steps will help you to transfer contacts from Apple iPhone 7 Plus to iPhone using iTunes-
Install iTunes and connect source iPhone
Download the latest version of iTunes on your PC, install it properly, and launch the software. Connect your source iPhone to your PC, and iTunes will automatically detect it.
Backup Contacts
Now click on the “Device” option and then select iPhone. Then you need to select the “Summary” option and then choose “This Computer” and “Back Up Now” to back up all your data and contacts on your PC.

Restore Backup
In the end, you need to connect your target iPhone to your PC and choose the “Summary” option in the iTunes software. You need to choose the “Restore Backup” option and then browse and select the latest backup folder. At last, choose the “Restore” option. iTunes transfers contacts and all the data from the source iPhone to target the iPhone, and it’s essential to back up the data from your source iPhone.

Transferring any data from your old phone to a new phone can be very painful. But nowadays it’s very easy with the help of a lot of tools. If you want to transfer contacts from your old iPhone to a new one, you need to use Dr.Fone - Phone Transfer because it’s the best solution to use a 1-Click system to copy contacts from one phone to another in a very easy and fast way. You can also use iCloud backup, iCloud syncing, and iTunes to transfer your contacts, but Dr.Fone can give you the safest and easiest solution. I can assure you that you won’t regret it if you choose Dr.Fone for this issue.
How to Transfer from Apple iPhone 7 Plus to Samsung Galaxy S20?
If you are willing to switch your phone from an iOS device to an android, the primary issue which restricts you to do so is your data loss and the data transferring from one device to another. In this article, we’ll be learning How to Transfer Data from Apple iPhone 7 Plus to Samsung Galaxy S20, with some easy and best techniques. The discussed techniques will ensure your data from not getting lost.

Part 1: Transfer from Apple iPhone 7 Plus to Samsung Galaxy S20 Directly (Easy and Fast)
Dr.Fone - Phone Transfer program is a phone transfer tool, you can transfer all types of data like photos, music, contacts, messages, calendar, etc. from one phone to another easily.
Let’s see how we can to transfer data from Apple iPhone 7 Plus to Galaxy S20
Dr.Fone - Phone Transfer allows you to transfer data between various phones with one click, including Android, iOS, Symbian, and WinPhone. Use this program to transfer and convey data between any of them.
Down below there’s a detailed step by step process explaining how you can transfer all your data from one phone to another using computer
Step 1. Connect Your Apple iPhone 7 Plus to the computer
After opening Dr.Fone on your computer, select “Phone Transfer” among the modules.
Make sure you have connected both of your devices with it. Here let’s take an iOS and a Samsung Galaxy S20(any Android device) as an example.
The data from the source device will be conveyed/transferred to the destination device. To exchange their position, you can use the “Flip” button too.
Step 2. Select the file and start to transfer
Choose the file types you desire to move. To begin the process, click on-Start Transfer. Until the process is completed, please don’t disconnect the Apple iPhone 7 Plus devices for its maximum efficiency.
Before commencing the data transfer process between both the phones, if you want to erase the data of the destination device-check the “Clear Data before Copy” box.
All the files you selected will be transferred to the targeted phone successfully In a couple of minutes.
Part 2: Transfer from iCloud Backup to Samsung Galaxy S20 (Wireless and Safe)
1. Dr.Fone - Switch App
If you don’t have a computer device and want to transfer data from an iOS device to an Android device, here is an in-depth step by step process guiding you how to do so.
How to sync data from the iCloud account to Android
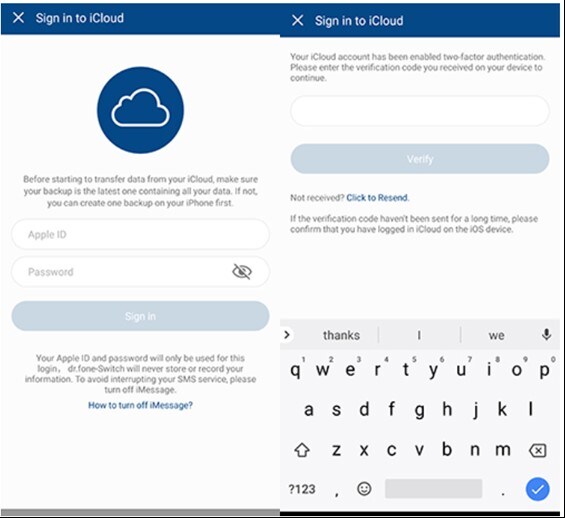
Step 1. Touch “Import from iCloud”, after installing the Android version of Dr.Fone - Switch.

Step 2. With your Apple ID and passcode, log in to the iCloud account.
If you have enabled the two-factor authentication, enter the verification code.
Step 3. On your iCloud account now in a while later, all types of data can be detected.
Touch “Start Importing” after Selecting your desired data or all of these data.
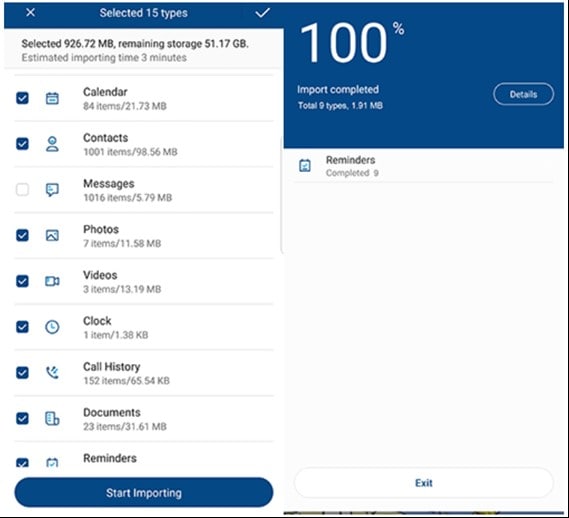
Step 4. Sit back until and unless data importing is fully completed. Then you can exit this app and check the data synced from iCloud on your Apple iPhone 7 Plus or tablet.
Prons:
- Transfer data from Apple iPhone 7 Plus to Android without a PC.
- Support mainstream Android phones (including Xiaomi, Huawei, Samsung, etc.)
Cons:
- For direct data transfer, connect iPhone to Android by using an iOS-to-Android adapter.
2. Samsung Smart Switch App
Export data from iCloud to Samsung S20 with Smart Switch
If you make use of the Samsung Smart Switch app, syncing iTunes with Samsung is just an easy-peasy task.
It has become simpler to sync iCloud to Samsung S20 as it stretches compatibility with iCloud. Here is how-
How to transfer data from iCloud to Samsung S20 with Smart Switch
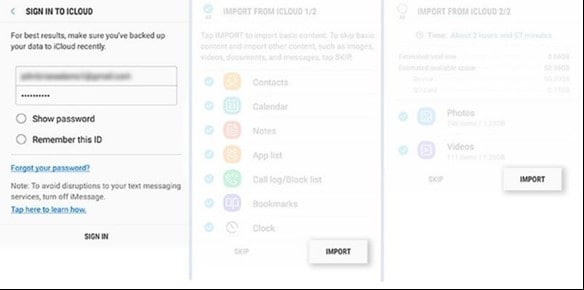
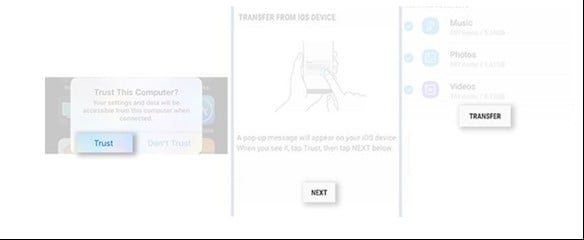
Download Smart Switch from Google Play on your Samsung Device. Open the app, then click on ‘WIRELESS,’ after that tap on ‘RECEIVE’ and select the ‘iOS’ option.
Sign in with your Apple ID and password. Now, select the desired content you want to transfer from iCloud to Samsung Galaxy S20 and press ‘IMPORT.’
If you are using a USB cable, do keep iOS cable, Mirco USB, and USB Adapter handy. Then, load Smart Switch on your Samsung S20 model and click on ‘USB CABLE.’
Further, connect the two devices by iPhone’s USB cable and the USB-OTG adapter with Samsung S20.
Click on ‘Trust’ followed by pressing ‘Next’ to proceed further. Choose the file and press on ‘TRANSFER’ to convey/Transfer from iCloud to Samsung S20.
Prons:
- Wireless transfer.
Cons:
- Only for Samsung phones.
If you prefer to run a desktop software to transfer data, use Dr.Fone - Phone Transfer. It’s a hassle-free solution. Connect both phones to computer and start to transfer data in one-click.
Part 3: Transfer from iTunes Backup to Samsung Galaxy S20 without iTunes
Step 1. Select the backup file
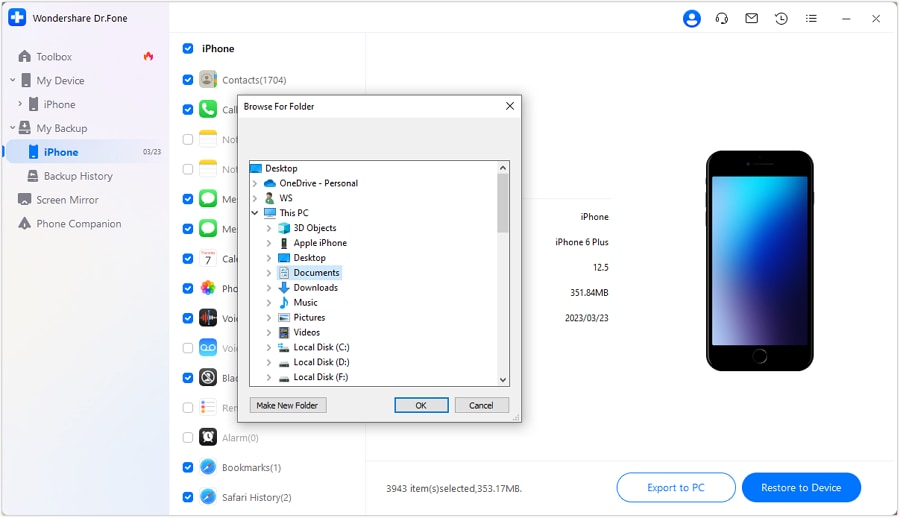
Launch Dr.Fone and select Phone Backup. Connect your Samsung S20 to the computer. Click on Restore.
It will give the option View backup history if you have used this function to backup your iOS device before. Click on View backup history option to view the backup file index.

After that, Dr.Fone will display the backup history. Just pick the backup file you want and click on the Next on the bottom of the program or view button next to the backup file.

Step 2. View and Restore the backup file
The program will take a few seconds to examine the backup file and display all data in categories in the backup file after you click on View.
After you find the files you require, you can pick a few files or choose them all to move to the next step.

Currently, Dr.Fone supports to restore the music, Safari bookmarks, Call History, Calendar, Voice memo, Notes, Contacts, Messages, Photos, videos to the Apple iPhone 7 Plus device. So you can restore these data to your Samsung device or transfer them all to your computer.
If you want to restore the files to your device, select the files and click on Restore to Device. In a couple of seconds, you will get these files on your Android gadget.
If you want to export the chosen files to your computer, click on Export to PC. Then select the save path to transfer your data.
Final Words
The techniques which are discussed above are meant to solve your problem and let you know How to Transfer from Apple iPhone 7 Plus to Samsung Galaxy S20. These techniques will guide you through transferring your file quickly and swiftly. The method discussed over here is related to both the users- who are willing to transfer their data using a computer and without using it. So, finally, we hope that this article would help you to solve your issue related to data transfer.
Also read:
- [New] 2024 Approved Mastering YouTube Sounds - 4 Top Budget-Friendly Apps
- [Updated] 2024 Approved Cognitive Cornerstones Essential Educational Content YT
- [Updated] 2024 Approved Insta Personality Showcase - 100 Crafted Caption Ideas
- [Updated] Deep Dive Into SRT Mechanics and Performance
- 3 Ways for Android Pokemon Go Spoofing On Honor 90 GT | Dr.fone
- AI-Assisted Naming Wizards The Best 10 for Podcasters for 2024
- How to Transfer Apple iPhone 15 Pro Max Data to iPhone 12 A Complete Guide | Dr.fone
- How To Transfer Messages From Apple iPhone 15 Pro to other iPhone All iOS Versions | Dr.fone
- In 2024, Fix Apple iPhone XR Stuck on Data Transfer Verified Solution! | Dr.fone
- In 2024, How To Transfer Data from Apple iPhone 11 to New iPhone 15 | Dr.fone
- In 2024, How to Transfer Everything from Apple iPhone 7 to iPhone | Dr.fone
- Title: In 2024, 5 Ways to Transfer Music from Apple iPhone 7 Plus to Android | Dr.fone
- Author: Charlotte
- Created at : 2024-10-13 05:08:54
- Updated at : 2024-10-17 21:29:55
- Link: https://iphone-transfer.techidaily.com/in-2024-5-ways-to-transfer-music-from-apple-iphone-7-plus-to-android-drfone-by-drfone-transfer-from-ios/
- License: This work is licensed under CC BY-NC-SA 4.0.