
In 2024, 5 Ways to Transfer Music from Apple iPhone 6s Plus to Android | Dr.fone
5 Ways to Transfer Music from Apple iPhone 6s Plus to Android
“I have just got a new Android, and I want to transfer music from Apple iPhone 6s Plus to Android. Can anyone help me learn how to send music from Apple iPhone 6s Plus to Android without much hassle?”
Switching from an iPhone to Android can be a tough job. Not only to transfer photos and contacts, but users also need to take some added measures for moving music from Apple iPhone 6s Plus to Android. The good news is that some tools can move data from iOS to Android instantly. You can use iTunes, a dedicated app, or a third-party data transfer tool to do the same. Read on and get to know how to transfer music from Apple iPhone 6s Plus to Android like a pro.
Part 1: How to transfer all music from Apple iPhone 6s Plus to Android in 1 click?
The simplest way of learning how to move music from Apple iPhone 6s Plus to Android is by using Dr.Fone - Phone Transfer . As the name suggests, the tool will make it easier for you to switch from one smartphone to another without losing any data. It is a part of the Dr.Fone toolkit and is compatible with leading iPhone and Android models. Therefore, you can easily perform a cross-platform transfer of data with a single click.
Dr.Fone - Phone Transfer
Transfer Music from Apple iPhone 6s Plus to Android Directly in 1 Click!
- Easily transfer contacts from Apple iPhone 6s Plus to Android phone without any complication.
- Works directly and transfer data between two cross-operating system devices in real-time.
- Works perfectly with Apple, Samsung, HTC, LG, Sony, Google, HUAWEI, Motorola, ZTE, Nokia, and more smartphones and tablets.
- Fully compatible with major providers like AT&T, Verizon, Sprint, and T-Mobile.
- Fully compatible with the latest iOS and Android
- Fully compatible with the latest Windows or Mac version.
3981454 people have downloaded it
Note: If you have no computer at hand, you can also get the Dr.Fone - Phone Transfer (mobile version) from Google Play, with which you could log into your iCloud account to download the data, or transfer from Apple iPhone 6s Plus to Android using an iPhone-to-Android adapter.
Besides music files and formats of different kids, Dr.Fone - Phone Transfer also supports the transfer of contacts, messages, photos, videos, and other types of contact. Therefore, you can move all your data at once using this tool. To learn how to send music from Apple iPhone 6s Plus to Android using Dr.Fone - Phone Transfer, follow these steps.
1. Download Dr.Fone - Phone Transfer on your Windows PC or Mac and launch it whenever you wish to transfer music from Apple iPhone 6s Plus to Android. From its welcome screen, select the “Switch” module.

2. Now, connect both the Apple iPhone 6s Plus devices to your computer and let the application detect them automatically. On the interface, you can see a preview of both the Apple iPhone 6s Plus devices.
3. Since you move your data from an iPhone to Android, your iPhone should be listed as a source while Android should be a destination device. If not, then use the Flip button to interchange their positions.

4. Select the type of data you wish to transfer. For instance, in this scenario, make sure that the option of “Music” is selected. Once you have made the selection, click on the “Start Transfer” button.

5. Sit back and wait for a while as Dr.Fone - Phone Transfer will automatically move the selected content from Apple iPhone 6s Plus to Android.
6. When the process is completed, you will be notified. In the end, you can remove both the Apple iPhone 6s Plus devices safely.

Part 2: How to transfer music from Apple iPhone 6s Plus to Android using Google Music Manager?
Another way to transfer music from Apple iPhone 6s Plus to Android is by using Google Music Manager. Though, unlike Dr.Fone tools, the process can be a bit complicated. Firstly, you need to sync your music between iPhone and iTunes, and then you have to import it from iTunes to Google Music Manager. Sounds complicated, right? In the end, you can access it on your Apple iPhone 6s Plus using the Google Music app. You can follow these steps to learn how to move music from Apple iPhone 6s Plus to Android using Google Music Manager.
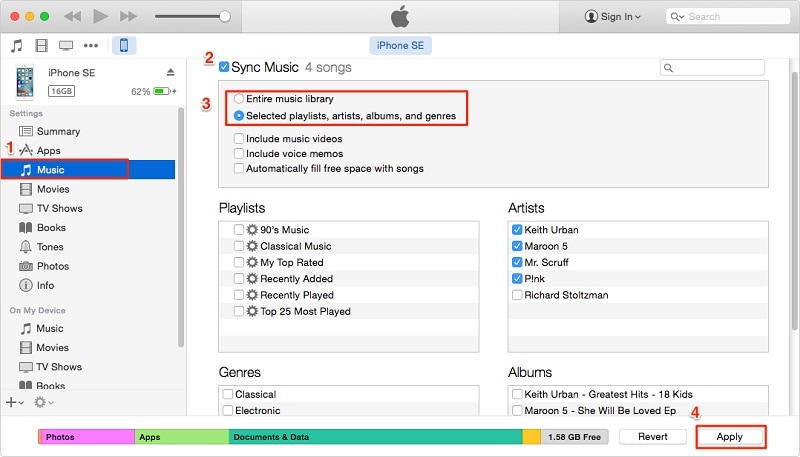
1. Firstly, you need to sync music between your iPhone and iTunes. To do this, launch an updated version of iTunes on your system and connect your iPhone to it.
2. Please select your device and go to its Music tab. From here, you can sync your iPhone with iTunes. Click on the “Apply” button and start the syncing process.
3. Once all your music is synced to iTunes, you can disconnect your iPhone.
4. Go to the official website of Google Music and download Google Music Manager on your system.

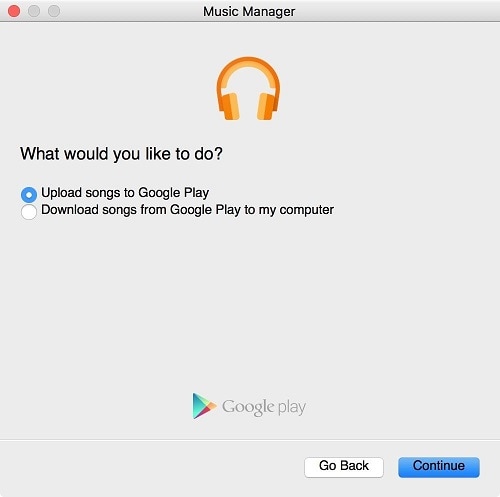
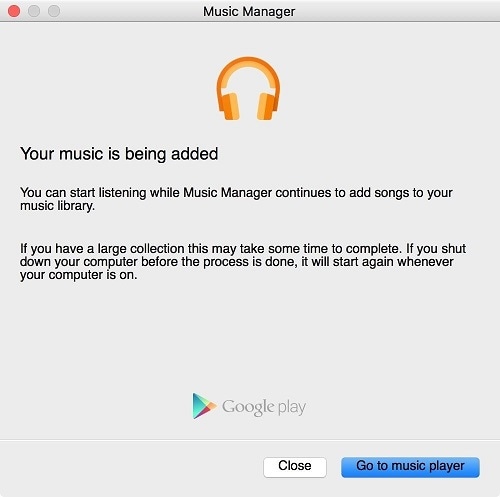
5. Launch the Music Manager application and choose to upload songs to Google Play.
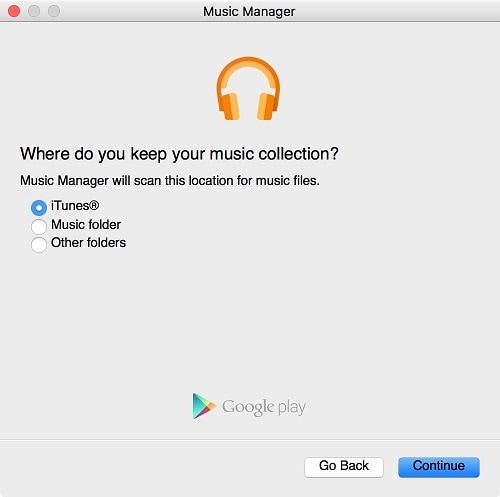
6. Select the source as “iTunes” and click on the “Continue” button.
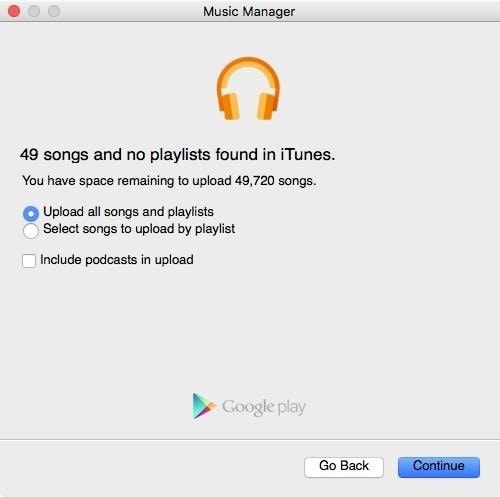
7. The Music Manager will automatically sync your iTunes library and display the available songs. From here, you can choose to upload selected songs or the entire library.

8. Wait for a while for your songs to be imported to Google Music Manager. Once it is done, you will be notified.
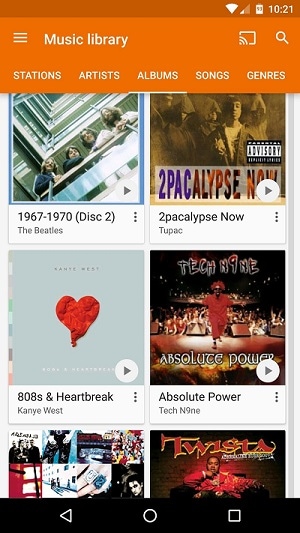
9. Great! You are almost there. In the end, you can download the Google Music app on your Android. From here, you can automatically access all the newly transferred songs on your Google Music library.
Part 3: How to transfer music from Apple iPhone 6s Plus to Android selectively?
As you can see, with Dr.Fone - Phone Transfer, all the music files are transferred from one device to another in one go. If you want to transfer music from Apple iPhone 6s Plus to Android selectively, you can take Dr.Fone’s assistance - Phone Manager (iOS) . It is also a part of the Dr.Fone toolkit and is developed by Wondershare.
Dr.Fone - Phone Manager (iOS)
Transfer iPhone/iTunes Media to Android Devices Selectively
- Transfer files between Android and iOS, including contacts, photos, music, SMS, and more.
- Manage, export/import your music, photos, videos, contacts, SMS, Apps etc.
- Transfer iTunes to Android (vice versa).
- Manage your iOS/Android device on computer.
- Fully compatible with the latest iOS and Android
4,335,819 people have downloaded it
With Dr.Fone - Phone Manager (iOS), you can move data between your iOS device and computer and even iPhone to another Android or iOS device. It works with all the leading smartphone models and supports prominent data types like photos, videos, music, contacts, messages, and more. Having a user-friendly interface will make it easier for you to learn how to transfer music from Apple iPhone 6s Plus to Android. All you need to do is follow these steps:
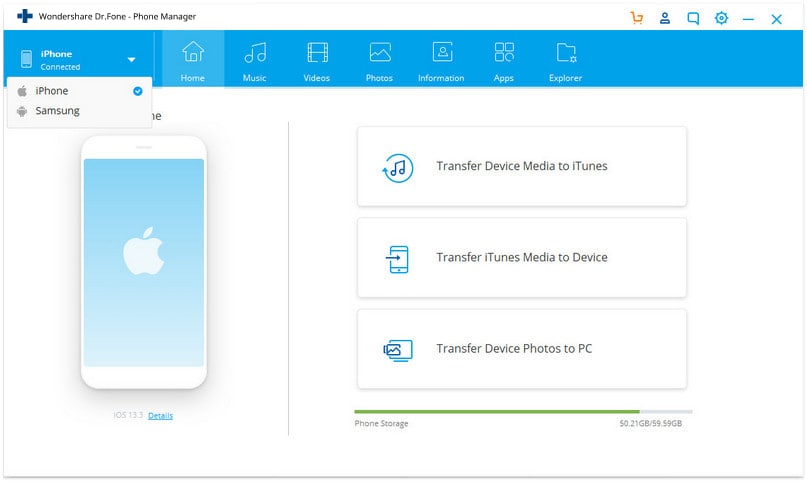
1. Start by launching the Dr.Fone toolkit on your system and visit the “Transfer” tool from its home screen.
2. Connect your iPhone and the target Android device to the system. The interface will automatically detect both the Apple iPhone 6s Plus devices in no time. From the top left option, make sure that you have selected your iPhone as a source device.
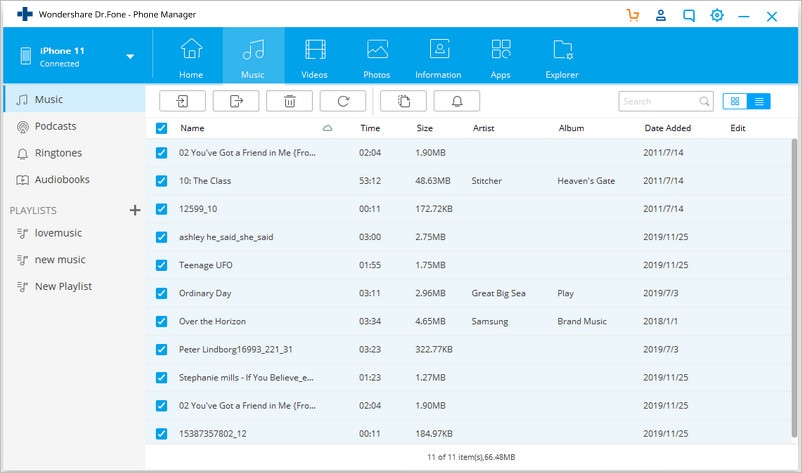
3. Great! Now, move to the “Music” tab on the application. Here, you can view all the music files stored on your iPhone, listed in different categories.
4. Just select the files you wish to transfer to your Android and click on the export button on the toolbar.
5. This will display a list of all the connected devices. Select the target Android device to commence the transfer process.
Part 4: How to transfer music from Apple iPhone 6s Plus to Android without computer?
Too often, users don’t wish to use a computer for moving music from Apple iPhone 6s Plus to Android. If you have the same preference, then you use a data transfer app to meet your requirements. Out of all the cross-platform data transfer options, SHAREit is one of the most recommended apps. You can install the app on both the Apple iPhone 6s Plus devices and learn how to transfer music from Apple iPhone 6s Plus to Android without computer by following these steps.
1. Before you proceed, make sure that you have installed the SHAREit app on your iPhone and Android by visiting its Google Play and App Store
2. Launch the app on both the Apple iPhone 6s Plus devices and connect them to the same WiFi network. This is because the transfer of data takes place through WiFi direct.
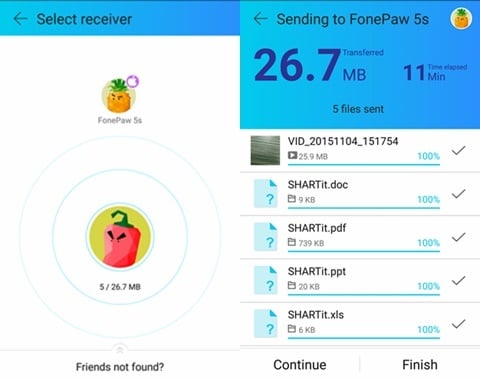
3. On the source iPhone, choose to “Send” the data. Also, you can browse and select the music files that you wish to send.
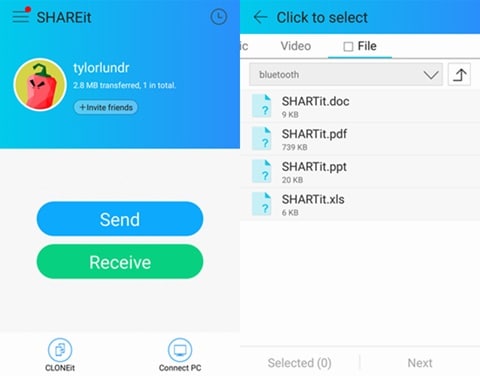
4. Similarly, on your target Android device, mark it as a receiving device. It will automatically start looking for the nearby devices.
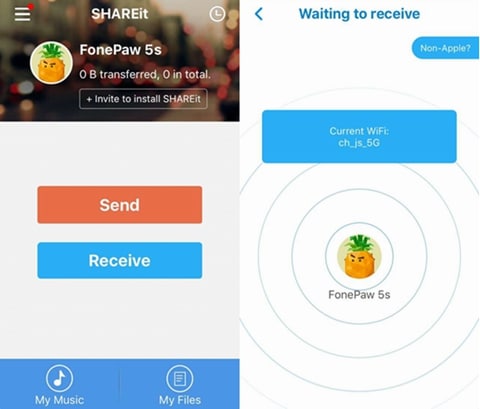
5. On your iPhone, you will be prompted regarding the target device. Select it to initiate the transfer.
6. Accept the incoming data from the source device and start receiving the selected music on your Android.
Part 5: How to transfer music from iTunes to Android?
It might surprise you, but there are different ways to learn how to transfer music from Apple iPhone 6s Plus to Android. We have already discussed how to send music from Apple iPhone 6s Plus to Android using iTunes and Google Music Manager. Though, there is another alternative to do the same. Once you have transferred your music from Apple iPhone 6s Plus to iTunes, you can directly move it to an Android device as well.
1. To start with, make sure that you have already synced your iPhone music with iTunes. Once it is done, launch iTunes again.
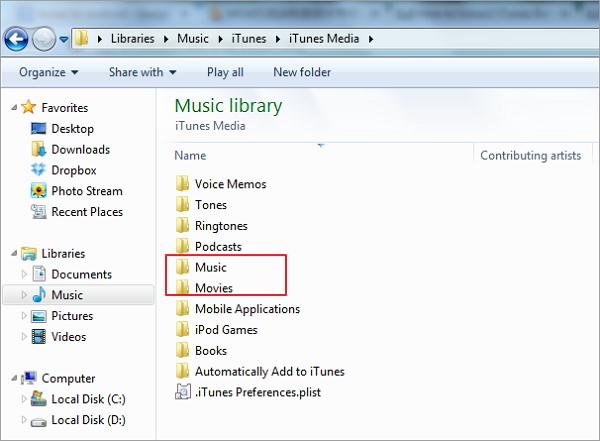
2. Go to its Preferences > Advanced options and enable the “Copy files to iTunes media folder when adding to library” feature from here.
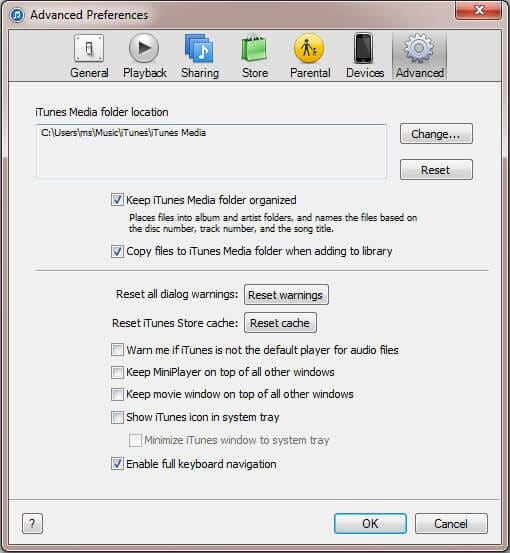
3. Once you apply this change, iTunes will make a dedicated folder with all the music files present in its library. In Windows, you can find it under My Music > iTunes while in Mac, it would be under Music > iTunes.
4. To transfer these music files, connect your Android to the system and choose to use it as a media transfer device.
5. Browse to the iTunes music folder, copy the selected songs, and transfer them to your Apple iPhone 6s Plus. If you have a Mac, then you need to use Android File Transfer to do the same.
After learning different moving music from Apple iPhone 6s Plus to Android, you can certainly pick a preferred method. As you can see, Dr.Fone toolkit provides the fastest and easiest way to transfer music from Apple iPhone 6s Plus to Android. With Dr.Fone - Phone Transfer , you can transfer all the music files from one device to another in a single click. In order to perform a selective transfer of data, you can try Dr.Fone - Phone Manager (iOS) as well. Go ahead and try these tools and teach others how to move music from Apple iPhone 6s Plus to Android by sharing this guide.
4 Ways to Sync Contacts from Apple iPhone 6s Plus to iPad Easily
One of the key elements within the Apple ecosystem is its capacity to synchronize data across various devices. In this age of inter connectivity, the importance of harmonizing contacts across multiple devices has emerged as vital. With the prevalence of iPhones and iPads, the demand for an efficient method to sync contacts between these two devices has surged.
For better contact management, the contacts syncing between iPhone and iPad is critical. This article discusses how do you sync contacts from Apple iPhone 6s Plus to iPad. It will go through 4 effective methods to sync contacts from an iPhone to an iPad.
Part 1: Sync Contacts from Apple iPhone 6s Plus to iPad Using Wondershare Dr.Fone
Wondershare Dr.Fone can be used to transfer contacts from Apple iPhone 6s Plus to iPad/iPhone . You can back up iPhone contacts using Dr.Fone and then restore the contacts to the iPad without losing any data.
Wondershare Dr.Fone
Back up & Restore iOS Data Turns Flexible.
- One-click to back up the whole iOS device to your computer.
- Allow to preview and restore any item from the backup to a device.
- Export what you want from the backup to your computer.
- No data loss on devices during the restoration.
- Selectively restore any data you want.
- Supported the newest iPhone and Android phones.
3981454 people have downloaded it
Here’s how to sync iPhone contacts to iPad:
- Step 1: Connect the iPhone to the computer
Launch Wondershare Dr.Fone on the computer and then select “My Backup” from among various options. Now, using a cable, connect the iPhone to the computer and then allow Dr.Fone to automatically detect your connected iPhone device.
- Step 2: Click “Back Up Now” to Back up
After the iPhone is connected successfully, Dr.Fone will automatically detect the file types in it. Click on “Back Up Now” to back up your iPhone.

The backup process will start and take a few minutes to complete depending on the volume of data to be backed up. Dr.Fone will display all the data that are supported after the backup is completed.

Now that you have backed up all the contacts on the iPhone and then restoring them to the iPad is the way to it.
- Step 3: Select Restore to Device
Once the backup is completed, connect your iPad using a USB cable. Select the backup file and hit “Restore to Device”. It’s as simple as it sounds, and anyone can back up your contacts and sync them to your iPad.

In addition to manual backup, you can also back up contacts on iPhone automatically.
How to back up contacts automatically and wirelessly?
Step 1: Click “Backup Preference” to set up the backup frequency and backup period.
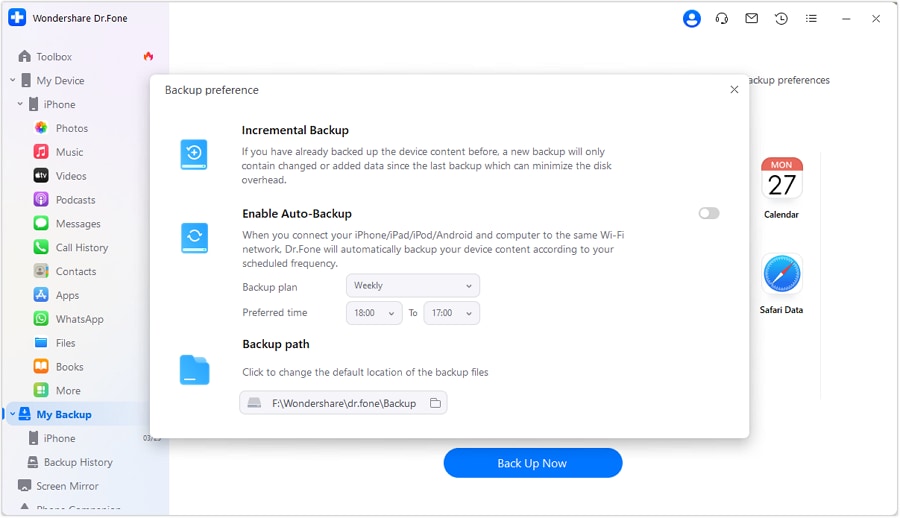
Step 2: Connect your iPhone and PC with the same wifi, the contacts on iPhone will be backed up automatically. You don’t need to use a USB cable to connect the iPhone to the PC in this step. Next time, if you would like to back up contacts again, it will only be for newly added data or modified files, which helps you save storage space and backup time.
Step 3: Restore the backup file to iPad/iPhone. You can preview the backup data and select the data you want to restore.

Bonus Tip: Sync Contacts from Apple iPhone 6s Plus to iPad with 1 Click
Except the Phone Backup feature can help you sync contacts from Apple iPhone 6s Plus to iPad easily, there is another tool that can also help you. If you have downloaded the Wondershare Dr.Fone, you may see this tool on the homepage, too. Yes! It is Dr.Fone - Phone Transfer .
Features of Dr.Fone - Phone Transfer tool:
- Easily share contacts and other types of data on iPhone to iPad/another iPhone.
- Just 1 click to transfer contacts to the iPad.
- Sync the data from Apple iPhone 6s Plus to iPad within less than 3 minutes, the time of a cup of coffee!
Part 2: Sync Contacts from Apple iPhone 6s Plus to iPad Using iCloud
If you’re heavily invested in the Apple environment, choosing iCloud is the optimal route. It serves as a convenient tool for synchronizing contacts between your iPhone and iPad. Leveraging iCloud’s powerful synchronization features, you can effortlessly maintain updated contact lists across all your Apple devices. Follow the simple steps outlined below to sync contacts from Apple iPhone 6s Plus to iPad:
Step 1: After ensuring that the same Apple ID is logged in on both iPhone and iPad, first move to iPhone’s Settings. Here, tap “Apple ID,” and on the following screen, choose “iCloud.” In the “iCloud” tab, move to the “Apps Using iCloud” section and ensure the “Contacts” app is toggled on. Afterward, transfer to your iPad and access the Apple iPhone 6s Plus device’s Settings.

Step 2: Within the Settings app, tap “Apple ID” and follow it by pressing “iCloud” on the following screen. Here, move to the “Apps Using iCloud” section and toggle on the “Contacts” app. Wait a few moments, and your contacts will be synced across devices.

Part 3: Sync Contacts from Apple iPhone 6s Plus to iPad Using AirDrop
AirDrop is a convenient feature native to Apple devices. It presents a convenient wireless solution for seamlessly transferring contacts between an iPhone and an iPad. With its user-friendly configuration, AirDrop enables the easy sharing of diverse data, including contacts, among nearby Apple devices. Follow the instructions below for how do I sync contacts from Apple iPhone 6s Plus to iPad using AirDrop:
Step 1: Begin by ensuring that Bluetooth and Wi-Fi are enabled on both iPhone and iPad. Afterward, access Control Center by swiping down from the top right corner of the Apple iPhone 6s Plus device.

Step 2: Here, enable AirDrop and set its visibility to “Everyone.” Now, open the ‘Contacts’ app on your iPhone, select the contacts you want to transfer and tap the “Share” button.

Step 3: Tap on “AirDrop” from the list of sharing options provided. After selecting “AirDrop,” choose your iPad as the receiving device. A prompt will appear on your iPad to accept the incoming contacts. Tap “Accept” to initiate the transfer.

Part 4: Sync Contacts from Apple iPhone 6s Plus to iPad Using iTunes/Finder
iTunes/Finder serves as a robust option for users who prefer a traditional and reliable method. It is a tested and trusted way of syncing data between their Apple devices. This software offers comprehensive backup and sync functionalities. That’s why iTunes/Finder provides a secure and efficient way to transfer contacts from an iPhone to an iPad. Follow the steps below to sync your contacts using iTunes or Finder:
Step 1. Begin by launching the most recent version of iTunes/Finder on your computer. Connect your iPhone and navigate to the “Summary” tab by clicking the “iPhone” icon. Here, enable the “Sync with this iPhone via Wi-Fi” feature.

Step 2. Subsequently, disconnect the iPhone and link your iPad to the computer. In iTunes/Finder, select the “Device” icon and switch to the “Info” tab. Here, ensure that the “Sync Contacts” box is checked, and then choose either “All Contacts” or “Selected Groups.”

Step 3. Once you have made your selection, click on “Apply” to initiate the contacts synchronization process. Upon completion, you can disconnect the iPad and access the synced contacts from your iPhone.

So, these are four ways in which you can transfer contacts from Apple iPhone 6s Plus to iPad. Since these methods are the outcome of thorough research, all the methods are absolutely safe, and there is absolutely no data loss in the process. However, we would recommend Wondershare Dr.Fone , considering its robust and efficient working design. It is one of the best and most popular tools to transfer data from Apple iPhone 6s Plus to iPad and offers an amazing overall experience with a simple interface and fast process. What’s imperative is to ensure that you follow all the steps properly and that’s all, there you have it; all the contacts on the iPad.
How to Transfer Everything from Apple iPhone 6s Plus to iPhone
Well, you all know already from experience that transferring to an iPhone device from an Android phone is an uphill task, especially if you have no idea about the right way or the tool you should use. Transferring photos from one device to another one, should be done extra care as you wouldn’t want to lose your beloved memories, right?
Therefore, to transfer photos from Android to iPhone, such as iPhone 15, you will need third-party software, which is easy to access the application as well. Now, both Android and iPhone devices have different operating systems, which make it impossible to do direct transfers.
However, fortunately, there are plenty of high-quality third-party programs that can help you enable Android to iPhone photo transfer. So, start reading the guide below and choose the option that best suits you.
Part 1: How to transfer photos from Android to iPhone including iPhone 15/15 Pro(Max) with Dr.Fone?
If you are confused over which method you should choose for transferring photos from Android to iPhone, then compare the quality and the quickness of the chosen method. Well, to be frank, the tool that qualifies all these criteria is the Dr.Fone toolkit, which is a comprehensive solution that is well designed to tackle all mobile-related issues and tasks.
Dr.Fone is perfect because you can transfer across multiple devices regardless of OS. As an example, if you want to transfer photos from Android to iPad /iPhone and vice versa, it can be done easily by following two ways as mentioned below:
Method 1.1 One-click to Transfer Photos from Android to iPhone using Dr.Fone - Phone Transfer
Dr.Fone - Phone Transfer is a software package that facilitates cross-device transactions such as transferring photos from Android to iPhone. If you are in the process of replacing your Android with a new iPhone, then use Dr.Fone to transfer all contents to the new phone. The content can include photos, contacts, videos, and social media messages.
Dr.Fone - Phone Transfer
Transfer Data from Android to iPhone in 1 Click Directly!
- Cross-platform data shift between any device of your choice from Android and iPhone.
- Support massive data, including images, videos, music, messages, contacts, apps, and more.
- Works perfectly with almost mobile phones and tablets, such as iPhone, iPad, Samsung, Huawei, etc.
- Fully work with mobile system iOS 17 and Android 13 and computer system Windows 10 and Mac 14.
- 100% safe and risk-free, backup & restore data as the original.
3981454 people have downloaded it
Let us see the steps on how to transfer photos from Android to iPhone using Dr.Fone - Phone Transfer.
Step 1. Download and install Dr.Fone - Phone Transfer and launch it. Then select the Switch option from the main interface.
Step 2. Now, connect your Android and iPhone to the computer.
Step 3. As soon as you connect the Apple iPhone 6s Plus device, it will start recognizing it and mentioned it as the ‘Source’ phone or ‘Destination’ phone accordingly. In this case, make sure the Android phone is the Source, and the iPhone is the Destination. You can change their position using the Flip button.
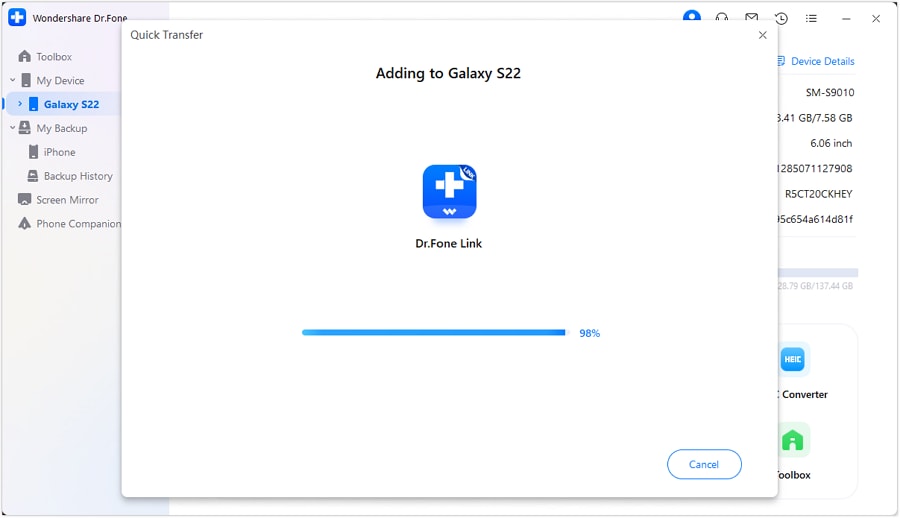
Step 4. Finally, select the files you want to transfer (photos) and click on ‘Start Transfer’.
That was it. Soon, it will transfer pictures from Android to iPhone.
Method 1.2 Selectively Transfer photos from Android to iPhone using Dr.Fone - Phone Manager (Android)
Another way that can assist you in moving photos from Android to iPhone is the Dr.Fone - Phone Manager (Android) . What is incredibly convenient about Dr.Fone - Phone Manager (Android) is its ability to transfer photos selectively. You can also use it to transfer contacts, videos, messages, podcasts, and anything else stored on your Android in minutes. Dr.Fone - Phone Manager (Android) is a secure, trustworthy program. Hence you can be reassured that your information will be kept safe while transferring from one device to another.
Dr.Fone - Phone Manager (Android)
All in one Solution to Transfer Photos from Android to iPhone
- Transfer, backup, edit, export, import & view the data on your phone easily.
- Support multiple data on your phone: music, photos, videos, contacts, SMS, Apps, etc.
- Copy data from one phone to another phone without any data loss.
- Additional features to help you root your device, make gif image, and ringtone.
- Compatible with more than 3,000 Android phones ranging from Samsung to LG, HTC, Huawei, Motorola, Sony, etc.
3981454 people have downloaded it
Here either you can select the photos that you wish to transfer selectively or select all the photos at once. Now, as you wish to transfer photos to an iPhone device, connect your iPhone as the Target phone and then click on the box with the export symbol > Select Export to Device. The name of your iOS device should appear. Click on the Apple iPhone 6s Plus device to start transferring photos.
Part 2: Transfer photos from Android to iPhone including iPhone 15/15 Pro(Max) using Move to iOS App?
Now, to answer how to transfer photos from Android to iPhone, there is another simple solution that you can make use of. It is called the “Move to iOS app,” which you can download freely from the Google Play store.
Note: This solution only works when you set up the iPhone. If the iPhone is already set up, you need to factory reset it and set it up to restore photos with this App.
Now to proceed, first of all, you need to do some settings on your iPhone device as follows:
On your iPhone, go to a screen called ‘Apps & Data’ > choose ‘Move Data from Android’ option.


The next step is to take your Apple iPhone 6s Plus to complete the transfer process with the “Move to iOS” app.
- Switch to your Apple iPhone 6s Plus, open Google Play Store, and search for ‘Move to iOS’ app.
- Open the ‘Move to iOS’ app to accept permission requests, install it, and open the app.
- At this point, tap Continue on both your iOS and Android device.

- On your Apple iPhone 6s Plus, enter the 12-digit code of the iPhone. This is so that the ‘Move to iOS’ app knows which iOS device it has to transfer the data to.

Before the transfer starts, you will be asked a number of questions, like do you want to transfer Google Account information, Bookmarks, etc. Now, since you only want videos and photos, deselect the other options except ‘Camera Roll’
The above process to transfer pictures from Android to iPhone is good for mobile users who are unwilling to invest money in software. However, the method is not perfect because it is time-consuming. The transaction can neither be done quickly nor can it be done with a single click.
Part 3: How to transfer photos from Android to iPhone using Google Drive?
Google Drive is cloud storage that is available to those who have a Gmail address. It can store anything ranging from Word Documents to photos and videos. Hence, if you are wondering how to move photos from Android to iPhone, then Google Drive is your answer.
To go with the transfer of photos and videos from Android to iPhone with Google Drive, follow the steps outlined below:
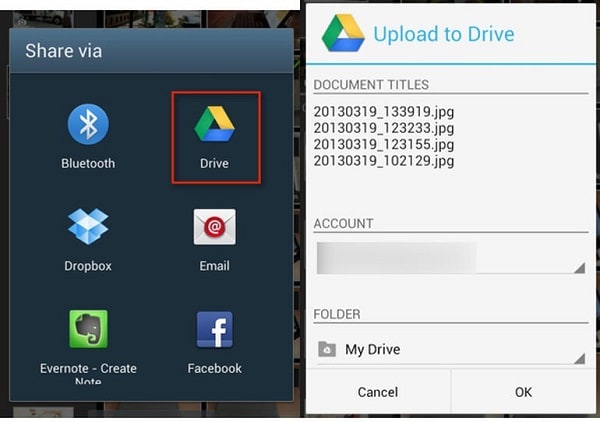
- First, make sure Google Drive is already installed on the Android device. If not, visit the Play Store to download Google drive. Then, on your Apple iPhone 6s Plus, visit the Gallery section> select the images> tap on Share button> and finally choose Share via Drive.
- Soon the file will get uploaded.
- Now, move to your iPhone.
- Here, download and install the Google Drive app onto your iPhone.
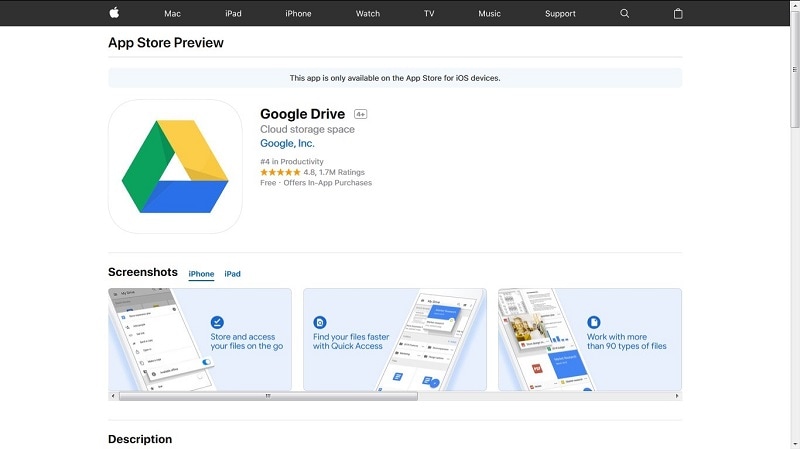
- Open the Drive (you must log in with the same Google ID). There you will see all the uploaded media files (Photos). Now, select ‘Save Image’ or ‘Save Video’ depending on your file type.
Part 4: Top 3 Android to iPhone photo transfer Apps
There are several apps that are specifically designed for storing and transferring images from an Android device to an iPhone. We have found the three best apps based on ease of use and accessibility.
PhotoSync
PhotoSync is a free photo-sharing app available on both Android and iOS devices. The app lets you store all your photos on one device and then transfer it to another device through Wi-Fi. PhotoSync is designed to work with several devices besides Android and iOS devices. It works on different platforms, including desktop computers, NAS, and Cloud Services.
You can extract videos and photos directly from the camera and transfer them to another device. You can even access the photos/videos via a web browser. PhotoSync is regularly updated with features to make the experience better support for RAW files and preserves for EXIF-data.
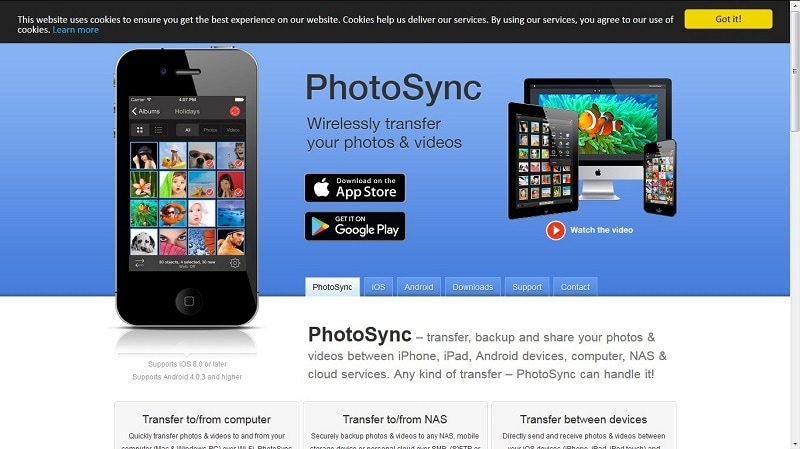
Photo Transfer
The photo transfer app is an incredibly popular app and with a good reason. You can perform Android to iPhone photo transfer without any cables. You can access Photo Transfer on different platforms, including desktop computers. It allows you to access your photos stored on the app via a web browser. You can easily download multiple photos for storage and exchange these photos across multiple platforms. If you are in need of an intuitive, easy to use app transfer photos to iPhone from Android, then consider using the Photo Transfer app.

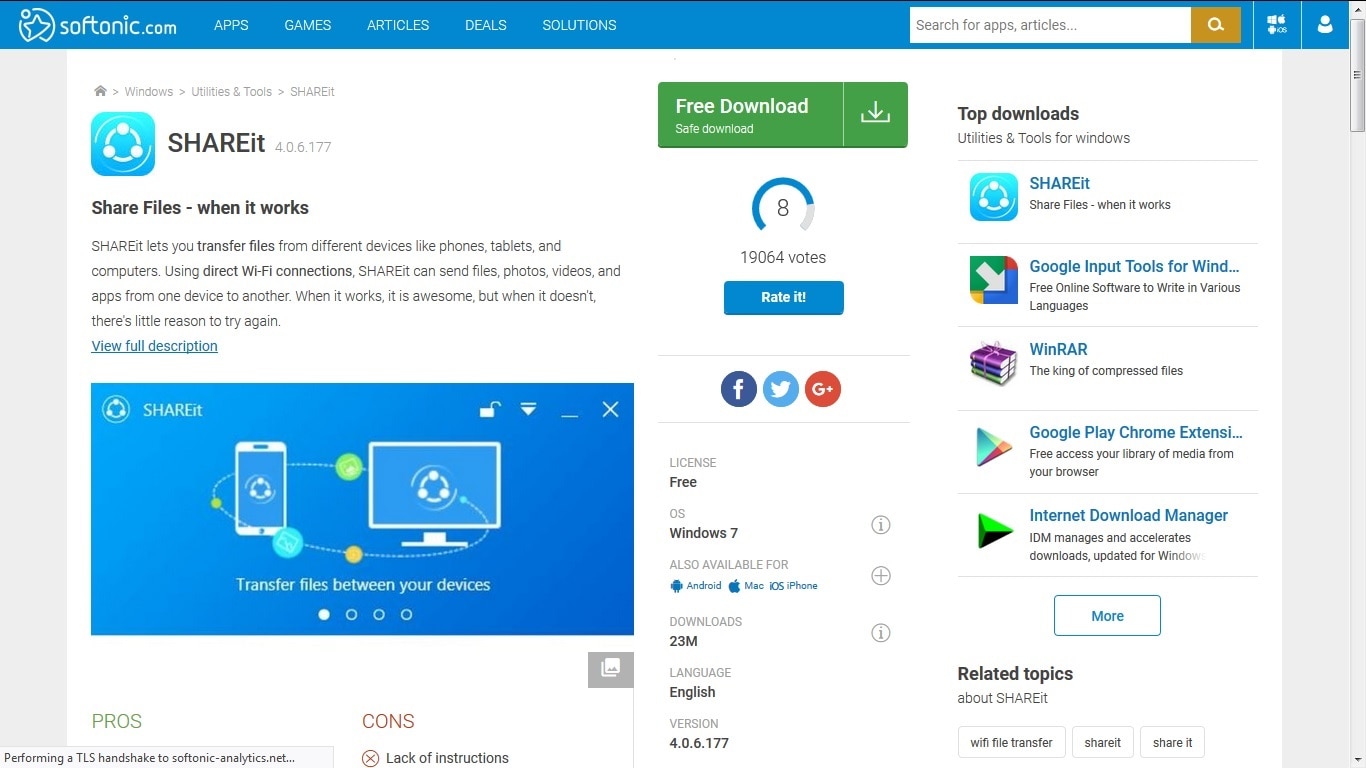
Shareit
Shareit is a special application developed to transfer files between two devices. You can use Shareit to transfer pictures from Android to iPhone in seconds. The software is free and completely secure, so you do not have to worry about how to transfer photos from one device to another. You can share individual photos or entire folders on Shareit. However, it should be noted that sharing folders can make slow down the process.
The best part of Shareit is the freedom allowed to users because you can transfer different file types besides photos. Hence, if you are wondering how to transfer video from Android to iPhone, then Shareit is your answer. The software is constantly being updated to make sure it is safe. Therefore, if users need to transfer more than just photos like sensitive information, they can rest assured about Shareit’s reliability.
Thus, after going through the article, we are sure that you got a wide range of options to choose from to transfer your Apple iPhone 6s Plus photos to the iPhone. Well, every method is good in itself; however, we would like to say that one of the best options for you would be the Dr.Fone tool without a doubt.
Also read:
- [New] In 2024, Uncovering Invisible Challenges in VR
- [Updated] Privacy-First Reader of Facebook Snapshots
- 1. Free Online Photo Slide Show Creator - Add Background Tunes!
- 2024 Approved Ranking the Best Sites for Superior Vectors
- Become a VR Trailblazer with Your Mobile Device
- Boost Your SSD's Performance Safely - A Quick Tutorial
- How to Transfer from Apple iPhone 6 Plus to iPhone 8/11/11 Pro | Dr.fone
- In 2024, Complete Tutorial Sending Photos From Apple iPhone 6s to iPad | Dr.fone
- In 2024, Easy Methods How To Transfer Pictures From Apple iPhone SE (2020) to PC | Dr.fone
- In 2024, How to Remove and Reset Face ID on iPhone 13 Pro Max | Dr.fone
- In 2024, Refurbished Apple iPhone 8 Plus Everything You Need to Know | Dr.fone
- In 2024, Transfer your Apple iPhone 13 Pro Max Apps to New iPhone | Dr.fone
- Methods to Transfer from Apple iPhone 15 to Android | Dr.fone
- Sneak Peek at Future Smartphones by Tech Giants Google and Samsung
- The Ultimate Guide to Online Video Preservation for 2024
- Ultimate Guide, How to Transfer Music From Apple iPhone 12 mini to iPhone | Dr.fone
- Ultimate Guide, How to Transfer Music From Apple iPhone 7 to iPhone | Dr.fone
- Title: In 2024, 5 Ways to Transfer Music from Apple iPhone 6s Plus to Android | Dr.fone
- Author: Charlotte
- Created at : 2024-10-11 10:06:46
- Updated at : 2024-10-17 21:56:38
- Link: https://iphone-transfer.techidaily.com/in-2024-5-ways-to-transfer-music-from-apple-iphone-6s-plus-to-android-drfone-by-drfone-transfer-from-ios/
- License: This work is licensed under CC BY-NC-SA 4.0.