
In 2024, 5 Ways to Transfer Music from Apple iPhone 14 to Android | Dr.fone
5 Ways to Transfer Music from Apple iPhone 14 to Android
“I have just got a new Android, and I want to transfer music from Apple iPhone 14 to Android. Can anyone help me learn how to send music from Apple iPhone 14 to Android without much hassle?”
Switching from an iPhone to Android can be a tough job. Not only to transfer photos and contacts, but users also need to take some added measures for moving music from Apple iPhone 14 to Android. The good news is that some tools can move data from iOS to Android instantly. You can use iTunes, a dedicated app, or a third-party data transfer tool to do the same. Read on and get to know how to transfer music from Apple iPhone 14 to Android like a pro.
Part 1: How to transfer all music from Apple iPhone 14 to Android in 1 click?
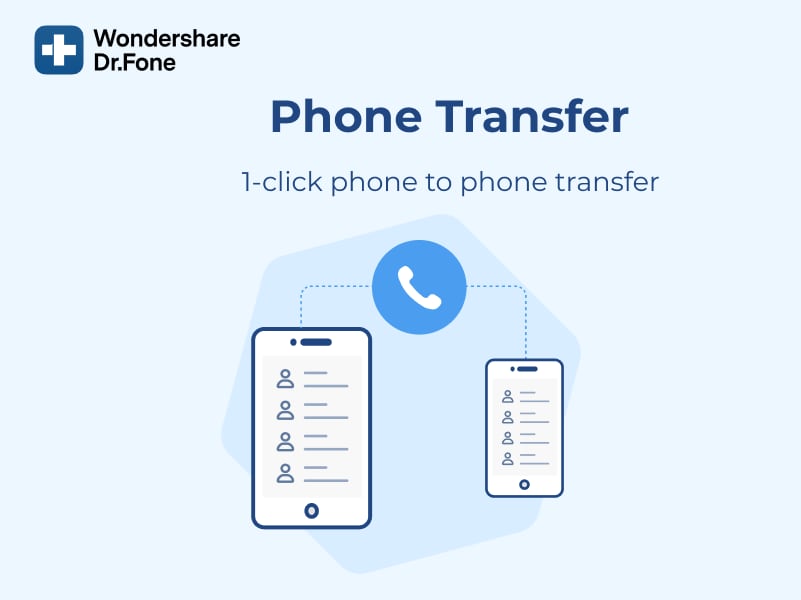
The simplest way of learning how to move music from Apple iPhone 14 to Android is by using Dr.Fone - Phone Transfer . As the name suggests, the tool will make it easier for you to switch from one smartphone to another without losing any data. It is a part of the Dr.Fone toolkit and is compatible with leading iPhone and Android models. Therefore, you can easily perform a cross-platform transfer of data with a single click.
Dr.Fone - Phone Transfer
Transfer Music from Apple iPhone 14 to Android Directly in 1 Click!
- Easily transfer contacts from Apple iPhone 14 to Android phone without any complication.
- Works directly and transfer data between two cross-operating system devices in real-time.
- Works perfectly with Apple, Samsung, HTC, LG, Sony, Google, HUAWEI, Motorola, ZTE, Nokia, and more smartphones and tablets.
- Fully compatible with major providers like AT&T, Verizon, Sprint, and T-Mobile.
- Fully compatible with the latest iOS and Android
- Fully compatible with the latest Windows or Mac version.
3981454 people have downloaded it
Note: If you have no computer at hand, you can also get the Dr.Fone - Phone Transfer (mobile version) from Google Play, with which you could log into your iCloud account to download the data, or transfer from Apple iPhone 14 to Android using an iPhone-to-Android adapter.
Besides music files and formats of different kids, Dr.Fone - Phone Transfer also supports the transfer of contacts, messages, photos, videos, and other types of contact. Therefore, you can move all your data at once using this tool. To learn how to send music from Apple iPhone 14 to Android using Dr.Fone - Phone Transfer, follow these steps.
1. Download Dr.Fone - Phone Transfer on your Windows PC or Mac and launch it whenever you wish to transfer music from Apple iPhone 14 to Android. From its welcome screen, select the “Switch” module.

2. Now, connect both the Apple iPhone 14 devices to your computer and let the application detect them automatically. On the interface, you can see a preview of both the Apple iPhone 14 devices.
3. Since you move your data from an iPhone to Android, your iPhone should be listed as a source while Android should be a destination device. If not, then use the Flip button to interchange their positions.

4. Select the type of data you wish to transfer. For instance, in this scenario, make sure that the option of “Music” is selected. Once you have made the selection, click on the “Start Transfer” button.

5. Sit back and wait for a while as Dr.Fone - Phone Transfer will automatically move the selected content from Apple iPhone 14 to Android.
6. When the process is completed, you will be notified. In the end, you can remove both the Apple iPhone 14 devices safely.

Part 2: How to transfer music from Apple iPhone 14 to Android using Google Music Manager?
Another way to transfer music from Apple iPhone 14 to Android is by using Google Music Manager. Though, unlike Dr.Fone tools, the process can be a bit complicated. Firstly, you need to sync your music between iPhone and iTunes, and then you have to import it from iTunes to Google Music Manager. Sounds complicated, right? In the end, you can access it on your Apple iPhone 14 using the Google Music app. You can follow these steps to learn how to move music from Apple iPhone 14 to Android using Google Music Manager.
1. Firstly, you need to sync music between your iPhone and iTunes. To do this, launch an updated version of iTunes on your system and connect your iPhone to it.
2. Please select your device and go to its Music tab. From here, you can sync your iPhone with iTunes. Click on the “Apply” button and start the syncing process.
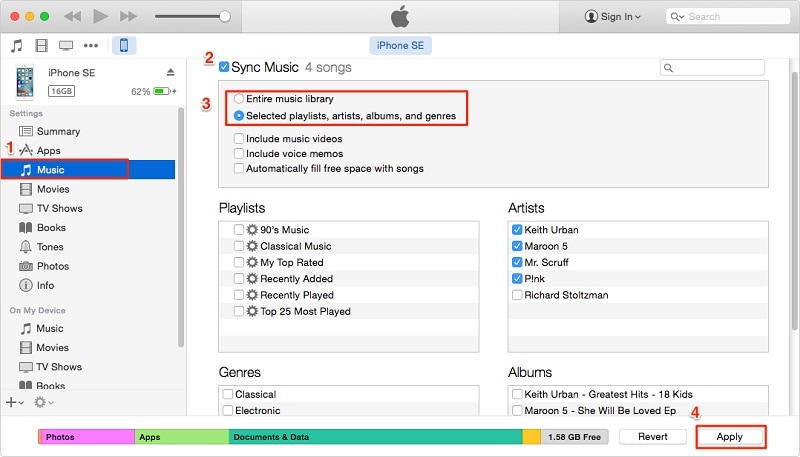
3. Once all your music is synced to iTunes, you can disconnect your iPhone.
4. Go to the official website of Google Music and download Google Music Manager on your system.

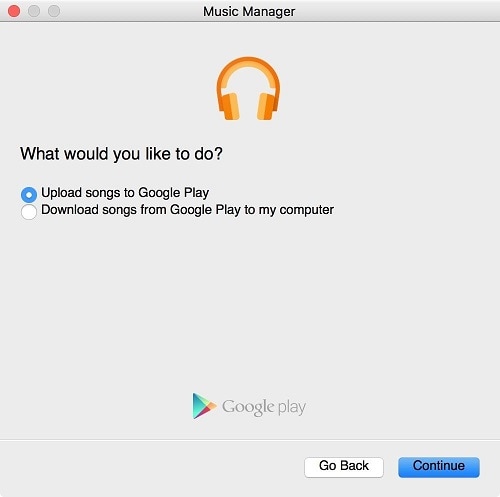
5. Launch the Music Manager application and choose to upload songs to Google Play.
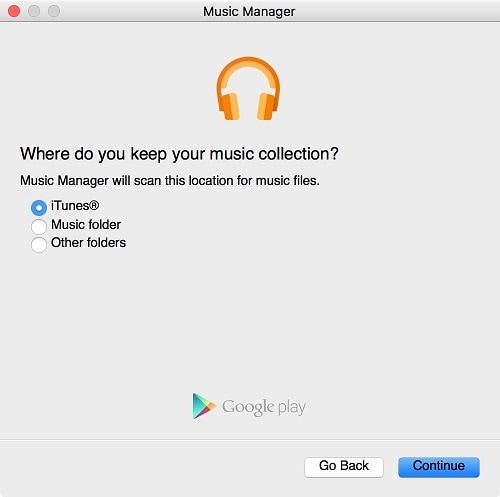
6. Select the source as “iTunes” and click on the “Continue” button.
7. The Music Manager will automatically sync your iTunes library and display the available songs. From here, you can choose to upload selected songs or the entire library.
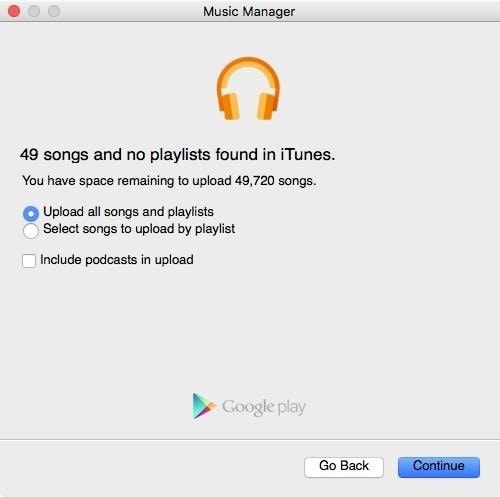

8. Wait for a while for your songs to be imported to Google Music Manager. Once it is done, you will be notified.
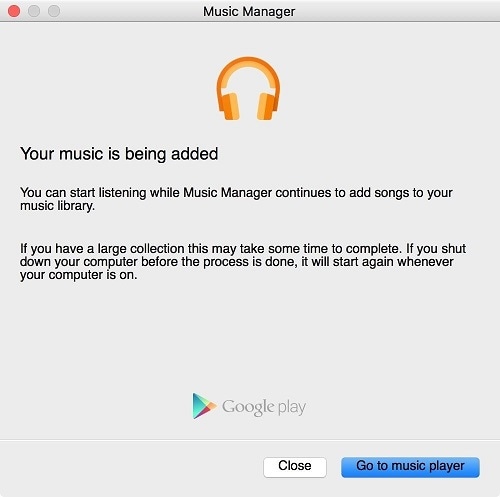
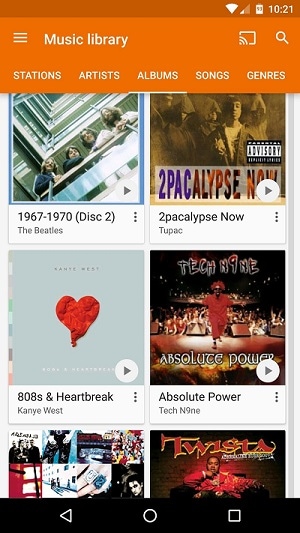
9. Great! You are almost there. In the end, you can download the Google Music app on your Android. From here, you can automatically access all the newly transferred songs on your Google Music library.
Part 3: How to transfer music from Apple iPhone 14 to Android selectively?
As you can see, with Dr.Fone - Phone Transfer, all the music files are transferred from one device to another in one go. If you want to transfer music from Apple iPhone 14 to Android selectively, you can take Dr.Fone’s assistance - Phone Manager (iOS) . It is also a part of the Dr.Fone toolkit and is developed by Wondershare.
Dr.Fone - Phone Manager (iOS)
Transfer iPhone/iTunes Media to Android Devices Selectively
- Transfer files between Android and iOS, including contacts, photos, music, SMS, and more.
- Manage, export/import your music, photos, videos, contacts, SMS, Apps etc.
- Transfer iTunes to Android (vice versa).
- Manage your iOS/Android device on computer.
- Fully compatible with the latest iOS and Android
4,335,819 people have downloaded it
With Dr.Fone - Phone Manager (iOS), you can move data between your iOS device and computer and even iPhone to another Android or iOS device. It works with all the leading smartphone models and supports prominent data types like photos, videos, music, contacts, messages, and more. Having a user-friendly interface will make it easier for you to learn how to transfer music from Apple iPhone 14 to Android. All you need to do is follow these steps:
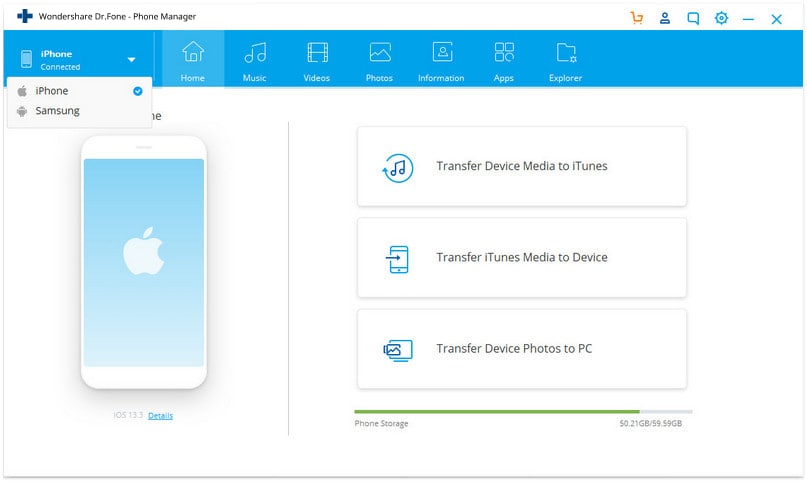
1. Start by launching the Dr.Fone toolkit on your system and visit the “Transfer” tool from its home screen.
2. Connect your iPhone and the target Android device to the system. The interface will automatically detect both the Apple iPhone 14 devices in no time. From the top left option, make sure that you have selected your iPhone as a source device.
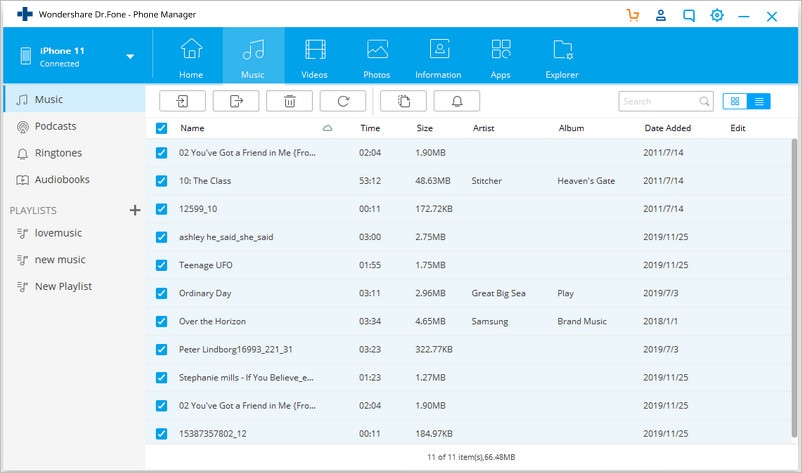
3. Great! Now, move to the “Music” tab on the application. Here, you can view all the music files stored on your iPhone, listed in different categories.
4. Just select the files you wish to transfer to your Android and click on the export button on the toolbar.
5. This will display a list of all the connected devices. Select the target Android device to commence the transfer process.
Part 4: How to transfer music from Apple iPhone 14 to Android without computer?
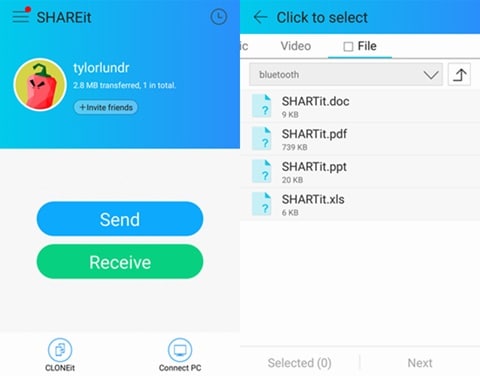
Too often, users don’t wish to use a computer for moving music from Apple iPhone 14 to Android. If you have the same preference, then you use a data transfer app to meet your requirements. Out of all the cross-platform data transfer options, SHAREit is one of the most recommended apps. You can install the app on both the Apple iPhone 14 devices and learn how to transfer music from Apple iPhone 14 to Android without computer by following these steps.
1. Before you proceed, make sure that you have installed the SHAREit app on your iPhone and Android by visiting its Google Play and App Store
2. Launch the app on both the Apple iPhone 14 devices and connect them to the same WiFi network. This is because the transfer of data takes place through WiFi direct.
3. On the source iPhone, choose to “Send” the data. Also, you can browse and select the music files that you wish to send.
4. Similarly, on your target Android device, mark it as a receiving device. It will automatically start looking for the nearby devices.
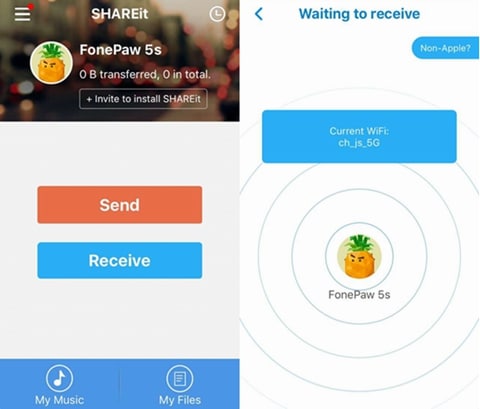
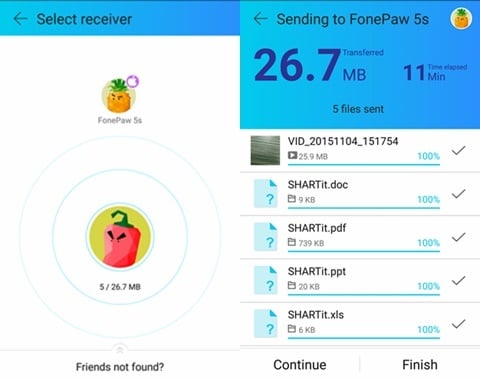
5. On your iPhone, you will be prompted regarding the target device. Select it to initiate the transfer.
6. Accept the incoming data from the source device and start receiving the selected music on your Android.
Part 5: How to transfer music from iTunes to Android?
It might surprise you, but there are different ways to learn how to transfer music from Apple iPhone 14 to Android. We have already discussed how to send music from Apple iPhone 14 to Android using iTunes and Google Music Manager. Though, there is another alternative to do the same. Once you have transferred your music from Apple iPhone 14 to iTunes, you can directly move it to an Android device as well.
1. To start with, make sure that you have already synced your iPhone music with iTunes. Once it is done, launch iTunes again.
2. Go to its Preferences > Advanced options and enable the “Copy files to iTunes media folder when adding to library” feature from here.
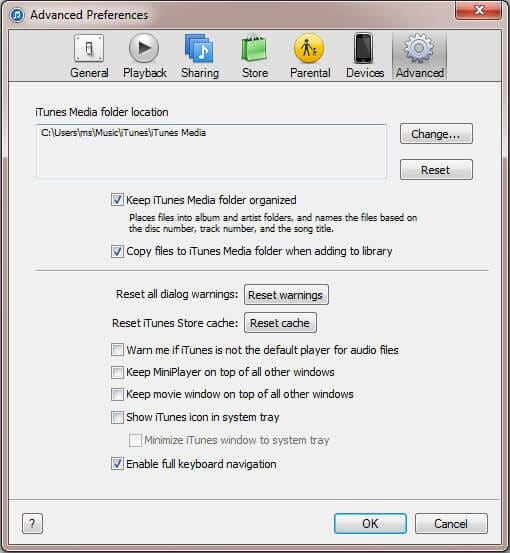
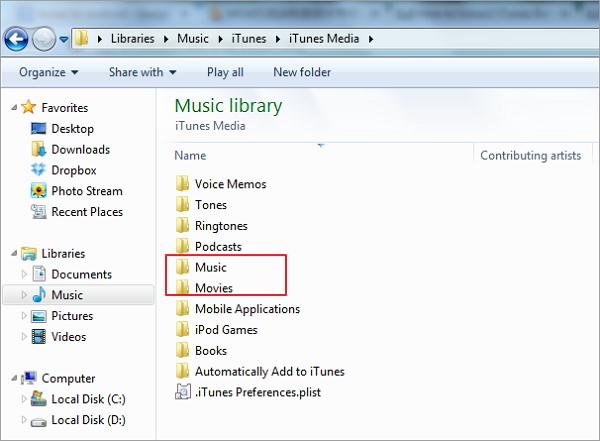
3. Once you apply this change, iTunes will make a dedicated folder with all the music files present in its library. In Windows, you can find it under My Music > iTunes while in Mac, it would be under Music > iTunes.
4. To transfer these music files, connect your Android to the system and choose to use it as a media transfer device.
5. Browse to the iTunes music folder, copy the selected songs, and transfer them to your Apple iPhone 14. If you have a Mac, then you need to use Android File Transfer to do the same.
After learning different moving music from Apple iPhone 14 to Android, you can certainly pick a preferred method. As you can see, Dr.Fone toolkit provides the fastest and easiest way to transfer music from Apple iPhone 14 to Android. With Dr.Fone - Phone Transfer , you can transfer all the music files from one device to another in a single click. In order to perform a selective transfer of data, you can try Dr.Fone - Phone Manager (iOS) as well. Go ahead and try these tools and teach others how to move music from Apple iPhone 14 to Android by sharing this guide.
4 Ways to Transfer Messages from Apple iPhone 14 to iPhone Including iPhone 15
“Do text messages transfer to the new iPhone from the old iPhone? I have bought a new iPhone but can’t understand how to transfer messages from Apple iPhone 14 to iPhone?”
Lately, we have gotten plenty of feedback like this from users who wish to learn how to transfer messages to new iPhone, like iPhone 15/15 Pro (Max), from an existing iOS device. If you have the same doubts, then you have come to the right place.
While it is quite easy to move music, videos, or pictures from one iPhone to another , you might need to walk an extra mile to transfer contacts or messages. To make it easier for our readers, we have come up with three different techniques to transfer messages from an old to a new iPhone effortlessly.
Read on and learn how to transfer messages from Apple iPhone 14 to iPhone in no time.
Which method to choose?
There are 4 different ways on how to transfer messages to the new iPhone. But which one to choose? Chances are that you might get confused. To make things easier for you, we here provide a quick comparison.
Method 1: How to transfer messages from Apple iPhone 14 to iPhone including iPhone 15/15 Pro (Max) in one click
If you want to learn how to transfer texts from Apple iPhone 14 to iPhone seamlessly, then take the assistance of Dr.Fone toolkit. Simply use Dr.Fone - Phone Transfer to move your messages from one iPhone to another. Not only messages, but you can also use it to transfer all data files to new iPhone .
Dr.Fone - Phone Transfer
Quickly Transfer Text Messages /iMessages from Apple iPhone 14 to iPhone
- Transfer messages from Apple iPhone 14 to iPhone without backup.
- Support any iDevices including iPhone, iPad, and iPod.
- Transfer everything including contacts, music, video, photo, SMS, app data, and more.
- Can be installed both on Win and Mac computers.
3981454 people have downloaded it
In this technique, the simple process goes as follows to transfer messages to new iPhone:
Open software > Connect iPhones to PC > Select “Messages” > Click “Start Transfer”
Now let’s dive in and learn how to transfer messages to new iPhone:
1. Set up Dr.Fone - Phone Transfer to Windows or Mac computer. Connect and start the application with your iPhone. On the home screen, click the “Phone Transfer” option.
2. Confirm that both iPhones have the correct target and source positions. Or to exchange by clicking “Flip”.
3. Choose the type of information to be transferred. Before clicking on the button “Start Transfer” make sure that the option “Text Messages” is enabled.
4. Wait a while for your old iPhone messages to be transferred to the new iPhone.
5. Once it is done, you can disconnect your iPhones from the PC, and view the messages on the target iPhone.
After following these easy steps, you can learn how to transfer texts from Apple iPhone 14 to iPhone with Dr.Fone - Phone Transfer.
Video Guide: How to transfer messages from Apple iPhone 14 to iPhone
You may be interested in:
- _ 4 ways to transfer SMS from Apple iPhone 14 to Android _
- _ 5 Ways to Transfer WhatsApp Messages from Apple iPhone 14 to iPhone _
Method 2: How to Transfer Messages from Apple iPhone 14 to iPhone Including iPhone 15/15 Pro (Max) Using iCloud Backup
Transferring data, including crucial messages, from an old iPhone to a new one is a smooth process using iCloud Backup. It allows you to access your essential conversations and other message data on your new device. Restoring your messages from an iCloud backup is a straightforward process. To effortlessly move your messages from one iPhone to another using an iCloud backup, adhere to the simple steps outlined below:
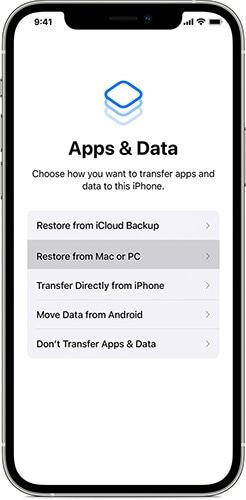
Step 1: Go to “Settings” on your iPhone, tap your name, and access “iCloud.” Press the “iCloud Backup” option, and on the following screen, ensure “Back Up This iPhone” is enabled. Now, “Back Up Now” to create a backup of your old iPhone’s data, including messages, on iCloud.

Step 2: Afterward, start setting up your new iPhone until you reach the “Apps & Data” screen. Here, choose “Restore from iCloud Backup” and log in using your Apple ID. Then, go on to select the backup you want to restore and complete the process by following the on-screen instructions.

Method 3: How to Transfer Messages from Apple iPhone 14 to iPhone, including iPhone 15/15 Pro (Max), using iCloud Sync
Ensuring a smooth transition to the latest iPhone is made simple with the aid of iCloud sync. It enables the transfer of essential data, including precious messages, from your old device. With it, you can sync your messages and other crucial data to your new device. This allows continued access to your valuable conversations and attachments. Below are the step-by-step instructions for transferring messages using the iCloud sync feature:
Step 1: On your old iPhone, access phone Settings and tap on your Apple ID. Press “iCloud” on the following screen and move to the “Apps Using iCloud” section.

Step 2: Here, tap “Show All” and go on to press “Messages in iCloud” from the list. On the following screen, enable the “Use on this iPhone” feature. It will sync iMessage with your iCloud account, allowing you to access them on your new iPhone.

Method 4: How to transfer messages from Apple iPhone 14 to iPhone including iPhone 15/15 Pro (Max) using iTunes/Finder
Besides iCloud, one can also take the assistance of iTunes/Finder to move their content from one iOS device to another. Not only do text messages transfer to new iPhone, other kinds of data files like photos or contacts can also be moved with this method. To learn how to transfer texts from Apple iPhone 14 to iPhone using iTunes, follow these steps:
1. Connect your source iPhone to your computer and launch iTunes or Finder (Mac Computer).
2. Select the Apple iPhone 14 device and go to its Summary page.
3. Under the Backups section, click on the “Backup Now” button to take a complete backup of your phone. Make sure that you are taking a backup on the computer instead of iCloud.

4. After taking a backup of your device, disconnect it, and connect the target phone to the computer.
5. Launch iTunes/Finder and wait for it to recognize the new iPhone. From here, you can choose to set up your device while restoring a previous backup.

6. Alternatively, you can also go to its “Summary” page and click on the “Restore Backup” option to restore the existing backup on your target device.

This will let you move not just messages, but all the major data files from one iOS device to another.
You may be interested in:
- _ Does iTunes Backup Text Messages? How to Restore? _
- iTunes Not Working? Here Are All Solutions You Need
Now when you know how to transfer messages from Apple iPhone 14 to iPhone in different ways, you can simply pick the preferred option. We have also compared these techniques so that you can go with the most suitable alternative.
Go ahead and follow this stepwise tutorial to transfer your messages from one iPhone to another. Whenever someone asks “do text messages transfer to the new iPhone,” make them familiar with an easy solution by sharing this informative post.
How to Transfer Apple iPhone 14 Data to iPhone 12: A Complete Guide
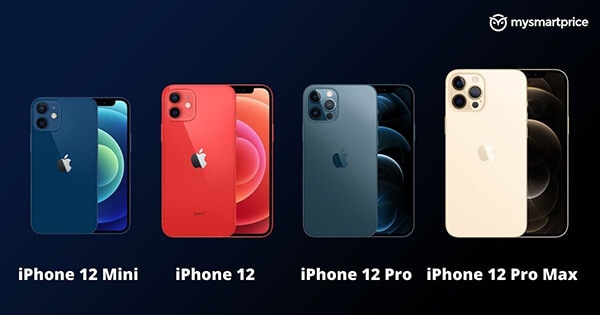
Apple announced a line-up of iPhones with four new devices in 2020. The series is called the iPhone 12 series that has four handsets of different sizes and price ranges. The iPhone 12 series include iPhone 12, iPhone 12 Mini, iPhone 12 Pro, and iPhone 12 Pro Max. These are the company’s first-ever 5G devices. They surely took a step into the future of technology with the 12 series.
The device is considered lighter than the iPhone SE launched in 2020. iPhone 12 Pro Max holds an outstanding camera system for high-quality image processing. Besides, the introduction of A14 SoC has encouraged the exceptional performance of all four models. Each of the series models is secured with suitable features and new capabilities. Let’s take a glance at the relevant specifications and iPhone 12 price.
Part 1: Apple iPhone 12 Series Specifications
To mention the iPhone 12 series specifications, these models are secured with an SoC of Apple A14 Bionic. All 4 of them consist of DRAM. The displays of these smartphones are quite satisfactory.
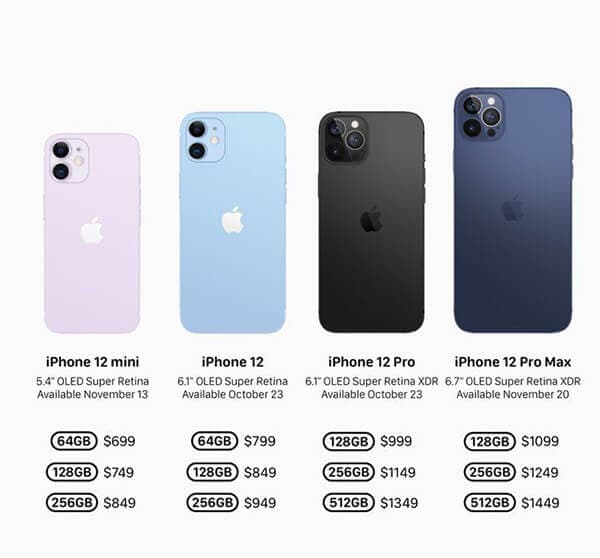
Display: The iPhone 12 Mini and iPhone12 have a display of 5.42” OLED (2340 x 1080) and 6.06” OLED (2532 x 1170). On the other hand, the magnificent iPhone 12 Pro has a display of 6.06” OLED (2532 x 1170) and 6.68” OLED (2778x1284).
Size & Weights: The size concerning height, width, and depth of both iPhone 12 and iPhone 12 pro are the same at 146.7 mm, 71.5 mm, 7.4 mm. Besides, the iPhone Mini stands at a height width and depth of 131.5 mm, 64.2 mm, and 7.4 mm. The iPhone 13 Pro max has a height of 160.8 mm, a width of 78.1 mm, and a depth of 7.4 mm. While the iPhone Mini weighs the lightest with 135g, iPhone 12 max weighs the heaviest (228 g). Both iPhone 12 and iPhone 12 Pro remain at 164g and 189g, respectively.
Wireless Charging: Each of the iPhone 12 series models supports MagSafe Wireless Charging up to 15 W. They are also Qi Compatible (7.5 W). Now, coming to the camera quality, all four models are secured with a front camera of 12 MP f/2.2.In rear camera setup, iPhone 12 Mini, iPhone 12, and iPhone 12 Pro have a main camera of 12 MP 1.4µm, 26mm eq. f/1.6, Optic OIS. iPhone 12 Pro Max comes with the main camera of 12 MP 1.7µm, 26mm eq. f/1.6.
Camera: The high-quality telephoto camera of the iPhone 12 Pro is 12 MP, 52mm eq. f/2.0 OIS. For iPhone 12 Pro Max is 12 MP, 65mm eq. f/2.2 OIS. The entire iPhone series model has an ultra-wide camera of 12 MP 13mm eq. f/2.4. The splash, water, and dust resistance feature with IP68 for up to 6m and 30 minutes keeps the phone durable.
iPhone Series devices hold dual-SIM support with nano-SIM and eSIM. Both iPhone 12 Mini and iPhone 12 come in distinct storage capacities like 64 GB, 128 GB, and 256 FB. The iPhone 12 Pro and Pro Max are available in the storage of 128 GB, 256 GB, and 512 GB.
Part 2: Transfer old iPhone data to iPhone 12
We know that the excitement of buying a new iPhone is real. However, it’s important to do one thing before jumping into the camera quality. And that’s data transfer. You do not want your old phone data to be gone with the old device, do you? We hope not. Here are some of the tactics by which you can transfer the old iPhone data to the new iPhone 12
2.1 Through iCloud
Before transferring, make sure your data is backed up. For that, connect the old iPhone with the WiFi and then go to “Settings.” Next, tap your name and then on “iCloud.” Next, select the “Backup Now” option and wait for the process to get completed. After completing the backup, follow the steps given below.
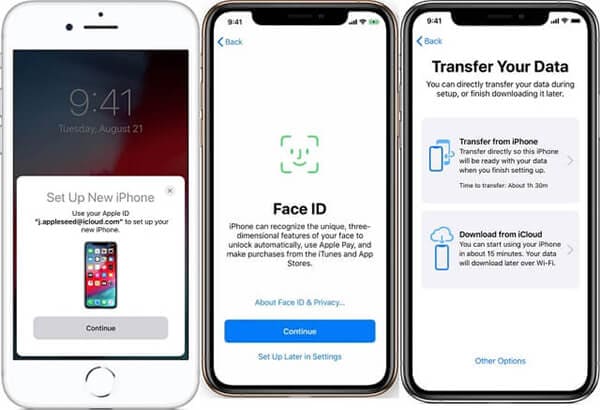
Step 1: First, turn on the new device to see the “Hello” screen. Now, follow the instructions appearing on the screen. Once you notice the WiFi screen, tap a WiFi network to join. Keep following the steps till the “Apps & Data” screen shows up. Tap on “Restore from iCloud.”
Step 2: Sign in to your iCloud with relevant credentials like Apple ID and password. Choose a backup but make sure to check the date and size.
If you have bought iTunes or App store content with multiple IDs, sign in with those accounts too.
Step 3: The restore process will be initiated. Make sure to be connected and wait till the process gets completed successfully. Once done, continue with the other steps to complete the setup process successfully.
2.2 Through iTunes or Finder
Start with the backup process by opening iTunes. Now, connect your iPhone with the PC. After it gets connected, choose your iPhone on the top toolbar. To transfer the data related to Health and Activity/saved passwords, choose the “Encrypt backup” option. Next, input a password and click “Back Up Now.”
To transfer the data through iTunes or Finder, launch your new device. Once the “Hello” screen appears, follow the instructions appearing on the screen. As soon as you note the “Apps & Data Screen,” tap on “Restore from Mac or PC.” Connect the new device to PC/Mac and open the iTunes/Finder window. Once your device name is visible on the screen, tap it.
Select “Restore Backup” to choose a “Backup.” Ensure that the size and data are accurate. To restore from an encrypted backup, input the password. The restoration process will start. Now, wait for the entire process to get completed and then move on to the remaining setup steps.
Part 3: Transfer Android Data to iPhone 12
The methods mentioned above can be time-consuming. In that case, it’s best to opt for a simple process that does not require too much work. For example, Dr.Fone - Phone Transfer all is an efficient and easy-to-use phone switch app.
As the name signifies, this App can help you with iPhone 12 transfer data in a few minutes. Experienced developers develop it for both iOS and Android users. So, you can transfer data from any of the Apple iPhone 14 devices to the new iPhone 12.
With Dr. Fone, you can migrate 13 files of distinct size to the new iPhone 12. Here’s a glimpse of the files below
Contact, photo, videos, voicemail, wallpaper, calendar, and many more
To transfer data through Dr. Fone, follow the easy steps mentioned below.
Step 1: First, connect both the old device and new iPhone 12 to your PC/Mac with USB.
Step 2: Now, launch the Dr. Fone - Phone Transfer and select the app
Step 3: Once the app starts, you will note a device detected as a source. Similarly, there will be other devices detected as destinations. Then, you will be given the option to flip the source and destination. For that, click on the “Flip” option.
Step 4: After selecting the Apple iPhone 14 device status, mark the checkboxes beside the files for transferring. Once done, tap on the “Start Transfer” button appearing on the screen.
You can select “Clear data before copy” to delete the data from the destination device before transferring. It will speed up the entire process.
Conclusion
Hopefully, you got a clear idea of how to transfer data to iPhone 12. Dr. Fone - Phone Transfer is one of the finest names for data recovery and data transfer between devices. They have distinct outstanding products that are efficient and useful for the users. One of the best things about the application is that you can transfer the data regardless of the mobile operating system. Be it an iOS or Android device, follow the steps provided above, and that’s it. The iPhone 12 data transfer process is quick, easy, and requires less effort.
Also read:
- [New] In 2024, Best FBX Game Recorder Alternatives
- [Updated] Canva Creative Editor Exploration
- 4 Quick Ways to Transfer Contacts from Apple iPhone 6 to iPhone With/Without iTunes | Dr.fone
- 4 Ways to Transfer Contacts from Apple iPhone 7 to iPhone Quickly | Dr.fone
- 6 Methods for Switching from Apple iPhone 14 Pro to Samsung | Dr.fone
- 6 Methods for Switching from Apple iPhone 14 to Samsung | Dr.fone
- Bring Your Library to Life in InShot App
- Dauntless Game Crashes on Windows: Troubleshooting Steps
- How to Remove Forgotten PIN Of Your Xiaomi
- In 2024, How to Transfer Data from Apple iPhone 14 Plus to ZTE Phones | Dr.fone
- In 2024, How to Transfer Everything from Apple iPhone 8 to iPhone | Dr.fone
- In 2024, How to Transfer from Apple iPhone 13 Pro to iPhone 8/11/11 Pro | Dr.fone
- In 2024, Meme World for iPhone Enthusiasts
- In 2024, Ultimate Guide, How to Transfer Music From Apple iPhone 12 Pro Max to iPhone | Dr.fone
- The Battle of Minds: Comparing Strong vs Weak Artificnicial Intelligence
- The Ultimate Quest Achieving Immaculate Upconversion From SDR to HDRI
- Top-Ranking Gratis Software Für Das Sichere Kopieren Von Datenträgern Extern
- Title: In 2024, 5 Ways to Transfer Music from Apple iPhone 14 to Android | Dr.fone
- Author: Charlotte
- Created at : 2024-10-15 19:36:26
- Updated at : 2024-10-18 08:20:08
- Link: https://iphone-transfer.techidaily.com/in-2024-5-ways-to-transfer-music-from-apple-iphone-14-to-android-drfone-by-drfone-transfer-from-ios/
- License: This work is licensed under CC BY-NC-SA 4.0.