
In 2024, 5 Ways to Send Ringtones from Apple iPhone 13 Pro Max to iPhone Including iPhone 15 | Dr.fone
5 Ways to Send Ringtones from Apple iPhone 13 Pro Max to iPhone Including iPhone 15
It is a common misconception that sending data from one iPhone to another can be a tedious task. For instance, there are plenty of ways to learn how to send ringtones from Apple iPhone 13 Pro Max to iPhone without any trouble. You can either perform a direct transfer to your new iPhone , such as iPhone 15, or even take the assistance of your system to do so. In this post, we will teach you in different ways how to transfer ringtones from Apple iPhone 13 Pro Max to iPhone in a stepwise manner. So let’s get started!
Part 1: How to Send Ringtones to iPhone including iPhone 15 with 1-Click
“How do I send a ringtone to another iPhone without iTunes?” If you want to transfer ringtones from Apple iPhone 13 Pro Max to iPhone, you can use the help of third-party applications that will get the job done in minutes. These applications are also useful when you are trying to shift content from one Apple device to another. Of course, you will need a computer/Laptop to play the middleman. Dr.Fone - Phone Transfer is the best iPhone transfer tool that lets you transfer your ringtones from Apple iPhone 13 Pro Max to iPhone.
Here is how:
Step 1: Download Dr.Fone - Phone Transfer application on your computer.

Step 2: Launch the application, and you’ll see options on the screen. Go with Phone Transfer.

Step 3: Then connect both your devices to the computer. In your case, it is the iPhone and the iPhone. You can also make this transfer between iPhone and Android devices.

Step 4: Now select the files that you want to transfer. Here, select all the ringtones that you want to shift. Then, initiate the transfer and don’t disconnect the Apple iPhone 13 Pro Max devices.

The data will be transferred successfully to the destination device.
Don’t have a laptop? Then you can do this!
Step 1: Download the mobile version of Wondershare Dr. Fone - Phone Transfer. Connect your iPhone and iPad using a suitable cable.

Step 2: The software will start to scan the synced data on your device.

Step 3: After the check, select the contacts you want to shift and click on ‘Start Importing’.

Part 2: How to Send Ringtones to iPhone Including iPhone 15 Using iTunes/Finder?
The traditional method of managing their iOS devices is utilizing iTunes or Finder. It remains a reliable approach for sending ringtones to your iPhone, including the latest iPhone 15. Be aware that iTunes versions 12.6 and earlier are capable of syncing your ringtones. The more recent versions exclusively support music synchronization. Here’s a step-by-step guide on how to transfer ringtones from Apple iPhone 13 Pro Max to iPhone:
Step 1: Start by installing iTunes version 12.6 or older on your computer and launch it. Now connect your old iPhone with ringtone to the computer. In iTunes, click “Files,” hover over “Devices,” and tap “Transfer Purchases from iPhone.”

Step 2: Press “Sync” and wait for the ringtones to sync. Afterward, disconnect the old iPhone and plug in the new iPhone. Once you’ve selected the Apple iPhone 13 Pro Max device icon, navigate to the “Tones” tab and mark the “Sync Tones” box. Next, choose either “All Tone” or “Selected Items” and finalize the process by clicking “Apply.”

Part 3: How to Send Ringtones to iPhone including iPhone 15 using OneDrive?
With Dr.Fone - Phone Transfer, you can transfer ringtones from one device to another directly, and that too within seconds. Nevertheless, if you wish to perform a wireless transfer, then you can take the assistance of a cloud service like OneDrive. Besides moving your files from one device to another, you can also keep them safe on the cloud.
To start with, download OneDrive on both iOS devices from App Store. You can also visit its iTunes store page right here .
Open OneDrive on your source device and tap on the “+” icon to add something to the drive. Next, tap on the “Upload” button and locate the ringtone on your device storage to upload it on the drive.

Now, launch OneDrive on your target device and sign in using the same credentials. Locate the file that you have just added to the drive. Open the folder and download it to your local storage.
In this way, you can learn how to transfer ringtones from Apple iPhone 13 Pro Max to iPhone without physically connecting both devices.

Part 4: How to Send Ringtones to iPhone including iPhone 15 using AirDrop?
AirDrop provides a quick and efficient way to transfer ringtones directly between two iOS devices. It allows for a smooth sharing experience without the need for extra software or cloud services. Follow these steps for how to send a ringtone from Apple iPhone 13 Pro Max to iPhone:
Step 1: Begin by confirming that AirDrop is active on both devices and set to “Everyone” for visibility. Additionally, make sure that Bluetooth and Wi-Fi are turned on for both devices as well.

Step 2: On the source device, move to the “Files” app. Here, navigate to the targeted ringtones and select them. Now, tap the “Share” button and select “AirDrop” as the sharing method. From the available devices for AirDrop, choose the targeted device. On the targeted iPhone, you will receive a prompt for AirDrop. Accept it to complete the ringtone-sharing process.

Part 5: How to Send Ringtones to iPhone including iPhone 15 using Email?
While this is not the most direct method, sending ringtones via email remains a viable option. It can transfer small audio files between iPhones. Follow these steps for how to send ringtones from Apple iPhone 13 Pro Max to iPhone using email:
Step 1: On the source iPhone, move to the ringtone you want to send and select it. Now, tap “Share” and choose “Email” as the sharing method.

Step 2: Once the ringtone is added as an attachment, add your email address in the recipient field. Afterward, press “Send” to email the selected ringtone. On your target iPhone, open the mail and download the ringtone.

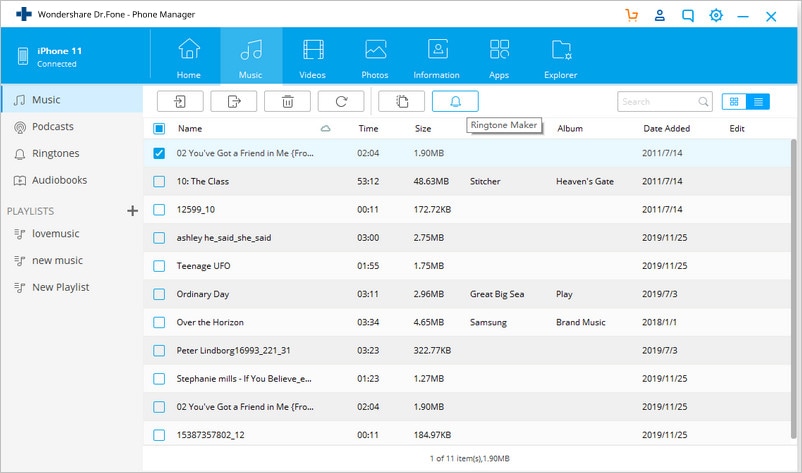
Bonus Tip. How to Make Custom Ringtone on iPhone
Creating custom ringtones for your iPhone allows you to personalize your device even further. This sets it apart from the standard options available. When it comes to finding a reliable and trusted ringtone maker, Wondershare Dr.Fone stands at the top. It allows you to create ringtones by selecting music files directly from the iPhone.
With its advanced features, you can craft unique ringtones from your favorite songs or audio files. Follow these steps to utilize the Dr.Fone Ringtone Maker feature and create your own custom ringtone on your iPhone:
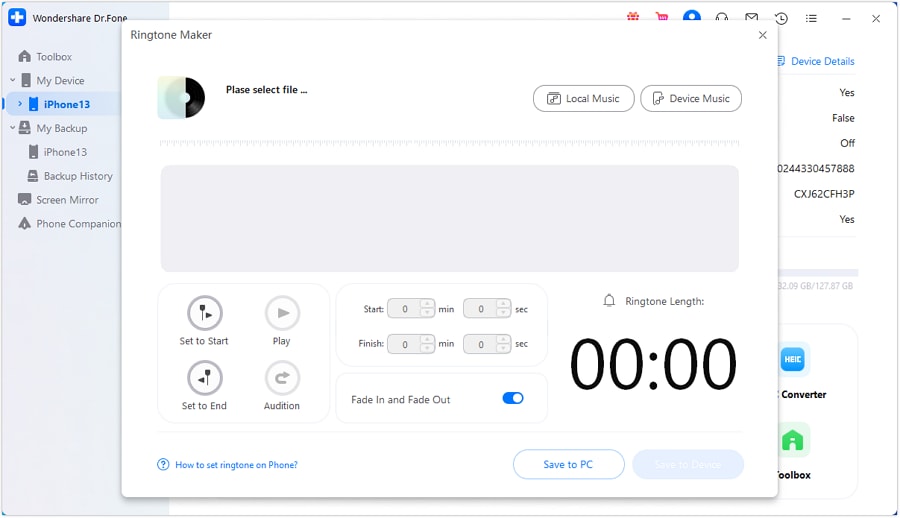
Step 1: Access Ringtone Maker in Wondershare Dr.Fone
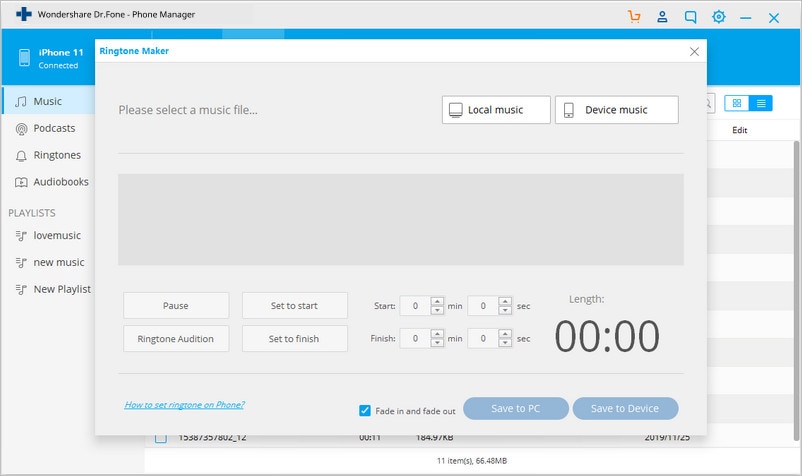
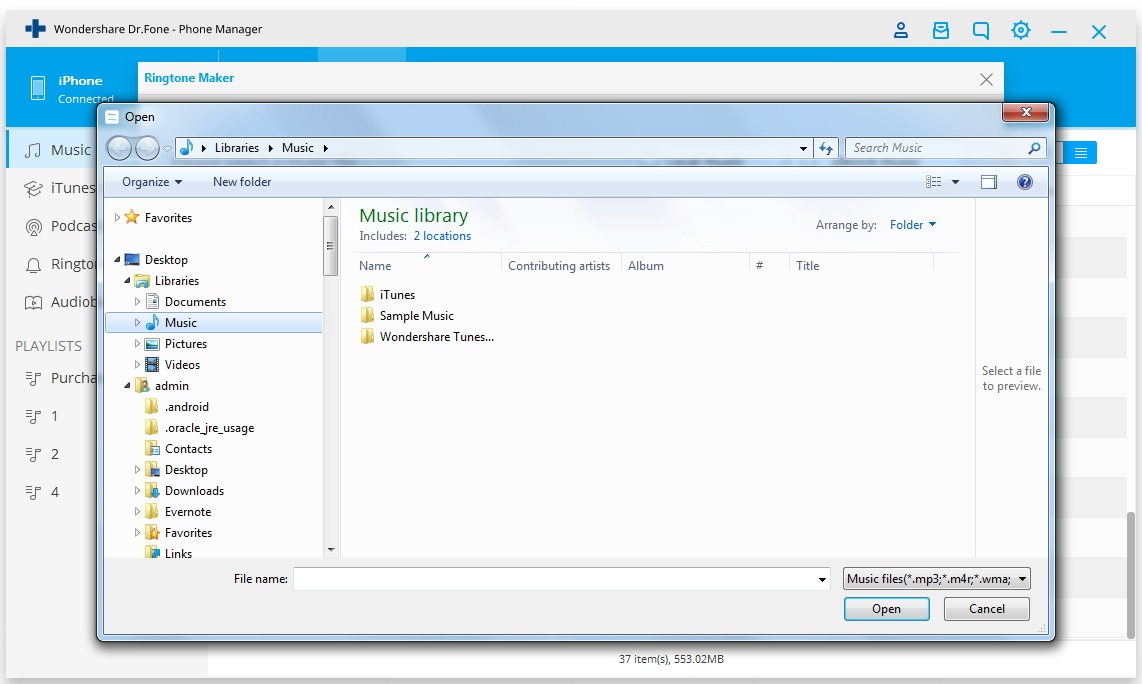
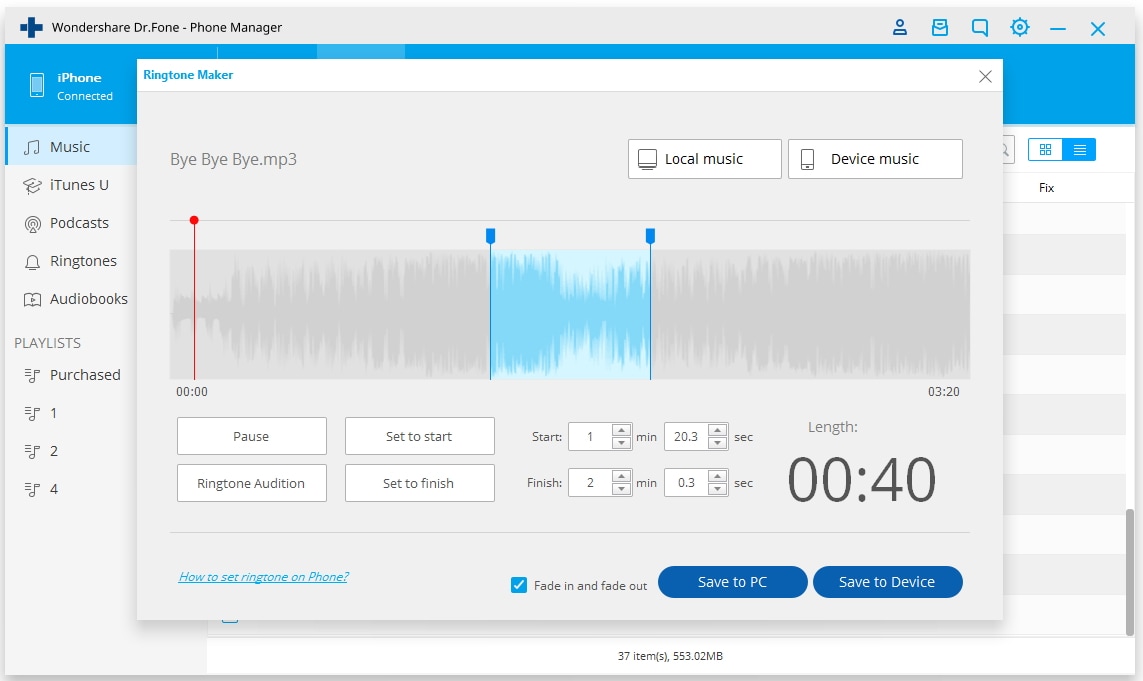
After launching Wondershare Dr.Fone on your computer, connect your iPhone to it using the original cable. Once Dr.Fone has detected your device, click “Ringtone Maker” from the available options. On the following window, use “Local Music” or “Device Music” to select an audio file.
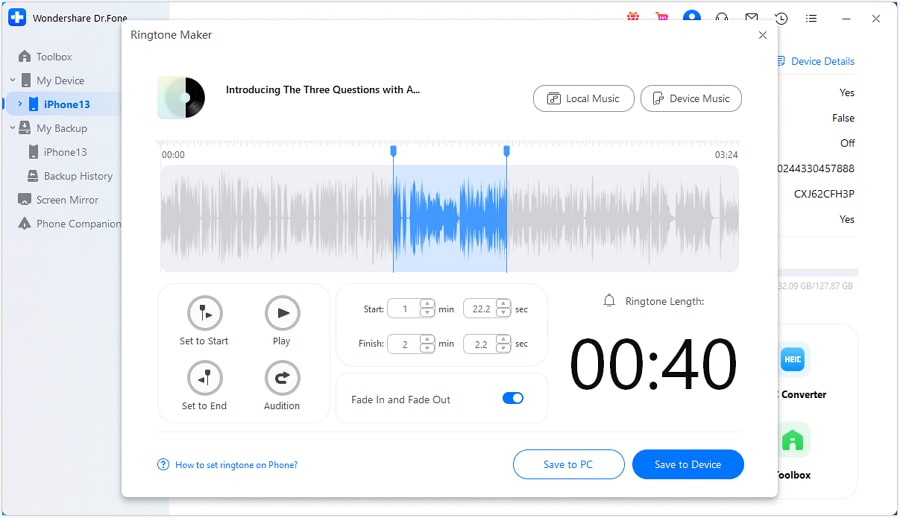
Step 2: Create the Custom iPhone Ringtone
Adjust the appended music to match your desired ringtone length. Employ the “Fade In” and “Fade Out” feature for personalized ringtone customization. Afterward, store the newly created ringtone directly on the iPhone using the “Save to Device” option.
FAQs About Ringtones on iPhone
- Where are my iPhone ringtones stored?
On an iPhone, custom ringtones are typically stored within the Apple iPhone 13 Pro Max device’s internal storage. Specifically, they are found within the “Settings” application under the “Sounds & Haptics.” Additionally, if you have synced ringtones via iTunes, they might be stored within the iTunes media folder on your computer.
- What if I have a large collection of ringtones to transfer?
For transferring a substantial assortment of ringtones, contemplate leveraging a cloud storage solution. OneDrive and Google Drive are among the options worth exploring. They enable the uploading and storage of significant data volumes. It enables easy access and download from multiple devices. Using a third-party software solution such as Wondershare Dr.Fone can simplify the process of bulk transfers.
- Are there any precautions I should take when transferring ringtones?
When transferring ringtones, ensure that the file formats are compatible. It’s also crucial to use secure and trusted transfer methods to prevent any data loss or security breaches. Additionally, always back up your data before initiating any transfer process. This is to avoid the risk of potential data loss during the transfer.
- What if I encounter issues during the transfer process?
If you encounter any issues during the transfer process, it’s essential to troubleshoot systematically. Check the compatibility of the file formats. In addition, ensure a stable internet connection, and verify that both devices are using the latest software updates. If the issue persists, consult the support documentation for the specific transfer method. Reach out to the customer support of the respective software or service provider for further help.
Now when you know how to send ringtones from Apple iPhone 13 Pro Max to iPhone in different ways, you can certainly move your data without any trouble. Feel free to give Dr.Fone - Phone Transfer a try and manage your device in no time. It is a complete phone management tool that will certainly come in handy to you on numerous occasions. If you face any setbacks while moving your ringtones from Apple iPhone 13 Pro Max to iPhone, let us know about them on our official social media.
How to Move Custom Ringtones from Apple iPhone 13 Pro Max to Android?
“Is it hard to move custom ringtones from Apple iPhone 13 Pro Max to Android?”
Apple has always emphasized IOS’s superiority over Android. Making it easier to transfer music files, ringtones from Apple iPhone 13 Pro Max to Android was never Apple’s priority. There are times when people feel the urge to transfer iPhone ringtones for android. The process is easy but it requires a bit of manual intervention on user’s behalf. Sometimes the entire data needs to backed up or transferred to another device. In this article, we will explain clearly on how to move custom ringtones from Apple iPhone 13 Pro Max to Android without any fuss.
Part 1. How to move custom ringtones from Apple iPhone 13 Pro Max to Android?
IOS’s file extension of a ringtone is .m4r whereas on an Android device a file with .m4a can be selected as the ringtone. This is the primary reason to change the extension when ringtones files are needed to be transferred from Apple iPhone 13 Pro Max to Android and vice versa.
Before we proceed, it is important to let you know that making ringtones from Apple music is not possible with any application since they are encrypted by Apple.
There are a dramatic number of versatile apps for all purposes related to iTunes, Android, IOS devices. With help of third party Phone Manager, you can manage all activities of your contacts right from your Desktop. Simply a hassle free as well convenient way. Here we will introduce Dr.Fone - Phone Manager (iOS) due to its important feature of the ability to provide so many functionalities without iTunes.
You can also explore all the files of your Device from your computer. With the help of this option, you can manually select an individual file to copy it on your computer.
Dr.Fone - Phone Manager (iOS)
One Stop Solution to Make and Manage iPhone Ringtones
- Transfer, manage, export/import your music, photos, videos, contacts, SMS, Apps etc.
- Backup your music, photos, videos, contacts, SMS, Apps etc. to computer and restore them easily.
- Transfer music, photos, videos, contacts, messages, etc from one smartphone to another.
- Highlighted features such as fix iOS/iPod, rebuild iTunes Library, file explorer, ringtone maker.
- Fully compatible with iOS 7, iOS 8, iOS 9, iOS 10, iOS 11, iOS 12, iOS 13, iOS 14, iOS 15, iOS 16, iOS 17 and iPod.
3,426,808 people have downloaded it
There are many online tools also which claims to provide similar services. However, it is crucial to note that trustful application will increase your experience in comparison of other unreliable apps that could spy and harm your devices.
Here are the methods to successfully transfer iPhone ringtones for android and we will show you how to custom iPhone ringtones as well.
Transfer iPhone Ringtones for Android with a Trustful App
Step 1 Dr.Fone - Phone Manager (iOS) allows the transfer of selected media files like videos and ringtones. To do that, you need to install the application first. Connect your IOS device and run the application.
Step 2 Choose the source device that you want to transfer from.

Step 3 Go to the “Music” tab. Select the Ringtones option on the left sidebar. Choose the ringtone you want to transfer and go to “Exports” option and select the “Export to …….” Where “……” is your Samsung device in this example. You can export the files to as many IOS, Android devices you want.
Part 2. How to Make Ringtones for iPhone?
Creating Ringtones for iPhone is easy and convenient with Dr.Fone - Phone Manager (iOS).
Step 1 Install and run Dr.Fone - Phone Manager (iOS). Connect your device to the computer and click on the “Music” tab.
Step 2 Then click on “Ringtone maker”. Or you can also select individual music file and right click on it to select the “Ringtone Maker”.
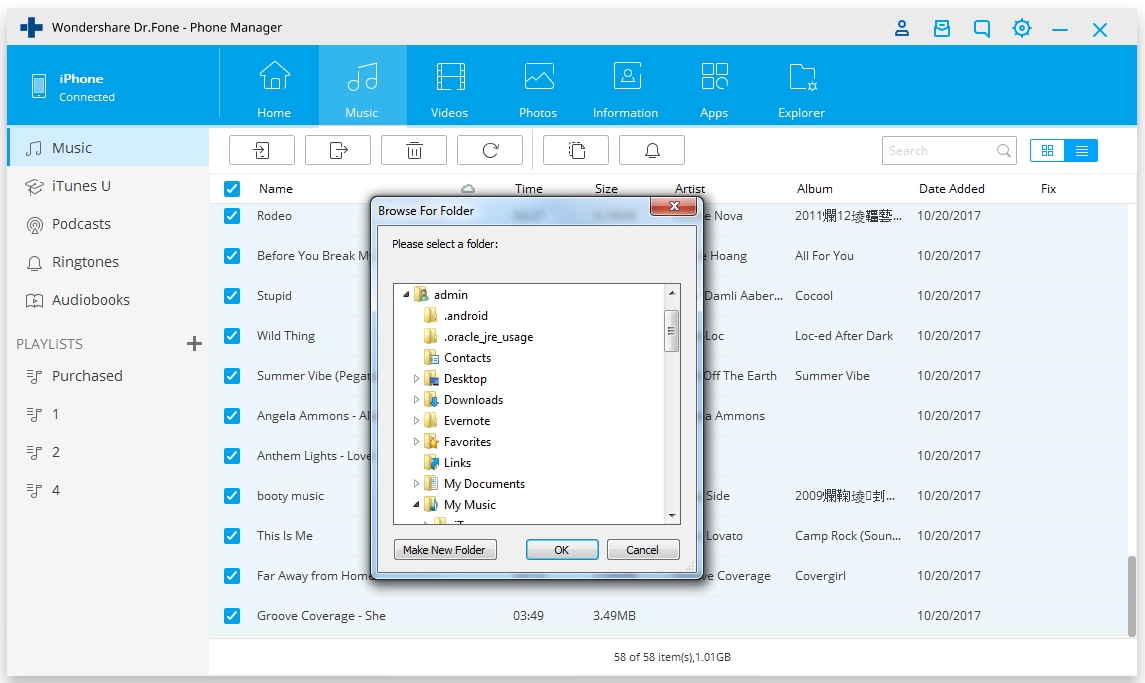
Step 3 A new window will pop up. To select the files from your computer, click on “Local Music”. To select files from your connected device, click “Save to Device”.
Step 4 You can select the start and finish time for the duration of your ringtone. To preview the ringtone, you need to click on the “Ringtone Audition”. Once you have mentioned the start and finish time, click on “Save to PC” or “Save to Device”.
With so many applications in the market related to services of iTunes, it is hard to try and test each one of them. Placing a high value on User experience and convenience, Dr.Fone - Phone Manager (iOS) was created to offer as many functionalities as possible.
Be it backing up IOS data on your computer or transferring music files from your IOS to Android Device, Dr.Fone - Phone Manager (iOS) does everything. The app is light and does not hog on memory resources. The design and interface is simplistic yet appealing.
Because of the above factors, Dr.Fone - Phone Manager (iOS) is widely used all over the world. Try Dr.Fone - Phone Manager (iOS) for making ringtones in iPhone. The trial version allows you to use the software for limited time. With nominal pricing you will get lifetime license with access to newer updates which would help in improving the efficiency of the product.
In case of technical concern, you can always contact our customer representative. This service is available only to premium customers. We also offer a 30-day money back guarantee.
Complete Tutorial: Sending Photos From Apple iPhone 13 Pro Max to iPad
Among the array of iOS devices, the iPhone and iPad stand as popular companions for capturing and storing precious moments. However, navigating the process of transferring photos from Apple iPhone 13 Pro Max to iPad can sometimes feel daunting. Fortunately, with the evolution of Apple’s ecosystem, it has become a straightforward task.
Now, the process can be managed with various methods and tools available at your disposal. The guide aims to effortlessly transfer your photos from an iPhone to an iPad. From utilizing iCloud and AirDrop to exploring third-party applications, we’ll cover step-by-step instructions.

Part 1: How To Transfer Photos From Apple iPhone 13 Pro Max to iPad Using AirDrop
AirDrop stands as one of the most convenient and straightforward methods. It can transfer photos between Apple devices wirelessly. This functionality employs Bluetooth and Wi-Fi to establish a direct link between your iPhone and iPad. That enables smooth photo sharing without requiring additional cables or an internet connection. Here’s a detailed guide outlining the process of how to transfer photos from Apple iPhone 13 Pro Max to iPad using AirDrop:
- Step 1. On your iPhone and iPad, swipe down from the top right corner to open the Control Center. Tap and hold the connectivity panel; within, press and hold the network connectivity box that includes AirDrop. Choose “Contacts Only” or “Everyone” to enable AirDrop visibility.

- Step 2. To begin, access the Photos app on your iPhone and pick the photos you’d like to transfer to your iPad. Afterward, select the “Share” icon within the app, and from the available options, opt for “AirDrop.” Look for your iPad in the AirDrop panel displayed and tap on it to start the transfer process.

- Step 3. When your iPad receives the notification prompting you to accept the incoming photos from the iPhone, tap “Accept.” The selected images will be saved to your iPad’s Photos app.

Part 2: How To Transfer Photos From Apple iPhone 13 Pro Max to iPad Using iCloud Sync
iCloud offers a smooth way to synchronize photos across your Apple devices. It ensures your photo library remains up-to-date without manual intervention. Enabling iCloud Photos automatically uploads your images to iCloud, allowing access from any device linked to the same Apple ID. Here’s a guide to transfer photos from Apple iPhone 13 Pro Max to iPad automatically via iCloud:
- Step 1. Begin by accessing your iPhone’s Settings and tapping your name at the top. On the following screen, choose “iCloud” followed by “Photos” on the next window. Here, ensure that “Sync this iPhone” is toggled for iCloud Photos.

- Step 2. Now, move to iPad and ensure you are logged in with the same Apple ID. Then, go to “Settings,” tap the name, press “iCloud,” and tap “Photos.” Here, you need to toggle on the “Sync this iPad” option. Afterward, wait for some time to let the syncing process complete. The speed of synchronization depends on your internet connection and the number of photos being uploaded.

Part 3: One-Click Innovative Solution To Transfer Photos From Apple iPhone 13 Pro Max to iPad
Wondershare Dr.Fone presents an innovative and user-friendly solution. It offers a comprehensive way to transfer photos between your iPhone and iPad. This software provides a straightforward method to transfer photos selectively or entirely. Moreover, when using it, you are no longer bound by the constraints of iCloud or AirDrop. The following are the detailed guides for transferring photos using Wondershare Dr.Fone:
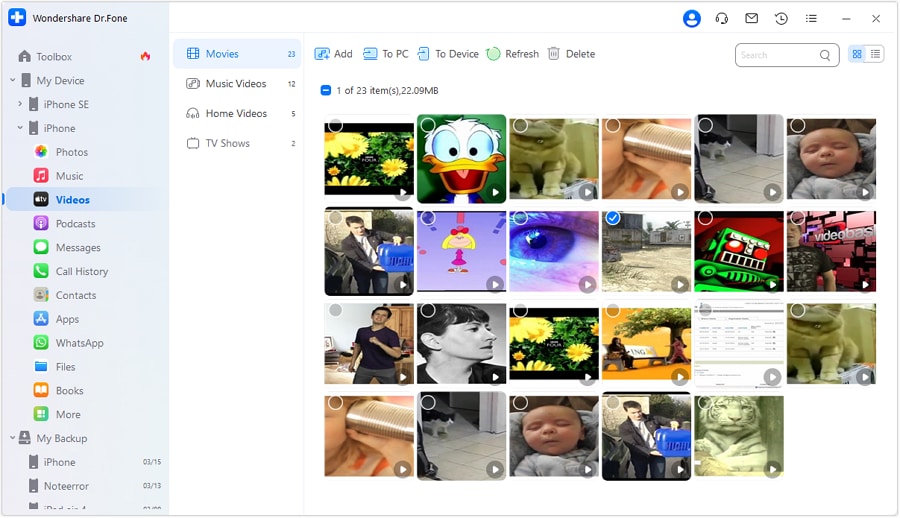
3.1 Transfer Selective Photos from Apple iPhone 13 Pro Max to iPad
Wondershare Dr.Fone is an intelligent iPhone transfer and management solution. It is designed to streamline your data handling. With its array of functions, you can manage your data through importing, exporting, and deletion processes. This tool offers the convenience of quick file transfers by simply dragging and dropping files. Here is how to add photos from Apple iPhone 13 Pro Max to iPad using Wondershare Dr.Fone:
- Step 1: Install and Open the Latest Wondershare Dr.Fone App
You can begin by installing the latest version of Wondershare Dr.Fone from its official website. Once installed, launch it and connect your iPhone and iPad to the computer. When the Apple iPhone 13 Pro Max devices are detected by Dr.Fone, click on the “iPhone” name to expand it in the left panel.
- Step 2: Transfer the Photos to the iPad from the iPhone
From the expanded options, choose “Photos” to access your iPhone’s photos. Here, select the files you want to transfer and click “To Device.” Now, choose the “iPad” from the available options, and the photos will be transferred in no time. You can send as many as you like without any constraints.
3.2 Transfer All Photos From Apple iPhone 13 Pro Max to iPad
When moving photos in bulk from Apple iPhone 13 Pro Max to iPad, Wondershare Dr.Fone also got you covered. It offers a powerful phone transfer feature that can transfer over 18 types of data from one device to another. Dr.Fone simplifies the process of transferring data between phones with just one click. It facilitates the smooth transfer of various data types, like photos. You can follow these simplified steps to transfer photos from Apple iPhone 13 Pro Max to iPad:
- Step 1: Navigate to Phone Transfer within Wondershare Dr.Fone
Once you have launched Wondershare Dr.Fone, connect the iPhone and iPad to the computer. Then, click “Toolbox” from the left side panel and tap the “Phone Transfer” option from the available choices. Then, you will be asked to position your devices correctly for data transfer.
- Step 2: Successfully Complete the Photos Transfer Process
When assigning positions, the iPhone will be the “Source” device. On the other hand, the iPad will become the “Destination” device. You can use the “Flip” to change the Apple iPhone 13 Pro Max devices’ positions. Afterward, select “Photos” from the data and click “Start Transfer” to initiate the process.

Part 4: How To Transfer Photos From Apple iPhone 13 Pro Max to iPad Using iTunes/Finder
iTunes or Finder can also be used to transfer photos from your iPhone to your iPad. It is the official Apple software for music, media, and backup management. Yet, iTunes/Finder can assist in manually syncing photos between your iOS devices. The steps needed to transfer photos from Apple iPhone 13 Pro Max to iPad automatically are given below:
- Step 1. Connect your iPhone to the PC or Mac and open the Photos app. In the Photos app, tap “Import,” select your iPhone, and wait for the computer to load photos from the iPhone. Once they are loaded, choose to transfer the targeted to the computer.

- Step 2. When photos are moved to your computer, unplug the iPhone and link your iPad. Now run the latest version of iTunes/Finder on your PC/Mac and tap the Apple iPhone 13 Pro Max device icon. Here, choose “Photos” from the left panel and check the box next to “Sync Photos.”

- Step 3. Now, choose the folder where you moved photos from the iPhone in the drop-down box. After that, hit the “Apply” button and wait for the images to sync with the iPad.

Part 5: How To Transfer Photos From Apple iPhone 13 Pro Max to iPad Using Social Media Apps
Social media apps can serve as a convenient platform for transferring photos. Numerous options are available for transferring pictures, and one of the widely used applications is WhatsApp. It is known for its communication features. Moreover, it enables users to share images and media files across various devices. Here’s a guide on how to transfer photos from Apple iPhone 13 Pro Max to iPad via WhatsApp:
- Step 1. After ensuring WhatsApp is running on both devices, open WhatsApp on iPhone. Tap the new chat icon to start a conversation with a WhatsApp account logged in on the iPad. Now, tap the “+” icon and choose either “Document,” “Camera,” or “Gallery” and pick the desired images. After selecting the photos, tap “Send” to transfer them to iPad.

- Step 2. Proceed to the iPad and launch the “WhatsApp Web” on Safari. Following this, access your conversations and download the images you received to complete the transfer process.

Part 6: How To Transfer Photos From Apple iPhone 13 Pro Max to iPad Using Email
Utilizing email provides a direct and frequently used approach for transferring photos between your iPhone and iPad. However, it might not be suitable for larger quantities of high-resolution images due to attachment size limits. Nevertheless, it is effective for smaller batches of images. Here’s a detailed guide on how to utilize email for transferring photos between your iPhone and iPad:
- Step 1. Access the email app on your iPhone and initiate a new email. Input your iPad email address in the recipient field. Next, tap on the “Attachment” icon to select the images you want to send.

- Step 2. Move to your iPad and on the “Mail” app there. Now navigate to “Inbox” and open the newly received email. Tap the attachments and save them to your device to complete the transfer process.

Conclusion
Transferring photos between your iPhone and iPad is an essential task for many users. Throughout this guide, we’ve explored various methods to transfer photos from Apple iPhone 13 Pro Max to iPad. These ranged from native Apple services like AirDrop, iCloud, and iTunes/Finder to unconventional approaches such as social media apps and email. Each method offers its advantages.
Yet, considering factors like convenience, ease of use, and efficiency, one option stands out as a versatile and user-friendly solution: Wondershare Dr.Fone. This innovative third-party software provides a hassle-free way to transfer photos between iOS devices. It offers both selective and bulk transfer options with a straightforward interface.
Also read:
- [New] Essentials Unleashed 8 Products That Are Changing the Business Landscape
- [Updated] 2024 Approved Exclusive Reveals on Securing High-Quality Live Cricket Broadcasting
- [Updated] Smooth Sync Add YouTube Soundtracks to iMovie Easily for 2024
- 2024 Approved Turning Viewers Into Cash A YouTube Advertising Primer
- Complete Analysis of the High-Def Sony FDR-X1000 Videographer
- Complete Tutorial Sending Photos From Apple iPhone 12 Pro to iPad | Dr.fone
- How Does the Current Uptick in Employment Affect Careers in Tech? Exploring with ZDNet's Perspective
- How to Transfer Everything from Apple iPhone 12 Pro Max to iPhone | Dr.fone
- How To Transfer Messages From Apple iPhone 13 Pro to other iPhone All iOS Versions | Dr.fone
- How To Transfer Messages From Apple iPhone 14 to other iPhone All iOS Versions | Dr.fone
- In 2024, 4 Ways to Sync Contacts from Apple iPhone 12 to iPad Easily | Dr.fone
- In 2024, 6 Methods for Switching from Apple iPhone X to Samsung | Dr.fone
- In 2024, Easiest Guide How to Clone Oppo A78 Phone? | Dr.fone
- In 2024, Fix Apple iPhone 13 mini Stuck on Data Transfer Verified Solution! | Dr.fone
- In 2024, Fix Apple iPhone 14 Pro Max Stuck on Data Transfer Verified Solution! | Dr.fone
- In 2024, Transfer your Apple iPhone 6 Plus Apps to New iPhone | Dr.fone
- Meta's New AI Feature: Introducing an Internal Image Creation Engine Comparable to DALL-E
- Microsoft Collaborates with Local Businesses in Singapore on AI Education Program
- Updated Lego Stop Motion Superstars The Best of the Best for 2024
- Title: In 2024, 5 Ways to Send Ringtones from Apple iPhone 13 Pro Max to iPhone Including iPhone 15 | Dr.fone
- Author: Charlotte
- Created at : 2024-10-15 09:48:57
- Updated at : 2024-10-18 08:39:37
- Link: https://iphone-transfer.techidaily.com/in-2024-5-ways-to-send-ringtones-from-apple-iphone-13-pro-max-to-iphone-including-iphone-15-drfone-by-drfone-transfer-from-ios/
- License: This work is licensed under CC BY-NC-SA 4.0.