
In 2024, 5 Tutorials on How to Transfer Photos From Apple iPhone 12 Pro to New iPhone | Dr.fone
5 Tutorials on How to Transfer Photos From Apple iPhone 12 Pro to New iPhone
When it comes to camera systems, the iPhone is certainly ahead of others. It has high-performing lenses and professional camera features that support various photography styles. For instance, you may use the Priotize Faster Shooting option to capture multiple photos at a time. Another thing is that you may enable Action Mode when shooting videos to keep the frame stable throughout the duration. Simply put, you can surely do a lot of things using your iPhone camera
Let’s say you’re planning to share your stunning snaps and footage with others. Is it possible to facilitate the transfer with little to no effort? The short answer is absolutely yes. There are many easy ways to move your media files between two iPhones. In no time, you can surely find the best tutorial on how to transfer photos from Apple iPhone 12 Pro to iPhone. Just choose one that matches perfectly your current situation.
In this article, we will talk about the iPhone’s Shared Album feature and its main benefits to users. We will also provide some tutorials on how to transfer pictures from Apple iPhone 12 Pro to iPhone quickly and easily. Continue reading below to learn more.
Everything You Need to Know About Shared Album
The Photos mobile application on iOS devices is a very powerful gallery software. It provides numerous options to help you organize and manage all your media files in one place. When it comes to data transfer, Photos offers users some channels to facilitate such procedures. One of which is through the syncing feature called Shared Album. It’s basically an ordinary folder where you can move and store your media files. But as the name suggests, you can share this folder with others by simply granting them access to it. Don’t worry. Your Shared Albums remain private on the platform. Only the people you add as subscribers can view its content and make changes. Therefore, the Shared Album feature is the best answer to the question: “How to transfer photos from Apple iPhone 12 Pro to iPhone.”
It’s true to say that Shared Album is a great iOS feature. However, it’s important to point out that it also has a few limitations. First on the list is the type of files supported by this feature. For images, Shared Album is compatible with photos in HEIF, JPEG, RAW, PNG, GIF, and TIFF formats. On the one hand, video formats supported by Shared Album include HEVC, MP4, QuickTime, H.264, and MPEG-4. Another thing to consider is the capacity of the Shared Album folder. By default, you can only store up to 5000 photos or videos in the album.
Do you find Shared Album a useful tool, though? If so, here are the tutorials on how to activate this feature and create one in the Photos app.
How to Activate Shared Album?
Here’s how to activate Shared Album on Settings.
- Step 1: Go to Settings.
- Step 2: Click your Apple ID Profile.

- Step 3: Click iCloud.
- Step 4: Click Photos.

- Step 5: Toggle on the radio button next to Shared Albums.

How to Create Shared Albums in Photos
Here’s how to create Shared Albums in Photos.
- Step 1: Go to the Photos.
- Step 2: Click the Album tab.
- Step 3: Click the + icon at the top-left corner of your screen to add a new folder.

- Step 4: Click New Shared Album.

- Step 5: Rename the Shared Album and then click Create.
How to Transfer Photos From Apple iPhone 12 Pro to iPhone in Easy Steps?
Undoubtedly, the Shared Album feature is a very convenient way to move media files from one iPhone to another. Imagine all you have to do is consolidate all the files in a Shared Album folder and add subscribers. From there, you can easily access the album on multiple iOS devices and download the files. But it’s important to note that there are other photo transfer methods you can try apart from using Shared Album. Check out the 5 tutorials below on how to transfer photos from Apple iPhone 12 Pro to iPhone.
Method 1: Transfer photos from Apple iPhone 12 Pro to iPhone by enabling iCloud photos
How do I transfer photos from Apple iPhone 12 Pro to iPhone? Well, the easiest way is to sync the photos to iCloud and enable the iCloud photos on both devices. Don’t worry. It’s very easy to set up. Here’s how to transfer photos from Apple iPhone 12 Pro to iPhone using iCloud.
- Step 1: On your device that contains the files, go to Settings.
- Step 2: Click on the Apple ID Profile.
- Step 3: Click Photos.

- Step 4: Toggle on the radio button next to Sync This iPhone. From then on, your iPhone will sync your photos to iCloud.

- Step 5: Do the same series of steps on the other iPhone. Once the synchronization has been completed, open the Photos app. Find the newly synced iCloud photos on the All Photos album.
Method 2: Transfer photos from Apple iPhone 12 Pro to iPhone using AirDrop
If you’re just sending a few pieces of photos, AirDrop is indeed a great transfer medium. It’s basically a wireless sharing option allowing users to send files between two iOS devices. Do you want to try it? Here’s how to transfer photos from Apple iPhone 12 Pro to iPhone using AirDrop.
- Step 1: Toggle on the Wi-Fi and Bluetooth connectivity on both iPhones. After that, find the AirDrop option on the two devices and then switch it on. Choose Everyone.

- Step 2: On the Apple iPhone 12 Pro device that contains the files, go to Photos. Select the images you want to transfer. After that, click the Share button at the bottom-left corner of your screen.
- Step 3: Choose AirDrop.

- Step 4: Select the recipient from the provided list. After that, accept the AirDrop request on the other device.
Method 3: Transfer photos from Apple iPhone 12 Pro to iPhone via Mail
Another reliable method you can try is to email the photos from one iPhone to another. Like AirDrop, it works great if you’re just moving a few bits of files to another device. Don’t work. The process will not take much time. Here’s how to transfer photos from Apple iPhone 12 Pro to iPhone via Mail.
- Step 1: On the Apple iPhone 12 Pro device containing the files, go to the Photos app.
- Step 2: Select the specific photos you want to transfer. After that, click the Share icon at the bottom-left corner of your screen.
- Step 3: Choose Mail among the given options.

- Step 4: Key in the email address of the recipient. Subsequently, click the Send icon.
- Step 5: Open the email on the other iPhone. Then, download the photos sent as email attachments.

Method 4: Transfer photos from Apple iPhone 12 Pro to iPhone using iCloud Link
Let’s say you’re sending one photo to another iPhone user. What is the best transfer option in this case? If you’re currently using iCloud photos might as well send files through the iCloud link. Don’t worry. It’s not that hard to get such details. Here’s how to transfer photos from Apple iPhone 12 Pro to iPhone using the iCloud link.
- Step 1: On the Apple iPhone 12 Pro device where your files are stored, go to the Photos app.
- Step 2: Select the specific group of images you want to transfer. Right after, click the Share icon at the bottom-left corner of your screen.
- Step 3: Scroll down and find the Copy iCloud Link. Click on it.

- Step 4: Share the iCloud link via Messages, Mail, or internet messaging platform. On the other iPhone device, access the link and then download the photos from there.
Method 5: Transfer photos from Apple iPhone 12 Pro to iPhone using Wondershare Dr.Fone
The first four tutorials above on how to transfer pictures from Apple iPhone 12 Pro to iPhone are very easy to follow. But if you wish to explore another convenient option, Wondershare Dr.Fone can help you with that. Its phone transfer feature has a powerful facility that can move your photos and other files between two mobile devices. Here’s how to use it in easy steps.
- Step 1: Download Wondershare Dr.Fone from its official website. Then, install it on your computer.
- Step 2: Open the newly installed software on your desktop. After it fully loads, connect your two iPhones using a data cable.
- Step 3: Access the left-side panel and then click Toolbox. On the main dashboard, click Phone Transfer.

- Step 4: Set the iPhone that contains the photos as the Source and the other iPhone as the Target. Alternatively, click the Flip button to modify the transfer path according to your liking.

- Step 5: Click Photos as the category of the files. Right after, click Start Transfer to proceed.

- Step 6: Wait while Wondershare Dr.Fone is facilitating the transfer. If you wish to terminate the progress, simply click Cancel.

- Step 7: After completing the process, click OK to wrap it up. Check your files from their respective locations afterward.

BONUS TIP: Back Up Your Photos First
The tutorials above on how to transfer all photos from Apple iPhone 12 Pro to iPhone are safe to initiate. You can be sure about that. But as an additional layer of protection, it’s best to back up your iPhone first before the transfer. Don’t worry. Wondershare Dr.Fone. simplifies the backup process for you. Here’s a quick tutorial to get you started.
- Step 1: Launch the Wondershare Dr.Fone on your computer. After it fully loads up, connect your iPhone using a data cable.
- Step 2: Access the left-side panel and then click My Backup. On the main dashboard, click Back Up Now.

- Step 3: Follow the on-screen instructions for SMS backup. After that, click OK to proceed.

- Step 4: Wait while Wondershare Dr.Fone is backing up your files.

- Step 5: After completing the backup process, click View Backups or Open in Folder to check your files.

Conclusion
Transferring photos between two iOS devices is very easy. In fact, you can instantly complete the migration process with just the snap of a finger. Refer to the five tutorials above on how to transfer photos from Apple iPhone 12 Pro to iPhone enumerated. One of them can certainly fit your situation and help you in this regard. For a more convenient file transfer option, download Wondershare Dr.Fone for free. It has a potent phone transfer feature that can aid in the transfer of your dearly cherished photos.
How to Transfer Photos from Apple iPhone 12 Pro to other iPhone without iCloud
This article’s content focuses on the importance of photos, and the techniques and tools you require to transfer photos from Apple iPhone 12 Pro to another iPhone without iCloud including iPhone 15.
Photos are important because they reflect our memories, we have so many memories in our brain and it is not easy to pull them all up when required, but photos can help a lot to remember. Photos invoke emotions, sometimes photos are important to remember details, for example, “What did I wear on my last Christmas?”.
Method 1: How to Transfer Photos from Apple iPhone 12 Pro to iPhone without iCloud (All in One Click) [iPhone 15 Included]
The top method to transfer photos from Apple iPhone 12 Pro to iPhone without iCloud is to transfer all the photos in one click. With this method, you can complete the photo transfer even within seconds without any photo loss. All you need are two lightning cables to connect both iPhones to your PC or Mac, and the Dr.Fone - Phone Transfer (iOS & Android) software.
Dr.Fone - Phone Transfer
Easiest Way to Transfer Photos from Apple iPhone 12 Pro to iPhone without iCloud
- Transfer photos from an old iPhone to a new iPhone within seconds.
- Support the transfer of more data like contacts, messages, files, videos, etc. from phone to phone.
- Transfer everything from Apple iPhone 12 Pro to new iPhone , from Android to Android, from Apple iPhone 12 Pro to Android, and from Android to iPhone.
- Supports iPhone, iPad, iPod touch, and the latest iOS version.
- Fully compatible with the latest Windows or Mac version.
3981454 people have downloaded it
Here are the simple steps to transfer photos from Apple iPhone 12 Pro to iPhone without iCloud:
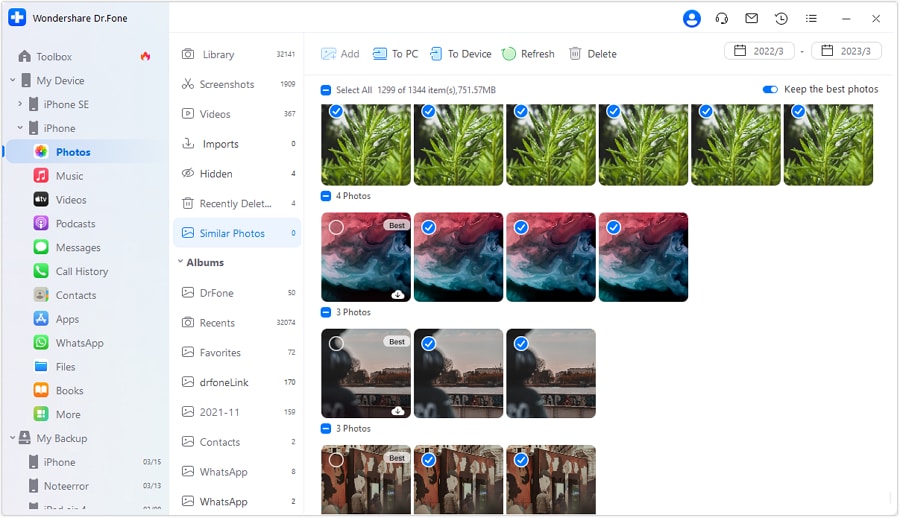
Step 1: Download the Dr.Fone software, open it, and you can see the following interface.
Step 2: Connect both iPhones to your PC and click “Phone Transfer”.

Note: Confirm which iPhone is your destination device and which one is the source. Click “Flip” to swap their positions if necessary.
Step 3: Select the “Photos” option and click “Start Transfer”. Then you can find all photos are transferred from Apple iPhone 12 Pro to iPhone without iCloud.

Video Guide: Transfer photos from Apple iPhone 12 Pro to iPhone without iCloud
Method 2: Transfer Photos from Apple iPhone 12 Pro to iPhone without iCloud (Selective Transfer) [iPhone 15 Included]
When you want to transfer your photos separately without transferring the other iDevice data, there is a perfect tool for you: Wondershare Dr.Fone . This action takes no time at all, and you can transfer the images within a matter of a few seconds. You can also use this phone manager app to transfer data from Apple iPhone 12 Pro to Android and iTunes or vice versa.
In addition, Wondershare Dr.Fone works efficiently without losing data while transferring media files between iOS devices. It can also transfer videos, contacts, messages, etc., from Apple iPhone 12 Pro to iPhone. Here is how to selectively transfer photos from Apple iPhone 12 Pro to iPhone without transferring the complete iPhone data via Wondershare Dr.Fone:
Step 1: Proceed With the Phone Manager feature
First, you need to install Wondershare Dr.Fone on your computer and connect both your iDevices to the computer using the Apple-certified USB cables. Next, locate the iPhone from which you want to transfer the images and expand it. Choose the “Photos” tab and let Wondershare Dr.Fone load all the pictures.

Step 2: Perform the Selective Photos Transfer
Once Dr.Fone detects all the photos in your iPhone, it will categorize them in the albums like they are in your iDevice. Choose the pictures you want to transfer and tap the “To Device” option. Then, click on the iPhone on which you want to send all the selected images and complete the photo transfer process.
Method 3: Transfer Photos from Apple iPhone 12 Pro to iPhone without iCloud via iTunes [iPhone 15 Included]
Using iCloud for transferring data is convenient, but it is not always practical due to the limitation of maximum data. In that case, iTunes can be a good option, which is another functional software from Apple. Following are the step-by-step instructions to transfer pictures from Apple iPhone 12 Pro to iPhone via iTunes to avoid data storage limitations:
Step 1: To begin with, launch iTunes on your computer and connect your source iPhone. Select the “Phone” icon near the top left corner of iTunes and move to the “Summary” tab. Then, navigate to the “Backups” section and check the “This Computer” option. Then, hit the “Back Up Now” button on the right side to start the backup process of your iDevice.

Step 2: Once the backup process is complete, disconnect the old iDevice. Next, you need to connect your new iPhone and proceed to the “Backups” section in the “Summary” tab. Here, tap “Restore Backup” and go on to choose the most recent backup. To complete the photo transfer process, tap “Restore” and wait for the backup to be restored.

Method 4: Transfer Photos from Apple iPhone 12 Pro to iPhone without iCloud via AirDrop [iPhone 15 Included]
AirDrop gives its users the wireless facility to transfer iPhone photos in a quick manner. Unlike iCloud or iTunes, it does not need to sync all the photos. You just have to select the photos from one of your iPhones and AirDrop them to another. However, the other iPhone should be within the Bluetooth and Wi-Fi range of the host iDevice. Here are the instructions you need to follow to AirDrop photos from old iPhone to new iPhone efficiently:
Step 1: On your old iPhone, you need to open the “Photos” app and hop into the desired folder. Next, pick the photos you want to share by tapping the “Select” button in the upper right corner.
Step 2: Following this, you will have to tap the “Share” icon, followed by selecting the targeted “AirDrop” recipient iPhone. Then, on the target iPhone, you have to choose “Accept” to receive them.

Tip: How to Transfer Photos from Apple iPhone 12 Pro to iPhone using iCloud
Step 1. To transfer the photos from your iPhone to another iPhone you must make sure that you make a backup through iCloud.
Step 2. On the home screen tap Settings. Once entered in settings tap iCloud.

Step 3. In the iCloud menu, you need to click on photos. Once entered in photos turn on the iCloud Photo Library option along with upload my photostream.
Step 4. When you are done your photos will be uploaded to iCloud and you can restore them by simply adding the iCloud id to the new iPhone device.
Editor’s Picks:
- 5 Ways to Transfer Everything from Old iPhone to your new iPhone
- 5 Ways to Transfer Photos from Apple iPhone 12 Pro to PC with/without iTunes
If you do not want to use iCloud for data transfer, run Dr.Fone - Phone Transfer on your computer and transfer data in one click quickly.
Fix Apple iPhone 12 Pro Stuck on Data Transfer [Verified Solution!]

With the release of the new iPhone 15, most iPhone enthusiasts must be looking to shift to the latest version of the Apple iPhone 12 Pro device. If you are among these iPhone lovers, we congratulate you in advance for buying the latest iPhone device out there. However, we also want to warn you about some problems while you try to transfer the data from your old iPhone or Android device.
As the full-fledged sale of the Apple iPhone 12 Pro began, many people faced the Apple iPhone 12 Pro stuck transferring data issues. If you are one of those people, this article will help you identify the problem and provide the best solution to tackle this issue.
Part 1: What Are the Problems Behind Apple iPhone 12 Pro Stuck on Data Transfer
In this section, we will try to identify the root cause of the problem. By understanding the cause of the issue, we can better find a suitable solution to your problem.
1. Bugs in the Move to iOS App
It is possible that the Move to iOS app may cause problems while transferring data from your Apple iPhone 12 Pro to your iPhone 15. This can happen because of two reasons: you haven’t updated the app for a long time, or the updated version has some bugs in it.
2. iTunes/Finder Backup is Corrupted
Sometimes, the backup stored in the iTunes/Finder turns out to be corrupted due to various issues. If you are restoring data from such a corrupted backup, it can cause the Apple iPhone 12 Pro to get stuck while transferring data. You have to identify corrupted backups in order to avoid this issue in your iPhone data process.
3. Poor Wi-Fi Connection
If you are transferring the data to your Apple iPhone 12 Pro using iCloud, you need a good Wi-Fi connection to ensure a smooth process. A slow Wi-Fi connection can stop or delay the data transfer process if your iCloud backup is in 100+ GBs.
4. Problem in the iOS Version
When performing iPhone-to-iPhone data transfer, ensure that both iPhones are free from any iOS bugs. For this purpose, update your older iPhone to the latest iOS version to avoid bugs and glitches. If you are using the iOS 17 Beta version on your old iPhone, it can also cause this issue.
Part 2: The Best Way To Fix Apple iPhone 12 Pro Stuck on Data Transfer
To cater to all these data transfer issues from Android or old iPhone to iPhone 15/15 Pro/15 Plus, we recommend first setting up your Apple iPhone 12 Pro as a new device and then using Wondershare Dr.Fone . This Phone Transfer tool helps you transfer data whenever you want after setting up the new iPhone 15. Moreover, the tool is highly optimized and supports all the old and newest iOS and Android versions, including Android 13 and iOS 17.
It is a single-click data transfer tool that can transfer 12 types of data from iOS to iOS and 8 from Android to iOS. Furthermore, you don’t have to worry about which phone brands this phone transfer app supports because it supports over 8000+ devices, including all iPhone models, Samsung, LG, Huawei, OPPO, Redmi, etc.
Key Features
- •Wondershare Dr.Fone promises to transfer the data within 3 minutes.
- •It doesn’t have the requirement of factory resetting the Apple iPhone 12 Pro for transferring the data.
- •Unlike iTunes/Finder, Wondershare Dr.Fone doesn’t overwrite the data saved on your iPhone 15.
Simplified Guide To Transfer Data From Old Smartphone to New iPhone 15
Following are the straightforward step-by-step instructions you need to follow to transfer from your old iPhone or Android to the new Apple iPhone 12 Pro series model:
- Step 1: Choose the Robust Phone Transfer Tool
Download and install the latest version of Wondershare Dr.Fone from the official website and access the Toolbox. Afterward, click on the Phone Transfer tool and attach your old phone and Apple iPhone 12 Pro with the help of official USB cables.
- Step 2: Initiate the Data Transfer Procedure
Wondershare Dr.Fone will automatically detect the positions of your old smartphone and Apple iPhone 12 Pro and assign them the positions. If the positions assigned are incorrect, press the “Flip” option and choose the data you want to transfer to iPhone 15. After this, press the “Start Transfer” button, and the procedure of transferring the data will initiate.
Conclusion
As we have discussed in the article, some initial Apple iPhone 12 Pro users are facing this screen stuck issue while transferring data. As explained in the article, you can avoid this problem by identifying the root cause. If you want a tool to prevent all such issues in the future, we have a perfect all-in-one mobile solution provider for you.
Wondershare Dr.Fone will not only solve this Apple iPhone 12 Pro stuck on data transfer issue but also deal with any future iPhone problem. So, download Wondershare Dr.Fone now to optimize your Apple iPhone 12 Pro using top-notch features.
Also read:
- [New] 2024 Approved Re-Image Twitter Video Portrait
- [Updated] From Capture to Air Expert Tips for Streaming Upside-Down Videos on Youtube for 2024
- 2024 Approved Uniting Subscribers Through Shared Playlists
- Analyzing Local File Transmission Methods: Which Fits Best?
- Enhance Your Content Strategy - Discover the Power of Social Blade and YouTube Data
- In 2024, Effortless Ways to Transfer Data from Your Apple iPhone 12 Pro to iPhone 15 | Dr.fone
- In 2024, How Do You Get Sun Stone Evolutions in Pokémon For Infinix Smart 7 HD? | Dr.fone
- In 2024, How to Transfer Everything from Apple iPhone XS Max to iPhone | Dr.fone
- In 2024, How to Transfer from Apple iPhone XS to iPhone 8/X/11 | Dr.fone
- In 2024, How To Transfer Messages From Apple iPhone 8 to other iPhone All iOS Versions | Dr.fone
- In 2024, iPhone Transfer Transfer Contact from Apple iPhone XS Max to iPhone without iCloud | Dr.fone
- In 2024, Top 12 Prominent Vivo Y100t Fingerprint Not Working Solutions
- Title: In 2024, 5 Tutorials on How to Transfer Photos From Apple iPhone 12 Pro to New iPhone | Dr.fone
- Author: Charlotte
- Created at : 2024-10-11 09:42:00
- Updated at : 2024-10-18 06:55:55
- Link: https://iphone-transfer.techidaily.com/in-2024-5-tutorials-on-how-to-transfer-photos-from-apple-iphone-12-pro-to-new-iphone-drfone-by-drfone-transfer-from-ios/
- License: This work is licensed under CC BY-NC-SA 4.0.