
In 2024, 5 Easy Ways to Transfer Contacts from Apple iPhone X to Android | Dr.fone
5 Easy Ways to Transfer Contacts from Apple iPhone X to Android
Whenever we move from one device to another, the first thing that we wish to do is transfer our contacts. After all, we can’t communicate with anyone without our list of contacts. Surprisingly, a lot of people find it hard to transfer contacts from Apple iPhone X to Android. Truth to be told - there can find countless ways to move contacts from Apple iPhone X to Android. You don’t need to worry a lot about the compatibility issues of different systems and can replace old phones at will when there is a new phone release, like the upcoming Samsung Galaxy S22 series. You can use a third-party app, a cloud service (like iCloud), and iTunes. Read on to learn how to transfer contacts from Apple iPhone X to Android in 5 different ways.
Part 1: Transfer all contacts from Apple iPhone X to Android in 1 click
The easiest way to transfer all the iPhone contacts to Android is by using Dr.Fone - Phone Transfer . A part of the Dr.Fone toolkit can easily transfer all your data from one device to another with a single click. The application is compatible with every leading Android and iPhone model. You can transfer your data from Apple iPhone X to Android and vice-versa. Besides a cross-platform transfer of data, iPhone to iPhone and Android to Android transfer is also supported.
The application also supports transferring all the leading data types such as videos, music, photos, messages, and so much more. Extremely easy to use, it is a must-have tool for every smartphone user out there. To learn how to move contacts from Apple iPhone X to Android, you can take these steps:
Step 1. First of all, launch the Dr.Fone toolkit on your Mac or Windows PC, and from its welcome screen, visit the “Phone Transfer” module.

Step 2. Connect your Android and iOS devices to the system and let the application detect them automatically. Since you wish to export iPhone contacts to Android, iPhone should be the source while Android should be the destination device. You can use the Flip button to interchange their positions.
Step 3. select the category of data you wish to transfer. Once you have checked the “Contacts” option, click on the “Start Transfer” button to start the process.

Step 4. Sit back and wait for a couple of minutes as the application syncs contacts from Apple iPhone X to Android. Make sure that both the Apple iPhone X devices are kept connected to the system until the process is completed.

Step 5. Once the transfer completes, you will be shown a message. In the end, you can remove the 2 devices safely from your system.

Part 2: Move contacts from Apple iPhone X to Android with Google Account
Another fast and hassle-free way to sync contacts from Apple iPhone X to Android is by using your Google Account. Since you can add your Google account on the iPhone, you can also use it to sync your contacts. While setting up your Android, you can use the same Google account. To learn how to import contacts from Apple iPhone X to Android using your Google account, these quick steps can be implemented.
Step 1. Unlock your iPhone and go to its Settings > Mail, Contacts, Calendars > Add Account and tap on “Google.”

Step 2. Sign in with your Google account credentials and grant your phone the needed permissions to access your Gmail data.
Step 3. Now, you can go back to your Google account from here and turn on the sync option for “Contacts.”

Step 4. Once your contacts are synced with your Google account, you can easily access them on any Android device. You can use the Google Contacts app or use the same account to set up your device for auto-sync contacts.
Part 3: Import contacts from Apple iPhone X to Android with iCloud
Another simple way to sync contacts from Apple iPhone X to Android is by using iCloud. Firstly, you need to sync the iPhone contacts with iCloud, and later you can export them a VCF file. To this end, the vCard can be imported to Google Contacts. Yes - it does sound a bit complicated. After all, the Dr.Fone tools provide such a hassle-free way to move contacts from Apple iPhone X to Android compared to this technique. Though, this is a free solution and can be your plan B. To learn how to transfer contacts from Apple iPhone X to Android via iCloud, follow these steps.
1. Before you proceed, make sure your iPhone contacts are synced with iCloud. To do this, go to the iCloud settings and turn on the sync for 1.Contacts.
2. Great! Once your contacts are synced with iCloud, you can easily access them remotely. Go to iCloud.com and log in with your Apple ID.
3. After logging in to your iCloud account, go to the “Contacts” option from the home screen.
4. This will display a list of all the synced contacts. Select the contacts you wish to move. To select all contacts, click on the gear icon (settings) at the bottom right corner.
5. Once you have made the desired selections, go to its settings again (the gear icon) and choose “Export vCard.” This will save a VCF file having all the contact details.
6. Now, go to Gmail and login with your account details. Select the Contacts option. Alternatively, you can go to the official website of Google Contacts as well.
7. From here, you can choose to Import a file. Click on the vCard option and browse the saved VCF file that you have just exported from iCloud.
8. Once you have imported these contacts to your Google account, you can easily access them on the connected device as well.
Part 4: Copy contacts from Apple iPhone X to Android using iTunes
If you are an avid user of iTunes, you can try this technique to export iPhone contacts to Android. Earlier, iTunes has a feature to sync contacts with Google, Outlook, and Windows account. Now, the Google feature has been removed from iTunes. Therefore, you first need to sync your contacts to your Windows account and can later export them into a card. Needless to say, the technique can also be a bit complicated. Though, you can implement these steps to copy contacts from Apple iPhone X to Android using iTunes.
1. Launch the latest version of iTunes from your system, and connect your iPhone with a cable.
2. Select your connected device and go to its Info tab. Enable the “Sync Contacts“ option and choose to sync them with Windows Contacts.
3. Ensure that you choose to sync “All Contacts” before clicking on the “Apply” button.
4. Great! Once you have synced your iPhone contacts to your Windows account, you can safely remove the Apple iPhone X device. Go to your Account > Contacts and click on the “Export” button on the toolbar.
5. Choose to export the contacts to a vCard and select the location to save the VCF file.

6. In the end, you can manually copy the VCF file to your Apple iPhone X or import it to your Google Contacts as well.
Part 5: Switch contacts from Apple iPhone X to Android without a computer
Often, users don’t wish to use a computer to export iPhone contacts to Android. If you have the same requirements, then you can use a data transfer app. While there are many apps out there that can help you move contacts from Apple iPhone X to Android, I would recommend My Contacts Backup. This is because the app is available on both iOS App Store and Google Play Store . To use this app to transfer contacts from Apple iPhone X to Android, follow these steps.
1. Firstly, download the My Contacts app on your iPhone and launch it. Grant the app the needed permissions to access your contacts.
2. The app will automatically detect all the contacts saved on your device and would give you an option to either mail them or save them to its server.
3. You can choose to email the contacts to your own Gmail account as well. A VCF file will be mailed to your account that can later be downloaded and synced.

4. Additionally, you can also upload the contacts to its server.
5. Now, you have to install the My Contacts Backup app on your Apple iPhone X and Google Play Store.
6. Launch the app and choose to restore your contacts using an in-app vCard. In this way, all the saved contacts will be exported to your Apple iPhone X.

Now that you have learned 7 different ways to move contacts from Apple iPhone X to Android, you can easily fulfill your requirements. Out of all the 8 provided options, Dr.Fone - Phone Transfer is the fastest and most convenient option to move all the contacts at once.
Complete Tutorial: Sending Photos From Apple iPhone X to iPad
Among the array of iOS devices, the iPhone and iPad stand as popular companions for capturing and storing precious moments. However, navigating the process of transferring photos from Apple iPhone X to iPad can sometimes feel daunting. Fortunately, with the evolution of Apple’s ecosystem, it has become a straightforward task.
Now, the process can be managed with various methods and tools available at your disposal. The guide aims to effortlessly transfer your photos from an iPhone to an iPad. From utilizing iCloud and AirDrop to exploring third-party applications, we’ll cover step-by-step instructions.

Part 1: How To Transfer Photos From Apple iPhone X to iPad Using AirDrop
AirDrop stands as one of the most convenient and straightforward methods. It can transfer photos between Apple devices wirelessly. This functionality employs Bluetooth and Wi-Fi to establish a direct link between your iPhone and iPad. That enables smooth photo sharing without requiring additional cables or an internet connection. Here’s a detailed guide outlining the process of how to transfer photos from Apple iPhone X to iPad using AirDrop:
- Step 1. On your iPhone and iPad, swipe down from the top right corner to open the Control Center. Tap and hold the connectivity panel; within, press and hold the network connectivity box that includes AirDrop. Choose “Contacts Only” or “Everyone” to enable AirDrop visibility.

- Step 2. To begin, access the Photos app on your iPhone and pick the photos you’d like to transfer to your iPad. Afterward, select the “Share” icon within the app, and from the available options, opt for “AirDrop.” Look for your iPad in the AirDrop panel displayed and tap on it to start the transfer process.

- Step 3. When your iPad receives the notification prompting you to accept the incoming photos from the iPhone, tap “Accept.” The selected images will be saved to your iPad’s Photos app.

Part 2: How To Transfer Photos From Apple iPhone X to iPad Using iCloud Sync
iCloud offers a smooth way to synchronize photos across your Apple devices. It ensures your photo library remains up-to-date without manual intervention. Enabling iCloud Photos automatically uploads your images to iCloud, allowing access from any device linked to the same Apple ID. Here’s a guide to transfer photos from Apple iPhone X to iPad automatically via iCloud:
- Step 1. Begin by accessing your iPhone’s Settings and tapping your name at the top. On the following screen, choose “iCloud” followed by “Photos” on the next window. Here, ensure that “Sync this iPhone” is toggled for iCloud Photos.

- Step 2. Now, move to iPad and ensure you are logged in with the same Apple ID. Then, go to “Settings,” tap the name, press “iCloud,” and tap “Photos.” Here, you need to toggle on the “Sync this iPad” option. Afterward, wait for some time to let the syncing process complete. The speed of synchronization depends on your internet connection and the number of photos being uploaded.

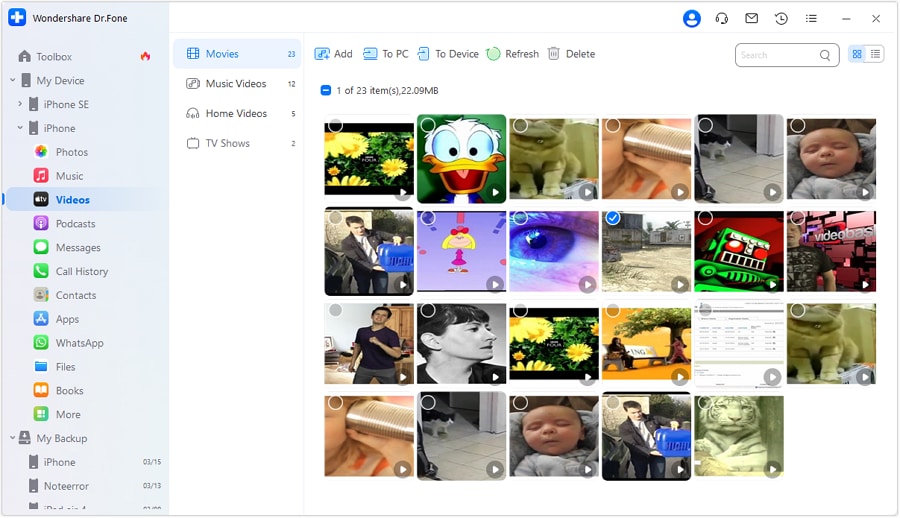
Part 3: One-Click Innovative Solution To Transfer Photos From Apple iPhone X to iPad
Wondershare Dr.Fone presents an innovative and user-friendly solution. It offers a comprehensive way to transfer photos between your iPhone and iPad. This software provides a straightforward method to transfer photos selectively or entirely. Moreover, when using it, you are no longer bound by the constraints of iCloud or AirDrop. The following are the detailed guides for transferring photos using Wondershare Dr.Fone:
3.1 Transfer Selective Photos from Apple iPhone X to iPad
Wondershare Dr.Fone is an intelligent iPhone transfer and management solution. It is designed to streamline your data handling. With its array of functions, you can manage your data through importing, exporting, and deletion processes. This tool offers the convenience of quick file transfers by simply dragging and dropping files. Here is how to add photos from Apple iPhone X to iPad using Wondershare Dr.Fone:
- Step 1: Install and Open the Latest Wondershare Dr.Fone App
You can begin by installing the latest version of Wondershare Dr.Fone from its official website. Once installed, launch it and connect your iPhone and iPad to the computer. When the Apple iPhone X devices are detected by Dr.Fone, click on the “iPhone” name to expand it in the left panel.

- Step 2: Transfer the Photos to the iPad from the iPhone
From the expanded options, choose “Photos” to access your iPhone’s photos. Here, select the files you want to transfer and click “To Device.” Now, choose the “iPad” from the available options, and the photos will be transferred in no time. You can send as many as you like without any constraints.
3.2 Transfer All Photos From Apple iPhone X to iPad
When moving photos in bulk from Apple iPhone X to iPad, Wondershare Dr.Fone also got you covered. It offers a powerful phone transfer feature that can transfer over 18 types of data from one device to another. Dr.Fone simplifies the process of transferring data between phones with just one click. It facilitates the smooth transfer of various data types, like photos. You can follow these simplified steps to transfer photos from Apple iPhone X to iPad:
- Step 1: Navigate to Phone Transfer within Wondershare Dr.Fone
Once you have launched Wondershare Dr.Fone, connect the iPhone and iPad to the computer. Then, click “Toolbox” from the left side panel and tap the “Phone Transfer” option from the available choices. Then, you will be asked to position your devices correctly for data transfer.
- Step 2: Successfully Complete the Photos Transfer Process
When assigning positions, the iPhone will be the “Source” device. On the other hand, the iPad will become the “Destination” device. You can use the “Flip” to change the Apple iPhone X devices’ positions. Afterward, select “Photos” from the data and click “Start Transfer” to initiate the process.

Part 4: How To Transfer Photos From Apple iPhone X to iPad Using iTunes/Finder
iTunes or Finder can also be used to transfer photos from your iPhone to your iPad. It is the official Apple software for music, media, and backup management. Yet, iTunes/Finder can assist in manually syncing photos between your iOS devices. The steps needed to transfer photos from Apple iPhone X to iPad automatically are given below:
- Step 1. Connect your iPhone to the PC or Mac and open the Photos app. In the Photos app, tap “Import,” select your iPhone, and wait for the computer to load photos from the iPhone. Once they are loaded, choose to transfer the targeted to the computer.

- Step 2. When photos are moved to your computer, unplug the iPhone and link your iPad. Now run the latest version of iTunes/Finder on your PC/Mac and tap the Apple iPhone X device icon. Here, choose “Photos” from the left panel and check the box next to “Sync Photos.”

- Step 3. Now, choose the folder where you moved photos from the iPhone in the drop-down box. After that, hit the “Apply” button and wait for the images to sync with the iPad.

Part 5: How To Transfer Photos From Apple iPhone X to iPad Using Social Media Apps
Social media apps can serve as a convenient platform for transferring photos. Numerous options are available for transferring pictures, and one of the widely used applications is WhatsApp. It is known for its communication features. Moreover, it enables users to share images and media files across various devices. Here’s a guide on how to transfer photos from Apple iPhone X to iPad via WhatsApp:
- Step 1. After ensuring WhatsApp is running on both devices, open WhatsApp on iPhone. Tap the new chat icon to start a conversation with a WhatsApp account logged in on the iPad. Now, tap the “+” icon and choose either “Document,” “Camera,” or “Gallery” and pick the desired images. After selecting the photos, tap “Send” to transfer them to iPad.

- Step 2. Proceed to the iPad and launch the “WhatsApp Web” on Safari. Following this, access your conversations and download the images you received to complete the transfer process.

Part 6: How To Transfer Photos From Apple iPhone X to iPad Using Email
Utilizing email provides a direct and frequently used approach for transferring photos between your iPhone and iPad. However, it might not be suitable for larger quantities of high-resolution images due to attachment size limits. Nevertheless, it is effective for smaller batches of images. Here’s a detailed guide on how to utilize email for transferring photos between your iPhone and iPad:
- Step 1. Access the email app on your iPhone and initiate a new email. Input your iPad email address in the recipient field. Next, tap on the “Attachment” icon to select the images you want to send.

- Step 2. Move to your iPad and on the “Mail” app there. Now navigate to “Inbox” and open the newly received email. Tap the attachments and save them to your device to complete the transfer process.

Conclusion
Transferring photos between your iPhone and iPad is an essential task for many users. Throughout this guide, we’ve explored various methods to transfer photos from Apple iPhone X to iPad. These ranged from native Apple services like AirDrop, iCloud, and iTunes/Finder to unconventional approaches such as social media apps and email. Each method offers its advantages.
Yet, considering factors like convenience, ease of use, and efficiency, one option stands out as a versatile and user-friendly solution: Wondershare Dr.Fone. This innovative third-party software provides a hassle-free way to transfer photos between iOS devices. It offers both selective and bulk transfer options with a straightforward interface.
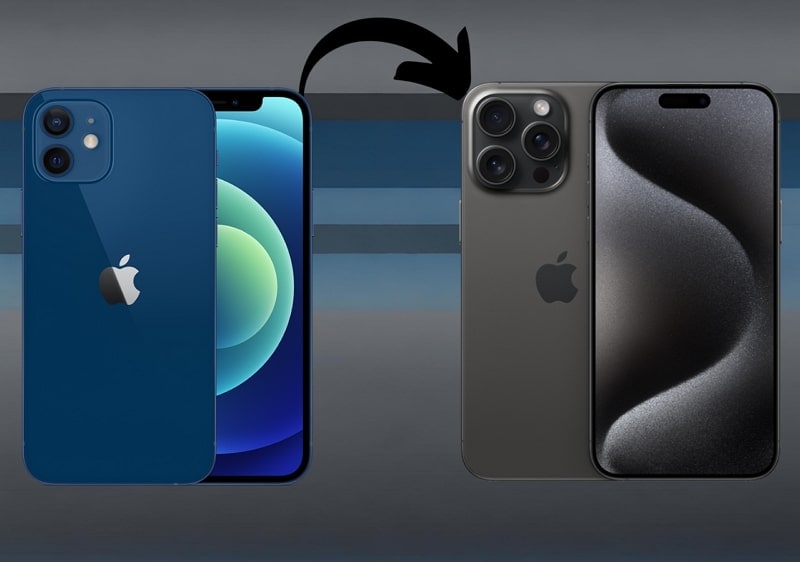
[Solved] How To Transfer From Apple iPhone X to iPhone 15
Transitioning to a new iPhone is undoubtedly thrilling. Yet, the process of migrating your data from one iOS device to another can appear overwhelming. With every iPhone model update, Apple unveils new features and functionalities. It can potentially complicate the transfer procedure. In this extensive guide, we’ll simplify the process of how to transfer data from Apple iPhone X to iPhone.
We’ll offer detailed, step-by-step guidance and explore many methods to ensure an efficient transition. By the end of this guide, you’ll possess the necessary know-how to effortlessly transfer your valuable data.
Part 1. How To Transfer Data From Apple iPhone X to iPhone With Apple’s Built-In Methods
Moving data from one iPhone to another can be easier using Apple’s tools. These features are already on your iPhone and make it simple and reliable to transfer your data. Given below are the three built-in solutions from Apple for how to transfer data from Apple iPhone X to iPhone:
Method 1. Quick Start
The Quick Start feature from Apple offers a way to transfer data from your previous iPhone to a new device without any hassle. This method utilizes a direct wireless connection between the Apple iPhone X devices. That makes the transition swift and efficient. Follow these steps to transfer data from Apple iPhone X to iPhone using Quick Start:
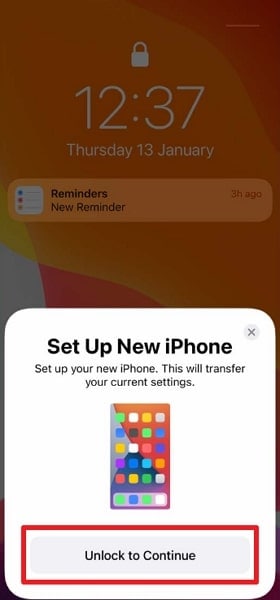
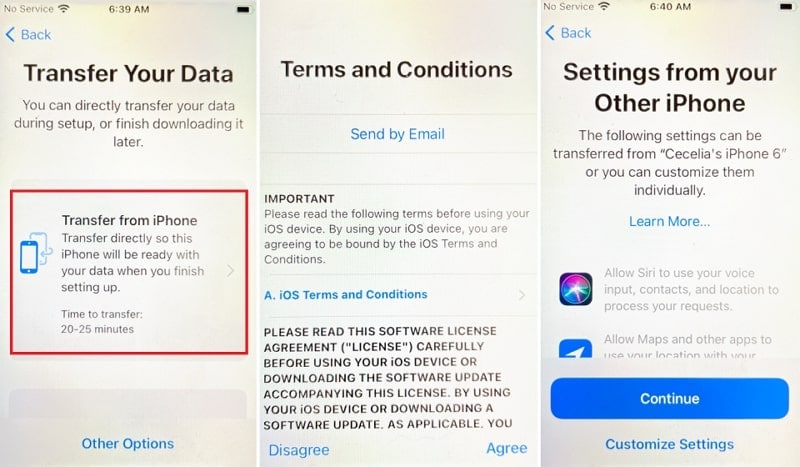
Step 1. Begin by turning on your new iPhone and placing it beside your old iPhone. When the “Set Up New iPhone” prompt appears, tap “Unlock to Continue.” This process will use the Apple ID associated with your old phone, so tap “Continue” if you’re comfortable with that.

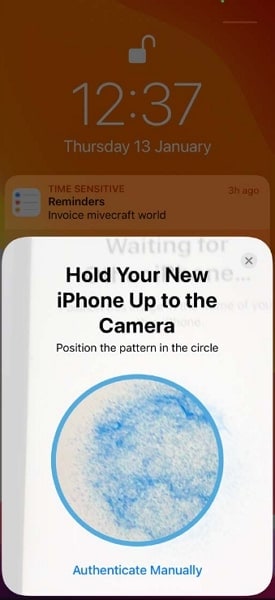
Step 2. An animation will appear on the new iPhone’s screen, and you have to hold this animation up to the camera on your old iPhone. Once the message “Finish on New [Device]“ appears, input your old iPhone’s passcode into the new one and follow the provided setup instructions.
Step 3. When you reach the “Transfer Your Data” screen, opt for “Transfer Directly from iPhone” and confirm the specific settings and data you wish to transfer. This streamlined process ensures a smooth transition to your new device while maintaining the data you want.
Method 2. iTunes/Finder
Another reliable method to transfer data between iPhones is using iTunes/Finder. iTunes is available for Windows or macOS versions before Catalina. The users on macOS Catalina and later versions can use Finder to transfer data. This method allows you to create a backup of your old iPhone and restore that backup to your new device. Here is **how to transfer data to the new iPhone** via iTunes/Finder:
Using iTunes (For Windows or macOS Versions Prior to Catalina)
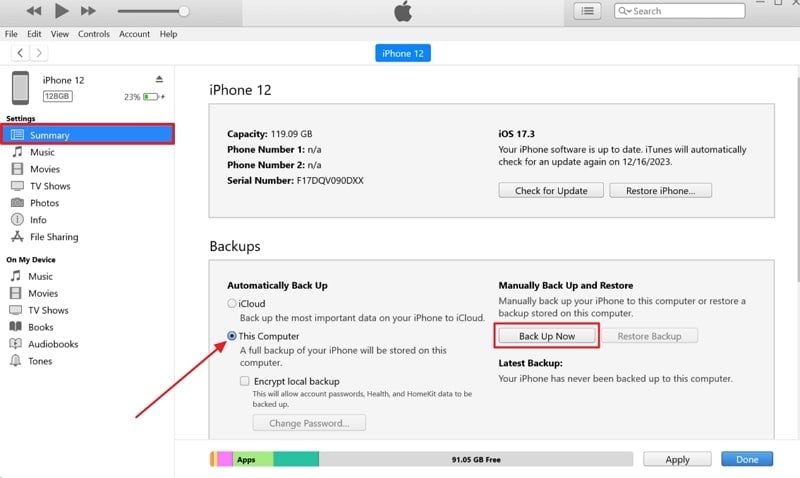
- Step 1. Initiate by connecting your old iPhone to your computer and launching the latest version of iTunes. Once your device is detected by iTunes, click the Apple iPhone X device icon to access the “Summary” tab. Here, move to the “Backups” section and click “Back Up Now” to start creating the backup. Before pressing “Back Up Now,” ensure that “This Computer” is selected as a backup location.
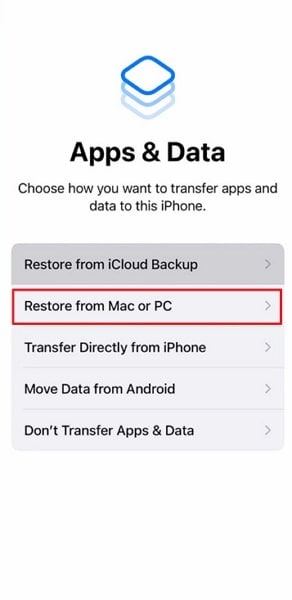
Step 2. Once the backup is completed, disconnect the old device and start setting up the new one. When you reach the “Apps & Data” screen, select “Restore from Mac or PC,” and connect to the computer with iTunes.
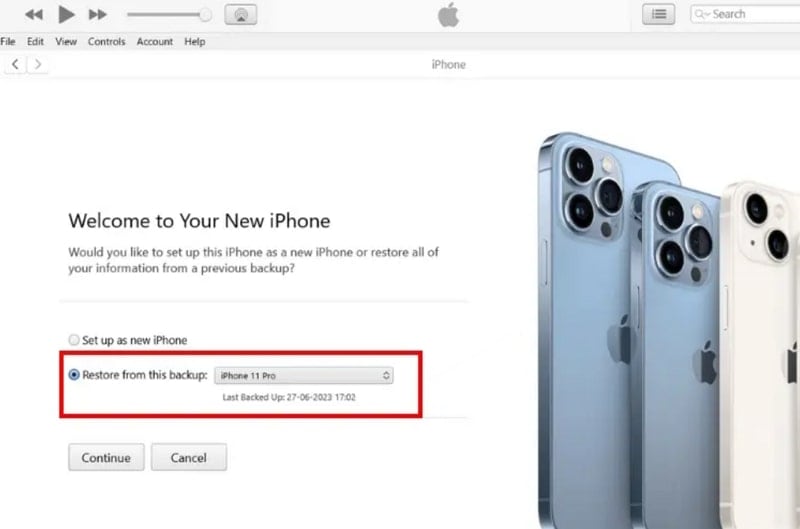
Step 3. Click the “Device” icon in iTunes when it loads the new iPhone, and you will come across the “Welcome to Your New iPhone” screen. Here, select “Restore from this Backup,” select the targeted backup, and click “Continue.” It will commence the backup restoration process, which takes some time, depending on the backup size.

Using Finder (On macOS Catalina and Later Versions)
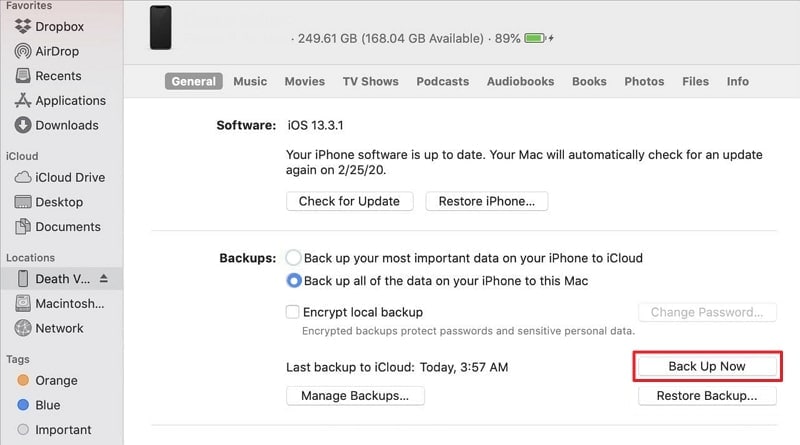
Step 1. To start, use a USB cable to connect your old iPhone to your Mac and open Finder. In Finder, select your iPhone under the “Locations” section. Click “Back Up Now” to create a backup of your old iPhone on your Mac. Ensure that the “Back up all of the data on your iPhone to this Mac” box is checked, and when the process is completed, unplug the old device.
Step 2. Now connect the new iPhone with “Restore from Mac or PC” selected from the “Apps & Data” screen. Choose your device in Finder and click “Restore Backup.” Then, select the targeted backup and wait for the backup restoration process to complete.
Method 3. iCloud Backup
Utilizing iCloud Backup offers a streamlined and wireless approach for transferring data. This method empowers you to generate a backup of your previous iPhone on iCloud. Afterward, it enables you to restore that backup to your new device.

Leveraging iCloud Backup facilitates the transfer of various data types. These include photos, videos, app data, settings, and more. The steps to **transfer data from Apple iPhone X to new iPhone** via iCloud Backup are these:
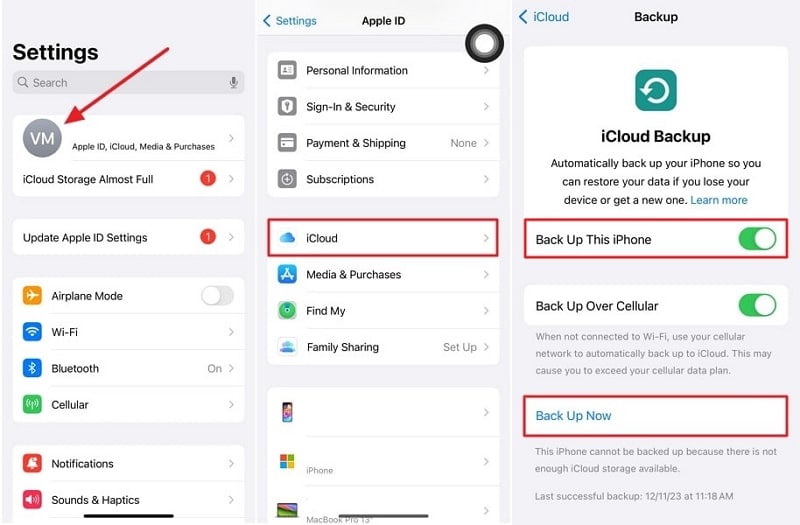
Step 1. Confirm that your former iPhone is connected to a reliable Wi-Fi network. Then, access the Settings app on your previous iPhone and tap your name, which is located at the top of the screen. Select “iCloud” and proceed to choose “iCloud Backup.” Ensure the “iCloud Backup” option is activated if it’s not switched on. Finally, click “Back Up Now” and wait for the backup process to finalize.
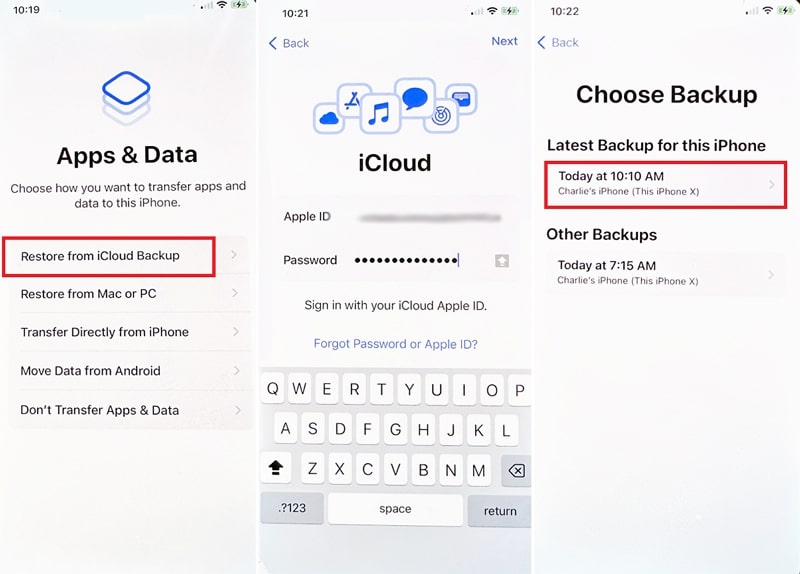
Step 2. Turn on your newly obtained iPhone and follow the initial setup instructions until you reach the “Apps & Data” display. Once there, select “Restore from iCloud Backup” and sign into your iCloud account. Ensure it is the same Apple ID you utilized to back up your previous iPhone. Afterward, select the latest backup of your previous iPhone and follow the on-screen instructions to complete the process.
Part 2. What Are the Drawbacks of Using Official Methods for Transferring Data From Apple iPhone X to iPhone
Apple’s official methods to transfer data from Apple iPhone X to iPhone offer convenience and reliability. Nevertheless, they do possess specific limitations and disadvantages. Users should consider these limitations to make a well-informed choice. It will help you find the most fitting approach for their requirements. Here are some of the downsides and constraints associated with Apple’s official methods:
1. Entire Devices Backups
A major drawback of using methods like Quick Start, iTunes, and iCloud is that they restore the entire device’s data. Users cannot selectively transfer data using any of these three methods.
2. iPhone Setup Requirement
The transfer methods like iCloud and Quick Start can only be employed when setting up a new iOS device. For old devices, you must factory reset the Apple iPhone X device for these methods to work.
3. Internet Dependency
Restoring iCloud Backup on your new iPhone requires a stable and relatively fast internet connection. This can be a limitation in areas with poor connectivity or limited data plans. If the internet is unstable, it could lead to issues during the iCloud backup restoration.
4. Limited Storage on iCloud
iCloud offers 5 GB of free storage, which might not be sufficient for users with large amounts of data. Users might need to buy more iCloud storage to accommodate their backups, incurring extra costs.
5. Compatibility Issues
Older iPhone models might not support the latest iOS versions or certain features. It leads to compatibility issues when transferring data between devices. This is a prominent issue when dealing with different iOS versions.
Part 3. One-Click Alternative to Official Methods To Transfer Data From Apple iPhone X to iPhone
Seeking an efficient, all-in-one solution that bypasses the limitations of Apple’s official methods? Wondershare Dr.Fone stands out as a comprehensive alternative. It offers a one-click approach to transferring data between iPhones of various models. This toolkit streamlines the process without relying on iCloud or iTunes/Finder. Dr.Fone also provides a user-friendly interface that simplifies the transfer process.
Its intuitive design allows users to transfer data between iPhones effortlessly. Unlike Apple’s native methods, Dr.Fone enables the transfer of over 15 types of data. This includes contacts, messages, photos, videos, music, call logs, apps, and more. It supports transferring data between different iOS versions and iPhone models.
Key Features of Wondershare Dr.Fone
- Beyond direct transfers, Wondershare Dr.Fone offers backup and restore functionalities.
- Fone – Phone Transfer is compatible with over 8000 devices from various brands.
- This tool enables swift data transfer between phones in under 3 minutes.
Steps to Transfer Data from Apple iPhone X to iPhone via Wondershare Dr.Fone
Dr.Fone supports effortless data transfer across devices and platforms. This is how to transfer data from Apple iPhone X to iPhone via Wondershare Dr.Fone:
- Step 1. Access Phone Transfer and Connect iOS Devices
Launch Wondershare Dr.Fone after installing it and access the “Toolbox” tab. Here, click “Phone Transfer” and connect both of your iOS devices to the computer. Once they are detected by Dr.Fone, move to assign them to the correct positions.
- Step 2. Pick Source and Destination Positions
Your old iPhone from which you are transferring data will be the “Source” device. Similarly, your new iPhone to which you want to move data will be in the “Destination” position. In case positions are wrong, use the “Flip” button to interchange the positions.
- Step 3. Start and Complete the Data Transfer Process
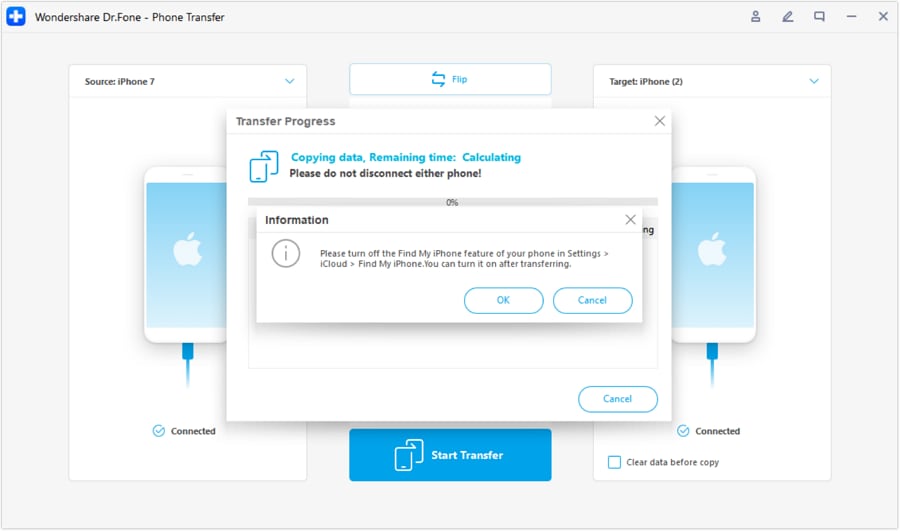
The last part includes selecting the data you want to transfer. You can select the data within the transfer screen and, upon making your choices, proceed by clicking “Start Transfer.” It’s important to note that during this process, you’ll need to deactivate the “Find My” feature on iOS devices. When done, the data process will commence automatically.
Bonus Tip. Want To Buy a New iPhone? Tips and Tricks To Select the Best iPhone for Your Use
Choosing the right iPhone involves considering various factors. Ensuring alignment with your preferences, needs, and budget is crucial. It requires evaluation of these aspects and conducting comprehensive research. This will enable you to confidently make a knowledgeable choice. Below, discover some helpful tips and tricks to aid in choosing the ideal iPhone:
1. Identify Your Priorities
Determine what matters most to you in an iPhone model. Are you more focused on camera quality, battery life, processers, or other features? Gaining clarity on your priorities will assist in focusing your choices.
2. Consider the Latest Models
Apple releases new iPhone models annually. Consider the latest offerings, as they often feature upgraded hardware. This includes improved cameras, better battery life, and new features.
3. Budget Consideration
Set a budget range for your new iPhone. Apple provides a range of models available at diverse price tiers. These range from flagship iPhones to more budget-friendly options. Consider your budget while weighing the features you need.
4. Size and Display Preferences
iPhones come in different sizes, from compact models like the iPhone 15 to larger models like the iPhone 15 Pro Max. Consider the screen size of your iPhone that suits your preferences. It also depends on if you prefer a more pocket-friendly device or a larger display.
5. Camera Capabilities
If photography holds significance for you, examine the camera capabilities. Seek out attributes such as multiple lenses, improved low-light performance, and advanced camera functionalities.
6. Consider Future Updates and Longevity
Opt for the latest Apple device, as the company provides software updates for its products over an extended period. Selecting a model with longer update support ensures that your device stays compatible with the latest software and features.
Conclusion
In conclusion, knowing how to transfer data from Apple iPhone X to iPhone is crucial for a smooth transition. While Apple’s native methods offer reliability, limitations exist. For an efficient, one-click alternative, Wondershare Dr.Fone stands out. Its comprehensive device-to-device transfer and versatile features make it the ideal choice. Embrace Dr.Fone for a hassle-free iPhone data transfer experience. Moreover, you can transfer between iOS devices without erasing the current data.
Also read:
- 4 Ways to Transfer Contacts from Apple iPhone 12 Pro to iPhone Quickly | Dr.fone
- 5 Ways to Send Ringtones from Apple iPhone 14 Pro to iPhone Including iPhone 15 | Dr.fone
- 5 Ways to Send Ringtones from Apple iPhone XS Max to iPhone Including iPhone 15 | Dr.fone
- Download Windows Movie Maker 6 Step-by-Step Guide
- Guide to Fixing and Refreshing Your 3D Printer's Filament Performance
- How To Transfer Data From iPhone SE (2022) To Other iPhone? | Dr.fone
- In 2024, 5 Ways to Transfer Music from Apple iPhone 6s Plus to Android | Dr.fone
- In 2024, How Can We Bypass Itel A70 FRP?
- In 2024, How To Transfer From Apple iPhone X to Samsung Simplified Guide | Dr.fone
- In 2024, iPhone Transfer Transfer Contact from Apple iPhone 6s to iPhone without iCloud | Dr.fone
- In 2024, Speedy Shot Mastery Discovering the Best 5 Hacks for Filming
- In 2024, Transfer your Apple iPhone 11 Apps to New iPhone | Dr.fone
- Solved How To Transfer From Apple iPhone XS to iPhone 15 | Dr.fone
- Strategies to Rectify Slow-Motion in CCTVs
- The Ultimate List of Powerful Instagram Hashtags
- Transferring and Playing Your Favorite PS4 Games Onto the PS5: How It Works
- Unlock the Secrets to Flawless Instagram Videos for 2024
- Title: In 2024, 5 Easy Ways to Transfer Contacts from Apple iPhone X to Android | Dr.fone
- Author: Charlotte
- Created at : 2024-10-14 02:01:08
- Updated at : 2024-10-18 11:45:03
- Link: https://iphone-transfer.techidaily.com/in-2024-5-easy-ways-to-transfer-contacts-from-apple-iphone-x-to-android-drfone-by-drfone-transfer-from-ios/
- License: This work is licensed under CC BY-NC-SA 4.0.