
In 2024, 5 Easy Ways to Transfer Contacts from Apple iPhone 13 to Android | Dr.fone
5 Easy Ways to Transfer Contacts from Apple iPhone 13 to Android
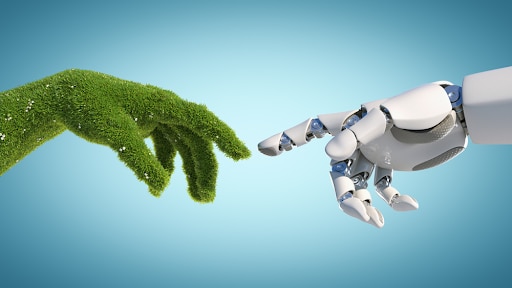
Whenever we move from one device to another, the first thing that we wish to do is transfer our contacts. After all, we can’t communicate with anyone without our list of contacts. Surprisingly, a lot of people find it hard to transfer contacts from Apple iPhone 13 to Android. Truth to be told - there can find countless ways to move contacts from Apple iPhone 13 to Android. You don’t need to worry a lot about the compatibility issues of different systems and can replace old phones at will when there is a new phone release, like the upcoming Samsung Galaxy S22 series. You can use a third-party app, a cloud service (like iCloud), and iTunes. Read on to learn how to transfer contacts from Apple iPhone 13 to Android in 5 different ways.
Part 1: Transfer all contacts from Apple iPhone 13 to Android in 1 click
The easiest way to transfer all the iPhone contacts to Android is by using Dr.Fone - Phone Transfer . A part of the Dr.Fone toolkit can easily transfer all your data from one device to another with a single click. The application is compatible with every leading Android and iPhone model. You can transfer your data from Apple iPhone 13 to Android and vice-versa. Besides a cross-platform transfer of data, iPhone to iPhone and Android to Android transfer is also supported.
The application also supports transferring all the leading data types such as videos, music, photos, messages, and so much more. Extremely easy to use, it is a must-have tool for every smartphone user out there. To learn how to move contacts from Apple iPhone 13 to Android, you can take these steps:
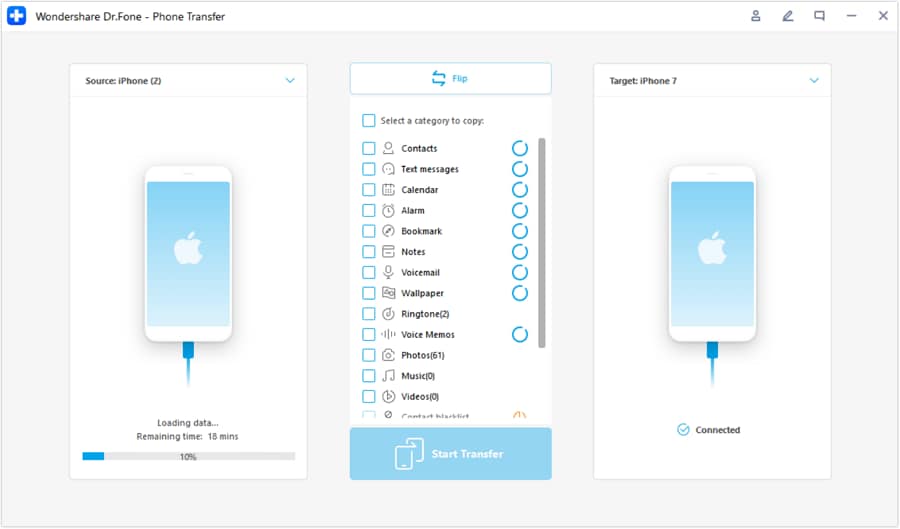
Step 1. First of all, launch the Dr.Fone toolkit on your Mac or Windows PC, and from its welcome screen, visit the “Phone Transfer” module.

Step 2. Connect your Android and iOS devices to the system and let the application detect them automatically. Since you wish to export iPhone contacts to Android, iPhone should be the source while Android should be the destination device. You can use the Flip button to interchange their positions.
Step 3. select the category of data you wish to transfer. Once you have checked the “Contacts” option, click on the “Start Transfer” button to start the process.

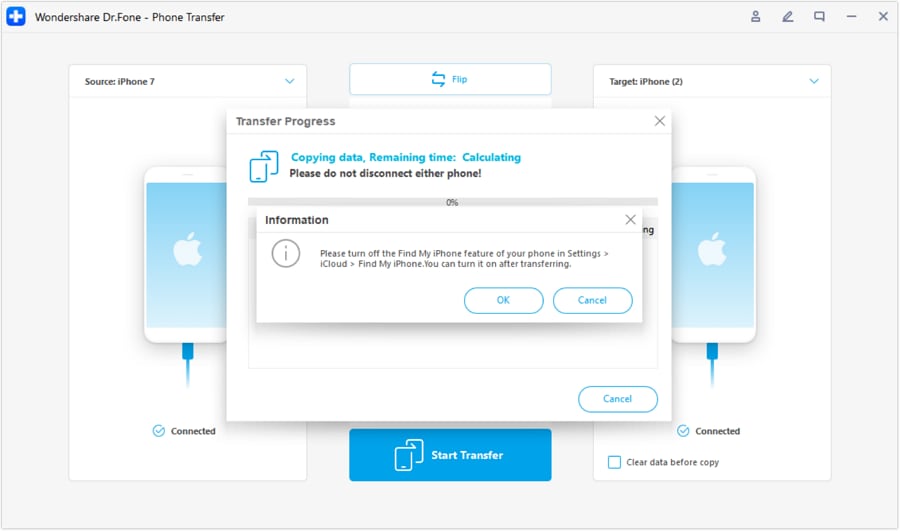
Step 4. Sit back and wait for a couple of minutes as the application syncs contacts from Apple iPhone 13 to Android. Make sure that both the Apple iPhone 13 devices are kept connected to the system until the process is completed.

Step 5. Once the transfer completes, you will be shown a message. In the end, you can remove the 2 devices safely from your system.

Part 2: Move contacts from Apple iPhone 13 to Android with Google Account
Another fast and hassle-free way to sync contacts from Apple iPhone 13 to Android is by using your Google Account. Since you can add your Google account on the iPhone, you can also use it to sync your contacts. While setting up your Android, you can use the same Google account. To learn how to import contacts from Apple iPhone 13 to Android using your Google account, these quick steps can be implemented.
Step 1. Unlock your iPhone and go to its Settings > Mail, Contacts, Calendars > Add Account and tap on “Google.”

Step 2. Sign in with your Google account credentials and grant your phone the needed permissions to access your Gmail data.
Step 3. Now, you can go back to your Google account from here and turn on the sync option for “Contacts.”

Step 4. Once your contacts are synced with your Google account, you can easily access them on any Android device. You can use the Google Contacts app or use the same account to set up your device for auto-sync contacts.
Part 3: Import contacts from Apple iPhone 13 to Android with iCloud
Another simple way to sync contacts from Apple iPhone 13 to Android is by using iCloud. Firstly, you need to sync the iPhone contacts with iCloud, and later you can export them a VCF file. To this end, the vCard can be imported to Google Contacts. Yes - it does sound a bit complicated. After all, the Dr.Fone tools provide such a hassle-free way to move contacts from Apple iPhone 13 to Android compared to this technique. Though, this is a free solution and can be your plan B. To learn how to transfer contacts from Apple iPhone 13 to Android via iCloud, follow these steps.
1. Before you proceed, make sure your iPhone contacts are synced with iCloud. To do this, go to the iCloud settings and turn on the sync for 1.Contacts.
2. Great! Once your contacts are synced with iCloud, you can easily access them remotely. Go to iCloud.com and log in with your Apple ID.
3. After logging in to your iCloud account, go to the “Contacts” option from the home screen.
4. This will display a list of all the synced contacts. Select the contacts you wish to move. To select all contacts, click on the gear icon (settings) at the bottom right corner.
5. Once you have made the desired selections, go to its settings again (the gear icon) and choose “Export vCard.” This will save a VCF file having all the contact details.
6. Now, go to Gmail and login with your account details. Select the Contacts option. Alternatively, you can go to the official website of Google Contacts as well.
7. From here, you can choose to Import a file. Click on the vCard option and browse the saved VCF file that you have just exported from iCloud.
8. Once you have imported these contacts to your Google account, you can easily access them on the connected device as well.
Part 4: Copy contacts from Apple iPhone 13 to Android using iTunes
If you are an avid user of iTunes, you can try this technique to export iPhone contacts to Android. Earlier, iTunes has a feature to sync contacts with Google, Outlook, and Windows account. Now, the Google feature has been removed from iTunes. Therefore, you first need to sync your contacts to your Windows account and can later export them into a card. Needless to say, the technique can also be a bit complicated. Though, you can implement these steps to copy contacts from Apple iPhone 13 to Android using iTunes.
1. Launch the latest version of iTunes from your system, and connect your iPhone with a cable.
2. Select your connected device and go to its Info tab. Enable the “Sync Contacts“ option and choose to sync them with Windows Contacts.
3. Ensure that you choose to sync “All Contacts” before clicking on the “Apply” button.
4. Great! Once you have synced your iPhone contacts to your Windows account, you can safely remove the Apple iPhone 13 device. Go to your Account > Contacts and click on the “Export” button on the toolbar.
5. Choose to export the contacts to a vCard and select the location to save the VCF file.

6. In the end, you can manually copy the VCF file to your Apple iPhone 13 or import it to your Google Contacts as well.
Part 5: Switch contacts from Apple iPhone 13 to Android without a computer
Often, users don’t wish to use a computer to export iPhone contacts to Android. If you have the same requirements, then you can use a data transfer app. While there are many apps out there that can help you move contacts from Apple iPhone 13 to Android, I would recommend My Contacts Backup. This is because the app is available on both iOS App Store and Google Play Store . To use this app to transfer contacts from Apple iPhone 13 to Android, follow these steps.
1. Firstly, download the My Contacts app on your iPhone and launch it. Grant the app the needed permissions to access your contacts.
2. The app will automatically detect all the contacts saved on your device and would give you an option to either mail them or save them to its server.
3. You can choose to email the contacts to your own Gmail account as well. A VCF file will be mailed to your account that can later be downloaded and synced.

4. Additionally, you can also upload the contacts to its server.
5. Now, you have to install the My Contacts Backup app on your Apple iPhone 13 and Google Play Store.
6. Launch the app and choose to restore your contacts using an in-app vCard. In this way, all the saved contacts will be exported to your Apple iPhone 13.

Now that you have learned 7 different ways to move contacts from Apple iPhone 13 to Android, you can easily fulfill your requirements. Out of all the 8 provided options, Dr.Fone - Phone Transfer is the fastest and most convenient option to move all the contacts at once.
Refurbished Apple iPhone 13: Everything You Need to Know
Are you planning to buy a new Apple iPhone 13 but feeling a pinch in your wallet? Have you ever wondered if there is a more affordable way to own the latest iPhone? If yes, then you are at the right place.
You must be familiar with the idea of recycled furniture and clothes, but not many of us like the idea of second-hand phones. However, like clothing and furniture, phones can also get repaired and given a whole new life. So, why not consider this option?

In this article, you will explore all about refurbished iPhones. What are they, and how they can be a budget-friendly alternative? We will answer everything you need to know.
But before starting, let’s shed some light on what refurbished iPhones actually are because some people aren’t aware of this term.
Part 1. What does a Refurbished Apple iPhone 13 mean?
Before going further, let’s clarify what exactly a refurbished Apple iPhone 13 is. In simple words, you can say that it is a device that has gone through a series of checks and repairs. So that it can work the same way as a brand-new Apple iPhone 13 does. If everything is done correctly, you can expect the same level of efficiency as one bought straight from the store.
When making a purchase, check the Apple iPhone 13 device to see if all its functions are working. Many times, the repairing process doesn’t go well. It results in causing some of the Apple iPhone 13 device’s functions to stop. Moreover, it’s also important to consider the source of the refurbished iPhone. You need to buy it from a trusted seller.
Let’s shed some light on the benefits of buying a refurbished or second-hand iPhone.
Part 2. What are the Benefits of Buying a Refurbished iPhone?
No doubt, refurbished iPhones are the same as the new ones. So, you will enjoy all the benefits that come with the brand-new Apple iPhone 13 at a lower price. If you are fine with a few scratches, refurbished iPhones have a lot more to offer you. The benefits of buying a used Apple iPhone 13 are as follows:
- Cost Savings
One of the major benefits of purchasing a refurbished Apple iPhone 13 is the cost savings. These devices are more affordable than brand-new ones. You can enjoy the latest features without breaking the bank.

- Quality Assurance
Refurbished iPhones are carefully inspected and tested to ensure that they meet Apple’s high standards. They are also thoroughly repaired and cleaned. Often, a refurbished Apple iPhone 13 will look and perform like a new iPhone.
- Environmental Friendly
When you get a refurbished item, you’re giving it a longer life. This means fewer iPhones end up in the trash, and that’s awesome for our planet. So, be eco-friendly and choose a refurbished iPhone.
- Warranty and Support
If you get a refurbished Apple iPhone 13 from Apple, you get a one-year warranty. You also get 90 days of free technical support. So, this warranty provides you peace of mind, just like you get when you buy a new iPhone.
- Miscellaneous Benefits
Refurbished iPhones are usually available in a variety of models. They also come with the latest software updates so that you can enjoy the newest features. These phones are reliable; you can trust that they will perform well.
Well, we have explored the benefits, but is it safe to buy a refurbished iPhone? Let’s find out!
Part 3. Is It Safe to Buy a Refurbished iPhone?
Safety is a natural concern when buying a pre-owned iPhone. You might wonder if it is a gamble or a secure choice. The answer is that it can be very safe. However, there are a few things that you should consider before making a purchase. If you are buying it from a retailer or third-party source, make sure that they are doing refurbishing in-house. If they are outsourcing it, then it will be less secure.
On the contrary, if you are buying a refurbished Apple iPhone 13 from a private seller, make sure that it’s not a scam. You can take someone who has tech knowledge. Otherwise, make sure that he is offering you a warranty period.
It is always suggested to buy second-hand things, especially tech related, from a legitimate source. If you are about to buy a used iPhone, make sure to follow the factors discussed in the next section.
Part 4. Factors to Consider Before Buying a Refurbished iPhone.
Before you purchase a refurbished iPhone, there are several factors to consider. These factors will help you make the right decision. They will also help to ensure that the Apple iPhone 13 device meets your needs and expectations. The factors that you should consider are as follows:
- Seller Reputation
Before you buy, do some homework on the seller. Go for the big names. They may include Apple’s official refurbishment program, authorized sellers, or trusted online markets.
Compatibility
Ensure the used Apple iPhone 13 you are thinking of buying is compatible with your carrier and region. Different models may not support all networks.
Storage
Choose the Apple iPhone 13 model and storage capacity that best suits your needs. Consider your usage and how much storage you need for apps, photos, and videos.
Warranty Coverage
Check the warranty that comes with the refurbished iPhone. It offers protection in case of unexpected problems. Be aware of the warranty’s duration and what it covers.
Condition and History
Ask questions about the phone’s condition and history. An honest seller would be willing to share everything about any prior issues and the refurbishment process.
Return Policy
Another critical factor is the returns policy. Without the right to return, you might end up with a malfunctioning phone. The duration of the returns policy matters as well.
Original Accessories
Find out if the refurbished Apple iPhone 13 comes with any essential accessories, such as a charger and headphones. Some listings may include these items, while others may not.
Price Comparison
Compare prices among different sellers to ensure you’re getting a competitive deal. Keep in mind that exceptionally low prices may be a red flag.
By considering these factors, you can make the right decision when buying a refurbished iPhone. In the next section, you will explore where you can buy second-hand iPhones.
Part 5. Your One-Stop Solution - Dr.Fone
If you have planned to buy a refurbished iPhone, you must be wondering how to transfer your essential data to your new phone. This is where Dr.Fone comes into play. It is a reliable and powerful tool developed by Wondershare. With this tool, you can transfer your data in just a few clicks.
Dr.Fone’s features are not just limited to transferring your data. There are plenty of other features that can enhance the performance of your iPhone. The best part? It has a user-friendly interface that simplifies all the processes. You can navigate to different features and use them without any tech knowledge.
Key Features of Dr.Fone
Some of the key features of Dr.Fone are as follows:
Data Recovery: Dr.Fone offers a data recovery feature for iOS and Android devices. It helps you retrieve lost or deleted data, including contacts, messages, photos, videos, and more.
Data Transfer: It enables seamless data transfer between different devices. You can easily move data between phones and switch between iOS and Android devices.
System Repair: This feature allows you to fix various iOS and Android system issues. You can fix black screens, boot loops, and more without data loss.
Screen Unlock: It can also help you unlock your device’s screen. Whether you’ve forgotten the password or encountered any other issue, you can easily regain access to your phone.
WhatsApp Transfer: Dr.Fone also enables you to transfer WhatsApp data. You can transfer Whatsapp chats and attachments between iOS and Android devices.
Data eraser: Dr.Fone offers a secure way to delete data from your device permanently. It ensures that it cannot be recovered by any means.
Now that you have been captivated by its features, you must be wondering how to use Dr.Fone. Well, let’s move forward to it!
Steps to Transfer Data Using Dr.Fone
Before starting, download and install the Dr.Fone app on your computer. Then follow the instructions given below:
- Step 1:
Connect your iOS devices (source and target) to your PC via a lightning cable or WiFi. Then, launch the Dr.Fone app and select “Toolbox” from the left side menu.
- Step 2:
Once the Apple iPhone 13 devices are connected, wait and let them load their data. Then, specify the “Source” and “Target” of the data transfer. You can also flip the locations by clicking the “Flio” button.
- Step 3:
Now, select the specific data types you want to transfer to your refurbished iPhone. Checkmark all data and select “Start Transfer” to proceed further.

- Step 4:
Once done, you will see a pop-up asking to turn off the Find My feature on iOS devices. Go to “Settings” on the iOS device and click the Apple iPhone 13 device’s name at the top. Then, click “iCloud” > “Find My” feature and turn it off.
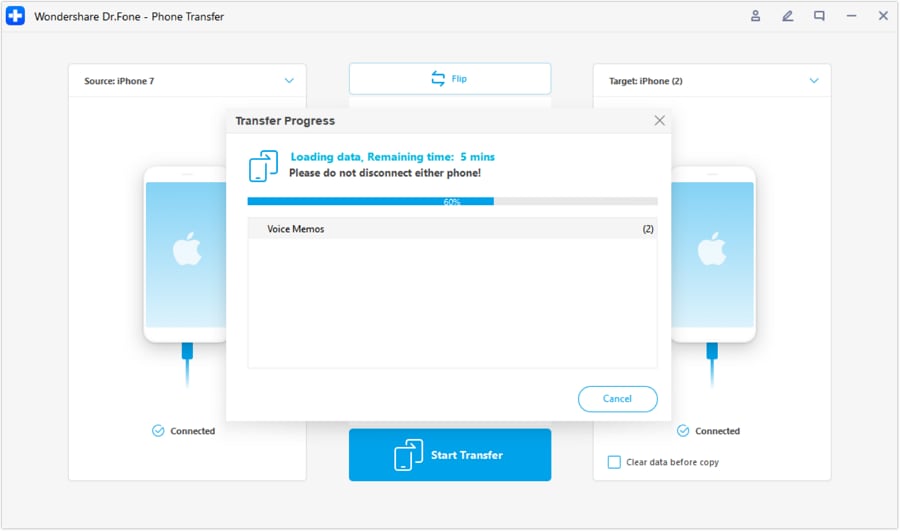
- Step 5:
Once you turn off the feature, the data transfer process will begin. You will also see the progress bar displaying the completion of the process.
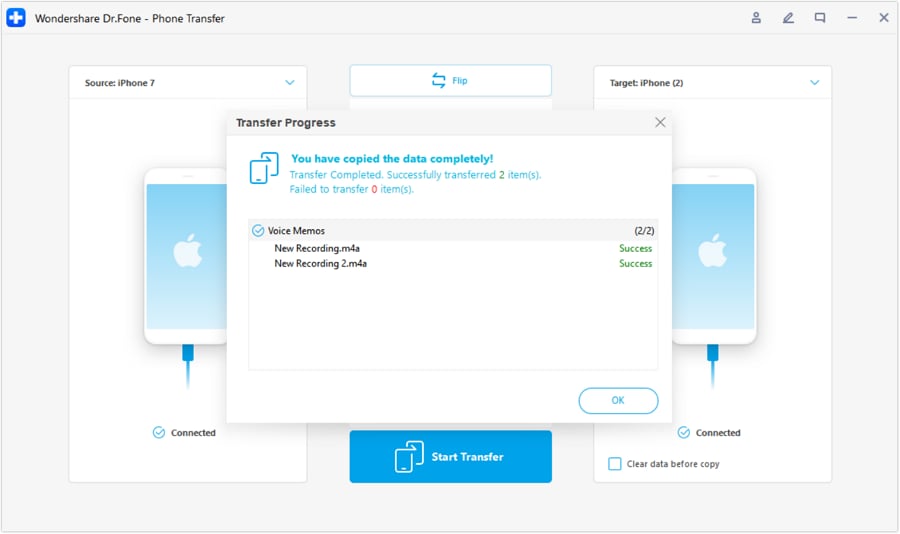
- Step 6:
Once completed, you will see the interface as shown below. Click “OK” to conclude the process entirely.
Similarly, you can also transfer data from Android to Apple iPhone 13 and Apple iPhone 13 to Android. There’s no need to try complex methods when you have Dr.Fone just a click away.
FAQs
1. Can I return a refurbished Apple iPhone 13 if I’m not satisfied with it?
Return policies vary by seller. However, It’s essential to understand the return policy of the seller you choose. It will ensure that you have the option to return the Apple iPhone 13 device if it doesn’t meet your expectations.
2. What’s the difference between a certified refurbished Apple iPhone 13 and a regular refurbished iPhone?
A certified refurbished Apple iPhone 13 is refurbished and certified by the manufacturer. These devices come with a manufacturer’s warranty. Moreover, they are known to be of higher quality compared to non-certified ones.
3. Can I get the latest iOS updates on a refurbished iPhone?
Refurbished iPhones come with the latest iOS software installed. They ensure that you have access to the newest features and security updates.
Final Thought
So, buying a refurbished Apple iPhone 13 is a wise way to get a good-quality Apple iPhone 13 at a lower cost. To make sure you’re getting a good deal, choose trusted sellers and understand the warranty and return policies.
By doing your homework and picking a reliable seller, you can make a safe and money-saving choice. Plus, you’ll be helping the environment by giving a second life to a functional device. It’s a win-win!
However, don’t forget to download Dr.Fone ! It is going to be very helpful to transfer and manage data on your new iPhone.
4 Ways to Transfer Contacts from Apple iPhone 13 to iPhone Quickly
Thought changing into a new phone is exciting, but changing phones can be a real pain because you have to move all your data into your new phone like iPhone 15 or iPhone 15 Pro (Max). Contacts are very important data on your phone because you won’t be able to make any calls or send texts to your known persons or friends and family without them. If you are an iPhone user, you need to follow some processes to transfer contacts from Apple iPhone 13 to iPhone. Also, you may want to import contacts from excel to iPhone . This article will give you all the information you need about how you can transfer contacts from Apple iPhone 13 to new iPhone like iPhone 15 or iPhone 15 Pro (Max).
Part 1. Transfer Contacts from Apple iPhone 13 to iPhone Including iPhone 15 with Dr.Fone (1- click solution)
Dr.Fone is a perfect tool for transferring contacts from Apple iPhone 13 to iPhone. It can transfer contacts and all kinds of data and media files from your iPhone to iPhone or Android and vice-versa. Dr.Fone - Phone Transfer is a great tool that supports all the latest iOS and Android-based smartphones; it also works smoothly on Windows and Mac. It’s the easiest, fastest, and safest way to transfer contacts from Apple iPhone 13 to iPhone.
Dr.Fone - Phone Transfer
1-Click Phone to Phone Transfer
- Easy, fast, and safe.
- Move data between devices with different operating systems, i.e., iOS to Android.
- Supports iOS devices that run the latest iOS

- Transfer photos, text messages, contacts, notes, and many other file types.

- Supports over 8000+ Android devices. Works for all models of iPhone, iPad, and iPod.
Follow these steps to learn how to transfer contacts from one iPhone to another.
Start The Process
First, you need to download dr. Fone on your computer and install it. Run the program and connect both of your iPhones to your computer with good-quality data cables. You will be able to see the home screen of Dr.Fone in front of you, and you will have to choose the option named “Phone Transfer.”
Transfer Contacts
Dr.Fone will show you both iPhones on your screen, and you will have to choose the “Contacts” option and click on the “Start Transfer” button.

Finish The Process
Your contacts will be transferred from the source iPhone to the target iPhone within a very short time.

Transferring contacts is easy with Dr.Fone - Phone Transfer. This doesn’t overwrite any data on your phone or doesn’t cause any data loss problem. Just follow the process to learn how to copy contacts from iPhone with the help of Dr.Fone - Phone Transfer.
Part 2. Transfer Contacts from Apple iPhone 13 to iPhone Including iPhone 15 by restoring from iCloud backup
You can easily transfer your contacts using iCloud backup without factory resetting the entire device and starting again. Just follow this process-
Log in to iCloud
You need to connect both your iPhones to Wi-Fi and log into your iCloud account from both of your iPhones.
Sync Contacts and Backup
Now you need to take your source iPhone and go to the Settings option. Then you need to tap the name at the top, go to the iCloud option, scroll down and make sure the option for Contact is toggled on. If you have iOS 10.2 and earlier on your phone, you will find it in Settings > iCloud.

After syncing the contacts, you need to scroll down to the iCloud Backup option and choose the Backup Now option.

Refresh Contacts
Ensure that the syncing contact option on your target iPhone is enabled from the settings option, and then open the contact app to swipe down and refresh it. Within a very short time, your contacts will start appearing on your target iPhone.
Part 3. Sync contacts from Apple iPhone 13 to iPhone Including iPhone 15 by iCloud syncing
You can easily learn how to transfer contacts from one iPhone to another (like iPhone 15 or iPhone 15 Pro) using iCloud syncing. It takes very little time, and all it needs is one apple account signed in to both your source and target iPhones at a time. Just follow these steps properly-
Merge Contacts
You need to go to the “Settings” option of your source iPhone and tap on your name at the top of the settings screen. Check the “Contacts” option is toggled on or not from the “iCloud” option. After that, hit merge to upload your contacts on iCloud.

You need to use the Apple ID and password on your target phone and do the same thing to toggle on the “Contacts” option from “iCloud” and wait until your iPhone asks you to merge contacts.

Refresh Contacts
After choosing the “Merge” option, you will see that existing contacts and previous contacts from the source iPhone will merge on your target iPhone. Now you need to refresh the contact list, which will allow you to find all the old contacts to your target iPhone.

Part 4. Move Contacts from Apple iPhone 13 to iPhone Including iPhone 15 using iTunes
iTunes is a great solution to transfer iPhone contacts. Many users prefer iTunes while transferring contacts because it comes directly from Apple, and it takes care of all your iOS device management needs. These steps will help you to transfer contacts from Apple iPhone 13 to iPhone using iTunes-
Install iTunes and connect source iPhone
Download the latest version of iTunes on your PC, install it properly, and launch the software. Connect your source iPhone to your PC, and iTunes will automatically detect it.
Backup Contacts
Now click on the “Device” option and then select iPhone. Then you need to select the “Summary” option and then choose “This Computer” and “Back Up Now” to back up all your data and contacts on your PC.

Restore Backup
In the end, you need to connect your target iPhone to your PC and choose the “Summary” option in the iTunes software. You need to choose the “Restore Backup” option and then browse and select the latest backup folder. At last, choose the “Restore” option. iTunes transfers contacts and all the data from the source iPhone to target the iPhone, and it’s essential to back up the data from your source iPhone.

Transferring any data from your old phone to a new phone can be very painful. But nowadays it’s very easy with the help of a lot of tools. If you want to transfer contacts from your old iPhone to a new one, you need to use Dr.Fone - Phone Transfer because it’s the best solution to use a 1-Click system to copy contacts from one phone to another in a very easy and fast way. You can also use iCloud backup, iCloud syncing, and iTunes to transfer your contacts, but Dr.Fone can give you the safest and easiest solution. I can assure you that you won’t regret it if you choose Dr.Fone for this issue.
Also read:
- [New] Boost Your Visuals - Video Enhance Pro 2.2 Guide
- 2024 Approved PhotoDirector Masterclass Review
- 3 Effective Methods to Fake GPS location on Android For your Tecno Spark 20 Pro | Dr.fone
- 5 Ways to Send Ringtones from Apple iPhone 11 Pro Max to iPhone Including iPhone 15 | Dr.fone
- Change Location on Yik Yak For your Vivo Y27 4G to Enjoy More Fun | Dr.fone
- Conversione Gratuita File WMV a Formato ASF: Guida Completa Online
- How to Transfer from Apple iPhone 6s to iPhone 8/11/11 Pro | Dr.fone
- How to Use Life360 on Windows PC For Oppo Find N3? | Dr.fone
- In 2024, 5 Ways to Transfer Music from Apple iPhone 8 to Android | Dr.fone
- In 2024, Transfer your Apple iPhone 12 Apps to New iPhone | Dr.fone
- New 5 Best Chrome Extensions You Can Use to Translate Videos
- Step-by-Step Guide: Removing a Default Search Engine Hijacker Using MalwareFox
- Top 10 Software Solutions to Completely Erase Your iPhone Data Safely and Securely
- Title: In 2024, 5 Easy Ways to Transfer Contacts from Apple iPhone 13 to Android | Dr.fone
- Author: Charlotte
- Created at : 2024-10-13 08:11:46
- Updated at : 2024-10-17 16:33:12
- Link: https://iphone-transfer.techidaily.com/in-2024-5-easy-ways-to-transfer-contacts-from-apple-iphone-13-to-android-drfone-by-drfone-transfer-from-ios/
- License: This work is licensed under CC BY-NC-SA 4.0.