
In 2024, 4 Ways to Transfer Music from Apple iPhone 7 Plus to iPod touch | Dr.fone
4 Ways to Transfer Music from Apple iPhone 7 Plus to iPod touch
Although the Apple iPods have been discontinued, many old users still use them as music players. As we all know, if you want to transfer music from Apple iPhone 7 Plus to iPod, you can just log in with the same Apple ID and then download the songs you purchased on the iPod touch. However, how can you transfer the music that is saved on other devices to your iPod? Don’t worry, this detailed guide introduces 4 ways to transfer music from Apple iPhone 7 Plus to iPod touch, just keep reading!
Part 1: Easy and powerful way to transfer music from Apple iPhone 7 Plus to iPod
A great tool for the purpose of easy transfer of music between iOS devices is Dr.Fone - Phone Transfer . This tool makes life easy for people who want to switch to a new smartphone or are looking for solutions to sync not only music but also contacts, messages, call logs, photos, etc. between different smartphones.
Dr.Fone - Phone Transfer
1-Click Phone to Phone Transfer
- Easy, fast, and safe.
- Move data between devices with different operating systems, i.e iOS to Android.
- Supports iOS devices that run the latest iOS version

- Transfer photos, text messages, contacts, notes, and many other file types.
- Supports over 8000+ Android devices. Works for all models of iPhone, iPad, and iPod.

4,495,115 people have downloaded it
How to use transfer music from Apple iPhone 7 Plus to iPod
Step 1. Download and install Dr.Fone on your computer. Run it and select Phone Transfer. Connect your iPhone and iPod with your computer, and Dr.Fone will detect your iOS devices automatically.

Step 2. Select Music and other file types you would like to transfer and click on Start Transfer.

Step 3. Then just sit and have a cup of coffee. All music files will be transferred from Apple iPhone 7 Plus to iPod successfully.

Part 2: Transfer Music purchased from the iTunes Store from Apple iPhone 7 Plus to iPod using iTunes
In case, you have purchased music from iTunes and want it to transfer from your iPhone to iPod, there is no direct way to the process. For it to be done, you need to re-download previous iTunes Store purchases on your computer. The best thing for this to be done, is that no extra cost is required to be done till the time, the same ID is used for the same purpose.
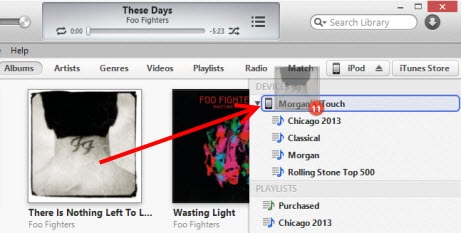
Then you need to follow the following steps for the process to be done. On the computer, in iTunes, go to the iTunes Store. Then you need to click ‘Purchased’, which is available in the Quick Links on the Home screen. Then you need to find the songs that are on the iPhone, but not in your computer’s iTunes library. Then, click the ‘cloud’ button next to the song name to download it. The last step of syncing remains which can be done as desired. Just sync those songs from your iTunes library to your iPod as desired and you are done with the job of Transfer Music Purchased from the iTunes store from Apple iPhone 7 Plus to iPod.
Part 3: Transfer Music purchased from the iTunes Store from Apple iPhone 7 Plus to iPod using iTunes match
iTunes match is another way to process of transfer music purchased or unpurchased from iTunes from Apple iPhone 7 Plus to iPod. In fact, iTunes match determines the song, which is present in the iCloud and since there are over 43 million songs, iTunes match matches these unpurchased songs with the database and allows playing these music from the iCloud store. Now, you just need to tap the iCloud download button to download music from an artist, album or playlist. Thus, a person has immediate access to a huge music library without having to worry about the storage space on your device.
Part 4: Transfer Music imported from a CD or other source from Apple iPhone 7 Plus to iPod
For this process to complete, you need to import all songs from CD to iTunes at first. Here is the process for the complete transfer of Music from CD and other sources.

Open iTunes and insert the CD that you wish to import into the disc drive
The options might appear in an instant. If you want to import every song on the disc, select yes and click No, in case you want specific music to import.
In case, you clicked on ‘NO’, Select the menu on the top-left side of the iTunes window and select the audio CD in the list.

Then, check the files you want to import to iTunes, then select Import CD.
The preferences option appears and you need to select the preferences and click OK after the preference has been done.
In case, the music library already contains tracks from the album, which you are importing, you will receive a prompt window to overwrite them. You can select either Replace Existing or Don’t Replace as your wish.
Then you have to wait till the music is ripped to the iTunes library.
As soon as the import is complete, attach your device to the computer.
You can now drag the album to the right side of the iTunes window where a pane will appear containing the music on your device. Drop it right on your iPod or other devices.


- All remains is to eject the iPod and enjoy your music
How to Transfer Apple iPhone 7 Plus Data to iPhone 12: A Complete Guide
Apple announced a line-up of iPhones with four new devices in 2020. The series is called the iPhone 12 series that has four handsets of different sizes and price ranges. The iPhone 12 series include iPhone 12, iPhone 12 Mini, iPhone 12 Pro, and iPhone 12 Pro Max. These are the company’s first-ever 5G devices. They surely took a step into the future of technology with the 12 series.
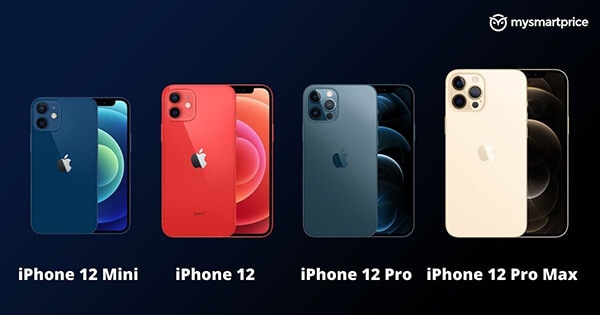
The device is considered lighter than the iPhone SE launched in 2020. iPhone 12 Pro Max holds an outstanding camera system for high-quality image processing. Besides, the introduction of A14 SoC has encouraged the exceptional performance of all four models. Each of the series models is secured with suitable features and new capabilities. Let’s take a glance at the relevant specifications and iPhone 12 price.
Part 1: Apple iPhone 12 Series Specifications
To mention the iPhone 12 series specifications, these models are secured with an SoC of Apple A14 Bionic. All 4 of them consist of DRAM. The displays of these smartphones are quite satisfactory.
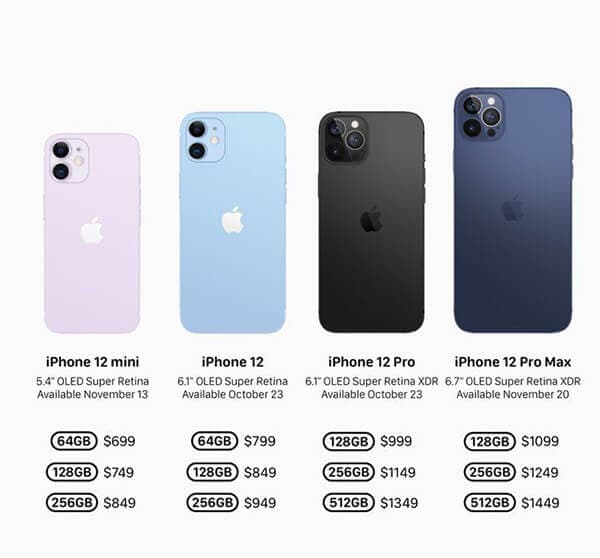
Display: The iPhone 12 Mini and iPhone12 have a display of 5.42” OLED (2340 x 1080) and 6.06” OLED (2532 x 1170). On the other hand, the magnificent iPhone 12 Pro has a display of 6.06” OLED (2532 x 1170) and 6.68” OLED (2778x1284).
Size & Weights: The size concerning height, width, and depth of both iPhone 12 and iPhone 12 pro are the same at 146.7 mm, 71.5 mm, 7.4 mm. Besides, the iPhone Mini stands at a height width and depth of 131.5 mm, 64.2 mm, and 7.4 mm. The iPhone 13 Pro max has a height of 160.8 mm, a width of 78.1 mm, and a depth of 7.4 mm. While the iPhone Mini weighs the lightest with 135g, iPhone 12 max weighs the heaviest (228 g). Both iPhone 12 and iPhone 12 Pro remain at 164g and 189g, respectively.
Wireless Charging: Each of the iPhone 12 series models supports MagSafe Wireless Charging up to 15 W. They are also Qi Compatible (7.5 W). Now, coming to the camera quality, all four models are secured with a front camera of 12 MP f/2.2.In rear camera setup, iPhone 12 Mini, iPhone 12, and iPhone 12 Pro have a main camera of 12 MP 1.4µm, 26mm eq. f/1.6, Optic OIS. iPhone 12 Pro Max comes with the main camera of 12 MP 1.7µm, 26mm eq. f/1.6.
Camera: The high-quality telephoto camera of the iPhone 12 Pro is 12 MP, 52mm eq. f/2.0 OIS. For iPhone 12 Pro Max is 12 MP, 65mm eq. f/2.2 OIS. The entire iPhone series model has an ultra-wide camera of 12 MP 13mm eq. f/2.4. The splash, water, and dust resistance feature with IP68 for up to 6m and 30 minutes keeps the phone durable.
iPhone Series devices hold dual-SIM support with nano-SIM and eSIM. Both iPhone 12 Mini and iPhone 12 come in distinct storage capacities like 64 GB, 128 GB, and 256 FB. The iPhone 12 Pro and Pro Max are available in the storage of 128 GB, 256 GB, and 512 GB.
Part 2: Transfer old iPhone data to iPhone 12
We know that the excitement of buying a new iPhone is real. However, it’s important to do one thing before jumping into the camera quality. And that’s data transfer. You do not want your old phone data to be gone with the old device, do you? We hope not. Here are some of the tactics by which you can transfer the old iPhone data to the new iPhone 12
2.1 Through iCloud
Before transferring, make sure your data is backed up. For that, connect the old iPhone with the WiFi and then go to “Settings.” Next, tap your name and then on “iCloud.” Next, select the “Backup Now” option and wait for the process to get completed. After completing the backup, follow the steps given below.
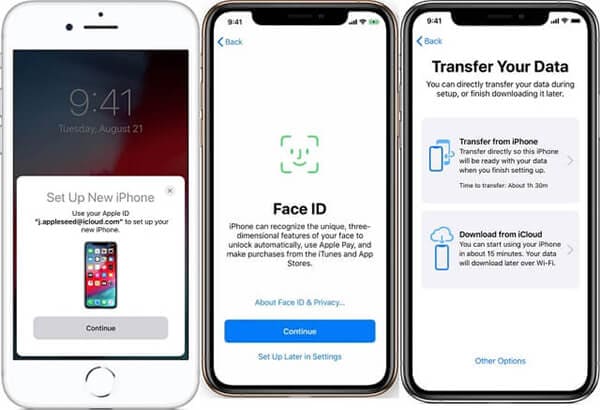
Step 1: First, turn on the new device to see the “Hello” screen. Now, follow the instructions appearing on the screen. Once you notice the WiFi screen, tap a WiFi network to join. Keep following the steps till the “Apps & Data” screen shows up. Tap on “Restore from iCloud.”
Step 2: Sign in to your iCloud with relevant credentials like Apple ID and password. Choose a backup but make sure to check the date and size.
If you have bought iTunes or App store content with multiple IDs, sign in with those accounts too.
Step 3: The restore process will be initiated. Make sure to be connected and wait till the process gets completed successfully. Once done, continue with the other steps to complete the setup process successfully.
2.2 Through iTunes or Finder
Start with the backup process by opening iTunes. Now, connect your iPhone with the PC. After it gets connected, choose your iPhone on the top toolbar. To transfer the data related to Health and Activity/saved passwords, choose the “Encrypt backup” option. Next, input a password and click “Back Up Now.”
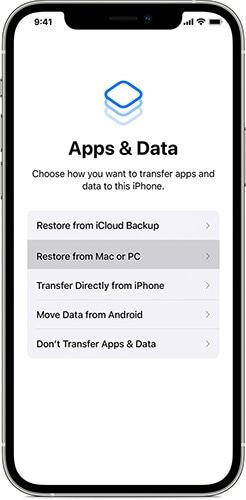
To transfer the data through iTunes or Finder, launch your new device. Once the “Hello” screen appears, follow the instructions appearing on the screen. As soon as you note the “Apps & Data Screen,” tap on “Restore from Mac or PC.” Connect the new device to PC/Mac and open the iTunes/Finder window. Once your device name is visible on the screen, tap it.
Select “Restore Backup” to choose a “Backup.” Ensure that the size and data are accurate. To restore from an encrypted backup, input the password. The restoration process will start. Now, wait for the entire process to get completed and then move on to the remaining setup steps.
Part 3: Transfer Android Data to iPhone 12
The methods mentioned above can be time-consuming. In that case, it’s best to opt for a simple process that does not require too much work. For example, Dr.Fone - Phone Transfer all is an efficient and easy-to-use phone switch app.
As the name signifies, this App can help you with iPhone 12 transfer data in a few minutes. Experienced developers develop it for both iOS and Android users. So, you can transfer data from any of the Apple iPhone 7 Plus devices to the new iPhone 12.
With Dr. Fone, you can migrate 13 files of distinct size to the new iPhone 12. Here’s a glimpse of the files below
Contact, photo, videos, voicemail, wallpaper, calendar, and many more
To transfer data through Dr. Fone, follow the easy steps mentioned below.
Step 1: First, connect both the old device and new iPhone 12 to your PC/Mac with USB.
Step 2: Now, launch the Dr. Fone - Phone Transfer and select the app
Step 3: Once the app starts, you will note a device detected as a source. Similarly, there will be other devices detected as destinations. Then, you will be given the option to flip the source and destination. For that, click on the “Flip” option.
Step 4: After selecting the Apple iPhone 7 Plus device status, mark the checkboxes beside the files for transferring. Once done, tap on the “Start Transfer” button appearing on the screen.
You can select “Clear data before copy” to delete the data from the destination device before transferring. It will speed up the entire process.
Conclusion
Hopefully, you got a clear idea of how to transfer data to iPhone 12. Dr. Fone - Phone Transfer is one of the finest names for data recovery and data transfer between devices. They have distinct outstanding products that are efficient and useful for the users. One of the best things about the application is that you can transfer the data regardless of the mobile operating system. Be it an iOS or Android device, follow the steps provided above, and that’s it. The iPhone 12 data transfer process is quick, easy, and requires less effort.
4 Ways to Transfer Music from Apple iPhone 7 Plus to iPod touch
Although the Apple iPods have been discontinued, many old users still use them as music players. As we all know, if you want to transfer music from Apple iPhone 7 Plus to iPod, you can just log in with the same Apple ID and then download the songs you purchased on the iPod touch. However, how can you transfer the music that is saved on other devices to your iPod? Don’t worry, this detailed guide introduces 4 ways to transfer music from Apple iPhone 7 Plus to iPod touch, just keep reading!
Part 1: Easy and powerful way to transfer music from Apple iPhone 7 Plus to iPod
A great tool for the purpose of easy transfer of music between iOS devices is Dr.Fone - Phone Transfer . This tool makes life easy for people who want to switch to a new smartphone or are looking for solutions to sync not only music but also contacts, messages, call logs, photos, etc. between different smartphones.
Dr.Fone - Phone Transfer
1-Click Phone to Phone Transfer
- Easy, fast, and safe.
- Move data between devices with different operating systems, i.e iOS to Android.
- Supports iOS devices that run the latest iOS version
- Transfer photos, text messages, contacts, notes, and many other file types.
- Supports over 8000+ Android devices. Works for all models of iPhone, iPad, and iPod.
4,495,115 people have downloaded it
How to use transfer music from Apple iPhone 7 Plus to iPod
Step 1. Download and install Dr.Fone on your computer. Run it and select Phone Transfer. Connect your iPhone and iPod with your computer, and Dr.Fone will detect your iOS devices automatically.
Step 2. Select Music and other file types you would like to transfer and click on Start Transfer.
Step 3. Then just sit and have a cup of coffee. All music files will be transferred from Apple iPhone 7 Plus to iPod successfully.
Part 2: Transfer Music purchased from the iTunes Store from Apple iPhone 7 Plus to iPod using iTunes
In case, you have purchased music from iTunes and want it to transfer from your iPhone to iPod, there is no direct way to the process. For it to be done, you need to re-download previous iTunes Store purchases on your computer. The best thing for this to be done, is that no extra cost is required to be done till the time, the same ID is used for the same purpose.
Then you need to follow the following steps for the process to be done. On the computer, in iTunes, go to the iTunes Store. Then you need to click ‘Purchased’, which is available in the Quick Links on the Home screen. Then you need to find the songs that are on the iPhone, but not in your computer’s iTunes library. Then, click the ‘cloud’ button next to the song name to download it. The last step of syncing remains which can be done as desired. Just sync those songs from your iTunes library to your iPod as desired and you are done with the job of Transfer Music Purchased from the iTunes store from Apple iPhone 7 Plus to iPod.
Part 3: Transfer Music purchased from the iTunes Store from Apple iPhone 7 Plus to iPod using iTunes match
iTunes match is another way to process of transfer music purchased or unpurchased from iTunes from Apple iPhone 7 Plus to iPod. In fact, iTunes match determines the song, which is present in the iCloud and since there are over 43 million songs, iTunes match matches these unpurchased songs with the database and allows playing these music from the iCloud store. Now, you just need to tap the iCloud download button to download music from an artist, album or playlist. Thus, a person has immediate access to a huge music library without having to worry about the storage space on your device.
Part 4: Transfer Music imported from a CD or other source from Apple iPhone 7 Plus to iPod
For this process to complete, you need to import all songs from CD to iTunes at first. Here is the process for the complete transfer of Music from CD and other sources.
Open iTunes and insert the CD that you wish to import into the disc drive
The options might appear in an instant. If you want to import every song on the disc, select yes and click No, in case you want specific music to import.
In case, you clicked on ‘NO’, Select the menu on the top-left side of the iTunes window and select the audio CD in the list.
Then, check the files you want to import to iTunes, then select Import CD.
The preferences option appears and you need to select the preferences and click OK after the preference has been done.
In case, the music library already contains tracks from the album, which you are importing, you will receive a prompt window to overwrite them. You can select either Replace Existing or Don’t Replace as your wish.
Then you have to wait till the music is ripped to the iTunes library.
As soon as the import is complete, attach your device to the computer.
You can now drag the album to the right side of the iTunes window where a pane will appear containing the music on your device. Drop it right on your iPod or other devices.
All remains is to eject the iPod and enjoy your music
Also read:
- [New] Pro-Level Clarity Top 8K Cameras for the Ultimate Picture
- [New] The Classic Questline versus the Dynamic Strategy for 2024
- 4 Ways to Transfer Messages from Apple iPhone 7 Plus to iPhone Including iPhone 15 | Dr.fone
- Comprehensive Troubleshooting: Overcoming the Common ChatGPT Body Stream Glitch with Ease
- Cracking Into an iPad Without Knowing the Lock Code: A Comprehensive Method
- Football Manager 2020: Fixed Version Available - No More Crashing Issues
- In 2024, How to Copy Contacts from Apple iPhone XS to SIM? | Dr.fone
- In 2024, How to Transfer Contacts from Xiaomi Redmi Note 12T Pro to Other Android Devices Using Bluetooth? | Dr.fone
- In 2024, Solved How To Transfer From Apple iPhone 12 mini to iPhone 15 | Dr.fone
- Intel AC3160 Wireless Networking Card Update: Fast and Simple Installation Steps
- Solved How To Transfer From Apple iPhone 15 Pro Max to iPhone 15 | Dr.fone
- Ultimate Guide to the Toshiba 55LF711U2n3 55” Fire TV Smart TV: Perfect for Amazon Prime Subscribers
- Which Pokémon can Evolve with a Moon Stone For Apple iPhone SE? | Dr.fone
- Title: In 2024, 4 Ways to Transfer Music from Apple iPhone 7 Plus to iPod touch | Dr.fone
- Author: Charlotte
- Created at : 2024-10-17 10:45:10
- Updated at : 2024-10-18 05:27:06
- Link: https://iphone-transfer.techidaily.com/in-2024-4-ways-to-transfer-music-from-apple-iphone-7-plus-to-ipod-touch-drfone-by-drfone-transfer-from-ios/
- License: This work is licensed under CC BY-NC-SA 4.0.