
In 2024, 4 Ways to Transfer Music from Apple iPhone 13 Pro to iPod touch | Dr.fone
4 Ways to Transfer Music from Apple iPhone 13 Pro to iPod touch
Although the Apple iPods have been discontinued, many old users still use them as music players. As we all know, if you want to transfer music from Apple iPhone 13 Pro to iPod, you can just log in with the same Apple ID and then download the songs you purchased on the iPod touch. However, how can you transfer the music that is saved on other devices to your iPod? Don’t worry, this detailed guide introduces 4 ways to transfer music from Apple iPhone 13 Pro to iPod touch, just keep reading!
Part 1: Easy and powerful way to transfer music from Apple iPhone 13 Pro to iPod
A great tool for the purpose of easy transfer of music between iOS devices is Dr.Fone - Phone Transfer . This tool makes life easy for people who want to switch to a new smartphone or are looking for solutions to sync not only music but also contacts, messages, call logs, photos, etc. between different smartphones.
Dr.Fone - Phone Transfer
1-Click Phone to Phone Transfer
- Easy, fast, and safe.
- Move data between devices with different operating systems, i.e iOS to Android.
- Supports iOS devices that run the latest iOS version

- Transfer photos, text messages, contacts, notes, and many other file types.
- Supports over 8000+ Android devices. Works for all models of iPhone, iPad, and iPod.

4,495,115 people have downloaded it
How to use transfer music from Apple iPhone 13 Pro to iPod
Step 1. Download and install Dr.Fone on your computer. Run it and select Phone Transfer. Connect your iPhone and iPod with your computer, and Dr.Fone will detect your iOS devices automatically.

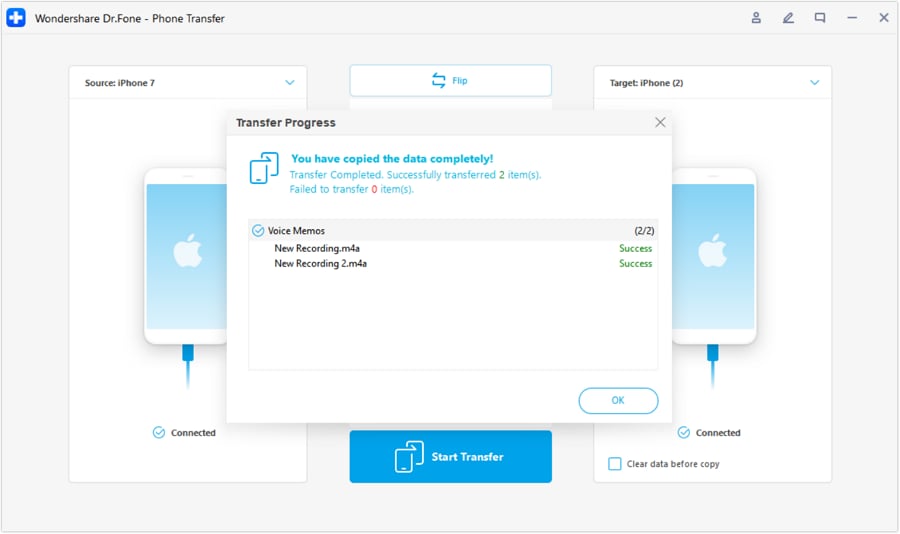
Step 2. Select Music and other file types you would like to transfer and click on Start Transfer.

Step 3. Then just sit and have a cup of coffee. All music files will be transferred from Apple iPhone 13 Pro to iPod successfully.

Part 2: Transfer Music purchased from the iTunes Store from Apple iPhone 13 Pro to iPod using iTunes
In case, you have purchased music from iTunes and want it to transfer from your iPhone to iPod, there is no direct way to the process. For it to be done, you need to re-download previous iTunes Store purchases on your computer. The best thing for this to be done, is that no extra cost is required to be done till the time, the same ID is used for the same purpose.
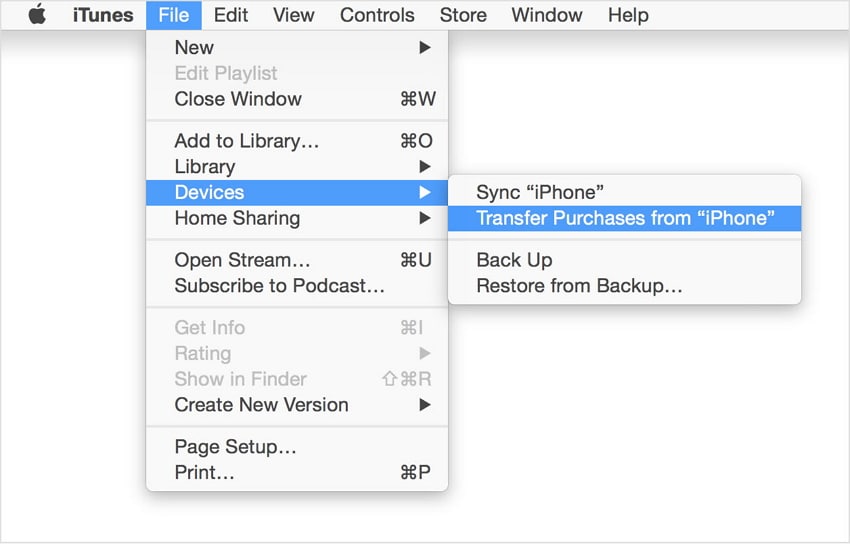
Then you need to follow the following steps for the process to be done. On the computer, in iTunes, go to the iTunes Store. Then you need to click ‘Purchased’, which is available in the Quick Links on the Home screen. Then you need to find the songs that are on the iPhone, but not in your computer’s iTunes library. Then, click the ‘cloud’ button next to the song name to download it. The last step of syncing remains which can be done as desired. Just sync those songs from your iTunes library to your iPod as desired and you are done with the job of Transfer Music Purchased from the iTunes store from Apple iPhone 13 Pro to iPod.
Part 3: Transfer Music purchased from the iTunes Store from Apple iPhone 13 Pro to iPod using iTunes match
iTunes match is another way to process of transfer music purchased or unpurchased from iTunes from Apple iPhone 13 Pro to iPod. In fact, iTunes match determines the song, which is present in the iCloud and since there are over 43 million songs, iTunes match matches these unpurchased songs with the database and allows playing these music from the iCloud store. Now, you just need to tap the iCloud download button to download music from an artist, album or playlist. Thus, a person has immediate access to a huge music library without having to worry about the storage space on your device.
Part 4: Transfer Music imported from a CD or other source from Apple iPhone 13 Pro to iPod
For this process to complete, you need to import all songs from CD to iTunes at first. Here is the process for the complete transfer of Music from CD and other sources.
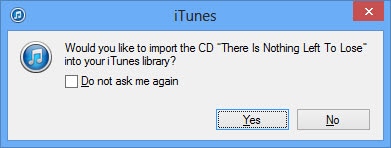
Open iTunes and insert the CD that you wish to import into the disc drive
The options might appear in an instant. If you want to import every song on the disc, select yes and click No, in case you want specific music to import.
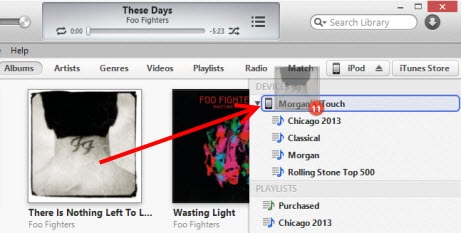
In case, you clicked on ‘NO’, Select the menu on the top-left side of the iTunes window and select the audio CD in the list.
Then, check the files you want to import to iTunes, then select Import CD.
The preferences option appears and you need to select the preferences and click OK after the preference has been done.
In case, the music library already contains tracks from the album, which you are importing, you will receive a prompt window to overwrite them. You can select either Replace Existing or Don’t Replace as your wish.
Then you have to wait till the music is ripped to the iTunes library.
As soon as the import is complete, attach your device to the computer.
You can now drag the album to the right side of the iTunes window where a pane will appear containing the music on your device. Drop it right on your iPod or other devices.
All remains is to eject the iPod and enjoy your music


iPhone Transfer: Transfer Contact from Apple iPhone 13 Pro to iPhone without iCloud
Transferring contacts from Apple iPhone 13 Pro to iPhone without iCloud is straightforward if you choose the right method. This process ensures your contacts are effortlessly moved between devices. This step-by-step guide proves invaluable when moving to a new iPhone or aiming to share contacts.
In this comprehensive guide, you’ll discover how to transfer contacts from Apple iPhone 13 Pro to iPhone without iCloud using various tools and techniques to achieve successful contact transfer. Follow these simple yet effective steps to migrate your contacts successfully.

4 Basic Methods To Transfer Contacts From Apple iPhone 13 Pro to iPhone Without iCloud
We will start by exploring the 4 basic methods to transfer contacts from Apple iPhone 13 Pro to iPhone without iCloud. Each method offers its advantages and is tailored to suit different preferences. By understanding these methods, you can choose the most suitable one for your needs:
Method 1. AirDrop
AirDrop is a convenient built-in feature on iPhones. It allows quick and wireless transfer of various data types, including contacts. Moreover, it ensures a hassle-free and direct exchange without extra apps or services. Follow these steps to copy contacts from Apple iPhone 13 Pro to iPhone without iCloud using AirDrop:
- Step 1: Begin by ensuring that AirDrop is enabled on both devices. For this, access the control center, expand the “Wireless” box, and long press the “AirDrop.” Now, set its visibility to “Contacts Only” or “Everyone for 10 Minutes.” Then, move your iPhone’s Contacts app and select the contact you want to share.

- Step 2: Following this, press “Share Contact” and select “AirDrop” as the sharing method. From the available devices on AirDrop, choose the targeted device. Finally, “Accept” the incoming AirDrop on your target iPhone to complete the process.

Method 2. NameDrop
NameDrop, integrated within iOS 17, enables the smooth sharing of contact information. All you need to do is bring your iPhone close to another iPhone. This feature eliminates the need for manual input of contact details. One of the standout advantages of NameDrop is its direct integration with AirDrop. This ensures swift and effortless sharing. Below are the steps to effortlessly share your contact information using NameDrop:
- Step 1: To enable the NameDrop feature, open your iPhone settings and access the “AirDrop” option from the “General settings. Afterward, turn on the “Bringing Devices Together” feature to activate NameDrop on your iOS devices.

- Step 2: If Contact Posters are generated in iOS 17, they will display on both iPhones. You will be given the option to either “Share” or “Receive Only.” If you wish to exchange contact information, select “Share.” The recipient can opt for “Receive Only” to obtain your details. You can also perform these steps in the opposite direction to get contact information on your iPhone.

Method 3. iTunes/Finder
If you want a more traditional approach to copying contacts from Apple iPhone 13 Pro to iPhone without iCloud, iTunes/Finder can be a great choice. It is a more drastic approach as it involves restoring the entire device’s data. This method is recommended if you are switching devices. Here is how you can copy contacts from Apple iPhone 13 Pro to iPhone without iCloud via iTunes/Finder:
- Step 1: After ensuring the latest iTunes/Finder is installed, use a USB cable to connect your source iPhone to your computer. To access the “Summary” tab in iTunes, click the “Device” icon. On Finder, select iPhone from “Locations” and access the “General” tab.

- Step 2: Move to the “Backups” section on iTunes/Finder and click “Back Up Now.” Before this, confirm the selection of “This Computer” in iTunes and for Finder” or “Back up all data from your iPhone to this Mac.”

- Step 3: Once the backup process is completed, remove the source iPhone and connect the target iOS device. Similarly, access the “Summary/General” tab and click “Restore Backup.” Choose the most recent backup and follow the on-screen guidelines to complete the process.

Method 4. Email
Another simple way to move contacts between iPhones is through email. This approach eliminates the necessity for extra applications or software. Yet, this method might be more suitable for transferring fewer contacts. This is due to the file size limitation of email attachments. The following are the steps to share contacts via email:
- Step 1: Open the Contacts app and move to the targeted contact you want to share. Select the contact and tap “Share Contact.” From the available sharing options, select “Email” and enter your email address in the recipient field.

- Step 2: Tap “Send” to email the selected contacts and open the email app on your target iPhone. Find the email you sent with the contacts attached and open it. Now, retrieve the attached vCard from the email. The contact will appear in your Contacts app but won’t be added directly. To save the contact, tap “Create New Contact,” write any contact details, and select “Done” to finish saving the contact.

Part 2: What Are the Problems Linked With the Basic Methods To Transfer Contacts?
The basic methods to transfer contacts from Apple iPhone 13 Pro to iPhone without iCloud are effective. However, they come with certain limitations that users should be aware of. AirDrop, while a quick and handy way, can only share one contact per transfer. It will become a tedious and time-consuming task when sharing the entire contacts library. The same can be said about email, where limitations on attachment size prohibit large transfers.
Using email or other online methods may raise security concerns. This is due to sensitive contact information that could be intercepted during transmission. As for NameDrop, it is only available on devices running iOS 17. Older iPhone models or software versions do not support this method. It limits the compatibility of the transfer process. Moreover, it can only allow you to share new contact information.
Local backups created through iTunes or Finder might require ample storage space. Moreover, the iTunes/Finder backups are used to restore the entire device’s data. You cannot use them to transfer contacts with your friends or colleagues.
Part 3: 2 Advanced Solutions To Transfer Contacts From Apple iPhone 13 Pro to iPhone Without iCloud
Want to know how to copy contacts from Apple iPhone 13 Pro to iPhone without iCloud in one click? There is good news for you as a tool exists that can make the whole transfer process a breeze. When it comes to data transfer among smartphones, the number one phone transfer tool is Wondershare Dr.Fone. .
With it, you can even transfer data directly to an iOS device or computer. Here is how to copy contacts from Apple iPhone 13 Pro to iPhone without iCloud using the Phone Manager of Wondershare Dr.Fone:
- Step 1: Access Contacts from The Left Panel. The first action is to download and install the latest Wondershare Dr.Fone version on your computer. Now, launch it and connect both of your iOS devices to the system. Choose the source iPhone from the left side panel and click “Contacts” from the expanded options.

- Step 2: Transfer the Selected Contacts. Once in the “Contacts” tab, choose the ones you want to transfer to the other device. After you have made the choice, click “To Device” from the top toolbar and select the targeted iOS device. Your chosen contacts will be immediately transferred to the other device.

Solution 2: Wondershare Dr.Fone - Phone Transfer
When you want to transfer all of your contacts from the source device, the recommended tool is the Wondershare Dr.Fone – Phone Transfer feature. It enables users to smoothly copy data from one phone to another with just one click. Moreover, it facilitates the smooth transfer of various data types. This includes contacts, text messages, photos, videos, music, and more.
The process is user-friendly, requiring simple clicks to initiate. It can transfer data between devices running on different OS, such as iOS and Android. Here is how to transfer contacts from Apple iPhone 13 Pro to iPhone without iCloud via Dr.Fone:
- Step 1: Navigate to Phone Transfer in Dr.Fone. Within Wondershare Dr.Fone, access the “Toolbox” tab and click “Phone Transfer.” Now, you will need to connect both iOS devices to the computer. Wait for Dr.Fone to recognize and load them. Once they are loaded, assign the “Source” and “Destination” positions to the Apple iPhone 13 Pro devices.

- Step 2: Make a Data Selection and Tap Start Transfer. After the Apple iPhone 13 Pro devices are configured, select the data you want to transfer alongside Contacts. When you have selected the desired data, click “Start Transfer” to proceed. A prompt will soon be displayed on the screen, requesting the deactivation of the Find My feature on iOS devices. Access the iOS device’s Settings and tap on the name located at the top.

- Step 3: Turn Off Find My and Complete the Transfer Process. Then, navigate to “iCloud” and access “Find My” to proceed to deactivate it. After deactivating the feature, the data transfer begins. The progress bar indicates the process’s completion. Once finished, the foremost window exhibits the finalized phone transfer. Press “OK” to conclude the process fully.
Conclusion
In conclusion, the process to transfer contact from Apple iPhone 13 Pro to iPhone without iCloud presents various challenges. However, advanced solutions like Wondershare Dr.Fone present efficient, secure, and comprehensive options. Moreover, Dr.Fone streamlines the process, overcoming the limitations of basic methods. Its intuitive interface and dedicated transfer features make it a recommended choice. With its reliability and effectiveness, Dr.Fone stands out as a trusted solution for hassle-free data transfer.
How to Transfer from Apple iPhone 13 Pro to Samsung Galaxy S20?
If you are willing to switch your phone from an iOS device to an android, the primary issue which restricts you to do so is your data loss and the data transferring from one device to another. In this article, we’ll be learning How to Transfer Data from Apple iPhone 13 Pro to Samsung Galaxy S20, with some easy and best techniques. The discussed techniques will ensure your data from not getting lost.

Part 1: Transfer from Apple iPhone 13 Pro to Samsung Galaxy S20 Directly (Easy and Fast)
Dr.Fone - Phone Transfer program is a phone transfer tool, you can transfer all types of data like photos, music, contacts, messages, calendar, etc. from one phone to another easily.
Let’s see how we can to transfer data from Apple iPhone 13 Pro to Galaxy S20
Dr.Fone - Phone Transfer allows you to transfer data between various phones with one click, including Android, iOS, Symbian, and WinPhone. Use this program to transfer and convey data between any of them.
Down below there’s a detailed step by step process explaining how you can transfer all your data from one phone to another using computer
Step 1. Connect Your Apple iPhone 13 Pro to the computer
After opening Dr.Fone on your computer, select “Phone Transfer” among the modules.
Make sure you have connected both of your devices with it. Here let’s take an iOS and a Samsung Galaxy S20(any Android device) as an example.

The data from the source device will be conveyed/transferred to the destination device. To exchange their position, you can use the “Flip” button too.
Step 2. Select the file and start to transfer
Choose the file types you desire to move. To begin the process, click on-Start Transfer. Until the process is completed, please don’t disconnect the Apple iPhone 13 Pro devices for its maximum efficiency.
Before commencing the data transfer process between both the phones, if you want to erase the data of the destination device-check the “Clear Data before Copy” box.
All the files you selected will be transferred to the targeted phone successfully In a couple of minutes.
Part 2: Transfer from iCloud Backup to Samsung Galaxy S20 (Wireless and Safe)
1. Dr.Fone - Switch App
If you don’t have a computer device and want to transfer data from an iOS device to an Android device, here is an in-depth step by step process guiding you how to do so.
How to sync data from the iCloud account to Android
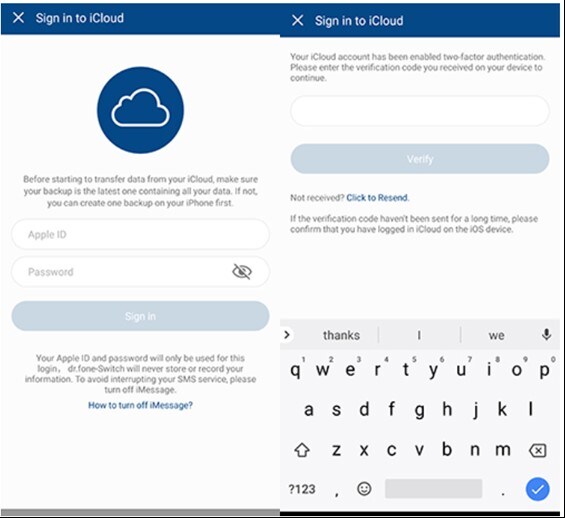
Step 1. Touch “Import from iCloud”, after installing the Android version of Dr.Fone - Switch.

Step 2. With your Apple ID and passcode, log in to the iCloud account.
If you have enabled the two-factor authentication, enter the verification code.
Step 3. On your iCloud account now in a while later, all types of data can be detected.
Touch “Start Importing” after Selecting your desired data or all of these data.
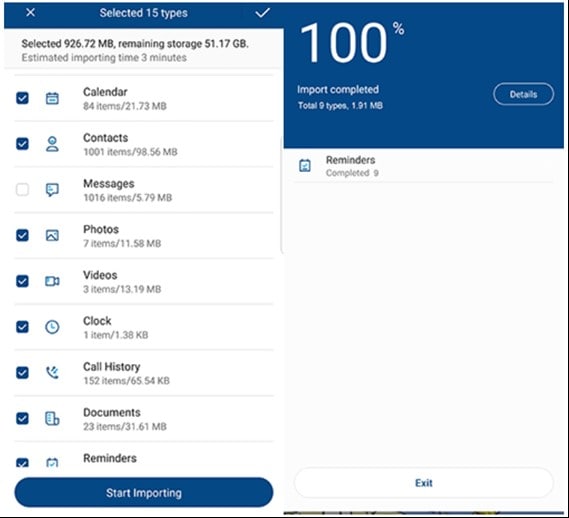
Step 4. Sit back until and unless data importing is fully completed. Then you can exit this app and check the data synced from iCloud on your Apple iPhone 13 Pro or tablet.
Prons:
- Transfer data from Apple iPhone 13 Pro to Android without a PC.
- Support mainstream Android phones (including Xiaomi, Huawei, Samsung, etc.)
Cons:
- For direct data transfer, connect iPhone to Android by using an iOS-to-Android adapter.
2. Samsung Smart Switch App
Export data from iCloud to Samsung S20 with Smart Switch
If you make use of the Samsung Smart Switch app, syncing iTunes with Samsung is just an easy-peasy task.
It has become simpler to sync iCloud to Samsung S20 as it stretches compatibility with iCloud. Here is how-
How to transfer data from iCloud to Samsung S20 with Smart Switch
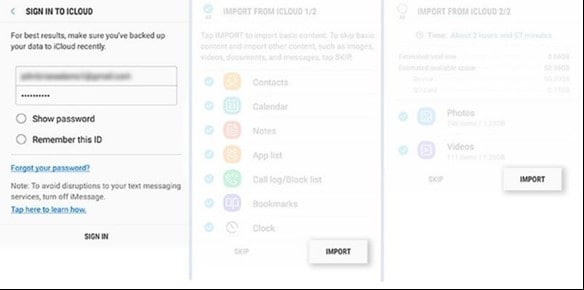
Download Smart Switch from Google Play on your Samsung Device. Open the app, then click on ‘WIRELESS,’ after that tap on ‘RECEIVE’ and select the ‘iOS’ option.
Sign in with your Apple ID and password. Now, select the desired content you want to transfer from iCloud to Samsung Galaxy S20 and press ‘IMPORT.’
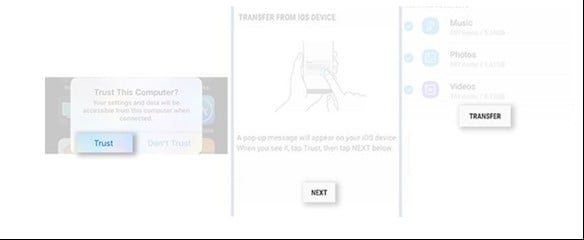
If you are using a USB cable, do keep iOS cable, Mirco USB, and USB Adapter handy. Then, load Smart Switch on your Samsung S20 model and click on ‘USB CABLE.’
Further, connect the two devices by iPhone’s USB cable and the USB-OTG adapter with Samsung S20.
Click on ‘Trust’ followed by pressing ‘Next’ to proceed further. Choose the file and press on ‘TRANSFER’ to convey/Transfer from iCloud to Samsung S20.
Prons:
- Wireless transfer.
Cons:
- Only for Samsung phones.
If you prefer to run a desktop software to transfer data, use Dr.Fone - Phone Transfer. It’s a hassle-free solution. Connect both phones to computer and start to transfer data in one-click.
Part 3: Transfer from iTunes Backup to Samsung Galaxy S20 without iTunes
Step 1. Select the backup file
Launch Dr.Fone and select Phone Backup. Connect your Samsung S20 to the computer. Click on Restore.
It will give the option View backup history if you have used this function to backup your iOS device before. Click on View backup history option to view the backup file index.

After that, Dr.Fone will display the backup history. Just pick the backup file you want and click on the Next on the bottom of the program or view button next to the backup file.

Step 2. View and Restore the backup file
The program will take a few seconds to examine the backup file and display all data in categories in the backup file after you click on View.
After you find the files you require, you can pick a few files or choose them all to move to the next step.

Currently, Dr.Fone supports to restore the music, Safari bookmarks, Call History, Calendar, Voice memo, Notes, Contacts, Messages, Photos, videos to the Apple iPhone 13 Pro device. So you can restore these data to your Samsung device or transfer them all to your computer.
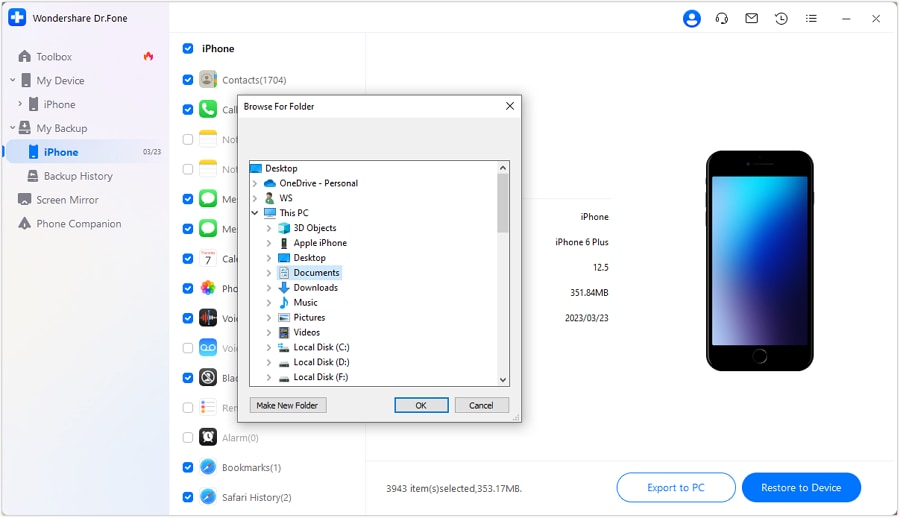
If you want to restore the files to your device, select the files and click on Restore to Device. In a couple of seconds, you will get these files on your Android gadget.
If you want to export the chosen files to your computer, click on Export to PC. Then select the save path to transfer your data.
Final Words
The techniques which are discussed above are meant to solve your problem and let you know How to Transfer from Apple iPhone 13 Pro to Samsung Galaxy S20. These techniques will guide you through transferring your file quickly and swiftly. The method discussed over here is related to both the users- who are willing to transfer their data using a computer and without using it. So, finally, we hope that this article would help you to solve your issue related to data transfer.
Also read:
- [Updated] A Palette's Journey Learning the Science of Colors
- [Updated] In 2024, Master the Art of Video Editing in OBS Studio
- [Updated] Pixel Perfect Free Mobile Photography Booster
- [Updated] Sync Audio to PowerPoint Presentations
- 4 Ways to Transfer Music from Apple iPhone 13 mini to iPod touch | Dr.fone
- Fix Apple iPhone 6s Plus Stuck on Data Transfer Verified Solution! | Dr.fone
- Gratis Online Omzijmen Van MP3 Naar WAV: Professionele Movavi-Tools Voor Audioprocessing
- How to Fix Unfortunately, Contacts Has Stopped Error on Infinix Smart 8 HD | Dr.fone
- In 2024, 4 Ways to Transfer Contacts from Apple iPhone SE (2020) to iPhone Quickly | Dr.fone
- In 2024, 4 Ways to Transfer Messages from Apple iPhone 6s Plus to iPhone Including iPhone 15 | Dr.fone
- In 2024, 5 Ways to Transfer Music from Apple iPhone 11 Pro to Android | Dr.fone
- In 2024, How to Copy Contacts from Apple iPhone 15 to SIM? | Dr.fone
- In 2024, The Most Useful Tips for Pokemon Go Ultra League On Xiaomi 13T | Dr.fone
- In 2024, Ultimate Guide, How to Transfer Music From Apple iPhone 13 Pro to iPhone | Dr.fone
- Maximize Amazon Listing Success with Professional Product Imagery and Boost Sales Instantly
- Quick Fix: Updating Synaptics PS/2 Touchpad Drivers Made Simple
- Title: In 2024, 4 Ways to Transfer Music from Apple iPhone 13 Pro to iPod touch | Dr.fone
- Author: Charlotte
- Created at : 2024-10-13 17:37:51
- Updated at : 2024-10-18 09:04:25
- Link: https://iphone-transfer.techidaily.com/in-2024-4-ways-to-transfer-music-from-apple-iphone-13-pro-to-ipod-touch-drfone-by-drfone-transfer-from-ios/
- License: This work is licensed under CC BY-NC-SA 4.0.