
In 2024, 4 Ways to Sync Contacts from Apple iPhone 12 mini to iPad Easily | Dr.fone
4 Ways to Sync Contacts from Apple iPhone 12 mini to iPad Easily
One of the key elements within the Apple ecosystem is its capacity to synchronize data across various devices. In this age of inter connectivity, the importance of harmonizing contacts across multiple devices has emerged as vital. With the prevalence of iPhones and iPads, the demand for an efficient method to sync contacts between these two devices has surged.
For better contact management, the contacts syncing between iPhone and iPad is critical. This article discusses how do you sync contacts from Apple iPhone 12 mini to iPad. It will go through 4 effective methods to sync contacts from an iPhone to an iPad.
Part 1: Sync Contacts from Apple iPhone 12 mini to iPad Using Wondershare Dr.Fone
Wondershare Dr.Fone can be used to transfer contacts from Apple iPhone 12 mini to iPad/iPhone . You can back up iPhone contacts using Dr.Fone and then restore the contacts to the iPad without losing any data.
Wondershare Dr.Fone
Back up & Restore iOS Data Turns Flexible.
- One-click to back up the whole iOS device to your computer.
- Allow to preview and restore any item from the backup to a device.
- Export what you want from the backup to your computer.
- No data loss on devices during the restoration.
- Selectively restore any data you want.
- Supported the newest iPhone and Android phones.
3981454 people have downloaded it
Here’s how to sync iPhone contacts to iPad:
- Step 1: Connect the iPhone to the computer
Launch Wondershare Dr.Fone on the computer and then select “My Backup” from among various options. Now, using a cable, connect the iPhone to the computer and then allow Dr.Fone to automatically detect your connected iPhone device.

- Step 2: Click “Back Up Now” to Back up
After the iPhone is connected successfully, Dr.Fone will automatically detect the file types in it. Click on “Back Up Now” to back up your iPhone.

The backup process will start and take a few minutes to complete depending on the volume of data to be backed up. Dr.Fone will display all the data that are supported after the backup is completed.


Now that you have backed up all the contacts on the iPhone and then restoring them to the iPad is the way to it.
- Step 3: Select Restore to Device
Once the backup is completed, connect your iPad using a USB cable. Select the backup file and hit “Restore to Device”. It’s as simple as it sounds, and anyone can back up your contacts and sync them to your iPad.

In addition to manual backup, you can also back up contacts on iPhone automatically.
How to back up contacts automatically and wirelessly?
Step 1: Click “Backup Preference” to set up the backup frequency and backup period.
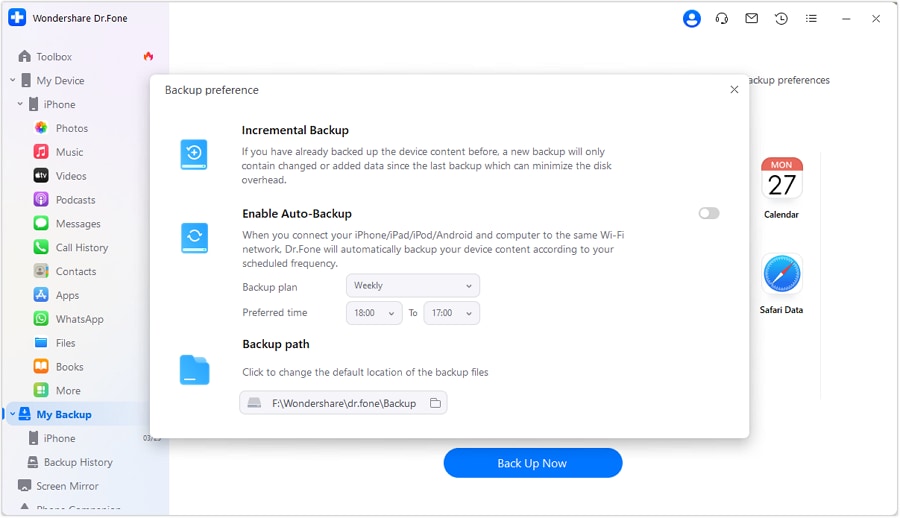
Step 2: Connect your iPhone and PC with the same wifi, the contacts on iPhone will be backed up automatically. You don’t need to use a USB cable to connect the iPhone to the PC in this step. Next time, if you would like to back up contacts again, it will only be for newly added data or modified files, which helps you save storage space and backup time.
Step 3: Restore the backup file to iPad/iPhone. You can preview the backup data and select the data you want to restore.

Bonus Tip: Sync Contacts from Apple iPhone 12 mini to iPad with 1 Click
Except the Phone Backup feature can help you sync contacts from Apple iPhone 12 mini to iPad easily, there is another tool that can also help you. If you have downloaded the Wondershare Dr.Fone, you may see this tool on the homepage, too. Yes! It is Dr.Fone - Phone Transfer .
Features of Dr.Fone - Phone Transfer tool:
- Easily share contacts and other types of data on iPhone to iPad/another iPhone.
- Just 1 click to transfer contacts to the iPad.
- Sync the data from Apple iPhone 12 mini to iPad within less than 3 minutes, the time of a cup of coffee!

Part 2: Sync Contacts from Apple iPhone 12 mini to iPad Using iCloud
If you’re heavily invested in the Apple environment, choosing iCloud is the optimal route. It serves as a convenient tool for synchronizing contacts between your iPhone and iPad. Leveraging iCloud’s powerful synchronization features, you can effortlessly maintain updated contact lists across all your Apple devices. Follow the simple steps outlined below to sync contacts from Apple iPhone 12 mini to iPad:
Step 1: After ensuring that the same Apple ID is logged in on both iPhone and iPad, first move to iPhone’s Settings. Here, tap “Apple ID,” and on the following screen, choose “iCloud.” In the “iCloud” tab, move to the “Apps Using iCloud” section and ensure the “Contacts” app is toggled on. Afterward, transfer to your iPad and access the Apple iPhone 12 mini device’s Settings.

Step 2: Within the Settings app, tap “Apple ID” and follow it by pressing “iCloud” on the following screen. Here, move to the “Apps Using iCloud” section and toggle on the “Contacts” app. Wait a few moments, and your contacts will be synced across devices.

Part 3: Sync Contacts from Apple iPhone 12 mini to iPad Using AirDrop
AirDrop is a convenient feature native to Apple devices. It presents a convenient wireless solution for seamlessly transferring contacts between an iPhone and an iPad. With its user-friendly configuration, AirDrop enables the easy sharing of diverse data, including contacts, among nearby Apple devices. Follow the instructions below for how do I sync contacts from Apple iPhone 12 mini to iPad using AirDrop:
Step 1: Begin by ensuring that Bluetooth and Wi-Fi are enabled on both iPhone and iPad. Afterward, access Control Center by swiping down from the top right corner of the Apple iPhone 12 mini device.

Step 2: Here, enable AirDrop and set its visibility to “Everyone.” Now, open the ‘Contacts’ app on your iPhone, select the contacts you want to transfer and tap the “Share” button.

Step 3: Tap on “AirDrop” from the list of sharing options provided. After selecting “AirDrop,” choose your iPad as the receiving device. A prompt will appear on your iPad to accept the incoming contacts. Tap “Accept” to initiate the transfer.

Part 4: Sync Contacts from Apple iPhone 12 mini to iPad Using iTunes/Finder
iTunes/Finder serves as a robust option for users who prefer a traditional and reliable method. It is a tested and trusted way of syncing data between their Apple devices. This software offers comprehensive backup and sync functionalities. That’s why iTunes/Finder provides a secure and efficient way to transfer contacts from an iPhone to an iPad. Follow the steps below to sync your contacts using iTunes or Finder:
Step 1. Begin by launching the most recent version of iTunes/Finder on your computer. Connect your iPhone and navigate to the “Summary” tab by clicking the “iPhone” icon. Here, enable the “Sync with this iPhone via Wi-Fi” feature.

Step 2. Subsequently, disconnect the iPhone and link your iPad to the computer. In iTunes/Finder, select the “Device” icon and switch to the “Info” tab. Here, ensure that the “Sync Contacts” box is checked, and then choose either “All Contacts” or “Selected Groups.”

Step 3. Once you have made your selection, click on “Apply” to initiate the contacts synchronization process. Upon completion, you can disconnect the iPad and access the synced contacts from your iPhone.

So, these are four ways in which you can transfer contacts from Apple iPhone 12 mini to iPad. Since these methods are the outcome of thorough research, all the methods are absolutely safe, and there is absolutely no data loss in the process. However, we would recommend Wondershare Dr.Fone , considering its robust and efficient working design. It is one of the best and most popular tools to transfer data from Apple iPhone 12 mini to iPad and offers an amazing overall experience with a simple interface and fast process. What’s imperative is to ensure that you follow all the steps properly and that’s all, there you have it; all the contacts on the iPad.
Various Methods to Transfer Pictures from Apple iPhone 12 mini to PC
Capturing life’s precious moments on the latest Apple iPhone 12 mini is a joy in itself. However, transferring them to a PC becomes essential when it comes to organizing, editing, or sharing those photos. That’s why mastering the art of transferring images between devices is a skill worth possessing.
It can be helpful in creating backups, freeing up storage space, and more. In this article, we will describe how to transfer photos from Apple iPhone 12 mini to a PC. It will explore step-by-step guides and tips for accommodating different preferences and comfort levels.
Part 1: How To Transfer Photos From Apple iPhone 12 mini to PC With Windows Features
With the Apple iPhone 12 mini ‘s advanced camera, capturing life’s beautiful moments is second nature. On the other hand, Windows OS has long been the backbone of personal computing. They come equipped with a range of tools to make the photo transfer process smooth and efficient. Explained below are two of the common method to import photos from Apple iPhone 12 mini to PC:
Method 1: File Explorer
When it comes to simplicity and direct control, File Explorer stands out as an excellent option. It is a steadfast companion for transferring photos from your Apple iPhone 12 mini to your Windows PC. This method gives you the freedom to navigate through your device’s internal storage.
Moreover, you can select the images you desire and move them to your computer. Follow these straightforward steps to harness the power of File Explorer:
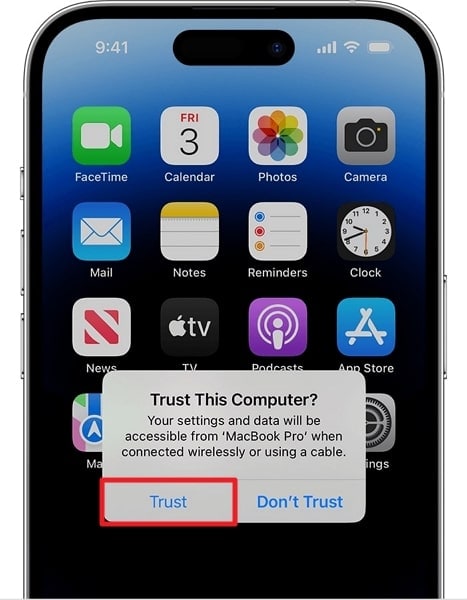
- Step 1: Begin by connecting your Apple iPhone 12 mini to your Windows PC using an Apple-certified USB cable. Ensure that your iPhone is unlocked, and if prompted, tap “Trust This Computer” on your device’s screen.
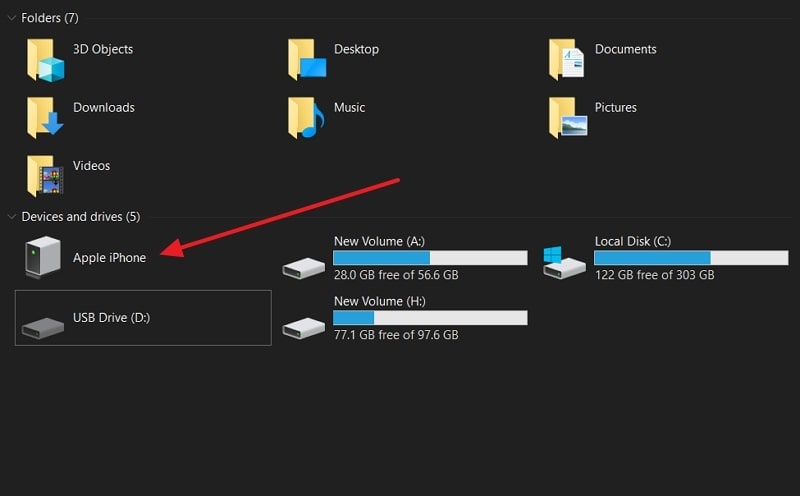
- Step 2: On your Windows PC, press the “File Explorer” icon on your taskbar. In the left-hand panel of File Explorer, locate and click “This PC.” Your connected Apple iPhone 12 mini should appear under the “Devices and Drives” section.
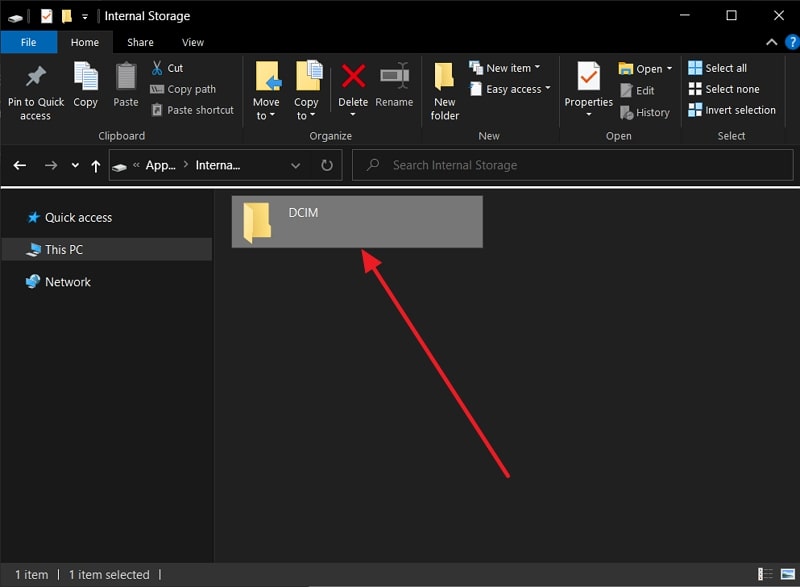
- Step 3: Here, double-click on your iPhone’s icon to access its internal storage. Most of your iPhone’s photos are stored in the “DCIM” folder. Browse the folder to select photos you want to move and copy them to your desired location.
Method 2: Photos App
Available in Windows 10 and later, the Photos app is a prime example of this convenience. It provides an elegant solution for transferring photos from your Apple iPhone 12 mini to your PC. Using this app, you can directly import photos and videos from your iPhone to the computer. Follow these simple instructions to utilize the power of the Photos app to learn how to transfer photos from Apple iPhone 12 mini to PC:
- Step 1: Connect your Apple iPhone 12 mini to your Windows PC using a USB cable, and if prompted, tap “Trust This Computer.” On your Windows PC, locate and open the “Photos” app.

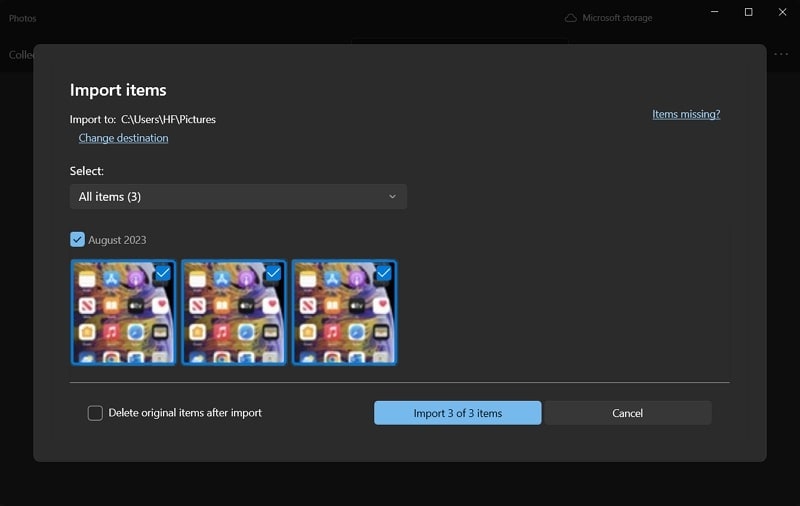
- Step 2: In the Photos app, click on the “Import” button located in the top-right corner. From the available options, choose “From a connected device” and select your iPhone. The Photos app will display the photos on your Apple iPhone 12 mini that are available for import. After selecting the images, select an existing folder or create a new one for the imported photos.
Part 2: How To Transfer Photos From Apple iPhone 12 mini to PC With Cloud Storages
Cloud storage offers a bridge between devices that goes beyond physical limitations. It lets you move photos from your Apple iPhone 12 mini to your desktop computer. This section will explore some of the popular cloud storage platforms since both of them offer their unique set of features and advantages. Described below are two cloud storage services to import photos from Apple iPhone 12 mini to PC:
Method 1: iCloud
iCloud is Apple’s cloud storage service which seamlessly knits together the Apple ecosystem. It offers a harmonious blend of convenience and synchronization. The iCloud interface is intuitive and clean, making it accessible to all individuals. With iCloud, you can easily access your photos across devices in the Apple ecosystem. Use the following steps to transfer photos from Apple iPhone 12 mini to PC via iCloud:
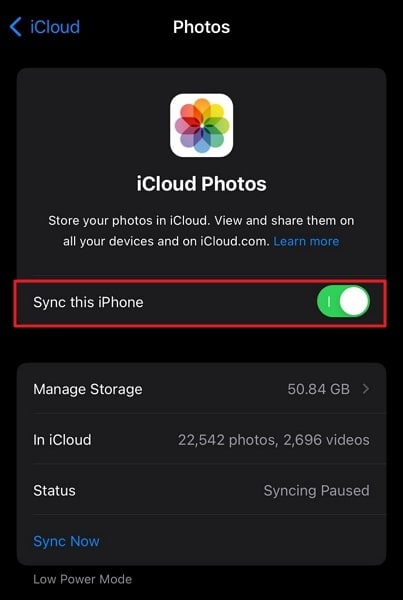
- Step 1: On your Apple iPhone 12 mini , go to “Settings” and tap on your Apple ID. There, select “iCloud,” tap “Photos,” and toggle on “Sync This iPhone” on the next screen. This uploads your photos to iCloud.
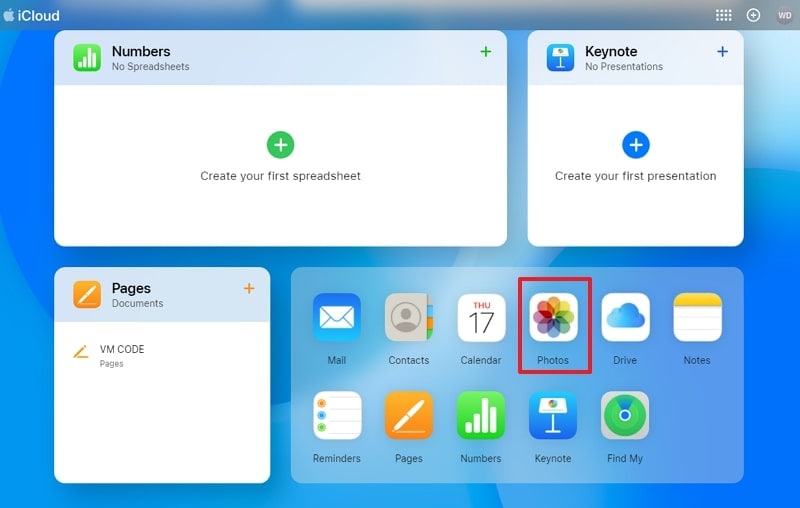
- Step 2: Move to your computer and on your Windows PC, open a web browser, and go to the iCloud website. Log in with your Apple ID and password and click the “Photos” icon to access your iCloud Photo Library.
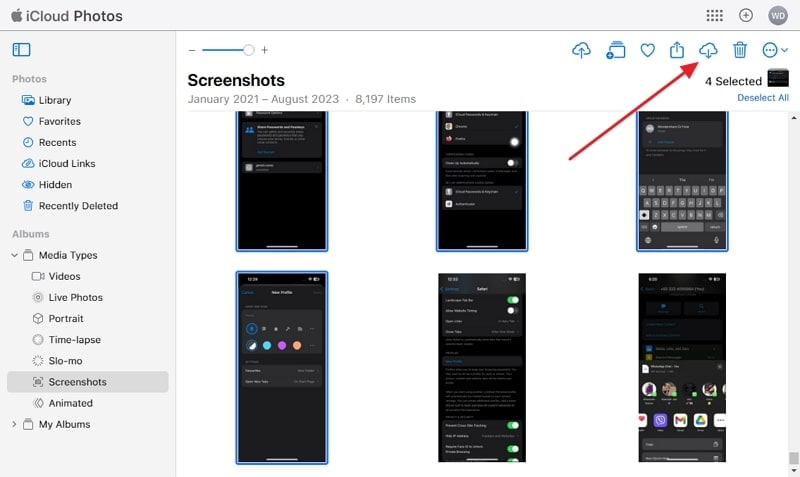
- Step 3: Browse your photos and select the ones you want to transfer to your PC. Click the “Download” icon (cloud with arrow) to download the selected pictures to your PC.
Pros
- iCloud can automatically back up your photos, ensuring that your memories are safeguarded in the event of device loss or damage.
- Your photos are accessible not only on your PC but also on your other Apple devices.
Con
- The provided 5GB of free cloud storage falls significantly short of meeting the requirements for adequate data backup.
Method 2: Google Drive
In the vast realm of cloud storage solutions, Google Drive emerges as a universal storage for storing data. It is accessible on a multitude of devices and operating systems. This enables easy photo transfer between various platforms. You get 15GB of free storage with Google Drive to store and transfer your data. The steps needed to transfer photos from Apple iPhone 12 mini to PC are given below:
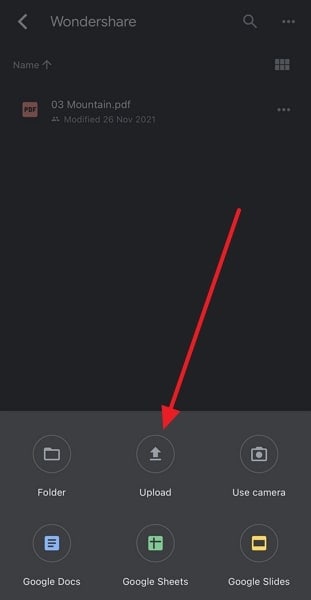
- Step 1: Download the Google Drive app from the App Store and log in using your Google account credentials. Tap the “+” button and select “Upload” to add the targeted photos to Google Drive.
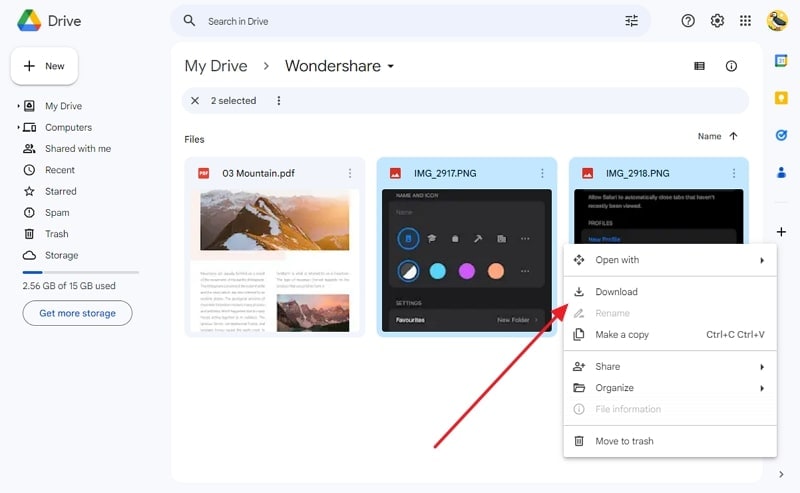
- Step 2: Once photos are uploaded, move to your PC and open Google Drive using a web browser. Locate the folder where you uploaded the pictures from your Apple iPhone 12 mini . Select the photos, right-click, and choose “Download” to initiate the download process.
Pros
- Google Drive permits offline access to your synced photos, even without a constant internet connection.
- It allows you to selectively share photos and albums with specific individuals.
Con
- Unlike iCloud, which automatically backs up photos, you have to upload all images manually to Google Drive.
Part 3: The Best iOS Management Tool To Transfer Photos From Apple iPhone 12 mini to PC
Wondershare Dr.Fone is the ultimate iOS management tool. It promises a harmonious blend of innovation, user-friendliness, and efficiency. This tool is a solution designed to bridge the gap between Apple iPhone 12 mini and PC. It offers a comprehensive suite of features beyond photo transfer, making it a one-stop solution for managing your Apple iPhone 12 mini data. With it, you can transfer data, get device details, view verification reports, and more.
Wondershare Dr.Fone also serves as a great tool to back up your data to your computer. It allows you to create wireless auto-backups on your computer. This backed-up data can be quickly restored to your device at any time. Furthermore, this tool also offers a dedicated iCloud manager to manage your iCloud data.
Key Features of Wondershare Dr.Fone
- If you want to sell your Apple iPhone 12 mini , then with the help of Wondershare Dr.Fone Anti-Recovery Mode, you can ensure that your data is erased properly.
- There is no need to jailbreak your iOS device for updating or downgrading it with the help of Wondershare Dr. Fone.
- Fone is designed so that even a layman can use it easily to manage his iPhone without any technical skill.
- You can use Wondershare Dr.Fone for almost all iOS versions and devices, including iPhone and iPod Touch.
Straightforward Step-by-Step Guide To Transfer Photos From Apple iPhone 12 mini to PC With Wondershare Dr.Fone
Transferring photos from Apple iPhone 12 mini to PC is a breeze with Wondershare Dr.Fone. Follow these steps to finish the transfer procedure:
- Step 1: Choose Export All Data in Wondershare Dr.Fone
With Wondershare Dr.Fone installed on your computer, connect to your Apple iPhone 12 mini . Once the Apple iPhone 12 mini device is detected, tap the Apple iPhone 12 mini device from the left sidebar and click “Export All Data.”

- Step 2: Select Photos for Transfer
Here you will be asked to choose the data you want to export. Select “Photos” and any other data you want to transfer. Once you click “Export,” Wondershare Dr.Fone will ask you to create a password for the backup.

- Step 3: Complete the Photo Transfer Process
Click “Verify” once you have created the process to start the transfer process of photos. The process will require a certain amount of time to finish. Once it is completed, you can click “Open in Folder” to view the backed-up data.

Conclusion
In our journey to uncover the most effective method for how to transfer photos from Apple iPhone 12 mini to PC, we’ve explored a myriad of options. Each method offered a unique blend of convenience and functionality. Among these, one solution stands out as a true game-changer: Wondershare Dr.Fone. As we conclude our guide, we wholeheartedly recommend Wondershare Dr.Fone as the ultimate iOS management tool.
It bridges the gap between devices with unparalleled features. Dr. Fone’s capability to transcend the realm of mere photo transfer sets it apart. Its comprehensive suite of features empowers you to manage your Apple iPhone 12 mini ‘s data with ease.
How to Transfer from Apple iPhone 12 mini to iPhone 8/X/11
If you’re one of those who is fond of new phones, then making the transfer to a new iPhone from your old phone can be a real struggle. The biggest problem comes when you need to transfer data from Apple iPhone 12 mini to iPhone 8 (Plus)/X/11 and data include your photos, documents, contacts, etc.
Cell phone data is highly important and no matter what, no one wants to be in a state where they have to lose their precious data. Having all the personal and professional contacts, documents, messages, music as well as all the memories which you have captured in the form of pictures.. no one can give it just like that.
Imagine getting a surprise on your birthday and here you have your brand new iPhone 8 (Plus)/X/11. The only thing that irritates you is the complex process to transfer your data from old iPhone to a newer one. Well, if you have ever faced such problem where transferring your data from one phone to another phone have been a nightmare for you, then this article is for you..
How to Transfer Everything from Apple iPhone 12 mini to iPhone 8 (Plus)/X/11
We have come up with a solution which will make transfer data from Apple iPhone 12 mini to iPhone 8 (Plus)/X/11 extremely easy. You might be wondering what we have. Well.. Dr.Fone is your ultimate stop and the best thing that can help you to transfer from Apple iPhone 12 mini to iPhone 8 (Plus)/X/11 without any kind of hassle.
Dr.Fone - Phone Transfer is great phone to phone transfer tool to help you transfer data from Apple iPhone 12 mini to iPhone 8 (Plus)/X/11 extremely easy with just one click. It is different from the traditional way of transfer data from Apple iPhone 12 mini to iPhone 8 (Plus)/X/11 by using iTunes. Comparative to iTunes, Dr.Fone is highly user-friendly and very easy to use. Thereby, making the transition and transfer data from old iPhone to iPhone 8 (Plus)/X/11 extremely easy. It works by following the very simple steps and you don’t even have to worry about backup and the restore things.
Dr.Fone - Phone Transfer
Transfer Everything from Apple iPhone 12 mini to iPhone 8 (Plus)/X/11 in 1 Click!.
- Easily transfer photos, videos, calendar, contacts, messages and music from old iPhone to new iPhone 15.
- Enable to transfer from HTC, Samsung, Nokia, Motorola and more to iPhone 15 and former.
- Works perfectly with Apple, Samsung, HTC, LG, Sony, Google, HUAWEI, Motorola, ZTE, Nokia and more smartphones and tablets.
- Fully compatible with major providers like AT&T, Verizon, Sprint and T-Mobile.
- Fully compatible with iOS 17 and Android 13
- Fully compatible with Windows 10 or Mac 14.
3,774,052 people have downloaded it
Still confused? Let us tell you easy steps that will help you to learn how to transfer everything from Apple iPhone 12 mini to iPhone 8 (Plus)/X/11 with Dr.Fone
- Download Dr.Fone - Phone Transfer Application. Open the Application and connect your Apple iPhone 12 minis to it.
- Click on to “Phone Transfer“. In order to boost the efficiency, make sure both the Apple iPhone 12 mini devices are connected
- Select the files and click “Start Transfer“ button.
Note: you can also click on to “Flip” button, in order to change the positions of the Apple iPhone 12 mini devices.
There are other methods too which enables the transfer data from old iPhone to iPhone 8 (Plus)/X/11.
Part 2: How to Transfer Everything from Apple iPhone 12 mini to iPhone 8 (Plus)/X/11 with iTunes
iTunes have been used traditionally to transfer the data. Let’s learn how iTunes works:
- In order to transfer your data from iPhone 6Plus to iPhone 8 (Plus)/X/11 via iTunes, first you need to make sure that the data from your previous device is backup with iTunes.
- To back up your data to iTunes, you need to connect your iPhone to the computer and then open the iTunes application. Please ensure that you’re using the latest version of the iTunes. Once, device is connected, click on “Backup Now“.
 with iTunes")
- Open your new device. Press home button once you see “Hello” Screen.
- Connect your phone to the laptop, where you have already backup your data with the iTunes.
- Open the iTunes application and then select your latest device to restore the backup.
 with iTunes")
- Wait until the process is completed.
Part 3: How to Transfer Everything from Apple iPhone 12 mini to iPhone 8 (Plus)/X/11 with iCloud
iCould is another software which also enables the transfer of data from Apple iPhone 12 mini to iPhone 8 (Plus)/X/11. In order to transfer data Apple iPhone 12 mini to iPhone 8 (Plus)/X/11 using iCloud, you can consider the following steps to make the process easy.
- Just like iTunes, with iCloud too you need to back up your data to iCloud so that it can be restored to your new iPhone 8 (Plus)/X/11. In order to back up, first you need to connect the Apple iPhone 12 mini device to the Wi-Fi network. Then go to the setting, click on iCloud button and then click on to iCloud backup. You need to check whether the iCloud backup is turned on or not. Make sure it is turned on. Click on “back up now“. Keep your phone connected to Wi-Fi until the process is completed.
 with iCloud")
- Connect your iPhone 8 (Plus)/X/11 to the computer when “Hello” screen appears.
- Connect your phone to the Wi-Fi network.
- To restore from iCloud backup, sign in to iCloud with the help of apple id and password.
 with iCloud")
- The application will ask for the backup. Once you’ve checked that the backup is correct you can click on it.
- Make sure your device is connected to it until the process is completed.
iTunes, iCloud and Dr.Fone are few of the methods which tend to enable the transfer data from old iPhone to iPhone 8 (Plus)/X/11. However, considering the complexity of the iTunes and iCloud, we’d urge the readers if they can try the Dr.Fone at least once. It is not only easy but also less time consuming. It prevents the additional steps such as backup and restore settings. Rather, the entire process is done with just one click. Dr.Fone is highly user friendly and a bit different from traditional ways of transfer data Apple iPhone 12 mini to iPhone 8 (Plus)/X/11.
We know the emotions and sentiments attached with one’s personal information and thus we have tried to give users a platform, where they can make the transition from one phone to another extremely simple. Simply download and have a try.
Also read:
- [New] 2024 Approved A Guide to Gauging IGTV Video Impressions
- [New] 2024 Approved Miniature Drone Selection Expert Recommendations
- [New] Instant Impact Facebook Vids for 2024
- [Updated] Unlock YouTube Potential with Top IGTV Editors for 2024
- 2024 Approved Leading Websites' Guide to Extracting Youtube Template Videos
- 4 Ways to Transfer Contacts from Apple iPhone 13 to iPhone Quickly | Dr.fone
- 4 Ways to Unlock iPhone 13 to Use USB Accessories Without Passcode | Dr.fone
- Age of Empires IV - Overcoming the Unlaunched Game Hurdle
- Containing the Chromatic Charge of an Acer Monitor
- How to Transfer Everything from Apple iPhone 13 Pro to iPhone | Dr.fone
- In 2024, 3 Ways to Export Contacts from Apple iPhone 8 Plus to Excel CSV & vCard Easily | Dr.fone
- In 2024, 4 Ways to Transfer Messages from Apple iPhone 15 to iPhone Including iPhone 15 | Dr.fone
- In 2024, Fix Apple iPhone 14 Pro Stuck on Data Transfer Verified Solution! | Dr.fone
- In 2024, iPhone Transfer Transfer Contact from Apple iPhone 15 Plus to iPhone without iCloud | Dr.fone
- Refurbished Apple iPhone 7 Plus Everything You Need to Know | Dr.fone
- Title: In 2024, 4 Ways to Sync Contacts from Apple iPhone 12 mini to iPad Easily | Dr.fone
- Author: Charlotte
- Created at : 2024-10-22 05:22:06
- Updated at : 2024-10-23 19:13:19
- Link: https://iphone-transfer.techidaily.com/in-2024-4-ways-to-sync-contacts-from-apple-iphone-12-mini-to-ipad-easily-drfone-by-drfone-transfer-from-ios/
- License: This work is licensed under CC BY-NC-SA 4.0.