
In 2024, 4 Quick Ways to Transfer Contacts from Apple iPhone 6 to iPhone With/Without iTunes | Dr.fone
4 Quick Ways to Transfer Contacts from Apple iPhone 6 to iPhone With/Without iTunes
“How to transfer contacts from Apple iPhone 6 to iPhone without using iTunes? I have got a new iPhone, but can’t seem to transfer contacts from Apple iPhone 6 to iPhone without iTunes.”
Lately, we have got plenty of queries like this from our readers who like to learn how to transfer contacts from Apple iPhone 6 to iPhone, such as iPhone 12/ 12 Pro (Max)/ 12 Mimi without iTunes. After all, when we get a new iPhone, this is the first thing that comes to our mind. If you are also going through the same dilemma, don’t worry as we have a perfect solution. This post will teach you how to transfer contacts from Apple iPhone 6 to iPhone without iTunes and transfer contacts with iTunes.
Part 1: Transfer Contacts from Apple iPhone 6 to iPhone Including iPhone 12/ 12 Pro (Max)/ 12 Mini with iTunes
To start with, let’s learn how to transfer contacts from Apple iPhone 6 to iPhone using iTunes. If you have an updated version of iTunes, you can transfer and sync your data between various devices. Ideally, you can either sync your contacts or backup and restore them. We have discussed both of these techniques to transfer contacts from Apple iPhone 6 to iPhone with iTunes.
Method 1: Backup and Restore iPhone contacts with iTunes
This is the easiest approach to learn how to transfer contacts from Apple iPhone 6 to iPhone with iTunes. In this, we will first take a backup of our old phone (including contacts) and later restore the backup to a new device. Needless to say, all the existing data on the target device would be erased, and with your contacts, the entire backup will be restored.
- 1. Firstly, connect your existing iPhone to your system and launch iTunes.
- 2. Select your device and visit its Summary section.
- 3. Under the Backups section, choose to take a backup on the local computer.
- 4. In the end, click on the “Backup Now” button and wait for iTunes to backup your device entirely.

- 5. Once you have taken a backup locally, you can connect the target device and go to its Summary.
- 6. From here, click on the “Restore Backup” and select the target backup and device.

In this way, your entire backup (including contacts) would be restored, and you can transfer contacts from Apple iPhone 6 to iPhone with iTunes.
Method 2: Sync Contacts with iTunes
If you only wish to transfer your contacts, then it can be achieved by syncing your device. To learn how to transfer contacts from Apple iPhone 6 to iPhone using iTunes, follow these steps:
- 1. Firstly, connect your existing iPhone to your system and launch an updated version of iTunes.
- 2. Select the Apple iPhone 6 device and go to its “Info” tab. From here, enable the option of “Sync Contacts”. You can either select all contacts or selected groups.
- 3. After making your selection, click on the Sync button and wait for it to complete the process.

- 4. Now, disconnect the Apple iPhone 6 device and connect your target iPhone to it.
- 5. Follow the same drill, go to its Info tab, and enable the option to “Sync Contacts”.
- 6. Additionally, you can visit its Advanced section and replace the old contacts with the new ones as well.
- 7. Once you have selected the option, click on the “Sync” button.

In this way, you would be able to learn how to transfer contacts from Apple iPhone 6 to iPhone with iTunes easily.
Part 2: 1-Click to transfer contacts from Apple iPhone 6 to iPhone, Including iPhone 12/ 12 Pro (Max)/ 12 Mini without iTunes
As you can see, learning how to transfer contacts from Apple iPhone 6 to iPhone using iTunes can be a little complicated. Therefore, we recommend using trying Dr.Fone - Phone Transfer . It provides a one-click solution to transfer the data of your choice from one device to another. The tool comes with an intuitive process and has a free trial as well. It is compatible with every leading iOS device (including devices running on iOS 14).
Besides transferring your contacts, you can also move other data files like photos, videos, calendars, messages, music, etc. It can also transfer data between different platforms (like Android to iOS, iOS to Windows, and more). To learn how to transfer contacts from Apple iPhone 6 to iPhone without iTunes, follow these steps:
Dr.Fone - Phone Transfer
1-Click to Transfer Contacts from Apple iPhone 6 to iPhone without iTunes
- Easy, fast, and safe.
- Move data between devices with different operating systems, i.e., iOS to Android.
- Supports iOS devices that run the latest iOS

- Transfer photos, text messages, contacts, notes, and many other file types.

- Supports over 8000+ Android devices. Works for all models of iPhone, iPad, and iPod.
4,777,470 people have downloaded it
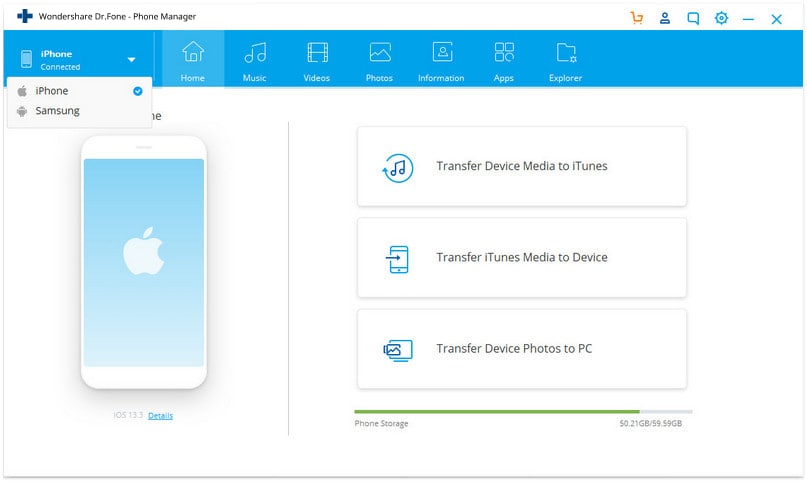
- 1. To start with, launch Dr.Fone and select the option of “Phone Transfer” from its welcome screen.

- 2. Now, connect the source and the target iOS device to your system and wait for them to be detected.
- 3. Dr.Fone - Phone Transfer follows an intuitive process and automatically lists the Apple iPhone 6 devices as Source and Destination. Though, you can click on the “Flip” button to exchange their positions.

- 4. Now, select the type of data you wish to transfer. For instance, if you want to move only contacts, select “Contacts” and click on the “Start Transfer” button. Additionally, you can select the option of “Clear data before copy” and delete the existing data on the target iPhone.
- 5. This will initiate the process and start the transfer process. You can view the progress from the on-screen indicator. Make sure that both the Apple iPhone 6 devices are connected at this stage.
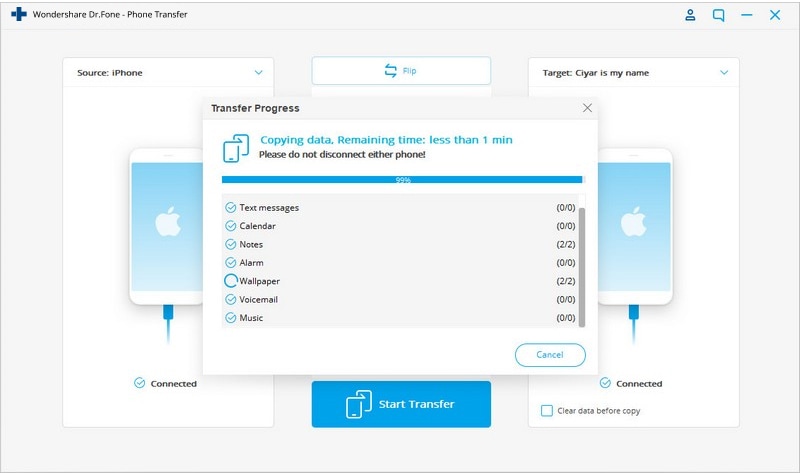
- 6. Once the process is complete, you will be notified. In the end, you can safely remove both the Apple iPhone 6 devices and use them the way you like.

Here is the video tutorial for you:
Part 3: Transfer iPhone contacts to iPhone Including iPhone 12/ 12 Pro (Max)/ 12 Mini without iTunes using Gmail
As you can see, Dr.Fone Phone Transfer provides a one-click solution to transfer your data from one iPhone to another. Though, if you want to try another option, then you can take the assistance of Gmail. Even though this is a more cumbersome process, it will meet your basic requirements. To learn how to transfer contacts from Apple iPhone 6 to iPhone without iTunes, you can try this approach.
- 1. If you are not using Gmail on your device, go to the Accounts settings and log in to your Gmail.
- 2. Afterwards, go to the Apple iPhone 6 device’s Settings > Mail, Contacts, Calendar > Gmail and turn on the option of Contacts.

- 3. Now, you can follow the same drill on the target device and sync your Gmail contacts.
- 4. Alternatively, you can visit your Gmail account on your desktop and go to its Contacts.
- 5. Select the contacts you wish to transfer and click on the “Export” button.

- 6. Choose to export your contacts to a vCard format. Once a vCard is created, you can manually move it to the target iPhone to import contacts from it.

Part 4: Transfer Contacts from Apple iPhone 6 to iPhone Including iPhone 12/ 12 Pro (Max)/ 12 Mini without iTunes using Bluetooth
If nothing else would work, you can transfer contacts from one iPhone to another using Bluetooth. It might be time-consuming, but it is also one of the easiest ways to learn how to transfer contacts from Apple iPhone 6 to iPhone without iTunes.
- 1. Turn on Bluetooth on both devices and make sure they are nearby.
- 2. You can always go to the Bluetooth settings of the source device and pair both devices.

- 3. Now, go to its Contacts and select the ones you wish to transfer.
- 4. Tap on the Share button and select the target device from the list of options.

- 5. Accept the incoming data on the target iPhone to complete the process.
After following these steps, you can learn how to transfer contacts from Apple iPhone 6 to iPhone with iTunes and without it. Besides these methods, you can also AirDrop the contacts or sync them via iCloud as well. As you can see, there are numerous ways to transfer contacts from Apple iPhone 6 to iPhone with iTunes (and without it) that you can try. We recommend Dr.Fone Phone Transfer as it is one of the easiest and fastest ways to transfer data between different devices.
5 Ways to Transfer Music from Apple iPhone 6 to Android
“I have just got a new Android, and I want to transfer music from Apple iPhone 6 to Android. Can anyone help me learn how to send music from Apple iPhone 6 to Android without much hassle?”
Switching from an iPhone to Android can be a tough job. Not only to transfer photos and contacts, but users also need to take some added measures for moving music from Apple iPhone 6 to Android. The good news is that some tools can move data from iOS to Android instantly. You can use iTunes, a dedicated app, or a third-party data transfer tool to do the same. Read on and get to know how to transfer music from Apple iPhone 6 to Android like a pro.
Part 1: How to transfer all music from Apple iPhone 6 to Android in 1 click?
The simplest way of learning how to move music from Apple iPhone 6 to Android is by using Dr.Fone - Phone Transfer . As the name suggests, the tool will make it easier for you to switch from one smartphone to another without losing any data. It is a part of the Dr.Fone toolkit and is compatible with leading iPhone and Android models. Therefore, you can easily perform a cross-platform transfer of data with a single click.
Dr.Fone - Phone Transfer
Transfer Music from Apple iPhone 6 to Android Directly in 1 Click!
- Easily transfer contacts from Apple iPhone 6 to Android phone without any complication.
- Works directly and transfer data between two cross-operating system devices in real-time.
- Works perfectly with Apple, Samsung, HTC, LG, Sony, Google, HUAWEI, Motorola, ZTE, Nokia, and more smartphones and tablets.
- Fully compatible with major providers like AT&T, Verizon, Sprint, and T-Mobile.
- Fully compatible with the latest iOS and Android
- Fully compatible with the latest Windows or Mac version.
3981454 people have downloaded it
Note: If you have no computer at hand, you can also get the Dr.Fone - Phone Transfer (mobile version) from Google Play, with which you could log into your iCloud account to download the data, or transfer from Apple iPhone 6 to Android using an iPhone-to-Android adapter.
Besides music files and formats of different kids, Dr.Fone - Phone Transfer also supports the transfer of contacts, messages, photos, videos, and other types of contact. Therefore, you can move all your data at once using this tool. To learn how to send music from Apple iPhone 6 to Android using Dr.Fone - Phone Transfer, follow these steps.
1. Download Dr.Fone - Phone Transfer on your Windows PC or Mac and launch it whenever you wish to transfer music from Apple iPhone 6 to Android. From its welcome screen, select the “Switch” module.
2. Now, connect both the Apple iPhone 6 devices to your computer and let the application detect them automatically. On the interface, you can see a preview of both the Apple iPhone 6 devices.
3. Since you move your data from an iPhone to Android, your iPhone should be listed as a source while Android should be a destination device. If not, then use the Flip button to interchange their positions.

4. Select the type of data you wish to transfer. For instance, in this scenario, make sure that the option of “Music” is selected. Once you have made the selection, click on the “Start Transfer” button.

5. Sit back and wait for a while as Dr.Fone - Phone Transfer will automatically move the selected content from Apple iPhone 6 to Android.
6. When the process is completed, you will be notified. In the end, you can remove both the Apple iPhone 6 devices safely.

Part 2: How to transfer music from Apple iPhone 6 to Android using Google Music Manager?
Another way to transfer music from Apple iPhone 6 to Android is by using Google Music Manager. Though, unlike Dr.Fone tools, the process can be a bit complicated. Firstly, you need to sync your music between iPhone and iTunes, and then you have to import it from iTunes to Google Music Manager. Sounds complicated, right? In the end, you can access it on your Apple iPhone 6 using the Google Music app. You can follow these steps to learn how to move music from Apple iPhone 6 to Android using Google Music Manager.
1. Firstly, you need to sync music between your iPhone and iTunes. To do this, launch an updated version of iTunes on your system and connect your iPhone to it.
2. Please select your device and go to its Music tab. From here, you can sync your iPhone with iTunes. Click on the “Apply” button and start the syncing process.
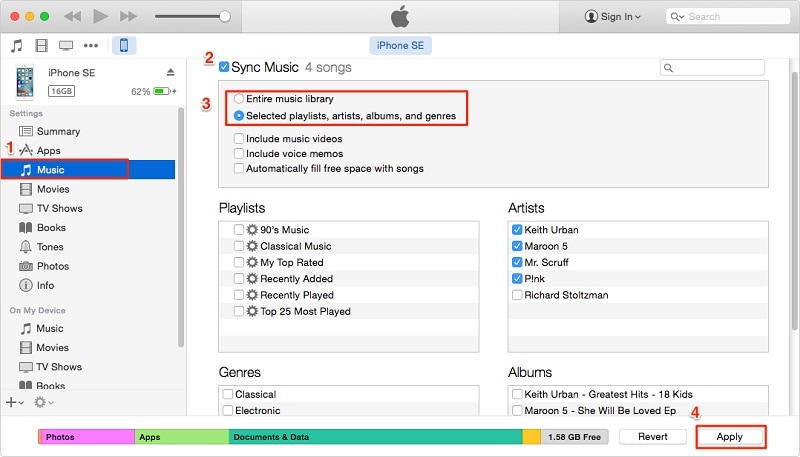
3. Once all your music is synced to iTunes, you can disconnect your iPhone.
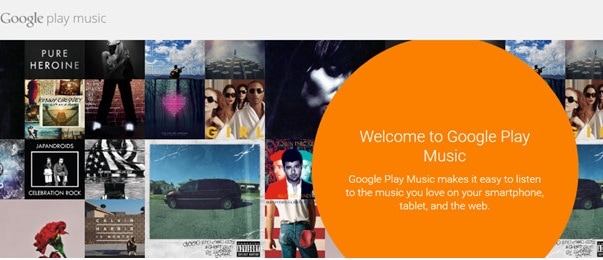
4. Go to the official website of Google Music and download Google Music Manager on your system.
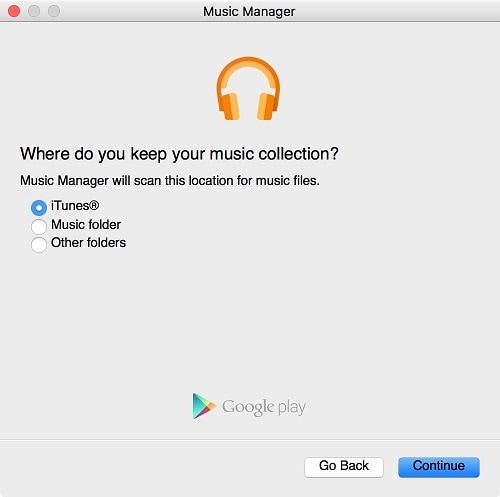
5. Launch the Music Manager application and choose to upload songs to Google Play.
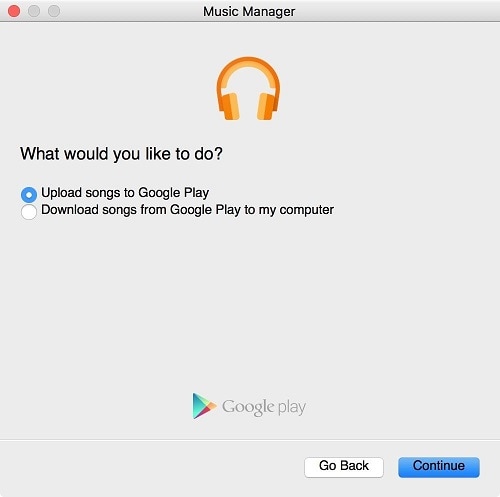
6. Select the source as “iTunes” and click on the “Continue” button.
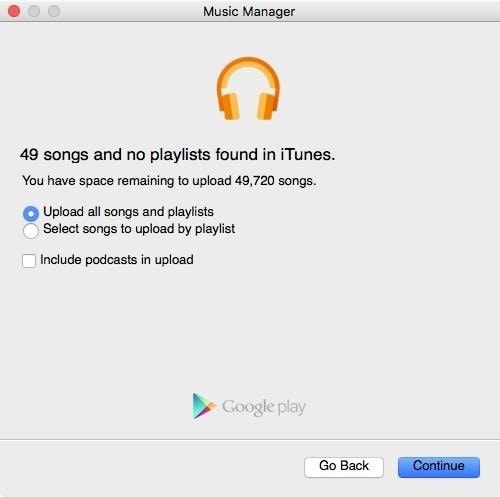
7. The Music Manager will automatically sync your iTunes library and display the available songs. From here, you can choose to upload selected songs or the entire library.
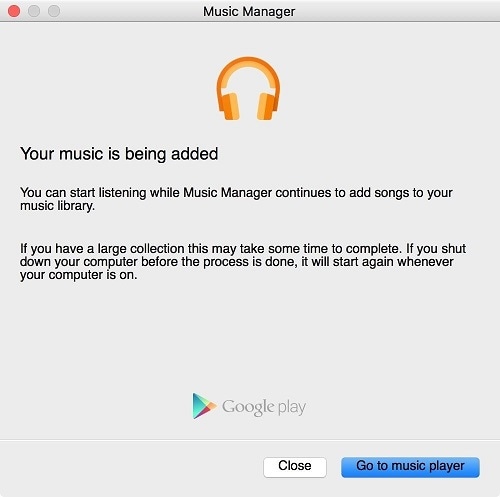
8. Wait for a while for your songs to be imported to Google Music Manager. Once it is done, you will be notified.
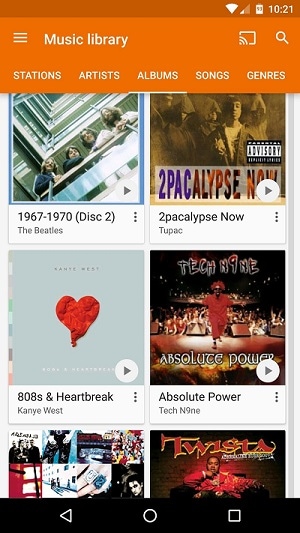
9. Great! You are almost there. In the end, you can download the Google Music app on your Android. From here, you can automatically access all the newly transferred songs on your Google Music library.
Part 3: How to transfer music from Apple iPhone 6 to Android selectively?
As you can see, with Dr.Fone - Phone Transfer, all the music files are transferred from one device to another in one go. If you want to transfer music from Apple iPhone 6 to Android selectively, you can take Dr.Fone’s assistance - Phone Manager (iOS) . It is also a part of the Dr.Fone toolkit and is developed by Wondershare.
Dr.Fone - Phone Manager (iOS)
Transfer iPhone/iTunes Media to Android Devices Selectively
- Transfer files between Android and iOS, including contacts, photos, music, SMS, and more.
- Manage, export/import your music, photos, videos, contacts, SMS, Apps etc.
- Transfer iTunes to Android (vice versa).
- Manage your iOS/Android device on computer.
- Fully compatible with the latest iOS and Android
4,335,819 people have downloaded it
With Dr.Fone - Phone Manager (iOS), you can move data between your iOS device and computer and even iPhone to another Android or iOS device. It works with all the leading smartphone models and supports prominent data types like photos, videos, music, contacts, messages, and more. Having a user-friendly interface will make it easier for you to learn how to transfer music from Apple iPhone 6 to Android. All you need to do is follow these steps:
1. Start by launching the Dr.Fone toolkit on your system and visit the “Transfer” tool from its home screen.
2. Connect your iPhone and the target Android device to the system. The interface will automatically detect both the Apple iPhone 6 devices in no time. From the top left option, make sure that you have selected your iPhone as a source device.
3. Great! Now, move to the “Music” tab on the application. Here, you can view all the music files stored on your iPhone, listed in different categories.
4. Just select the files you wish to transfer to your Android and click on the export button on the toolbar.
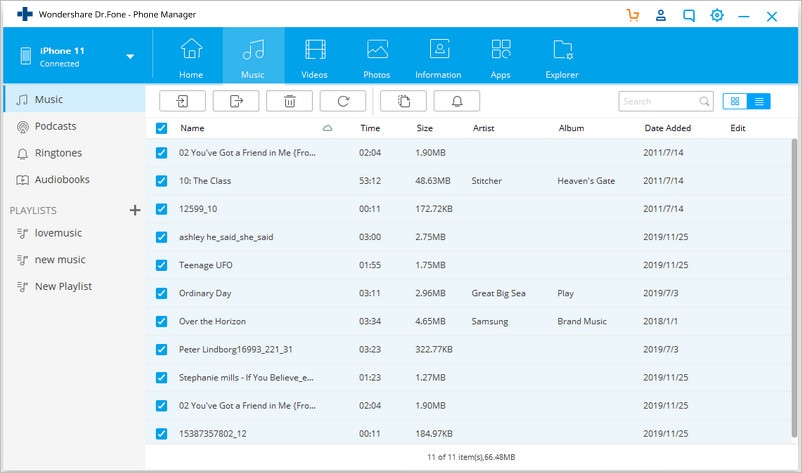
5. This will display a list of all the connected devices. Select the target Android device to commence the transfer process.
Part 4: How to transfer music from Apple iPhone 6 to Android without computer?
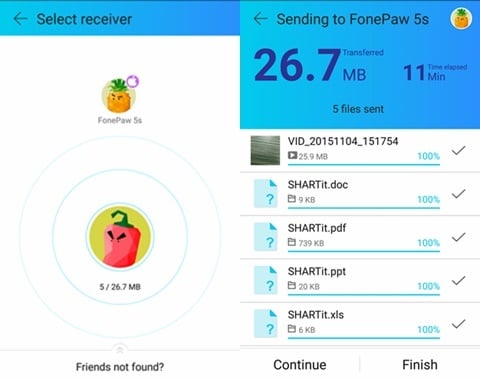
Too often, users don’t wish to use a computer for moving music from Apple iPhone 6 to Android. If you have the same preference, then you use a data transfer app to meet your requirements. Out of all the cross-platform data transfer options, SHAREit is one of the most recommended apps. You can install the app on both the Apple iPhone 6 devices and learn how to transfer music from Apple iPhone 6 to Android without computer by following these steps.
1. Before you proceed, make sure that you have installed the SHAREit app on your iPhone and Android by visiting its Google Play and App Store
2. Launch the app on both the Apple iPhone 6 devices and connect them to the same WiFi network. This is because the transfer of data takes place through WiFi direct.
3. On the source iPhone, choose to “Send” the data. Also, you can browse and select the music files that you wish to send.
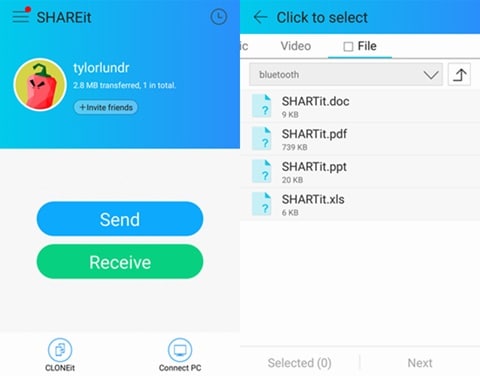
4. Similarly, on your target Android device, mark it as a receiving device. It will automatically start looking for the nearby devices.
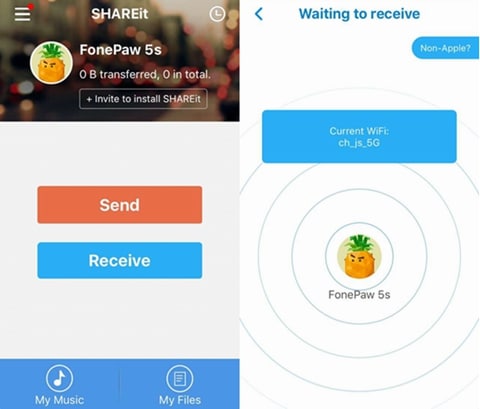
5. On your iPhone, you will be prompted regarding the target device. Select it to initiate the transfer.
6. Accept the incoming data from the source device and start receiving the selected music on your Android.
Part 5: How to transfer music from iTunes to Android?
It might surprise you, but there are different ways to learn how to transfer music from Apple iPhone 6 to Android. We have already discussed how to send music from Apple iPhone 6 to Android using iTunes and Google Music Manager. Though, there is another alternative to do the same. Once you have transferred your music from Apple iPhone 6 to iTunes, you can directly move it to an Android device as well.
1. To start with, make sure that you have already synced your iPhone music with iTunes. Once it is done, launch iTunes again.
2. Go to its Preferences > Advanced options and enable the “Copy files to iTunes media folder when adding to library” feature from here.
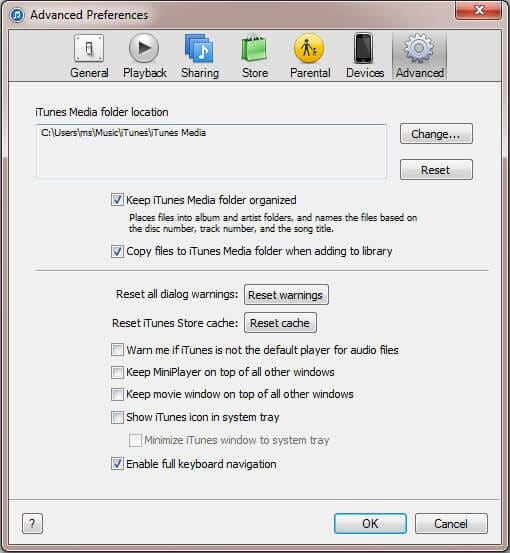
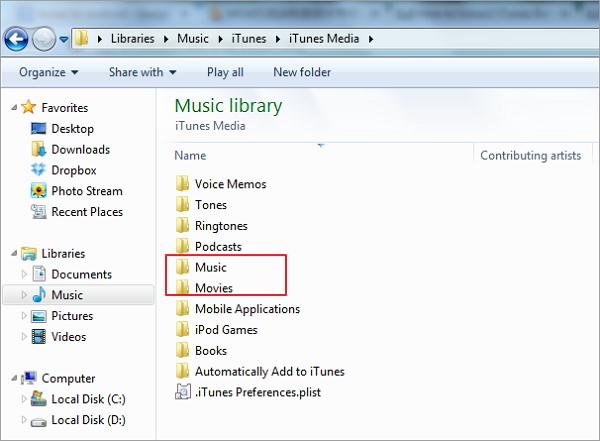
3. Once you apply this change, iTunes will make a dedicated folder with all the music files present in its library. In Windows, you can find it under My Music > iTunes while in Mac, it would be under Music > iTunes.
4. To transfer these music files, connect your Android to the system and choose to use it as a media transfer device.
5. Browse to the iTunes music folder, copy the selected songs, and transfer them to your Apple iPhone 6. If you have a Mac, then you need to use Android File Transfer to do the same.
After learning different moving music from Apple iPhone 6 to Android, you can certainly pick a preferred method. As you can see, Dr.Fone toolkit provides the fastest and easiest way to transfer music from Apple iPhone 6 to Android. With Dr.Fone - Phone Transfer , you can transfer all the music files from one device to another in a single click. In order to perform a selective transfer of data, you can try Dr.Fone - Phone Manager (iOS) as well. Go ahead and try these tools and teach others how to move music from Apple iPhone 6 to Android by sharing this guide.
3 Ways to Export Contacts from Apple iPhone 6 to Excel CSV & vCard Easily
A lot of readers have asked us how to export contacts from Apple iPhone 6 to Excel. After all, it allows them to keep their contacts handy and transfer them to any other device pretty easily. Though, if you are using an iOS device, then you might find it hard to export iPhone contacts to CSV at first. Nevertheless, there are some smart and quick ways of exporting iPhone contacts to Excel that every iOS user should know. In this guide, we will teach you in three different ways, how to export iPhone contacts to Excel free.
Part 1: How to export contacts from Apple iPhone 6 to Excel using Dr.Fone - Phone Manager (iOS)
If you are looking for a hassle-free solution to export contacts from Apple iPhone 6 to Excel, then try Dr.Fone - Phone Manager (iOS) . It is a part of the Dr.Fone toolkit, which is developed by Wondershare. The desktop application is available for both Windows and Mac, and comes with a free trial as well. Therefore, you can export iPhone contacts to Excel free using Dr.Fone - Phone Manager (iOS). The tool works flawlessly with all the leading versions of iOS, including iOS 11.
It would be a one-stop solution to transfer all kinds of content between your iOS device and computer. Besides exporting iPhone contacts to Excel, you can also move photos, messages, music, and more. It can also be used to transfer iTunes media as well. The best part is that you don’t need to use iTunes (or any other complicated tool) to export iPhone contacts to CSV. All you need to do is follow these simple steps:
Dr.Fone - Phone Manager (iOS)
Transfer MP3 to iPhone/iPad/iPod without iTunes
- Transfer, manage, export/import your music, photos, videos, contacts, SMS, Apps etc.
- Backup your music, photos, videos, contacts, SMS, Apps etc. to computer and restore them easily.
- Transfer music, photos, videos, contacts, messages, etc from one smartphone to another.
- Transfer media files between iOS devices and iTunes.
- Fully compatible with iOS 7, iOS 8, iOS 9, iOS 10, iOS 11 and iPod.
4,244,162 people have downloaded it
1. First of all, connect your iOS device to your system using an authentic cable and launch Dr.Fone on it. From the welcome screen, you need to select the “Transfer” module.
2. Since the tool follows an intuitive process, it will automatically detect your iPhone and prepare it for the transfer process. Once it is ready, you will get the following interface.

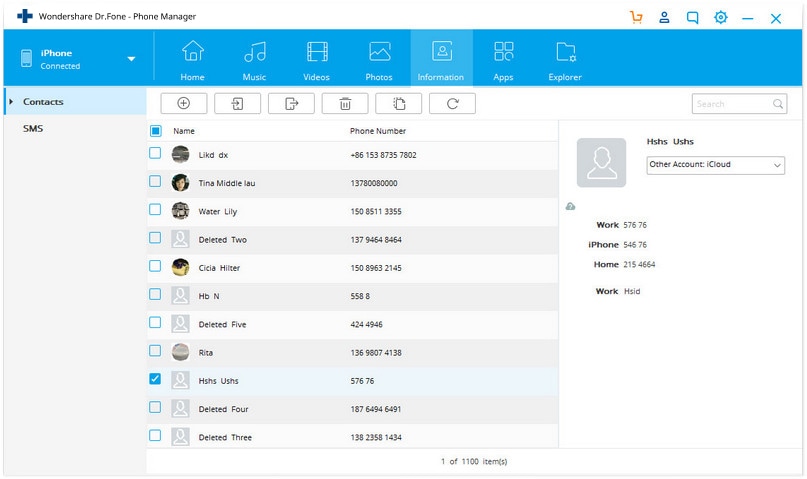
3. Instead of selecting options from its home, go to the “Information” tab.
4. The Information tab will have data related to your device’s contacts and SMS. You can switch between Contacts and SMS from their selective options on the left panel.
5. Now, to export contacts from Apple iPhone 6 to Excel, go to the “Contacts” tab from the left panel. This will display all the contacts saved on your device. From here, you can add a contact, delete it, sort them, etc.
6. Select the contacts that you wish to export. You can even look for a contact from the search bar. If you wish to export the entire list, then check the select all button.
7. After making your selections, click on the Export icon on the toolbar. The tool will allow you to export contacts in different formats like CSV, vCard, etc. Select the “to CSV File” option.
That’s it! In this way, you would be able to automatically export iPhone contacts to CSV. Now you can just visit the location and copy the file to any other device.
Part 2: Export iPhone contacts to Excel free using SA Contacts Lite
You can also try SA Contacts Lite to export iPhone contacts to Excel free as well. It is a freely available app that can be downloaded from the App Store. The app can be used to import and export your contacts in different formats. It makes the process of exporting iPhone contacts to Excel pretty easy. You can make it work with these simple steps:
1. Firstly, download SA Contacts Lite on your iPhone. Whenever you wish to export contacts from Apple iPhone 6 to Excel, launch the app.
2. Go to the “Export” section of the app. It will ask permission to access the contacts on your device. Simply grant the respected permission to proceed.
3. Now, you can choose if you wish to export all contacts, groups, or selected contacts. Additionally, from the Property Style dropdown menu, you can choose if you wish to export iPhone contacts to CSV, vCard, Gmail, etc.

4. Go with the default option of “Separated” or “Backup” and tap on the Start button to initiate the process.
5. In no time, the app will create a CSV file of your contacts. From here, you can mail yourself the CSV file as well.
6. Furthermore, you can tap on the More option as well. This will allow you to upload the CSV file to any cloud service like Dropbox, OneDrive, Google Drive, etc.

7. For instance, if you wish to upload the file to Dropbox, simply select the provided option and grant the app the needed permissions.
Part 3: Export iPhone contacts to CSV using iCloud
If you don’t want to take the assistance of any third-party app to export iPhone contacts to Excel free, then you can also use iCloud. The process of exporting iPhone contacts to Excel using iCloud is a little tedious compared to other methods. Though, these steps will help you meet your requirements.
1. Before you proceed, make sure that you have already synced your iPhone contacts with iCloud by visiting its Settings on your device.

2. Afterward, go to the official website of iCloud and log in with your credentials. From its welcome page, select the Contacts option.

3. Click on the gear icon (Settings) on the bottom left corner. From here, you can select all contacts in one go. Though, if you wish, you can manually select the contacts you wish to export as well.

4. Once you have made your selection, go to the Settings again and click on the option of “Export vCard”.

5. The exported vCard will automatically be saved in the Downloads folder (or any other default location). Now, you can simply go to a vCard to CSV converter web tool to convert the vCard to a CSV file.

We hope that our quick and smart guide would be able to help you export contacts from Apple iPhone 6 to Excel. Dr.Fone Transfer provides a fast and easy solution export iPhone contacts to CSV and other formats. It can also be used to transfer other types of content between your iOS device and computer too. Give it a try and make the most of your iPhone without any trouble.
Also read:
- [New] 2024 Approved Skyrocket on Instagram Unveiling Your Path with Top 9 Secrets
- [New] Enhance Projects No-Cost Templates for PP Prodigies
- [Updated] Winning Strategy Top 9 Windows Apps for Animated GIF Mastery
- 2024 Approved The Ultimate Guide to YouTube Openers A&B Methods
- 6 Methods for Switching from Apple iPhone 11 Pro Max to Samsung | Dr.fone
- Enhanced Graphics on Windows 11 - GeForce RTX210
- Exploring the Price Differences Between Uber and Traditional Cabs
- How to Transfer Data from Apple iPhone X to ZTE Phones | Dr.fone
- How to Transfer Everything from Apple iPhone 13 Pro Max to iPhone 8/X/11 | Dr.fone
- How To Transfer From Apple iPhone 13 Pro to Samsung Simplified Guide | Dr.fone
- How to Transfer Photos from Apple iPhone 12 Pro Max to other iPhone without iCloud | Dr.fone
- In 2024, 4 Quick Ways to Transfer Contacts from Apple iPhone 11 to iPhone With/Without iTunes | Dr.fone
- In 2024, How to Detect and Stop mSpy from Spying on Your Vivo S18 | Dr.fone
- In 2024, How to Transfer from Apple iPhone 11 to iPhone 8/11/11 Pro | Dr.fone
- Radiant Registering and Unregistering Rites
- Reviewing Magix Music Production for Budding Musicians for 2024
- Various Methods to Transfer Pictures from Apple iPhone 7 Plus to PC | Dr.fone
- Title: In 2024, 4 Quick Ways to Transfer Contacts from Apple iPhone 6 to iPhone With/Without iTunes | Dr.fone
- Author: Charlotte
- Created at : 2024-10-17 23:16:11
- Updated at : 2024-10-23 22:37:08
- Link: https://iphone-transfer.techidaily.com/in-2024-4-quick-ways-to-transfer-contacts-from-apple-iphone-6-to-iphone-withwithout-itunes-drfone-by-drfone-transfer-from-ios/
- License: This work is licensed under CC BY-NC-SA 4.0.