
How to Transfer Photos from Apple iPhone SE to other iPhone without iCloud | Dr.fone
How to Transfer Photos from Apple iPhone SE to other iPhone without iCloud
This article’s content focuses on the importance of photos, and the techniques and tools you require to transfer photos from Apple iPhone SE to another iPhone without iCloud including iPhone 15.
Photos are important because they reflect our memories, we have so many memories in our brain and it is not easy to pull them all up when required, but photos can help a lot to remember. Photos invoke emotions, sometimes photos are important to remember details, for example, “What did I wear on my last Christmas?”.
Method 1: How to Transfer Photos from Apple iPhone SE to iPhone without iCloud (All in One Click) [iPhone 15 Included]
The top method to transfer photos from Apple iPhone SE to iPhone without iCloud is to transfer all the photos in one click. With this method, you can complete the photo transfer even within seconds without any photo loss. All you need are two lightning cables to connect both iPhones to your PC or Mac, and the Dr.Fone - Phone Transfer (iOS & Android) software.

Dr.Fone - Phone Transfer
Easiest Way to Transfer Photos from Apple iPhone SE to iPhone without iCloud
- Transfer photos from an old iPhone to a new iPhone within seconds.
- Support the transfer of more data like contacts, messages, files, videos, etc. from phone to phone.
- Transfer everything from Apple iPhone SE to new iPhone , from Android to Android, from Apple iPhone SE to Android, and from Android to iPhone.
- Supports iPhone, iPad, iPod touch, and the latest iOS version.
- Fully compatible with the latest Windows or Mac version.
3981454 people have downloaded it
Here are the simple steps to transfer photos from Apple iPhone SE to iPhone without iCloud:
Step 1: Download the Dr.Fone software, open it, and you can see the following interface.

Step 2: Connect both iPhones to your PC and click “Phone Transfer”.

Note: Confirm which iPhone is your destination device and which one is the source. Click “Flip” to swap their positions if necessary.
Step 3: Select the “Photos” option and click “Start Transfer”. Then you can find all photos are transferred from Apple iPhone SE to iPhone without iCloud.

Video Guide: Transfer photos from Apple iPhone SE to iPhone without iCloud
Method 2: Transfer Photos from Apple iPhone SE to iPhone without iCloud (Selective Transfer) [iPhone 15 Included]
When you want to transfer your photos separately without transferring the other iDevice data, there is a perfect tool for you: Wondershare Dr.Fone . This action takes no time at all, and you can transfer the images within a matter of a few seconds. You can also use this phone manager app to transfer data from Apple iPhone SE to Android and iTunes or vice versa.
In addition, Wondershare Dr.Fone works efficiently without losing data while transferring media files between iOS devices. It can also transfer videos, contacts, messages, etc., from Apple iPhone SE to iPhone. Here is how to selectively transfer photos from Apple iPhone SE to iPhone without transferring the complete iPhone data via Wondershare Dr.Fone:
Step 1: Proceed With the Phone Manager feature
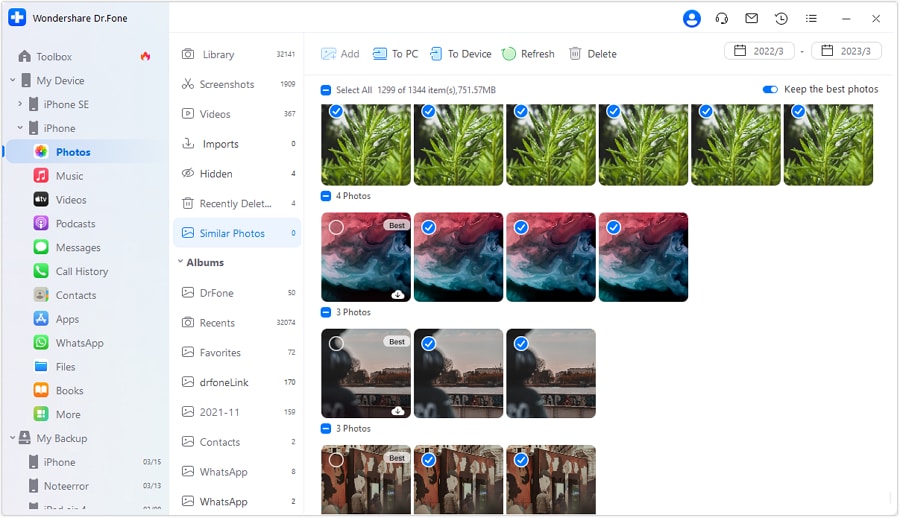
First, you need to install Wondershare Dr.Fone on your computer and connect both your iDevices to the computer using the Apple-certified USB cables. Next, locate the iPhone from which you want to transfer the images and expand it. Choose the “Photos” tab and let Wondershare Dr.Fone load all the pictures.

Step 2: Perform the Selective Photos Transfer
Once Dr.Fone detects all the photos in your iPhone, it will categorize them in the albums like they are in your iDevice. Choose the pictures you want to transfer and tap the “To Device” option. Then, click on the iPhone on which you want to send all the selected images and complete the photo transfer process.
Method 3: Transfer Photos from Apple iPhone SE to iPhone without iCloud via iTunes [iPhone 15 Included]
Using iCloud for transferring data is convenient, but it is not always practical due to the limitation of maximum data. In that case, iTunes can be a good option, which is another functional software from Apple. Following are the step-by-step instructions to transfer pictures from Apple iPhone SE to iPhone via iTunes to avoid data storage limitations:
Step 1: To begin with, launch iTunes on your computer and connect your source iPhone. Select the “Phone” icon near the top left corner of iTunes and move to the “Summary” tab. Then, navigate to the “Backups” section and check the “This Computer” option. Then, hit the “Back Up Now” button on the right side to start the backup process of your iDevice.

Step 2: Once the backup process is complete, disconnect the old iDevice. Next, you need to connect your new iPhone and proceed to the “Backups” section in the “Summary” tab. Here, tap “Restore Backup” and go on to choose the most recent backup. To complete the photo transfer process, tap “Restore” and wait for the backup to be restored.

Method 4: Transfer Photos from Apple iPhone SE to iPhone without iCloud via AirDrop [iPhone 15 Included]
AirDrop gives its users the wireless facility to transfer iPhone photos in a quick manner. Unlike iCloud or iTunes, it does not need to sync all the photos. You just have to select the photos from one of your iPhones and AirDrop them to another. However, the other iPhone should be within the Bluetooth and Wi-Fi range of the host iDevice. Here are the instructions you need to follow to AirDrop photos from old iPhone to new iPhone efficiently:
Step 1: On your old iPhone, you need to open the “Photos” app and hop into the desired folder. Next, pick the photos you want to share by tapping the “Select” button in the upper right corner.
Step 2: Following this, you will have to tap the “Share” icon, followed by selecting the targeted “AirDrop” recipient iPhone. Then, on the target iPhone, you have to choose “Accept” to receive them.

Tip: How to Transfer Photos from Apple iPhone SE to iPhone using iCloud
Step 1. To transfer the photos from your iPhone to another iPhone you must make sure that you make a backup through iCloud.
Step 2. On the home screen tap Settings. Once entered in settings tap iCloud.

Step 3. In the iCloud menu, you need to click on photos. Once entered in photos turn on the iCloud Photo Library option along with upload my photostream.
Step 4. When you are done your photos will be uploaded to iCloud and you can restore them by simply adding the iCloud id to the new iPhone device.
Editor’s Picks:
- 5 Ways to Transfer Everything from Old iPhone to your new iPhone
- 5 Ways to Transfer Photos from Apple iPhone SE to PC with/without iTunes
If you do not want to use iCloud for data transfer, run Dr.Fone - Phone Transfer on your computer and transfer data in one click quickly.
How to Transfer from Apple iPhone SE to iPhone 8/11/11 Pro
Are you an Apple iPhone SE user? Well, iPhone 8/11/11 Pro will be a huge technological leap for you. In this article we will take you through how to transfer everything from Apple iPhone SE to iPhone 8/11/11 Pro easily in three sim-ple steps because we understand that no smartphone works up to our expectations if our data, such as contacts, music, photos, notes, etc is not fed in it.
So if you are planning to buy the new iPhone 8/11/11 Pro, here is everything you need to know to transfer data from old iPhone to new iPhone. Also, even if you want to retain your old device, transfer Apple iPhone SE to iPhone 8/11/11 Pro and enjoying the same data on both your iPhones.
Best iPhone to iPhone transfer tool - transfer files from old device to new iPhone 8/11/11 Pro without iTunes
We bet you have heard of Dr.Fone software. It is the most reliable 1-Click Phone Transfer tool to send data (contacts/text messages/photos/etc.) from an old phone to new one. Its user-friendliness and intuitive interface make it the best and most efficient software to transfer Apple iPhone SE to iPhone 8/11/11 Pro as it is fully compatible with iOS 13. It is available for both Mac and Windows and is very thoughtfully designed to prevent hacking and data loss.
You may also put this software to good use to backup and restore your iPhone data.
Dr.Fone - Phone Transfer
Transfer Everything from iPhone 5S to iPhone 8/11/11 Pro in 1 Click!
- Easily transfer photos, videos, calendar, contacts, messages and music from old iPhone to new iPhone 8/11/11 Pro.
- Enable to transfer from HTC, Samsung, Nokia, Motorola and more to iPhone X/8/7S/7/6S/6 (Plus)/5s/5c/5/4S/4/3GS.
- Works perfectly with Apple, Samsung, HTC, LG, Sony, Google, HUAWEI, Motorola, ZTE, Nokia and more smartphones and tablets.
- Fully compatible with major providers like AT&T, Verizon, Sprint and T-Mobile.
- Supports iPhone, iPad, iPod touch and the latest iOS version.
- Fully compatible with the latest Windows or Mac version.
3981454 people have downloaded it
How to transfer everything from Apple iPhone SE to iPhone 8/11/11 Pro
In this segment, we will learn how to transfer everything from Apple iPhone SE to iPhone 8/11/11 Pro with Dr.Fone. To do so, download and install the software on your computer and follow the steps given below:
Step 1: Launch Dr.Fone software
Once Dr.Fone - Phone Transfer is installed on your PC, launch the program and connect the Apple iPhone SE and iPhone 8/11/11 Pro to the PC with the help of two different USB cables. Next up, select “Phone Transfer” option on Dr.Fone toolkit and move on.
Step 2. Data Transfer from iPhone 5S to iPhone 8/11/11 Pro
In this step, select content to transfer data from old iPhone to iPhone 8/11/11 Pro. Also, make sure the source and target device are duly recognized (if not, just swap them).
Step 3. Initiate the Transfer from iPhone 5S to iPhone 8/11/11 Pro
This is the last step which only requires you to hit the “Start Transfer” button and view the transfer progress on the screen.

Note: The images above are of iPhone 6Plus. There is no difference in procedure to transfer Apple iPhone SE to iPhone 8/11/11 Pro.
Simple, right? In just one click, all the data is moved from Apple iPhone SE to iPhone 8/11/11 Pro.
Part 2: How to transfer everything from Apple iPhone SE to iPhone 8/11/11 Pro with iTunes?
iTunes is the software developed by Apple Inc. to manage iPhones and other iOS devices. Many users still prefer to use iTunes to transfer data from old iPhone to iPhone 8/11/11 Pro, thus, here are simple steps to help you do so:
Step 1. First and foremost, download the latest version of iTunes on your PC from Apple’s official website. Install it and launch the program.
Step 2. Using an USB, connect the Apple iPhone SE to your PC and wait until iTunes automatically detects it. You will be able to view your Apple iPhone SE under the “Devices” tab.
Step 3. Click Apple iPhone SE to view all the options at the left hand side of the iTunes interface. Select “Backup Now” to backup all the data stored in the Apple iPhone SE which needs to be transferred to iPhone 8/11/11 Pro.

Step 4. Let the process of backing up Apple iPhone SE finish completely. Once this is done, disconnect it and use another USB to connect new iPhone 8/11/11 Pro to the PC.
Step 5. Follow the steps given above to view the options with respect to the new iPhone 8/11/11 Pro on the iTunes interface. Select “Restore Backup” and waiter the process to get over to transfer data from old iPhone to iPhone 8/11/11 Pro.
Part 3: How to transfer everything from Apple iPhone SE to iPhone 8/11/11 Pro with iCloud?
iCloud is another great way to transfer Apple iPhone SE to iPhone 8/11/11 Pro in hassle free manner. Since it is a cloud service by Apple, it stores all our data and allows us to restore it on any and every iOS device with the same Apple ID and password.
Follow the steps given below to understand how to transfer everything from Apple iPhone SE to iPhone 8/11/11 Pro:
Step 1. Do not set up your new iPhone 8/11/11 Pro. If you already have, Visit “Settings” > “General” > “Reset” > Erase all content and settings to start from scratch.
Step 2. Now on your old Phone 5s, visit “Settings” and tap on your name. Select “iCloud” and scroll down to select “iCloud Backup” and hit “Backup Now”. Let the process finish completely and note down the exact timing of the back up file.

Step 3. Now, on the iPhone 8/11/11 Pro, start setting it up once again and connect it to a WiFi network.
Step 4. Once you reach the “Set Up” Page, select “Restore from iCloud backup” .
Step 5. Select the most recent back up file. Feed in your Apple ID details and let the iPhone restore all the data from iCloud backup. Let your iPhone 8/11/11 Pro reboot at the end of restoration process.

Moving data from old Apple iPhone SE to new iPhone 8/11/11 Pro is an easy job with the help of three tools listed above. All our data, such as photos, videos, music, contacts, notes, calendar, messages, Apps, etc, are important to us and need to be restored in the new device for us to start enjoying our new iPhone 8/11/11 Pro.
Where iTunes and iCloud are easy and go-to tools for many users, Dr.Fone - Phone Transfer is comparatively new, but way more effective than the other two methods to transfer data from old iPhone to iPhone 8/11/11 Pro. We recommend that you download and install this software right away and also share your experience along with this guide with your friends and family. Explore its features and make life simpler by managing your iPhone in a better and more secure way.
Ultimate Guide, How to Transfer Music From Apple iPhone SE to iPhone
The evolution of technology continually transforms how we consume and enjoy music. The iPhone stands among the most dominant brands in the smartphone world. Thus, the need for effortless ways to transfer music from iDevices has never been more paramount. In this comprehensive article, we will go through various methods and tools. This guide aims to simplify the process and empower you with the knowledge to transfer your music hassle-free.
It will explore native functionalities provided by Apple and third-party apps. Moreover, it will take you through music transfer employing cloud services. The goal is to equip you with the most effective, efficient, and reliable methods to transfer music from Apple iPhone SE to iPhone.
Part 1: How To Transfer Selective and All Music From Apple iPhone SE to iPhone in One-Click
When it comes to transferring music between iPhones, Wondershare Dr.Fone emerges as a versatile solution. It allows you to move the entire music library or selective tracks with a single click. With its one-click transfer functionality, managing your music collection becomes a smooth experience.
This ensures that your favorite tunes are available on your new iPhone. The following are the detailed methods on how to transfer music from Apple iPhone SE to iPhone using Wondershare Dr.Fone:
Method 1: Transfer Music Using Wondershare Dr.Fone – Phone Manager
Wondershare Dr.Fone offers a comprehensive solution for managing your iPhone. It allows you to handle your iPhone data efficiently. You can perform tasks like importing, exporting, and deleting files. With its intuitive drag-and-drop feature, you can move files into any desired app on your device. You can transfer a variety of data between your iOS device and computer. Here is how to transfer music from Apple iPhone SE to iPhone using the phone manager feature:
- Step 1: Access the Source iPhone in Wondershare Dr.Fone
The first thing you need to do is install and launch Wondershare Dr.Fone. Then, connect both iPhones to the computer and wait for their detection by Dr.Fone. Once detected, click the source iPhone from the left panel.
- Step 2: Transfer the Selected Music Track
From the expanded options for the source iPhone, choose “Music.” Now, go to the track you want to share and select it. Now, tap “To Device” from the top toolbar and select the other iPhone as the destination. As soon as you select the other iPhone, the music file will be transferred.

Method 2: Transfer Music Using Wondershare Dr.Fone – Phone Transfer
Wondershare Dr.Fone - Phone Transfer simplifies transferring different data types between 8000+ devices. It ensures ease of use with a simple click-through process. Moreover, it is compatible with Apple, Samsung, HUAWEI, OPPO, Sony, Google, and more.
You also get full support for the latest iOS and Android versions. It supports the transfer of over 15 types of data between different OS. Here is how to transfer music from iPod to iPhone using the Phone Transfer tool of Wondershare Dr.Fone:
- Step 1: Click Phone Transfer in Wondershare Dr.Fone
To begin, you need to connect both devices to the computer with Wondershare Dr.Fone. Within Dr.Fone, click “Toolbox” from the left panel and choose “Phone Transfer” as the option. It will lead to a new screen where you need to assign the positions to the iPhones.
- Step 2: Select Music and Tap Start Transfer
The iPhone from which you want to transfer the music should be in the “Source” position. Now, give the “Destination” position to the iPhone where you want to transfer music. Then select “Music” from the available data type and click “Start Transfer.” Wait for the transfer process to complete, which will take time, depending on the library size.

Part 2: How To Transfer Music From Apple iPhone SE to iPhone Using iTunes
iTunes remains a reliable and widely used application for managing iOS devices. Many iPhone users prefer this method for transferring music between iOS devices, which is limited to purchased songs. Follow these steps to transfer music from Apple iPhone SE to iPad using iTunes:
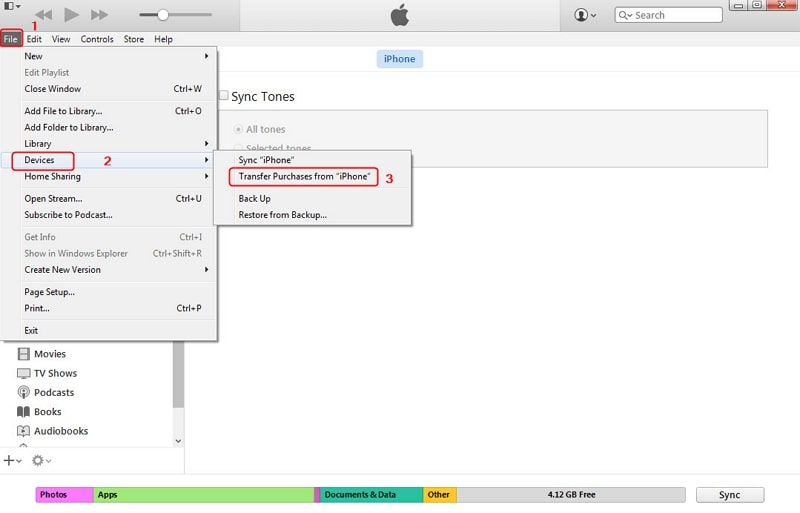
- Step 1. Run the latest version of iTunes on your computer and connect the source iPhone. After accessing iTunes, click on “File,” located in the top left corner, and choose “Devices.” Next, select “Transfer Purchases from iPhone” and let the process finish.
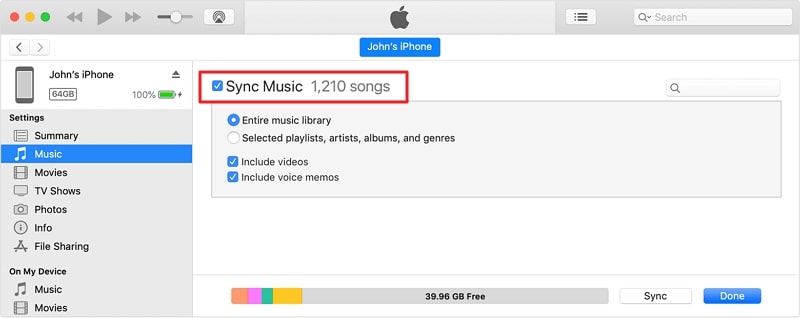
- Step 2. Once all the purchased songs are transferred, disconnect the source iPhone. Now, connect the targeted iPhone and wait for iTunes to recognize it. Then tap the “Device” icon to access the iPhone window.
- Step 3. Here, click the “Music” tab from the left side panel. Now check the “Sync Music” box and select “Entire Library” or another option depending on your choice. Finally, press “Sync” to commence the music transfer process.
Part 3: How To Transfer Music From Apple iPhone SE to iPhone via AirDrop
AirDrop provides a convenient and wireless way to transfer music between iPhones. It allows you to share songs, albums, or playlists effortlessly. You don’t need any cable or extra software to use this method. This wireless approach simplifies the process, making it an excellent choice for transferring a few tracks or albums. Follow these steps to transfer music from Apple iPhone SE to iPhone without iTunes:
- Step 1. Start by ensuring that AirDrop is enabled on both devices and its visibility is set to “Everyone.” Moreover, you also need to ensure that both Wi-Fi and Bluetooth are also enabled, as they are essential.
- Step 2. Now open the Music app and find the track you want to transfer to the other iPhone. Tap the three-dots icon and select “Share Song.” From the available options, choose “AirDrop.”
- Step 3. Among the available devices to AirDrop, select the targeted iPhone. Now, you will receive a prompt on the targeted iPhone, which you need to accept to complete the data transfer.

Part 4: How To Transfer Music From Apple iPhone SE to iPhone by Syncing Apple Music Library
Syncing your Apple Music Library across iPhones offers a smooth way to transfer music. It ensures all your favorite tracks, playlists, and albums are available on your new device. This method ensures a consistent music experience. It allows you to enjoy your favorite tunes without the need for manual transfers. Follow these steps to transfer music from iPad to iPhone Apple Music:
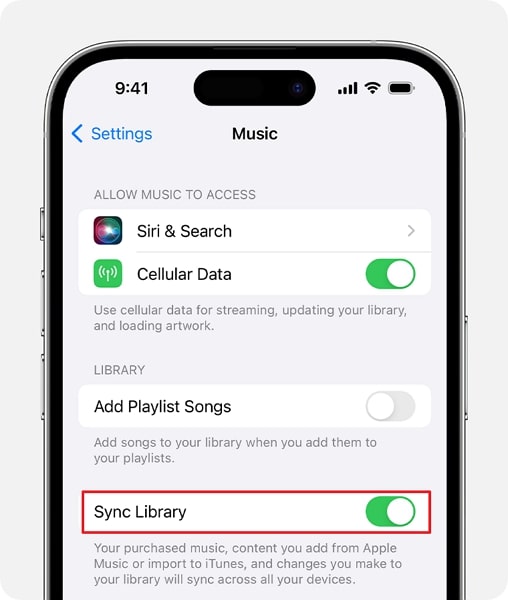
- Step 1. On both of your iPhone devices, log in using the same Apple ID. Then, move to the source iPhone and access the Apple iPhone SE device’s Settings. Here, scroll down to find and tap the “Music” option.
- Step 2. Now, move to toggle on the “Sync Library” option on the following screen. Afterward, repeat the same process on the new iPhone. Give the syncing process some time, and you will be able to access all songs on the new device.
Part 5: How To Transfer Music From Apple iPhone SE to iPhone Using Google Drive
Transferring music via Google Drive offers a convenient way to move your music collection. This allows a music exchange between iPhones without the need for cables. It’s a particularly useful method for transferring a few select songs or albums. With it, you can transfer songs that you have downloaded from the internet. The following are the steps you need to follow to transfer music from iDevices via Google Drive:
- Step 1. Once you’ve installed the Google Drive app on your iPhone, launch the app, sign in, and tap the “+” icon located at the lower right. Select “Upload” to proceed. Now, tap “Browse” and then go on to locate and select the targeted songs.
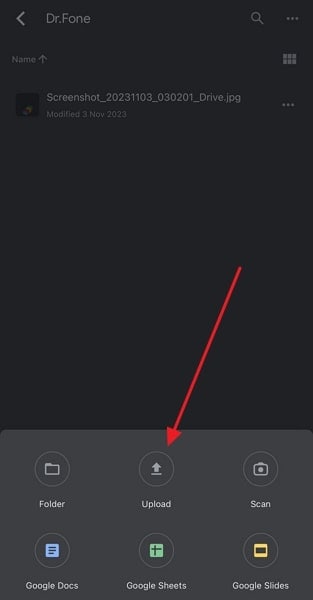
- Step 2. Once they are uploaded, move to the new iPhone and install the Google Drive app there. Here, log in using the same Google ID and access the songs you uploaded from the source device. Then tap the “Three dots” icon and select “Make available offline” to complete the process.

Part 6: How To Transfer Music Streaming Services Playlists From Apple iPhone SE to iPhone
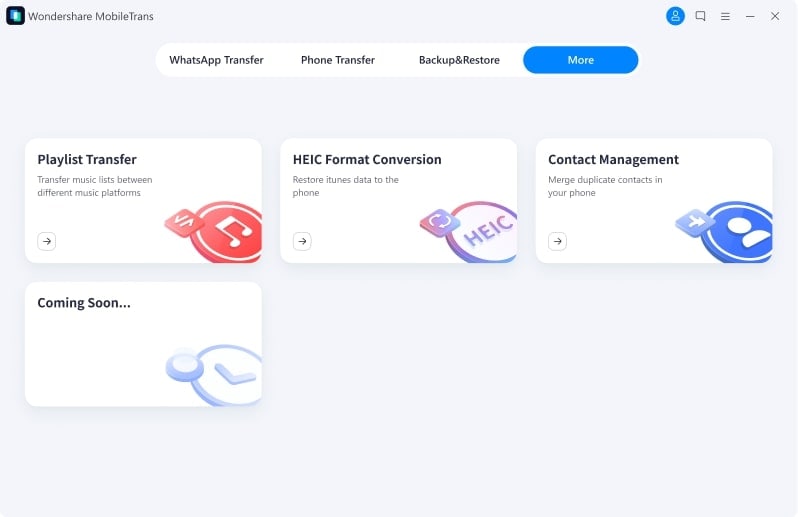
Transitioning between music streaming platforms can be challenging. However, with Wondershare MobileTrans, you can effortlessly transfer your beloved playlists. You can move your Spotify playlists to Apple Music, YouTube Music, or between various services hassle-free. Whether you’re tech-savvy or not, its user-friendly interface ensures easy operation. Additionally, it supports more platforms and is completely free to use. Here are the steps you need to follow for playlist transfer:
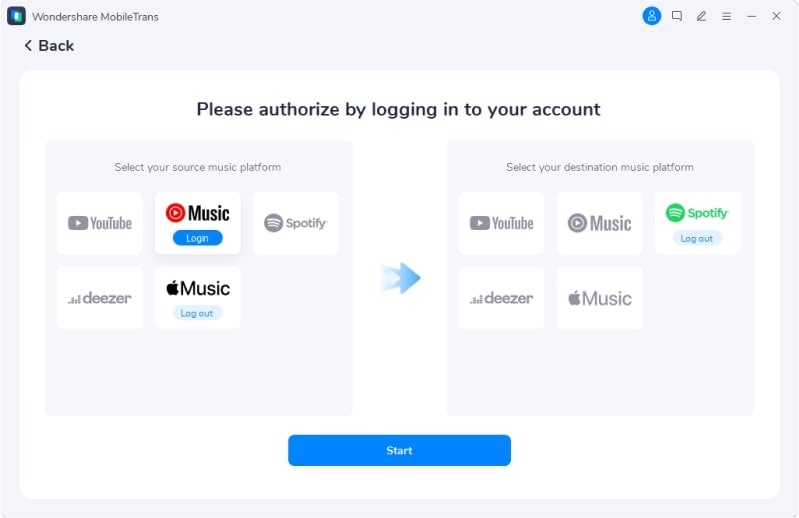
- Step 1. You start the process by installing Wondershare MobileTrans on your computer. Now, launch it and move to the “More” tab. Here, click the first option, “Playlist Transfer” to proceed.
- Step 2. On the following screen, log into both music streaming services. Once you are logged in, tap “Start” to commence the playlist transfer procedure. The time it will take depends upon the number of playlists and songs.
Conclusion
In conclusion, transferring music between iPhones is essential for preserving our musical experiences. Whether using iTunes, AirDrop, cloud services, or specialized tools, the process can be simplified. For a comprehensive and user-friendly solution, consider Wondershare Dr.Fone. Its intuitive interface and versatile functionalities streamline the music transfer process. This makes Dr.Fone an ideal choice for how to transfer music from Apple iPhone SE to iPhone.
Also read:
- [New] Ultimate Guide Top FreeFire Streams & Strategies on YouTube for 2024
- Comprehensive Guide to Perfecting FaceTime Call Screen Captures
- Expert Tips for Resolving Power Plugs Detected, Yet No Charge on Windows OS
- How to Transfer Everything from Apple iPhone 14 Pro to iPhone 8/X/11 | Dr.fone
- How To Transfer From Apple iPhone 12 to Samsung Simplified Guide | Dr.fone
- How to Transfer from Apple iPhone 14 to Samsung Galaxy S20? | Dr.fone
- In 2024, 4 Quick Ways to Transfer Contacts from Apple iPhone SE (2022) to iPhone With/Without iTunes | Dr.fone
- In 2024, Methods to Transfer from Apple iPhone 13 to Android | Dr.fone
- In 2024, Should I Switch From iPhone To Google Pixel? | Dr.fone
- In 2024, Various Methods to Transfer Pictures from Apple iPhone 13 to PC | Dr.fone
- Installing the Official Epson ES-400 Scanning Drivers for Windows Computers
- Is GSM Flasher ADB Legit? Full Review To Bypass Your Realme Narzo 60x 5G Phone FRP Lock
- Methods to Change GPS Location On ZTE Nubia Z60 Ultra | Dr.fone
- The Definitive Fix for Shell.dll Not Found or Missing Errors
- Top 6 Ways to Transfer Text Messages from OnePlus Ace 2V to Other Android Devices | Dr.fone
- Transfer your Apple iPhone SE (2022) Apps to New iPhone | Dr.fone
- Troubleshooting Windows Bar Icon Failures
- Title: How to Transfer Photos from Apple iPhone SE to other iPhone without iCloud | Dr.fone
- Author: Charlotte
- Created at : 2024-10-18 03:46:17
- Updated at : 2024-10-23 20:35:52
- Link: https://iphone-transfer.techidaily.com/how-to-transfer-photos-from-apple-iphone-se-to-other-iphone-without-icloud-drfone-by-drfone-transfer-from-ios/
- License: This work is licensed under CC BY-NC-SA 4.0.