
How To Transfer From Apple iPhone 7 to Samsung Simplified Guide | Dr.fone
How To Transfer From Apple iPhone 7 to Samsung: Simplified Guide
If you have been using your iPhone for a long time but want a change in your life, you can easily switch to other brands like Samsung. Samsung phones offer more customization options regarding the software compared to iPhones. One of the major issues iPhone users face is limited storage, which can be avoided by using Samsung.
If the only thing stopping you from switching is the stress of transferring your data, you don’t have to worry anymore. In this article, we will discover various aspects to transfer data from Apple iPhone 7 to Samsung. Different methods and prerequisites to be fulfilled will be covered ahead. Moreover, we’ll also provide you with the best one-click method for transferring your iPhone to Samsung.

Part 1: What Are the Pre-Requirements To Fulfill Before Transferring From Apple iPhone 7 to Samsung?
Before we discuss different methods to transfer data from Apple iPhone 7 to Samsung, there are some things that you should not neglect. These attributes must be fulfilled before switching to ensure a smooth transition. That’s why we want you to look at these prerequisites and fulfill them before moving to your new device. Here’s a checklist of these pre-requirements before transferring the iPhone to Samsung.
- Backup Your iPhone: First of all, you have to ensure you have backed up your iPhone before proceeding with data transfer. This step will secure your data from losing or deleting it. Moreover, you can access it from any device whenever you need to. You can perform the backup by turning on the iCloud backup option from the iPhone.
- Battery Percentage: Another critical aspect is to charge both your iPhone and Samsung device to an adequate battery level. This will prevent any interruption due to low battery during the transfer process. Also, the performance of the Apple iPhone 7 devices will be optimum at the ideal battery percentage.
- Update Software: Furthermore, you should confirm that both your iPhone and Samsung devices are running the latest operating system software. You must update your iPhone to the latest iOS version and your Samsung device to the latest Android version.
- Secure Your Data: When you are done with the transferring process, it is necessary to clear your data from the old phone. Although the iPhone is one of the most secure devices, you should reset it before leaving. This will ensure that no one can access your files after you have wiped off all your data.
Part 2: How To Transfer Data From Apple iPhone 7 to Samsung Using Smart Switch App
Samsung Smart Switch tool is designed to simplify transferring various types of data from an iPhone to a Samsung. The data includes contacts, messages, photos, videos, and more. It supports both wired and wireless transfer methods. You can connect the Apple iPhone 7 devices using a USB cable or the wireless transfer option, which is more convenient for some users.
Let’s discuss the simple steps to help you in transferring data from Apple iPhone 7 to Samsung. The steps for wireless and wired methods are different, so stay tuned ahead.
1. Wireless Method
The wireless method will free you up from the need for a cable. However, you must sync your data to iCloud before transferring your iPhone to Samsung. The steps for a wireless transfer via the Smart Switch tool are described below:
- Step 1: First, you need to sync your iOS device to iCloud. You can do this by accessing “Settings” and tapping your Apple ID. After that, select the “iCloud” option and toggle on the data you want to sync.

- Step 2: Now, move to your Samsung device and open the “Smart Switch” application. Then, tap the “Continue” option followed by the “Allow” button to accept the terms of service.

- Step 3: After that, you need to choose the “Receive Data” option and tap on “iPhone/iPad.” To do so, select “Get Data from iCloud Instead” at the bottom of the screen.

- Step 4: Subsequently, enter your “Apple ID” and “Password” and tap on the “Sign In” option. Then, verify on your iPhone by choosing the “Allow” option, and you will get a verification code.

- Step 5: Finally, you have to enter the verification code on your Samsung device and tap on the “Connect” option. After that, select the data you want to transfer and hit the “Transfer” option.

2. Wired Method
Using a USB cable is essential for this data transfer process. To ensure seamless transfer, it is advised to link both devices via Wi-Fi, especially when dealing with sizable files. A comprehensive guide on transferring data from an iPhone to a Samsung device using a USB cable is below:
- Step 1: To start with, you need to open the “Smart Switch” application on your new Samsung phone and select the “Receive Data” option. After that, tap on the “iPhone/iPad” device to connect with.

- Step 2: You have to connect both phones using the iOS device’s lightning cable and a USB-OTG adapter. A menu will pop up for the verification process, so tap the “Trust” option and enter the unlock “Code” on the iPhone.

- Step 3: After that, you have to tap the “Next” option on your Samsung device. Then, select the data you wish to transfer and press the “Transfer” option. Finally, when finished, hit the “Done” button followed by the “Go to Home Screen” button on your Samsung device and disconnect the cable.

Part 3: What Are the Disadvantages Linked With Samsung Smart Switch?
Samsung Smart Switch is an efficient and convenient software for transferring an iPhone to Samsung. However, there are certain disadvantages associated with the Smart Switch application. These limitations could be irritating and tiresome to do the transfer process. We have gathered and written below some common disadvantages linked with the Samsung Smart Switch:
- **App Data Transfer Limitation:**Smart Switch can transfer many data types and files. However, it cannot transfer all the applications and their data from an iPhone to a Samsung device. Smart Switch does not support some apps. In other scenarios, the data present in the apps can show resistance to transfer due to platform differences.
- **Glitches:**Glitches during the transfer process can occur for various reasons, such as Wi-Fi connectivity issues or other potential factors. The important point is that the Smart Switch app can face interruptions mid-transfer. These interruptions could result in data loss or malfunctions in the receiving phone.
- **Speed Issues:**The transfer speed of the Smart Switch application is quite impressive. Despite that, using the wireless option requires keeping the two phones in close surroundings for optimal speed. If the phones are farther apart, the transfer speed significantly decreases.
- **File Format Compatibility:**Samsung Smar Switch does not fully support certain file formats or data types. When transferred to the Samsung device, these formats will require some additional steps for proper compatibility. This could affect multimedia files, documents, or specific file types.
Part 4: The Best One-Click Alternative to Samsung Smart Switch for Transferring iPhone to Samsung
We have described the methods to transfer from Apple iPhone 7 to Samsung via the Samsung Smart Switch application. Despite that, some limitations can hinder your process. That’s why we will provide you with the best one-click solution: Wondershare Dr.Fone . This software will transfer data from Apple iPhone 7 to Samsung within no time.
Dr.Fone is equipped with advanced tools that can understand the requirements and perform the task automatically. It assists in transferring, managing, and backing up data across devices. Ultimately, the software provides comprehensive solutions for your needs.
Method 1: Transfer iPhone Data to Samsung
The Phone Transfer feature in Wondershare Dr.Fone allows you to copy data effortlessly from one phone to another using a single click. You can transfer various data types such as contacts, SMS, photos, videos, music, and more. This transfer can even be between devices operating on different systems like iOS and Android. Also, the tool is compatible with Android 14 (Win) and the latest iOS 17, which ensures smooth functionality.
The straightforward process requires simple clicks to initiate and complete the transfer from Apple iPhone 7 to Samsung. We have described the whole method step-wise below for your convenience:
- Step 1: Activate the Phone Transfer Tool in Dr.Fone
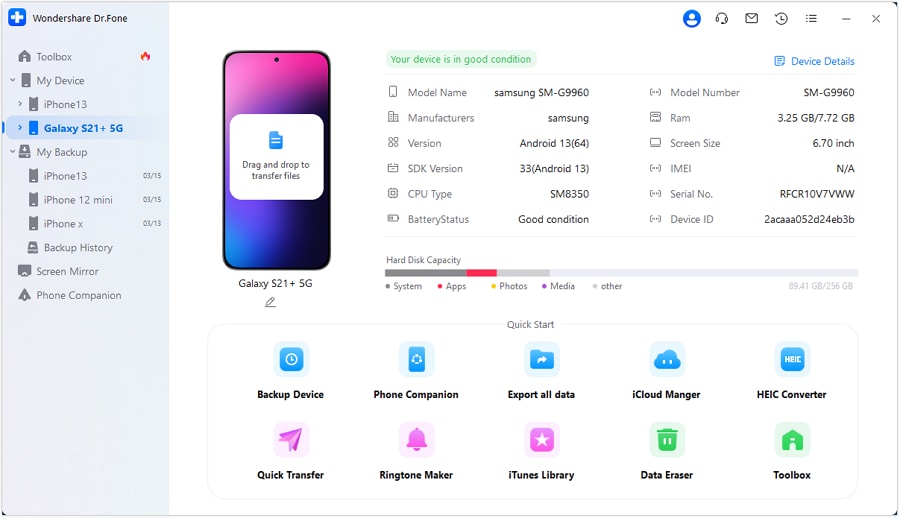
To start with, you need to launch the Wondershare Dr.Fone toolkit on your Windows PC or MacBook. Then, access the “Phone Transfer” tool from the left side via the “Toolbox” tab and connect your iPhone and Samsung devices.

- Step 2: Select the “Source” and “Destination” Devices
In the next step, the software will detect the connected iPhone and Samsung devices. You have to choose the “Source” and “Destination” devices to associate the path of transfer. You can also use the “Flip” button if the direction is the other way around.

- Step 3: Select the Data Types and Start the Transfer Process
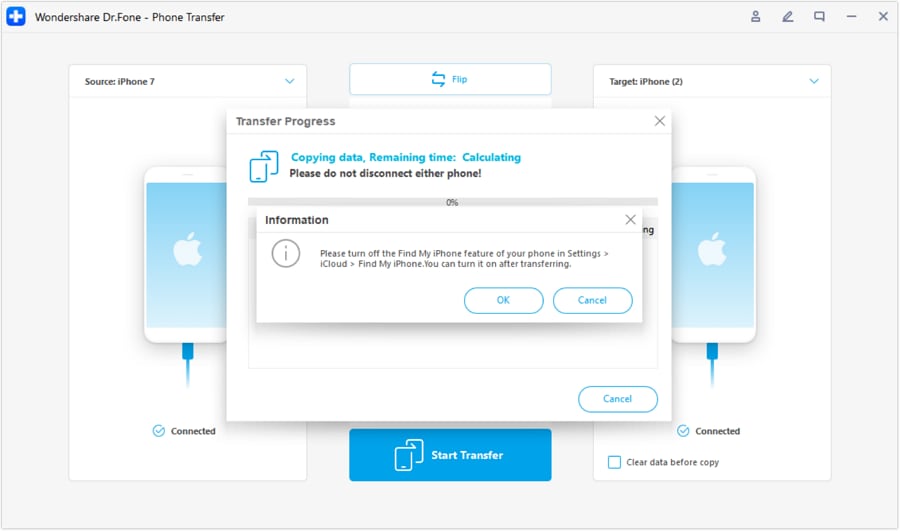
Now, you have to choose the specific data types for transfer by marking the relevant categories. After that, initiate the process by tapping the “Start Transfer” button. Also, you need to turn off the iCloud syncing when a prompt appears on Wondershare Dr.Fone. You can do this in the “Profile” settings on your iPhone.

- Step 4: Conclude the iPhone to Samsung Transfer Process
Finally, the progress bar will appear before you, where you can observe the process. Hit the “OK” button after the successful completion of the process. Then, you can verify your data from your new Samsung device.

Method 2: Transfer iTunes Data to Samsung
If you have backed up your iPhone data in iTunes, you can restore it to your Samsung device. The “Phone Manager” feature in Dr.Fone allows you to restore iTunes data on your Apple iPhone 7. This tool can transfer media files, social data, mobile apps, contacts, and more. Let’s explore the steps involved in transferring data from an iPhone to a Samsung device using iTunes:
Step 1: Activate Dr.Fone and Connect Samsung Device
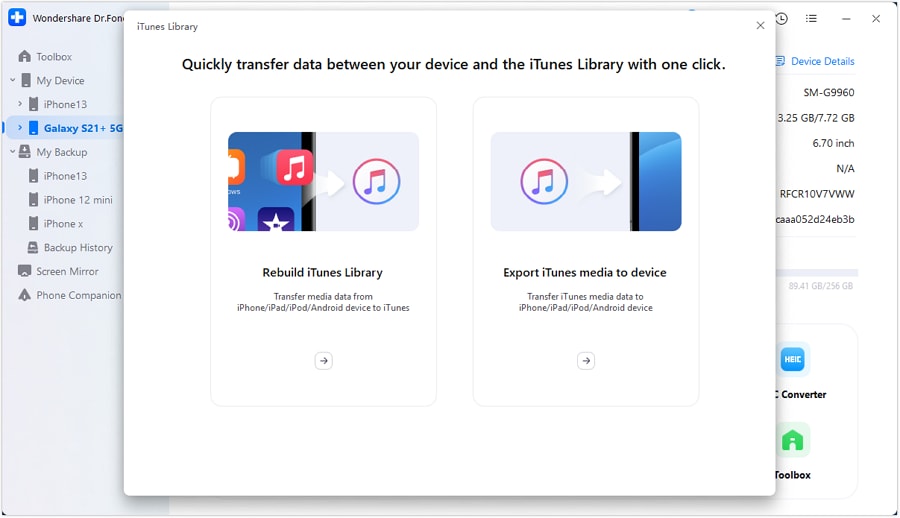
First, access the Wondershare Dr.Fone software and connect your Samsung device to your system. The device will appear on the left side that you will select to access the homepage. There, choose the “iTunes Library” option to proceed further.
- Step 2: Select and Export the Specific File Types
The new window will open, and you must select the “Export iTunes Media to Device” option. This will enable the transfer of iTunes media to your Apple iPhone 7. After that, you need to checkmark the file types to transfer and hit the “Transfer” button.
Step 3: End the Transfer Process
Finally, monitor the progress bar displayed in the subsequent window to track the completion of the transfer. Then, click “OK” to confirm the successful transfer from iTunes to your Apple iPhone 7.
Method 3: Transfer iCloud Data to Samsung
iCloud serves as a highly convenient method to back up iOS devices. However, restoring an iCloud backup to Android devices is not as simple. iCloud only allows restoring the entire backup to iOS device setup, and it doesn’t support restoring backups to Android devices. The iCloud Manager feature in Wondershare Dr.Fone offers a solution to address this limitation.
It allows selective content restoration from iCloud backups to Samsung devices without alteration. Learn how to transfer from Apple iPhone 7 to Samsung via iCloud backup data with the help of the following steps:
- Step 1: Access Wondershare Dr.Fone and Plugin Samsung Device
To begin with, open the Wondershare Dr.Fone software on your system and connect your Samsung device to it. Then, access your device on the software from the left side and select the “iCloud Manager” option within the home screen. You have to fill in those credentials to sign into your iCloud account.
- Step 2: Select the Data Files and Start Restoration
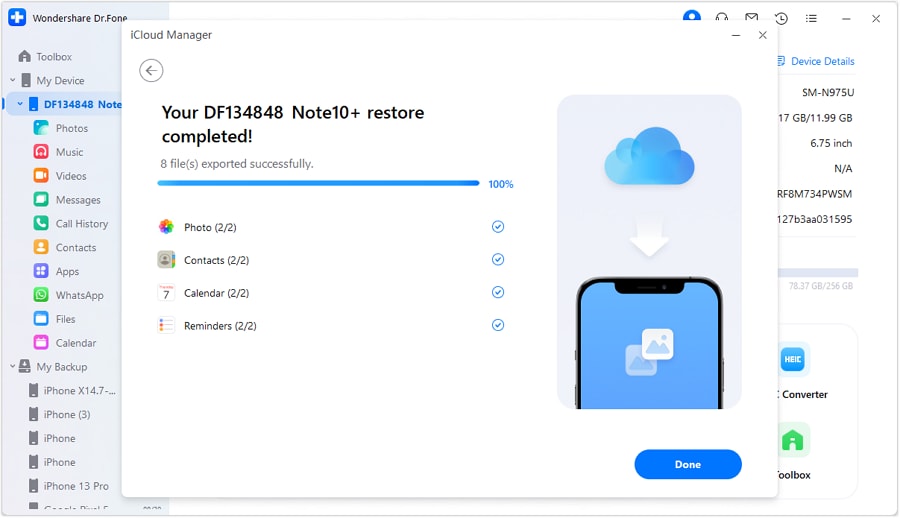
In the next step, you have to select the data type from your iCloud backed-up data. Then, hit the “Restore to Device” button and the “Start” button to start the restoration process. The progress bar will appear and display the progress of the restoration of iCloud data to Samsung devices.

- Step 3: Finish the Data Restoration Process on Your Samsung Device
The process will conclude within a few minutes and display the final message of completion. Then, you can press the “Done” button to conclude the iCloud to Samsung data transfer process.
Bonus Tip. What Are the Most Recommended Upcoming Smartphones of Samsung in 2024?
Samsung is planning to add generative AI to its new products, and they will possibly share more details next year. They’ve introduced their generative AI and given hints regarding Galaxy AI’s role in their 2024 phones. It’s a major competitor and other big names in the mobile market. We’re expecting the following mobile products from Samsung next year based on their usual launch cycle and reports.
1. Galaxy S24 Series
The projected launch timeline for the Galaxy S24 series is early 2024. Artificial intelligence will likely take the main area for the Galaxy S24. Samsung’s Gauss generative AI model, similar to ChatGPT, can compose emails, summarize documents, and help in coding. Additionally, the Galaxy AI is anticipated to facilitate call translations.
Moreover, Samsung’s Exynos 2400 processor guarantees a significant AI performance boost, enabling text-to-image AI generation. AI enhancements, such as Samsung’s Zoom Anywhere feature, will notably impact the camera. This feature, probably in Galaxy S24 Ultra, will enable 4x zoom for moving objects.
2. Galaxy Z Flip 6
The rumored Galaxy Z Flip 6 expects to overcome the Z Flip 5 by introducing a new processor and more software features. These software features will benefit its foldable design. Also, the reports suggest a 50-megapixel primary camera sensor for the Z Flip 6. There is also the possibility of AI capabilities similar to those of the Galaxy S24 series. Samsung normally unveils new Galaxy Z Flip phones around August.
3. Galaxy Z Fold 6
Samsung’s Galaxy Z Fold is very similar to the Z Flip. This phone will probably have a slot for the S Pen stylus that will boost its productivity. Also, the Z Fold 6 might come with a new processor similar to the one in the Galaxy S24. Some fresh software features and slight design enhancements might be added, too.
4. Galaxy A55 5G
Samsung usually unveils new Galaxy A phone versions in March. Samsung’s Galaxy A series phones offer impressive features like multi-lens cameras and high-refresh-rate screens at more affordable prices. However, they often compromise on performance and camera quality. Also, it’s unlikely that the Galaxy A55 will use the same chip as the Galaxy S24 series.
Samsung’s Galaxy A phones usually have a slightly less powerful processor than their flagship counterparts. For instance, the Galaxy A54 uses the Exynos 1380 processor, which falls behind Qualcomm’s Snapdragon 8 series.
Conclusion
In a nutshell, the Samsung Smart Switch application provides an efficient and convenient method to transfer from Apple iPhone 7 to Samsung. However, it comes with certain disadvantages and limitations that have been faced by many users. We have provided you with a more effective and powerful solution: Wondershare Dr.Fone. This tool will assist you in transferring your iPhone to Samsung with just one click. Plus, you learned about the latest Samsung devices in this article.
[Solved] How To Transfer From Apple iPhone 7 to iPhone 15
Transitioning to a new iPhone is undoubtedly thrilling. Yet, the process of migrating your data from one iOS device to another can appear overwhelming. With every iPhone model update, Apple unveils new features and functionalities. It can potentially complicate the transfer procedure. In this extensive guide, we’ll simplify the process of how to transfer data from Apple iPhone 7 to iPhone.
We’ll offer detailed, step-by-step guidance and explore many methods to ensure an efficient transition. By the end of this guide, you’ll possess the necessary know-how to effortlessly transfer your valuable data.
Part 1. How To Transfer Data From Apple iPhone 7 to iPhone With Apple’s Built-In Methods
Moving data from one iPhone to another can be easier using Apple’s tools. These features are already on your iPhone and make it simple and reliable to transfer your data. Given below are the three built-in solutions from Apple for how to transfer data from Apple iPhone 7 to iPhone:
Method 1. Quick Start
The Quick Start feature from Apple offers a way to transfer data from your previous iPhone to a new device without any hassle. This method utilizes a direct wireless connection between the Apple iPhone 7 devices. That makes the transition swift and efficient. Follow these steps to transfer data from Apple iPhone 7 to iPhone using Quick Start:
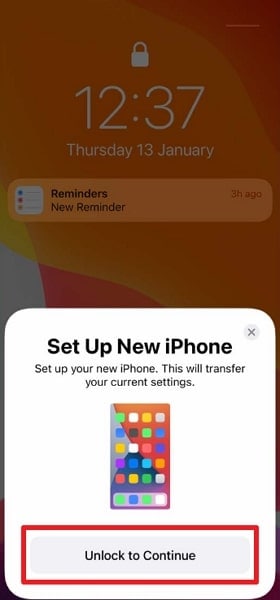
Step 1. Begin by turning on your new iPhone and placing it beside your old iPhone. When the “Set Up New iPhone” prompt appears, tap “Unlock to Continue.” This process will use the Apple ID associated with your old phone, so tap “Continue” if you’re comfortable with that.

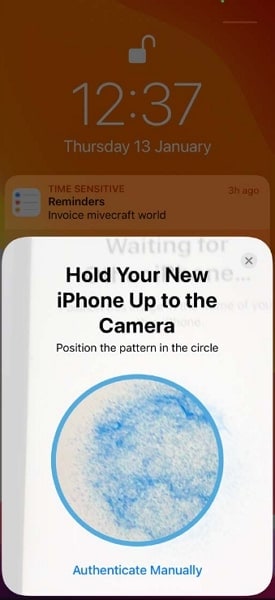
Step 2. An animation will appear on the new iPhone’s screen, and you have to hold this animation up to the camera on your old iPhone. Once the message “Finish on New [Device]“ appears, input your old iPhone’s passcode into the new one and follow the provided setup instructions.
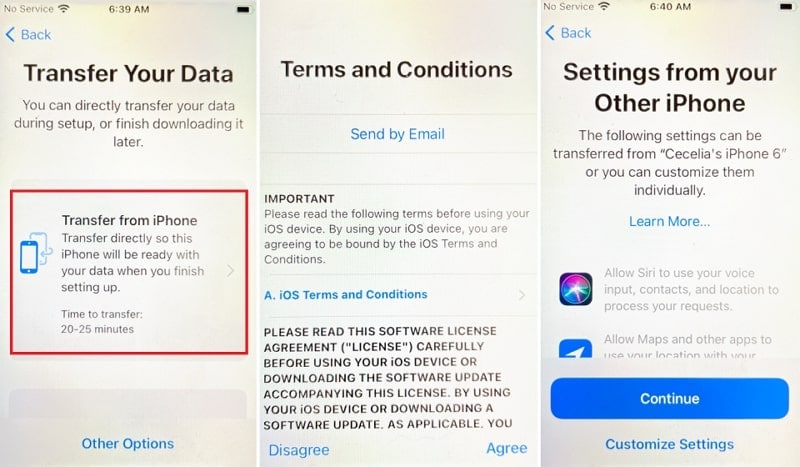
Step 3. When you reach the “Transfer Your Data” screen, opt for “Transfer Directly from iPhone” and confirm the specific settings and data you wish to transfer. This streamlined process ensures a smooth transition to your new device while maintaining the data you want.
Method 2. iTunes/Finder
Another reliable method to transfer data between iPhones is using iTunes/Finder. iTunes is available for Windows or macOS versions before Catalina. The users on macOS Catalina and later versions can use Finder to transfer data. This method allows you to create a backup of your old iPhone and restore that backup to your new device. Here is **how to transfer data to the new iPhone** via iTunes/Finder:
Using iTunes (For Windows or macOS Versions Prior to Catalina)
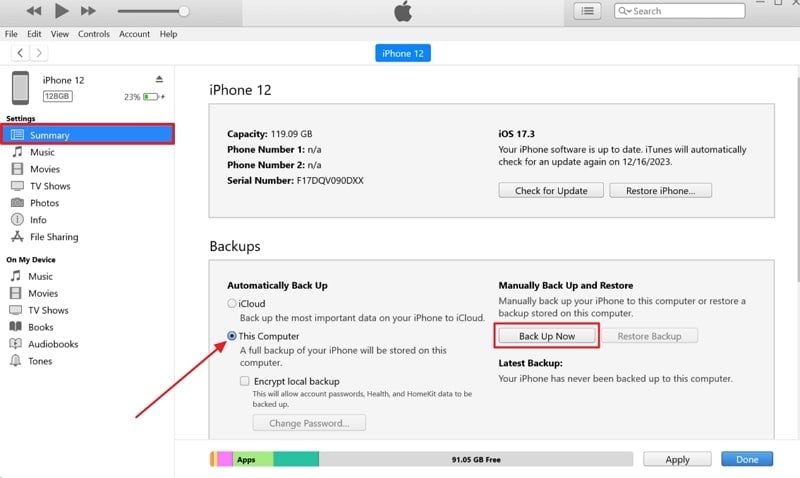
Step 1. Initiate by connecting your old iPhone to your computer and launching the latest version of iTunes. Once your device is detected by iTunes, click the Apple iPhone 7 device icon to access the “Summary” tab. Here, move to the “Backups” section and click “Back Up Now” to start creating the backup. Before pressing “Back Up Now,” ensure that “This Computer” is selected as a backup location.
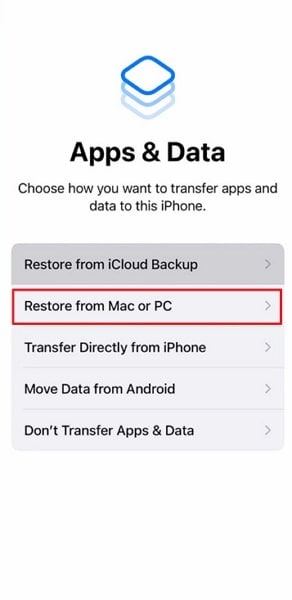
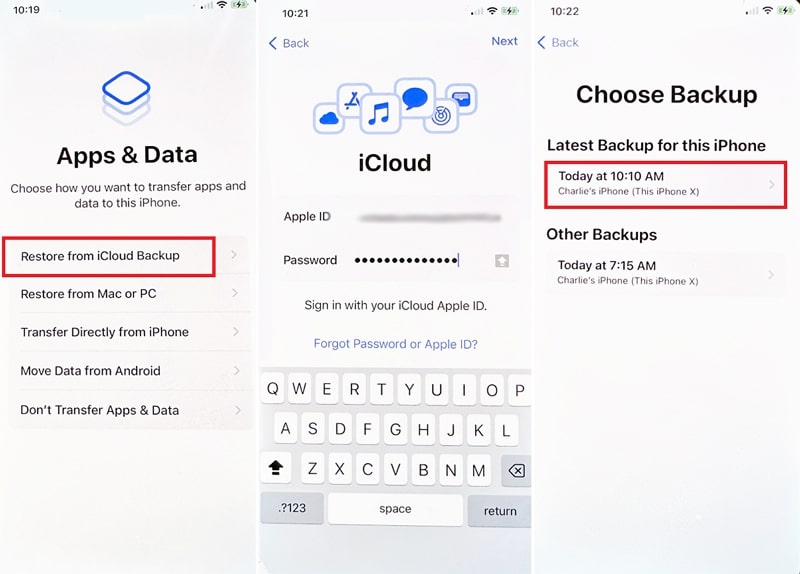
Step 2. Once the backup is completed, disconnect the old device and start setting up the new one. When you reach the “Apps & Data” screen, select “Restore from Mac or PC,” and connect to the computer with iTunes.
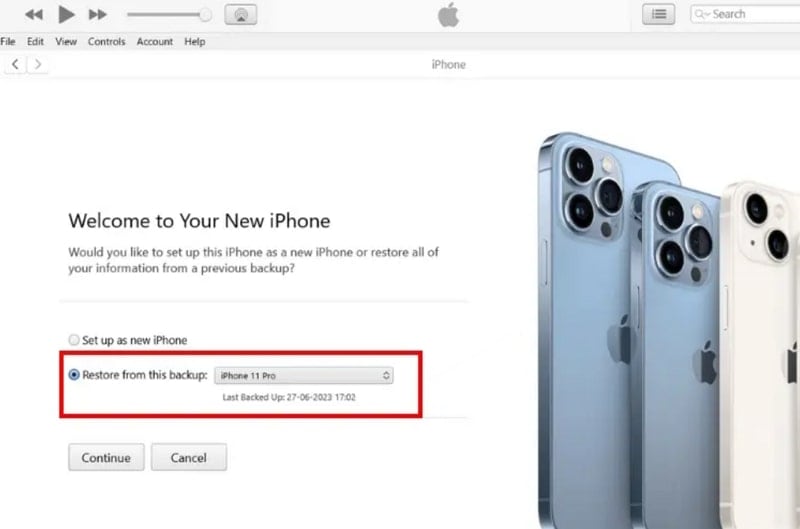
Step 3. Click the “Device” icon in iTunes when it loads the new iPhone, and you will come across the “Welcome to Your New iPhone” screen. Here, select “Restore from this Backup,” select the targeted backup, and click “Continue.” It will commence the backup restoration process, which takes some time, depending on the backup size.

Using Finder (On macOS Catalina and Later Versions)
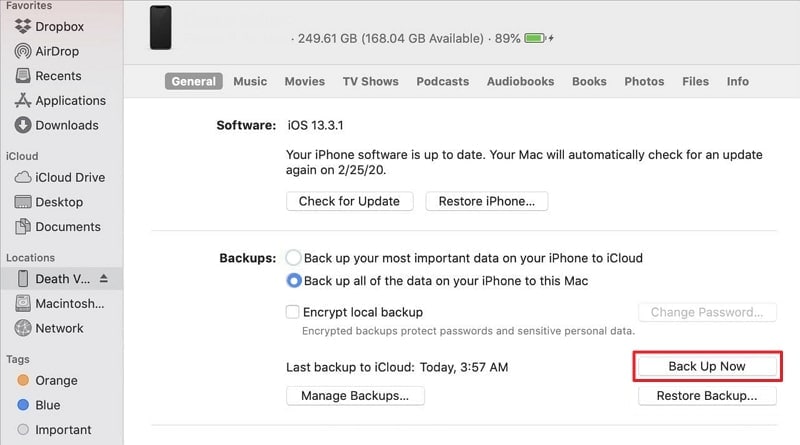
- Step 1. To start, use a USB cable to connect your old iPhone to your Mac and open Finder. In Finder, select your iPhone under the “Locations” section. Click “Back Up Now” to create a backup of your old iPhone on your Mac. Ensure that the “Back up all of the data on your iPhone to this Mac” box is checked, and when the process is completed, unplug the old device.
- Step 2. Now connect the new iPhone with “Restore from Mac or PC” selected from the “Apps & Data” screen. Choose your device in Finder and click “Restore Backup.” Then, select the targeted backup and wait for the backup restoration process to complete.
Method 3. iCloud Backup
Utilizing iCloud Backup offers a streamlined and wireless approach for transferring data. This method empowers you to generate a backup of your previous iPhone on iCloud. Afterward, it enables you to restore that backup to your new device.

Leveraging iCloud Backup facilitates the transfer of various data types. These include photos, videos, app data, settings, and more. The steps to **transfer data from Apple iPhone 7 to new iPhone** via iCloud Backup are these:
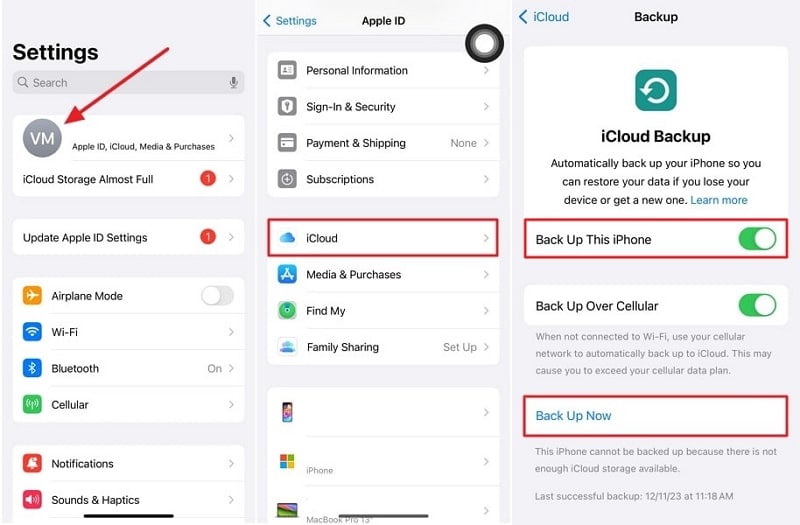
Step 1. Confirm that your former iPhone is connected to a reliable Wi-Fi network. Then, access the Settings app on your previous iPhone and tap your name, which is located at the top of the screen. Select “iCloud” and proceed to choose “iCloud Backup.” Ensure the “iCloud Backup” option is activated if it’s not switched on. Finally, click “Back Up Now” and wait for the backup process to finalize.
Step 2. Turn on your newly obtained iPhone and follow the initial setup instructions until you reach the “Apps & Data” display. Once there, select “Restore from iCloud Backup” and sign into your iCloud account. Ensure it is the same Apple ID you utilized to back up your previous iPhone. Afterward, select the latest backup of your previous iPhone and follow the on-screen instructions to complete the process.
Part 2. What Are the Drawbacks of Using Official Methods for Transferring Data From Apple iPhone 7 to iPhone
Apple’s official methods to transfer data from Apple iPhone 7 to iPhone offer convenience and reliability. Nevertheless, they do possess specific limitations and disadvantages. Users should consider these limitations to make a well-informed choice. It will help you find the most fitting approach for their requirements. Here are some of the downsides and constraints associated with Apple’s official methods:
1. Entire Devices Backups
A major drawback of using methods like Quick Start, iTunes, and iCloud is that they restore the entire device’s data. Users cannot selectively transfer data using any of these three methods.
2. iPhone Setup Requirement
The transfer methods like iCloud and Quick Start can only be employed when setting up a new iOS device. For old devices, you must factory reset the Apple iPhone 7 device for these methods to work.
3. Internet Dependency
Restoring iCloud Backup on your new iPhone requires a stable and relatively fast internet connection. This can be a limitation in areas with poor connectivity or limited data plans. If the internet is unstable, it could lead to issues during the iCloud backup restoration.
4. Limited Storage on iCloud
iCloud offers 5 GB of free storage, which might not be sufficient for users with large amounts of data. Users might need to buy more iCloud storage to accommodate their backups, incurring extra costs.
5. Compatibility Issues
Older iPhone models might not support the latest iOS versions or certain features. It leads to compatibility issues when transferring data between devices. This is a prominent issue when dealing with different iOS versions.
Part 3. One-Click Alternative to Official Methods To Transfer Data From Apple iPhone 7 to iPhone
Seeking an efficient, all-in-one solution that bypasses the limitations of Apple’s official methods? Wondershare Dr.Fone stands out as a comprehensive alternative. It offers a one-click approach to transferring data between iPhones of various models. This toolkit streamlines the process without relying on iCloud or iTunes/Finder. Dr.Fone also provides a user-friendly interface that simplifies the transfer process.
Its intuitive design allows users to transfer data between iPhones effortlessly. Unlike Apple’s native methods, Dr.Fone enables the transfer of over 15 types of data. This includes contacts, messages, photos, videos, music, call logs, apps, and more. It supports transferring data between different iOS versions and iPhone models.
Key Features of Wondershare Dr.Fone
- Beyond direct transfers, Wondershare Dr.Fone offers backup and restore functionalities.
- Fone – Phone Transfer is compatible with over 8000 devices from various brands.
- This tool enables swift data transfer between phones in under 3 minutes.
Steps to Transfer Data from Apple iPhone 7 to iPhone via Wondershare Dr.Fone
Dr.Fone supports effortless data transfer across devices and platforms. This is how to transfer data from Apple iPhone 7 to iPhone via Wondershare Dr.Fone:
- Step 1. Access Phone Transfer and Connect iOS Devices
Launch Wondershare Dr.Fone after installing it and access the “Toolbox” tab. Here, click “Phone Transfer” and connect both of your iOS devices to the computer. Once they are detected by Dr.Fone, move to assign them to the correct positions.
- Step 2. Pick Source and Destination Positions
Your old iPhone from which you are transferring data will be the “Source” device. Similarly, your new iPhone to which you want to move data will be in the “Destination” position. In case positions are wrong, use the “Flip” button to interchange the positions.

- Step 3. Start and Complete the Data Transfer Process
The last part includes selecting the data you want to transfer. You can select the data within the transfer screen and, upon making your choices, proceed by clicking “Start Transfer.” It’s important to note that during this process, you’ll need to deactivate the “Find My” feature on iOS devices. When done, the data process will commence automatically.
Bonus Tip. Want To Buy a New iPhone? Tips and Tricks To Select the Best iPhone for Your Use
Choosing the right iPhone involves considering various factors. Ensuring alignment with your preferences, needs, and budget is crucial. It requires evaluation of these aspects and conducting comprehensive research. This will enable you to confidently make a knowledgeable choice. Below, discover some helpful tips and tricks to aid in choosing the ideal iPhone:
1. Identify Your Priorities
Determine what matters most to you in an iPhone model. Are you more focused on camera quality, battery life, processers, or other features? Gaining clarity on your priorities will assist in focusing your choices.
2. Consider the Latest Models
Apple releases new iPhone models annually. Consider the latest offerings, as they often feature upgraded hardware. This includes improved cameras, better battery life, and new features.
3. Budget Consideration
Set a budget range for your new iPhone. Apple provides a range of models available at diverse price tiers. These range from flagship iPhones to more budget-friendly options. Consider your budget while weighing the features you need.
4. Size and Display Preferences
iPhones come in different sizes, from compact models like the iPhone 15 to larger models like the iPhone 15 Pro Max. Consider the screen size of your iPhone that suits your preferences. It also depends on if you prefer a more pocket-friendly device or a larger display.
5. Camera Capabilities
If photography holds significance for you, examine the camera capabilities. Seek out attributes such as multiple lenses, improved low-light performance, and advanced camera functionalities.
6. Consider Future Updates and Longevity
Opt for the latest Apple device, as the company provides software updates for its products over an extended period. Selecting a model with longer update support ensures that your device stays compatible with the latest software and features.
Conclusion
In conclusion, knowing how to transfer data from Apple iPhone 7 to iPhone is crucial for a smooth transition. While Apple’s native methods offer reliability, limitations exist. For an efficient, one-click alternative, Wondershare Dr.Fone stands out. Its comprehensive device-to-device transfer and versatile features make it the ideal choice. Embrace Dr.Fone for a hassle-free iPhone data transfer experience. Moreover, you can transfer between iOS devices without erasing the current data.
How to Transfer Everything from Apple iPhone 7 to iPhone
Well, you all know already from experience that transferring to an iPhone device from an Android phone is an uphill task, especially if you have no idea about the right way or the tool you should use. Transferring photos from one device to another one, should be done extra care as you wouldn’t want to lose your beloved memories, right?
Therefore, to transfer photos from Android to iPhone, such as iPhone 15, you will need third-party software, which is easy to access the application as well. Now, both Android and iPhone devices have different operating systems, which make it impossible to do direct transfers.
However, fortunately, there are plenty of high-quality third-party programs that can help you enable Android to iPhone photo transfer. So, start reading the guide below and choose the option that best suits you.
Part 1: How to transfer photos from Android to iPhone including iPhone 15/15 Pro(Max) with Dr.Fone?
If you are confused over which method you should choose for transferring photos from Android to iPhone, then compare the quality and the quickness of the chosen method. Well, to be frank, the tool that qualifies all these criteria is the Dr.Fone toolkit, which is a comprehensive solution that is well designed to tackle all mobile-related issues and tasks.
Dr.Fone is perfect because you can transfer across multiple devices regardless of OS. As an example, if you want to transfer photos from Android to iPad /iPhone and vice versa, it can be done easily by following two ways as mentioned below:
Method 1.1 One-click to Transfer Photos from Android to iPhone using Dr.Fone - Phone Transfer
Dr.Fone - Phone Transfer is a software package that facilitates cross-device transactions such as transferring photos from Android to iPhone. If you are in the process of replacing your Android with a new iPhone, then use Dr.Fone to transfer all contents to the new phone. The content can include photos, contacts, videos, and social media messages.
Dr.Fone - Phone Transfer
Transfer Data from Android to iPhone in 1 Click Directly!
- Cross-platform data shift between any device of your choice from Android and iPhone.
- Support massive data, including images, videos, music, messages, contacts, apps, and more.
- Works perfectly with almost mobile phones and tablets, such as iPhone, iPad, Samsung, Huawei, etc.
- Fully work with mobile system iOS 17 and Android 13 and computer system Windows 10 and Mac 14.
- 100% safe and risk-free, backup & restore data as the original.
3981454 people have downloaded it
Let us see the steps on how to transfer photos from Android to iPhone using Dr.Fone - Phone Transfer.
Step 1. Download and install Dr.Fone - Phone Transfer and launch it. Then select the Switch option from the main interface.
Step 2. Now, connect your Android and iPhone to the computer.
Step 3. As soon as you connect the Apple iPhone 7 device, it will start recognizing it and mentioned it as the ‘Source’ phone or ‘Destination’ phone accordingly. In this case, make sure the Android phone is the Source, and the iPhone is the Destination. You can change their position using the Flip button.
Step 4. Finally, select the files you want to transfer (photos) and click on ‘Start Transfer’.

That was it. Soon, it will transfer pictures from Android to iPhone.
Method 1.2 Selectively Transfer photos from Android to iPhone using Dr.Fone - Phone Manager (Android)
Another way that can assist you in moving photos from Android to iPhone is the Dr.Fone - Phone Manager (Android) . What is incredibly convenient about Dr.Fone - Phone Manager (Android) is its ability to transfer photos selectively. You can also use it to transfer contacts, videos, messages, podcasts, and anything else stored on your Android in minutes. Dr.Fone - Phone Manager (Android) is a secure, trustworthy program. Hence you can be reassured that your information will be kept safe while transferring from one device to another.
Dr.Fone - Phone Manager (Android)
All in one Solution to Transfer Photos from Android to iPhone
- Transfer, backup, edit, export, import & view the data on your phone easily.
- Support multiple data on your phone: music, photos, videos, contacts, SMS, Apps, etc.
- Copy data from one phone to another phone without any data loss.
- Additional features to help you root your device, make gif image, and ringtone.
- Compatible with more than 3,000 Android phones ranging from Samsung to LG, HTC, Huawei, Motorola, Sony, etc.
3981454 people have downloaded it
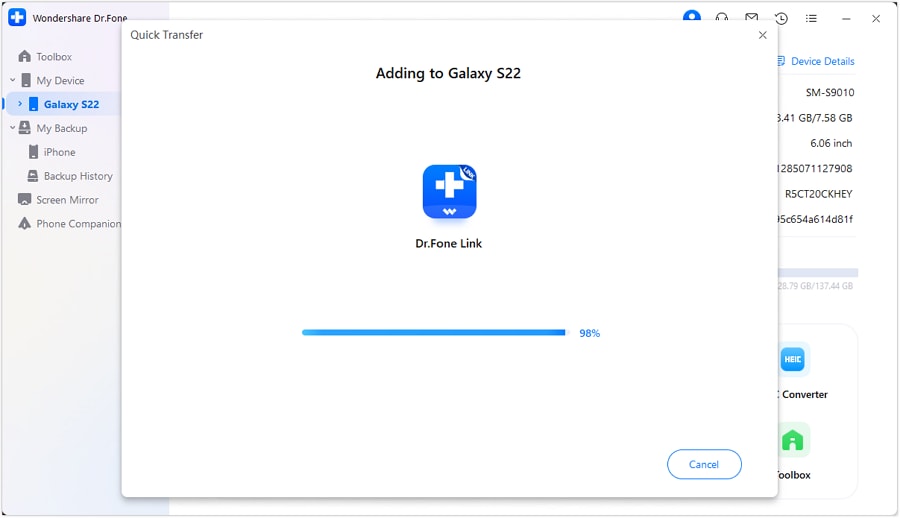
Here either you can select the photos that you wish to transfer selectively or select all the photos at once. Now, as you wish to transfer photos to an iPhone device, connect your iPhone as the Target phone and then click on the box with the export symbol > Select Export to Device. The name of your iOS device should appear. Click on the Apple iPhone 7 device to start transferring photos.
Part 2: Transfer photos from Android to iPhone including iPhone 15/15 Pro(Max) using Move to iOS App?
Now, to answer how to transfer photos from Android to iPhone, there is another simple solution that you can make use of. It is called the “Move to iOS app,” which you can download freely from the Google Play store.
Note: This solution only works when you set up the iPhone. If the iPhone is already set up, you need to factory reset it and set it up to restore photos with this App.
Now to proceed, first of all, you need to do some settings on your iPhone device as follows:
On your iPhone, go to a screen called ‘Apps & Data’ > choose ‘Move Data from Android’ option.


The next step is to take your Apple iPhone 7 to complete the transfer process with the “Move to iOS” app.
- Switch to your Apple iPhone 7, open Google Play Store, and search for ‘Move to iOS’ app.
- Open the ‘Move to iOS’ app to accept permission requests, install it, and open the app.
- At this point, tap Continue on both your iOS and Android device.

- On your Apple iPhone 7, enter the 12-digit code of the iPhone. This is so that the ‘Move to iOS’ app knows which iOS device it has to transfer the data to.

Before the transfer starts, you will be asked a number of questions, like do you want to transfer Google Account information, Bookmarks, etc. Now, since you only want videos and photos, deselect the other options except ‘Camera Roll’
The above process to transfer pictures from Android to iPhone is good for mobile users who are unwilling to invest money in software. However, the method is not perfect because it is time-consuming. The transaction can neither be done quickly nor can it be done with a single click.
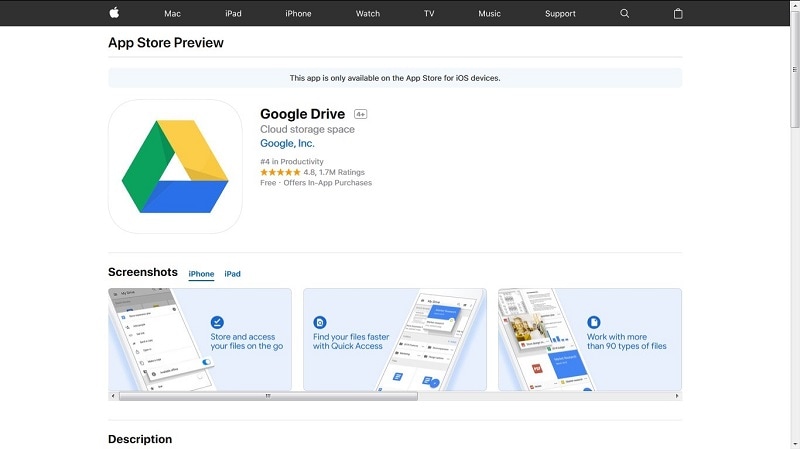
Part 3: How to transfer photos from Android to iPhone using Google Drive?
Google Drive is cloud storage that is available to those who have a Gmail address. It can store anything ranging from Word Documents to photos and videos. Hence, if you are wondering how to move photos from Android to iPhone, then Google Drive is your answer.
To go with the transfer of photos and videos from Android to iPhone with Google Drive, follow the steps outlined below:
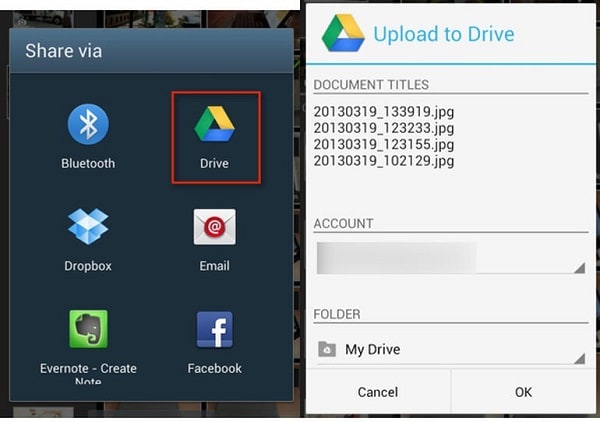
- First, make sure Google Drive is already installed on the Android device. If not, visit the Play Store to download Google drive. Then, on your Apple iPhone 7, visit the Gallery section> select the images> tap on Share button> and finally choose Share via Drive.
- Soon the file will get uploaded.
- Now, move to your iPhone.
- Here, download and install the Google Drive app onto your iPhone.
- Open the Drive (you must log in with the same Google ID). There you will see all the uploaded media files (Photos). Now, select ‘Save Image’ or ‘Save Video’ depending on your file type.
Part 4: Top 3 Android to iPhone photo transfer Apps
There are several apps that are specifically designed for storing and transferring images from an Android device to an iPhone. We have found the three best apps based on ease of use and accessibility.
PhotoSync
PhotoSync is a free photo-sharing app available on both Android and iOS devices. The app lets you store all your photos on one device and then transfer it to another device through Wi-Fi. PhotoSync is designed to work with several devices besides Android and iOS devices. It works on different platforms, including desktop computers, NAS, and Cloud Services.
You can extract videos and photos directly from the camera and transfer them to another device. You can even access the photos/videos via a web browser. PhotoSync is regularly updated with features to make the experience better support for RAW files and preserves for EXIF-data.
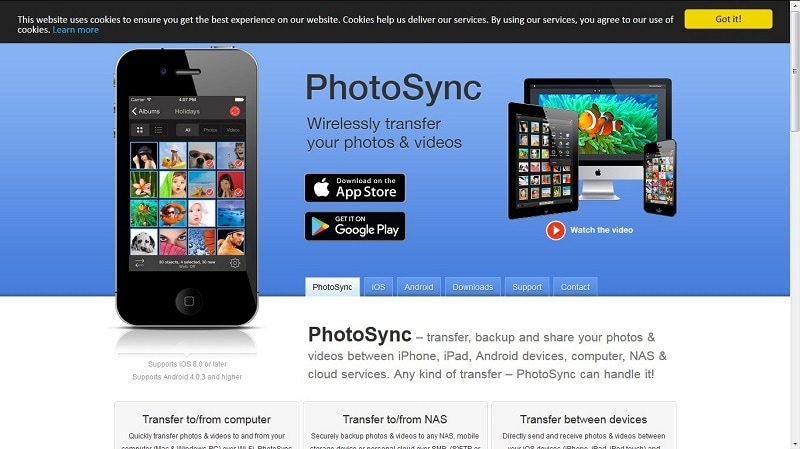
Photo Transfer
The photo transfer app is an incredibly popular app and with a good reason. You can perform Android to iPhone photo transfer without any cables. You can access Photo Transfer on different platforms, including desktop computers. It allows you to access your photos stored on the app via a web browser. You can easily download multiple photos for storage and exchange these photos across multiple platforms. If you are in need of an intuitive, easy to use app transfer photos to iPhone from Android, then consider using the Photo Transfer app.

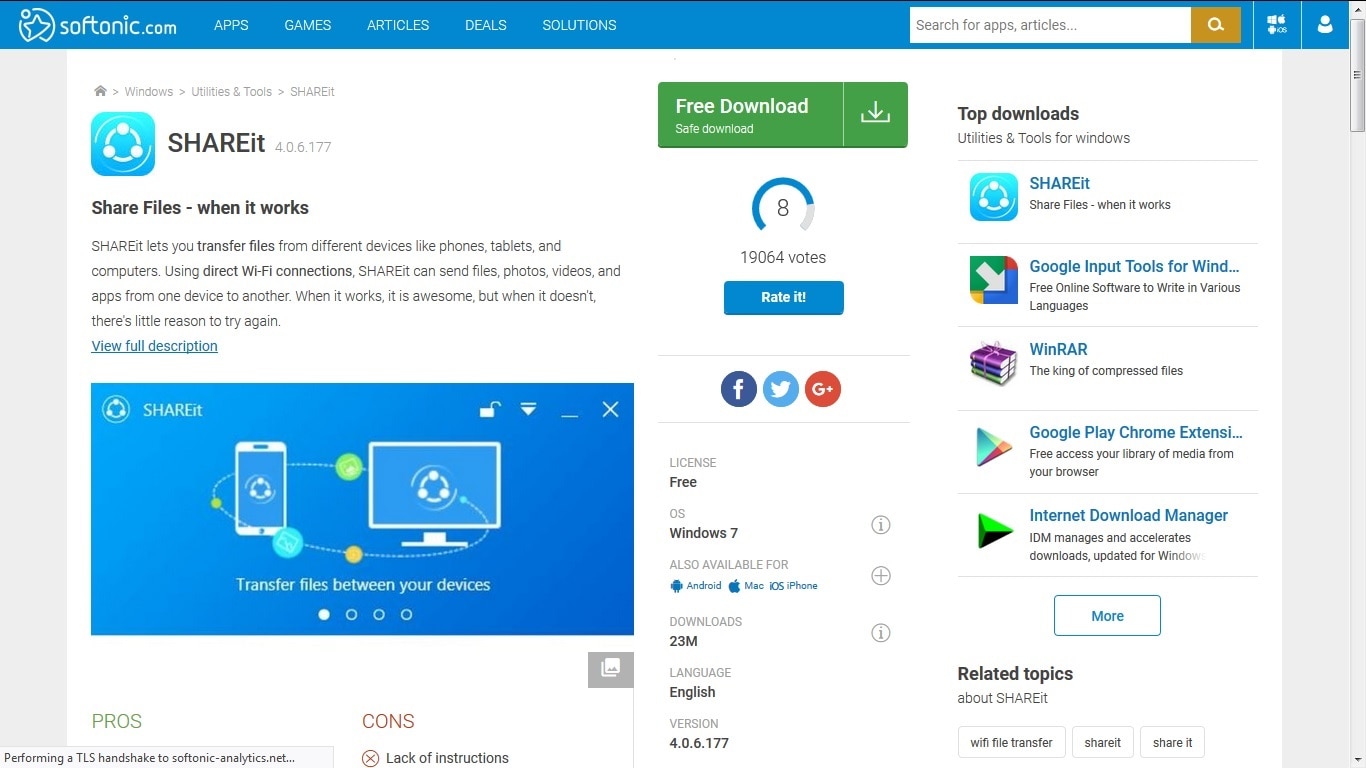
Shareit
Shareit is a special application developed to transfer files between two devices. You can use Shareit to transfer pictures from Android to iPhone in seconds. The software is free and completely secure, so you do not have to worry about how to transfer photos from one device to another. You can share individual photos or entire folders on Shareit. However, it should be noted that sharing folders can make slow down the process.
The best part of Shareit is the freedom allowed to users because you can transfer different file types besides photos. Hence, if you are wondering how to transfer video from Android to iPhone, then Shareit is your answer. The software is constantly being updated to make sure it is safe. Therefore, if users need to transfer more than just photos like sensitive information, they can rest assured about Shareit’s reliability.
Thus, after going through the article, we are sure that you got a wide range of options to choose from to transfer your Apple iPhone 7 photos to the iPhone. Well, every method is good in itself; however, we would like to say that one of the best options for you would be the Dr.Fone tool without a doubt.
Also read:
- [Updated] 2024 Approved Free and Uncomplicated YouTube Image Extractor Tools Reviewed
- [Updated] Reimagining Design Post-ACID Pro Landscape
- [Updated] The Art of Recording Flawless Podcasts via Zoom
- 2024 Approved Mastering Audio-Visual Synchronization for Streams
- 5 Tutorials on How to Transfer Photos From Apple iPhone 12 mini to New iPhone | Dr.fone
- Evaluating the Effectiveness of 'Shake' Reduction in Adobe Photos for 2024
- How to Copy Contacts from Apple iPhone 6s to SIM? | Dr.fone
- How To Install the Latest iOS/iPadOS Beta Version on Apple iPhone SE (2022)? | Dr.fone
- How to Transfer Photos from Apple iPhone XS to other iPhone without iCloud | Dr.fone
- In 2024, 4 Ways to Transfer Contacts from Apple iPhone 11 to iPhone Quickly | Dr.fone
- In 2024, 5 Ways to Send Ringtones from Apple iPhone 14 Pro to iPhone Including iPhone 15 | Dr.fone
- In 2024, 5 Ways to Transfer Music from Oppo F23 5G to Other Android Devices Easily | Dr.fone
- Refurbished Apple iPhone 14 Everything You Need to Know | Dr.fone
- Switch Cards Between Apple iPhone XS and other iPhones Will Move All Phone Services? | Dr.fone
- The Essential ChatGPT Handbook
- Title: How To Transfer From Apple iPhone 7 to Samsung Simplified Guide | Dr.fone
- Author: Charlotte
- Created at : 2024-10-24 17:16:07
- Updated at : 2024-10-29 20:49:30
- Link: https://iphone-transfer.techidaily.com/how-to-transfer-from-apple-iphone-7-to-samsung-simplified-guide-drfone-by-drfone-transfer-from-ios/
- License: This work is licensed under CC BY-NC-SA 4.0.