
How to Transfer from Apple iPhone 7 Plus to Samsung Galaxy S20? | Dr.fone
How to Transfer from Apple iPhone 7 Plus to Samsung Galaxy S20?
If you are willing to switch your phone from an iOS device to an android, the primary issue which restricts you to do so is your data loss and the data transferring from one device to another. In this article, we’ll be learning How to Transfer Data from Apple iPhone 7 Plus to Samsung Galaxy S20, with some easy and best techniques. The discussed techniques will ensure your data from not getting lost.

Part 1: Transfer from Apple iPhone 7 Plus to Samsung Galaxy S20 Directly (Easy and Fast)
Dr.Fone - Phone Transfer program is a phone transfer tool, you can transfer all types of data like photos, music, contacts, messages, calendar, etc. from one phone to another easily.
Let’s see how we can to transfer data from Apple iPhone 7 Plus to Galaxy S20
Dr.Fone - Phone Transfer allows you to transfer data between various phones with one click, including Android, iOS, Symbian, and WinPhone. Use this program to transfer and convey data between any of them.
Down below there’s a detailed step by step process explaining how you can transfer all your data from one phone to another using computer
Step 1. Connect Your Apple iPhone 7 Plus to the computer
After opening Dr.Fone on your computer, select “Phone Transfer” among the modules.

Make sure you have connected both of your devices with it. Here let’s take an iOS and a Samsung Galaxy S20(any Android device) as an example.

The data from the source device will be conveyed/transferred to the destination device. To exchange their position, you can use the “Flip” button too.
Step 2. Select the file and start to transfer
Choose the file types you desire to move. To begin the process, click on-Start Transfer. Until the process is completed, please don’t disconnect the Apple iPhone 7 Plus devices for its maximum efficiency.

Before commencing the data transfer process between both the phones, if you want to erase the data of the destination device-check the “Clear Data before Copy” box.
All the files you selected will be transferred to the targeted phone successfully In a couple of minutes.

Part 2: Transfer from iCloud Backup to Samsung Galaxy S20 (Wireless and Safe)
1. Dr.Fone - Switch App
If you don’t have a computer device and want to transfer data from an iOS device to an Android device, here is an in-depth step by step process guiding you how to do so.
How to sync data from the iCloud account to Android
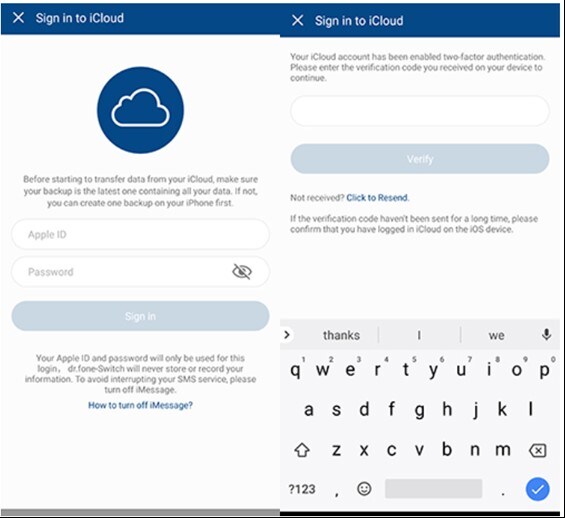
Step 1. Touch “Import from iCloud”, after installing the Android version of Dr.Fone - Switch.

Step 2. With your Apple ID and passcode, log in to the iCloud account.
If you have enabled the two-factor authentication, enter the verification code.
Step 3. On your iCloud account now in a while later, all types of data can be detected.
Touch “Start Importing” after Selecting your desired data or all of these data.
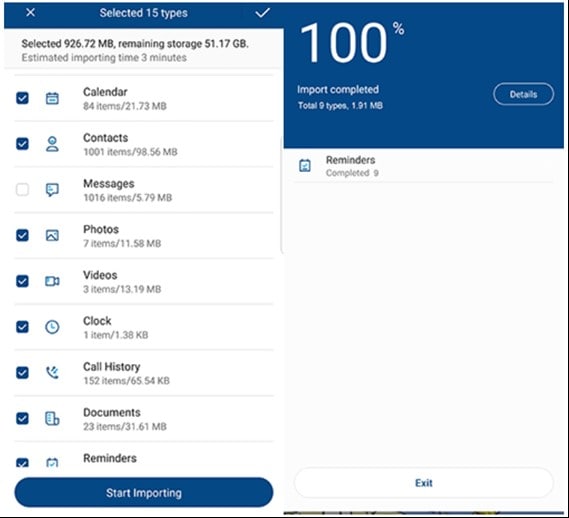
Step 4. Sit back until and unless data importing is fully completed. Then you can exit this app and check the data synced from iCloud on your Apple iPhone 7 Plus or tablet.
Prons:
- Transfer data from Apple iPhone 7 Plus to Android without a PC.
- Support mainstream Android phones (including Xiaomi, Huawei, Samsung, etc.)
Cons:
- For direct data transfer, connect iPhone to Android by using an iOS-to-Android adapter.
2. Samsung Smart Switch App
Export data from iCloud to Samsung S20 with Smart Switch
If you make use of the Samsung Smart Switch app, syncing iTunes with Samsung is just an easy-peasy task.
It has become simpler to sync iCloud to Samsung S20 as it stretches compatibility with iCloud. Here is how-
How to transfer data from iCloud to Samsung S20 with Smart Switch
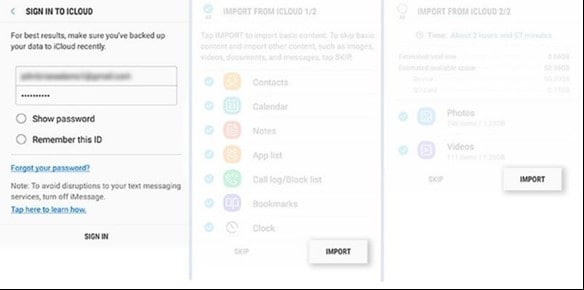
Download Smart Switch from Google Play on your Samsung Device. Open the app, then click on ‘WIRELESS,’ after that tap on ‘RECEIVE’ and select the ‘iOS’ option.
Sign in with your Apple ID and password. Now, select the desired content you want to transfer from iCloud to Samsung Galaxy S20 and press ‘IMPORT.’

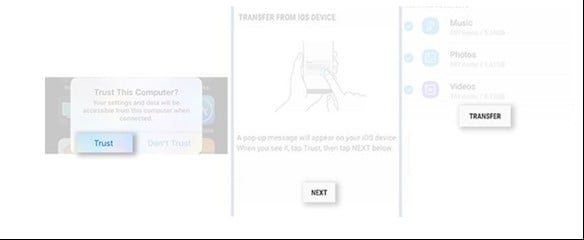
If you are using a USB cable, do keep iOS cable, Mirco USB, and USB Adapter handy. Then, load Smart Switch on your Samsung S20 model and click on ‘USB CABLE.’
Further, connect the two devices by iPhone’s USB cable and the USB-OTG adapter with Samsung S20.
Click on ‘Trust’ followed by pressing ‘Next’ to proceed further. Choose the file and press on ‘TRANSFER’ to convey/Transfer from iCloud to Samsung S20.
Prons:
- Wireless transfer.
Cons:
- Only for Samsung phones.
If you prefer to run a desktop software to transfer data, use Dr.Fone - Phone Transfer. It’s a hassle-free solution. Connect both phones to computer and start to transfer data in one-click.
Part 3: Transfer from iTunes Backup to Samsung Galaxy S20 without iTunes
Step 1. Select the backup file
Launch Dr.Fone and select Phone Backup. Connect your Samsung S20 to the computer. Click on Restore.
It will give the option View backup history if you have used this function to backup your iOS device before. Click on View backup history option to view the backup file index.

After that, Dr.Fone will display the backup history. Just pick the backup file you want and click on the Next on the bottom of the program or view button next to the backup file.

Step 2. View and Restore the backup file
The program will take a few seconds to examine the backup file and display all data in categories in the backup file after you click on View.
After you find the files you require, you can pick a few files or choose them all to move to the next step.

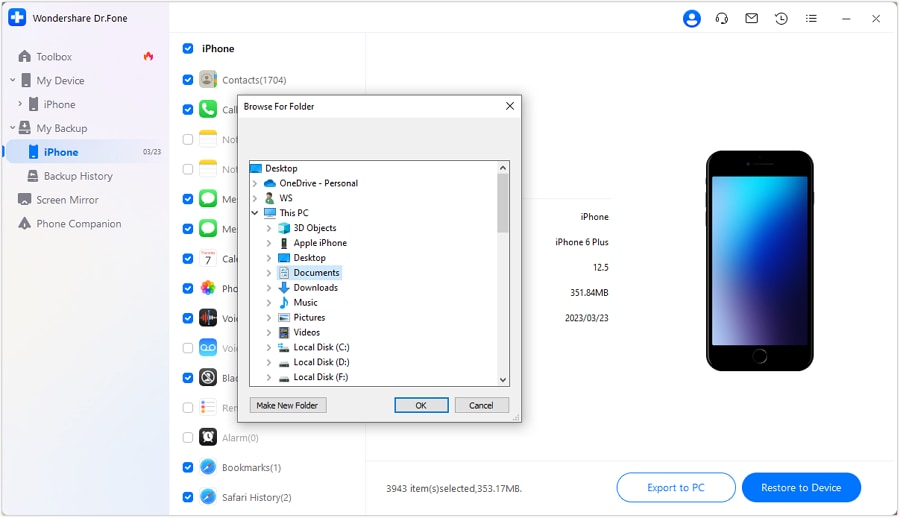
Currently, Dr.Fone supports to restore the music, Safari bookmarks, Call History, Calendar, Voice memo, Notes, Contacts, Messages, Photos, videos to the Apple iPhone 7 Plus device. So you can restore these data to your Samsung device or transfer them all to your computer.
If you want to restore the files to your device, select the files and click on Restore to Device. In a couple of seconds, you will get these files on your Android gadget.
If you want to export the chosen files to your computer, click on Export to PC. Then select the save path to transfer your data.
Final Words
The techniques which are discussed above are meant to solve your problem and let you know How to Transfer from Apple iPhone 7 Plus to Samsung Galaxy S20. These techniques will guide you through transferring your file quickly and swiftly. The method discussed over here is related to both the users- who are willing to transfer their data using a computer and without using it. So, finally, we hope that this article would help you to solve your issue related to data transfer.
Ultimate Guide, How to Transfer Music From Apple iPhone 7 Plus to iPhone
The evolution of technology continually transforms how we consume and enjoy music. The iPhone stands among the most dominant brands in the smartphone world. Thus, the need for effortless ways to transfer music from iDevices has never been more paramount. In this comprehensive article, we will go through various methods and tools. This guide aims to simplify the process and empower you with the knowledge to transfer your music hassle-free.
It will explore native functionalities provided by Apple and third-party apps. Moreover, it will take you through music transfer employing cloud services. The goal is to equip you with the most effective, efficient, and reliable methods to transfer music from Apple iPhone 7 Plus to iPhone.
Part 1: How To Transfer Selective and All Music From Apple iPhone 7 Plus to iPhone in One-Click
When it comes to transferring music between iPhones, Wondershare Dr.Fone emerges as a versatile solution. It allows you to move the entire music library or selective tracks with a single click. With its one-click transfer functionality, managing your music collection becomes a smooth experience.
This ensures that your favorite tunes are available on your new iPhone. The following are the detailed methods on how to transfer music from Apple iPhone 7 Plus to iPhone using Wondershare Dr.Fone:
Method 1: Transfer Music Using Wondershare Dr.Fone – Phone Manager
Wondershare Dr.Fone offers a comprehensive solution for managing your iPhone. It allows you to handle your iPhone data efficiently. You can perform tasks like importing, exporting, and deleting files. With its intuitive drag-and-drop feature, you can move files into any desired app on your device. You can transfer a variety of data between your iOS device and computer. Here is how to transfer music from Apple iPhone 7 Plus to iPhone using the phone manager feature:
- Step 1: Access the Source iPhone in Wondershare Dr.Fone
The first thing you need to do is install and launch Wondershare Dr.Fone. Then, connect both iPhones to the computer and wait for their detection by Dr.Fone. Once detected, click the source iPhone from the left panel.

- Step 2: Transfer the Selected Music Track
From the expanded options for the source iPhone, choose “Music.” Now, go to the track you want to share and select it. Now, tap “To Device” from the top toolbar and select the other iPhone as the destination. As soon as you select the other iPhone, the music file will be transferred.

Method 2: Transfer Music Using Wondershare Dr.Fone – Phone Transfer
Wondershare Dr.Fone - Phone Transfer simplifies transferring different data types between 8000+ devices. It ensures ease of use with a simple click-through process. Moreover, it is compatible with Apple, Samsung, HUAWEI, OPPO, Sony, Google, and more.
You also get full support for the latest iOS and Android versions. It supports the transfer of over 15 types of data between different OS. Here is how to transfer music from iPod to iPhone using the Phone Transfer tool of Wondershare Dr.Fone:
- Step 1: Click Phone Transfer in Wondershare Dr.Fone
To begin, you need to connect both devices to the computer with Wondershare Dr.Fone. Within Dr.Fone, click “Toolbox” from the left panel and choose “Phone Transfer” as the option. It will lead to a new screen where you need to assign the positions to the iPhones.
- Step 2: Select Music and Tap Start Transfer
The iPhone from which you want to transfer the music should be in the “Source” position. Now, give the “Destination” position to the iPhone where you want to transfer music. Then select “Music” from the available data type and click “Start Transfer.” Wait for the transfer process to complete, which will take time, depending on the library size.

Part 2: How To Transfer Music From Apple iPhone 7 Plus to iPhone Using iTunes
iTunes remains a reliable and widely used application for managing iOS devices. Many iPhone users prefer this method for transferring music between iOS devices, which is limited to purchased songs. Follow these steps to transfer music from Apple iPhone 7 Plus to iPad using iTunes:
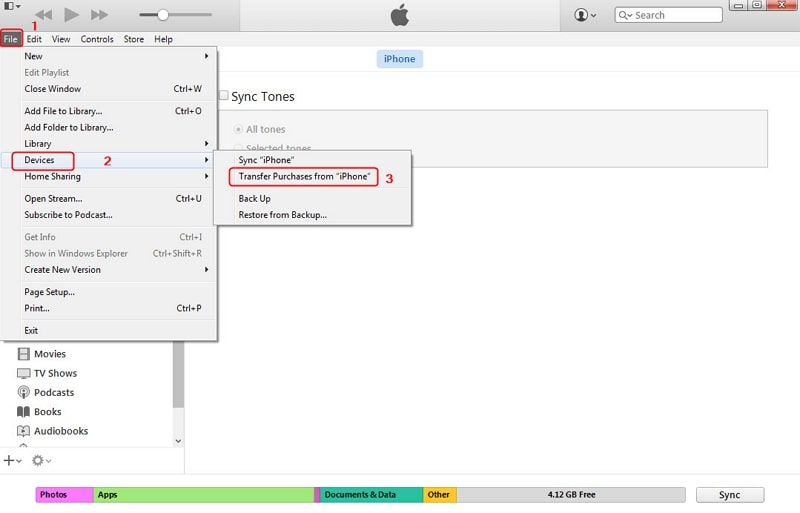
- Step 1. Run the latest version of iTunes on your computer and connect the source iPhone. After accessing iTunes, click on “File,” located in the top left corner, and choose “Devices.” Next, select “Transfer Purchases from iPhone” and let the process finish.
- Step 2. Once all the purchased songs are transferred, disconnect the source iPhone. Now, connect the targeted iPhone and wait for iTunes to recognize it. Then tap the “Device” icon to access the iPhone window.
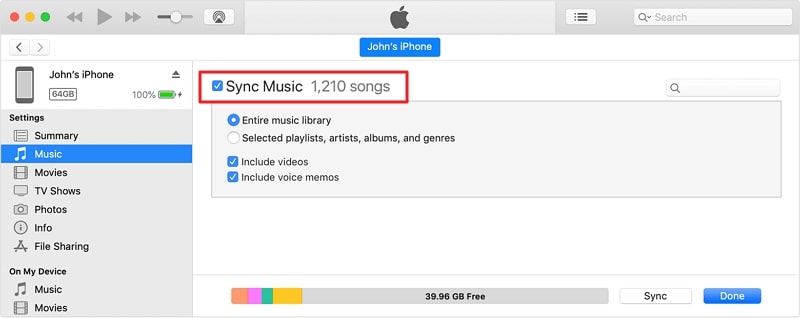
- Step 3. Here, click the “Music” tab from the left side panel. Now check the “Sync Music” box and select “Entire Library” or another option depending on your choice. Finally, press “Sync” to commence the music transfer process.
Part 3: How To Transfer Music From Apple iPhone 7 Plus to iPhone via AirDrop
AirDrop provides a convenient and wireless way to transfer music between iPhones. It allows you to share songs, albums, or playlists effortlessly. You don’t need any cable or extra software to use this method. This wireless approach simplifies the process, making it an excellent choice for transferring a few tracks or albums. Follow these steps to transfer music from Apple iPhone 7 Plus to iPhone without iTunes:
- Step 1. Start by ensuring that AirDrop is enabled on both devices and its visibility is set to “Everyone.” Moreover, you also need to ensure that both Wi-Fi and Bluetooth are also enabled, as they are essential.
- Step 2. Now open the Music app and find the track you want to transfer to the other iPhone. Tap the three-dots icon and select “Share Song.” From the available options, choose “AirDrop.”
- Step 3. Among the available devices to AirDrop, select the targeted iPhone. Now, you will receive a prompt on the targeted iPhone, which you need to accept to complete the data transfer.

Part 4: How To Transfer Music From Apple iPhone 7 Plus to iPhone by Syncing Apple Music Library
Syncing your Apple Music Library across iPhones offers a smooth way to transfer music. It ensures all your favorite tracks, playlists, and albums are available on your new device. This method ensures a consistent music experience. It allows you to enjoy your favorite tunes without the need for manual transfers. Follow these steps to transfer music from iPad to iPhone Apple Music:
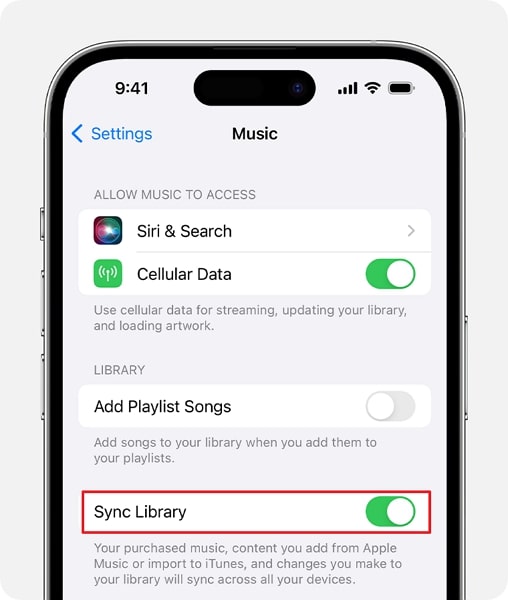
- Step 1. On both of your iPhone devices, log in using the same Apple ID. Then, move to the source iPhone and access the Apple iPhone 7 Plus device’s Settings. Here, scroll down to find and tap the “Music” option.
- Step 2. Now, move to toggle on the “Sync Library” option on the following screen. Afterward, repeat the same process on the new iPhone. Give the syncing process some time, and you will be able to access all songs on the new device.
Part 5: How To Transfer Music From Apple iPhone 7 Plus to iPhone Using Google Drive
Transferring music via Google Drive offers a convenient way to move your music collection. This allows a music exchange between iPhones without the need for cables. It’s a particularly useful method for transferring a few select songs or albums. With it, you can transfer songs that you have downloaded from the internet. The following are the steps you need to follow to transfer music from iDevices via Google Drive:
- Step 1. Once you’ve installed the Google Drive app on your iPhone, launch the app, sign in, and tap the “+” icon located at the lower right. Select “Upload” to proceed. Now, tap “Browse” and then go on to locate and select the targeted songs.
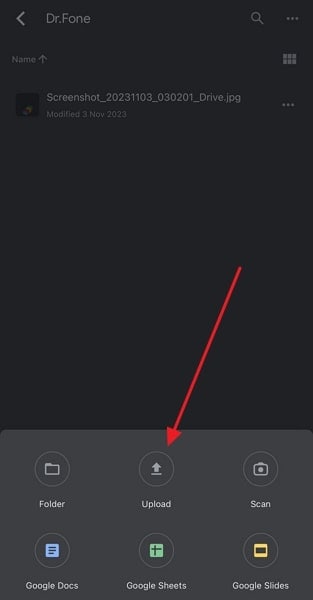
- Step 2. Once they are uploaded, move to the new iPhone and install the Google Drive app there. Here, log in using the same Google ID and access the songs you uploaded from the source device. Then tap the “Three dots” icon and select “Make available offline” to complete the process.

Part 6: How To Transfer Music Streaming Services Playlists From Apple iPhone 7 Plus to iPhone
Transitioning between music streaming platforms can be challenging. However, with Wondershare MobileTrans, you can effortlessly transfer your beloved playlists. You can move your Spotify playlists to Apple Music, YouTube Music, or between various services hassle-free. Whether you’re tech-savvy or not, its user-friendly interface ensures easy operation. Additionally, it supports more platforms and is completely free to use. Here are the steps you need to follow for playlist transfer:
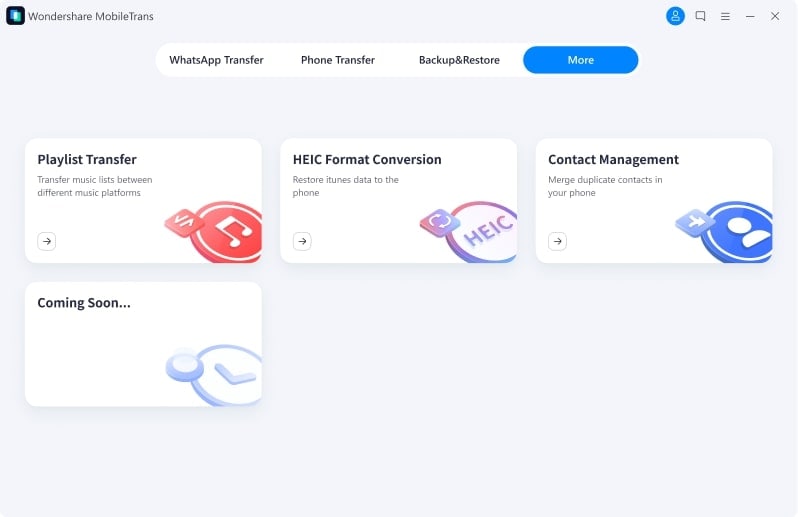
- Step 1. You start the process by installing Wondershare MobileTrans on your computer. Now, launch it and move to the “More” tab. Here, click the first option, “Playlist Transfer” to proceed.
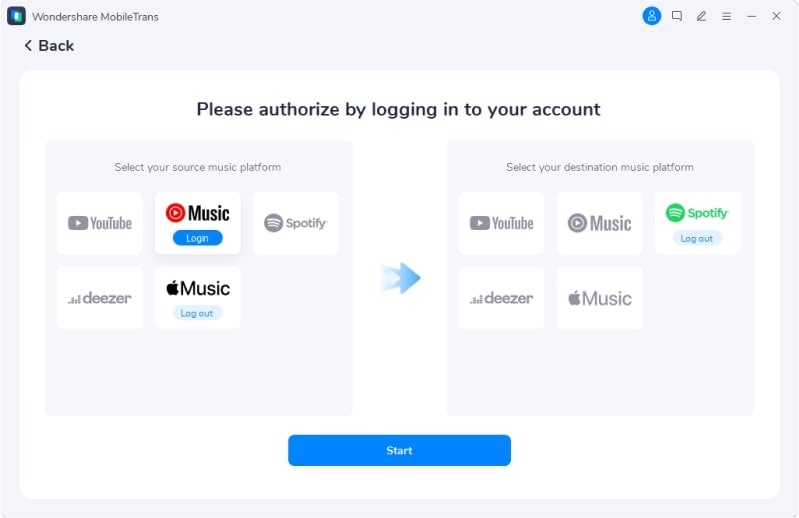
- Step 2. On the following screen, log into both music streaming services. Once you are logged in, tap “Start” to commence the playlist transfer procedure. The time it will take depends upon the number of playlists and songs.
Conclusion
In conclusion, transferring music between iPhones is essential for preserving our musical experiences. Whether using iTunes, AirDrop, cloud services, or specialized tools, the process can be simplified. For a comprehensive and user-friendly solution, consider Wondershare Dr.Fone. Its intuitive interface and versatile functionalities streamline the music transfer process. This makes Dr.Fone an ideal choice for how to transfer music from Apple iPhone 7 Plus to iPhone.
How to Transfer/Sync Notes from Apple iPhone 7 Plus to iPad
The Notes app comes pre-installed on iPhone and iPad, and it proves to be very handy and useful when you need to jot down some ideas, details, plans, or any other important information which can be reviewed whenever you need. Sometimes you will need more to check your note from your iPhone on iPad. In this case, transferring/syncing notes from Apple iPhone 7 Plus to iPad plays an important role. This article will provide the ways with and without iCloud to transfer notes from Apple iPhone 7 Plus to iPad in detail.
Part 1. Transfer Notes from Apple iPhone 7 Plus to iPad Using iCloud
This part will introduce how to transfer iPhone notes to iPad with iCloud. In fact, this is very easy to be done, and you’ll only need several simple steps. Check it out.
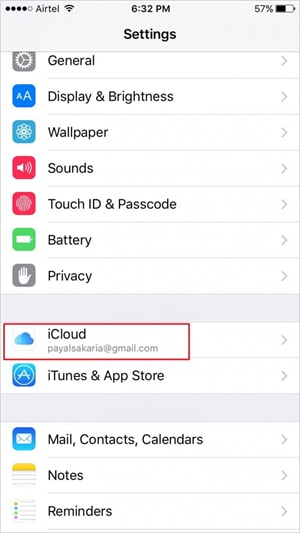
Step 1 Open Settings and select iCloud
Tap Settings > iCloud on both your iPhone and iPad.
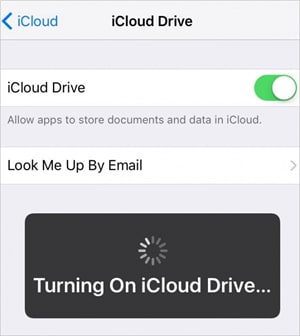
Step 2 Turn on iCloud Drive
Click on iCloud Drive option and then turn it on. You need to turn the option on both your iPhone and iPad.
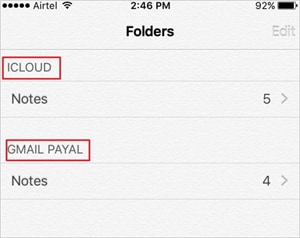
Step 3 Go to Notes App on iPhone
Now go to the Notes app on your iPhone, and you can see a folder named iCloud. Now you can create notes in the iCloud folder on your iPhone, and the notes will be automatically synced to the iPad when the two devices are connected with Wi-Fi connection.
Part 2. Sync Notes from Apple iPhone 7 Plus to iPad Using Third-Party Software
Dr.Fone - Phone Manager (iOS)
Transfer Files Between iPhone and iPad without iTunes
- Transfer, manage, export/import your music, photos, videos, contacts, SMS, Apps, etc.
- Back up your music, photos, videos, contacts, SMS, Apps, etc. to the computer and restore them easily.
- Transfer music, photos, videos, contacts, messages, etc from one smartphone to another.
- Transfer media files between iOS devices and iTunes.
- Fully compatible with the latest iOS version and iPod.
3981454 people have downloaded it
Besides iCloud, there are several third-party softwares that also allow you to sync and transfer notes from Apple iPhone 7 Plus to iPad. This part will introduce the top programs which can help you to get the work done easily.
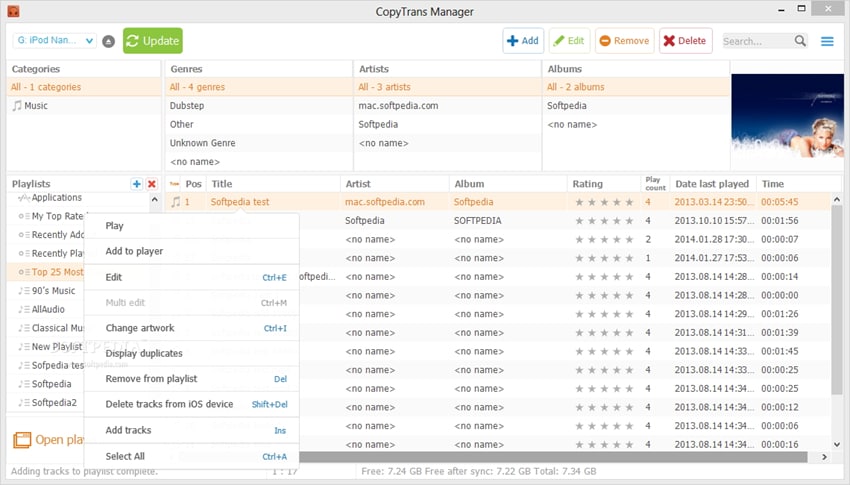
1. CopyTrans
It allows you to transfer apps, notes, photos, videos, and other content between iOS devices, PC, and iTunes. The software also takes backup of data so that it can be restored in case of data loss. CopyTrans also enables you to import the artwork, playlist, and other information into iTunes.
Pros
- Easy-to-use and clean interface
- Provides the option to take back up iOS data
- The app provides multiple guides and tips for the users
Cons
- The time of transfer is long
- Many users have also complained about detecting virus
User reviews
- Thousands of songs can be copied back to iTunes in minutes
- Virus detected by windows 10. Windows 10 detected a virus and removed the download 2x. Never unzipped the file.
2. iExplorer
This is another app that allows you to sync notes from Apple iPhone 7 Plus to iPad. The app allows you to transfer images, music, notes, SMS and all other information respectively without any need to sync the entire file every time. iExplorer helps to manage folders and transfer data for iOS devices, and it is a great iTunes alternative.
Pros
- The app displays the data of the Apple iPhone 7 Plus device in a clear layout
- The detection of the Apple iPhone 7 Plus device by the app is quick and thoroughly
- Allows users to drag and drop files for the transfer
Cons
- Many users complaint of crashing issues
- There are lots of pop-up dialog for full version purchase
- The access to SMS and the contacts information is with jailbreak terminals only
User Reviews
- Amazingly quick! Got the job in very short time. Very user-friendly.
- I forgot my login information for my old iTunes account and had no way of obtaining it since I was also using a new email address. I downloaded this program and it transferred all 600-something of my files within a minute or two. Saved me so much money!
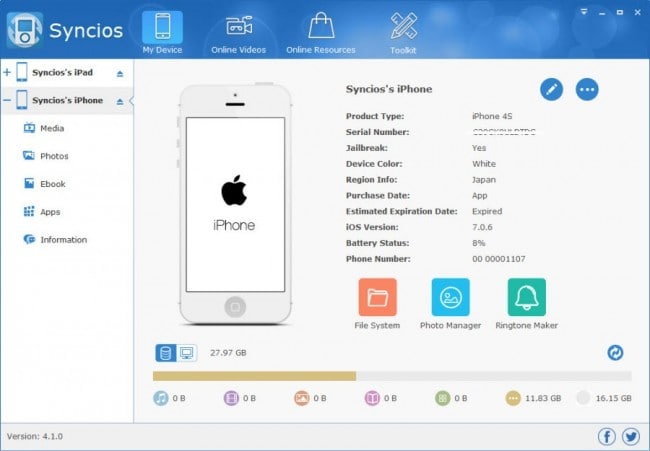
3. Syncios
Syncios also works as a decent iTunes alternative to transfer data between iOS devices and PC. The app allows users to transfer videos, photos, ringtones. TV shows, playlist, notes and all other data between iPhone/iPad/iPod and PC easily and quickly.
Pros
- Comes with easy setup wizard
- Excellent using experience when transfer files
Cons
- Free software does not comes with selected options to choose from
- Some users complain about the software collapse.
User Reviews
- Software crashed and we lost years of family photos, including photos of our kids with nanna who passed away recently. The scam part is this, if you go to the website you will notice they do data recovery, you can also download for free but to actually recover ‘photos’ etc, you have to pay $50.00 USD and there is the scam. They create the issue with the free software and then they sting you to give you back your photos. Warn everybody you know. BEWARE.
- Since I go through lots of music, videos, photos, I had to be able to backup the iPhones and this is where iTunes got kinda complicated for me. SyncIOS make the use of my Apple device much more user-friendly and comfortable.
Also read:
- [New] Unlock the Secrets of Automatic YouTube Videos on FB for 2024
- [Updated] 10+ Best Photo to Cartoon Softwares
- [Updated] 2024 Approved Social Media Sensations TikTok's Top 10 Tweets
- [Updated] 2024 Approved Upgrading Laptop & Mobile Conferencing With Background Changes
- [Updated] In 2024, Heaviest Airborne Haulers Drone Selection Insights
- 2024 Approved Craft Compelling FB Video Ads - Free Toolkit Included
- 5 Tutorials on How to Transfer Photos From Apple iPhone 7 Plus to New iPhone | Dr.fone
- 5 Ways to Transfer Music from Apple iPhone 6s to Android | Dr.fone
- How to Transfer Everything from Apple iPhone 15 Pro Max to iPhone | Dr.fone
- How to Transfer Everything from Apple iPhone XS Max to iPhone | Dr.fone
- In 2024, How to Transfer Contacts from Tecno Camon 20 to Other Android Devices Using Bluetooth? | Dr.fone
- In 2024, Solved How To Transfer From Apple iPhone 7 to iPhone 15 | Dr.fone
- In 2024, Transfer your Apple iPhone 14 Pro Max Apps to New iPhone | Dr.fone
- JPG/JPEG 이미지를 무료로 원시 상자(RAW)으로 Google 탐색에서 전환
- Title: How to Transfer from Apple iPhone 7 Plus to Samsung Galaxy S20? | Dr.fone
- Author: Charlotte
- Created at : 2024-10-20 02:56:59
- Updated at : 2024-10-23 22:19:25
- Link: https://iphone-transfer.techidaily.com/how-to-transfer-from-apple-iphone-7-plus-to-samsung-galaxy-s20-drfone-by-drfone-transfer-from-ios/
- License: This work is licensed under CC BY-NC-SA 4.0.