
How to Transfer from Apple iPhone 6 to iPhone 8/11/11 Pro | Dr.fone
How to Transfer from Apple iPhone 6 to iPhone 8/11/11 Pro
Are you an Apple iPhone 6 user? Well, iPhone 8/11/11 Pro will be a huge technological leap for you. In this article we will take you through how to transfer everything from Apple iPhone 6 to iPhone 8/11/11 Pro easily in three sim-ple steps because we understand that no smartphone works up to our expectations if our data, such as contacts, music, photos, notes, etc is not fed in it.
So if you are planning to buy the new iPhone 8/11/11 Pro, here is everything you need to know to transfer data from old iPhone to new iPhone. Also, even if you want to retain your old device, transfer Apple iPhone 6 to iPhone 8/11/11 Pro and enjoying the same data on both your iPhones.
Best iPhone to iPhone transfer tool - transfer files from old device to new iPhone 8/11/11 Pro without iTunes
We bet you have heard of Dr.Fone software. It is the most reliable 1-Click Phone Transfer tool to send data (contacts/text messages/photos/etc.) from an old phone to new one. Its user-friendliness and intuitive interface make it the best and most efficient software to transfer Apple iPhone 6 to iPhone 8/11/11 Pro as it is fully compatible with iOS 13. It is available for both Mac and Windows and is very thoughtfully designed to prevent hacking and data loss.
You may also put this software to good use to backup and restore your iPhone data.
Dr.Fone - Phone Transfer
Transfer Everything from iPhone 5S to iPhone 8/11/11 Pro in 1 Click!
- Easily transfer photos, videos, calendar, contacts, messages and music from old iPhone to new iPhone 8/11/11 Pro.
- Enable to transfer from HTC, Samsung, Nokia, Motorola and more to iPhone X/8/7S/7/6S/6 (Plus)/5s/5c/5/4S/4/3GS.
- Works perfectly with Apple, Samsung, HTC, LG, Sony, Google, HUAWEI, Motorola, ZTE, Nokia and more smartphones and tablets.
- Fully compatible with major providers like AT&T, Verizon, Sprint and T-Mobile.
- Supports iPhone, iPad, iPod touch and the latest iOS version.
- Fully compatible with the latest Windows or Mac version.
3981454 people have downloaded it

How to transfer everything from Apple iPhone 6 to iPhone 8/11/11 Pro
In this segment, we will learn how to transfer everything from Apple iPhone 6 to iPhone 8/11/11 Pro with Dr.Fone. To do so, download and install the software on your computer and follow the steps given below:
Step 1: Launch Dr.Fone software
Once Dr.Fone - Phone Transfer is installed on your PC, launch the program and connect the Apple iPhone 6 and iPhone 8/11/11 Pro to the PC with the help of two different USB cables. Next up, select “Phone Transfer” option on Dr.Fone toolkit and move on.

Step 2. Data Transfer from iPhone 5S to iPhone 8/11/11 Pro
In this step, select content to transfer data from old iPhone to iPhone 8/11/11 Pro. Also, make sure the source and target device are duly recognized (if not, just swap them).
Step 3. Initiate the Transfer from iPhone 5S to iPhone 8/11/11 Pro
This is the last step which only requires you to hit the “Start Transfer” button and view the transfer progress on the screen.

Note: The images above are of iPhone 6Plus. There is no difference in procedure to transfer Apple iPhone 6 to iPhone 8/11/11 Pro.
Simple, right? In just one click, all the data is moved from Apple iPhone 6 to iPhone 8/11/11 Pro.
Part 2: How to transfer everything from Apple iPhone 6 to iPhone 8/11/11 Pro with iTunes?
iTunes is the software developed by Apple Inc. to manage iPhones and other iOS devices. Many users still prefer to use iTunes to transfer data from old iPhone to iPhone 8/11/11 Pro, thus, here are simple steps to help you do so:
Step 1. First and foremost, download the latest version of iTunes on your PC from Apple’s official website. Install it and launch the program.
Step 2. Using an USB, connect the Apple iPhone 6 to your PC and wait until iTunes automatically detects it. You will be able to view your Apple iPhone 6 under the “Devices” tab.
Step 3. Click Apple iPhone 6 to view all the options at the left hand side of the iTunes interface. Select “Backup Now” to backup all the data stored in the Apple iPhone 6 which needs to be transferred to iPhone 8/11/11 Pro.

Step 4. Let the process of backing up Apple iPhone 6 finish completely. Once this is done, disconnect it and use another USB to connect new iPhone 8/11/11 Pro to the PC.
Step 5. Follow the steps given above to view the options with respect to the new iPhone 8/11/11 Pro on the iTunes interface. Select “Restore Backup” and waiter the process to get over to transfer data from old iPhone to iPhone 8/11/11 Pro.
Part 3: How to transfer everything from Apple iPhone 6 to iPhone 8/11/11 Pro with iCloud?
iCloud is another great way to transfer Apple iPhone 6 to iPhone 8/11/11 Pro in hassle free manner. Since it is a cloud service by Apple, it stores all our data and allows us to restore it on any and every iOS device with the same Apple ID and password.
Follow the steps given below to understand how to transfer everything from Apple iPhone 6 to iPhone 8/11/11 Pro:
Step 1. Do not set up your new iPhone 8/11/11 Pro. If you already have, Visit “Settings” > “General” > “Reset” > Erase all content and settings to start from scratch.
Step 2. Now on your old Phone 5s, visit “Settings” and tap on your name. Select “iCloud” and scroll down to select “iCloud Backup” and hit “Backup Now”. Let the process finish completely and note down the exact timing of the back up file.

Step 3. Now, on the iPhone 8/11/11 Pro, start setting it up once again and connect it to a WiFi network.
Step 4. Once you reach the “Set Up” Page, select “Restore from iCloud backup” .
Step 5. Select the most recent back up file. Feed in your Apple ID details and let the iPhone restore all the data from iCloud backup. Let your iPhone 8/11/11 Pro reboot at the end of restoration process.

Moving data from old Apple iPhone 6 to new iPhone 8/11/11 Pro is an easy job with the help of three tools listed above. All our data, such as photos, videos, music, contacts, notes, calendar, messages, Apps, etc, are important to us and need to be restored in the new device for us to start enjoying our new iPhone 8/11/11 Pro.
Where iTunes and iCloud are easy and go-to tools for many users, Dr.Fone - Phone Transfer is comparatively new, but way more effective than the other two methods to transfer data from old iPhone to iPhone 8/11/11 Pro. We recommend that you download and install this software right away and also share your experience along with this guide with your friends and family. Explore its features and make life simpler by managing your iPhone in a better and more secure way.
Various Methods to Transfer Pictures from Apple iPhone 6 to PC
Capturing life’s precious moments on the latest Apple iPhone 6 is a joy in itself. However, transferring them to a PC becomes essential when it comes to organizing, editing, or sharing those photos. That’s why mastering the art of transferring images between devices is a skill worth possessing.
It can be helpful in creating backups, freeing up storage space, and more. In this article, we will describe how to transfer photos from Apple iPhone 6 to a PC. It will explore step-by-step guides and tips for accommodating different preferences and comfort levels.
Part 1: How To Transfer Photos From Apple iPhone 6 to PC With Windows Features
With the Apple iPhone 6 ‘s advanced camera, capturing life’s beautiful moments is second nature. On the other hand, Windows OS has long been the backbone of personal computing. They come equipped with a range of tools to make the photo transfer process smooth and efficient. Explained below are two of the common method to import photos from Apple iPhone 6 to PC:
Method 1: File Explorer
When it comes to simplicity and direct control, File Explorer stands out as an excellent option. It is a steadfast companion for transferring photos from your Apple iPhone 6 to your Windows PC. This method gives you the freedom to navigate through your device’s internal storage.
Moreover, you can select the images you desire and move them to your computer. Follow these straightforward steps to harness the power of File Explorer:
- Step 1: Begin by connecting your Apple iPhone 6 to your Windows PC using an Apple-certified USB cable. Ensure that your iPhone is unlocked, and if prompted, tap “Trust This Computer” on your device’s screen.
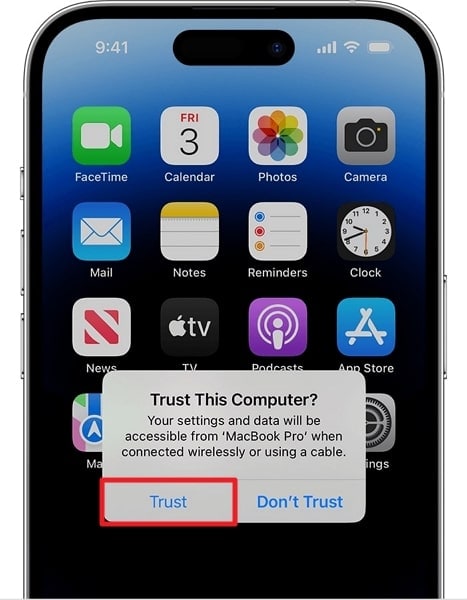
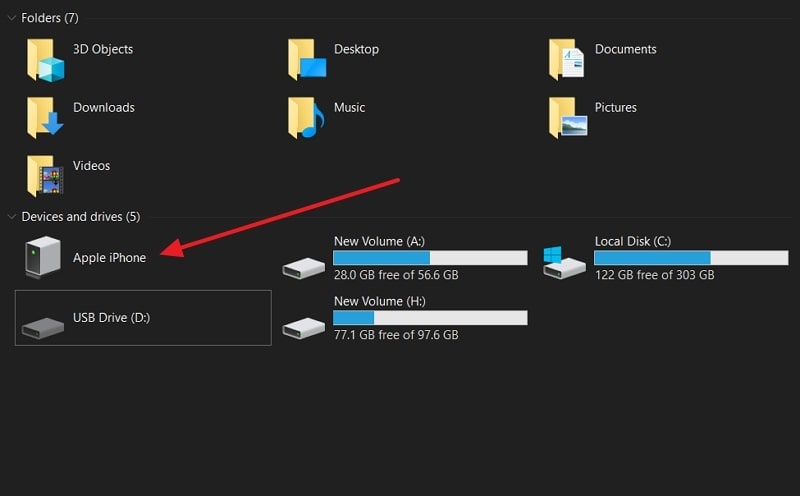
- Step 2: On your Windows PC, press the “File Explorer” icon on your taskbar. In the left-hand panel of File Explorer, locate and click “This PC.” Your connected Apple iPhone 6 should appear under the “Devices and Drives” section.
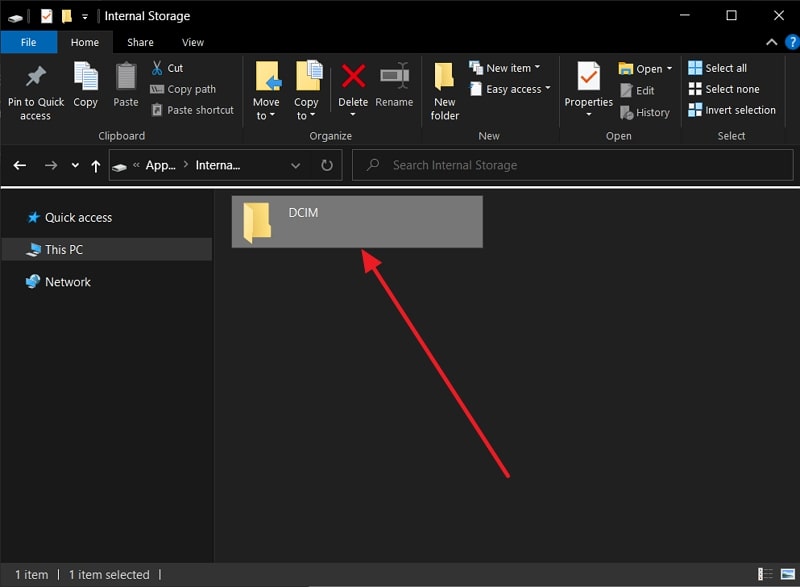
- Step 3: Here, double-click on your iPhone’s icon to access its internal storage. Most of your iPhone’s photos are stored in the “DCIM” folder. Browse the folder to select photos you want to move and copy them to your desired location.
Method 2: Photos App
Available in Windows 10 and later, the Photos app is a prime example of this convenience. It provides an elegant solution for transferring photos from your Apple iPhone 6 to your PC. Using this app, you can directly import photos and videos from your iPhone to the computer. Follow these simple instructions to utilize the power of the Photos app to learn how to transfer photos from Apple iPhone 6 to PC:
- Step 1: Connect your Apple iPhone 6 to your Windows PC using a USB cable, and if prompted, tap “Trust This Computer.” On your Windows PC, locate and open the “Photos” app.

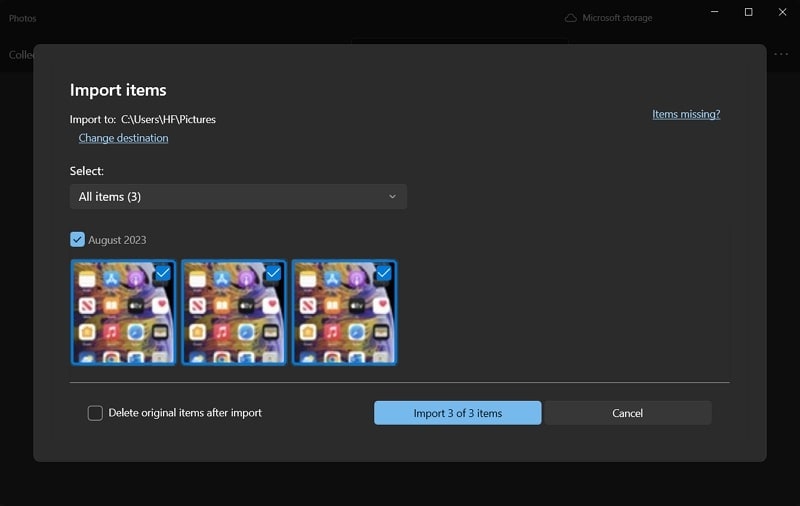
- Step 2: In the Photos app, click on the “Import” button located in the top-right corner. From the available options, choose “From a connected device” and select your iPhone. The Photos app will display the photos on your Apple iPhone 6 that are available for import. After selecting the images, select an existing folder or create a new one for the imported photos.
Part 2: How To Transfer Photos From Apple iPhone 6 to PC With Cloud Storages
Cloud storage offers a bridge between devices that goes beyond physical limitations. It lets you move photos from your Apple iPhone 6 to your desktop computer. This section will explore some of the popular cloud storage platforms since both of them offer their unique set of features and advantages. Described below are two cloud storage services to import photos from Apple iPhone 6 to PC:
Method 1: iCloud
iCloud is Apple’s cloud storage service which seamlessly knits together the Apple ecosystem. It offers a harmonious blend of convenience and synchronization. The iCloud interface is intuitive and clean, making it accessible to all individuals. With iCloud, you can easily access your photos across devices in the Apple ecosystem. Use the following steps to transfer photos from Apple iPhone 6 to PC via iCloud:
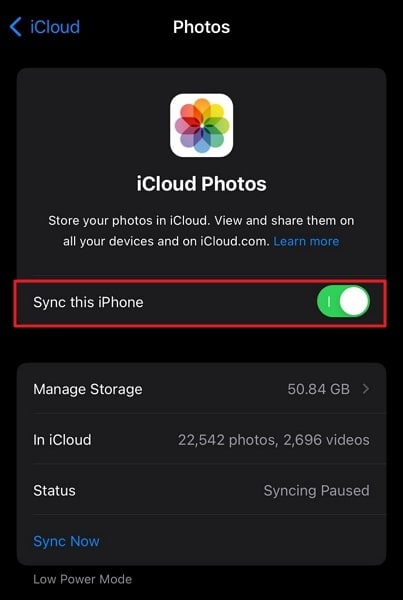
- Step 1: On your Apple iPhone 6 , go to “Settings” and tap on your Apple ID. There, select “iCloud,” tap “Photos,” and toggle on “Sync This iPhone” on the next screen. This uploads your photos to iCloud.
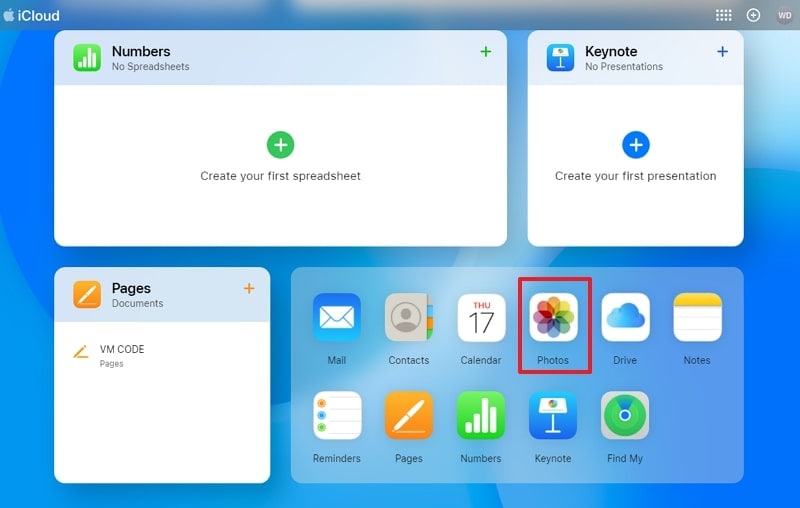
- Step 2: Move to your computer and on your Windows PC, open a web browser, and go to the iCloud website. Log in with your Apple ID and password and click the “Photos” icon to access your iCloud Photo Library.
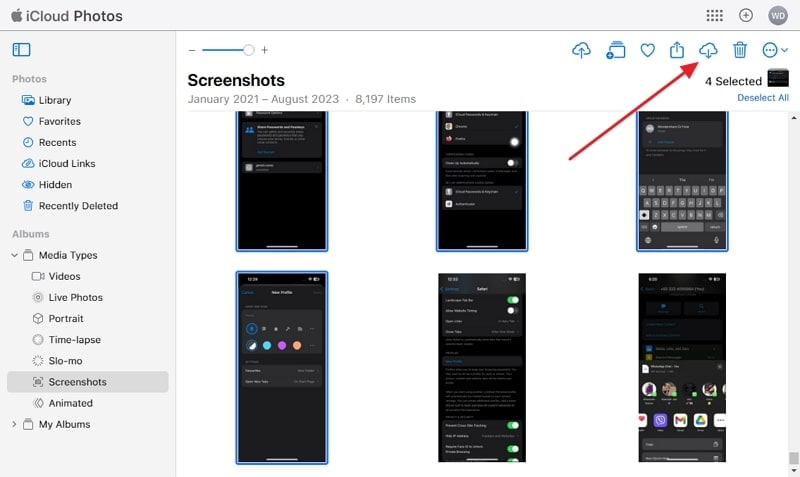
- Step 3: Browse your photos and select the ones you want to transfer to your PC. Click the “Download” icon (cloud with arrow) to download the selected pictures to your PC.
Pros
- iCloud can automatically back up your photos, ensuring that your memories are safeguarded in the event of device loss or damage.
- Your photos are accessible not only on your PC but also on your other Apple devices.
Con
- The provided 5GB of free cloud storage falls significantly short of meeting the requirements for adequate data backup.
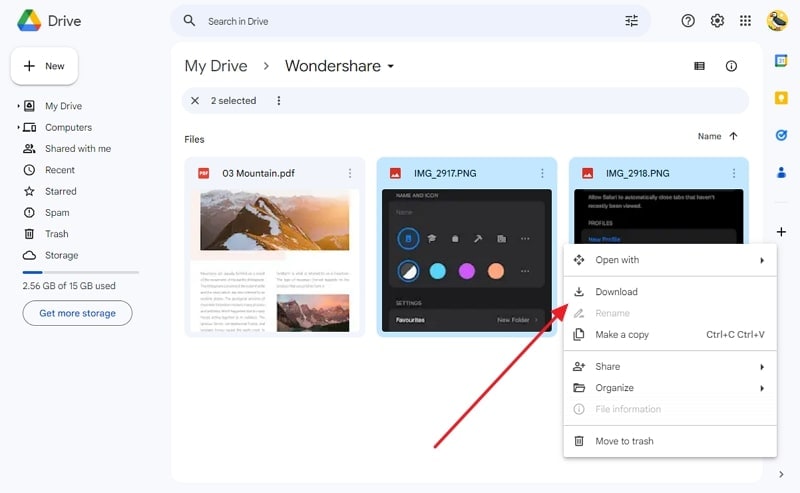
Method 2: Google Drive
In the vast realm of cloud storage solutions, Google Drive emerges as a universal storage for storing data. It is accessible on a multitude of devices and operating systems. This enables easy photo transfer between various platforms. You get 15GB of free storage with Google Drive to store and transfer your data. The steps needed to transfer photos from Apple iPhone 6 to PC are given below:
- Step 1: Download the Google Drive app from the App Store and log in using your Google account credentials. Tap the “+” button and select “Upload” to add the targeted photos to Google Drive.
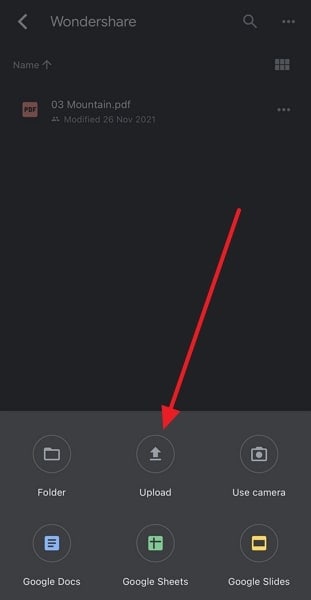
- Step 2: Once photos are uploaded, move to your PC and open Google Drive using a web browser. Locate the folder where you uploaded the pictures from your Apple iPhone 6 . Select the photos, right-click, and choose “Download” to initiate the download process.
Pros
- Google Drive permits offline access to your synced photos, even without a constant internet connection.
- It allows you to selectively share photos and albums with specific individuals.
Con
- Unlike iCloud, which automatically backs up photos, you have to upload all images manually to Google Drive.
Part 3: The Best iOS Management Tool To Transfer Photos From Apple iPhone 6 to PC
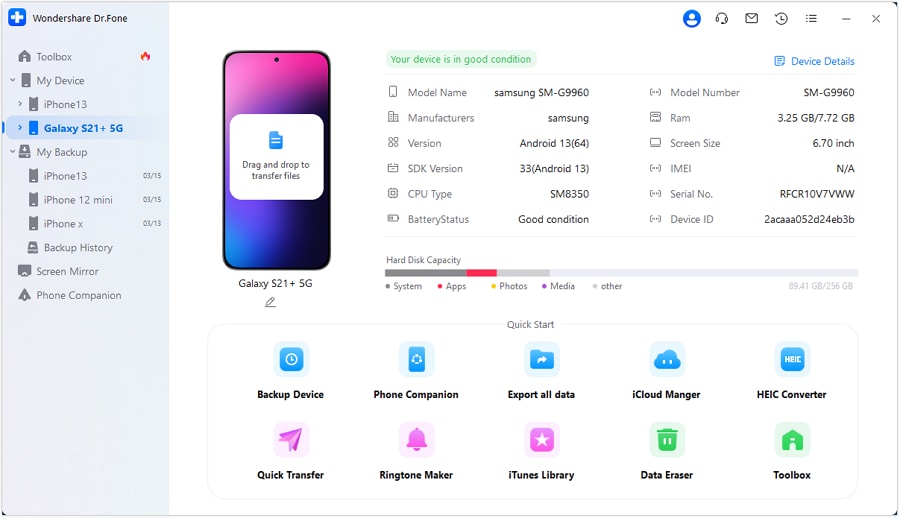
Wondershare Dr.Fone is the ultimate iOS management tool. It promises a harmonious blend of innovation, user-friendliness, and efficiency. This tool is a solution designed to bridge the gap between Apple iPhone 6 and PC. It offers a comprehensive suite of features beyond photo transfer, making it a one-stop solution for managing your Apple iPhone 6 data. With it, you can transfer data, get device details, view verification reports, and more.
Wondershare Dr.Fone also serves as a great tool to back up your data to your computer. It allows you to create wireless auto-backups on your computer. This backed-up data can be quickly restored to your device at any time. Furthermore, this tool also offers a dedicated iCloud manager to manage your iCloud data.
Key Features of Wondershare Dr.Fone
- If you want to sell your Apple iPhone 6 , then with the help of Wondershare Dr.Fone Anti-Recovery Mode, you can ensure that your data is erased properly.
- There is no need to jailbreak your iOS device for updating or downgrading it with the help of Wondershare Dr. Fone.
- Fone is designed so that even a layman can use it easily to manage his iPhone without any technical skill.
- You can use Wondershare Dr.Fone for almost all iOS versions and devices, including iPhone and iPod Touch.
Straightforward Step-by-Step Guide To Transfer Photos From Apple iPhone 6 to PC With Wondershare Dr.Fone
Transferring photos from Apple iPhone 6 to PC is a breeze with Wondershare Dr.Fone. Follow these steps to finish the transfer procedure:
- Step 1: Choose Export All Data in Wondershare Dr.Fone
With Wondershare Dr.Fone installed on your computer, connect to your Apple iPhone 6 . Once the Apple iPhone 6 device is detected, tap the Apple iPhone 6 device from the left sidebar and click “Export All Data.”

- Step 2: Select Photos for Transfer
Here you will be asked to choose the data you want to export. Select “Photos” and any other data you want to transfer. Once you click “Export,” Wondershare Dr.Fone will ask you to create a password for the backup.

- Step 3: Complete the Photo Transfer Process
Click “Verify” once you have created the process to start the transfer process of photos. The process will require a certain amount of time to finish. Once it is completed, you can click “Open in Folder” to view the backed-up data.

Conclusion
In our journey to uncover the most effective method for how to transfer photos from Apple iPhone 6 to PC, we’ve explored a myriad of options. Each method offered a unique blend of convenience and functionality. Among these, one solution stands out as a true game-changer: Wondershare Dr.Fone. As we conclude our guide, we wholeheartedly recommend Wondershare Dr.Fone as the ultimate iOS management tool.
It bridges the gap between devices with unparalleled features. Dr. Fone’s capability to transcend the realm of mere photo transfer sets it apart. Its comprehensive suite of features empowers you to manage your Apple iPhone 6 ‘s data with ease.
How To Transfer From Apple iPhone 6 to Samsung: Simplified Guide
If you have been using your iPhone for a long time but want a change in your life, you can easily switch to other brands like Samsung. Samsung phones offer more customization options regarding the software compared to iPhones. One of the major issues iPhone users face is limited storage, which can be avoided by using Samsung.
If the only thing stopping you from switching is the stress of transferring your data, you don’t have to worry anymore. In this article, we will discover various aspects to transfer data from Apple iPhone 6 to Samsung. Different methods and prerequisites to be fulfilled will be covered ahead. Moreover, we’ll also provide you with the best one-click method for transferring your iPhone to Samsung.

Part 1: What Are the Pre-Requirements To Fulfill Before Transferring From Apple iPhone 6 to Samsung?
Before we discuss different methods to transfer data from Apple iPhone 6 to Samsung, there are some things that you should not neglect. These attributes must be fulfilled before switching to ensure a smooth transition. That’s why we want you to look at these prerequisites and fulfill them before moving to your new device. Here’s a checklist of these pre-requirements before transferring the iPhone to Samsung.
- Backup Your iPhone: First of all, you have to ensure you have backed up your iPhone before proceeding with data transfer. This step will secure your data from losing or deleting it. Moreover, you can access it from any device whenever you need to. You can perform the backup by turning on the iCloud backup option from the iPhone.
- Battery Percentage: Another critical aspect is to charge both your iPhone and Samsung device to an adequate battery level. This will prevent any interruption due to low battery during the transfer process. Also, the performance of the Apple iPhone 6 devices will be optimum at the ideal battery percentage.
- Update Software: Furthermore, you should confirm that both your iPhone and Samsung devices are running the latest operating system software. You must update your iPhone to the latest iOS version and your Samsung device to the latest Android version.
- Secure Your Data: When you are done with the transferring process, it is necessary to clear your data from the old phone. Although the iPhone is one of the most secure devices, you should reset it before leaving. This will ensure that no one can access your files after you have wiped off all your data.
Part 2: How To Transfer Data From Apple iPhone 6 to Samsung Using Smart Switch App
Samsung Smart Switch tool is designed to simplify transferring various types of data from an iPhone to a Samsung. The data includes contacts, messages, photos, videos, and more. It supports both wired and wireless transfer methods. You can connect the Apple iPhone 6 devices using a USB cable or the wireless transfer option, which is more convenient for some users.
Let’s discuss the simple steps to help you in transferring data from Apple iPhone 6 to Samsung. The steps for wireless and wired methods are different, so stay tuned ahead.
1. Wireless Method
The wireless method will free you up from the need for a cable. However, you must sync your data to iCloud before transferring your iPhone to Samsung. The steps for a wireless transfer via the Smart Switch tool are described below:
- Step 1: First, you need to sync your iOS device to iCloud. You can do this by accessing “Settings” and tapping your Apple ID. After that, select the “iCloud” option and toggle on the data you want to sync.

- Step 2: Now, move to your Samsung device and open the “Smart Switch” application. Then, tap the “Continue” option followed by the “Allow” button to accept the terms of service.

- Step 3: After that, you need to choose the “Receive Data” option and tap on “iPhone/iPad.” To do so, select “Get Data from iCloud Instead” at the bottom of the screen.

- Step 4: Subsequently, enter your “Apple ID” and “Password” and tap on the “Sign In” option. Then, verify on your iPhone by choosing the “Allow” option, and you will get a verification code.

- Step 5: Finally, you have to enter the verification code on your Samsung device and tap on the “Connect” option. After that, select the data you want to transfer and hit the “Transfer” option.

2. Wired Method
Using a USB cable is essential for this data transfer process. To ensure seamless transfer, it is advised to link both devices via Wi-Fi, especially when dealing with sizable files. A comprehensive guide on transferring data from an iPhone to a Samsung device using a USB cable is below:
- Step 1: To start with, you need to open the “Smart Switch” application on your new Samsung phone and select the “Receive Data” option. After that, tap on the “iPhone/iPad” device to connect with.

- Step 2: You have to connect both phones using the iOS device’s lightning cable and a USB-OTG adapter. A menu will pop up for the verification process, so tap the “Trust” option and enter the unlock “Code” on the iPhone.

- Step 3: After that, you have to tap the “Next” option on your Samsung device. Then, select the data you wish to transfer and press the “Transfer” option. Finally, when finished, hit the “Done” button followed by the “Go to Home Screen” button on your Samsung device and disconnect the cable.

Part 3: What Are the Disadvantages Linked With Samsung Smart Switch?
Samsung Smart Switch is an efficient and convenient software for transferring an iPhone to Samsung. However, there are certain disadvantages associated with the Smart Switch application. These limitations could be irritating and tiresome to do the transfer process. We have gathered and written below some common disadvantages linked with the Samsung Smart Switch:
- **App Data Transfer Limitation:**Smart Switch can transfer many data types and files. However, it cannot transfer all the applications and their data from an iPhone to a Samsung device. Smart Switch does not support some apps. In other scenarios, the data present in the apps can show resistance to transfer due to platform differences.
- **Glitches:**Glitches during the transfer process can occur for various reasons, such as Wi-Fi connectivity issues or other potential factors. The important point is that the Smart Switch app can face interruptions mid-transfer. These interruptions could result in data loss or malfunctions in the receiving phone.
- **Speed Issues:**The transfer speed of the Smart Switch application is quite impressive. Despite that, using the wireless option requires keeping the two phones in close surroundings for optimal speed. If the phones are farther apart, the transfer speed significantly decreases.
- **File Format Compatibility:**Samsung Smar Switch does not fully support certain file formats or data types. When transferred to the Samsung device, these formats will require some additional steps for proper compatibility. This could affect multimedia files, documents, or specific file types.
Part 4: The Best One-Click Alternative to Samsung Smart Switch for Transferring iPhone to Samsung
We have described the methods to transfer from Apple iPhone 6 to Samsung via the Samsung Smart Switch application. Despite that, some limitations can hinder your process. That’s why we will provide you with the best one-click solution: Wondershare Dr.Fone . This software will transfer data from Apple iPhone 6 to Samsung within no time.
Dr.Fone is equipped with advanced tools that can understand the requirements and perform the task automatically. It assists in transferring, managing, and backing up data across devices. Ultimately, the software provides comprehensive solutions for your needs.
Method 1: Transfer iPhone Data to Samsung
The Phone Transfer feature in Wondershare Dr.Fone allows you to copy data effortlessly from one phone to another using a single click. You can transfer various data types such as contacts, SMS, photos, videos, music, and more. This transfer can even be between devices operating on different systems like iOS and Android. Also, the tool is compatible with Android 14 (Win) and the latest iOS 17, which ensures smooth functionality.
The straightforward process requires simple clicks to initiate and complete the transfer from Apple iPhone 6 to Samsung. We have described the whole method step-wise below for your convenience:
- Step 1: Activate the Phone Transfer Tool in Dr.Fone
To start with, you need to launch the Wondershare Dr.Fone toolkit on your Windows PC or MacBook. Then, access the “Phone Transfer” tool from the left side via the “Toolbox” tab and connect your iPhone and Samsung devices.
- Step 2: Select the “Source” and “Destination” Devices
In the next step, the software will detect the connected iPhone and Samsung devices. You have to choose the “Source” and “Destination” devices to associate the path of transfer. You can also use the “Flip” button if the direction is the other way around.

- Step 3: Select the Data Types and Start the Transfer Process
Now, you have to choose the specific data types for transfer by marking the relevant categories. After that, initiate the process by tapping the “Start Transfer” button. Also, you need to turn off the iCloud syncing when a prompt appears on Wondershare Dr.Fone. You can do this in the “Profile” settings on your iPhone.

- Step 4: Conclude the iPhone to Samsung Transfer Process
Finally, the progress bar will appear before you, where you can observe the process. Hit the “OK” button after the successful completion of the process. Then, you can verify your data from your new Samsung device.

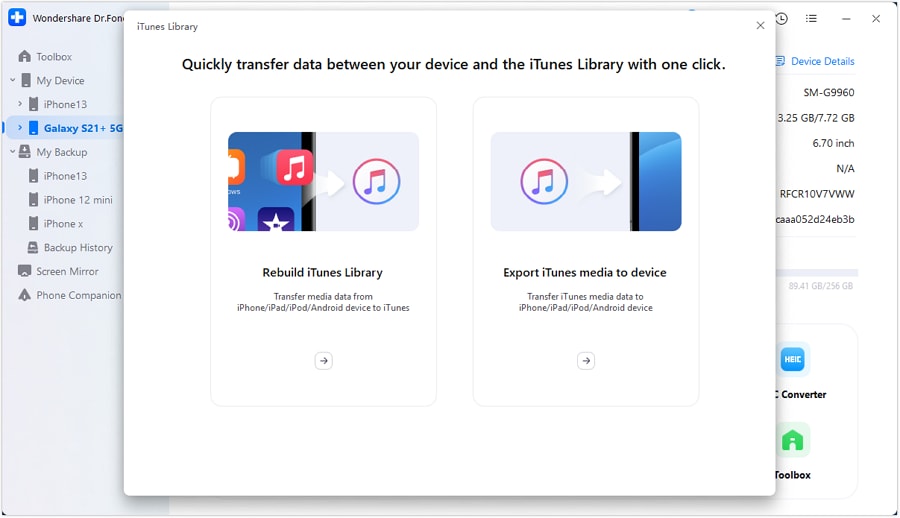
Method 2: Transfer iTunes Data to Samsung
If you have backed up your iPhone data in iTunes, you can restore it to your Samsung device. The “Phone Manager” feature in Dr.Fone allows you to restore iTunes data on your Apple iPhone 6. This tool can transfer media files, social data, mobile apps, contacts, and more. Let’s explore the steps involved in transferring data from an iPhone to a Samsung device using iTunes:
Step 1: Activate Dr.Fone and Connect Samsung Device
First, access the Wondershare Dr.Fone software and connect your Samsung device to your system. The device will appear on the left side that you will select to access the homepage. There, choose the “iTunes Library” option to proceed further.
- Step 2: Select and Export the Specific File Types
The new window will open, and you must select the “Export iTunes Media to Device” option. This will enable the transfer of iTunes media to your Apple iPhone 6. After that, you need to checkmark the file types to transfer and hit the “Transfer” button.
Step 3: End the Transfer Process
Finally, monitor the progress bar displayed in the subsequent window to track the completion of the transfer. Then, click “OK” to confirm the successful transfer from iTunes to your Apple iPhone 6.
Method 3: Transfer iCloud Data to Samsung
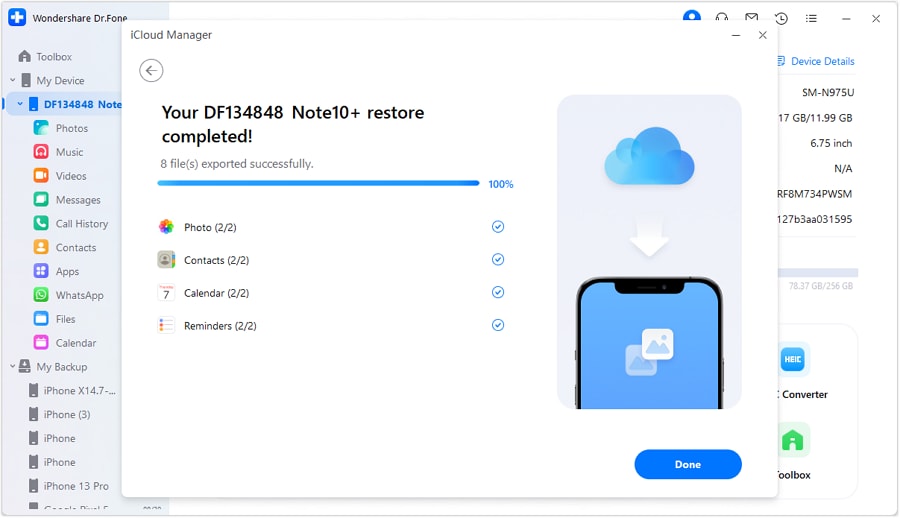
iCloud serves as a highly convenient method to back up iOS devices. However, restoring an iCloud backup to Android devices is not as simple. iCloud only allows restoring the entire backup to iOS device setup, and it doesn’t support restoring backups to Android devices. The iCloud Manager feature in Wondershare Dr.Fone offers a solution to address this limitation.
It allows selective content restoration from iCloud backups to Samsung devices without alteration. Learn how to transfer from Apple iPhone 6 to Samsung via iCloud backup data with the help of the following steps:
- Step 1: Access Wondershare Dr.Fone and Plugin Samsung Device
To begin with, open the Wondershare Dr.Fone software on your system and connect your Samsung device to it. Then, access your device on the software from the left side and select the “iCloud Manager” option within the home screen. You have to fill in those credentials to sign into your iCloud account.
- Step 2: Select the Data Files and Start Restoration
In the next step, you have to select the data type from your iCloud backed-up data. Then, hit the “Restore to Device” button and the “Start” button to start the restoration process. The progress bar will appear and display the progress of the restoration of iCloud data to Samsung devices.

- Step 3: Finish the Data Restoration Process on Your Samsung Device
The process will conclude within a few minutes and display the final message of completion. Then, you can press the “Done” button to conclude the iCloud to Samsung data transfer process.
Bonus Tip. What Are the Most Recommended Upcoming Smartphones of Samsung in 2024?
Samsung is planning to add generative AI to its new products, and they will possibly share more details next year. They’ve introduced their generative AI and given hints regarding Galaxy AI’s role in their 2024 phones. It’s a major competitor and other big names in the mobile market. We’re expecting the following mobile products from Samsung next year based on their usual launch cycle and reports.
1. Galaxy S24 Series
The projected launch timeline for the Galaxy S24 series is early 2024. Artificial intelligence will likely take the main area for the Galaxy S24. Samsung’s Gauss generative AI model, similar to ChatGPT, can compose emails, summarize documents, and help in coding. Additionally, the Galaxy AI is anticipated to facilitate call translations.
Moreover, Samsung’s Exynos 2400 processor guarantees a significant AI performance boost, enabling text-to-image AI generation. AI enhancements, such as Samsung’s Zoom Anywhere feature, will notably impact the camera. This feature, probably in Galaxy S24 Ultra, will enable 4x zoom for moving objects.
2. Galaxy Z Flip 6
The rumored Galaxy Z Flip 6 expects to overcome the Z Flip 5 by introducing a new processor and more software features. These software features will benefit its foldable design. Also, the reports suggest a 50-megapixel primary camera sensor for the Z Flip 6. There is also the possibility of AI capabilities similar to those of the Galaxy S24 series. Samsung normally unveils new Galaxy Z Flip phones around August.
3. Galaxy Z Fold 6
Samsung’s Galaxy Z Fold is very similar to the Z Flip. This phone will probably have a slot for the S Pen stylus that will boost its productivity. Also, the Z Fold 6 might come with a new processor similar to the one in the Galaxy S24. Some fresh software features and slight design enhancements might be added, too.
4. Galaxy A55 5G
Samsung usually unveils new Galaxy A phone versions in March. Samsung’s Galaxy A series phones offer impressive features like multi-lens cameras and high-refresh-rate screens at more affordable prices. However, they often compromise on performance and camera quality. Also, it’s unlikely that the Galaxy A55 will use the same chip as the Galaxy S24 series.
Samsung’s Galaxy A phones usually have a slightly less powerful processor than their flagship counterparts. For instance, the Galaxy A54 uses the Exynos 1380 processor, which falls behind Qualcomm’s Snapdragon 8 series.
Conclusion
In a nutshell, the Samsung Smart Switch application provides an efficient and convenient method to transfer from Apple iPhone 6 to Samsung. However, it comes with certain disadvantages and limitations that have been faced by many users. We have provided you with a more effective and powerful solution: Wondershare Dr.Fone. This tool will assist you in transferring your iPhone to Samsung with just one click. Plus, you learned about the latest Samsung devices in this article.
Also read:
- [New] 2024 Approved The Beginner's Handbook to IGTV Mastery
- [New] In 2024, MelodicMeasurement Reaction to Tunes
- [Updated] Adobe PhotoStability Effective or Fanciful, In 2024
- 5 Ways to Transfer Music from Apple iPhone 6s Plus to Android | Dr.fone
- 5 Ways to Transfer Music from Apple iPhone XS Max to Android | Dr.fone
- A Comprehensible Walkthrough Finding Your YouTube Remarks for 2024
- Affordable & Efficient TopMate C302 Laptop Cooler - Comprehensive Review
- Easy Methods How To Transfer Pictures From Apple iPhone 6 to PC | Dr.fone
- How can I get more stardust in pokemon go On Oppo A38? | Dr.fone
- How To Transfer From Apple iPhone 11 Pro Max to Samsung Simplified Guide | Dr.fone
- In 2024, How to Transfer from Apple iPhone 6s Plus to iPhone 8/11/11 Pro | Dr.fone
- Linguistic Borrowing: A World View in Eng
- Score the Ultimate Deal on Apple Watch Series 9, Exclusive Lowest Prices Post Prime Day
- Various Methods to Transfer Pictures from Apple iPhone 14 to PC | Dr.fone
- Title: How to Transfer from Apple iPhone 6 to iPhone 8/11/11 Pro | Dr.fone
- Author: Charlotte
- Created at : 2024-10-22 19:42:05
- Updated at : 2024-10-29 20:09:36
- Link: https://iphone-transfer.techidaily.com/how-to-transfer-from-apple-iphone-6-to-iphone-81111-pro-drfone-by-drfone-transfer-from-ios/
- License: This work is licensed under CC BY-NC-SA 4.0.