
How to Transfer from Apple iPhone 14 Pro to iPhone 8/X/11 | Dr.fone
How to Transfer from Apple iPhone 14 Pro to iPhone 8/11/11 Pro
Are you an Apple iPhone 14 Pro user? Well, iPhone 8/11/11 Pro will be a huge technological leap for you. In this article we will take you through how to transfer everything from Apple iPhone 14 Pro to iPhone 8/11/11 Pro easily in three sim-ple steps because we understand that no smartphone works up to our expectations if our data, such as contacts, music, photos, notes, etc is not fed in it.
So if you are planning to buy the new iPhone 8/11/11 Pro, here is everything you need to know to transfer data from old iPhone to new iPhone. Also, even if you want to retain your old device, transfer Apple iPhone 14 Pro to iPhone 8/11/11 Pro and enjoying the same data on both your iPhones.
Best iPhone to iPhone transfer tool - transfer files from old device to new iPhone 8/11/11 Pro without iTunes
We bet you have heard of Dr.Fone software. It is the most reliable 1-Click Phone Transfer tool to send data (contacts/text messages/photos/etc.) from an old phone to new one. Its user-friendliness and intuitive interface make it the best and most efficient software to transfer Apple iPhone 14 Pro to iPhone 8/11/11 Pro as it is fully compatible with iOS 13. It is available for both Mac and Windows and is very thoughtfully designed to prevent hacking and data loss.
You may also put this software to good use to backup and restore your iPhone data.
Dr.Fone - Phone Transfer
Transfer Everything from iPhone 5S to iPhone 8/11/11 Pro in 1 Click!
- Easily transfer photos, videos, calendar, contacts, messages and music from old iPhone to new iPhone 8/11/11 Pro.
- Enable to transfer from HTC, Samsung, Nokia, Motorola and more to iPhone X/8/7S/7/6S/6 (Plus)/5s/5c/5/4S/4/3GS.
- Works perfectly with Apple, Samsung, HTC, LG, Sony, Google, HUAWEI, Motorola, ZTE, Nokia and more smartphones and tablets.
- Fully compatible with major providers like AT&T, Verizon, Sprint and T-Mobile.
- Supports iPhone, iPad, iPod touch and the latest iOS version.
- Fully compatible with the latest Windows or Mac version.
3981454 people have downloaded it
How to transfer everything from Apple iPhone 14 Pro to iPhone 8/11/11 Pro
In this segment, we will learn how to transfer everything from Apple iPhone 14 Pro to iPhone 8/11/11 Pro with Dr.Fone. To do so, download and install the software on your computer and follow the steps given below:
Step 1: Launch Dr.Fone software
Once Dr.Fone - Phone Transfer is installed on your PC, launch the program and connect the Apple iPhone 14 Pro and iPhone 8/11/11 Pro to the PC with the help of two different USB cables. Next up, select “Phone Transfer” option on Dr.Fone toolkit and move on.

Step 2. Data Transfer from iPhone 5S to iPhone 8/11/11 Pro
In this step, select content to transfer data from old iPhone to iPhone 8/11/11 Pro. Also, make sure the source and target device are duly recognized (if not, just swap them).
Step 3. Initiate the Transfer from iPhone 5S to iPhone 8/11/11 Pro
This is the last step which only requires you to hit the “Start Transfer” button and view the transfer progress on the screen.

Note: The images above are of iPhone 6Plus. There is no difference in procedure to transfer Apple iPhone 14 Pro to iPhone 8/11/11 Pro.
Simple, right? In just one click, all the data is moved from Apple iPhone 14 Pro to iPhone 8/11/11 Pro.
Part 2: How to transfer everything from Apple iPhone 14 Pro to iPhone 8/11/11 Pro with iTunes?
iTunes is the software developed by Apple Inc. to manage iPhones and other iOS devices. Many users still prefer to use iTunes to transfer data from old iPhone to iPhone 8/11/11 Pro, thus, here are simple steps to help you do so:
Step 1. First and foremost, download the latest version of iTunes on your PC from Apple’s official website. Install it and launch the program.
Step 2. Using an USB, connect the Apple iPhone 14 Pro to your PC and wait until iTunes automatically detects it. You will be able to view your Apple iPhone 14 Pro under the “Devices” tab.
Step 3. Click Apple iPhone 14 Pro to view all the options at the left hand side of the iTunes interface. Select “Backup Now” to backup all the data stored in the Apple iPhone 14 Pro which needs to be transferred to iPhone 8/11/11 Pro.

Step 4. Let the process of backing up Apple iPhone 14 Pro finish completely. Once this is done, disconnect it and use another USB to connect new iPhone 8/11/11 Pro to the PC.
Step 5. Follow the steps given above to view the options with respect to the new iPhone 8/11/11 Pro on the iTunes interface. Select “Restore Backup” and waiter the process to get over to transfer data from old iPhone to iPhone 8/11/11 Pro.
Part 3: How to transfer everything from Apple iPhone 14 Pro to iPhone 8/11/11 Pro with iCloud?
iCloud is another great way to transfer Apple iPhone 14 Pro to iPhone 8/11/11 Pro in hassle free manner. Since it is a cloud service by Apple, it stores all our data and allows us to restore it on any and every iOS device with the same Apple ID and password.
Follow the steps given below to understand how to transfer everything from Apple iPhone 14 Pro to iPhone 8/11/11 Pro:
Step 1. Do not set up your new iPhone 8/11/11 Pro. If you already have, Visit “Settings” > “General” > “Reset” > Erase all content and settings to start from scratch.
Step 2. Now on your old Phone 5s, visit “Settings” and tap on your name. Select “iCloud” and scroll down to select “iCloud Backup” and hit “Backup Now”. Let the process finish completely and note down the exact timing of the back up file.

Step 3. Now, on the iPhone 8/11/11 Pro, start setting it up once again and connect it to a WiFi network.
Step 4. Once you reach the “Set Up” Page, select “Restore from iCloud backup” .
Step 5. Select the most recent back up file. Feed in your Apple ID details and let the iPhone restore all the data from iCloud backup. Let your iPhone 8/11/11 Pro reboot at the end of restoration process.

Moving data from old Apple iPhone 14 Pro to new iPhone 8/11/11 Pro is an easy job with the help of three tools listed above. All our data, such as photos, videos, music, contacts, notes, calendar, messages, Apps, etc, are important to us and need to be restored in the new device for us to start enjoying our new iPhone 8/11/11 Pro.
Where iTunes and iCloud are easy and go-to tools for many users, Dr.Fone - Phone Transfer is comparatively new, but way more effective than the other two methods to transfer data from old iPhone to iPhone 8/11/11 Pro. We recommend that you download and install this software right away and also share your experience along with this guide with your friends and family. Explore its features and make life simpler by managing your iPhone in a better and more secure way.
Switch Cards Between Apple iPhone 14 Pro and other iPhones Will Move All Phone Services?
The existence of SIM cards is the fundamental source of all cellular network connections. With their use from the inception of smartphones, SIM cards are associated with every significant cellular operation. All major functions, such as cellular calling, messaging, and cellular internet, are obtained through SIM cards. Whether you are using an iPhone or an Android, using a SIM card is standard.
If you are seeking to change your iPhone, you will have to shift everything, including the SIM cards. For that, the article discusses a guide explaining how to switch SIM cards in Apple iPhone 14 Pro and other iPhones properly. Look through the discussion for better awareness of switching SIM cards between Apple iPhone 14 Pro and other iPhones. The implications of shifting SIM cards and other details will be focused on throughout the discussion.
Part 1: Things To Know Before Switching SIM Cards in iPhone
Whenever you consider switching your SIM card to iPhone, you must keep a few things in mind. Considering these points will help you in avoiding all forms of discrepancies that can occur on your iOS device:
- Compatibility of SIM Card: You have to ensure that the SIM card is compatible with your iPhone. Some SIM cards do not operate on Apple iPhone 14 Pro and other iPhones since they are incompatible.
- Unlocked iPhone: If you have an unlocked iPhone, you can utilize third-party SIM cards for this purpose. An unlocked iPhone is a best-case scenario for using such SIMs.
- Backup iPhone Data: Although there is no direct involvement of iPhone data in the process, it is best to back up the data. It includes all essential contacts and media that might get physically damaged while changing SIM cards.
- Turn Off iPhone While Switching SIM Cards: It is best to turn off your iOS device during such processes. To avoid any software anomaly, turning off the Apple iPhone 14 Pro device can save you the drill.
Part 2: What Happens If You Switch Two SIM Cards in iPhone
On switching a SIM card to a new iPhone, there are multiple consequences that occur against it. The provided details explain the possible situations that can arise if you consider switching SIM cards in iPhone:
- SIM cards usually contain contacts from the previous device it is contained in. There is a possibility that the contacts present in the SIM card might be transferred into the new iPhone. On attaching the SIM card to the iPhone, the contacts will be automatically transferred.
- The cellular network, along with other cellular packages, will be in operational use as the SIM card will be attached to the iPhone. You will be paying according to the packages offered by your SIM carrier.
- If the SIM card is not compatible with the iPhone, the network operations will malfunction and not operate properly. Different connectivity issues will be reported across the scale.
- On switching your SIM card, you will have to reactivate iMessage and FaceTime under the cellular settings of the new SIM card. The previous settings for both services will be removed upon removing the SIM card.
Part 3: How To Switch SIM Card to New iPhone Safely
Once you have learned the implications of switching your SIM card to your new iPhone, you will need to understand the operability involved in the process. To know how to switch SIM cards iPhone perfectly, follow the step-by-step process provided below:
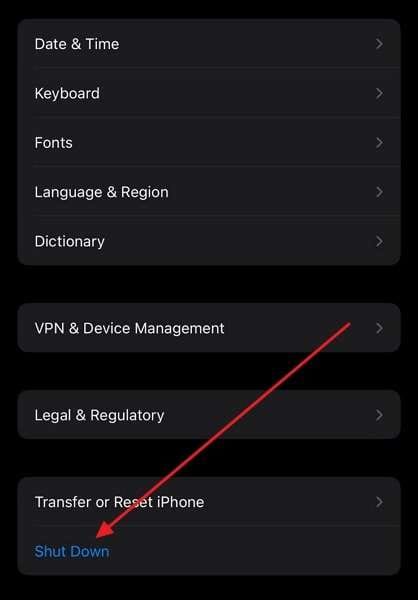
Step 1: Turn off your iPhone to remove the current SIM card from your device. For that, lead into the “Settings” and look for the “General” section. Follow through the screen and scroll down to find the option of “Shut Down” to turn off your iOS device.
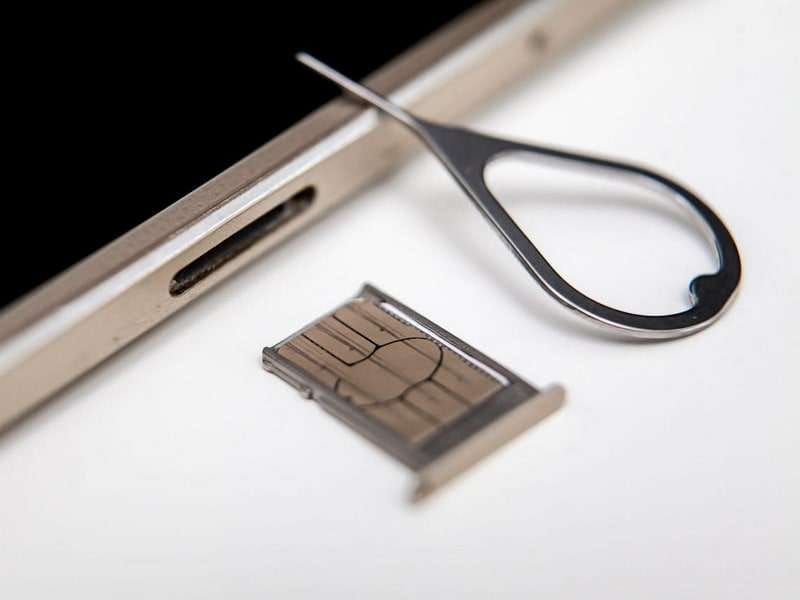
Step 2: As the Apple iPhone 14 Pro device turns off, use a proper pin to open the SIM tray on your iPhone, which completely depends on your model. For the latest and newest Apple iPhone 14 Pro and other iPhones, the SIM tray is present on the bottom-left side of the Apple iPhone 14 Pro device. Remove the old SIM card and replace it with the new one according to the position. Re-insert the SIM tray back into the Apple iPhone 14 Pro device.

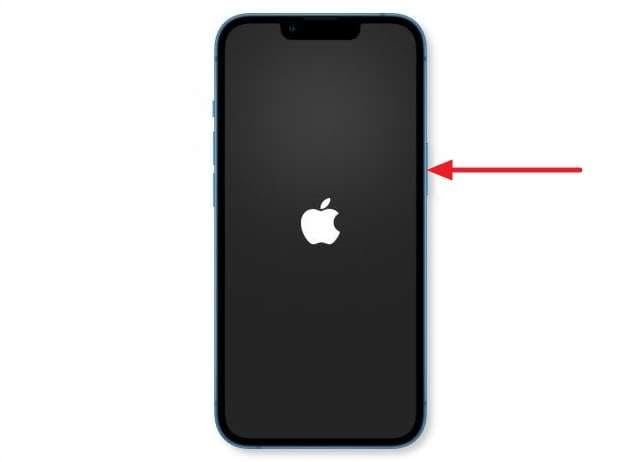
Step 3: Use the “Power” button on your iOS device to turn it on. Once it turns on, you will find the cellular operations working according to the new SIM card.
Part 4: What Happens If You Switch to an iPhone Locked to A Specific Carrier?
If you switch to an iPhone locked to a specific carrier, you might encounter several complications. These could prevent the Apple iPhone 14 Pro device from functioning with your desired network provider. In such instances, the iPhone’s functionality could be limited. It hinders your ability to use certain features or services on the Apple iPhone 14 Pro device. This issue is particularly prevalent when trying to use a SIM card from a different carrier than the one the iPhone is locked to.
To address this concern, you can use Dr.Fone - Screen Unlock (iOS) , a cutting-edge solution. It is designed to unlock SIM locks and enable the use of the iPhone with any compatible carrier. Dr.Fone provides a reliable and user-friendly method to unlock various locks. This also includes SIM locks on Apple iPhone 14 Pro and other iPhones, allowing you to switch between carriers.
Dr.Fone - Screen Unlock (iOS)
Best SIM Unlock for iPhone.
- Simple, click-through, process.
- Fix SIM unlock with a few clicks.
- Supports almost all carriers, from Vodafone to Sprint.
- No tech knowledge required, everybody can handle it.
- Supports iPhone 5S to iPhone X, which are running between iOS 12.0 and iOS 14.8.1


3,046,049 people have downloaded it
Steps To Remove iPhone SIM Lock via Dr.Fone - Screen Unlock (iOS)
The following are the steps you need to follow to remove the iPhone SIM lock with the help of Wondershare Dr.Fone:
Step 1: Access Screen Unlock Within Wondershare Dr.Fone
Start installing and launching Wondershare Dr.Fone on your computer and selecting “Toolbox.” From the main interface, click “Screen Unlock” and identify “iOS” as your device. Now, tap “Remove SIM Locked” from the “Screen Unlock” menu and connect your iPhone.
Step 2: Jailbreak Your iDevice
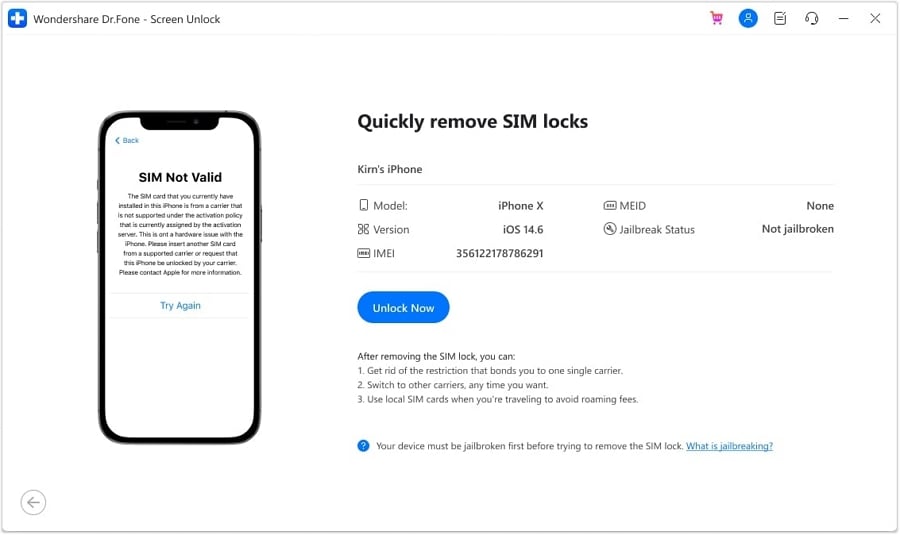
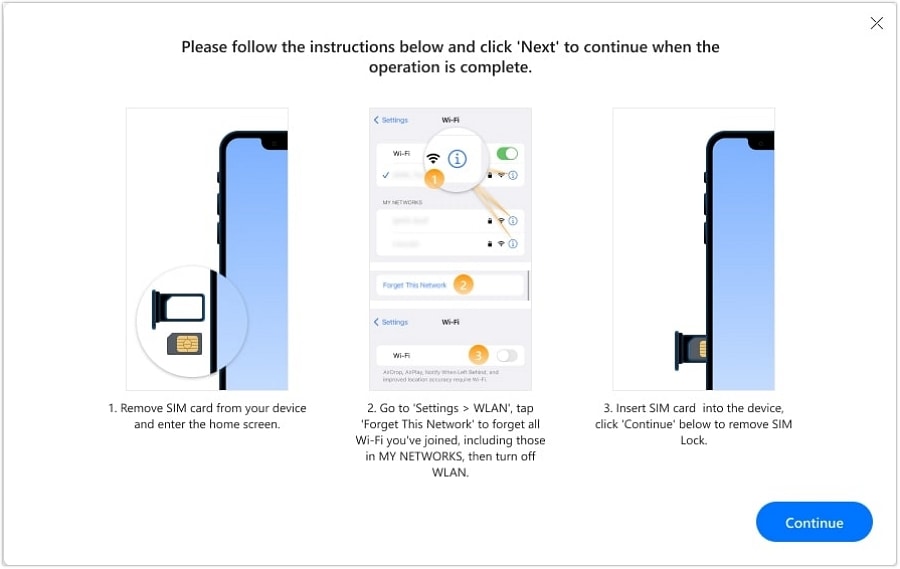
On the following screen, tap “Start” and follow it by clicking “Unlock Now” as Wondershare Dr.Fone recognizes your device. Now, you will need to jailbreak your device, for which the instructions are given on the screen. Remove the SIM card from the phone and access “WLAN” through device Settings.
Step 3: Complete the SIM Lock Removal Process
Go to the Wi-Fi network you are connected to and choose “Forget This Network.” Then, move to each saved Wi-Fi network in “My Networks” and remove all of them. Reinsert the SIM card to the Apple iPhone 14 Pro device and press “Continue” on the screen. It will initiate the SIM lock removal process, which will be finished in a few moments.
Part 5: How To Switch All Data to New iPhone in One Click
Whenever you consider changing your SIM card on your new iPhone, there are certain things you must look out for. Maintaining all the data is one appropriate consideration that can be effective for your operations. Keeping data backups under such circumstances is the best-case scenario to avoid discrepancies. Although you are switching SIM cards between Apple iPhone 14 Pro and other iPhones, what if you are required to shift data?
If you have bought a new iPhone and need to switch all data along with the SIM card, you will need a proper direction. For this, Dr.Fone - Phone Transfer (iOS) is the savior. This particular platform is known for making operations of data transfer easier. While Dr.Fone replicates multiple features and functions, it offers some extensive characteristics. An overview of these features is presented as follows:
- You can transfer various data between devices, ranging between 8 to 15. It entirely depends on the nature of the transfer between devices.
- The process of transferring data is straightforward. You are not required to put in any effort to transfer data.
- The results provided in the data transfer are incredibly high. Dr.Fone reports concluding proceedings within 3 minutes.
Steps To Switch Data to New iPhone With Dr.Fone - Phone Transfer
As you seek to know the steps to switch data to a new iPhone with Dr.Fone - Phone Transfer, follow the steps as provided next:
Step 1: Open Dr.Fone and Select Phone Transfer
Launch Wondershare Dr.Fone after downloading and installing it on your device. Continue to select “Phone Transfer” from the available options. Following this, connect your old and new Apple iPhone 14 Pro and other iPhones to your device.
Step 2: Set Source and Destination
As you connect both devices in the transfer process, define the source and destination. Set your old device as the “Source” and the new iPhone as the “Target.” To change the Apple iPhone 14 Pro devices, use the “Flip” button.

Step 3: Select File Types and Transfer
Select the file types that you wish to transfer from the center section. Select “Start Transfer” to initiate the process. The data will be successfully transferred in a few minutes.

Frequently Asked Questions
Here are answers to some of the FAQs available on the internet regarding how to change a SIM card on an iPhone.
- Can I use the same eSIM card to switch between different Apple iPhone 14 Pro and other iPhones?
Yes, you can use the same eSIM card to switch between different Apple iPhone 14 Pro and other iPhones, provided that the specific carrier supports eSIM technology and allows the transfer of the eSIM between devices. With eSIMs, the process of switching between devices is typically smoother compared to physical SIM cards. The reason is it involves digital activation and can be done remotely without the need to swap cards physically.
- Is there a difference between switching physical SIM cards and using eSIM for transferring phone services between Apple iPhone 14 Pro and other iPhones?
Physical SIM cards are tangible, removable chips that need to be inserted into a SIM card tray, whereas eSIMs are integrated directly into the Apple iPhone 14 Pro device’s hardware. Swapping physical SIM cards involves physically removing and inserting the card into the new device, whereas transferring an eSIM between devices can be done remotely. Physical SIM cards can store limited contact information and some network settings, whereas eSIMs can store multiple network profiles.
Conclusion
This article has provided a valuable overview of switching SIM cards to new Apple iPhone 14 Pro and other iPhones. With a proper understanding of the repercussions involved in the process, a guide has been discussed. Along with its thorough discussion, you have also figured out how to transfer data to a new iPhone. For that, Dr.Fone - Phone Transfer is the best option in the market.
4 Ways to Transfer Music from Apple iPhone 14 Pro to iPod touch
Although the Apple iPods have been discontinued, many old users still use them as music players. As we all know, if you want to transfer music from Apple iPhone 14 Pro to iPod, you can just log in with the same Apple ID and then download the songs you purchased on the iPod touch. However, how can you transfer the music that is saved on other devices to your iPod? Don’t worry, this detailed guide introduces 4 ways to transfer music from Apple iPhone 14 Pro to iPod touch, just keep reading!
Part 1: Easy and powerful way to transfer music from Apple iPhone 14 Pro to iPod
A great tool for the purpose of easy transfer of music between iOS devices is Dr.Fone - Phone Transfer . This tool makes life easy for people who want to switch to a new smartphone or are looking for solutions to sync not only music but also contacts, messages, call logs, photos, etc. between different smartphones.
Dr.Fone - Phone Transfer
1-Click Phone to Phone Transfer
- Easy, fast, and safe.
- Move data between devices with different operating systems, i.e iOS to Android.
- Supports iOS devices that run the latest iOS version
- Transfer photos, text messages, contacts, notes, and many other file types.
- Supports over 8000+ Android devices. Works for all models of iPhone, iPad, and iPod.
4,495,115 people have downloaded it
How to use transfer music from Apple iPhone 14 Pro to iPod
Step 1. Download and install Dr.Fone on your computer. Run it and select Phone Transfer. Connect your iPhone and iPod with your computer, and Dr.Fone will detect your iOS devices automatically.
Step 2. Select Music and other file types you would like to transfer and click on Start Transfer.

Step 3. Then just sit and have a cup of coffee. All music files will be transferred from Apple iPhone 14 Pro to iPod successfully.
Part 2: Transfer Music purchased from the iTunes Store from Apple iPhone 14 Pro to iPod using iTunes
In case, you have purchased music from iTunes and want it to transfer from your iPhone to iPod, there is no direct way to the process. For it to be done, you need to re-download previous iTunes Store purchases on your computer. The best thing for this to be done, is that no extra cost is required to be done till the time, the same ID is used for the same purpose.
Then you need to follow the following steps for the process to be done. On the computer, in iTunes, go to the iTunes Store. Then you need to click ‘Purchased’, which is available in the Quick Links on the Home screen. Then you need to find the songs that are on the iPhone, but not in your computer’s iTunes library. Then, click the ‘cloud’ button next to the song name to download it. The last step of syncing remains which can be done as desired. Just sync those songs from your iTunes library to your iPod as desired and you are done with the job of Transfer Music Purchased from the iTunes store from Apple iPhone 14 Pro to iPod.
Part 3: Transfer Music purchased from the iTunes Store from Apple iPhone 14 Pro to iPod using iTunes match
iTunes match is another way to process of transfer music purchased or unpurchased from iTunes from Apple iPhone 14 Pro to iPod. In fact, iTunes match determines the song, which is present in the iCloud and since there are over 43 million songs, iTunes match matches these unpurchased songs with the database and allows playing these music from the iCloud store. Now, you just need to tap the iCloud download button to download music from an artist, album or playlist. Thus, a person has immediate access to a huge music library without having to worry about the storage space on your device.
Part 4: Transfer Music imported from a CD or other source from Apple iPhone 14 Pro to iPod
For this process to complete, you need to import all songs from CD to iTunes at first. Here is the process for the complete transfer of Music from CD and other sources.
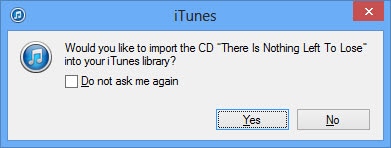
Open iTunes and insert the CD that you wish to import into the disc drive
The options might appear in an instant. If you want to import every song on the disc, select yes and click No, in case you want specific music to import.
In case, you clicked on ‘NO’, Select the menu on the top-left side of the iTunes window and select the audio CD in the list.
Then, check the files you want to import to iTunes, then select Import CD.
The preferences option appears and you need to select the preferences and click OK after the preference has been done.
In case, the music library already contains tracks from the album, which you are importing, you will receive a prompt window to overwrite them. You can select either Replace Existing or Don’t Replace as your wish.
Then you have to wait till the music is ripped to the iTunes library.
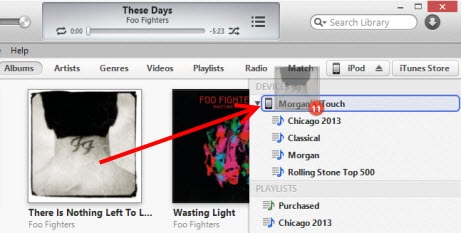
As soon as the import is complete, attach your device to the computer.
You can now drag the album to the right side of the iTunes window where a pane will appear containing the music on your device. Drop it right on your iPod or other devices.
All remains is to eject the iPod and enjoy your music


Also read:
- [New] The Testimonial Toolkit for Effective Promotion
- 4 Ways to Sync Contacts from Apple iPhone XR to iPad Easily | Dr.fone
- Complete Tutorial Sending Photos From Apple iPhone XS to iPad | Dr.fone
- In 2024, Complete Tutorial Sending Photos From Apple iPhone 14 Plus to iPad | Dr.fone
- In 2024, How to Transfer from Apple iPhone 12 mini to iPhone 8/11/11 Pro | Dr.fone
- Issue Corrected: Remaining Unused Storage After Hard Drive Duplication Process
- Mastering Troubleshooting: A Complete Reference for PC Blue Screen Codes
- Reactivate Missing Siri Suggestions: Tips for iPhone Users
- Troubleshooting Creative Pebble Speaker Connectivity Problems
- Title: How to Transfer from Apple iPhone 14 Pro to iPhone 8/X/11 | Dr.fone
- Author: Charlotte
- Created at : 2024-10-27 00:27:57
- Updated at : 2024-10-29 20:45:58
- Link: https://iphone-transfer.techidaily.com/how-to-transfer-from-apple-iphone-14-pro-to-iphone-8x11-drfone-by-drfone-transfer-from-ios/
- License: This work is licensed under CC BY-NC-SA 4.0.