
How to Transfer Everything from Apple iPhone 6s Plus to iPhone 8/X/11 | Dr.fone
How to Transfer Everything from Apple iPhone 6s Plus to iPhone 8/X/11

This article guide focuses on the techniques and tools you need to transfer everything from Apple iPhone 6s Plus to iPhone 8/X/11. As we know that most of the iPhone users will be switching their devices because of the new and improved iPhone 8/X/11 device which has to offer more features to the Apple users however, there is always a need for proper tool that can transfer data from the old iPhone device to new iPhone 8/X/11.
We have different kinds of files in our iPhone and almost all of the files are important to us. We would never want to stay out of touch with our important ones, and contacts help us to do that. All of that collection of your favorite music is not east to gather and you would certainly not like it if all of it is gone from your handset, So Contacts, Photos, SMS, Music all of these files are very important to us one can only understand the importance when they have no more access to these contents. Similarly, Photos are also important because they are the proof of our precious memories, and we don’t want to lose them. SMS messages are the records of every conversation we had with our contacts and sometimes we need record to continue the conversation regarding the subject. To transfer all of the content from one phone to another, we need a transfer tool because different handsets have different operating systems. And it is not easy to perform transfer functions between two devices. Most of the people hesitate to switch to a newer device because of the hassle they think they might have to go through to transfer data to new device, including the new iPhone 8/X/11.
How to transfer everything from Apple iPhone 6s Plus to iPhone 8/X/11
If you are looking to transfer everything from your old iPhone to your new iPhone 8/X/11 then Dr.Fone - Phone Transfer is a must get tool. With Dr.Fone application, you can easily transfer your important music, pictures, videos, SMS and much more transfer data to your new iPhone 8/X/11. There are always complications for iPhone users when they want to switch to new and latest device, but it is very easy thanks to Wondershare’s Mobile Trans.

Dr.Fone - Phone Transfer
Transfer Everything from Apple iPhone 6s Plus to iPhone 8/X/11 in 1 Click!.
- Easily transfer photos, videos, calendar, contacts, messages and music from old iPhone to new iPhone 8/X/11.
- Enable to transfer from HTC, Samsung, Nokia, Motorola and more to iPhone 11/X/8/7S/7/6S/6 (Plus)/5s/5c/5/4S/4/3GS.
- Works perfectly with Apple, Samsung, HTC, LG, Sony, Google, HUAWEI, Motorola, ZTE, Nokia and more smartphones and tablets.
- Fully compatible with major providers like AT&T, Verizon, Sprint and T-Mobile.
- Supports iPhone, iPad, iPod touch and the latest iOS version.
- Fully compatible with the latest Windows or Mac version.
3981454 people have downloaded it
This section of the article focuses on the steps through which you can transfer your data from your Apple iPhone 6s Plus to your new iPhone 8/X/11.
Step 1: The first and foremost step includes connecting your devices to your PC. When you are done simply launch the Dr.Fone software click Phone Transfer in the main menu.

Step 2: Right after your devices have been connected simply note the source and destination phone are connected at this moment, you will get a proper tab with source and destination phone images and their connection status.
Step 3: When you are done with selecting the source which in this case would be iPhone 7/7Plus and destination device which in this case would be iPhone 8/X/11 click Start Transfer, you need to specify the data you want to transfer in this case you would select all contents since you want to transfer everything.
Step 4: Simply click start transfer and the transfer process will begin make sure that both of the Apple iPhone 6s Plus devices remain connected throughout the transfer process.

Part 2: How to transfer everything from Apple iPhone 6s Plus to iPhone 8/X/11 with iCloud
Initially signing up for ICloud gets you 5GB of storage, you can use this storage for IOS device backup, iCloud photo library, app data and documents stored in the ICloud. If you feel 5gb storage is not enough you, you can always upgrade your storage but then you will have to pay. iCloud as a backup is a great if anything happens to your phone you can get access to your data anywhere with the internet besides this you can also use this data to switch your new iPhone 8/X/11 device.
Step 1. From your IPhone 7 device connect to a Wi-Fi network. Go to IPhone 7 settings and tap on your name. Scroll down and select the iCloud option.
Step 2. After you have clicked the iCloud option in the backup section enable iCloud backup option. And hit “Backup Now”.
Step 3. You must be connected to the Wi-Fi until the backup process is completed. In ICloud tab select storage to see the details of your backup.

Step 4. Now that your data has been backed up using your iCloud id you can always add this id to your new iPhone 8/X/11 device. Right after you add your iCloud id to your new iPhone 8/X/11, and Restore from iCloud Backup, all of the backed up data from Apple iPhone 6s Plus will be transferred to your new iPhone 8/X/11 device.
Part 3: How to transfer everything from Apple iPhone 6s Plus to iPhone 8/X/11 with iTunes?
You can create a local backup for your Apple iPhone 6s Plus device on your PC through iTunes, and then restore to your new iPhone 8/X/11. So that you sync all data from Apple iPhone 6s Plus to iPhone 8/X/11 with iTunes. If you don’t have iTunes you can download for free from apple’s official website.
Step 1. After you have successfully installed iTunes on your Computer connect the Apple iPhone 6s Plus device to your system and launch the iTunes Application.
Step 2. iTunes will detect your device, simply click summary of your phone, in the Backups tab you must click “Backup Up Now” under the Manually Backup and Restore.
Step 3. The iTunes will back up your iPhone. After the process is complete you can disconnect your Apple iPhone 6s Plus.
Step 4. After you have backed up the data from your old Apple iPhone 6s Plus device, simply connect your new iPhone 8/X/11 and restore the data to your new iPhone 8/X/11 device through iTunes.

With the advancements in the mobile technology we are presented with the new and improved features every year, there is always a point where we need to change our device because we do need those new features. So in one of the cases iPhone users would want to change their device because of the extensive features iPhone 8/X/11 has to offer. So in this case we would want to transfer the data from our Apple iPhone 6s Plus to iPhone 8/X/11. Apple users and techie’s are always up for new handset and they love to get their hands on the newer Apple’s device. This is where there is a need for an effective tool to transfer the data from the old Apple iPhone 6s Plus to iPhone 8/X/11.
After going through this article guide we can conclude that iPhone users can transfer their data to their latest iPhone 8/X/11 with the help of iTunes, iCloud and Dr.Fone - Phone Transfer (iOS & Android). However, Dr.Fone is very effective for data transfer operations. Plus, the iPhone to iPhone Transfer tool is very easy to use because of its user friendly interface design.
5 Tutorials on How to Transfer Photos From Apple iPhone 6s Plus to New iPhone
When it comes to camera systems, the iPhone is certainly ahead of others. It has high-performing lenses and professional camera features that support various photography styles. For instance, you may use the Priotize Faster Shooting option to capture multiple photos at a time. Another thing is that you may enable Action Mode when shooting videos to keep the frame stable throughout the duration. Simply put, you can surely do a lot of things using your iPhone camera
Let’s say you’re planning to share your stunning snaps and footage with others. Is it possible to facilitate the transfer with little to no effort? The short answer is absolutely yes. There are many easy ways to move your media files between two iPhones. In no time, you can surely find the best tutorial on how to transfer photos from Apple iPhone 6s Plus to iPhone. Just choose one that matches perfectly your current situation.
In this article, we will talk about the iPhone’s Shared Album feature and its main benefits to users. We will also provide some tutorials on how to transfer pictures from Apple iPhone 6s Plus to iPhone quickly and easily. Continue reading below to learn more.
Everything You Need to Know About Shared Album
The Photos mobile application on iOS devices is a very powerful gallery software. It provides numerous options to help you organize and manage all your media files in one place. When it comes to data transfer, Photos offers users some channels to facilitate such procedures. One of which is through the syncing feature called Shared Album. It’s basically an ordinary folder where you can move and store your media files. But as the name suggests, you can share this folder with others by simply granting them access to it. Don’t worry. Your Shared Albums remain private on the platform. Only the people you add as subscribers can view its content and make changes. Therefore, the Shared Album feature is the best answer to the question: “How to transfer photos from Apple iPhone 6s Plus to iPhone.”
It’s true to say that Shared Album is a great iOS feature. However, it’s important to point out that it also has a few limitations. First on the list is the type of files supported by this feature. For images, Shared Album is compatible with photos in HEIF, JPEG, RAW, PNG, GIF, and TIFF formats. On the one hand, video formats supported by Shared Album include HEVC, MP4, QuickTime, H.264, and MPEG-4. Another thing to consider is the capacity of the Shared Album folder. By default, you can only store up to 5000 photos or videos in the album.
Do you find Shared Album a useful tool, though? If so, here are the tutorials on how to activate this feature and create one in the Photos app.
How to Activate Shared Album?
Here’s how to activate Shared Album on Settings.
- Step 1: Go to Settings.
- Step 2: Click your Apple ID Profile.

- Step 3: Click iCloud.
- Step 4: Click Photos.

- Step 5: Toggle on the radio button next to Shared Albums.

How to Create Shared Albums in Photos
Here’s how to create Shared Albums in Photos.
- Step 1: Go to the Photos.
- Step 2: Click the Album tab.
- Step 3: Click the + icon at the top-left corner of your screen to add a new folder.

- Step 4: Click New Shared Album.

- Step 5: Rename the Shared Album and then click Create.
How to Transfer Photos From Apple iPhone 6s Plus to iPhone in Easy Steps?
Undoubtedly, the Shared Album feature is a very convenient way to move media files from one iPhone to another. Imagine all you have to do is consolidate all the files in a Shared Album folder and add subscribers. From there, you can easily access the album on multiple iOS devices and download the files. But it’s important to note that there are other photo transfer methods you can try apart from using Shared Album. Check out the 5 tutorials below on how to transfer photos from Apple iPhone 6s Plus to iPhone.
Method 1: Transfer photos from Apple iPhone 6s Plus to iPhone by enabling iCloud photos
How do I transfer photos from Apple iPhone 6s Plus to iPhone? Well, the easiest way is to sync the photos to iCloud and enable the iCloud photos on both devices. Don’t worry. It’s very easy to set up. Here’s how to transfer photos from Apple iPhone 6s Plus to iPhone using iCloud.
- Step 1: On your device that contains the files, go to Settings.
- Step 2: Click on the Apple ID Profile.
- Step 3: Click Photos.

- Step 4: Toggle on the radio button next to Sync This iPhone. From then on, your iPhone will sync your photos to iCloud.

- Step 5: Do the same series of steps on the other iPhone. Once the synchronization has been completed, open the Photos app. Find the newly synced iCloud photos on the All Photos album.
Method 2: Transfer photos from Apple iPhone 6s Plus to iPhone using AirDrop
If you’re just sending a few pieces of photos, AirDrop is indeed a great transfer medium. It’s basically a wireless sharing option allowing users to send files between two iOS devices. Do you want to try it? Here’s how to transfer photos from Apple iPhone 6s Plus to iPhone using AirDrop.
- Step 1: Toggle on the Wi-Fi and Bluetooth connectivity on both iPhones. After that, find the AirDrop option on the two devices and then switch it on. Choose Everyone.

- Step 2: On the Apple iPhone 6s Plus device that contains the files, go to Photos. Select the images you want to transfer. After that, click the Share button at the bottom-left corner of your screen.
- Step 3: Choose AirDrop.

- Step 4: Select the recipient from the provided list. After that, accept the AirDrop request on the other device.
Method 3: Transfer photos from Apple iPhone 6s Plus to iPhone via Mail
Another reliable method you can try is to email the photos from one iPhone to another. Like AirDrop, it works great if you’re just moving a few bits of files to another device. Don’t work. The process will not take much time. Here’s how to transfer photos from Apple iPhone 6s Plus to iPhone via Mail.
- Step 1: On the Apple iPhone 6s Plus device containing the files, go to the Photos app.
- Step 2: Select the specific photos you want to transfer. After that, click the Share icon at the bottom-left corner of your screen.
- Step 3: Choose Mail among the given options.

- Step 4: Key in the email address of the recipient. Subsequently, click the Send icon.
- Step 5: Open the email on the other iPhone. Then, download the photos sent as email attachments.
Method 4: Transfer photos from Apple iPhone 6s Plus to iPhone using iCloud Link
Let’s say you’re sending one photo to another iPhone user. What is the best transfer option in this case? If you’re currently using iCloud photos might as well send files through the iCloud link. Don’t worry. It’s not that hard to get such details. Here’s how to transfer photos from Apple iPhone 6s Plus to iPhone using the iCloud link.
- Step 1: On the Apple iPhone 6s Plus device where your files are stored, go to the Photos app.
- Step 2: Select the specific group of images you want to transfer. Right after, click the Share icon at the bottom-left corner of your screen.
- Step 3: Scroll down and find the Copy iCloud Link. Click on it.

- Step 4: Share the iCloud link via Messages, Mail, or internet messaging platform. On the other iPhone device, access the link and then download the photos from there.
Method 5: Transfer photos from Apple iPhone 6s Plus to iPhone using Wondershare Dr.Fone
The first four tutorials above on how to transfer pictures from Apple iPhone 6s Plus to iPhone are very easy to follow. But if you wish to explore another convenient option, Wondershare Dr.Fone can help you with that. Its phone transfer feature has a powerful facility that can move your photos and other files between two mobile devices. Here’s how to use it in easy steps.
- Step 1: Download Wondershare Dr.Fone from its official website. Then, install it on your computer.
- Step 2: Open the newly installed software on your desktop. After it fully loads, connect your two iPhones using a data cable.
- Step 3: Access the left-side panel and then click Toolbox. On the main dashboard, click Phone Transfer.
- Step 4: Set the iPhone that contains the photos as the Source and the other iPhone as the Target. Alternatively, click the Flip button to modify the transfer path according to your liking.

- Step 5: Click Photos as the category of the files. Right after, click Start Transfer to proceed.

- Step 6: Wait while Wondershare Dr.Fone is facilitating the transfer. If you wish to terminate the progress, simply click Cancel.

- Step 7: After completing the process, click OK to wrap it up. Check your files from their respective locations afterward.

BONUS TIP: Back Up Your Photos First
The tutorials above on how to transfer all photos from Apple iPhone 6s Plus to iPhone are safe to initiate. You can be sure about that. But as an additional layer of protection, it’s best to back up your iPhone first before the transfer. Don’t worry. Wondershare Dr.Fone. simplifies the backup process for you. Here’s a quick tutorial to get you started.
- Step 1: Launch the Wondershare Dr.Fone on your computer. After it fully loads up, connect your iPhone using a data cable.
- Step 2: Access the left-side panel and then click My Backup. On the main dashboard, click Back Up Now.

- Step 3: Follow the on-screen instructions for SMS backup. After that, click OK to proceed.

- Step 4: Wait while Wondershare Dr.Fone is backing up your files.

- Step 5: After completing the backup process, click View Backups or Open in Folder to check your files.

Conclusion
Transferring photos between two iOS devices is very easy. In fact, you can instantly complete the migration process with just the snap of a finger. Refer to the five tutorials above on how to transfer photos from Apple iPhone 6s Plus to iPhone enumerated. One of them can certainly fit your situation and help you in this regard. For a more convenient file transfer option, download Wondershare Dr.Fone for free. It has a potent phone transfer feature that can aid in the transfer of your dearly cherished photos.
How To Transfer From Apple iPhone 6s Plus to Samsung: Simplified Guide
If you have been using your iPhone for a long time but want a change in your life, you can easily switch to other brands like Samsung. Samsung phones offer more customization options regarding the software compared to iPhones. One of the major issues iPhone users face is limited storage, which can be avoided by using Samsung.
If the only thing stopping you from switching is the stress of transferring your data, you don’t have to worry anymore. In this article, we will discover various aspects to transfer data from Apple iPhone 6s Plus to Samsung. Different methods and prerequisites to be fulfilled will be covered ahead. Moreover, we’ll also provide you with the best one-click method for transferring your iPhone to Samsung.

Part 1: What Are the Pre-Requirements To Fulfill Before Transferring From Apple iPhone 6s Plus to Samsung?
Before we discuss different methods to transfer data from Apple iPhone 6s Plus to Samsung, there are some things that you should not neglect. These attributes must be fulfilled before switching to ensure a smooth transition. That’s why we want you to look at these prerequisites and fulfill them before moving to your new device. Here’s a checklist of these pre-requirements before transferring the iPhone to Samsung.
- Backup Your iPhone: First of all, you have to ensure you have backed up your iPhone before proceeding with data transfer. This step will secure your data from losing or deleting it. Moreover, you can access it from any device whenever you need to. You can perform the backup by turning on the iCloud backup option from the iPhone.
- Battery Percentage: Another critical aspect is to charge both your iPhone and Samsung device to an adequate battery level. This will prevent any interruption due to low battery during the transfer process. Also, the performance of the Apple iPhone 6s Plus devices will be optimum at the ideal battery percentage.
- Update Software: Furthermore, you should confirm that both your iPhone and Samsung devices are running the latest operating system software. You must update your iPhone to the latest iOS version and your Samsung device to the latest Android version.
- Secure Your Data: When you are done with the transferring process, it is necessary to clear your data from the old phone. Although the iPhone is one of the most secure devices, you should reset it before leaving. This will ensure that no one can access your files after you have wiped off all your data.
Part 2: How To Transfer Data From Apple iPhone 6s Plus to Samsung Using Smart Switch App
Samsung Smart Switch tool is designed to simplify transferring various types of data from an iPhone to a Samsung. The data includes contacts, messages, photos, videos, and more. It supports both wired and wireless transfer methods. You can connect the Apple iPhone 6s Plus devices using a USB cable or the wireless transfer option, which is more convenient for some users.
Let’s discuss the simple steps to help you in transferring data from Apple iPhone 6s Plus to Samsung. The steps for wireless and wired methods are different, so stay tuned ahead.
1. Wireless Method
The wireless method will free you up from the need for a cable. However, you must sync your data to iCloud before transferring your iPhone to Samsung. The steps for a wireless transfer via the Smart Switch tool are described below:
- Step 1: First, you need to sync your iOS device to iCloud. You can do this by accessing “Settings” and tapping your Apple ID. After that, select the “iCloud” option and toggle on the data you want to sync.

- Step 2: Now, move to your Samsung device and open the “Smart Switch” application. Then, tap the “Continue” option followed by the “Allow” button to accept the terms of service.

- Step 3: After that, you need to choose the “Receive Data” option and tap on “iPhone/iPad.” To do so, select “Get Data from iCloud Instead” at the bottom of the screen.

- Step 4: Subsequently, enter your “Apple ID” and “Password” and tap on the “Sign In” option. Then, verify on your iPhone by choosing the “Allow” option, and you will get a verification code.

- Step 5: Finally, you have to enter the verification code on your Samsung device and tap on the “Connect” option. After that, select the data you want to transfer and hit the “Transfer” option.

2. Wired Method
Using a USB cable is essential for this data transfer process. To ensure seamless transfer, it is advised to link both devices via Wi-Fi, especially when dealing with sizable files. A comprehensive guide on transferring data from an iPhone to a Samsung device using a USB cable is below:
- Step 1: To start with, you need to open the “Smart Switch” application on your new Samsung phone and select the “Receive Data” option. After that, tap on the “iPhone/iPad” device to connect with.

- Step 2: You have to connect both phones using the iOS device’s lightning cable and a USB-OTG adapter. A menu will pop up for the verification process, so tap the “Trust” option and enter the unlock “Code” on the iPhone.

- Step 3: After that, you have to tap the “Next” option on your Samsung device. Then, select the data you wish to transfer and press the “Transfer” option. Finally, when finished, hit the “Done” button followed by the “Go to Home Screen” button on your Samsung device and disconnect the cable.

Part 3: What Are the Disadvantages Linked With Samsung Smart Switch?
Samsung Smart Switch is an efficient and convenient software for transferring an iPhone to Samsung. However, there are certain disadvantages associated with the Smart Switch application. These limitations could be irritating and tiresome to do the transfer process. We have gathered and written below some common disadvantages linked with the Samsung Smart Switch:
- **App Data Transfer Limitation:**Smart Switch can transfer many data types and files. However, it cannot transfer all the applications and their data from an iPhone to a Samsung device. Smart Switch does not support some apps. In other scenarios, the data present in the apps can show resistance to transfer due to platform differences.
- **Glitches:**Glitches during the transfer process can occur for various reasons, such as Wi-Fi connectivity issues or other potential factors. The important point is that the Smart Switch app can face interruptions mid-transfer. These interruptions could result in data loss or malfunctions in the receiving phone.
- **Speed Issues:**The transfer speed of the Smart Switch application is quite impressive. Despite that, using the wireless option requires keeping the two phones in close surroundings for optimal speed. If the phones are farther apart, the transfer speed significantly decreases.
- **File Format Compatibility:**Samsung Smar Switch does not fully support certain file formats or data types. When transferred to the Samsung device, these formats will require some additional steps for proper compatibility. This could affect multimedia files, documents, or specific file types.
Part 4: The Best One-Click Alternative to Samsung Smart Switch for Transferring iPhone to Samsung
We have described the methods to transfer from Apple iPhone 6s Plus to Samsung via the Samsung Smart Switch application. Despite that, some limitations can hinder your process. That’s why we will provide you with the best one-click solution: Wondershare Dr.Fone . This software will transfer data from Apple iPhone 6s Plus to Samsung within no time.
Dr.Fone is equipped with advanced tools that can understand the requirements and perform the task automatically. It assists in transferring, managing, and backing up data across devices. Ultimately, the software provides comprehensive solutions for your needs.
Method 1: Transfer iPhone Data to Samsung
The Phone Transfer feature in Wondershare Dr.Fone allows you to copy data effortlessly from one phone to another using a single click. You can transfer various data types such as contacts, SMS, photos, videos, music, and more. This transfer can even be between devices operating on different systems like iOS and Android. Also, the tool is compatible with Android 14 (Win) and the latest iOS 17, which ensures smooth functionality.
The straightforward process requires simple clicks to initiate and complete the transfer from Apple iPhone 6s Plus to Samsung. We have described the whole method step-wise below for your convenience:
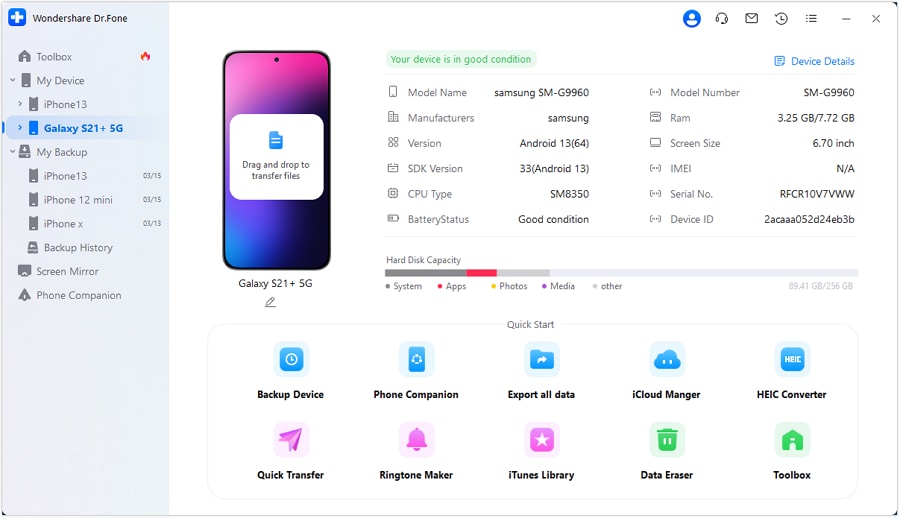
- Step 1: Activate the Phone Transfer Tool in Dr.Fone
To start with, you need to launch the Wondershare Dr.Fone toolkit on your Windows PC or MacBook. Then, access the “Phone Transfer” tool from the left side via the “Toolbox” tab and connect your iPhone and Samsung devices.
- Step 2: Select the “Source” and “Destination” Devices
In the next step, the software will detect the connected iPhone and Samsung devices. You have to choose the “Source” and “Destination” devices to associate the path of transfer. You can also use the “Flip” button if the direction is the other way around.

- Step 3: Select the Data Types and Start the Transfer Process
Now, you have to choose the specific data types for transfer by marking the relevant categories. After that, initiate the process by tapping the “Start Transfer” button. Also, you need to turn off the iCloud syncing when a prompt appears on Wondershare Dr.Fone. You can do this in the “Profile” settings on your iPhone.

- Step 4: Conclude the iPhone to Samsung Transfer Process
Finally, the progress bar will appear before you, where you can observe the process. Hit the “OK” button after the successful completion of the process. Then, you can verify your data from your new Samsung device.

Method 2: Transfer iTunes Data to Samsung
If you have backed up your iPhone data in iTunes, you can restore it to your Samsung device. The “Phone Manager” feature in Dr.Fone allows you to restore iTunes data on your Apple iPhone 6s Plus. This tool can transfer media files, social data, mobile apps, contacts, and more. Let’s explore the steps involved in transferring data from an iPhone to a Samsung device using iTunes:
Step 1: Activate Dr.Fone and Connect Samsung Device
First, access the Wondershare Dr.Fone software and connect your Samsung device to your system. The device will appear on the left side that you will select to access the homepage. There, choose the “iTunes Library” option to proceed further.
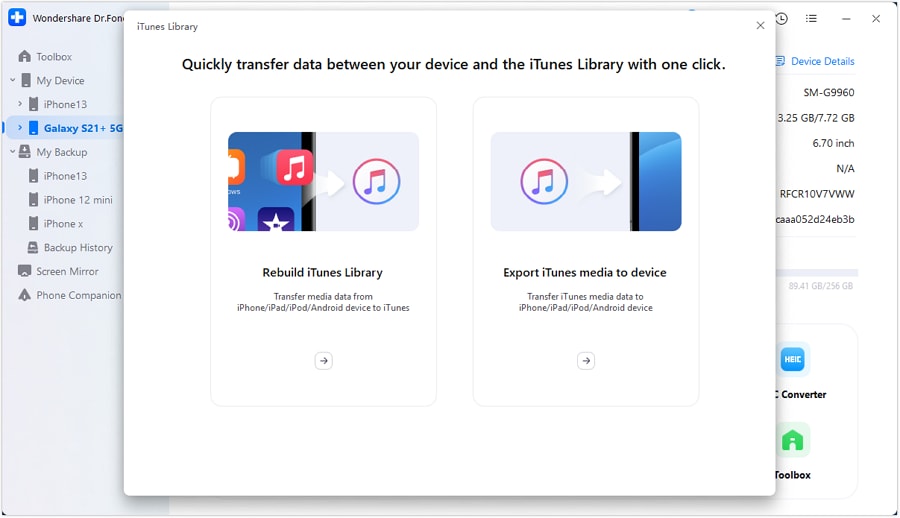
- Step 2: Select and Export the Specific File Types
The new window will open, and you must select the “Export iTunes Media to Device” option. This will enable the transfer of iTunes media to your Apple iPhone 6s Plus. After that, you need to checkmark the file types to transfer and hit the “Transfer” button.
Step 3: End the Transfer Process
Finally, monitor the progress bar displayed in the subsequent window to track the completion of the transfer. Then, click “OK” to confirm the successful transfer from iTunes to your Apple iPhone 6s Plus.
Method 3: Transfer iCloud Data to Samsung
iCloud serves as a highly convenient method to back up iOS devices. However, restoring an iCloud backup to Android devices is not as simple. iCloud only allows restoring the entire backup to iOS device setup, and it doesn’t support restoring backups to Android devices. The iCloud Manager feature in Wondershare Dr.Fone offers a solution to address this limitation.
It allows selective content restoration from iCloud backups to Samsung devices without alteration. Learn how to transfer from Apple iPhone 6s Plus to Samsung via iCloud backup data with the help of the following steps:
- Step 1: Access Wondershare Dr.Fone and Plugin Samsung Device
To begin with, open the Wondershare Dr.Fone software on your system and connect your Samsung device to it. Then, access your device on the software from the left side and select the “iCloud Manager” option within the home screen. You have to fill in those credentials to sign into your iCloud account.
- Step 2: Select the Data Files and Start Restoration
In the next step, you have to select the data type from your iCloud backed-up data. Then, hit the “Restore to Device” button and the “Start” button to start the restoration process. The progress bar will appear and display the progress of the restoration of iCloud data to Samsung devices.

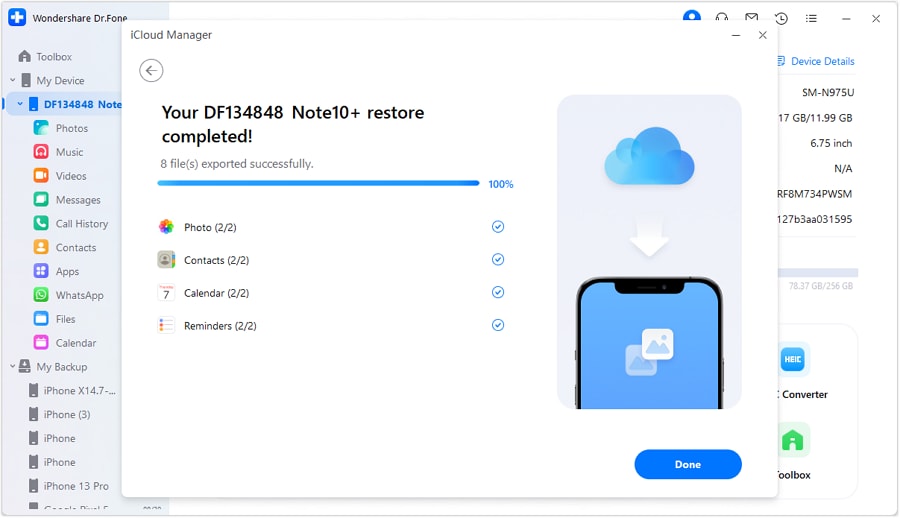
- Step 3: Finish the Data Restoration Process on Your Samsung Device
The process will conclude within a few minutes and display the final message of completion. Then, you can press the “Done” button to conclude the iCloud to Samsung data transfer process.
Bonus Tip. What Are the Most Recommended Upcoming Smartphones of Samsung in 2024?
Samsung is planning to add generative AI to its new products, and they will possibly share more details next year. They’ve introduced their generative AI and given hints regarding Galaxy AI’s role in their 2024 phones. It’s a major competitor and other big names in the mobile market. We’re expecting the following mobile products from Samsung next year based on their usual launch cycle and reports.
1. Galaxy S24 Series
The projected launch timeline for the Galaxy S24 series is early 2024. Artificial intelligence will likely take the main area for the Galaxy S24. Samsung’s Gauss generative AI model, similar to ChatGPT, can compose emails, summarize documents, and help in coding. Additionally, the Galaxy AI is anticipated to facilitate call translations.
Moreover, Samsung’s Exynos 2400 processor guarantees a significant AI performance boost, enabling text-to-image AI generation. AI enhancements, such as Samsung’s Zoom Anywhere feature, will notably impact the camera. This feature, probably in Galaxy S24 Ultra, will enable 4x zoom for moving objects.
2. Galaxy Z Flip 6
The rumored Galaxy Z Flip 6 expects to overcome the Z Flip 5 by introducing a new processor and more software features. These software features will benefit its foldable design. Also, the reports suggest a 50-megapixel primary camera sensor for the Z Flip 6. There is also the possibility of AI capabilities similar to those of the Galaxy S24 series. Samsung normally unveils new Galaxy Z Flip phones around August.
3. Galaxy Z Fold 6
Samsung’s Galaxy Z Fold is very similar to the Z Flip. This phone will probably have a slot for the S Pen stylus that will boost its productivity. Also, the Z Fold 6 might come with a new processor similar to the one in the Galaxy S24. Some fresh software features and slight design enhancements might be added, too.
4. Galaxy A55 5G
Samsung usually unveils new Galaxy A phone versions in March. Samsung’s Galaxy A series phones offer impressive features like multi-lens cameras and high-refresh-rate screens at more affordable prices. However, they often compromise on performance and camera quality. Also, it’s unlikely that the Galaxy A55 will use the same chip as the Galaxy S24 series.
Samsung’s Galaxy A phones usually have a slightly less powerful processor than their flagship counterparts. For instance, the Galaxy A54 uses the Exynos 1380 processor, which falls behind Qualcomm’s Snapdragon 8 series.
Conclusion
In a nutshell, the Samsung Smart Switch application provides an efficient and convenient method to transfer from Apple iPhone 6s Plus to Samsung. However, it comes with certain disadvantages and limitations that have been faced by many users. We have provided you with a more effective and powerful solution: Wondershare Dr.Fone. This tool will assist you in transferring your iPhone to Samsung with just one click. Plus, you learned about the latest Samsung devices in this article.
Also read:
- [Updated] Streamlining Your WebM Experience Without Spending Money for 2024
- Convert Any File Type with Movavi's Free EM4R On-Line Tool!
- Cutting-Edge Clarity Two Easy Steps to Brighten iPhone Videos
- Easy Methods How To Transfer Pictures From Apple iPhone 14 Pro Max to PC | Dr.fone
- How to Transfer Apple iPhone 13 mini Data to iPhone 12 A Complete Guide | Dr.fone
- How to Transfer from Apple iPhone 11 Pro to iPhone 8/11/11 Pro | Dr.fone
- HP Elitebooks 840 G3: Fresh Driver Download & Seamless Installation Guide
- In 2024, Easy Methods How To Transfer Pictures From Apple iPhone 14 to PC | Dr.fone
- Perfectly Tuned: Top Settings Every Switcher Should Know
- Pokémon Go Cooldown Chart On Apple iPhone 13 mini | Dr.fone
- Smooth Solutions: No Display on Graphics Boards
- Unlocking iPhone X Secrets Restoring Face ID Functionality
- Title: How to Transfer Everything from Apple iPhone 6s Plus to iPhone 8/X/11 | Dr.fone
- Author: Charlotte
- Created at : 2024-10-23 21:32:04
- Updated at : 2024-10-29 19:00:12
- Link: https://iphone-transfer.techidaily.com/how-to-transfer-everything-from-apple-iphone-6s-plus-to-iphone-8x11-drfone-by-drfone-transfer-from-ios/
- License: This work is licensed under CC BY-NC-SA 4.0.