
How to Copy Contacts from Apple iPhone XS Max to SIM? | Dr.fone
How to Copy Contacts from Apple iPhone XS Max to SIM?
“How to copy contacts from Apple iPhone XS Max to SIM? I want to use my SIM on another device but can’t seem to export contacts to SIM on iPhone!”
Lately, lots of iPhone users have asked similar questions as they wish to save contacts to SIM card on iPhone. It might sound surprising, but it can be a little complicated to learn how to save contacts to SIM on iPhone. In this tutorial, we will answer the question – how to transfer contacts from Apple iPhone XS Max to SIM and provide a foolproof way to save and restore your iPhone contacts. Let’s get it started and learn more about how to export contacts from Apple iPhone XS Max to SIM.
Part 1: Is it possible to save contacts to SIM on iPhone?
A lot of users take the assistance of SIM card to save their contacts. If you are also doing the same, then you can easily learn how to import SIM contacts to iPhone. Simply go to your device’s Settings > Mail, Contacts, Calendar and tap on “Import SIM Contacts”.

Though, the problem occurs when users wish to do vice versa and learn how to import contacts from Apple iPhone XS Max to SIM. As of now, Apple doesn’t provide a direct solution to export contacts to SIM on iPhone. If you really wish to save contacts to SIM on iPhone, then you have to jailbreak your device once. After jailbreaking your device, you can use certain apps to move contacts to SIM easily.
Though, if your device has not been jailbroken, then you can’t export contacts to SIM on iPhone directly. This is because Apple assumes the transfer of contacts via SIM card is an obsolete method. Don’t worry – you can try an alternative method to save and backup contacts on iPhone. We have discussed it in the next section.

Part 2: How to save iPhone contacts with Dr.Fone?
While we can’t learn how to copy contacts from Apple iPhone XS Max to SIM, we can try an alternative method to save our contacts. By taking the assistance of Dr.Fone - Backup & Restore (iOS), you can save your data by taking its backup. Later, you can restore the backup on any other iOS (or Android) device. In this way, you can easily move your contacts and don’t need to learn how to save contacts to SIM on iPhone.
Dr.Fone - Backup & Restore (iOS) is a highly advanced and intuitive tool that can backup and restore all the major data types like contacts, messages, photos, music, etc. It is compatible with every leading version of iOS (including iOS 17). Therefore, instead of learning how to transfer contacts from Apple iPhone XS Max to SIM, you can use Dr.Fone Backup & Restore by following these steps:
Dr.Fone - Backup & Restore (iOS)
Save and Backup iPhone Contacts with 1-Click.
- One click to backup the whole iOS device to your computer.
- Support to backup Social apps on iOS devices, such as WhatsApp, LINE, Kik, Viber.
- Allow to preview and restore any item from the backup to a device.
- Export what you want from the backup to your computer.
- No data loss on devices during the restore.
- Selectively backup and restore any data you want.
- Supported iPhone 15/14/13/12/11/X that run iOS 17/16/15/14/13 and former
- Fully compatible with Windows 10 or Mac 14
3981454 people have downloaded it
1. Firstly, download Dr.Fone - Backup & Restore(iOS) on your computer and launch it whenever you wish to learn how to export contacts from iPhone (by taking its backup). From the welcome screen of Dr.Fone toolkit, select the option of “Backup & Restore”.

2. Now, connect your iPhone to the system and wait for the application to detect it automatically.
3. You can see that the tool can backup tons of applications as well. Simply click on the “Backup” button on the right panel to get things started.

4. From the next window, you can select the type of data that you wish to backup. You can also check the “Select all” option to take a comprehensive backup of your data. Additionally, you can alter the backup path from here as well.
5. To backup contacts, make sure the option of “Contacts” (under the Privacy section) is enabled before you click on the Backup button.
6. Wait for a while as Dr.Fone will backup your selected data. Once it is done, you will be notified. You can either view the backup content or go to the Backup location as well.

7. Whenever you need to restore your contacts, you can simply connect the Apple iPhone XS Max device and click on the “Restore” option instead.
8. This will automatically display a list of the previous backup files. Select the file you wish to restore and click on the “View” button.

9. Your backup will be listed under different categories here. Go to Privacy > Contacts and select the contacts you wish to restore.
10. After making your selection, you can export this data to your PC or restore it to the connected device. Simply click on the “Restore to Device” and wait for a while.

11. In no time, your contacts would be restored to your device. When the process is completed, you will be notified.
That’s it! After restoring your contacts, you can safely remove the Apple iPhone XS Max device and use it as per your wishes. Therefore, if you have Dr.Fone Backup & Restore, then you don’t need to worry about how to import contacts from Apple iPhone XS Max to SIM.
Part 3: Other solutions to transfer iPhone contacts
While you can’t learn how to copy contacts from Apple iPhone XS Max to SIM directly, you can always move your contacts from one phone to another. We have listed some easy solutions to help you resolve your query on how to save contacts to SIM on iPhone with some alternative methods.
Save your contacts to iCloud
By default, every user gets a free space of 5 GB on iCloud (which can later be expanded). Therefore, you can easily take a backup of your contacts and other important files on iCloud. Just go to your device’s Settings > iCloud and turn the backup option on. Make sure that the backup for Contacts is turned on as well. This will sync your contacts to iCloud, letting you access them on the go. In this way, you don’t have to learn how to transfer contacts from Apple iPhone XS Max to SIM.

Export iPhone contacts Via iTunes
Another alternative to learning how to export contacts from Apple iPhone XS Max to SIM is by taking the assistance of iTunes. Simply connect your Apple iPhone XS Max to the system and launch iTunes. Select your iPhone and go to its “Info” tab. From here, you can sync its contacts with iTunes. This will keep your contacts safe and allow you to sync them with another iOS device.

Copy iPhone Contacts Using Gmail
Just like iCloud, you can also sync your contacts with Gmail. If you don’t use Gmail, then go to your iPhone’s Accounts Settings and set up your Gmail account. Later, you can go to Settings > Mail, Contacts, Calendar > Gmail and toggle on the syncing option for Contacts.

If you want, you can access your Google Contacts and import them to a vCard as well. This would be a perfect alternative to learn how to import contacts from Apple iPhone XS Max to SIM.

We hope this guide was able to answer your question of how to copy contacts from Apple iPhone XS Max to SIM. Since there is no ideal solution for it, you can try different alternatives. Dr.Fone Backup & Restore is one of the best ways to keep your contacts (and other types of data) safe and will certainly save the day during an emergency situation.
How to Transfer from Apple iPhone XS Max to iPhone 8/X/11
If you’re one of those who is fond of new phones, then making the transfer to a new iPhone from your old phone can be a real struggle. The biggest problem comes when you need to transfer data from Apple iPhone XS Max to iPhone 8 (Plus)/X/11 and data include your photos, documents, contacts, etc.
Cell phone data is highly important and no matter what, no one wants to be in a state where they have to lose their precious data. Having all the personal and professional contacts, documents, messages, music as well as all the memories which you have captured in the form of pictures.. no one can give it just like that.
Imagine getting a surprise on your birthday and here you have your brand new iPhone 8 (Plus)/X/11. The only thing that irritates you is the complex process to transfer your data from old iPhone to a newer one. Well, if you have ever faced such problem where transferring your data from one phone to another phone have been a nightmare for you, then this article is for you..
How to Transfer Everything from Apple iPhone XS Max to iPhone 8 (Plus)/X/11
We have come up with a solution which will make transfer data from Apple iPhone XS Max to iPhone 8 (Plus)/X/11 extremely easy. You might be wondering what we have. Well.. Dr.Fone is your ultimate stop and the best thing that can help you to transfer from Apple iPhone XS Max to iPhone 8 (Plus)/X/11 without any kind of hassle.
Dr.Fone - Phone Transfer is great phone to phone transfer tool to help you transfer data from Apple iPhone XS Max to iPhone 8 (Plus)/X/11 extremely easy with just one click. It is different from the traditional way of transfer data from Apple iPhone XS Max to iPhone 8 (Plus)/X/11 by using iTunes. Comparative to iTunes, Dr.Fone is highly user-friendly and very easy to use. Thereby, making the transition and transfer data from old iPhone to iPhone 8 (Plus)/X/11 extremely easy. It works by following the very simple steps and you don’t even have to worry about backup and the restore things.
Dr.Fone - Phone Transfer
Transfer Everything from Apple iPhone XS Max to iPhone 8 (Plus)/X/11 in 1 Click!.
- Easily transfer photos, videos, calendar, contacts, messages and music from old iPhone to new iPhone 15.
- Enable to transfer from HTC, Samsung, Nokia, Motorola and more to iPhone 15 and former.
- Works perfectly with Apple, Samsung, HTC, LG, Sony, Google, HUAWEI, Motorola, ZTE, Nokia and more smartphones and tablets.
- Fully compatible with major providers like AT&T, Verizon, Sprint and T-Mobile.
- Fully compatible with iOS 17 and Android 13
- Fully compatible with Windows 10 or Mac 14.
3,774,052 people have downloaded it
Still confused? Let us tell you easy steps that will help you to learn how to transfer everything from Apple iPhone XS Max to iPhone 8 (Plus)/X/11 with Dr.Fone
- Download Dr.Fone - Phone Transfer Application. Open the Application and connect your Apple iPhone XS Maxs to it.
- Click on to “Phone Transfer“. In order to boost the efficiency, make sure both the Apple iPhone XS Max devices are connected
- Select the files and click “Start Transfer“ button.
Note: you can also click on to “Flip” button, in order to change the positions of the Apple iPhone XS Max devices.
There are other methods too which enables the transfer data from old iPhone to iPhone 8 (Plus)/X/11.
Part 2: How to Transfer Everything from Apple iPhone XS Max to iPhone 8 (Plus)/X/11 with iTunes
iTunes have been used traditionally to transfer the data. Let’s learn how iTunes works:
- In order to transfer your data from iPhone 6Plus to iPhone 8 (Plus)/X/11 via iTunes, first you need to make sure that the data from your previous device is backup with iTunes.
- To back up your data to iTunes, you need to connect your iPhone to the computer and then open the iTunes application. Please ensure that you’re using the latest version of the iTunes. Once, device is connected, click on “Backup Now“.
 with iTunes")
- Open your new device. Press home button once you see “Hello” Screen.
- Connect your phone to the laptop, where you have already backup your data with the iTunes.
- Open the iTunes application and then select your latest device to restore the backup.
 with iTunes")
- Wait until the process is completed.
Part 3: How to Transfer Everything from Apple iPhone XS Max to iPhone 8 (Plus)/X/11 with iCloud
iCould is another software which also enables the transfer of data from Apple iPhone XS Max to iPhone 8 (Plus)/X/11. In order to transfer data Apple iPhone XS Max to iPhone 8 (Plus)/X/11 using iCloud, you can consider the following steps to make the process easy.
- Just like iTunes, with iCloud too you need to back up your data to iCloud so that it can be restored to your new iPhone 8 (Plus)/X/11. In order to back up, first you need to connect the Apple iPhone XS Max device to the Wi-Fi network. Then go to the setting, click on iCloud button and then click on to iCloud backup. You need to check whether the iCloud backup is turned on or not. Make sure it is turned on. Click on “back up now“. Keep your phone connected to Wi-Fi until the process is completed.
 with iCloud")
- Connect your iPhone 8 (Plus)/X/11 to the computer when “Hello” screen appears.
- Connect your phone to the Wi-Fi network.
- To restore from iCloud backup, sign in to iCloud with the help of apple id and password.
 with iCloud")
- The application will ask for the backup. Once you’ve checked that the backup is correct you can click on it.
- Make sure your device is connected to it until the process is completed.
iTunes, iCloud and Dr.Fone are few of the methods which tend to enable the transfer data from old iPhone to iPhone 8 (Plus)/X/11. However, considering the complexity of the iTunes and iCloud, we’d urge the readers if they can try the Dr.Fone at least once. It is not only easy but also less time consuming. It prevents the additional steps such as backup and restore settings. Rather, the entire process is done with just one click. Dr.Fone is highly user friendly and a bit different from traditional ways of transfer data Apple iPhone XS Max to iPhone 8 (Plus)/X/11.
We know the emotions and sentiments attached with one’s personal information and thus we have tried to give users a platform, where they can make the transition from one phone to another extremely simple. Simply download and have a try.
How to Move Custom Ringtones from Apple iPhone XS Max to Android?
“Is it hard to move custom ringtones from Apple iPhone XS Max to Android?”
Apple has always emphasized IOS’s superiority over Android. Making it easier to transfer music files, ringtones from Apple iPhone XS Max to Android was never Apple’s priority. There are times when people feel the urge to transfer iPhone ringtones for android. The process is easy but it requires a bit of manual intervention on user’s behalf. Sometimes the entire data needs to backed up or transferred to another device. In this article, we will explain clearly on how to move custom ringtones from Apple iPhone XS Max to Android without any fuss.
Part 1. How to move custom ringtones from Apple iPhone XS Max to Android?
IOS’s file extension of a ringtone is .m4r whereas on an Android device a file with .m4a can be selected as the ringtone. This is the primary reason to change the extension when ringtones files are needed to be transferred from Apple iPhone XS Max to Android and vice versa.
Before we proceed, it is important to let you know that making ringtones from Apple music is not possible with any application since they are encrypted by Apple.
There are a dramatic number of versatile apps for all purposes related to iTunes, Android, IOS devices. With help of third party Phone Manager, you can manage all activities of your contacts right from your Desktop. Simply a hassle free as well convenient way. Here we will introduce Dr.Fone - Phone Manager (iOS) due to its important feature of the ability to provide so many functionalities without iTunes.
You can also explore all the files of your Device from your computer. With the help of this option, you can manually select an individual file to copy it on your computer.
Dr.Fone - Phone Manager (iOS)
One Stop Solution to Make and Manage iPhone Ringtones
- Transfer, manage, export/import your music, photos, videos, contacts, SMS, Apps etc.
- Backup your music, photos, videos, contacts, SMS, Apps etc. to computer and restore them easily.
- Transfer music, photos, videos, contacts, messages, etc from one smartphone to another.
- Highlighted features such as fix iOS/iPod, rebuild iTunes Library, file explorer, ringtone maker.
- Fully compatible with iOS 7, iOS 8, iOS 9, iOS 10, iOS 11, iOS 12, iOS 13, iOS 14, iOS 15, iOS 16, iOS 17 and iPod.
3,426,808 people have downloaded it
There are many online tools also which claims to provide similar services. However, it is crucial to note that trustful application will increase your experience in comparison of other unreliable apps that could spy and harm your devices.
Here are the methods to successfully transfer iPhone ringtones for android and we will show you how to custom iPhone ringtones as well.
Transfer iPhone Ringtones for Android with a Trustful App
Step 1 Dr.Fone - Phone Manager (iOS) allows the transfer of selected media files like videos and ringtones. To do that, you need to install the application first. Connect your IOS device and run the application.
Step 2 Choose the source device that you want to transfer from.

Step 3 Go to the “Music” tab. Select the Ringtones option on the left sidebar. Choose the ringtone you want to transfer and go to “Exports” option and select the “Export to …….” Where “……” is your Samsung device in this example. You can export the files to as many IOS, Android devices you want.
Part 2. How to Make Ringtones for iPhone?
Creating Ringtones for iPhone is easy and convenient with Dr.Fone - Phone Manager (iOS).
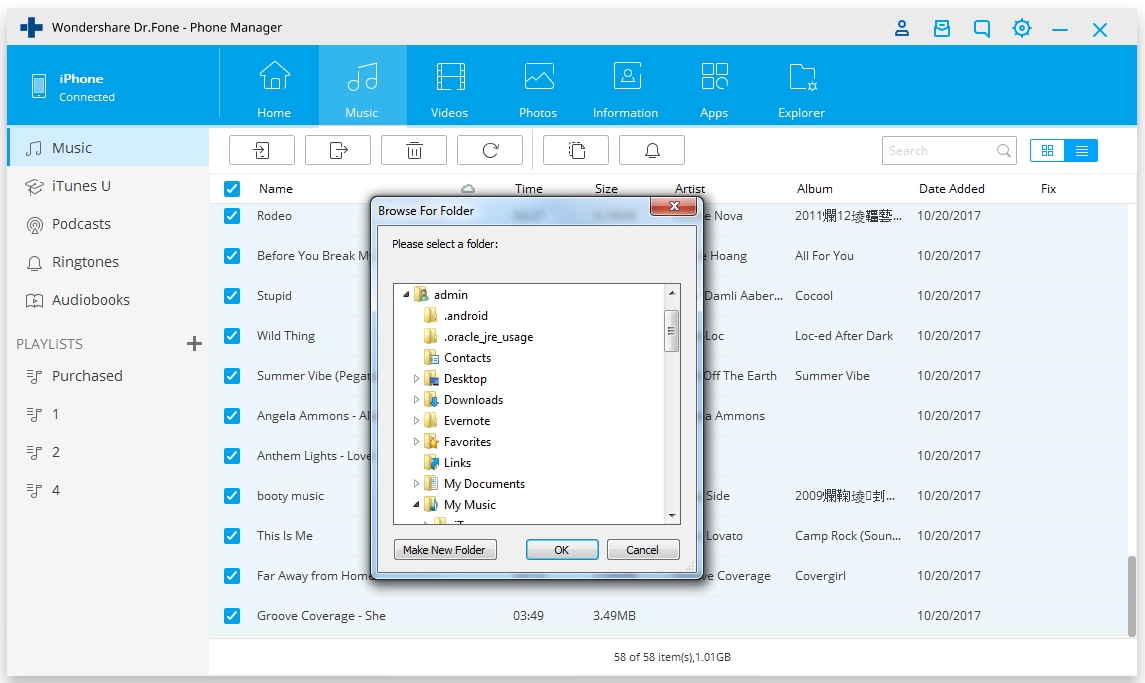
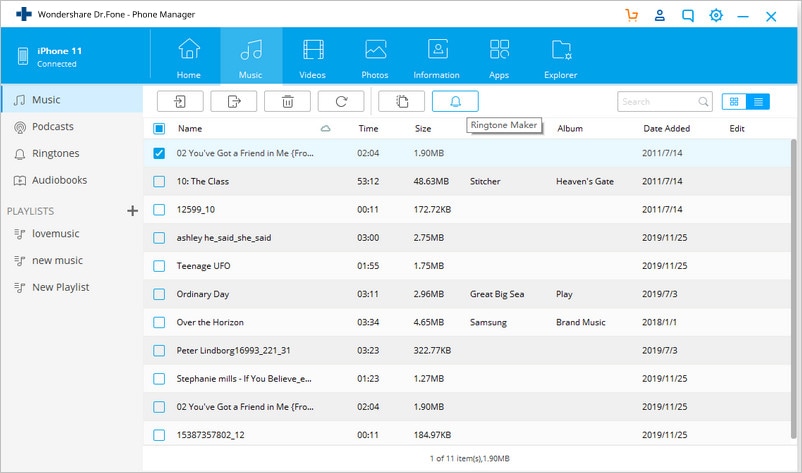
Step 1 Install and run Dr.Fone - Phone Manager (iOS). Connect your device to the computer and click on the “Music” tab.
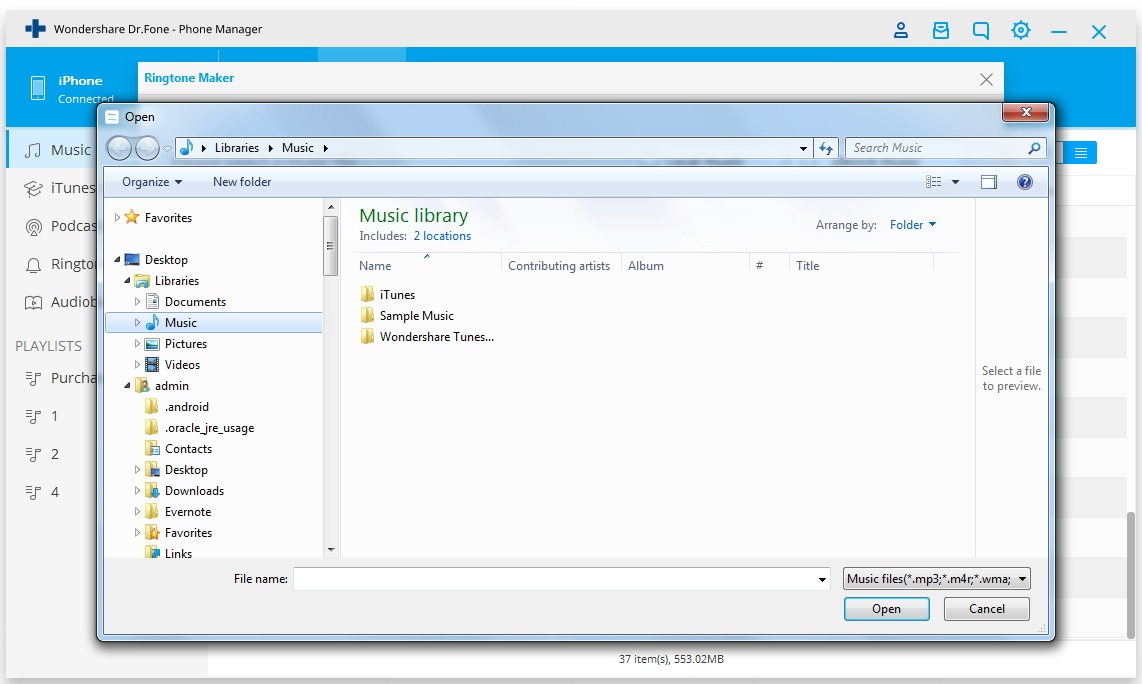
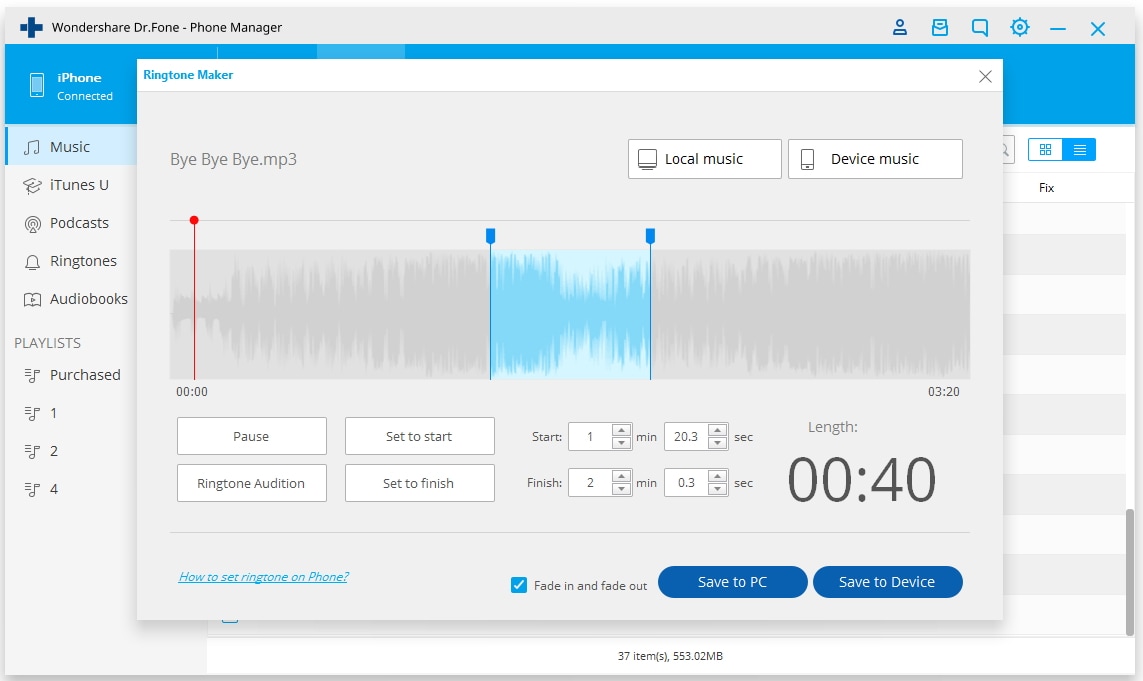
Step 2 Then click on “Ringtone maker”. Or you can also select individual music file and right click on it to select the “Ringtone Maker”.
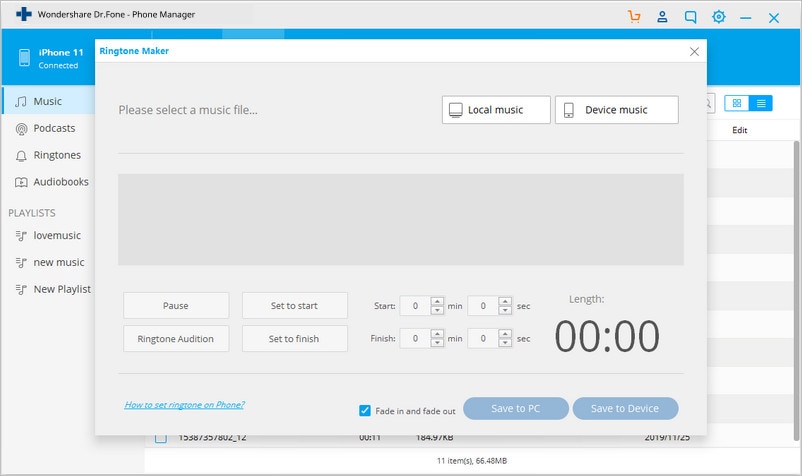
Step 3 A new window will pop up. To select the files from your computer, click on “Local Music”. To select files from your connected device, click “Save to Device”.
Step 4 You can select the start and finish time for the duration of your ringtone. To preview the ringtone, you need to click on the “Ringtone Audition”. Once you have mentioned the start and finish time, click on “Save to PC” or “Save to Device”.
With so many applications in the market related to services of iTunes, it is hard to try and test each one of them. Placing a high value on User experience and convenience, Dr.Fone - Phone Manager (iOS) was created to offer as many functionalities as possible.
Be it backing up IOS data on your computer or transferring music files from your IOS to Android Device, Dr.Fone - Phone Manager (iOS) does everything. The app is light and does not hog on memory resources. The design and interface is simplistic yet appealing.
Because of the above factors, Dr.Fone - Phone Manager (iOS) is widely used all over the world. Try Dr.Fone - Phone Manager (iOS) for making ringtones in iPhone. The trial version allows you to use the software for limited time. With nominal pricing you will get lifetime license with access to newer updates which would help in improving the efficiency of the product.
In case of technical concern, you can always contact our customer representative. This service is available only to premium customers. We also offer a 30-day money back guarantee.
Also read:
- [Updated] Back-Track Technique Reverse Video in iOS Devices for 2024
- [Updated] In 2024, Choosing Superior Tools for Vocal Change in Content Making
- 3 Ways to Export Contacts from Apple iPhone X to Excel CSV & vCard Easily | Dr.fone
- Becoming a Filmora FCC The Pathway Explained
- Complete Tutorial Sending Photos From Apple iPhone 14 Pro Max to iPad | Dr.fone
- Exploring Apple's Innovation: The IMac with M1 - A Comprehensive Performance Overview
- How to Transfer from Apple iPhone XR to iPhone 8/X/11 | Dr.fone
- In 2024, 5 Tutorials on How to Transfer Photos From Apple iPhone 11 to New iPhone | Dr.fone
- In 2024, 5 Ways to Send Ringtones from Apple iPhone 13 Pro Max to iPhone Including iPhone 15 | Dr.fone
- New 2024 Approved What Is Talking Avatar?
- Troubleshooting Tips: Fixing iPhone Backup Problems on iCloud
- Title: How to Copy Contacts from Apple iPhone XS Max to SIM? | Dr.fone
- Author: Charlotte
- Created at : 2024-10-28 19:19:14
- Updated at : 2024-10-30 00:44:20
- Link: https://iphone-transfer.techidaily.com/how-to-copy-contacts-from-apple-iphone-xs-max-to-sim-drfone-by-drfone-transfer-from-ios/
- License: This work is licensed under CC BY-NC-SA 4.0.