
Effortless Ways to Transfer Data from Your Apple iPhone SE (2020) to iPhone 15 | Dr.fone
Effortless Ways to Transfer Data from Your Apple iPhone SE (2020) to iPhone 15
With the arrival of the iPhone 15, Apple continues to redefine technological boundaries. It offers users a device that combines innovation and elegance. If you are also switching to iPhone 15 from your Apple iPhone SE (2020), you will need to move data from one device to another. In this comprehensive guide, we explore iPhone 15 transfer data from your old phone.
This guide will decode the process, ensuring your valuable data finds its new home in the iPhone 15 without a hitch. Stick with the article to find different ways for data transfer to the new iPhone 15.
Part 1: How To Perform iPhone 15 Data Transfer With Official Methods
When it comes to data transfer to iPhone 15 from your old phone, there are multiple options available. There are four official methods available to transfer data from an old phone to a new iPhone. These range from using backups like iCloud and iTunes to direct transfer. Given below are the 4 official methods to transfer your data to the new iPhone 15:
Method 1: Using iCloud Backup
iCloud Backup emerges as a powerful solution when it comes to transferring your data to the iPhone 15. Apple’s cloud-based ecosystem enables you to migrate your essential information seamlessly. It ensures that your new device is an extension of your digital world. Follow these steps to use iCloud Backup for a smooth transition:
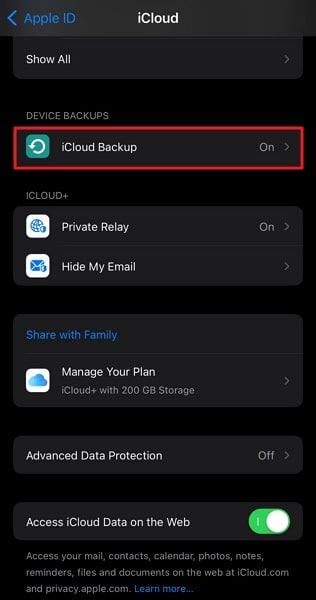
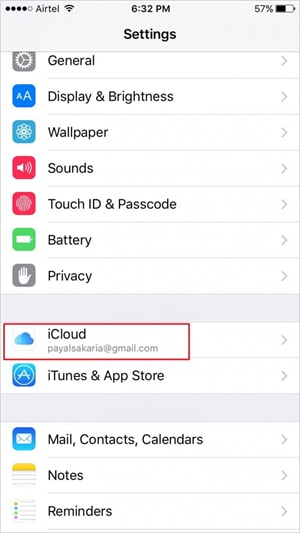
- Step 1: First, we begin with creating a backup of your old iPhone. To do that, you need to navigate to Settings and tap Apple ID. Here choose “iCloud” and follow it by tapping “iCloud Backup.” Ensure it is toggled on, and use “Back Up Now” to create an iCloud backup.
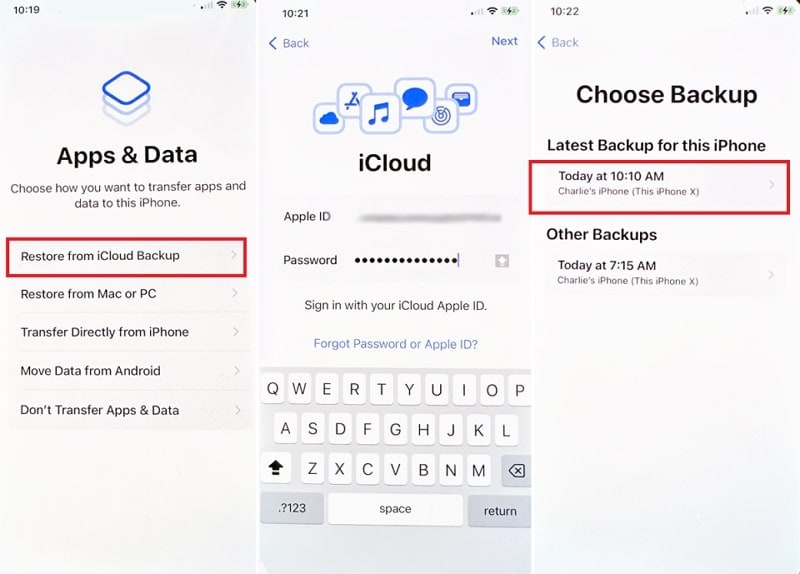
- Step 2: Now move to your new iPhone 15 and start setting it up. When you reach the “Apps & Data” screen, tap “Restore from iCloud Backup.” Here, log in using your Apple ID and choose the most recent backup file to restore data.
Method 2: Use the iTunes/Finder Backup
iTunes/Finder presents a reliable and customizable option for data transfer to a new iPhone. It is great for those who prefer a more hands-on approach to data transfer. You can create a backup of your Apple iPhone SE (2020) on your computer. Later this backup is used to transfer your Apple iPhone SE (2020) data to the new one. Follow these steps to transfer your data using iTunes or Finder:
- Step 1: Begin by connecting your previous device to your computer using a USB cable. If you’re using macOS Catalina or a later version, open Finder; otherwise, open iTunes. When your device is detected, ensure it’s selected in iTunes or Finder.
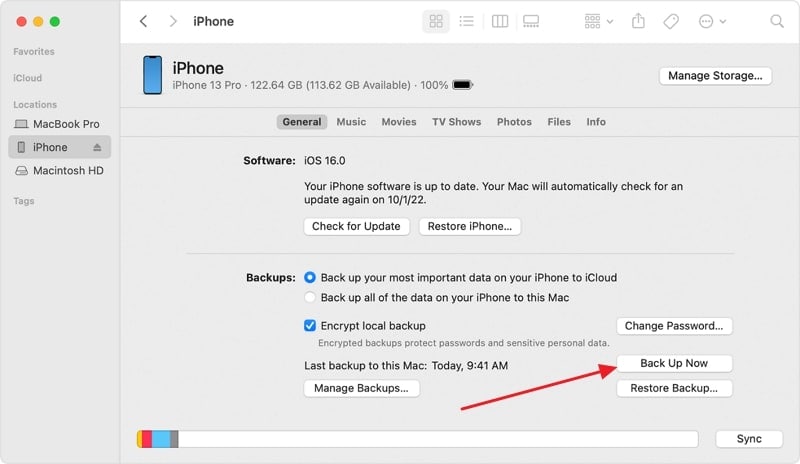
- Step 2: Navigate to the “Summary” section and locate the “Back Up Now” option. Click on it to commence a comprehensive backup of your Apple iPhone SE (2020). The duration of this process depends on the volume of your data and may require some time.
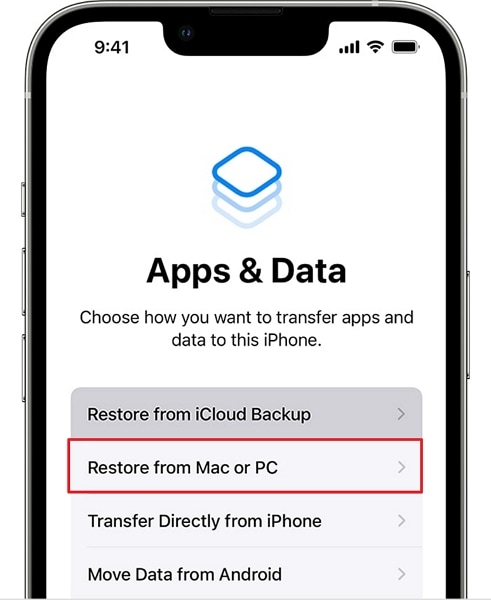
- Step 3: Power up your iPhone 15 and follow the initial setup prompts until you reach the “Apps & Data” display. Here opt for the “Restore from Mac or PC” and connect your iPhone 15 to the same computer where you performed the backup.
- Step 4: In Finder or iTunes, select your iPhone 15 from the sidebar or top. Enable the “Restore from this Backup” option and choose the most recent backup you created. Afterward, click “Continue” to begin the process of transferring the old iPhone data to iPhone 15.

Method 3: Transfer Directly Through Another iPhone
When setting up a new iPhone 15, transferring data directly from the Apple iPhone SE (2020) to the new one is possible. Transferring data directly from one device to another is also known as the Quick Start method. It requires minimal equipment and promises a swift and efficient data migration process. Follow these steps to execute a direct transfer between iPhones:
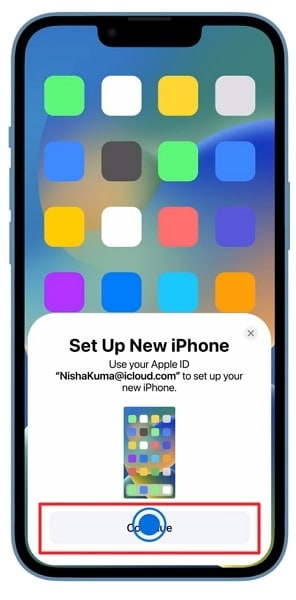
- Step 1: Ensure the Bluetooth and Wi-Fi are enabled on the old iPhone. Now turn on the new iPhone and place it near the Apple iPhone SE (2020). Press “Continue” when a prompt appears on the old iPhone about setting up the new iPhone 15.
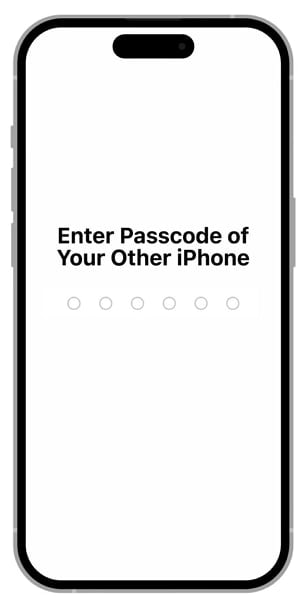
- Step 2: An animation will appear on the screen of the new iPhone 15. Scan it using the old iPhone, and afterward, enter the 6-digit passcode of the Apple iPhone SE (2020) on the new iPhone 15. Log in using your Apple ID and set up your Face ID.
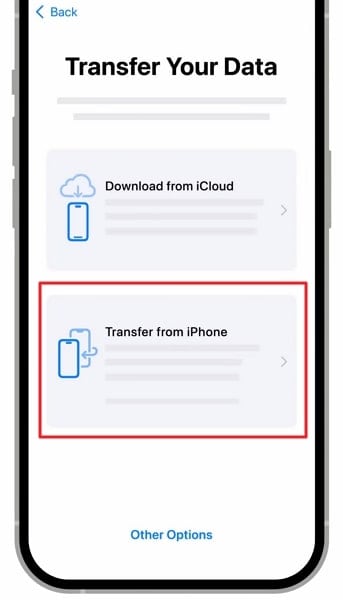
- Step 3: When it asks you to choose a data transfer method, select “Transfer from iPhone.” It will kickstart the process of transferring your Apple iPhone SE (2020) data to the new one. Keep the Apple iPhone SE (2020) devices close to each other to avoid any complications.
Method 4: Transfer Data from Android to iPhone 15
Transitioning from an Android device to the iPhone 15 is now a seamless process. It is mainly thanks to Apple’s “Move to iOS” app. Designed to simplify the transfer of your data, this app ensures that your switch to the iPhone 15 is smooth and hassle-free. Use the simplified steps given below to transfer data to iPhone 15:
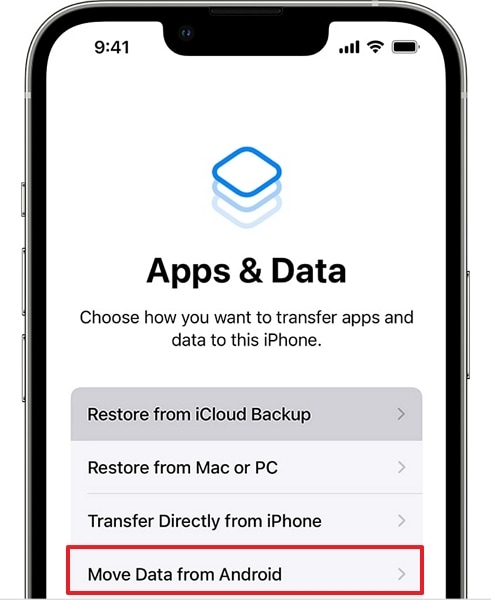
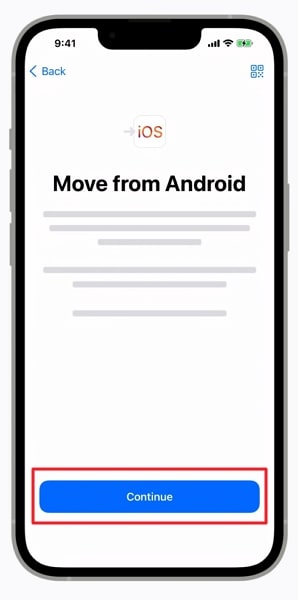
- Step 1: Turn on your new iPhone and set it up until you reach the “Apps & Data” screen. Here, tap “Move Data from Android” and move to the Android device.
- Step 2: On your Apple iPhone SE (2020), install and launch the Move to iOS app. Agree to the terms and conditions, and on the iOS device, press “Continue” once the Move to Android screen appears. It will display a code that you need to put on the Android device to establish a connection.
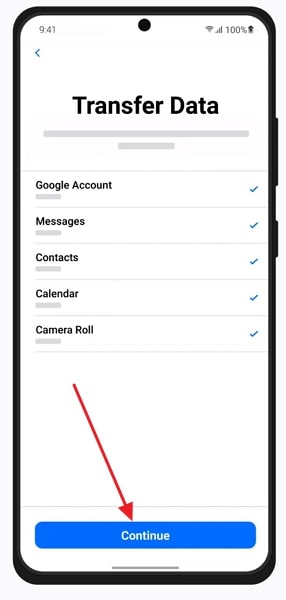
- Step 3: Once both devices are connected to the temporary Wi-Fi network, wait for the data transfer screen to appear on the Android. Then, choose the old Android device data you want to transfer. Lastly, press “Continue” to start the Android to iPhone 15 transfer process.
Part 2: The Blazing Fast and Efficient Phone Transfer Tool for iPhone 15
Whenever you switch from one device to another, data transfer stands out as the main hurdle. It makes you want to have a tool that can simplify the process and be quick at your disposal. Luckily, there is one such tool, and that is Dr.Fone - Phone Transfer . This software allows you to transfer data between Android and iOS devices with ease.
Main Features of Wondershare Dr.Fone
- Wondershare Dr.Fone supports data transfer over 12 types of data between different devices.
- It is a blazing-fast tool with a much higher data transfer speed than most official transfer tools.
- This software supports over 8000 smartphones for data transfer across all major brands.
Steps To Use Wondershare Dr.Fone To Transfer Old Device Data to iPhone 15
Given below are the detailed steps to use Wondershare Dr.Fone to transfer data to iPhone 15:
- Step 1: Connect the Respective Devices
To transfer data from your old phone to iPhone 15, start with launching Wondershare Dr.Fone on your computer. Next, head towards the “Toolbox” option and tap on it. It will show you a list of options from which you need to select the “Phone Transfer” option. Besides this, connect your old and new devices to your computer.

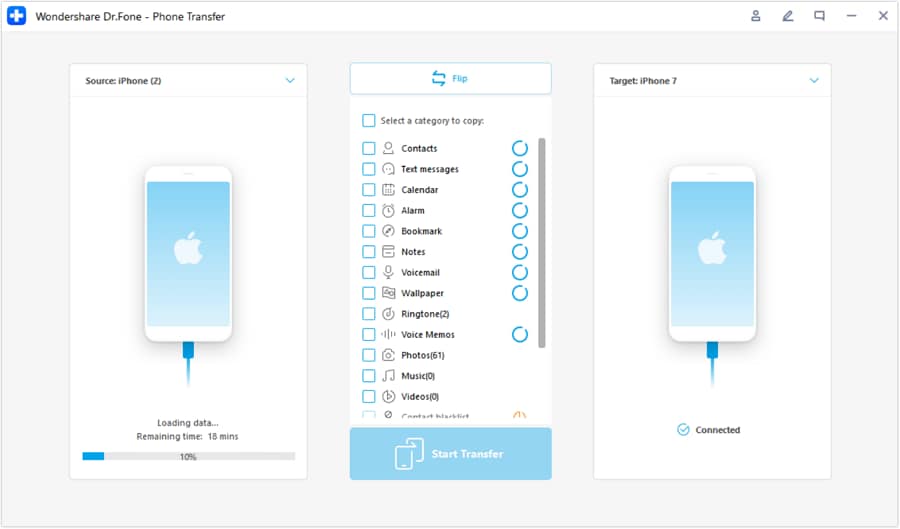
- Step 2: Assign Correct Positions to the Apple iPhone SE (2020) devices
So that platform can automatically detect them and give them respective positions as “Source” and “Destination.” Your old phone would be the “Source,” while the new iPhone 15 is the “Destination.” Here, if the position of the Apple iPhone SE (2020) devices is incorrect, use the “Flip” button to change the position between devices.

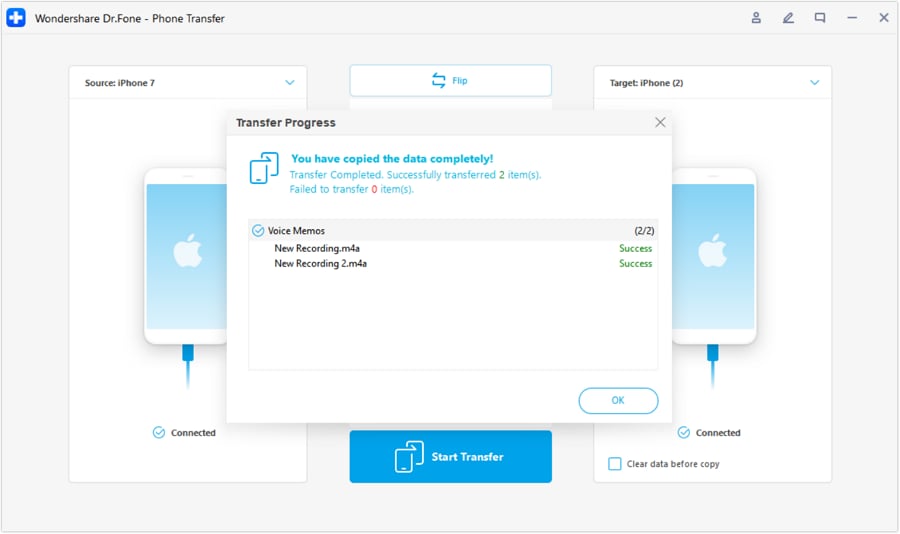
- Step 3: Start the iPhone 15 Transfer Process
After this, select the data types on the platform you want to transfer and click the “Start Transfer” option. This will initiate the process of transferring data from source to destination, which you can track on the progress bar in the new window. Once the process is completed, click the “OK” button to conclude the process.
Part 3: Having Trouble When Transferring to iPhone 15 Stucks?
The issue of iPhone 15 getting stuck when users attempt to transfer data from their older devices, like the iPhone 14, to the new iPhone 15 has become a frustrating challenge for many Apple enthusiasts. This problem often arises due to the complex nature of data migration and the high expectations associated with Apple’s seamless ecosystem. When attempting to transfer photos, apps, contacts, and other vital information, users may encounter lengthy delays, frozen screens, or failed transfers.
The possible reasons could be:
- ·Software glitches
- ·Insufficient storage space
- ·Incompatible iOS versions between the old and new devices
The impact of this issue extends beyond mere inconvenience, as it can result in data loss or a less-than-optimal out-of-the-box experience with the latest iPhone. Addressing this problem, you may try:
- ·Updating both devices to the latest iOS version
- ·Ensuring sufficient storage
- ·Seeking assistance from Apple Support
- ·Authorized service providers when necessary
Or, you can also try to ask for help from a third-party application, Dr.Fone - Phone Transfer is always at your service. Dr.Fone - Phone Transfer offers a reliable solution to the iPhone data transfer problem. This user-friendly software is designed to simplify the migration process, making it hassle-free for iPhone users. Here are the steps to get you started:
Step 1 Launch Phone Transfer Tool
Initiate the process by launching Wondershare Dr.Fone on the computer. Continue from Toolbox > Phone Transfer to redirect towards opening the particular tool.
Step 2 Set Data Transfer Path
On accessing the Phone Transfer tool, continue to connect your iOS devices and let them load their data on the next screen. Here, define the Source and Destination of the transfer to specify the direction of the phone transfer. To change locations, use the Flip button on the top.
Step 3 Choose Data Types
After successfully determining the source and destination, select the specific data types you want to transfer. Checkmark all data and select Start Transfer to proceed with the operations.
Step 4 Turn Off Find My Feature
Once done, a prompt appears on the front asking to turn off the Find My feature on iOS devices. Open the Settings of the iOS device and proceed further by tapping on the name at the top. Continue from iCloud > Find My feature and turn it off.
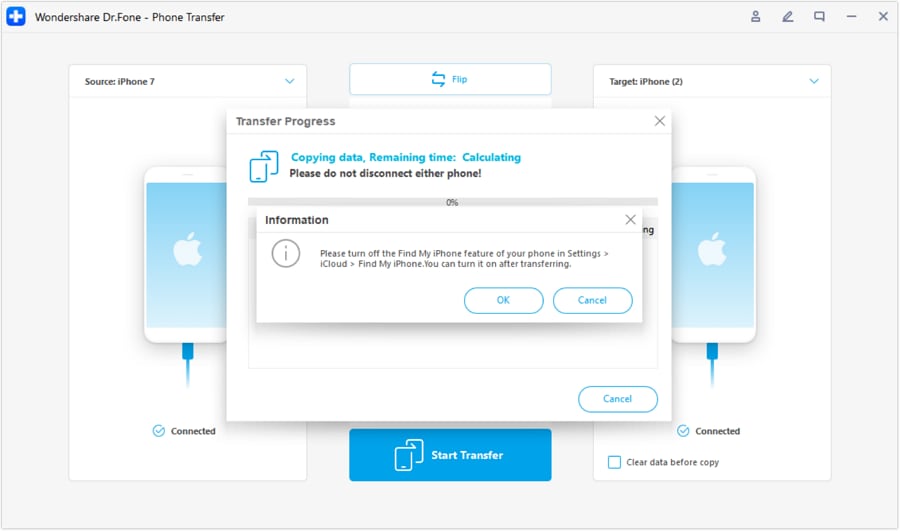
Step 5 Complete Your Transfer
Once done, the window in the front shows the completed phone transfer. Click OK to conclude the process entirely.
Bonus Tip: The Best Data Eraser To Make Apple iPhone SE (2020) Data Unrecoverable
Nowadays, data privacy is paramount. That’s why ensuring your old phone’s sensitive information remains unrecoverable is crucial. Before you part ways with your device, just deleting the data or factory resetting your device isn’t enough. Wondershare Dr.Fone doesn’t stop at facilitating seamless data transfer. It also offers an exceptional data eraser feature.
This ensures your data is permanently wiped from your old phone, leaving no traces behind. Moreover, it consists of a private data eraser through which you can erase your data and make it unrecoverable. You can also use its Space Saver feature to erase junk data to speed up your old or new device.
Conclusion
In summary, the realm of mobile technology continues to evolve. It has increased the importance of smooth and efficient data transfer. With the arrival of the iPhone 15, a new world of possibilities opens up. The journey of iPhone 15 data transfer should be a seamless transition. In this guide, we’ve explored a range of methods, both official and third-party.
These empower you to transfer your cherished data to the iPhone 15 easily. While Apple’s official methods offer solid data migration, Wondershare Dr.Fone emerges as the ultimate solution that goes beyond the ordinary. Its unparalleled data transfer and erasure capabilities make it a game-changer.
5 Ways to Send Ringtones from Apple iPhone SE (2020) to iPhone Including iPhone 15
It is a common misconception that sending data from one iPhone to another can be a tedious task. For instance, there are plenty of ways to learn how to send ringtones from Apple iPhone SE (2020) to iPhone without any trouble. You can either perform a direct transfer to your new iPhone , such as iPhone 15, or even take the assistance of your system to do so. In this post, we will teach you in different ways how to transfer ringtones from Apple iPhone SE (2020) to iPhone in a stepwise manner. So let’s get started!
Part 1: How to Send Ringtones to iPhone including iPhone 15 with 1-Click
“How do I send a ringtone to another iPhone without iTunes?” If you want to transfer ringtones from Apple iPhone SE (2020) to iPhone, you can use the help of third-party applications that will get the job done in minutes. These applications are also useful when you are trying to shift content from one Apple device to another. Of course, you will need a computer/Laptop to play the middleman. Dr.Fone - Phone Transfer is the best iPhone transfer tool that lets you transfer your ringtones from Apple iPhone SE (2020) to iPhone.
Here is how:
Step 1: Download Dr.Fone - Phone Transfer application on your computer.

Step 2: Launch the application, and you’ll see options on the screen. Go with Phone Transfer.
Step 3: Then connect both your devices to the computer. In your case, it is the iPhone and the iPhone. You can also make this transfer between iPhone and Android devices.

Step 4: Now select the files that you want to transfer. Here, select all the ringtones that you want to shift. Then, initiate the transfer and don’t disconnect the Apple iPhone SE (2020) devices.

The data will be transferred successfully to the destination device.
Don’t have a laptop? Then you can do this!
Step 1: Download the mobile version of Wondershare Dr. Fone - Phone Transfer. Connect your iPhone and iPad using a suitable cable.

Step 2: The software will start to scan the synced data on your device.

Step 3: After the check, select the contacts you want to shift and click on ‘Start Importing’.

Part 2: How to Send Ringtones to iPhone Including iPhone 15 Using iTunes/Finder?
The traditional method of managing their iOS devices is utilizing iTunes or Finder. It remains a reliable approach for sending ringtones to your iPhone, including the latest iPhone 15. Be aware that iTunes versions 12.6 and earlier are capable of syncing your ringtones. The more recent versions exclusively support music synchronization. Here’s a step-by-step guide on how to transfer ringtones from Apple iPhone SE (2020) to iPhone:
Step 1: Start by installing iTunes version 12.6 or older on your computer and launch it. Now connect your old iPhone with ringtone to the computer. In iTunes, click “Files,” hover over “Devices,” and tap “Transfer Purchases from iPhone.”

Step 2: Press “Sync” and wait for the ringtones to sync. Afterward, disconnect the old iPhone and plug in the new iPhone. Once you’ve selected the Apple iPhone SE (2020) device icon, navigate to the “Tones” tab and mark the “Sync Tones” box. Next, choose either “All Tone” or “Selected Items” and finalize the process by clicking “Apply.”

Part 3: How to Send Ringtones to iPhone including iPhone 15 using OneDrive?
With Dr.Fone - Phone Transfer, you can transfer ringtones from one device to another directly, and that too within seconds. Nevertheless, if you wish to perform a wireless transfer, then you can take the assistance of a cloud service like OneDrive. Besides moving your files from one device to another, you can also keep them safe on the cloud.
To start with, download OneDrive on both iOS devices from App Store. You can also visit its iTunes store page right here .
Open OneDrive on your source device and tap on the “+” icon to add something to the drive. Next, tap on the “Upload” button and locate the ringtone on your device storage to upload it on the drive.

Now, launch OneDrive on your target device and sign in using the same credentials. Locate the file that you have just added to the drive. Open the folder and download it to your local storage.
In this way, you can learn how to transfer ringtones from Apple iPhone SE (2020) to iPhone without physically connecting both devices.

Part 4: How to Send Ringtones to iPhone including iPhone 15 using AirDrop?
AirDrop provides a quick and efficient way to transfer ringtones directly between two iOS devices. It allows for a smooth sharing experience without the need for extra software or cloud services. Follow these steps for how to send a ringtone from Apple iPhone SE (2020) to iPhone:
Step 1: Begin by confirming that AirDrop is active on both devices and set to “Everyone” for visibility. Additionally, make sure that Bluetooth and Wi-Fi are turned on for both devices as well.

Step 2: On the source device, move to the “Files” app. Here, navigate to the targeted ringtones and select them. Now, tap the “Share” button and select “AirDrop” as the sharing method. From the available devices for AirDrop, choose the targeted device. On the targeted iPhone, you will receive a prompt for AirDrop. Accept it to complete the ringtone-sharing process.

Part 5: How to Send Ringtones to iPhone including iPhone 15 using Email?
While this is not the most direct method, sending ringtones via email remains a viable option. It can transfer small audio files between iPhones. Follow these steps for how to send ringtones from Apple iPhone SE (2020) to iPhone using email:
Step 1: On the source iPhone, move to the ringtone you want to send and select it. Now, tap “Share” and choose “Email” as the sharing method.

Step 2: Once the ringtone is added as an attachment, add your email address in the recipient field. Afterward, press “Send” to email the selected ringtone. On your target iPhone, open the mail and download the ringtone.

Bonus Tip. How to Make Custom Ringtone on iPhone
Creating custom ringtones for your iPhone allows you to personalize your device even further. This sets it apart from the standard options available. When it comes to finding a reliable and trusted ringtone maker, Wondershare Dr.Fone stands at the top. It allows you to create ringtones by selecting music files directly from the iPhone.
With its advanced features, you can craft unique ringtones from your favorite songs or audio files. Follow these steps to utilize the Dr.Fone Ringtone Maker feature and create your own custom ringtone on your iPhone:
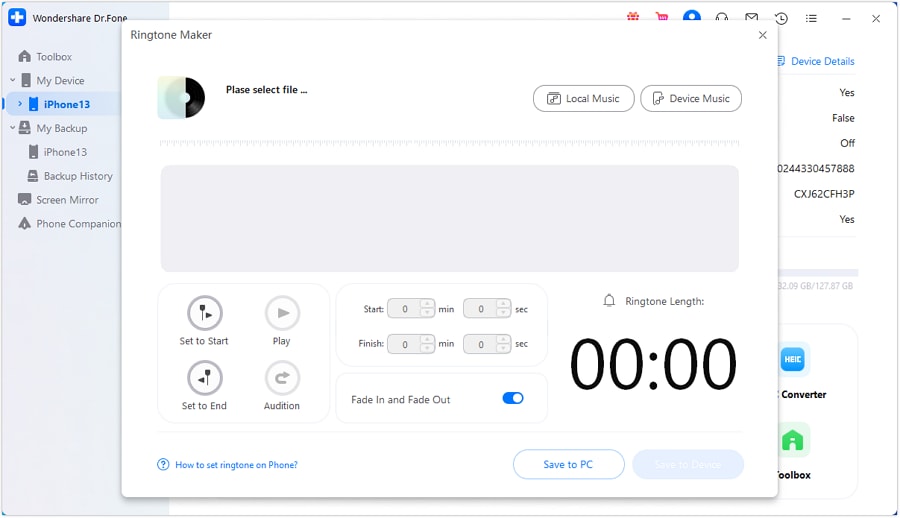
Step 1: Access Ringtone Maker in Wondershare Dr.Fone
After launching Wondershare Dr.Fone on your computer, connect your iPhone to it using the original cable. Once Dr.Fone has detected your device, click “Ringtone Maker” from the available options. On the following window, use “Local Music” or “Device Music” to select an audio file.
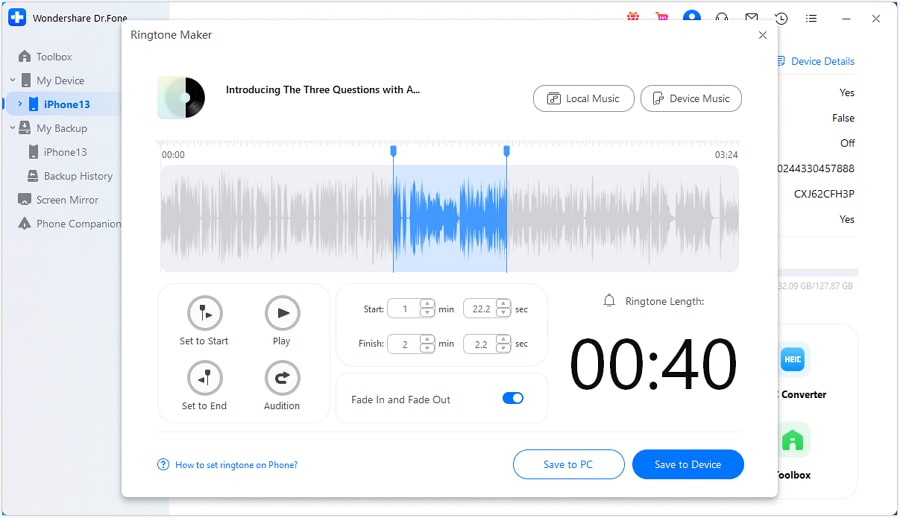
Step 2: Create the Custom iPhone Ringtone
Adjust the appended music to match your desired ringtone length. Employ the “Fade In” and “Fade Out” feature for personalized ringtone customization. Afterward, store the newly created ringtone directly on the iPhone using the “Save to Device” option.
FAQs About Ringtones on iPhone
- Where are my iPhone ringtones stored?
On an iPhone, custom ringtones are typically stored within the Apple iPhone SE (2020) device’s internal storage. Specifically, they are found within the “Settings” application under the “Sounds & Haptics.” Additionally, if you have synced ringtones via iTunes, they might be stored within the iTunes media folder on your computer.
- What if I have a large collection of ringtones to transfer?
For transferring a substantial assortment of ringtones, contemplate leveraging a cloud storage solution. OneDrive and Google Drive are among the options worth exploring. They enable the uploading and storage of significant data volumes. It enables easy access and download from multiple devices. Using a third-party software solution such as Wondershare Dr.Fone can simplify the process of bulk transfers.
- Are there any precautions I should take when transferring ringtones?
When transferring ringtones, ensure that the file formats are compatible. It’s also crucial to use secure and trusted transfer methods to prevent any data loss or security breaches. Additionally, always back up your data before initiating any transfer process. This is to avoid the risk of potential data loss during the transfer.
- What if I encounter issues during the transfer process?
If you encounter any issues during the transfer process, it’s essential to troubleshoot systematically. Check the compatibility of the file formats. In addition, ensure a stable internet connection, and verify that both devices are using the latest software updates. If the issue persists, consult the support documentation for the specific transfer method. Reach out to the customer support of the respective software or service provider for further help.
Now when you know how to send ringtones from Apple iPhone SE (2020) to iPhone in different ways, you can certainly move your data without any trouble. Feel free to give Dr.Fone - Phone Transfer a try and manage your device in no time. It is a complete phone management tool that will certainly come in handy to you on numerous occasions. If you face any setbacks while moving your ringtones from Apple iPhone SE (2020) to iPhone, let us know about them on our official social media.
How to Transfer/Sync Notes from Apple iPhone SE (2020) to iPad
The Notes app comes pre-installed on iPhone and iPad, and it proves to be very handy and useful when you need to jot down some ideas, details, plans, or any other important information which can be reviewed whenever you need. Sometimes you will need more to check your note from your iPhone on iPad. In this case, transferring/syncing notes from Apple iPhone SE (2020) to iPad plays an important role. This article will provide the ways with and without iCloud to transfer notes from Apple iPhone SE (2020) to iPad in detail.
Part 1. Transfer Notes from Apple iPhone SE (2020) to iPad Using iCloud
This part will introduce how to transfer iPhone notes to iPad with iCloud. In fact, this is very easy to be done, and you’ll only need several simple steps. Check it out.
Step 1 Open Settings and select iCloud
Tap Settings > iCloud on both your iPhone and iPad.
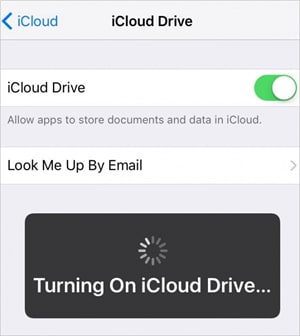
Step 2 Turn on iCloud Drive
Click on iCloud Drive option and then turn it on. You need to turn the option on both your iPhone and iPad.
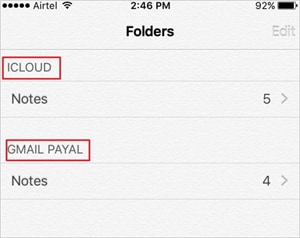
Step 3 Go to Notes App on iPhone
Now go to the Notes app on your iPhone, and you can see a folder named iCloud. Now you can create notes in the iCloud folder on your iPhone, and the notes will be automatically synced to the iPad when the two devices are connected with Wi-Fi connection.
Part 2. Sync Notes from Apple iPhone SE (2020) to iPad Using Third-Party Software
Dr.Fone - Phone Manager (iOS)
Transfer Files Between iPhone and iPad without iTunes
- Transfer, manage, export/import your music, photos, videos, contacts, SMS, Apps, etc.
- Back up your music, photos, videos, contacts, SMS, Apps, etc. to the computer and restore them easily.
- Transfer music, photos, videos, contacts, messages, etc from one smartphone to another.
- Transfer media files between iOS devices and iTunes.
- Fully compatible with the latest iOS version and iPod.
3981454 people have downloaded it
Besides iCloud, there are several third-party softwares that also allow you to sync and transfer notes from Apple iPhone SE (2020) to iPad. This part will introduce the top programs which can help you to get the work done easily.
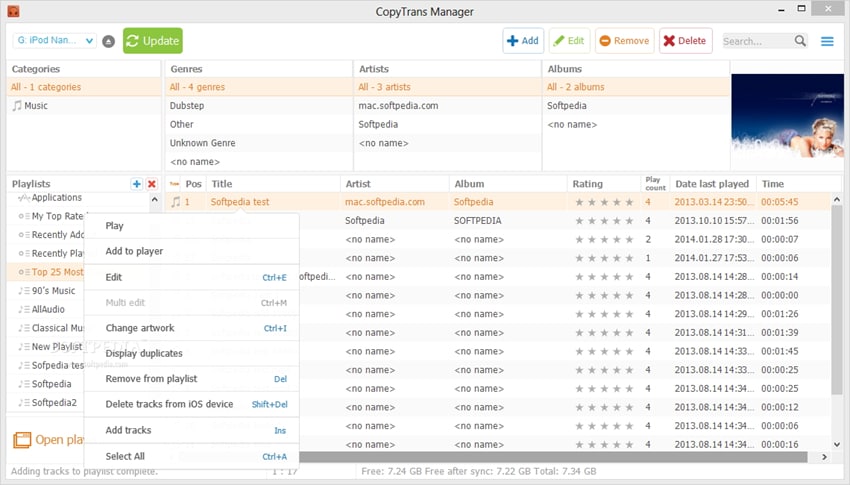
1. CopyTrans
It allows you to transfer apps, notes, photos, videos, and other content between iOS devices, PC, and iTunes. The software also takes backup of data so that it can be restored in case of data loss. CopyTrans also enables you to import the artwork, playlist, and other information into iTunes.
Pros
- Easy-to-use and clean interface
- Provides the option to take back up iOS data
- The app provides multiple guides and tips for the users
Cons
- The time of transfer is long
- Many users have also complained about detecting virus
User reviews
- Thousands of songs can be copied back to iTunes in minutes
- Virus detected by windows 10. Windows 10 detected a virus and removed the download 2x. Never unzipped the file.
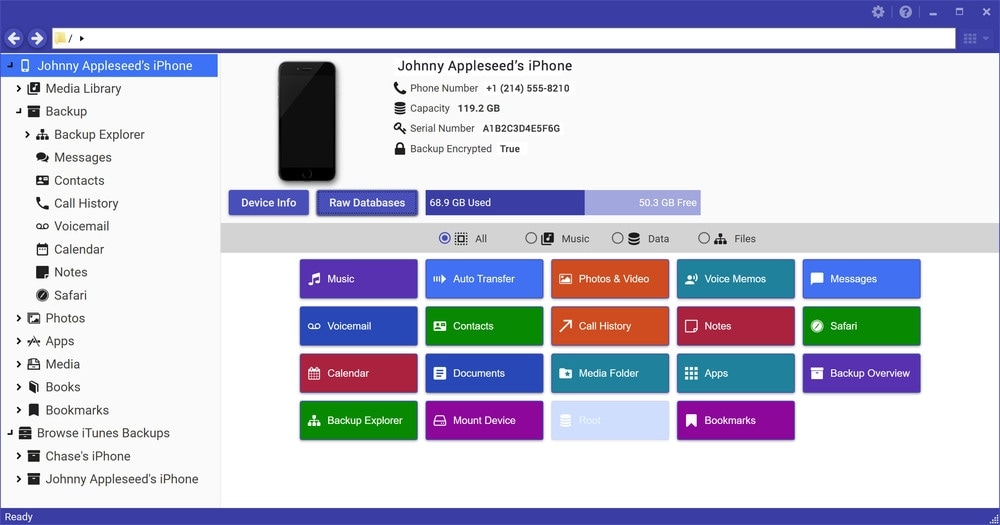
2. iExplorer
This is another app that allows you to sync notes from Apple iPhone SE (2020) to iPad. The app allows you to transfer images, music, notes, SMS and all other information respectively without any need to sync the entire file every time. iExplorer helps to manage folders and transfer data for iOS devices, and it is a great iTunes alternative.
Pros
- The app displays the data of the Apple iPhone SE (2020) device in a clear layout
- The detection of the Apple iPhone SE (2020) device by the app is quick and thoroughly
- Allows users to drag and drop files for the transfer
Cons
- Many users complaint of crashing issues
- There are lots of pop-up dialog for full version purchase
- The access to SMS and the contacts information is with jailbreak terminals only
User Reviews
- Amazingly quick! Got the job in very short time. Very user-friendly.
- I forgot my login information for my old iTunes account and had no way of obtaining it since I was also using a new email address. I downloaded this program and it transferred all 600-something of my files within a minute or two. Saved me so much money!
3. Syncios
Syncios also works as a decent iTunes alternative to transfer data between iOS devices and PC. The app allows users to transfer videos, photos, ringtones. TV shows, playlist, notes and all other data between iPhone/iPad/iPod and PC easily and quickly.
Pros
- Comes with easy setup wizard
- Excellent using experience when transfer files
Cons
- Free software does not comes with selected options to choose from
- Some users complain about the software collapse.
User Reviews
- Software crashed and we lost years of family photos, including photos of our kids with nanna who passed away recently. The scam part is this, if you go to the website you will notice they do data recovery, you can also download for free but to actually recover ‘photos’ etc, you have to pay $50.00 USD and there is the scam. They create the issue with the free software and then they sting you to give you back your photos. Warn everybody you know. BEWARE.
- Since I go through lots of music, videos, photos, I had to be able to backup the iPhones and this is where iTunes got kinda complicated for me. SyncIOS make the use of my Apple device much more user-friendly and comfortable.
Also read:
- [Updated] 2024 Approved From Components to Creativity Designing Your Own 4K Editor PC
- 2024 Approved Secure Your Travel Documents Grab 10 FREE Passport Photos Online/Desktop
- 2024 Approved The Art of Choosing Perfect Thumbnails
- 4 Quick Ways to Transfer Contacts from Apple iPhone XR to iPhone With/Without iTunes | Dr.fone
- 4 Ways to Transfer Contacts from Apple iPhone 11 to iPhone Quickly | Dr.fone
- About Vivo Y78t FRP Bypass
- How To Change Nubia Red Magic 8S Pro Lock Screen Clock in Seconds
- How To Transfer Messages From Apple iPhone XR to other iPhone All iOS Versions | Dr.fone
- How to Transfer Photos from Apple iPhone 14 Plus to other iPhone without iCloud | Dr.fone
- In 2024, 3 Things You Must Know about Fake Snapchat Location On Vivo V29 | Dr.fone
- In 2024, 4 Ways to Transfer Messages from Apple iPhone 13 to iPhone Including iPhone 15 | Dr.fone
- In 2024, Fix Apple iPhone X Stuck on Data Transfer Verified Solution! | Dr.fone
- In 2024, How To Transfer Data from Apple iPhone 12 to New iPhone 15 | Dr.fone
- In 2024, How to Transfer from Apple iPhone 12 Pro to Samsung Galaxy S20? | Dr.fone
- In 2024, Navigating Through Facebook GIF Downloads Across Platforms
- In 2024, Why Your WhatsApp Live Location is Not Updating and How to Fix on your Apple iPhone 6s | Dr.fone
- Incorporate Rhetorical Questions to Engage the Reader.
- Seamlessly Update Graphics with Free Intel 82^V 82579 Driver Software – Download Today!
- Switch Cards Between Apple iPhone 15 Pro and other iPhones Will Move All Phone Services? | Dr.fone
- Title: Effortless Ways to Transfer Data from Your Apple iPhone SE (2020) to iPhone 15 | Dr.fone
- Author: Charlotte
- Created at : 2024-10-25 00:52:45
- Updated at : 2024-10-29 18:44:13
- Link: https://iphone-transfer.techidaily.com/effortless-ways-to-transfer-data-from-your-apple-iphone-se-2020-to-iphone-15-drfone-by-drfone-transfer-from-ios/
- License: This work is licensed under CC BY-NC-SA 4.0.