
Easy Methods How To Transfer Pictures From Apple iPhone XS Max to PC | Dr.fone
Easy Methods: How To Transfer Pictures From Apple iPhone XS Max to PC
Photo transfer from your iPhone to your PC is a common practice for various reasons. It can free up your device’s storage space, create backups, or simply edit and organize your photos on a larger screen.
Thankfully, there are various methods to transfer pictures from your iPhone to your PC, providing flexibility to users based on their preferences and convenience. Read our comprehensive guide on how to transfer pictures from Apple iPhone XS Max to PC. This article covers step-by-step instructions so you can easily and efficiently manage and transfer your iPhone photos to your computer while preserving your cherished memories.
Part 1: How To Transfer Pictures From Apple iPhone XS Max to PC with iCloud
One of the widely used and efficient methods to transfer pictures from your iPhone to a PC is through iCloud, Apple’s cloud-based service. iCloud provides seamless integration across Apple devices, allowing users to sync and access their photos and videos effortlessly.
However, even if your PC is using other operating systems, such as Windows, you can still use iCloud for Windows to save and transfer your iPhone photos from iCloud.
How to transfer iPhone photos to a computer using iCloud:
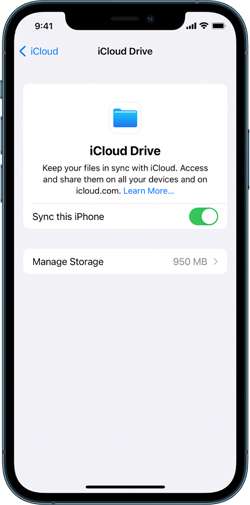
Step 1: Make sure you have synced iCloud photos on your iPhone.
On your iPhone Settings, go to your profile and tap iCloud. Then, select Photos and turn on the switch next to “Sync this [device].” Otherwise, go to iCloud settings > iCloud Drive, and switch on “Sync this iPhone.”
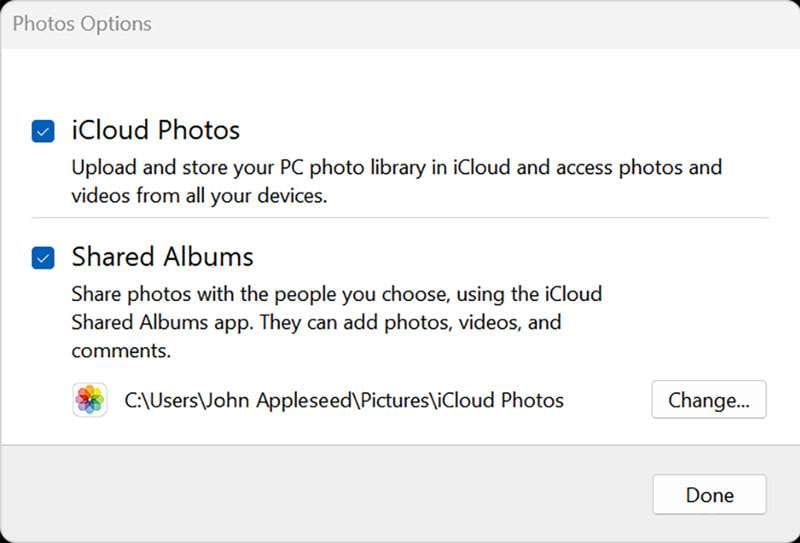
Step 2: Set up your iCloud for Windows.
Open iCloud for Windows and ensure you’re signed in with your Apple ID. Next to Photos, select Options > iCloud Photos. Click “Done” and “Apply” to save the changes and close the window.
Step 3: Keep iPhone photos on PC.
Open iCloud Photos and select the images you want to transfer to your PC. Right-click to open a drop-down menu and choose “Always keep on this device.”
That’s it! Now, you can find your iPhone Photos on your computer.
Part 2: How To Transfer Pictures From iPhone with Google Drive
Another convenient way to transfer iPhone pics to a computer is through Google Drive. As a cloud-based storage solution, Google Drive allows users to seamlessly store, manage, and share files, including photos, across different devices.
If you already have a Google account, you can jump right into Google Drive without signing up. However, be aware that the free version only gives you 15 GB of space. If you need more room, you’ll have to sign up for a subscription.
How to transfer iPhone pictures to a computer with Google Drive:
Step 1: Set up your Google Drive.
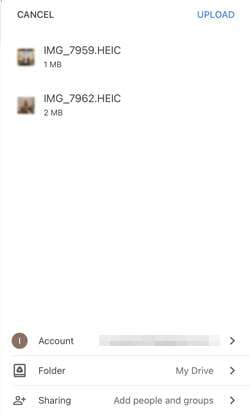
Open Google Drive on your iPhone. Once opened, tap the multicolored + symbol and select “Upload” > “Photos and Videos.” If prompted, grant access to all photos by tapping “Allow Access to All Photos.”
Step 2: Upload your iPhone photos on Google Drive.
Browse through your iPhone albums to locate the specific photos you wish to upload. Hold and tap to select multiple photos. Then, tap “Upload” to upload your iPhone photos to Google Drive.
Optional: Automatic backup or sync with Google Photos
For those seeking automatic backups, open Google Photos, tap your profile image, navigate to “Google Photos settings,” and select “Backup & Sync.” Toggle “Backup & Sync” to On for continuous backups.
Step 3: Transfer your iPhone photos from Google Drive to your PC.
Once your photos are stored on Google Drive, proceed to save and transfer them to your PC. Select the desired photos in Google Drive, and click “Download.”
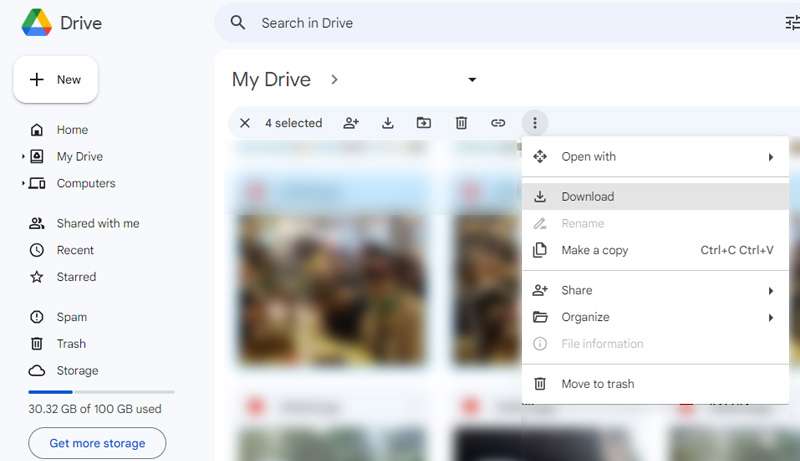
To save all photos from a specific Google Drive folder, open Google Drive and select “My Drive.” Locate the intended folder, and click the three dots to open the drop-down menu. Select “Download,” and all photos and files within the folder will be saved to your computer in ZIP format.
Part 3: How To Transfer Pictures From iPhone with iTunes
You can also make the most of iTunes to secure your iPhone with backups, keep it up-to-date, or synchronize content between your iOS device and your computer in both directions. Even if you’re a Windows PC user, there’s no need to fret. Although iTunes is an Apple product, it’s also available for Windows use.
To get started, make sure that you have iTunes for Windows installed or update your existing version to at least iTunes 12.5.1. Once done, follow the instructions below.
How to transfer iPhone pics to a PC using iTunes:
Step 1: Connect your device to your computer.
Plug in your iPhone to your computer using a USB cable.
Step 2: Grant access to your iPhone Photos.
If your phone is asking you to Trust This Computer, tap “Trust” or “Allow to proceed.”
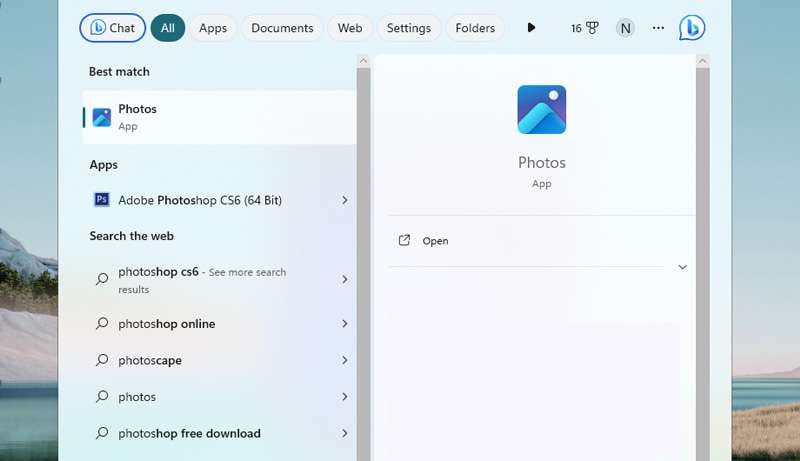
Step 3: Open your computer’s Photos app.
Go to the Start menu on your PC. Search and select Photos to open the Photos app.
Step 4: Import your Photos to your PC.
Within the Photos app, click on Import > From a USB device and follow the instructions on the screen. You can choose specific photos for the transfer and decide where to save them on your PC. Remember to make sure that the photos are saved on the Apple iPhone XS Max device rather than stored in the cloud.
Finally, allow a few moments for the system to detect and transfer the selected photos.
Part 4: How To Quick Transfer Pictures From Apple iPhone XS Max to PC
If you find the above methods difficult, there is a quick and easy way to transfer photos from your iPhone to a PC with Dr. Fone’s Export All Data feature. With this feature, there’s no need to navigate through various locations to just locate and transfer files from your iPhone.
Dr.Fone - Phone Manager (iOS)
Transfer Photos from Computer to iPod/iPhone/iPad without iTunes
- Transfer, manage, export/import your music, photos, videos, contacts, SMS, Apps, etc.
- Back up your music, photos, videos, contacts, SMS, Apps, etc., to the computer and restore them easily.
- Transfer music, photos, videos, contacts, messages, etc., from one smartphone to another.
- Transfer media files between iOS devices and iTunes.
- Fully compatible with iOS 7 to iOS 15 and iPod.
3981454 people have downloaded it
Dr. Fone’s Export All Data feature offers some great functionalities, including:
- Comprehensive data export, including Photos, Contacts, Messages, Voicemail, and more
- Encrypted data transfer and backups
- Available for iOS and Android devices
- Regular updates to provide an enhanced user experience
To transfer photos from your iPhone to a PC using Dr.Fone, follow the step-by-step below:
Step 1: Launch Dr.Fone and make device connections using a USB cable.
Start by Image nameing your iPhone device to the computer via a USB connection. Launch Dr.Fone and select “Export all data” in the My Device section.

Step 2: Choose file types for export
When a new window appears, select the specific file types you wish to transfer (in this case, your photos). Then, click “Export” at the bottom of the screen to initiate the procedure. Choose the preferred location for saving the exported data.


Step 3: Make a password for the backup file
Next, you will be asked to create an encrypted password for the backup file to be stored on the computer. Set a password, confirm it, and click “Done” to execute the process.

Step 4: Monitor the progress
Your iPhone will start exporting its data to the computer through Dr.Fone. You can wait and monitor the progress on the screen.

Step 5: Successful export of data to the computer
After successful completion of exporting the data, a window will appear on your computer screen. Click “Open” to review the exported data at the specified location.

Conclusion
Before, you must have wondered how do you transfer pictures from Apple iPhone XS Max to PC. But after learning from the article above, you now have a variety of straightforward methods in your hand, whether with iCloud, Google Drive, iTunes, or reliable software like Dr.Fone.
If you’re embedded in the Apple ecosystem, iCloud provides seamless integration of your iPhone Photos. Alternatively, Google Drive offers a cross-platform solution, enabling you to upload your iPhone photos to the cloud and access them on your computer browser.
For those who prefer a more traditional approach, iTunes provides a straightforward method via a USB connection. And if you’re looking for a quick and versatile third-party solution, software like Dr.Fone simplifies the data transfer process with its user-friendly interface and robust features.
4 Ways to Transfer Messages from Apple iPhone XS Max to iPhone Including iPhone 15
“Do text messages transfer to the new iPhone from the old iPhone? I have bought a new iPhone but can’t understand how to transfer messages from Apple iPhone XS Max to iPhone?”
Lately, we have gotten plenty of feedback like this from users who wish to learn how to transfer messages to new iPhone, like iPhone 15/15 Pro (Max), from an existing iOS device. If you have the same doubts, then you have come to the right place.
While it is quite easy to move music, videos, or pictures from one iPhone to another , you might need to walk an extra mile to transfer contacts or messages. To make it easier for our readers, we have come up with three different techniques to transfer messages from an old to a new iPhone effortlessly.
Read on and learn how to transfer messages from Apple iPhone XS Max to iPhone in no time.
Which method to choose?
There are 4 different ways on how to transfer messages to the new iPhone. But which one to choose? Chances are that you might get confused. To make things easier for you, we here provide a quick comparison.
Method 1: How to transfer messages from Apple iPhone XS Max to iPhone including iPhone 15/15 Pro (Max) in one click
If you want to learn how to transfer texts from Apple iPhone XS Max to iPhone seamlessly, then take the assistance of Dr.Fone toolkit. Simply use Dr.Fone - Phone Transfer to move your messages from one iPhone to another. Not only messages, but you can also use it to transfer all data files to new iPhone .
Dr.Fone - Phone Transfer
Quickly Transfer Text Messages /iMessages from Apple iPhone XS Max to iPhone
- Transfer messages from Apple iPhone XS Max to iPhone without backup.
- Support any iDevices including iPhone, iPad, and iPod.
- Transfer everything including contacts, music, video, photo, SMS, app data, and more.
- Can be installed both on Win and Mac computers.
3981454 people have downloaded it
In this technique, the simple process goes as follows to transfer messages to new iPhone:
Open software > Connect iPhones to PC > Select “Messages” > Click “Start Transfer”
Now let’s dive in and learn how to transfer messages to new iPhone:
1. Set up Dr.Fone - Phone Transfer to Windows or Mac computer. Connect and start the application with your iPhone. On the home screen, click the “Phone Transfer” option.

2. Confirm that both iPhones have the correct target and source positions. Or to exchange by clicking “Flip”.

3. Choose the type of information to be transferred. Before clicking on the button “Start Transfer” make sure that the option “Text Messages” is enabled.
4. Wait a while for your old iPhone messages to be transferred to the new iPhone.

5. Once it is done, you can disconnect your iPhones from the PC, and view the messages on the target iPhone.

After following these easy steps, you can learn how to transfer texts from Apple iPhone XS Max to iPhone with Dr.Fone - Phone Transfer.
Video Guide: How to transfer messages from Apple iPhone XS Max to iPhone
You may be interested in:
- _ 4 ways to transfer SMS from Apple iPhone XS Max to Android _
- _ 5 Ways to Transfer WhatsApp Messages from Apple iPhone XS Max to iPhone _
Method 2: How to Transfer Messages from Apple iPhone XS Max to iPhone Including iPhone 15/15 Pro (Max) Using iCloud Backup
Transferring data, including crucial messages, from an old iPhone to a new one is a smooth process using iCloud Backup. It allows you to access your essential conversations and other message data on your new device. Restoring your messages from an iCloud backup is a straightforward process. To effortlessly move your messages from one iPhone to another using an iCloud backup, adhere to the simple steps outlined below:
Step 1: Go to “Settings” on your iPhone, tap your name, and access “iCloud.” Press the “iCloud Backup” option, and on the following screen, ensure “Back Up This iPhone” is enabled. Now, “Back Up Now” to create a backup of your old iPhone’s data, including messages, on iCloud.

Step 2: Afterward, start setting up your new iPhone until you reach the “Apps & Data” screen. Here, choose “Restore from iCloud Backup” and log in using your Apple ID. Then, go on to select the backup you want to restore and complete the process by following the on-screen instructions.

Method 3: How to Transfer Messages from Apple iPhone XS Max to iPhone, including iPhone 15/15 Pro (Max), using iCloud Sync
Ensuring a smooth transition to the latest iPhone is made simple with the aid of iCloud sync. It enables the transfer of essential data, including precious messages, from your old device. With it, you can sync your messages and other crucial data to your new device. This allows continued access to your valuable conversations and attachments. Below are the step-by-step instructions for transferring messages using the iCloud sync feature:
Step 1: On your old iPhone, access phone Settings and tap on your Apple ID. Press “iCloud” on the following screen and move to the “Apps Using iCloud” section.

Step 2: Here, tap “Show All” and go on to press “Messages in iCloud” from the list. On the following screen, enable the “Use on this iPhone” feature. It will sync iMessage with your iCloud account, allowing you to access them on your new iPhone.

Method 4: How to transfer messages from Apple iPhone XS Max to iPhone including iPhone 15/15 Pro (Max) using iTunes/Finder
Besides iCloud, one can also take the assistance of iTunes/Finder to move their content from one iOS device to another. Not only do text messages transfer to new iPhone, other kinds of data files like photos or contacts can also be moved with this method. To learn how to transfer texts from Apple iPhone XS Max to iPhone using iTunes, follow these steps:
1. Connect your source iPhone to your computer and launch iTunes or Finder (Mac Computer).
2. Select the Apple iPhone XS Max device and go to its Summary page.
3. Under the Backups section, click on the “Backup Now” button to take a complete backup of your phone. Make sure that you are taking a backup on the computer instead of iCloud.

4. After taking a backup of your device, disconnect it, and connect the target phone to the computer.
5. Launch iTunes/Finder and wait for it to recognize the new iPhone. From here, you can choose to set up your device while restoring a previous backup.

6. Alternatively, you can also go to its “Summary” page and click on the “Restore Backup” option to restore the existing backup on your target device.

This will let you move not just messages, but all the major data files from one iOS device to another.
You may be interested in:
- _ Does iTunes Backup Text Messages? How to Restore? _
- iTunes Not Working? Here Are All Solutions You Need
Now when you know how to transfer messages from Apple iPhone XS Max to iPhone in different ways, you can simply pick the preferred option. We have also compared these techniques so that you can go with the most suitable alternative.
Go ahead and follow this stepwise tutorial to transfer your messages from one iPhone to another. Whenever someone asks “do text messages transfer to the new iPhone,” make them familiar with an easy solution by sharing this informative post.
How To Transfer Messages From Apple iPhone XS Max to other iPhone [All iOS Versions]
Transferring messages from one iPhone to another is a common necessity. It often arises during device upgrades, replacements, or when sharing information between devices. With the evolution of iOS versions, the methods for transferring messages have also adapted and improved. Regardless of the version, transferring messages between iPhones remains vital and relevant.
This guide will go through many techniques to transfer messages from Apple iPhone XS Max to iPhone. Our goal is to provide you with the necessary knowledge for transferring your messages between two iPhones. We will ensure a smooth transition process by offering clear step-by-step guidance and helpful tips.

Part 1: How To Sync Messages Between Two iOS Devices?
Synchronizing messages between two iOS devices is a convenient way. It ensures that conversations and attachments transfer from one iPhone to another smoothly. iOS offers iCloud as the method to achieve this synchronization. It enables users to maintain message continuity across their devices. Here is how to transfer messages from Apple iPhone XS Max to iPhone via iCloud sync:
- Step 1. Ensure you’re signed in with the required Apple ID on both devices. Next, navigate to the “Settings” app on the source device and select “Apple ID.” On the following screen, press “iCloud” to proceed.

- Step 2. Here, tap “Show All” under the “Apps Using iCloud” section and press “Messages in iCloud.” On the ensuing screen, toggle on “Use on this iPhone” and then press the “Sync Now” option.

- Step 3. Now, move to the target device and access “iCloud” settings through the Settings app. Here, navigate to “Messages in iCloud,” and on the next screen, enable “Use on this iPhone.” Give it some time, and the messages on both devices will sync.

Part 2. How To Transfer Messages From Apple iPhone XS Max to iPhone Using iCloud Backup
Transferring messages between iPhones using iCloud backup offers an efficient method. It guarantees the transfer of all your conversations, attachments, and message history. Nonetheless, a significant limitation of this approach is its exclusive usability during the setup of an iPhone. Moreover, you can’t restore messages selectively with this method. Here is how to transfer text messages from Apple iPhone XS Max to iPhone using iCloud backup:
- Step 1. Ensure your old iPhone is linked to a reliable Wi-Fi network. Open “Settings,” tap on your name, and select “iCloud.” Tap “iCloud Backup” and ensure the “Back Up This iPhone” toggle switch is turned on.

- Step 2. Here, press “Back Up Now” to initiate an immediate backup and wait for the process to complete. Afterward, move to the new iPhone and start setting it up until you reach the “Apps & Data” screen.

- Step 3. Next, opt for “Restore from iCloud Backup.” Then, log in to your iCloud account with the identical credentials employed during the backup process. Pick the latest backup from the available options, including the messages you aim to transfer. The restoration process will begin, and once it’s completed, open the Messages app to verify that all your message history has been transferred.

Part 3. How To Transfer Messages From Apple iPhone XS Max to iPhone via iTunes/Finder
Using iTunes or Finder provides an alternate method to transfer messages from one iPhone to another. iTunes is available for Windows and on macOS Mojave and earlier. The users of macOS Catalina and later can use the Finder app to use this method. This approach completely restores your previous iPhone’s data, including messages.
Ensure that both iPhones are updated to the latest iOS version and that your computer has the latest version of iTunes or Finder. This is to avoid any compatibility issues during the backup and restoration process. Here is how to transfer messages from Apple iPhone XS Max to iPhone via iTunes/Finder backup:
- Step 1. Begin by connecting your old iPhone to the Mac or PC and access it in iTunes or Finder. On iTunes, click the Apple iPhone XS Max device to access the “Summary” tab, while in Finder, access the “General” tab. Here, go to “Backups” and choose “Back Up Now” to create a backup for your device. Make sure to select either “This Computer” (for iTunes) or “Backup all data from your iPhone to this Mac” (for Finder).

- Step 2. Once the backup is completed, start setting up your new iPhone. Once you reach the “Apps & Data” screen, select “Restore from Mac or PC,” and follow this guide:
For Finder/iTunes: Link your iPhone to the PC and gain access by clicking on the “Device” icon at the top left corner. This action will lead you to the “Welcome to Your New iPhone” screen, where the “Restore from this backup” option is pre-selected. Here, choose the desired backup and click “Continue” to kickstart the backup restoration process.

Part 4. The Best Way To Transfer Messages From Apple iPhone XS Max to iPhone Without Resetting
iCloud and iTunes are viable options for transferring messages, but both need an entire device reset. However, synchronization of devices is limited to those sharing the same Apple ID. Therefore, if you seek a hassle-free method, Wondershare Dr.Fone emerges as your optimal choice. It is a reliable and efficient solution that simplifies transferring data between iPhones.
With Dr.Fone, users can copy all their content from one device to another with just one click. This functionality also extends across different OS, enabling smooth transfers between iOS and Android devices. Users can move various data types, including contacts, SMS, photos, videos, music, etc.
Key Features of Wondershare Dr.Fone
- It is compatible with the latest iOS 17 and new models of iPhone 15.
- This Phone Transfer tool can operate with over 8000 devices, encompassing Apple, Samsung, and an extensive array of others.
- Wondershare Dr.Fone facilitates the transfer of up to 15 different file types between phones.
Steps To Transfer Messages From Apple iPhone XS Max to iPhone Without Backup via Dr.Fone
When using Wondershare Dr.Fone for phone-to-phone transfer, the process requires no technical expertise. Here is how to transfer messages from Apple iPhone XS Max to iPhone without backup using Dr.Fone:
- Step 1. Initiating Phone Transfer Setup
Start by installing and opening Wondershare Dr.Fone on your computer to begin the process. Navigate to “Toolbox” and select “Phone Transfer” to proceed. Now, connect your iOS devices and allow them to load on the following screen. In this step, designate the “Source” and “Destination” for the transfer to specify the direction of the phone transfer. If you need to switch the locations of your iOS devices, utilize the “Flip” button.
- Step 2. Data Type Selection and Transfer Initialization
Once the source and destination are confirmed, choose the particular data types for transfer. Make sure Messages are selected, then mark all other data if you want, and click on “Start Transfer.” Subsequently, a notification will prompt you to turn off the Find My feature on iOS devices.

- Step 3. Disable Find My on iOS Device and Complete Data Transfer
Access the iOS device settings, tap on the name at the top, proceed to iCloud > Find My, and deactivate it. Once the feature is turned off, the data transfer will start, and the progress bar will indicate the completion of the transfer process. After completion, the front window displays the finished phone transfer. Press “OK” to finalize the entire process.
![]()
Pro Tip. How To View and Export Messages of iPhone on Your Computer/MacBook
Looking for a way to view and export your messages from your iPhone to your computer? If yes, Wondershare Dr.Fone has got you covered. Dr.Fone offers a robust iOS phone management tool that enables the export of data from your iOS device.
This functionality empowers you to create a backup of your iPhone messages directly onto your system. Here is how you can view and export your messages via Wondershare Dr.Fone:
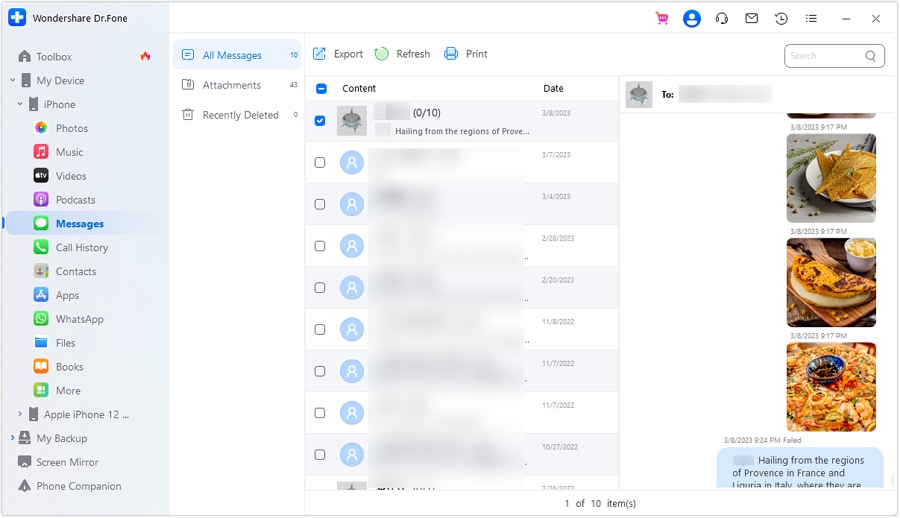
- Step 1. Access the Messages App Data
Start by establishing a link between your iOS device and the computer using a USB connection. After the Apple iPhone XS Max device is detected, its specifics will be visible on the home screen. Proceed by selecting the “Messages” option from your device apps on the left side.
- Step 2. Export the Messages From the iPhone
Next, you can view all the messages and their attachments from your iPhone on your computer. If you want to export them, select the messages and press the “Export” button from the top. You can export the messages in Excel, CSV, or PDF format with all the details.
Conclusion
In conclusion, the process of transferring messages from Apple iPhone XS Max to iPhone is crucial for maintaining communication continuity. Whether using iCloud, iTunes/Finder, or third-party solutions, each method offers advantages.
Yet, for effortless transfers without device resets, Wondershare Dr.Fone emerges as a standout choice. Its intuitive interface, selective data transfer, and message export capabilities make it an ideal solution. For effortless and efficient iPhone message handling, Dr.Fone proves to be a recommended tool.
Also read:
- [New] 2024 Approved The Essential Guide to Advanced YouTube Studio Editing
- [Updated] Direct Linking of YouTube Content to Facebook Feeds via Autoplay Settings for 2024
- [Updated] Ultimate Guide to Best Android Video Capture Software #5
- 2024 Approved The Art of Arranging YouTube Video Elements
- 5 Ways to Send Ringtones from Apple iPhone X to iPhone Including iPhone 15 | Dr.fone
- Bypass iCloud Activation Lock with IMEI Code From your Apple iPhone 11 Pro
- Complete Tutorial Sending Photos From Apple iPhone SE to iPad | Dr.fone
- Easy Methods How To Transfer Pictures From Apple iPhone 6 to PC | Dr.fone
- God of War Memory Error Explained: Strategies for Playing Without Interruptions
- Hassle-Free Ways to Remove FRP Lock on OnePlus Nord N30 SEwith/without a PC
- How To Transfer From Apple iPhone 14 Pro to Samsung Simplified Guide | Dr.fone
- How to Transfer from Apple iPhone 8 Plus to Samsung Galaxy S20? | Dr.fone
- Ideal Complementary Behaviors with Audio Tales Playing
- In 2024, 4 Ways to Transfer Music from Apple iPhone 7 to iPod touch | Dr.fone
- In 2024, How to Move Custom Ringtones from Apple iPhone 6 to Android? | Dr.fone
- In 2024, How to Transfer from Apple iPhone 6s Plus to iPhone 8/11/11 Pro | Dr.fone
- In 2024, Refurbished Apple iPhone 7 Everything You Need to Know | Dr.fone
- Mitigating Outdated Video Formats
- ZTE Blade A73 5G support - Forgotten screen lock.
- Title: Easy Methods How To Transfer Pictures From Apple iPhone XS Max to PC | Dr.fone
- Author: Charlotte
- Created at : 2024-10-26 19:29:00
- Updated at : 2024-10-29 22:38:29
- Link: https://iphone-transfer.techidaily.com/easy-methods-how-to-transfer-pictures-from-apple-iphone-xs-max-to-pc-drfone-by-drfone-transfer-from-ios/
- License: This work is licensed under CC BY-NC-SA 4.0.