
Easy Methods How To Transfer Pictures From Apple iPhone 13 to PC | Dr.fone
Easy Methods: How To Transfer Pictures From Apple iPhone 13 to PC
Photo transfer from your iPhone to your PC is a common practice for various reasons. It can free up your device’s storage space, create backups, or simply edit and organize your photos on a larger screen.
Thankfully, there are various methods to transfer pictures from your iPhone to your PC, providing flexibility to users based on their preferences and convenience. Read our comprehensive guide on how to transfer pictures from Apple iPhone 13 to PC. This article covers step-by-step instructions so you can easily and efficiently manage and transfer your iPhone photos to your computer while preserving your cherished memories.
Part 1: How To Transfer Pictures From Apple iPhone 13 to PC with iCloud
One of the widely used and efficient methods to transfer pictures from your iPhone to a PC is through iCloud, Apple’s cloud-based service. iCloud provides seamless integration across Apple devices, allowing users to sync and access their photos and videos effortlessly.
However, even if your PC is using other operating systems, such as Windows, you can still use iCloud for Windows to save and transfer your iPhone photos from iCloud.
How to transfer iPhone photos to a computer using iCloud:
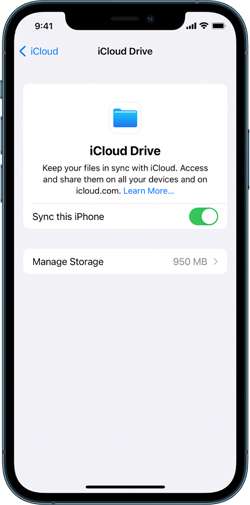
Step 1: Make sure you have synced iCloud photos on your iPhone.
On your iPhone Settings, go to your profile and tap iCloud. Then, select Photos and turn on the switch next to “Sync this [device].” Otherwise, go to iCloud settings > iCloud Drive, and switch on “Sync this iPhone.”
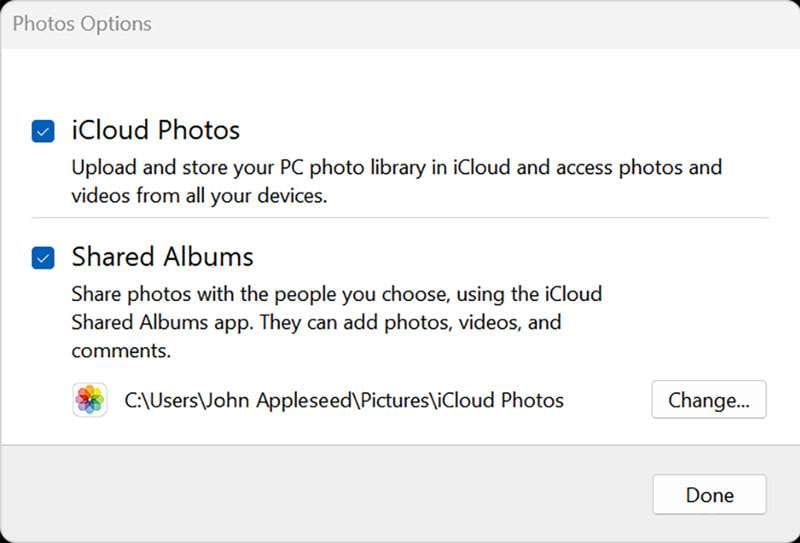
Step 2: Set up your iCloud for Windows.
Open iCloud for Windows and ensure you’re signed in with your Apple ID. Next to Photos, select Options > iCloud Photos. Click “Done” and “Apply” to save the changes and close the window.
Step 3: Keep iPhone photos on PC.
Open iCloud Photos and select the images you want to transfer to your PC. Right-click to open a drop-down menu and choose “Always keep on this device.”
That’s it! Now, you can find your iPhone Photos on your computer.
Part 2: How To Transfer Pictures From iPhone with Google Drive
Another convenient way to transfer iPhone pics to a computer is through Google Drive. As a cloud-based storage solution, Google Drive allows users to seamlessly store, manage, and share files, including photos, across different devices.
If you already have a Google account, you can jump right into Google Drive without signing up. However, be aware that the free version only gives you 15 GB of space. If you need more room, you’ll have to sign up for a subscription.
How to transfer iPhone pictures to a computer with Google Drive:
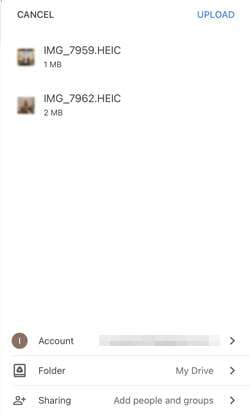
Step 1: Set up your Google Drive.
Open Google Drive on your iPhone. Once opened, tap the multicolored + symbol and select “Upload” > “Photos and Videos.” If prompted, grant access to all photos by tapping “Allow Access to All Photos.”
Step 2: Upload your iPhone photos on Google Drive.
Browse through your iPhone albums to locate the specific photos you wish to upload. Hold and tap to select multiple photos. Then, tap “Upload” to upload your iPhone photos to Google Drive.
Optional: Automatic backup or sync with Google Photos
For those seeking automatic backups, open Google Photos, tap your profile image, navigate to “Google Photos settings,” and select “Backup & Sync.” Toggle “Backup & Sync” to On for continuous backups.
Step 3: Transfer your iPhone photos from Google Drive to your PC.
Once your photos are stored on Google Drive, proceed to save and transfer them to your PC. Select the desired photos in Google Drive, and click “Download.”
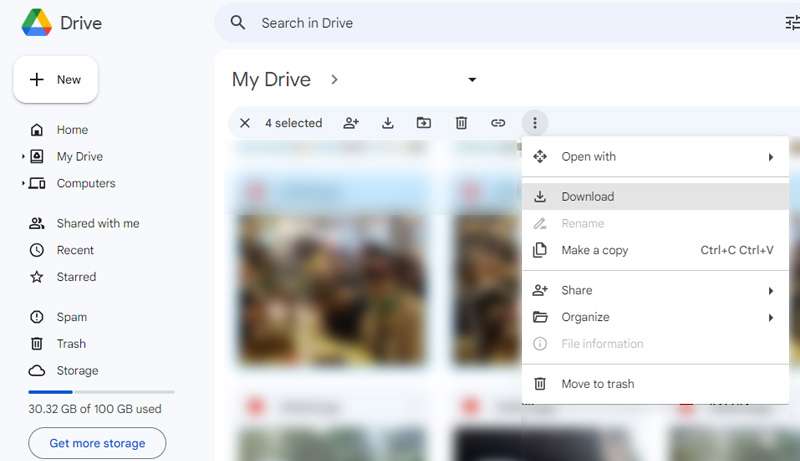
To save all photos from a specific Google Drive folder, open Google Drive and select “My Drive.” Locate the intended folder, and click the three dots to open the drop-down menu. Select “Download,” and all photos and files within the folder will be saved to your computer in ZIP format.
Part 3: How To Transfer Pictures From iPhone with iTunes
You can also make the most of iTunes to secure your iPhone with backups, keep it up-to-date, or synchronize content between your iOS device and your computer in both directions. Even if you’re a Windows PC user, there’s no need to fret. Although iTunes is an Apple product, it’s also available for Windows use.
To get started, make sure that you have iTunes for Windows installed or update your existing version to at least iTunes 12.5.1. Once done, follow the instructions below.
How to transfer iPhone pics to a PC using iTunes:
Step 1: Connect your device to your computer.
Plug in your iPhone to your computer using a USB cable.
Step 2: Grant access to your iPhone Photos.
If your phone is asking you to Trust This Computer, tap “Trust” or “Allow to proceed.”
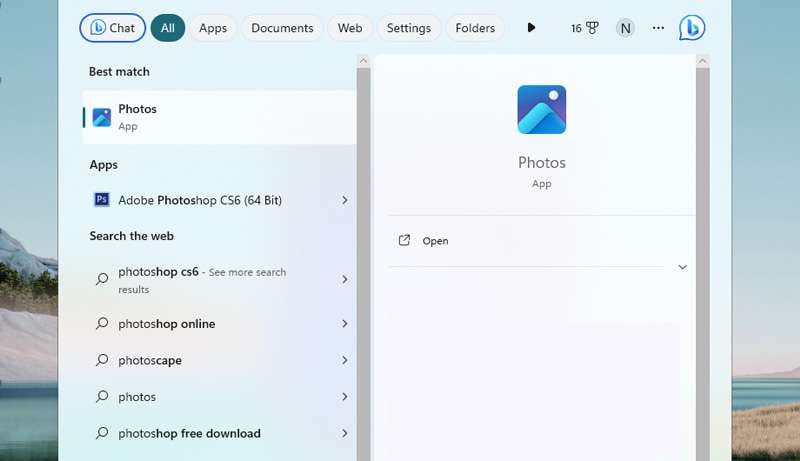
Step 3: Open your computer’s Photos app.
Go to the Start menu on your PC. Search and select Photos to open the Photos app.
Step 4: Import your Photos to your PC.
Within the Photos app, click on Import > From a USB device and follow the instructions on the screen. You can choose specific photos for the transfer and decide where to save them on your PC. Remember to make sure that the photos are saved on the Apple iPhone 13 device rather than stored in the cloud.
Finally, allow a few moments for the system to detect and transfer the selected photos.
Part 4: How To Quick Transfer Pictures From Apple iPhone 13 to PC
If you find the above methods difficult, there is a quick and easy way to transfer photos from your iPhone to a PC with Dr. Fone’s Export All Data feature. With this feature, there’s no need to navigate through various locations to just locate and transfer files from your iPhone.
Dr.Fone - Phone Manager (iOS)
Transfer Photos from Computer to iPod/iPhone/iPad without iTunes
- Transfer, manage, export/import your music, photos, videos, contacts, SMS, Apps, etc.
- Back up your music, photos, videos, contacts, SMS, Apps, etc., to the computer and restore them easily.
- Transfer music, photos, videos, contacts, messages, etc., from one smartphone to another.
- Transfer media files between iOS devices and iTunes.
- Fully compatible with iOS 7 to iOS 15 and iPod.
3981454 people have downloaded it
Dr. Fone’s Export All Data feature offers some great functionalities, including:
- Comprehensive data export, including Photos, Contacts, Messages, Voicemail, and more
- Encrypted data transfer and backups
- Available for iOS and Android devices
- Regular updates to provide an enhanced user experience
To transfer photos from your iPhone to a PC using Dr.Fone, follow the step-by-step below:
Step 1: Launch Dr.Fone and make device connections using a USB cable.
Start by Image nameing your iPhone device to the computer via a USB connection. Launch Dr.Fone and select “Export all data” in the My Device section.

Step 2: Choose file types for export
When a new window appears, select the specific file types you wish to transfer (in this case, your photos). Then, click “Export” at the bottom of the screen to initiate the procedure. Choose the preferred location for saving the exported data.

Step 3: Make a password for the backup file
Next, you will be asked to create an encrypted password for the backup file to be stored on the computer. Set a password, confirm it, and click “Done” to execute the process.

Step 4: Monitor the progress
Your iPhone will start exporting its data to the computer through Dr.Fone. You can wait and monitor the progress on the screen.

Step 5: Successful export of data to the computer
After successful completion of exporting the data, a window will appear on your computer screen. Click “Open” to review the exported data at the specified location.

Conclusion
Before, you must have wondered how do you transfer pictures from Apple iPhone 13 to PC. But after learning from the article above, you now have a variety of straightforward methods in your hand, whether with iCloud, Google Drive, iTunes, or reliable software like Dr.Fone.
If you’re embedded in the Apple ecosystem, iCloud provides seamless integration of your iPhone Photos. Alternatively, Google Drive offers a cross-platform solution, enabling you to upload your iPhone photos to the cloud and access them on your computer browser.
For those who prefer a more traditional approach, iTunes provides a straightforward method via a USB connection. And if you’re looking for a quick and versatile third-party solution, software like Dr.Fone simplifies the data transfer process with its user-friendly interface and robust features.
iPhone Transfer: Transfer Contact from Apple iPhone 13 to iPhone without iCloud
Transferring contacts from Apple iPhone 13 to iPhone without iCloud is straightforward if you choose the right method. This process ensures your contacts are effortlessly moved between devices. This step-by-step guide proves invaluable when moving to a new iPhone or aiming to share contacts.
In this comprehensive guide, you’ll discover how to transfer contacts from Apple iPhone 13 to iPhone without iCloud using various tools and techniques to achieve successful contact transfer. Follow these simple yet effective steps to migrate your contacts successfully.

4 Basic Methods To Transfer Contacts From Apple iPhone 13 to iPhone Without iCloud
We will start by exploring the 4 basic methods to transfer contacts from Apple iPhone 13 to iPhone without iCloud. Each method offers its advantages and is tailored to suit different preferences. By understanding these methods, you can choose the most suitable one for your needs:
Method 1. AirDrop
AirDrop is a convenient built-in feature on iPhones. It allows quick and wireless transfer of various data types, including contacts. Moreover, it ensures a hassle-free and direct exchange without extra apps or services. Follow these steps to copy contacts from Apple iPhone 13 to iPhone without iCloud using AirDrop:
- Step 1: Begin by ensuring that AirDrop is enabled on both devices. For this, access the control center, expand the “Wireless” box, and long press the “AirDrop.” Now, set its visibility to “Contacts Only” or “Everyone for 10 Minutes.” Then, move your iPhone’s Contacts app and select the contact you want to share.

- Step 2: Following this, press “Share Contact” and select “AirDrop” as the sharing method. From the available devices on AirDrop, choose the targeted device. Finally, “Accept” the incoming AirDrop on your target iPhone to complete the process.

Method 2. NameDrop
NameDrop, integrated within iOS 17, enables the smooth sharing of contact information. All you need to do is bring your iPhone close to another iPhone. This feature eliminates the need for manual input of contact details. One of the standout advantages of NameDrop is its direct integration with AirDrop. This ensures swift and effortless sharing. Below are the steps to effortlessly share your contact information using NameDrop:
- Step 1: To enable the NameDrop feature, open your iPhone settings and access the “AirDrop” option from the “General settings. Afterward, turn on the “Bringing Devices Together” feature to activate NameDrop on your iOS devices.

- Step 2: If Contact Posters are generated in iOS 17, they will display on both iPhones. You will be given the option to either “Share” or “Receive Only.” If you wish to exchange contact information, select “Share.” The recipient can opt for “Receive Only” to obtain your details. You can also perform these steps in the opposite direction to get contact information on your iPhone.

Method 3. iTunes/Finder
If you want a more traditional approach to copying contacts from Apple iPhone 13 to iPhone without iCloud, iTunes/Finder can be a great choice. It is a more drastic approach as it involves restoring the entire device’s data. This method is recommended if you are switching devices. Here is how you can copy contacts from Apple iPhone 13 to iPhone without iCloud via iTunes/Finder:
- Step 1: After ensuring the latest iTunes/Finder is installed, use a USB cable to connect your source iPhone to your computer. To access the “Summary” tab in iTunes, click the “Device” icon. On Finder, select iPhone from “Locations” and access the “General” tab.

- Step 2: Move to the “Backups” section on iTunes/Finder and click “Back Up Now.” Before this, confirm the selection of “This Computer” in iTunes and for Finder” or “Back up all data from your iPhone to this Mac.”

- Step 3: Once the backup process is completed, remove the source iPhone and connect the target iOS device. Similarly, access the “Summary/General” tab and click “Restore Backup.” Choose the most recent backup and follow the on-screen guidelines to complete the process.

Method 4. Email
Another simple way to move contacts between iPhones is through email. This approach eliminates the necessity for extra applications or software. Yet, this method might be more suitable for transferring fewer contacts. This is due to the file size limitation of email attachments. The following are the steps to share contacts via email:
- Step 1: Open the Contacts app and move to the targeted contact you want to share. Select the contact and tap “Share Contact.” From the available sharing options, select “Email” and enter your email address in the recipient field.

- Step 2: Tap “Send” to email the selected contacts and open the email app on your target iPhone. Find the email you sent with the contacts attached and open it. Now, retrieve the attached vCard from the email. The contact will appear in your Contacts app but won’t be added directly. To save the contact, tap “Create New Contact,” write any contact details, and select “Done” to finish saving the contact.

Part 2: What Are the Problems Linked With the Basic Methods To Transfer Contacts?
The basic methods to transfer contacts from Apple iPhone 13 to iPhone without iCloud are effective. However, they come with certain limitations that users should be aware of. AirDrop, while a quick and handy way, can only share one contact per transfer. It will become a tedious and time-consuming task when sharing the entire contacts library. The same can be said about email, where limitations on attachment size prohibit large transfers.
Using email or other online methods may raise security concerns. This is due to sensitive contact information that could be intercepted during transmission. As for NameDrop, it is only available on devices running iOS 17. Older iPhone models or software versions do not support this method. It limits the compatibility of the transfer process. Moreover, it can only allow you to share new contact information.
Local backups created through iTunes or Finder might require ample storage space. Moreover, the iTunes/Finder backups are used to restore the entire device’s data. You cannot use them to transfer contacts with your friends or colleagues.
Part 3: 2 Advanced Solutions To Transfer Contacts From Apple iPhone 13 to iPhone Without iCloud
Want to know how to copy contacts from Apple iPhone 13 to iPhone without iCloud in one click? There is good news for you as a tool exists that can make the whole transfer process a breeze. When it comes to data transfer among smartphones, the number one phone transfer tool is Wondershare Dr.Fone. .
With it, you can even transfer data directly to an iOS device or computer. Here is how to copy contacts from Apple iPhone 13 to iPhone without iCloud using the Phone Manager of Wondershare Dr.Fone:
- Step 1: Access Contacts from The Left Panel. The first action is to download and install the latest Wondershare Dr.Fone version on your computer. Now, launch it and connect both of your iOS devices to the system. Choose the source iPhone from the left side panel and click “Contacts” from the expanded options.
- Step 2: Transfer the Selected Contacts. Once in the “Contacts” tab, choose the ones you want to transfer to the other device. After you have made the choice, click “To Device” from the top toolbar and select the targeted iOS device. Your chosen contacts will be immediately transferred to the other device.

Solution 2: Wondershare Dr.Fone - Phone Transfer
When you want to transfer all of your contacts from the source device, the recommended tool is the Wondershare Dr.Fone – Phone Transfer feature. It enables users to smoothly copy data from one phone to another with just one click. Moreover, it facilitates the smooth transfer of various data types. This includes contacts, text messages, photos, videos, music, and more.
The process is user-friendly, requiring simple clicks to initiate. It can transfer data between devices running on different OS, such as iOS and Android. Here is how to transfer contacts from Apple iPhone 13 to iPhone without iCloud via Dr.Fone:
- Step 1: Navigate to Phone Transfer in Dr.Fone. Within Wondershare Dr.Fone, access the “Toolbox” tab and click “Phone Transfer.” Now, you will need to connect both iOS devices to the computer. Wait for Dr.Fone to recognize and load them. Once they are loaded, assign the “Source” and “Destination” positions to the Apple iPhone 13 devices.

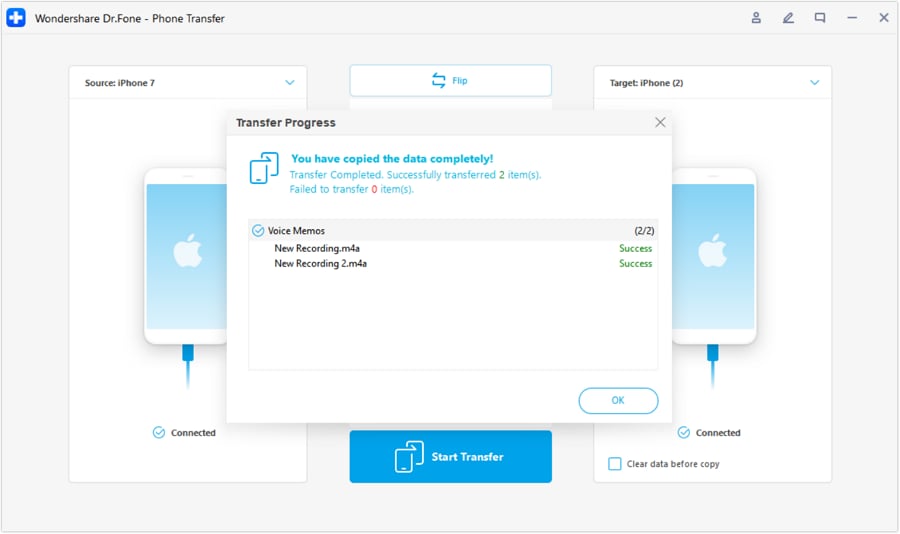
- Step 2: Make a Data Selection and Tap Start Transfer. After the Apple iPhone 13 devices are configured, select the data you want to transfer alongside Contacts. When you have selected the desired data, click “Start Transfer” to proceed. A prompt will soon be displayed on the screen, requesting the deactivation of the Find My feature on iOS devices. Access the iOS device’s Settings and tap on the name located at the top.

- Step 3: Turn Off Find My and Complete the Transfer Process. Then, navigate to “iCloud” and access “Find My” to proceed to deactivate it. After deactivating the feature, the data transfer begins. The progress bar indicates the process’s completion. Once finished, the foremost window exhibits the finalized phone transfer. Press “OK” to conclude the process fully.
Conclusion
In conclusion, the process to transfer contact from Apple iPhone 13 to iPhone without iCloud presents various challenges. However, advanced solutions like Wondershare Dr.Fone present efficient, secure, and comprehensive options. Moreover, Dr.Fone streamlines the process, overcoming the limitations of basic methods. Its intuitive interface and dedicated transfer features make it a recommended choice. With its reliability and effectiveness, Dr.Fone stands out as a trusted solution for hassle-free data transfer.
How to Transfer Data from Apple iPhone 13 to ZTE Phones
Moving your contacts, call logs, calendar, photos, music, videos and apps from your iPhone or iPad to your ZTE phone is essential. But a lot of time the process can be very difficult, not to mention the time consuming task of transferring every single piece of data individually. If you wanted to transfer data from your iOS device to your ZTE phone, you would have to go through a lengthy guide, probably off the internet that would be complicated and time consuming.
Part 1: How to transfer data from Apple iPhone 13 to ZTE with 1 click
Dr.Fone - Phone Transfer is that phone data transfer tool which can help you to save your time when you need to transfer data from Apple iPhone 13 to ZTE phones. In fact, apart from the data transfer between iOS and ZTE phones, Dr.Fone - Phone Transfer supports data transfer between lots of Android and iOS devices.
Dr.Fone - Phone Transfer
Transfer data from Apple iPhone 13 to ZTE in 1 click!
- Easily transfer photos, videos, calendar, contacts, messages and music from Apple iPhone 13 to ZTE.
- Takes less than 10 minutes to finish.
- Supports iPhone 15/14/13/12/11/X and former and the latest iOS 17 fully!

- Works perfectly with Apple, Samsung, HTC, LG, Sony, Google, HUAWEI, Motorola, ZTE, and more smartphones and tablets.
- Fully compatible with major providers like AT&T, Verizon, Sprint and T-Mobile.
- Fully compatible with Windows 10 or Mac 14.

4,513,943 people have downloaded it
Note: When you have no computer at hand, you can just get the Dr.Fone - Phone Transfer (mobile version) from Google Play. After installing this Android app, you can download iCloud data to your ZTE directly, or connect iPhone to ZTE for data transfer using an iPhone-to-Android adapter.
It can be very easy to sync contacts to a new phone especially if you are using a service like Google, but it is all the other stuff such as pictures, videos, text messages and your calendar that can be hard to move unless you are tech savvy. Dr.Fone - Phone Transfer makes it so easy, all you need is to simply install this software utility and then connect both phones to a PC. Both phones must however be connected at the same time in order for this service to work. This means that you cannot back up contents from your iOS device to transfer at a later time. This problem is however negated by the fact that it will take a very short time to transfer everything, so there is no need to back-up anything.
Steps to transfer data from Apple iPhone 13 to ZTE by Dr.Fone - Phone Transfer
So imagine how easy it would be to transfer data from your iPhone to your ZTE phone in just one click.
Step 1: Get Connected
Assuming that you have downloaded and installed Dr.Fone - Phone Transfer on your computer (there are versions for both Windows and MAC), choose “Switch”.
Then connect your iPhone and ZTE phones to your computer via USB cables. Once you have done this correctly and the program has detected both phones, you should see the following window.

Step 2: Let’s Transfer Data
In the screenshot below you will notice that all the data that can be transferred from the iPhone to your ZTE phone is listed in the middle. This includes such data as contacts, photos, music, calendar and messages. Select all of the data that you want to transfer to the ZTE phone and then click on “Start Transfer”. All of the data will then be transferred to the ZTE phone in a process that looks something like this;

Part 2: Which ZTE devices do you use?
ZTE devices keep getting better; the following are some of the best ZTE phones in the market. Is yours one of them?
1. The ZTE Sonata 4G: This Android 4.1.2 Smartphone comes with a 4 inch 800 x 480 TFT screen. It also has a 5 megapixel camera and a 4GB memory. But perhaps the most impressive feature is its 13-day on standby battery life.
2. The ZTE ZMax: this phablet comes with an internal memory of 16GB but can support up to 32GB via MicroSD. It also has 2 cameras; a front 1.6 megapixel and a back 8-megapixel.
3. The ZTE Warp Zinc: This phone has 8GB memory capacity that can be expanded to 64GB. It also comes with a front and rear camera of 1.6 megapixel and 8 megapixel respectively.
4. The ZTE Blade S6: Its compact design has made this Smartphone a favorite to many. This Android 5.0 Lollipop phone has a memory capacity of 16GB. It also comes with a 5 megapixel front facing camera.
5. The ZTE Grand X: It is the most affordable of all ZTE Smartphones and its Qualcomm processor also runs on the Android OS. Its internal memory capacity is 8GB.
6. The ZTE Grand S Pro: This phone’s most impressive feature is the full HD front facing 2 megapixel camera. It also has a rear camera that is a 13 megapixel. It has an internal memory of about 8GB.
7. The ZTE Speed: This Android 5.0 Lollipop has a rear 2 megapixel camera and an internal memory of 8GB. Its battery promises up to 14 hours of talk time.
8. The ZTE Open C: This phone runs the Firefox OS although this can be rehashed to the Android 4.4 platform depending on what you prefer. It comes with a 4GB internal memory.
9. The ZTE Radiant: This Android Jelly bean Smartphone has a 5 megapixel rear camera and a 4GB memory capacity.
10. The ZTE Grand X Max: this one comes with a 1 megapixel front camera and an 8 megapixel HD rear camera. It has an internal memory of 8GB and a RAM capacity of 1GB.
Also read:
- [New] Mastering Gopro Livestreams Connecting to Facebook & Periscope for 2024
- [New] The Magic Box Inside a Top-Tier VR Device
- [Updated] 2024 Approved Dual-Domain Delight Posting Videos Across Social Platforms
- 4 Ways to Sync Contacts from Apple iPhone 15 to iPad Easily | Dr.fone
- 5 Tutorials on How to Transfer Photos From Apple iPhone SE to New iPhone | Dr.fone
- Celtic Angels | Free Book
- Conversion MP4 en FLV Gratuite Sur Internet : Méthodes Efficaces Utilisant Movavi
- Forgot iPhone 7 Password? – Here are the Best Solutions | Stellar
- Google Play Services Wont Update? 12 Fixes are Here on Realme GT Neo 5 SE | Dr.fone
- How to Move Custom Ringtones from Apple iPhone 14 Pro to Android? | Dr.fone
- How to Transfer Photos from Apple iPhone 13 Pro Max to other iPhone without iCloud | Dr.fone
- In 2024, 5 Tutorials on How to Transfer Photos From Apple iPhone 13 to New iPhone | Dr.fone
- In 2024, Easy Methods How To Transfer Pictures From Apple iPhone 6s to PC | Dr.fone
- In 2024, Methods to Transfer from Apple iPhone 6 Plus to Android | Dr.fone
- In 2024, Methods to Transfer from Apple iPhone SE (2020) to Android | Dr.fone
- The Ultimate Guide to Fixing Windows 11 with SFC and DISM Commands
- VideoPilot HD Snapshot Guide
- Title: Easy Methods How To Transfer Pictures From Apple iPhone 13 to PC | Dr.fone
- Author: Charlotte
- Created at : 2024-10-27 17:10:37
- Updated at : 2024-10-29 22:44:28
- Link: https://iphone-transfer.techidaily.com/easy-methods-how-to-transfer-pictures-from-apple-iphone-13-to-pc-drfone-by-drfone-transfer-from-ios/
- License: This work is licensed under CC BY-NC-SA 4.0.