
Complete Tutorial Sending Photos From Apple iPhone 15 Plus to iPad | Dr.fone
Complete Tutorial: Sending Photos From Apple iPhone 15 Plus to iPad
Among the array of iOS devices, the iPhone and iPad stand as popular companions for capturing and storing precious moments. However, navigating the process of transferring photos from Apple iPhone 15 Plus to iPad can sometimes feel daunting. Fortunately, with the evolution of Apple’s ecosystem, it has become a straightforward task.
Now, the process can be managed with various methods and tools available at your disposal. The guide aims to effortlessly transfer your photos from an iPhone to an iPad. From utilizing iCloud and AirDrop to exploring third-party applications, we’ll cover step-by-step instructions.

Part 1: How To Transfer Photos From Apple iPhone 15 Plus to iPad Using AirDrop
AirDrop stands as one of the most convenient and straightforward methods. It can transfer photos between Apple devices wirelessly. This functionality employs Bluetooth and Wi-Fi to establish a direct link between your iPhone and iPad. That enables smooth photo sharing without requiring additional cables or an internet connection. Here’s a detailed guide outlining the process of how to transfer photos from Apple iPhone 15 Plus to iPad using AirDrop:
- Step 1. On your iPhone and iPad, swipe down from the top right corner to open the Control Center. Tap and hold the connectivity panel; within, press and hold the network connectivity box that includes AirDrop. Choose “Contacts Only” or “Everyone” to enable AirDrop visibility.

- Step 2. To begin, access the Photos app on your iPhone and pick the photos you’d like to transfer to your iPad. Afterward, select the “Share” icon within the app, and from the available options, opt for “AirDrop.” Look for your iPad in the AirDrop panel displayed and tap on it to start the transfer process.

- Step 3. When your iPad receives the notification prompting you to accept the incoming photos from the iPhone, tap “Accept.” The selected images will be saved to your iPad’s Photos app.

Part 2: How To Transfer Photos From Apple iPhone 15 Plus to iPad Using iCloud Sync
iCloud offers a smooth way to synchronize photos across your Apple devices. It ensures your photo library remains up-to-date without manual intervention. Enabling iCloud Photos automatically uploads your images to iCloud, allowing access from any device linked to the same Apple ID. Here’s a guide to transfer photos from Apple iPhone 15 Plus to iPad automatically via iCloud:
- Step 1. Begin by accessing your iPhone’s Settings and tapping your name at the top. On the following screen, choose “iCloud” followed by “Photos” on the next window. Here, ensure that “Sync this iPhone” is toggled for iCloud Photos.

- Step 2. Now, move to iPad and ensure you are logged in with the same Apple ID. Then, go to “Settings,” tap the name, press “iCloud,” and tap “Photos.” Here, you need to toggle on the “Sync this iPad” option. Afterward, wait for some time to let the syncing process complete. The speed of synchronization depends on your internet connection and the number of photos being uploaded.

Part 3: One-Click Innovative Solution To Transfer Photos From Apple iPhone 15 Plus to iPad
Wondershare Dr.Fone presents an innovative and user-friendly solution. It offers a comprehensive way to transfer photos between your iPhone and iPad. This software provides a straightforward method to transfer photos selectively or entirely. Moreover, when using it, you are no longer bound by the constraints of iCloud or AirDrop. The following are the detailed guides for transferring photos using Wondershare Dr.Fone:
3.1 Transfer Selective Photos from Apple iPhone 15 Plus to iPad
Wondershare Dr.Fone is an intelligent iPhone transfer and management solution. It is designed to streamline your data handling. With its array of functions, you can manage your data through importing, exporting, and deletion processes. This tool offers the convenience of quick file transfers by simply dragging and dropping files. Here is how to add photos from Apple iPhone 15 Plus to iPad using Wondershare Dr.Fone:
- Step 1: Install and Open the Latest Wondershare Dr.Fone App
You can begin by installing the latest version of Wondershare Dr.Fone from its official website. Once installed, launch it and connect your iPhone and iPad to the computer. When the Apple iPhone 15 Plus devices are detected by Dr.Fone, click on the “iPhone” name to expand it in the left panel.

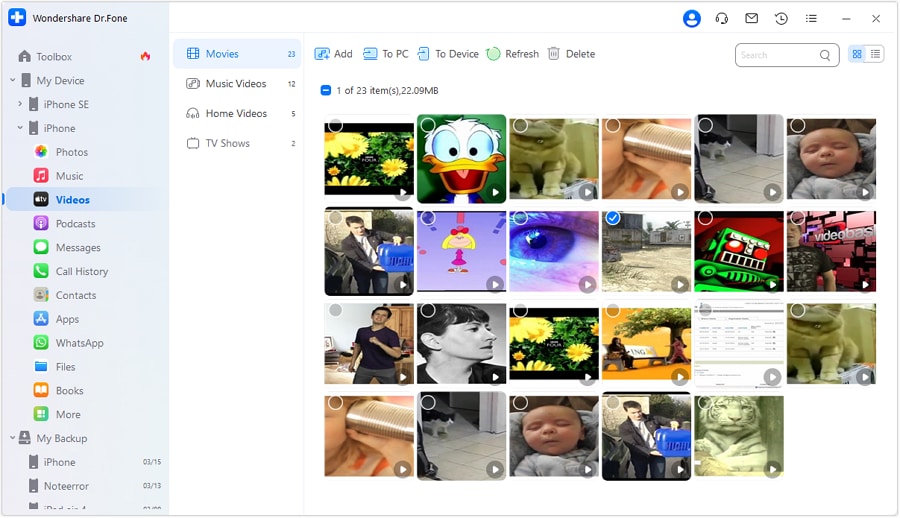
- Step 2: Transfer the Photos to the iPad from the iPhone
From the expanded options, choose “Photos” to access your iPhone’s photos. Here, select the files you want to transfer and click “To Device.” Now, choose the “iPad” from the available options, and the photos will be transferred in no time. You can send as many as you like without any constraints.
3.2 Transfer All Photos From Apple iPhone 15 Plus to iPad
When moving photos in bulk from Apple iPhone 15 Plus to iPad, Wondershare Dr.Fone also got you covered. It offers a powerful phone transfer feature that can transfer over 18 types of data from one device to another. Dr.Fone simplifies the process of transferring data between phones with just one click. It facilitates the smooth transfer of various data types, like photos. You can follow these simplified steps to transfer photos from Apple iPhone 15 Plus to iPad:
- Step 1: Navigate to Phone Transfer within Wondershare Dr.Fone
Once you have launched Wondershare Dr.Fone, connect the iPhone and iPad to the computer. Then, click “Toolbox” from the left side panel and tap the “Phone Transfer” option from the available choices. Then, you will be asked to position your devices correctly for data transfer.

- Step 2: Successfully Complete the Photos Transfer Process
When assigning positions, the iPhone will be the “Source” device. On the other hand, the iPad will become the “Destination” device. You can use the “Flip” to change the Apple iPhone 15 Plus devices’ positions. Afterward, select “Photos” from the data and click “Start Transfer” to initiate the process.

Part 4: How To Transfer Photos From Apple iPhone 15 Plus to iPad Using iTunes/Finder
iTunes or Finder can also be used to transfer photos from your iPhone to your iPad. It is the official Apple software for music, media, and backup management. Yet, iTunes/Finder can assist in manually syncing photos between your iOS devices. The steps needed to transfer photos from Apple iPhone 15 Plus to iPad automatically are given below:
- Step 1. Connect your iPhone to the PC or Mac and open the Photos app. In the Photos app, tap “Import,” select your iPhone, and wait for the computer to load photos from the iPhone. Once they are loaded, choose to transfer the targeted to the computer.

- Step 2. When photos are moved to your computer, unplug the iPhone and link your iPad. Now run the latest version of iTunes/Finder on your PC/Mac and tap the Apple iPhone 15 Plus device icon. Here, choose “Photos” from the left panel and check the box next to “Sync Photos.”

- Step 3. Now, choose the folder where you moved photos from the iPhone in the drop-down box. After that, hit the “Apply” button and wait for the images to sync with the iPad.

Part 5: How To Transfer Photos From Apple iPhone 15 Plus to iPad Using Social Media Apps
Social media apps can serve as a convenient platform for transferring photos. Numerous options are available for transferring pictures, and one of the widely used applications is WhatsApp. It is known for its communication features. Moreover, it enables users to share images and media files across various devices. Here’s a guide on how to transfer photos from Apple iPhone 15 Plus to iPad via WhatsApp:
- Step 1. After ensuring WhatsApp is running on both devices, open WhatsApp on iPhone. Tap the new chat icon to start a conversation with a WhatsApp account logged in on the iPad. Now, tap the “+” icon and choose either “Document,” “Camera,” or “Gallery” and pick the desired images. After selecting the photos, tap “Send” to transfer them to iPad.

- Step 2. Proceed to the iPad and launch the “WhatsApp Web” on Safari. Following this, access your conversations and download the images you received to complete the transfer process.

Part 6: How To Transfer Photos From Apple iPhone 15 Plus to iPad Using Email
Utilizing email provides a direct and frequently used approach for transferring photos between your iPhone and iPad. However, it might not be suitable for larger quantities of high-resolution images due to attachment size limits. Nevertheless, it is effective for smaller batches of images. Here’s a detailed guide on how to utilize email for transferring photos between your iPhone and iPad:
- Step 1. Access the email app on your iPhone and initiate a new email. Input your iPad email address in the recipient field. Next, tap on the “Attachment” icon to select the images you want to send.

- Step 2. Move to your iPad and on the “Mail” app there. Now navigate to “Inbox” and open the newly received email. Tap the attachments and save them to your device to complete the transfer process.

Conclusion
Transferring photos between your iPhone and iPad is an essential task for many users. Throughout this guide, we’ve explored various methods to transfer photos from Apple iPhone 15 Plus to iPad. These ranged from native Apple services like AirDrop, iCloud, and iTunes/Finder to unconventional approaches such as social media apps and email. Each method offers its advantages.
Yet, considering factors like convenience, ease of use, and efficiency, one option stands out as a versatile and user-friendly solution: Wondershare Dr.Fone. This innovative third-party software provides a hassle-free way to transfer photos between iOS devices. It offers both selective and bulk transfer options with a straightforward interface.
4 Quick Ways to Transfer Contacts from Apple iPhone 15 Plus to iPhone With/Without iTunes
“How to transfer contacts from Apple iPhone 15 Plus to iPhone without using iTunes? I have got a new iPhone, but can’t seem to transfer contacts from Apple iPhone 15 Plus to iPhone without iTunes.”
Lately, we have got plenty of queries like this from our readers who like to learn how to transfer contacts from Apple iPhone 15 Plus to iPhone, such as iPhone 12/ 12 Pro (Max)/ 12 Mimi without iTunes. After all, when we get a new iPhone, this is the first thing that comes to our mind. If you are also going through the same dilemma, don’t worry as we have a perfect solution. This post will teach you how to transfer contacts from Apple iPhone 15 Plus to iPhone without iTunes and transfer contacts with iTunes.
Part 1: Transfer Contacts from Apple iPhone 15 Plus to iPhone Including iPhone 12/ 12 Pro (Max)/ 12 Mini with iTunes
To start with, let’s learn how to transfer contacts from Apple iPhone 15 Plus to iPhone using iTunes. If you have an updated version of iTunes, you can transfer and sync your data between various devices. Ideally, you can either sync your contacts or backup and restore them. We have discussed both of these techniques to transfer contacts from Apple iPhone 15 Plus to iPhone with iTunes.
Method 1: Backup and Restore iPhone contacts with iTunes
This is the easiest approach to learn how to transfer contacts from Apple iPhone 15 Plus to iPhone with iTunes. In this, we will first take a backup of our old phone (including contacts) and later restore the backup to a new device. Needless to say, all the existing data on the target device would be erased, and with your contacts, the entire backup will be restored.
- 1. Firstly, connect your existing iPhone to your system and launch iTunes.
- 2. Select your device and visit its Summary section.
- 3. Under the Backups section, choose to take a backup on the local computer.
- 4. In the end, click on the “Backup Now” button and wait for iTunes to backup your device entirely.

- 5. Once you have taken a backup locally, you can connect the target device and go to its Summary.
- 6. From here, click on the “Restore Backup” and select the target backup and device.

In this way, your entire backup (including contacts) would be restored, and you can transfer contacts from Apple iPhone 15 Plus to iPhone with iTunes.
Method 2: Sync Contacts with iTunes
If you only wish to transfer your contacts, then it can be achieved by syncing your device. To learn how to transfer contacts from Apple iPhone 15 Plus to iPhone using iTunes, follow these steps:
- 1. Firstly, connect your existing iPhone to your system and launch an updated version of iTunes.
- 2. Select the Apple iPhone 15 Plus device and go to its “Info” tab. From here, enable the option of “Sync Contacts”. You can either select all contacts or selected groups.
- 3. After making your selection, click on the Sync button and wait for it to complete the process.

- 4. Now, disconnect the Apple iPhone 15 Plus device and connect your target iPhone to it.
- 5. Follow the same drill, go to its Info tab, and enable the option to “Sync Contacts”.
- 6. Additionally, you can visit its Advanced section and replace the old contacts with the new ones as well.
- 7. Once you have selected the option, click on the “Sync” button.

In this way, you would be able to learn how to transfer contacts from Apple iPhone 15 Plus to iPhone with iTunes easily.
Part 2: 1-Click to transfer contacts from Apple iPhone 15 Plus to iPhone, Including iPhone 12/ 12 Pro (Max)/ 12 Mini without iTunes
As you can see, learning how to transfer contacts from Apple iPhone 15 Plus to iPhone using iTunes can be a little complicated. Therefore, we recommend using trying Dr.Fone - Phone Transfer . It provides a one-click solution to transfer the data of your choice from one device to another. The tool comes with an intuitive process and has a free trial as well. It is compatible with every leading iOS device (including devices running on iOS 14).
Besides transferring your contacts, you can also move other data files like photos, videos, calendars, messages, music, etc. It can also transfer data between different platforms (like Android to iOS, iOS to Windows, and more). To learn how to transfer contacts from Apple iPhone 15 Plus to iPhone without iTunes, follow these steps:
Dr.Fone - Phone Transfer
1-Click to Transfer Contacts from Apple iPhone 15 Plus to iPhone without iTunes
- Easy, fast, and safe.
- Move data between devices with different operating systems, i.e., iOS to Android.
- Supports iOS devices that run the latest iOS

- Transfer photos, text messages, contacts, notes, and many other file types.
- Supports over 8000+ Android devices. Works for all models of iPhone, iPad, and iPod.

4,777,470 people have downloaded it
- 1. To start with, launch Dr.Fone and select the option of “Phone Transfer” from its welcome screen.
- 2. Now, connect the source and the target iOS device to your system and wait for them to be detected.
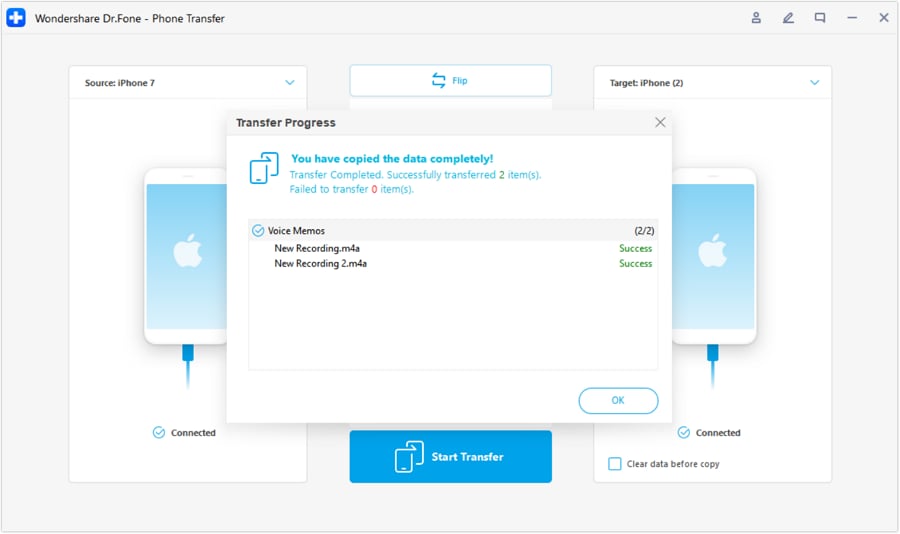
- 3. Dr.Fone - Phone Transfer follows an intuitive process and automatically lists the Apple iPhone 15 Plus devices as Source and Destination. Though, you can click on the “Flip” button to exchange their positions.

- 4. Now, select the type of data you wish to transfer. For instance, if you want to move only contacts, select “Contacts” and click on the “Start Transfer” button. Additionally, you can select the option of “Clear data before copy” and delete the existing data on the target iPhone.
- 5. This will initiate the process and start the transfer process. You can view the progress from the on-screen indicator. Make sure that both the Apple iPhone 15 Plus devices are connected at this stage.
- 6. Once the process is complete, you will be notified. In the end, you can safely remove both the Apple iPhone 15 Plus devices and use them the way you like.

Here is the video tutorial for you:
Part 3: Transfer iPhone contacts to iPhone Including iPhone 12/ 12 Pro (Max)/ 12 Mini without iTunes using Gmail
As you can see, Dr.Fone Phone Transfer provides a one-click solution to transfer your data from one iPhone to another. Though, if you want to try another option, then you can take the assistance of Gmail. Even though this is a more cumbersome process, it will meet your basic requirements. To learn how to transfer contacts from Apple iPhone 15 Plus to iPhone without iTunes, you can try this approach.
- 1. If you are not using Gmail on your device, go to the Accounts settings and log in to your Gmail.
- 2. Afterwards, go to the Apple iPhone 15 Plus device’s Settings > Mail, Contacts, Calendar > Gmail and turn on the option of Contacts.

- 3. Now, you can follow the same drill on the target device and sync your Gmail contacts.
- 4. Alternatively, you can visit your Gmail account on your desktop and go to its Contacts.
- 5. Select the contacts you wish to transfer and click on the “Export” button.

- 6. Choose to export your contacts to a vCard format. Once a vCard is created, you can manually move it to the target iPhone to import contacts from it.

Part 4: Transfer Contacts from Apple iPhone 15 Plus to iPhone Including iPhone 12/ 12 Pro (Max)/ 12 Mini without iTunes using Bluetooth
If nothing else would work, you can transfer contacts from one iPhone to another using Bluetooth. It might be time-consuming, but it is also one of the easiest ways to learn how to transfer contacts from Apple iPhone 15 Plus to iPhone without iTunes.
- 1. Turn on Bluetooth on both devices and make sure they are nearby.
- 2. You can always go to the Bluetooth settings of the source device and pair both devices.

- 3. Now, go to its Contacts and select the ones you wish to transfer.
- 4. Tap on the Share button and select the target device from the list of options.

- 5. Accept the incoming data on the target iPhone to complete the process.
After following these steps, you can learn how to transfer contacts from Apple iPhone 15 Plus to iPhone with iTunes and without it. Besides these methods, you can also AirDrop the contacts or sync them via iCloud as well. As you can see, there are numerous ways to transfer contacts from Apple iPhone 15 Plus to iPhone with iTunes (and without it) that you can try. We recommend Dr.Fone Phone Transfer as it is one of the easiest and fastest ways to transfer data between different devices.
iPhone Transfer: Transfer Contact from Apple iPhone 15 Plus to iPhone without iCloud
Transferring contacts from Apple iPhone 15 Plus to iPhone without iCloud is straightforward if you choose the right method. This process ensures your contacts are effortlessly moved between devices. This step-by-step guide proves invaluable when moving to a new iPhone or aiming to share contacts.
In this comprehensive guide, you’ll discover how to transfer contacts from Apple iPhone 15 Plus to iPhone without iCloud using various tools and techniques to achieve successful contact transfer. Follow these simple yet effective steps to migrate your contacts successfully.

4 Basic Methods To Transfer Contacts From Apple iPhone 15 Plus to iPhone Without iCloud
We will start by exploring the 4 basic methods to transfer contacts from Apple iPhone 15 Plus to iPhone without iCloud. Each method offers its advantages and is tailored to suit different preferences. By understanding these methods, you can choose the most suitable one for your needs:
Method 1. AirDrop
AirDrop is a convenient built-in feature on iPhones. It allows quick and wireless transfer of various data types, including contacts. Moreover, it ensures a hassle-free and direct exchange without extra apps or services. Follow these steps to copy contacts from Apple iPhone 15 Plus to iPhone without iCloud using AirDrop:
- Step 1: Begin by ensuring that AirDrop is enabled on both devices. For this, access the control center, expand the “Wireless” box, and long press the “AirDrop.” Now, set its visibility to “Contacts Only” or “Everyone for 10 Minutes.” Then, move your iPhone’s Contacts app and select the contact you want to share.

- Step 2: Following this, press “Share Contact” and select “AirDrop” as the sharing method. From the available devices on AirDrop, choose the targeted device. Finally, “Accept” the incoming AirDrop on your target iPhone to complete the process.

Method 2. NameDrop
NameDrop, integrated within iOS 17, enables the smooth sharing of contact information. All you need to do is bring your iPhone close to another iPhone. This feature eliminates the need for manual input of contact details. One of the standout advantages of NameDrop is its direct integration with AirDrop. This ensures swift and effortless sharing. Below are the steps to effortlessly share your contact information using NameDrop:
- Step 1: To enable the NameDrop feature, open your iPhone settings and access the “AirDrop” option from the “General settings. Afterward, turn on the “Bringing Devices Together” feature to activate NameDrop on your iOS devices.

- Step 2: If Contact Posters are generated in iOS 17, they will display on both iPhones. You will be given the option to either “Share” or “Receive Only.” If you wish to exchange contact information, select “Share.” The recipient can opt for “Receive Only” to obtain your details. You can also perform these steps in the opposite direction to get contact information on your iPhone.

Method 3. iTunes/Finder
If you want a more traditional approach to copying contacts from Apple iPhone 15 Plus to iPhone without iCloud, iTunes/Finder can be a great choice. It is a more drastic approach as it involves restoring the entire device’s data. This method is recommended if you are switching devices. Here is how you can copy contacts from Apple iPhone 15 Plus to iPhone without iCloud via iTunes/Finder:
- Step 1: After ensuring the latest iTunes/Finder is installed, use a USB cable to connect your source iPhone to your computer. To access the “Summary” tab in iTunes, click the “Device” icon. On Finder, select iPhone from “Locations” and access the “General” tab.

- Step 2: Move to the “Backups” section on iTunes/Finder and click “Back Up Now.” Before this, confirm the selection of “This Computer” in iTunes and for Finder” or “Back up all data from your iPhone to this Mac.”

- Step 3: Once the backup process is completed, remove the source iPhone and connect the target iOS device. Similarly, access the “Summary/General” tab and click “Restore Backup.” Choose the most recent backup and follow the on-screen guidelines to complete the process.

Method 4. Email
Another simple way to move contacts between iPhones is through email. This approach eliminates the necessity for extra applications or software. Yet, this method might be more suitable for transferring fewer contacts. This is due to the file size limitation of email attachments. The following are the steps to share contacts via email:
- Step 1: Open the Contacts app and move to the targeted contact you want to share. Select the contact and tap “Share Contact.” From the available sharing options, select “Email” and enter your email address in the recipient field.

- Step 2: Tap “Send” to email the selected contacts and open the email app on your target iPhone. Find the email you sent with the contacts attached and open it. Now, retrieve the attached vCard from the email. The contact will appear in your Contacts app but won’t be added directly. To save the contact, tap “Create New Contact,” write any contact details, and select “Done” to finish saving the contact.

Part 2: What Are the Problems Linked With the Basic Methods To Transfer Contacts?
The basic methods to transfer contacts from Apple iPhone 15 Plus to iPhone without iCloud are effective. However, they come with certain limitations that users should be aware of. AirDrop, while a quick and handy way, can only share one contact per transfer. It will become a tedious and time-consuming task when sharing the entire contacts library. The same can be said about email, where limitations on attachment size prohibit large transfers.
Using email or other online methods may raise security concerns. This is due to sensitive contact information that could be intercepted during transmission. As for NameDrop, it is only available on devices running iOS 17. Older iPhone models or software versions do not support this method. It limits the compatibility of the transfer process. Moreover, it can only allow you to share new contact information.
Local backups created through iTunes or Finder might require ample storage space. Moreover, the iTunes/Finder backups are used to restore the entire device’s data. You cannot use them to transfer contacts with your friends or colleagues.
Part 3: 2 Advanced Solutions To Transfer Contacts From Apple iPhone 15 Plus to iPhone Without iCloud
Want to know how to copy contacts from Apple iPhone 15 Plus to iPhone without iCloud in one click? There is good news for you as a tool exists that can make the whole transfer process a breeze. When it comes to data transfer among smartphones, the number one phone transfer tool is Wondershare Dr.Fone. .
With it, you can even transfer data directly to an iOS device or computer. Here is how to copy contacts from Apple iPhone 15 Plus to iPhone without iCloud using the Phone Manager of Wondershare Dr.Fone:
- Step 1: Access Contacts from The Left Panel. The first action is to download and install the latest Wondershare Dr.Fone version on your computer. Now, launch it and connect both of your iOS devices to the system. Choose the source iPhone from the left side panel and click “Contacts” from the expanded options.
- Step 2: Transfer the Selected Contacts. Once in the “Contacts” tab, choose the ones you want to transfer to the other device. After you have made the choice, click “To Device” from the top toolbar and select the targeted iOS device. Your chosen contacts will be immediately transferred to the other device.

Solution 2: Wondershare Dr.Fone - Phone Transfer
When you want to transfer all of your contacts from the source device, the recommended tool is the Wondershare Dr.Fone – Phone Transfer feature. It enables users to smoothly copy data from one phone to another with just one click. Moreover, it facilitates the smooth transfer of various data types. This includes contacts, text messages, photos, videos, music, and more.
The process is user-friendly, requiring simple clicks to initiate. It can transfer data between devices running on different OS, such as iOS and Android. Here is how to transfer contacts from Apple iPhone 15 Plus to iPhone without iCloud via Dr.Fone:
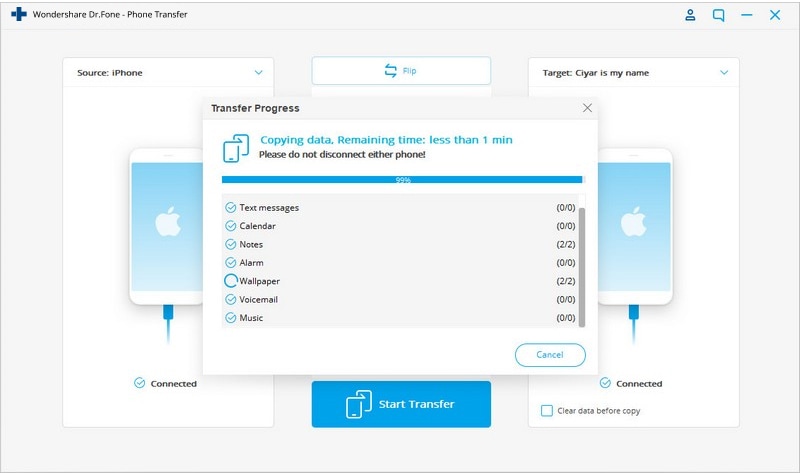
- Step 1: Navigate to Phone Transfer in Dr.Fone. Within Wondershare Dr.Fone, access the “Toolbox” tab and click “Phone Transfer.” Now, you will need to connect both iOS devices to the computer. Wait for Dr.Fone to recognize and load them. Once they are loaded, assign the “Source” and “Destination” positions to the Apple iPhone 15 Plus devices.
- Step 2: Make a Data Selection and Tap Start Transfer. After the Apple iPhone 15 Plus devices are configured, select the data you want to transfer alongside Contacts. When you have selected the desired data, click “Start Transfer” to proceed. A prompt will soon be displayed on the screen, requesting the deactivation of the Find My feature on iOS devices. Access the iOS device’s Settings and tap on the name located at the top.
- Step 3: Turn Off Find My and Complete the Transfer Process. Then, navigate to “iCloud” and access “Find My” to proceed to deactivate it. After deactivating the feature, the data transfer begins. The progress bar indicates the process’s completion. Once finished, the foremost window exhibits the finalized phone transfer. Press “OK” to conclude the process fully.
Conclusion
In conclusion, the process to transfer contact from Apple iPhone 15 Plus to iPhone without iCloud presents various challenges. However, advanced solutions like Wondershare Dr.Fone present efficient, secure, and comprehensive options. Moreover, Dr.Fone streamlines the process, overcoming the limitations of basic methods. Its intuitive interface and dedicated transfer features make it a recommended choice. With its reliability and effectiveness, Dr.Fone stands out as a trusted solution for hassle-free data transfer.
Also read:
- [Updated] In 2024, Essential Guide to YouTube Video Resolutions & Aspects
- 4 Ways to Transfer Music from Apple iPhone XR to iPod touch | Dr.fone
- Fixes for Apps Keep Crashing on Infinix Note 30 VIP | Dr.fone
- How To Repair System of iPhone 15 Pro? | Dr.fone
- How to Transfer from Apple iPhone XS Max to iPhone 8/X/11 | Dr.fone
- In 2024, Effortless Ways to Transfer Data from Your Apple iPhone 11 Pro Max to iPhone 15 | Dr.fone
- In 2024, Effortless Ways to Transfer Data from Your Apple iPhone 14 Plus to iPhone 15 | Dr.fone
- In 2024, Fix Apple iPhone 11 Pro Stuck on Data Transfer Verified Solution! | Dr.fone
- In 2024, How to Transfer Everything from Apple iPhone 12 Pro Max to iPhone 8/X/11 | Dr.fone
- In 2024, How to Transfer from Apple iPhone SE (2022) to Samsung Galaxy S20? | Dr.fone
- In 2024, Transfer your Apple iPhone 11 Pro Max Apps to New iPhone | Dr.fone
- In 2024, Unlocking Instagram's Top Spot in Minutes
- New Best Online YouTube Video Trimmer
- Resolve Windows 10 Compatibility Problems with Your HP Deskjet Printer
- Singing into Bone | Free Book
- The Ultimate Guide to Oppo Find X7 Ultra Pattern Lock Screen Everything You Need to Know
- Understanding the Major Drawbacks of Using ChatGPT by OpenAI
- Unraveling the Enthralling Elements of Filmora Editing
- Various Methods to Transfer Pictures from Apple iPhone 11 to PC | Dr.fone
- Title: Complete Tutorial Sending Photos From Apple iPhone 15 Plus to iPad | Dr.fone
- Author: Charlotte
- Created at : 2024-10-23 22:28:58
- Updated at : 2024-10-29 20:57:46
- Link: https://iphone-transfer.techidaily.com/complete-tutorial-sending-photos-from-apple-iphone-15-plus-to-ipad-drfone-by-drfone-transfer-from-ios/
- License: This work is licensed under CC BY-NC-SA 4.0.