
Complete Tutorial Sending Photos From Apple iPhone 14 Plus to iPad | Dr.fone
Complete Tutorial: Sending Photos From Apple iPhone 14 Plus to iPad
Among the array of iOS devices, the iPhone and iPad stand as popular companions for capturing and storing precious moments. However, navigating the process of transferring photos from Apple iPhone 14 Plus to iPad can sometimes feel daunting. Fortunately, with the evolution of Apple’s ecosystem, it has become a straightforward task.
Now, the process can be managed with various methods and tools available at your disposal. The guide aims to effortlessly transfer your photos from an iPhone to an iPad. From utilizing iCloud and AirDrop to exploring third-party applications, we’ll cover step-by-step instructions.

Part 1: How To Transfer Photos From Apple iPhone 14 Plus to iPad Using AirDrop
AirDrop stands as one of the most convenient and straightforward methods. It can transfer photos between Apple devices wirelessly. This functionality employs Bluetooth and Wi-Fi to establish a direct link between your iPhone and iPad. That enables smooth photo sharing without requiring additional cables or an internet connection. Here’s a detailed guide outlining the process of how to transfer photos from Apple iPhone 14 Plus to iPad using AirDrop:
- Step 1. On your iPhone and iPad, swipe down from the top right corner to open the Control Center. Tap and hold the connectivity panel; within, press and hold the network connectivity box that includes AirDrop. Choose “Contacts Only” or “Everyone” to enable AirDrop visibility.

- Step 2. To begin, access the Photos app on your iPhone and pick the photos you’d like to transfer to your iPad. Afterward, select the “Share” icon within the app, and from the available options, opt for “AirDrop.” Look for your iPad in the AirDrop panel displayed and tap on it to start the transfer process.

- Step 3. When your iPad receives the notification prompting you to accept the incoming photos from the iPhone, tap “Accept.” The selected images will be saved to your iPad’s Photos app.

Part 2: How To Transfer Photos From Apple iPhone 14 Plus to iPad Using iCloud Sync
iCloud offers a smooth way to synchronize photos across your Apple devices. It ensures your photo library remains up-to-date without manual intervention. Enabling iCloud Photos automatically uploads your images to iCloud, allowing access from any device linked to the same Apple ID. Here’s a guide to transfer photos from Apple iPhone 14 Plus to iPad automatically via iCloud:
- Step 1. Begin by accessing your iPhone’s Settings and tapping your name at the top. On the following screen, choose “iCloud” followed by “Photos” on the next window. Here, ensure that “Sync this iPhone” is toggled for iCloud Photos.

- Step 2. Now, move to iPad and ensure you are logged in with the same Apple ID. Then, go to “Settings,” tap the name, press “iCloud,” and tap “Photos.” Here, you need to toggle on the “Sync this iPad” option. Afterward, wait for some time to let the syncing process complete. The speed of synchronization depends on your internet connection and the number of photos being uploaded.

Part 3: One-Click Innovative Solution To Transfer Photos From Apple iPhone 14 Plus to iPad
Wondershare Dr.Fone presents an innovative and user-friendly solution. It offers a comprehensive way to transfer photos between your iPhone and iPad. This software provides a straightforward method to transfer photos selectively or entirely. Moreover, when using it, you are no longer bound by the constraints of iCloud or AirDrop. The following are the detailed guides for transferring photos using Wondershare Dr.Fone:
3.1 Transfer Selective Photos from Apple iPhone 14 Plus to iPad
Wondershare Dr.Fone is an intelligent iPhone transfer and management solution. It is designed to streamline your data handling. With its array of functions, you can manage your data through importing, exporting, and deletion processes. This tool offers the convenience of quick file transfers by simply dragging and dropping files. Here is how to add photos from Apple iPhone 14 Plus to iPad using Wondershare Dr.Fone:
- Step 1: Install and Open the Latest Wondershare Dr.Fone App
You can begin by installing the latest version of Wondershare Dr.Fone from its official website. Once installed, launch it and connect your iPhone and iPad to the computer. When the Apple iPhone 14 Plus devices are detected by Dr.Fone, click on the “iPhone” name to expand it in the left panel.

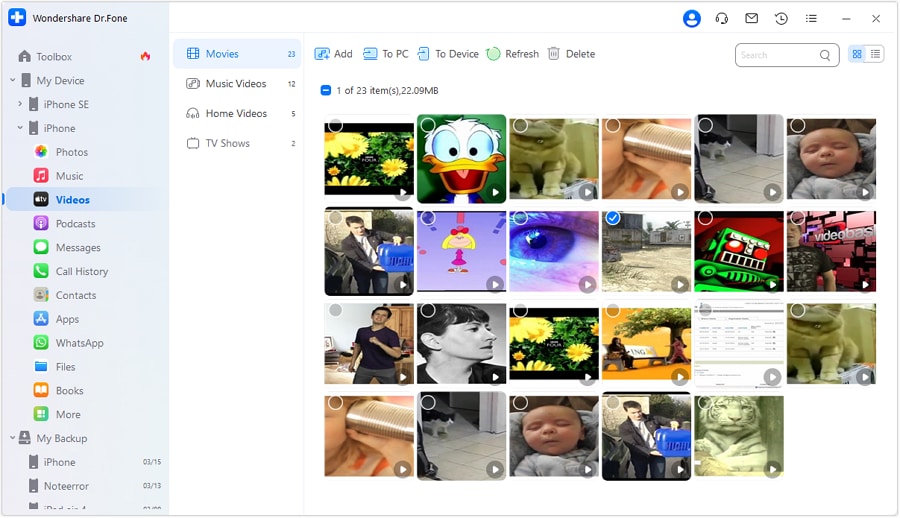
- Step 2: Transfer the Photos to the iPad from the iPhone
From the expanded options, choose “Photos” to access your iPhone’s photos. Here, select the files you want to transfer and click “To Device.” Now, choose the “iPad” from the available options, and the photos will be transferred in no time. You can send as many as you like without any constraints.
3.2 Transfer All Photos From Apple iPhone 14 Plus to iPad
When moving photos in bulk from Apple iPhone 14 Plus to iPad, Wondershare Dr.Fone also got you covered. It offers a powerful phone transfer feature that can transfer over 18 types of data from one device to another. Dr.Fone simplifies the process of transferring data between phones with just one click. It facilitates the smooth transfer of various data types, like photos. You can follow these simplified steps to transfer photos from Apple iPhone 14 Plus to iPad:
- Step 1: Navigate to Phone Transfer within Wondershare Dr.Fone
Once you have launched Wondershare Dr.Fone, connect the iPhone and iPad to the computer. Then, click “Toolbox” from the left side panel and tap the “Phone Transfer” option from the available choices. Then, you will be asked to position your devices correctly for data transfer.

- Step 2: Successfully Complete the Photos Transfer Process
When assigning positions, the iPhone will be the “Source” device. On the other hand, the iPad will become the “Destination” device. You can use the “Flip” to change the Apple iPhone 14 Plus devices’ positions. Afterward, select “Photos” from the data and click “Start Transfer” to initiate the process.

Part 4: How To Transfer Photos From Apple iPhone 14 Plus to iPad Using iTunes/Finder
iTunes or Finder can also be used to transfer photos from your iPhone to your iPad. It is the official Apple software for music, media, and backup management. Yet, iTunes/Finder can assist in manually syncing photos between your iOS devices. The steps needed to transfer photos from Apple iPhone 14 Plus to iPad automatically are given below:
- Step 1. Connect your iPhone to the PC or Mac and open the Photos app. In the Photos app, tap “Import,” select your iPhone, and wait for the computer to load photos from the iPhone. Once they are loaded, choose to transfer the targeted to the computer.

- Step 2. When photos are moved to your computer, unplug the iPhone and link your iPad. Now run the latest version of iTunes/Finder on your PC/Mac and tap the Apple iPhone 14 Plus device icon. Here, choose “Photos” from the left panel and check the box next to “Sync Photos.”

- Step 3. Now, choose the folder where you moved photos from the iPhone in the drop-down box. After that, hit the “Apply” button and wait for the images to sync with the iPad.

Part 5: How To Transfer Photos From Apple iPhone 14 Plus to iPad Using Social Media Apps
Social media apps can serve as a convenient platform for transferring photos. Numerous options are available for transferring pictures, and one of the widely used applications is WhatsApp. It is known for its communication features. Moreover, it enables users to share images and media files across various devices. Here’s a guide on how to transfer photos from Apple iPhone 14 Plus to iPad via WhatsApp:
- Step 1. After ensuring WhatsApp is running on both devices, open WhatsApp on iPhone. Tap the new chat icon to start a conversation with a WhatsApp account logged in on the iPad. Now, tap the “+” icon and choose either “Document,” “Camera,” or “Gallery” and pick the desired images. After selecting the photos, tap “Send” to transfer them to iPad.

- Step 2. Proceed to the iPad and launch the “WhatsApp Web” on Safari. Following this, access your conversations and download the images you received to complete the transfer process.

Part 6: How To Transfer Photos From Apple iPhone 14 Plus to iPad Using Email
Utilizing email provides a direct and frequently used approach for transferring photos between your iPhone and iPad. However, it might not be suitable for larger quantities of high-resolution images due to attachment size limits. Nevertheless, it is effective for smaller batches of images. Here’s a detailed guide on how to utilize email for transferring photos between your iPhone and iPad:
- Step 1. Access the email app on your iPhone and initiate a new email. Input your iPad email address in the recipient field. Next, tap on the “Attachment” icon to select the images you want to send.

- Step 2. Move to your iPad and on the “Mail” app there. Now navigate to “Inbox” and open the newly received email. Tap the attachments and save them to your device to complete the transfer process.

Conclusion
Transferring photos between your iPhone and iPad is an essential task for many users. Throughout this guide, we’ve explored various methods to transfer photos from Apple iPhone 14 Plus to iPad. These ranged from native Apple services like AirDrop, iCloud, and iTunes/Finder to unconventional approaches such as social media apps and email. Each method offers its advantages.
Yet, considering factors like convenience, ease of use, and efficiency, one option stands out as a versatile and user-friendly solution: Wondershare Dr.Fone. This innovative third-party software provides a hassle-free way to transfer photos between iOS devices. It offers both selective and bulk transfer options with a straightforward interface.
How to Transfer Data from Apple iPhone 14 Plus to ZTE Phones
Moving your contacts, call logs, calendar, photos, music, videos and apps from your iPhone or iPad to your ZTE phone is essential. But a lot of time the process can be very difficult, not to mention the time consuming task of transferring every single piece of data individually. If you wanted to transfer data from your iOS device to your ZTE phone, you would have to go through a lengthy guide, probably off the internet that would be complicated and time consuming.
Part 1: How to transfer data from Apple iPhone 14 Plus to ZTE with 1 click
Dr.Fone - Phone Transfer is that phone data transfer tool which can help you to save your time when you need to transfer data from Apple iPhone 14 Plus to ZTE phones. In fact, apart from the data transfer between iOS and ZTE phones, Dr.Fone - Phone Transfer supports data transfer between lots of Android and iOS devices.
Dr.Fone - Phone Transfer
Transfer data from Apple iPhone 14 Plus to ZTE in 1 click!
- Easily transfer photos, videos, calendar, contacts, messages and music from Apple iPhone 14 Plus to ZTE.
- Takes less than 10 minutes to finish.
- Supports iPhone 15/14/13/12/11/X and former and the latest iOS 17 fully!

- Works perfectly with Apple, Samsung, HTC, LG, Sony, Google, HUAWEI, Motorola, ZTE, and more smartphones and tablets.
- Fully compatible with major providers like AT&T, Verizon, Sprint and T-Mobile.
- Fully compatible with Windows 10 or Mac 14.

4,513,943 people have downloaded it
Note: When you have no computer at hand, you can just get the Dr.Fone - Phone Transfer (mobile version) from Google Play. After installing this Android app, you can download iCloud data to your ZTE directly, or connect iPhone to ZTE for data transfer using an iPhone-to-Android adapter.
It can be very easy to sync contacts to a new phone especially if you are using a service like Google, but it is all the other stuff such as pictures, videos, text messages and your calendar that can be hard to move unless you are tech savvy. Dr.Fone - Phone Transfer makes it so easy, all you need is to simply install this software utility and then connect both phones to a PC. Both phones must however be connected at the same time in order for this service to work. This means that you cannot back up contents from your iOS device to transfer at a later time. This problem is however negated by the fact that it will take a very short time to transfer everything, so there is no need to back-up anything.
Steps to transfer data from Apple iPhone 14 Plus to ZTE by Dr.Fone - Phone Transfer
So imagine how easy it would be to transfer data from your iPhone to your ZTE phone in just one click.
Step 1: Get Connected
Assuming that you have downloaded and installed Dr.Fone - Phone Transfer on your computer (there are versions for both Windows and MAC), choose “Switch”.
Then connect your iPhone and ZTE phones to your computer via USB cables. Once you have done this correctly and the program has detected both phones, you should see the following window.

Step 2: Let’s Transfer Data
In the screenshot below you will notice that all the data that can be transferred from the iPhone to your ZTE phone is listed in the middle. This includes such data as contacts, photos, music, calendar and messages. Select all of the data that you want to transfer to the ZTE phone and then click on “Start Transfer”. All of the data will then be transferred to the ZTE phone in a process that looks something like this;

Part 2: Which ZTE devices do you use?
ZTE devices keep getting better; the following are some of the best ZTE phones in the market. Is yours one of them?
1. The ZTE Sonata 4G: This Android 4.1.2 Smartphone comes with a 4 inch 800 x 480 TFT screen. It also has a 5 megapixel camera and a 4GB memory. But perhaps the most impressive feature is its 13-day on standby battery life.
2. The ZTE ZMax: this phablet comes with an internal memory of 16GB but can support up to 32GB via MicroSD. It also has 2 cameras; a front 1.6 megapixel and a back 8-megapixel.
3. The ZTE Warp Zinc: This phone has 8GB memory capacity that can be expanded to 64GB. It also comes with a front and rear camera of 1.6 megapixel and 8 megapixel respectively.
4. The ZTE Blade S6: Its compact design has made this Smartphone a favorite to many. This Android 5.0 Lollipop phone has a memory capacity of 16GB. It also comes with a 5 megapixel front facing camera.
5. The ZTE Grand X: It is the most affordable of all ZTE Smartphones and its Qualcomm processor also runs on the Android OS. Its internal memory capacity is 8GB.
6. The ZTE Grand S Pro: This phone’s most impressive feature is the full HD front facing 2 megapixel camera. It also has a rear camera that is a 13 megapixel. It has an internal memory of about 8GB.
7. The ZTE Speed: This Android 5.0 Lollipop has a rear 2 megapixel camera and an internal memory of 8GB. Its battery promises up to 14 hours of talk time.
8. The ZTE Open C: This phone runs the Firefox OS although this can be rehashed to the Android 4.4 platform depending on what you prefer. It comes with a 4GB internal memory.
9. The ZTE Radiant: This Android Jelly bean Smartphone has a 5 megapixel rear camera and a 4GB memory capacity.
10. The ZTE Grand X Max: this one comes with a 1 megapixel front camera and an 8 megapixel HD rear camera. It has an internal memory of 8GB and a RAM capacity of 1GB.
How to Transfer from Apple iPhone 14 Plus to iPhone 8/11/11 Pro
Are you an Apple iPhone 14 Plus user? Well, iPhone 8/11/11 Pro will be a huge technological leap for you. In this article we will take you through how to transfer everything from Apple iPhone 14 Plus to iPhone 8/11/11 Pro easily in three sim-ple steps because we understand that no smartphone works up to our expectations if our data, such as contacts, music, photos, notes, etc is not fed in it.
So if you are planning to buy the new iPhone 8/11/11 Pro, here is everything you need to know to transfer data from old iPhone to new iPhone. Also, even if you want to retain your old device, transfer Apple iPhone 14 Plus to iPhone 8/11/11 Pro and enjoying the same data on both your iPhones.
Best iPhone to iPhone transfer tool - transfer files from old device to new iPhone 8/11/11 Pro without iTunes
We bet you have heard of Dr.Fone software. It is the most reliable 1-Click Phone Transfer tool to send data (contacts/text messages/photos/etc.) from an old phone to new one. Its user-friendliness and intuitive interface make it the best and most efficient software to transfer Apple iPhone 14 Plus to iPhone 8/11/11 Pro as it is fully compatible with iOS 13. It is available for both Mac and Windows and is very thoughtfully designed to prevent hacking and data loss.
You may also put this software to good use to backup and restore your iPhone data.
Dr.Fone - Phone Transfer
Transfer Everything from iPhone 5S to iPhone 8/11/11 Pro in 1 Click!
- Easily transfer photos, videos, calendar, contacts, messages and music from old iPhone to new iPhone 8/11/11 Pro.
- Enable to transfer from HTC, Samsung, Nokia, Motorola and more to iPhone X/8/7S/7/6S/6 (Plus)/5s/5c/5/4S/4/3GS.
- Works perfectly with Apple, Samsung, HTC, LG, Sony, Google, HUAWEI, Motorola, ZTE, Nokia and more smartphones and tablets.
- Fully compatible with major providers like AT&T, Verizon, Sprint and T-Mobile.
- Supports iPhone, iPad, iPod touch and the latest iOS version.
- Fully compatible with the latest Windows or Mac version.
3981454 people have downloaded it
How to transfer everything from Apple iPhone 14 Plus to iPhone 8/11/11 Pro
In this segment, we will learn how to transfer everything from Apple iPhone 14 Plus to iPhone 8/11/11 Pro with Dr.Fone. To do so, download and install the software on your computer and follow the steps given below:
Step 1: Launch Dr.Fone software
Once Dr.Fone - Phone Transfer is installed on your PC, launch the program and connect the Apple iPhone 14 Plus and iPhone 8/11/11 Pro to the PC with the help of two different USB cables. Next up, select “Phone Transfer” option on Dr.Fone toolkit and move on.
Step 2. Data Transfer from iPhone 5S to iPhone 8/11/11 Pro
In this step, select content to transfer data from old iPhone to iPhone 8/11/11 Pro. Also, make sure the source and target device are duly recognized (if not, just swap them).
Step 3. Initiate the Transfer from iPhone 5S to iPhone 8/11/11 Pro
This is the last step which only requires you to hit the “Start Transfer” button and view the transfer progress on the screen.

Note: The images above are of iPhone 6Plus. There is no difference in procedure to transfer Apple iPhone 14 Plus to iPhone 8/11/11 Pro.
Simple, right? In just one click, all the data is moved from Apple iPhone 14 Plus to iPhone 8/11/11 Pro.
Part 2: How to transfer everything from Apple iPhone 14 Plus to iPhone 8/11/11 Pro with iTunes?
iTunes is the software developed by Apple Inc. to manage iPhones and other iOS devices. Many users still prefer to use iTunes to transfer data from old iPhone to iPhone 8/11/11 Pro, thus, here are simple steps to help you do so:
Step 1. First and foremost, download the latest version of iTunes on your PC from Apple’s official website. Install it and launch the program.
Step 2. Using an USB, connect the Apple iPhone 14 Plus to your PC and wait until iTunes automatically detects it. You will be able to view your Apple iPhone 14 Plus under the “Devices” tab.
Step 3. Click Apple iPhone 14 Plus to view all the options at the left hand side of the iTunes interface. Select “Backup Now” to backup all the data stored in the Apple iPhone 14 Plus which needs to be transferred to iPhone 8/11/11 Pro.

Step 4. Let the process of backing up Apple iPhone 14 Plus finish completely. Once this is done, disconnect it and use another USB to connect new iPhone 8/11/11 Pro to the PC.
Step 5. Follow the steps given above to view the options with respect to the new iPhone 8/11/11 Pro on the iTunes interface. Select “Restore Backup” and waiter the process to get over to transfer data from old iPhone to iPhone 8/11/11 Pro.
Part 3: How to transfer everything from Apple iPhone 14 Plus to iPhone 8/11/11 Pro with iCloud?
iCloud is another great way to transfer Apple iPhone 14 Plus to iPhone 8/11/11 Pro in hassle free manner. Since it is a cloud service by Apple, it stores all our data and allows us to restore it on any and every iOS device with the same Apple ID and password.
Follow the steps given below to understand how to transfer everything from Apple iPhone 14 Plus to iPhone 8/11/11 Pro:
Step 1. Do not set up your new iPhone 8/11/11 Pro. If you already have, Visit “Settings” > “General” > “Reset” > Erase all content and settings to start from scratch.
Step 2. Now on your old Phone 5s, visit “Settings” and tap on your name. Select “iCloud” and scroll down to select “iCloud Backup” and hit “Backup Now”. Let the process finish completely and note down the exact timing of the back up file.

Step 3. Now, on the iPhone 8/11/11 Pro, start setting it up once again and connect it to a WiFi network.
Step 4. Once you reach the “Set Up” Page, select “Restore from iCloud backup” .
Step 5. Select the most recent back up file. Feed in your Apple ID details and let the iPhone restore all the data from iCloud backup. Let your iPhone 8/11/11 Pro reboot at the end of restoration process.

Moving data from old Apple iPhone 14 Plus to new iPhone 8/11/11 Pro is an easy job with the help of three tools listed above. All our data, such as photos, videos, music, contacts, notes, calendar, messages, Apps, etc, are important to us and need to be restored in the new device for us to start enjoying our new iPhone 8/11/11 Pro.
Where iTunes and iCloud are easy and go-to tools for many users, Dr.Fone - Phone Transfer is comparatively new, but way more effective than the other two methods to transfer data from old iPhone to iPhone 8/11/11 Pro. We recommend that you download and install this software right away and also share your experience along with this guide with your friends and family. Explore its features and make life simpler by managing your iPhone in a better and more secure way.
Also read:
- [New] Revolutionize Your Editing Approach with These Top Methods in OBS Studio
- [Updated] Customize With Ease Adding Personalized Audio to Android Devices for 2024
- [Updated] In 2024, Techniques for Ensuring Quality Screen-Recording in FaceTime Chats
- 4 Ways to Sync Contacts from Apple iPhone 12 Pro to iPad Easily | Dr.fone
- 5 Tutorials on How to Transfer Photos From Apple iPhone 15 Pro Max to New iPhone | Dr.fone
- Complete Tutorial Sending Photos From Apple iPhone 15 Pro Max to iPad | Dr.fone
- How to Address the Helper.dll File Not Found Error Effectively
- How to Transfer Data from Apple iPhone 14 Plus to ZTE Phones | Dr.fone
- How to Transfer from Apple iPhone XR to Samsung Galaxy S20? | Dr.fone
- In 2024, Filmora Frenzy Unbeatable Easter Deals and Discounts Inside
- In 2024, How to Transfer Apple iPhone 12 Pro Max Data to iPhone 12 A Complete Guide | Dr.fone
- In 2024, How to Transfer from Apple iPhone 15 Pro to iPhone 8/11/11 Pro | Dr.fone
- New 2024 Approved Reverse Rhythms 2023S Most Memorable Inverted Melodies
- The Top 10 Apple iPhone 12 Pro Emualtors for Windows, Mac and Android | Dr.fone
- Troubleshooting Steps to Prevent Game Crashes in Code Vein
- Title: Complete Tutorial Sending Photos From Apple iPhone 14 Plus to iPad | Dr.fone
- Author: Charlotte
- Created at : 2024-10-23 20:07:22
- Updated at : 2024-10-29 16:25:02
- Link: https://iphone-transfer.techidaily.com/complete-tutorial-sending-photos-from-apple-iphone-14-plus-to-ipad-drfone-by-drfone-transfer-from-ios/
- License: This work is licensed under CC BY-NC-SA 4.0.