
5 Ways to Send Ringtones from Apple iPhone 14 Plus to iPhone Including iPhone 15 | Dr.fone
5 Ways to Send Ringtones from Apple iPhone 14 Plus to iPhone Including iPhone 15
It is a common misconception that sending data from one iPhone to another can be a tedious task. For instance, there are plenty of ways to learn how to send ringtones from Apple iPhone 14 Plus to iPhone without any trouble. You can either perform a direct transfer to your new iPhone , such as iPhone 15, or even take the assistance of your system to do so. In this post, we will teach you in different ways how to transfer ringtones from Apple iPhone 14 Plus to iPhone in a stepwise manner. So let’s get started!
Part 1: How to Send Ringtones to iPhone including iPhone 15 with 1-Click
“How do I send a ringtone to another iPhone without iTunes?” If you want to transfer ringtones from Apple iPhone 14 Plus to iPhone, you can use the help of third-party applications that will get the job done in minutes. These applications are also useful when you are trying to shift content from one Apple device to another. Of course, you will need a computer/Laptop to play the middleman. Dr.Fone - Phone Transfer is the best iPhone transfer tool that lets you transfer your ringtones from Apple iPhone 14 Plus to iPhone.
Here is how:
Step 1: Download Dr.Fone - Phone Transfer application on your computer.

Step 2: Launch the application, and you’ll see options on the screen. Go with Phone Transfer.

Step 3: Then connect both your devices to the computer. In your case, it is the iPhone and the iPhone. You can also make this transfer between iPhone and Android devices.

Step 4: Now select the files that you want to transfer. Here, select all the ringtones that you want to shift. Then, initiate the transfer and don’t disconnect the Apple iPhone 14 Plus devices.

The data will be transferred successfully to the destination device.
Don’t have a laptop? Then you can do this!
Step 1: Download the mobile version of Wondershare Dr. Fone - Phone Transfer. Connect your iPhone and iPad using a suitable cable.

Step 2: The software will start to scan the synced data on your device.

Step 3: After the check, select the contacts you want to shift and click on ‘Start Importing’.

Part 2: How to Send Ringtones to iPhone Including iPhone 15 Using iTunes/Finder?
The traditional method of managing their iOS devices is utilizing iTunes or Finder. It remains a reliable approach for sending ringtones to your iPhone, including the latest iPhone 15. Be aware that iTunes versions 12.6 and earlier are capable of syncing your ringtones. The more recent versions exclusively support music synchronization. Here’s a step-by-step guide on how to transfer ringtones from Apple iPhone 14 Plus to iPhone:
Step 1: Start by installing iTunes version 12.6 or older on your computer and launch it. Now connect your old iPhone with ringtone to the computer. In iTunes, click “Files,” hover over “Devices,” and tap “Transfer Purchases from iPhone.”

Step 2: Press “Sync” and wait for the ringtones to sync. Afterward, disconnect the old iPhone and plug in the new iPhone. Once you’ve selected the Apple iPhone 14 Plus device icon, navigate to the “Tones” tab and mark the “Sync Tones” box. Next, choose either “All Tone” or “Selected Items” and finalize the process by clicking “Apply.”

Part 3: How to Send Ringtones to iPhone including iPhone 15 using OneDrive?
With Dr.Fone - Phone Transfer, you can transfer ringtones from one device to another directly, and that too within seconds. Nevertheless, if you wish to perform a wireless transfer, then you can take the assistance of a cloud service like OneDrive. Besides moving your files from one device to another, you can also keep them safe on the cloud.
To start with, download OneDrive on both iOS devices from App Store. You can also visit its iTunes store page right here .
Open OneDrive on your source device and tap on the “+” icon to add something to the drive. Next, tap on the “Upload” button and locate the ringtone on your device storage to upload it on the drive.

Now, launch OneDrive on your target device and sign in using the same credentials. Locate the file that you have just added to the drive. Open the folder and download it to your local storage.
In this way, you can learn how to transfer ringtones from Apple iPhone 14 Plus to iPhone without physically connecting both devices.

Part 4: How to Send Ringtones to iPhone including iPhone 15 using AirDrop?
AirDrop provides a quick and efficient way to transfer ringtones directly between two iOS devices. It allows for a smooth sharing experience without the need for extra software or cloud services. Follow these steps for how to send a ringtone from Apple iPhone 14 Plus to iPhone:
Step 1: Begin by confirming that AirDrop is active on both devices and set to “Everyone” for visibility. Additionally, make sure that Bluetooth and Wi-Fi are turned on for both devices as well.

Step 2: On the source device, move to the “Files” app. Here, navigate to the targeted ringtones and select them. Now, tap the “Share” button and select “AirDrop” as the sharing method. From the available devices for AirDrop, choose the targeted device. On the targeted iPhone, you will receive a prompt for AirDrop. Accept it to complete the ringtone-sharing process.

Part 5: How to Send Ringtones to iPhone including iPhone 15 using Email?
While this is not the most direct method, sending ringtones via email remains a viable option. It can transfer small audio files between iPhones. Follow these steps for how to send ringtones from Apple iPhone 14 Plus to iPhone using email:
Step 1: On the source iPhone, move to the ringtone you want to send and select it. Now, tap “Share” and choose “Email” as the sharing method.

Step 2: Once the ringtone is added as an attachment, add your email address in the recipient field. Afterward, press “Send” to email the selected ringtone. On your target iPhone, open the mail and download the ringtone.

Bonus Tip. How to Make Custom Ringtone on iPhone
Creating custom ringtones for your iPhone allows you to personalize your device even further. This sets it apart from the standard options available. When it comes to finding a reliable and trusted ringtone maker, Wondershare Dr.Fone stands at the top. It allows you to create ringtones by selecting music files directly from the iPhone.
With its advanced features, you can craft unique ringtones from your favorite songs or audio files. Follow these steps to utilize the Dr.Fone Ringtone Maker feature and create your own custom ringtone on your iPhone:
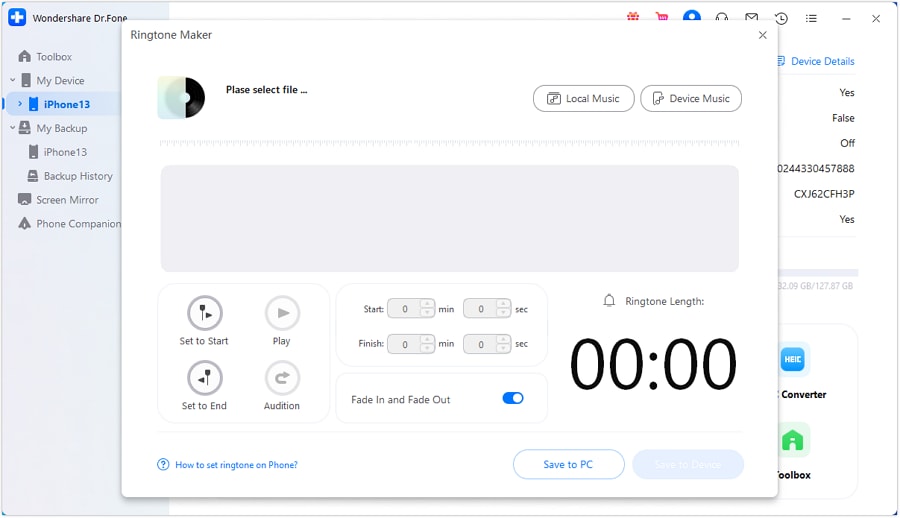
Step 1: Access Ringtone Maker in Wondershare Dr.Fone
After launching Wondershare Dr.Fone on your computer, connect your iPhone to it using the original cable. Once Dr.Fone has detected your device, click “Ringtone Maker” from the available options. On the following window, use “Local Music” or “Device Music” to select an audio file.
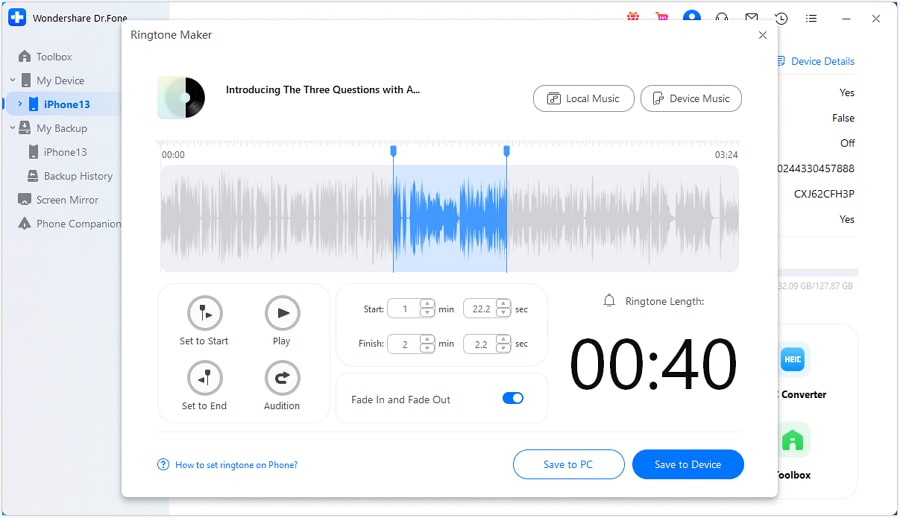
Step 2: Create the Custom iPhone Ringtone
Adjust the appended music to match your desired ringtone length. Employ the “Fade In” and “Fade Out” feature for personalized ringtone customization. Afterward, store the newly created ringtone directly on the iPhone using the “Save to Device” option.
FAQs About Ringtones on iPhone
- Where are my iPhone ringtones stored?
On an iPhone, custom ringtones are typically stored within the Apple iPhone 14 Plus device’s internal storage. Specifically, they are found within the “Settings” application under the “Sounds & Haptics.” Additionally, if you have synced ringtones via iTunes, they might be stored within the iTunes media folder on your computer.
- What if I have a large collection of ringtones to transfer?
For transferring a substantial assortment of ringtones, contemplate leveraging a cloud storage solution. OneDrive and Google Drive are among the options worth exploring. They enable the uploading and storage of significant data volumes. It enables easy access and download from multiple devices. Using a third-party software solution such as Wondershare Dr.Fone can simplify the process of bulk transfers.
- Are there any precautions I should take when transferring ringtones?
When transferring ringtones, ensure that the file formats are compatible. It’s also crucial to use secure and trusted transfer methods to prevent any data loss or security breaches. Additionally, always back up your data before initiating any transfer process. This is to avoid the risk of potential data loss during the transfer.
- What if I encounter issues during the transfer process?
If you encounter any issues during the transfer process, it’s essential to troubleshoot systematically. Check the compatibility of the file formats. In addition, ensure a stable internet connection, and verify that both devices are using the latest software updates. If the issue persists, consult the support documentation for the specific transfer method. Reach out to the customer support of the respective software or service provider for further help.
Now when you know how to send ringtones from Apple iPhone 14 Plus to iPhone in different ways, you can certainly move your data without any trouble. Feel free to give Dr.Fone - Phone Transfer a try and manage your device in no time. It is a complete phone management tool that will certainly come in handy to you on numerous occasions. If you face any setbacks while moving your ringtones from Apple iPhone 14 Plus to iPhone, let us know about them on our official social media.
How to Transfer from Apple iPhone 14 Plus to Samsung Galaxy S20?
If you are willing to switch your phone from an iOS device to an android, the primary issue which restricts you to do so is your data loss and the data transferring from one device to another. In this article, we’ll be learning How to Transfer Data from Apple iPhone 14 Plus to Samsung Galaxy S20, with some easy and best techniques. The discussed techniques will ensure your data from not getting lost.

Part 1: Transfer from Apple iPhone 14 Plus to Samsung Galaxy S20 Directly (Easy and Fast)
Dr.Fone - Phone Transfer program is a phone transfer tool, you can transfer all types of data like photos, music, contacts, messages, calendar, etc. from one phone to another easily.
Let’s see how we can to transfer data from Apple iPhone 14 Plus to Galaxy S20
Dr.Fone - Phone Transfer allows you to transfer data between various phones with one click, including Android, iOS, Symbian, and WinPhone. Use this program to transfer and convey data between any of them.
Down below there’s a detailed step by step process explaining how you can transfer all your data from one phone to another using computer
Step 1. Connect Your Apple iPhone 14 Plus to the computer
After opening Dr.Fone on your computer, select “Phone Transfer” among the modules.
Make sure you have connected both of your devices with it. Here let’s take an iOS and a Samsung Galaxy S20(any Android device) as an example.
The data from the source device will be conveyed/transferred to the destination device. To exchange their position, you can use the “Flip” button too.
Step 2. Select the file and start to transfer
Choose the file types you desire to move. To begin the process, click on-Start Transfer. Until the process is completed, please don’t disconnect the Apple iPhone 14 Plus devices for its maximum efficiency.
Before commencing the data transfer process between both the phones, if you want to erase the data of the destination device-check the “Clear Data before Copy” box.
All the files you selected will be transferred to the targeted phone successfully In a couple of minutes.

Part 2: Transfer from iCloud Backup to Samsung Galaxy S20 (Wireless and Safe)
1. Dr.Fone - Switch App
If you don’t have a computer device and want to transfer data from an iOS device to an Android device, here is an in-depth step by step process guiding you how to do so.
How to sync data from the iCloud account to Android
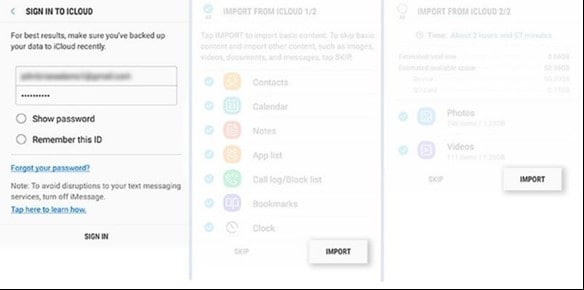
Step 1. Touch “Import from iCloud”, after installing the Android version of Dr.Fone - Switch.

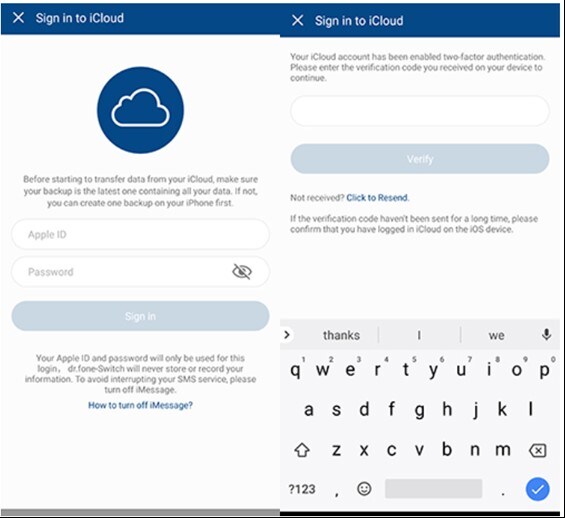
Step 2. With your Apple ID and passcode, log in to the iCloud account.
If you have enabled the two-factor authentication, enter the verification code.
Step 3. On your iCloud account now in a while later, all types of data can be detected.
Touch “Start Importing” after Selecting your desired data or all of these data.
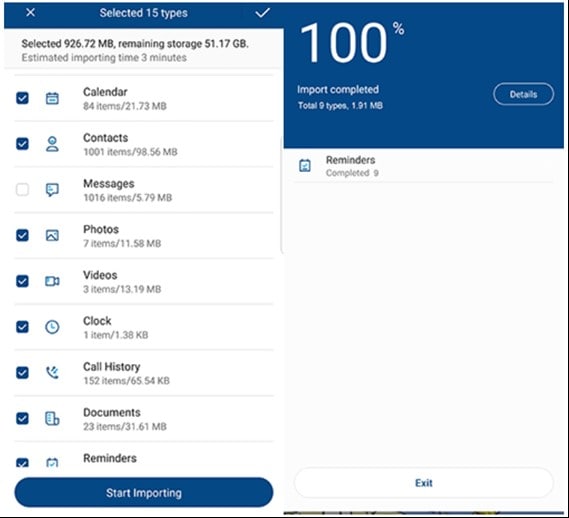
Step 4. Sit back until and unless data importing is fully completed. Then you can exit this app and check the data synced from iCloud on your Apple iPhone 14 Plus or tablet.
Prons:
- Transfer data from Apple iPhone 14 Plus to Android without a PC.
- Support mainstream Android phones (including Xiaomi, Huawei, Samsung, etc.)
Cons:
- For direct data transfer, connect iPhone to Android by using an iOS-to-Android adapter.
2. Samsung Smart Switch App
Export data from iCloud to Samsung S20 with Smart Switch
If you make use of the Samsung Smart Switch app, syncing iTunes with Samsung is just an easy-peasy task.
It has become simpler to sync iCloud to Samsung S20 as it stretches compatibility with iCloud. Here is how-
How to transfer data from iCloud to Samsung S20 with Smart Switch
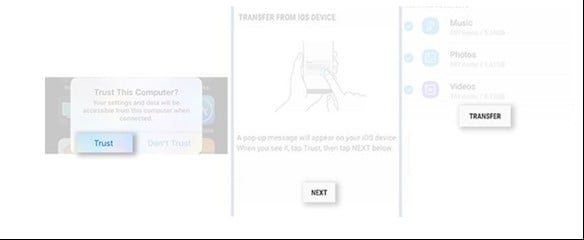
Download Smart Switch from Google Play on your Samsung Device. Open the app, then click on ‘WIRELESS,’ after that tap on ‘RECEIVE’ and select the ‘iOS’ option.
Sign in with your Apple ID and password. Now, select the desired content you want to transfer from iCloud to Samsung Galaxy S20 and press ‘IMPORT.’
If you are using a USB cable, do keep iOS cable, Mirco USB, and USB Adapter handy. Then, load Smart Switch on your Samsung S20 model and click on ‘USB CABLE.’
Further, connect the two devices by iPhone’s USB cable and the USB-OTG adapter with Samsung S20.
Click on ‘Trust’ followed by pressing ‘Next’ to proceed further. Choose the file and press on ‘TRANSFER’ to convey/Transfer from iCloud to Samsung S20.
Prons:
- Wireless transfer.
Cons:
- Only for Samsung phones.
If you prefer to run a desktop software to transfer data, use Dr.Fone - Phone Transfer. It’s a hassle-free solution. Connect both phones to computer and start to transfer data in one-click.
Part 3: Transfer from iTunes Backup to Samsung Galaxy S20 without iTunes
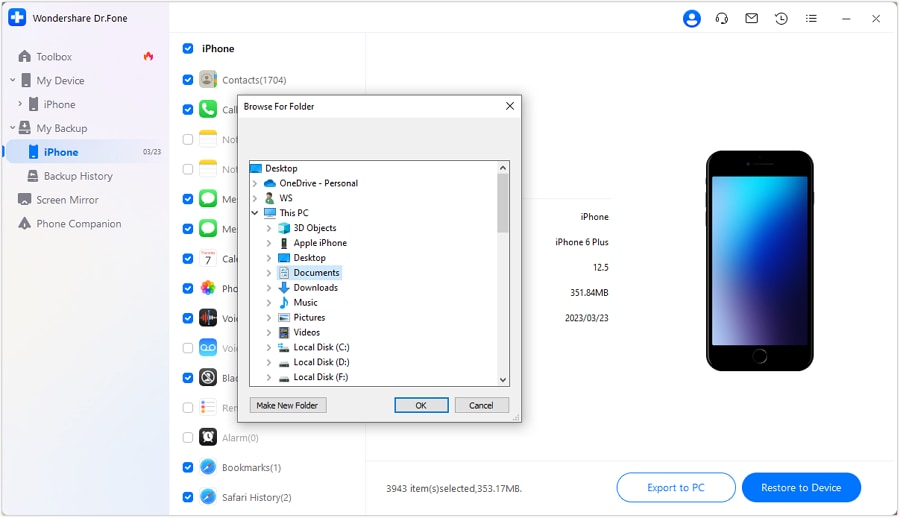
Step 1. Select the backup file
Launch Dr.Fone and select Phone Backup. Connect your Samsung S20 to the computer. Click on Restore.
It will give the option View backup history if you have used this function to backup your iOS device before. Click on View backup history option to view the backup file index.

After that, Dr.Fone will display the backup history. Just pick the backup file you want and click on the Next on the bottom of the program or view button next to the backup file.

Step 2. View and Restore the backup file
The program will take a few seconds to examine the backup file and display all data in categories in the backup file after you click on View.
After you find the files you require, you can pick a few files or choose them all to move to the next step.

Currently, Dr.Fone supports to restore the music, Safari bookmarks, Call History, Calendar, Voice memo, Notes, Contacts, Messages, Photos, videos to the Apple iPhone 14 Plus device. So you can restore these data to your Samsung device or transfer them all to your computer.
If you want to restore the files to your device, select the files and click on Restore to Device. In a couple of seconds, you will get these files on your Android gadget.
If you want to export the chosen files to your computer, click on Export to PC. Then select the save path to transfer your data.
Final Words
The techniques which are discussed above are meant to solve your problem and let you know How to Transfer from Apple iPhone 14 Plus to Samsung Galaxy S20. These techniques will guide you through transferring your file quickly and swiftly. The method discussed over here is related to both the users- who are willing to transfer their data using a computer and without using it. So, finally, we hope that this article would help you to solve your issue related to data transfer.
How to Copy Contacts from Apple iPhone 14 Plus to SIM?
“How to copy contacts from Apple iPhone 14 Plus to SIM? I want to use my SIM on another device but can’t seem to export contacts to SIM on iPhone!”
Lately, lots of iPhone users have asked similar questions as they wish to save contacts to SIM card on iPhone. It might sound surprising, but it can be a little complicated to learn how to save contacts to SIM on iPhone. In this tutorial, we will answer the question – how to transfer contacts from Apple iPhone 14 Plus to SIM and provide a foolproof way to save and restore your iPhone contacts. Let’s get it started and learn more about how to export contacts from Apple iPhone 14 Plus to SIM.
Part 1: Is it possible to save contacts to SIM on iPhone?
A lot of users take the assistance of SIM card to save their contacts. If you are also doing the same, then you can easily learn how to import SIM contacts to iPhone. Simply go to your device’s Settings > Mail, Contacts, Calendar and tap on “Import SIM Contacts”.

Though, the problem occurs when users wish to do vice versa and learn how to import contacts from Apple iPhone 14 Plus to SIM. As of now, Apple doesn’t provide a direct solution to export contacts to SIM on iPhone. If you really wish to save contacts to SIM on iPhone, then you have to jailbreak your device once. After jailbreaking your device, you can use certain apps to move contacts to SIM easily.
Though, if your device has not been jailbroken, then you can’t export contacts to SIM on iPhone directly. This is because Apple assumes the transfer of contacts via SIM card is an obsolete method. Don’t worry – you can try an alternative method to save and backup contacts on iPhone. We have discussed it in the next section.
Part 2: How to save iPhone contacts with Dr.Fone?
While we can’t learn how to copy contacts from Apple iPhone 14 Plus to SIM, we can try an alternative method to save our contacts. By taking the assistance of Dr.Fone - Backup & Restore (iOS), you can save your data by taking its backup. Later, you can restore the backup on any other iOS (or Android) device. In this way, you can easily move your contacts and don’t need to learn how to save contacts to SIM on iPhone.
Dr.Fone - Backup & Restore (iOS) is a highly advanced and intuitive tool that can backup and restore all the major data types like contacts, messages, photos, music, etc. It is compatible with every leading version of iOS (including iOS 17). Therefore, instead of learning how to transfer contacts from Apple iPhone 14 Plus to SIM, you can use Dr.Fone Backup & Restore by following these steps:
Dr.Fone - Backup & Restore (iOS)
Save and Backup iPhone Contacts with 1-Click.
- One click to backup the whole iOS device to your computer.
- Support to backup Social apps on iOS devices, such as WhatsApp, LINE, Kik, Viber.
- Allow to preview and restore any item from the backup to a device.
- Export what you want from the backup to your computer.
- No data loss on devices during the restore.
- Selectively backup and restore any data you want.
- Supported iPhone 15/14/13/12/11/X that run iOS 17/16/15/14/13 and former
- Fully compatible with Windows 10 or Mac 14
3981454 people have downloaded it
1. Firstly, download Dr.Fone - Backup & Restore(iOS) on your computer and launch it whenever you wish to learn how to export contacts from iPhone (by taking its backup). From the welcome screen of Dr.Fone toolkit, select the option of “Backup & Restore”.
2. Now, connect your iPhone to the system and wait for the application to detect it automatically.
3. You can see that the tool can backup tons of applications as well. Simply click on the “Backup” button on the right panel to get things started.
4. From the next window, you can select the type of data that you wish to backup. You can also check the “Select all” option to take a comprehensive backup of your data. Additionally, you can alter the backup path from here as well.
5. To backup contacts, make sure the option of “Contacts” (under the Privacy section) is enabled before you click on the Backup button.
6. Wait for a while as Dr.Fone will backup your selected data. Once it is done, you will be notified. You can either view the backup content or go to the Backup location as well.

7. Whenever you need to restore your contacts, you can simply connect the Apple iPhone 14 Plus device and click on the “Restore” option instead.
8. This will automatically display a list of the previous backup files. Select the file you wish to restore and click on the “View” button.
9. Your backup will be listed under different categories here. Go to Privacy > Contacts and select the contacts you wish to restore.
10. After making your selection, you can export this data to your PC or restore it to the connected device. Simply click on the “Restore to Device” and wait for a while.
11. In no time, your contacts would be restored to your device. When the process is completed, you will be notified.
That’s it! After restoring your contacts, you can safely remove the Apple iPhone 14 Plus device and use it as per your wishes. Therefore, if you have Dr.Fone Backup & Restore, then you don’t need to worry about how to import contacts from Apple iPhone 14 Plus to SIM.
Part 3: Other solutions to transfer iPhone contacts
While you can’t learn how to copy contacts from Apple iPhone 14 Plus to SIM directly, you can always move your contacts from one phone to another. We have listed some easy solutions to help you resolve your query on how to save contacts to SIM on iPhone with some alternative methods.
Save your contacts to iCloud
By default, every user gets a free space of 5 GB on iCloud (which can later be expanded). Therefore, you can easily take a backup of your contacts and other important files on iCloud. Just go to your device’s Settings > iCloud and turn the backup option on. Make sure that the backup for Contacts is turned on as well. This will sync your contacts to iCloud, letting you access them on the go. In this way, you don’t have to learn how to transfer contacts from Apple iPhone 14 Plus to SIM.

Export iPhone contacts Via iTunes
Another alternative to learning how to export contacts from Apple iPhone 14 Plus to SIM is by taking the assistance of iTunes. Simply connect your Apple iPhone 14 Plus to the system and launch iTunes. Select your iPhone and go to its “Info” tab. From here, you can sync its contacts with iTunes. This will keep your contacts safe and allow you to sync them with another iOS device.

Copy iPhone Contacts Using Gmail
Just like iCloud, you can also sync your contacts with Gmail. If you don’t use Gmail, then go to your iPhone’s Accounts Settings and set up your Gmail account. Later, you can go to Settings > Mail, Contacts, Calendar > Gmail and toggle on the syncing option for Contacts.

If you want, you can access your Google Contacts and import them to a vCard as well. This would be a perfect alternative to learn how to import contacts from Apple iPhone 14 Plus to SIM.

We hope this guide was able to answer your question of how to copy contacts from Apple iPhone 14 Plus to SIM. Since there is no ideal solution for it, you can try different alternatives. Dr.Fone Backup & Restore is one of the best ways to keep your contacts (and other types of data) safe and will certainly save the day during an emergency situation.
Also read:
- [New] 2024 Approved Riding Ahead with Clarity Hats Cam Excellence in the Year of '23
- [New] Discover Your Ideal Screen Recorder - PC & Mac Edition for 2024
- 11 Pros of Perfect Color Balancing Mastery
- 6 Methods for Switching from Apple iPhone 7 to Samsung | Dr.fone
- Boost Your AirPods/AirPods Pro's Charging Time with These 7 Essential Tips!
- Formulating Flashy Podcast Teasers for 2024
- How to Transfer from Apple iPhone 15 Pro Max to iPhone 8/11/11 Pro | Dr.fone
- In 2024, 4 Ways to Transfer Contacts from Apple iPhone 14 Pro Max to iPhone Quickly | Dr.fone
- In 2024, How to Transfer Apple iPhone 6s Data to iPhone 12 A Complete Guide | Dr.fone
- In 2024, How to Transfer Data from Apple iPhone 12 Pro Max to ZTE Phones | Dr.fone
- Skype Talk Improvement Silence the Surroundings
- Switch Cards Between Apple iPhone 6 Plus and other iPhones Will Move All Phone Services? | Dr.fone
- The Pathway to Aural Brilliance Incorporating & Fine-Tuning Sounds in Canvas
- Title: 5 Ways to Send Ringtones from Apple iPhone 14 Plus to iPhone Including iPhone 15 | Dr.fone
- Author: Charlotte
- Created at : 2024-11-03 16:34:09
- Updated at : 2024-11-04 17:30:52
- Link: https://iphone-transfer.techidaily.com/5-ways-to-send-ringtones-from-apple-iphone-14-plus-to-iphone-including-iphone-15-drfone-by-drfone-transfer-from-ios/
- License: This work is licensed under CC BY-NC-SA 4.0.