
5 Tutorials on How to Transfer Photos From Apple iPhone 6 Plus to New iPhone | Dr.fone
5 Tutorials on How to Transfer Photos From Apple iPhone 6 Plus to New iPhone
When it comes to camera systems, the iPhone is certainly ahead of others. It has high-performing lenses and professional camera features that support various photography styles. For instance, you may use the Priotize Faster Shooting option to capture multiple photos at a time. Another thing is that you may enable Action Mode when shooting videos to keep the frame stable throughout the duration. Simply put, you can surely do a lot of things using your iPhone camera
Let’s say you’re planning to share your stunning snaps and footage with others. Is it possible to facilitate the transfer with little to no effort? The short answer is absolutely yes. There are many easy ways to move your media files between two iPhones. In no time, you can surely find the best tutorial on how to transfer photos from Apple iPhone 6 Plus to iPhone. Just choose one that matches perfectly your current situation.
In this article, we will talk about the iPhone’s Shared Album feature and its main benefits to users. We will also provide some tutorials on how to transfer pictures from Apple iPhone 6 Plus to iPhone quickly and easily. Continue reading below to learn more.
Everything You Need to Know About Shared Album
The Photos mobile application on iOS devices is a very powerful gallery software. It provides numerous options to help you organize and manage all your media files in one place. When it comes to data transfer, Photos offers users some channels to facilitate such procedures. One of which is through the syncing feature called Shared Album. It’s basically an ordinary folder where you can move and store your media files. But as the name suggests, you can share this folder with others by simply granting them access to it. Don’t worry. Your Shared Albums remain private on the platform. Only the people you add as subscribers can view its content and make changes. Therefore, the Shared Album feature is the best answer to the question: “How to transfer photos from Apple iPhone 6 Plus to iPhone.”
It’s true to say that Shared Album is a great iOS feature. However, it’s important to point out that it also has a few limitations. First on the list is the type of files supported by this feature. For images, Shared Album is compatible with photos in HEIF, JPEG, RAW, PNG, GIF, and TIFF formats. On the one hand, video formats supported by Shared Album include HEVC, MP4, QuickTime, H.264, and MPEG-4. Another thing to consider is the capacity of the Shared Album folder. By default, you can only store up to 5000 photos or videos in the album.
Do you find Shared Album a useful tool, though? If so, here are the tutorials on how to activate this feature and create one in the Photos app.

How to Activate Shared Album?
Here’s how to activate Shared Album on Settings.
- Step 1: Go to Settings.
- Step 2: Click your Apple ID Profile.

- Step 3: Click iCloud.
- Step 4: Click Photos.

- Step 5: Toggle on the radio button next to Shared Albums.

How to Create Shared Albums in Photos
Here’s how to create Shared Albums in Photos.
- Step 1: Go to the Photos.
- Step 2: Click the Album tab.
- Step 3: Click the + icon at the top-left corner of your screen to add a new folder.

- Step 4: Click New Shared Album.

- Step 5: Rename the Shared Album and then click Create.
How to Transfer Photos From Apple iPhone 6 Plus to iPhone in Easy Steps?
Undoubtedly, the Shared Album feature is a very convenient way to move media files from one iPhone to another. Imagine all you have to do is consolidate all the files in a Shared Album folder and add subscribers. From there, you can easily access the album on multiple iOS devices and download the files. But it’s important to note that there are other photo transfer methods you can try apart from using Shared Album. Check out the 5 tutorials below on how to transfer photos from Apple iPhone 6 Plus to iPhone.
Method 1: Transfer photos from Apple iPhone 6 Plus to iPhone by enabling iCloud photos
How do I transfer photos from Apple iPhone 6 Plus to iPhone? Well, the easiest way is to sync the photos to iCloud and enable the iCloud photos on both devices. Don’t worry. It’s very easy to set up. Here’s how to transfer photos from Apple iPhone 6 Plus to iPhone using iCloud.
- Step 1: On your device that contains the files, go to Settings.
- Step 2: Click on the Apple ID Profile.
- Step 3: Click Photos.

- Step 4: Toggle on the radio button next to Sync This iPhone. From then on, your iPhone will sync your photos to iCloud.

- Step 5: Do the same series of steps on the other iPhone. Once the synchronization has been completed, open the Photos app. Find the newly synced iCloud photos on the All Photos album.
Method 2: Transfer photos from Apple iPhone 6 Plus to iPhone using AirDrop
If you’re just sending a few pieces of photos, AirDrop is indeed a great transfer medium. It’s basically a wireless sharing option allowing users to send files between two iOS devices. Do you want to try it? Here’s how to transfer photos from Apple iPhone 6 Plus to iPhone using AirDrop.
- Step 1: Toggle on the Wi-Fi and Bluetooth connectivity on both iPhones. After that, find the AirDrop option on the two devices and then switch it on. Choose Everyone.

- Step 2: On the Apple iPhone 6 Plus device that contains the files, go to Photos. Select the images you want to transfer. After that, click the Share button at the bottom-left corner of your screen.
- Step 3: Choose AirDrop.

- Step 4: Select the recipient from the provided list. After that, accept the AirDrop request on the other device.
Method 3: Transfer photos from Apple iPhone 6 Plus to iPhone via Mail
Another reliable method you can try is to email the photos from one iPhone to another. Like AirDrop, it works great if you’re just moving a few bits of files to another device. Don’t work. The process will not take much time. Here’s how to transfer photos from Apple iPhone 6 Plus to iPhone via Mail.
- Step 1: On the Apple iPhone 6 Plus device containing the files, go to the Photos app.
- Step 2: Select the specific photos you want to transfer. After that, click the Share icon at the bottom-left corner of your screen.
- Step 3: Choose Mail among the given options.

- Step 4: Key in the email address of the recipient. Subsequently, click the Send icon.
- Step 5: Open the email on the other iPhone. Then, download the photos sent as email attachments.
Method 4: Transfer photos from Apple iPhone 6 Plus to iPhone using iCloud Link
Let’s say you’re sending one photo to another iPhone user. What is the best transfer option in this case? If you’re currently using iCloud photos might as well send files through the iCloud link. Don’t worry. It’s not that hard to get such details. Here’s how to transfer photos from Apple iPhone 6 Plus to iPhone using the iCloud link.
- Step 1: On the Apple iPhone 6 Plus device where your files are stored, go to the Photos app.
- Step 2: Select the specific group of images you want to transfer. Right after, click the Share icon at the bottom-left corner of your screen.
- Step 3: Scroll down and find the Copy iCloud Link. Click on it.

- Step 4: Share the iCloud link via Messages, Mail, or internet messaging platform. On the other iPhone device, access the link and then download the photos from there.
Method 5: Transfer photos from Apple iPhone 6 Plus to iPhone using Wondershare Dr.Fone
The first four tutorials above on how to transfer pictures from Apple iPhone 6 Plus to iPhone are very easy to follow. But if you wish to explore another convenient option, Wondershare Dr.Fone can help you with that. Its phone transfer feature has a powerful facility that can move your photos and other files between two mobile devices. Here’s how to use it in easy steps.
- Step 1: Download Wondershare Dr.Fone from its official website. Then, install it on your computer.
- Step 2: Open the newly installed software on your desktop. After it fully loads, connect your two iPhones using a data cable.
- Step 3: Access the left-side panel and then click Toolbox. On the main dashboard, click Phone Transfer.

- Step 4: Set the iPhone that contains the photos as the Source and the other iPhone as the Target. Alternatively, click the Flip button to modify the transfer path according to your liking.

- Step 5: Click Photos as the category of the files. Right after, click Start Transfer to proceed.

- Step 6: Wait while Wondershare Dr.Fone is facilitating the transfer. If you wish to terminate the progress, simply click Cancel.

- Step 7: After completing the process, click OK to wrap it up. Check your files from their respective locations afterward.

BONUS TIP: Back Up Your Photos First
The tutorials above on how to transfer all photos from Apple iPhone 6 Plus to iPhone are safe to initiate. You can be sure about that. But as an additional layer of protection, it’s best to back up your iPhone first before the transfer. Don’t worry. Wondershare Dr.Fone. simplifies the backup process for you. Here’s a quick tutorial to get you started.
- Step 1: Launch the Wondershare Dr.Fone on your computer. After it fully loads up, connect your iPhone using a data cable.
- Step 2: Access the left-side panel and then click My Backup. On the main dashboard, click Back Up Now.

- Step 3: Follow the on-screen instructions for SMS backup. After that, click OK to proceed.

- Step 4: Wait while Wondershare Dr.Fone is backing up your files.

- Step 5: After completing the backup process, click View Backups or Open in Folder to check your files.

Conclusion
Transferring photos between two iOS devices is very easy. In fact, you can instantly complete the migration process with just the snap of a finger. Refer to the five tutorials above on how to transfer photos from Apple iPhone 6 Plus to iPhone enumerated. One of them can certainly fit your situation and help you in this regard. For a more convenient file transfer option, download Wondershare Dr.Fone for free. It has a potent phone transfer feature that can aid in the transfer of your dearly cherished photos.
Transfer your Apple iPhone 6 Plus Apps to New iPhone
We would be very excited to buy a new iPhone like iPhone 15/15 Pro(Max) whenever possible. Just think, what makes us emotional and enthusiastic towards buying and using a new iPhone? Maybe the new and advanced features are better than the old one? Exactly! Once you have bought a new iPhone like iPhone 15/15 Pro(Max), definitely the next step would be to transfer all your applications, games, movies, photos, files, videos, etc. Now the question arises, how to transfer apps from Apple iPhone 6 Plus to iPhone? There must be some solution for every query so, let us research the ways of transfer by using iTunes, iCloud, and the iPhone app store. To know more about the process let us go in-depth.
One-click to transfer apps between iPhone [iPhone 13 Included]
There are so many ways for transferring Apps between iOS devices. If you are searching for a time-saving way to transfer the data. You can try the Dr.Fone - Phone Transfer to help you get the Apps. There is no incompatibility or limitations on iOS models and systems. You can click to transfer one data type from one to another.
Dr.Fone - Phone Transfer
Transfer Apps from Apple iPhone 6 Plus to iPhone in 1 Click Directly!
- Cross-platform data migrating between any devices of your choice from Android and iPhone.
- Support massive data including images, videos, music, messages, contacts, apps, and more.
- Works perfectly with almost mobile phones and tablets, such as iPhones, iPad, Samsung, Huawei, etc.
- Fully work with mobile systems iOS 17 and Android 10.0 and computer systems Windows 10 and Mac 14.
- 100% safe and risk-free, backup & restore data as the original.
3981454 people have downloaded it
Connect both the two iPhones to your computer. Once both the iPhones are connected successfully, all the data from source devices will be detected and listed on the screen. You can adjust the target devices and source devices by clicking the “Flip” button directly.

A more detailed guide can be learned from this user guide. Check it out!
Another way that can assist you to move photos from Android to iPhone is the Dr.Fone - Phone Manager (Android) . What is incredibly convenient about Dr.Fone - Phone Manager (Android) is its ability to transfer photos selectively. You can also use it to transfer contacts, videos, messages, podcasts, and anything else stored on your Android in minutes. Dr.Fone - Phone Manager (Android) is a secure, trustworthy program, hence you can be reassured that your information will be kept safe while transferring from one device to another.
Part 1: How to transfer apps from iPhone apps to the new iPhone via iTunes?
iTunes backup is one of the most commonly used transfer methods. All you have to do is take the backup from the old iPhone and using iTunes you can transfer it to the new iPhone like iPhone 15/15 Pro (Max). Very simply, you can transfer apps from the old iPhone to the iPhone 15/15 Pro(Max) or an earlier model.
The Whole Process is divided into two sections
- A- Backing up old phone data to iTunes.
- B- Transferring backed-up data to a new phone using iTunes.
Section A - To start, you have to start with the backup in iTunes using the old iPhone:
- Firstly, you have to connect the old iPhone and the computer using the USB cable.
- Next, Open the settings and view iTunes. Ensure have the latest version of iTunes.
- Choose the Apple iPhone 6 Plus device.
- Create the passcode in terms of encryption. After that, directly, click the backup now button.

- Once the backup process is finished, you should check whether the backup was done in iTunes preferences in the old iPhone. You can check it by verifying your name, time, and date in the backup.
Note: You have created the backup process on your old iPhone. Now, you should start the next work to transfer apps to the new iPhone like iPhone 15/15 Pro (Max).
Section B - Once you are done with backing up your old phone data with iTunes, now the next process is to transfer apps from Apple iPhone 6 Plus to iPhone using iTunes backed up data:
- The first step is to switch on your new iPhone. The screen “Hello” should be visible to you. If you did the steps already in your new iPhone then you have to remove the entire step out before transferring the apps.
- In your settings, you will have the option Apps & Data. Click it and choose the option “Restore from the iTunes backup” among other options.

- Now, you have to connect the new iPhone device to the PC where the backup from the old iPhone was done.
- View iTunes from the computer and choose your new iPhone like iPhone 15/15 Pro (Max).
- Choose the “Restore backup” and cross-check the date, time, iPhone old name, etc.
- If you set a passcode then enter it. Just wait for a few minutes to get complete the restore process. Keep On the Wifi support to the new iPhone like iPhone 15/15 Pro (Max) and your backup will automatically download to the new iPhone.
Note: You have done the entire process to transfer apps to the new iPhone 15/15 Pro (Max) or an earlier model.
Part 2: How to transfer apps from Apple iPhone 6 Plus to iPhone using iCloud?
The next successful method is an iCloud backup. iCloud the most used application for verification purposes in the iPhone. This method will be very genuine and no complications occur throughout the process when you transfer apps from Apple iPhone 6 Plus to iPhone 15/15 Pro (Max) or an earlier model.
Here also, we have summed up the transferring process via iCloud under two sections
Section A - Backing up the process: Let’s see the steps to take the backup in iCloud using the old iPhone.
- Connect the old iPhone to the Wifi connection.
- Tap the settings and choose iCloud. Click the iCloud and turn ON the iCloud backup.
- Just ensure that you have turned on backup on iCloud.
- Select the backup now button and don’t turn off the wifi till the process gets completed.

Note: You have taken the backup from the old iPhone using the iCloud application.
Section B: Now Let us move ahead to see the steps to transfer apps to the new iPhone like iPhone 15/15 Pro (Max):
1. First, we need to connect the new iPhone and wait for the hello message to receive. If you have completed the set up then you have to remove the setup for the backup process.
2. To remove the setup in the new device – choose settings and then general. From the general choose the reset option. Now select erase all the content and the settings.
Note: Doing so will erase any old setup.
3. Ensure the Wifi is connected to the Apple iPhone 6 Plus device and complete the process to configure the wifi.
4. Open the Apps/Data and select “Restore from the iCloud backup”.

5: You will get the screen to enter the iCloud credential details such as ID/ password.

6: After entering the credentials, you will have the choice to select the backup process. Ensure the date/time of the backup process for verification.
7: The backup process starts on your new phone and you do not interrupt or stop the wifi connection while the backup process continues.
8: Your photos, videos, files, etc will be automatically downloaded into your new Phone using iCloud.
Part 3: How to transfer apps from Apple iPhone 6 Plus to iPhone with the help of the App store?
In this part, we are going to transfer apps from Apple iPhone 6 Plus to iPhone 15/15 Pro (Max) or an earlier model using the iPhone app store. In this method, you do not need to connect to the computer, or no lengthy steps needed. Let us see the steps carefully!
1: You can access the iPhone app store once if you log in to the iCloud account. Click on the settings and choose the “iTunes & App store”. It will ask you to enter the credentials such as Apple ID and password.
2: If you didn’t update the app store then update it by clicking the icon in the lower right corner of the window.

3: Once you tap on the update icon, it will show the option “My Purchase”. It will ask you to sign in the iCloud account.

4: After entering the credential, you have the two options such as all and not on this phone.
5: Select the option “not on this phone” present on the right upper side of the window. You will get the list of applications that you have purchased using the iCloud account.
6: Click the download button next to the icon of the apps. The apps will be installed on your new Phone.

Note: You have completed the installation of apps on your new iPhone.
We have given and explained to you 3 methods to transfer apps from Apple iPhone 6 Plus to iPhone with proper guidance. Each method describes a unique verification process along with the manual setup. You now do not need to wait in a queue to transfer apps to your new iPhone. We can assure you that you would also be in no need of any help from outside. All the best!
Easy Methods: How To Transfer Pictures From Apple iPhone 6 Plus to PC
Photo transfer from your iPhone to your PC is a common practice for various reasons. It can free up your device’s storage space, create backups, or simply edit and organize your photos on a larger screen.
Thankfully, there are various methods to transfer pictures from your iPhone to your PC, providing flexibility to users based on their preferences and convenience. Read our comprehensive guide on how to transfer pictures from Apple iPhone 6 Plus to PC. This article covers step-by-step instructions so you can easily and efficiently manage and transfer your iPhone photos to your computer while preserving your cherished memories.
Part 1: How To Transfer Pictures From Apple iPhone 6 Plus to PC with iCloud
One of the widely used and efficient methods to transfer pictures from your iPhone to a PC is through iCloud, Apple’s cloud-based service. iCloud provides seamless integration across Apple devices, allowing users to sync and access their photos and videos effortlessly.
However, even if your PC is using other operating systems, such as Windows, you can still use iCloud for Windows to save and transfer your iPhone photos from iCloud.
How to transfer iPhone photos to a computer using iCloud:
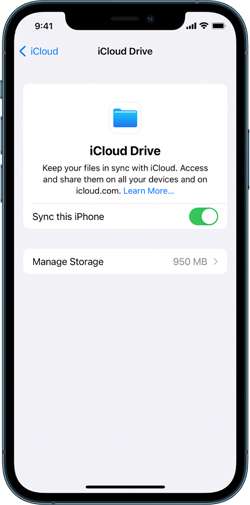
Step 1: Make sure you have synced iCloud photos on your iPhone.
On your iPhone Settings, go to your profile and tap iCloud. Then, select Photos and turn on the switch next to “Sync this [device].” Otherwise, go to iCloud settings > iCloud Drive, and switch on “Sync this iPhone.”
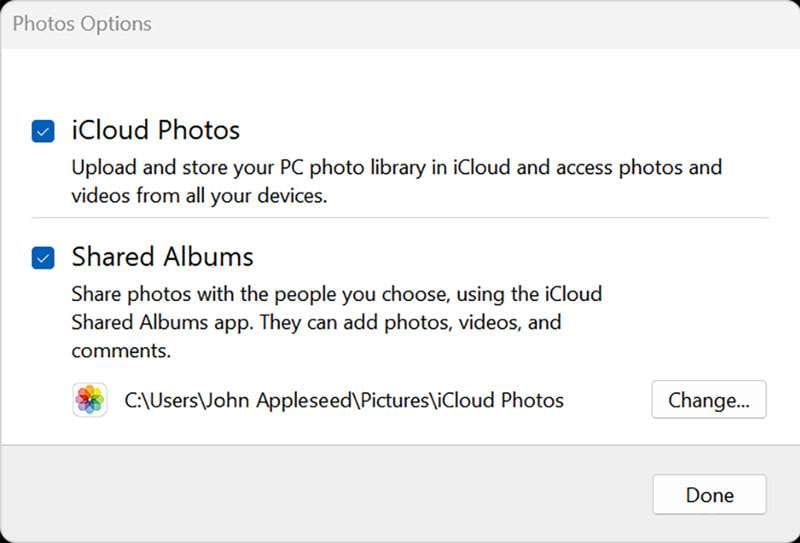
Step 2: Set up your iCloud for Windows.
Open iCloud for Windows and ensure you’re signed in with your Apple ID. Next to Photos, select Options > iCloud Photos. Click “Done” and “Apply” to save the changes and close the window.
Step 3: Keep iPhone photos on PC.
Open iCloud Photos and select the images you want to transfer to your PC. Right-click to open a drop-down menu and choose “Always keep on this device.”
That’s it! Now, you can find your iPhone Photos on your computer.
Part 2: How To Transfer Pictures From iPhone with Google Drive
Another convenient way to transfer iPhone pics to a computer is through Google Drive. As a cloud-based storage solution, Google Drive allows users to seamlessly store, manage, and share files, including photos, across different devices.
If you already have a Google account, you can jump right into Google Drive without signing up. However, be aware that the free version only gives you 15 GB of space. If you need more room, you’ll have to sign up for a subscription.
How to transfer iPhone pictures to a computer with Google Drive:
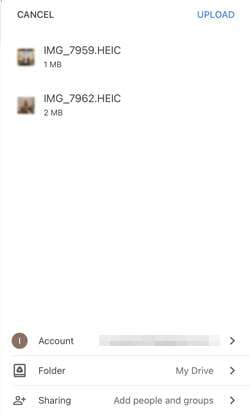
Step 1: Set up your Google Drive.
Open Google Drive on your iPhone. Once opened, tap the multicolored + symbol and select “Upload” > “Photos and Videos.” If prompted, grant access to all photos by tapping “Allow Access to All Photos.”
Step 2: Upload your iPhone photos on Google Drive.
Browse through your iPhone albums to locate the specific photos you wish to upload. Hold and tap to select multiple photos. Then, tap “Upload” to upload your iPhone photos to Google Drive.
Optional: Automatic backup or sync with Google Photos
For those seeking automatic backups, open Google Photos, tap your profile image, navigate to “Google Photos settings,” and select “Backup & Sync.” Toggle “Backup & Sync” to On for continuous backups.
Step 3: Transfer your iPhone photos from Google Drive to your PC.
Once your photos are stored on Google Drive, proceed to save and transfer them to your PC. Select the desired photos in Google Drive, and click “Download.”
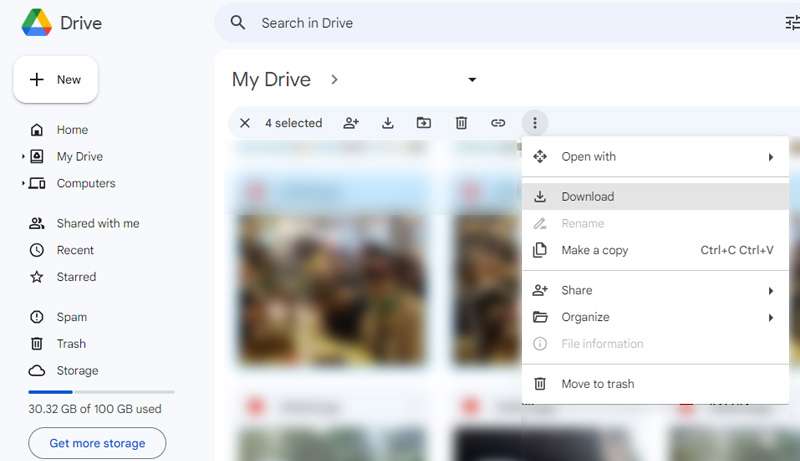
To save all photos from a specific Google Drive folder, open Google Drive and select “My Drive.” Locate the intended folder, and click the three dots to open the drop-down menu. Select “Download,” and all photos and files within the folder will be saved to your computer in ZIP format.
Part 3: How To Transfer Pictures From iPhone with iTunes
You can also make the most of iTunes to secure your iPhone with backups, keep it up-to-date, or synchronize content between your iOS device and your computer in both directions. Even if you’re a Windows PC user, there’s no need to fret. Although iTunes is an Apple product, it’s also available for Windows use.
To get started, make sure that you have iTunes for Windows installed or update your existing version to at least iTunes 12.5.1. Once done, follow the instructions below.
How to transfer iPhone pics to a PC using iTunes:
Step 1: Connect your device to your computer.
Plug in your iPhone to your computer using a USB cable.
Step 2: Grant access to your iPhone Photos.
If your phone is asking you to Trust This Computer, tap “Trust” or “Allow to proceed.”
Step 3: Open your computer’s Photos app.
Go to the Start menu on your PC. Search and select Photos to open the Photos app.
Step 4: Import your Photos to your PC.
Within the Photos app, click on Import > From a USB device and follow the instructions on the screen. You can choose specific photos for the transfer and decide where to save them on your PC. Remember to make sure that the photos are saved on the Apple iPhone 6 Plus device rather than stored in the cloud.
Finally, allow a few moments for the system to detect and transfer the selected photos.
Part 4: How To Quick Transfer Pictures From Apple iPhone 6 Plus to PC
If you find the above methods difficult, there is a quick and easy way to transfer photos from your iPhone to a PC with Dr. Fone’s Export All Data feature. With this feature, there’s no need to navigate through various locations to just locate and transfer files from your iPhone.
Dr.Fone - Phone Manager (iOS)
Transfer Photos from Computer to iPod/iPhone/iPad without iTunes
- Transfer, manage, export/import your music, photos, videos, contacts, SMS, Apps, etc.
- Back up your music, photos, videos, contacts, SMS, Apps, etc., to the computer and restore them easily.
- Transfer music, photos, videos, contacts, messages, etc., from one smartphone to another.
- Transfer media files between iOS devices and iTunes.
- Fully compatible with iOS 7 to iOS 15 and iPod.
3981454 people have downloaded it
Dr. Fone’s Export All Data feature offers some great functionalities, including:
- Comprehensive data export, including Photos, Contacts, Messages, Voicemail, and more
- Encrypted data transfer and backups
- Available for iOS and Android devices
- Regular updates to provide an enhanced user experience
To transfer photos from your iPhone to a PC using Dr.Fone, follow the step-by-step below:
Step 1: Launch Dr.Fone and make device connections using a USB cable.
Start by Image nameing your iPhone device to the computer via a USB connection. Launch Dr.Fone and select “Export all data” in the My Device section.

Step 2: Choose file types for export
When a new window appears, select the specific file types you wish to transfer (in this case, your photos). Then, click “Export” at the bottom of the screen to initiate the procedure. Choose the preferred location for saving the exported data.

Step 3: Make a password for the backup file
Next, you will be asked to create an encrypted password for the backup file to be stored on the computer. Set a password, confirm it, and click “Done” to execute the process.

Step 4: Monitor the progress
Your iPhone will start exporting its data to the computer through Dr.Fone. You can wait and monitor the progress on the screen.

Step 5: Successful export of data to the computer
After successful completion of exporting the data, a window will appear on your computer screen. Click “Open” to review the exported data at the specified location.

Conclusion
Before, you must have wondered how do you transfer pictures from Apple iPhone 6 Plus to PC. But after learning from the article above, you now have a variety of straightforward methods in your hand, whether with iCloud, Google Drive, iTunes, or reliable software like Dr.Fone.
If you’re embedded in the Apple ecosystem, iCloud provides seamless integration of your iPhone Photos. Alternatively, Google Drive offers a cross-platform solution, enabling you to upload your iPhone photos to the cloud and access them on your computer browser.
For those who prefer a more traditional approach, iTunes provides a straightforward method via a USB connection. And if you’re looking for a quick and versatile third-party solution, software like Dr.Fone simplifies the data transfer process with its user-friendly interface and robust features.
Also read:
- [New] 2024 Approved Earn Through Engagement Securing YouTube Partnership Membership
- [New] DIY iPhone Photography Learn to Smudge Images on No Budget
- [New] Ideal Green Visual Effects Systems Practical Steps
- [New] Pro Tips and Hidden Tricks Revolutionize Your WhatsApp Experience for 2024
- Does Meizu 21 Pro Have Find My Friends? | Dr.fone
- Effortless Ways to Transfer Data from Your Apple iPhone X to iPhone 15 | Dr.fone
- How to Send and Fake Live Location on Facebook Messenger Of your Tecno Pova 5 | Dr.fone
- How to Transfer Data from Apple iPhone 12 to ZTE Phones | Dr.fone
- How to Transfer Photos from Apple iPhone 12 mini to other iPhone without iCloud | Dr.fone
- How to Transfer/Sync Notes from Apple iPhone 13 Pro Max to iPad | Dr.fone
- In 2024, 5 Easy Ways to Transfer Contacts from Apple iPhone 11 Pro Max to Android | Dr.fone
- The Ultimate Guide to Close-Up Mastery on Roblox for 2024
- Title: 5 Tutorials on How to Transfer Photos From Apple iPhone 6 Plus to New iPhone | Dr.fone
- Author: Charlotte
- Created at : 2024-10-29 16:48:21
- Updated at : 2024-11-04 16:28:59
- Link: https://iphone-transfer.techidaily.com/5-tutorials-on-how-to-transfer-photos-from-apple-iphone-6-plus-to-new-iphone-drfone-by-drfone-transfer-from-ios/
- License: This work is licensed under CC BY-NC-SA 4.0.