
5 Easy Ways to Transfer Contacts from Apple iPhone SE to Android | Dr.fone
5 Easy Ways to Transfer Contacts from Apple iPhone SE to Android
Whenever we move from one device to another, the first thing that we wish to do is transfer our contacts. After all, we can’t communicate with anyone without our list of contacts. Surprisingly, a lot of people find it hard to transfer contacts from Apple iPhone SE to Android. Truth to be told - there can find countless ways to move contacts from Apple iPhone SE to Android. You don’t need to worry a lot about the compatibility issues of different systems and can replace old phones at will when there is a new phone release, like the upcoming Samsung Galaxy S22 series. You can use a third-party app, a cloud service (like iCloud), and iTunes. Read on to learn how to transfer contacts from Apple iPhone SE to Android in 5 different ways.
Part 1: Transfer all contacts from Apple iPhone SE to Android in 1 click
The easiest way to transfer all the iPhone contacts to Android is by using Dr.Fone - Phone Transfer . A part of the Dr.Fone toolkit can easily transfer all your data from one device to another with a single click. The application is compatible with every leading Android and iPhone model. You can transfer your data from Apple iPhone SE to Android and vice-versa. Besides a cross-platform transfer of data, iPhone to iPhone and Android to Android transfer is also supported.
The application also supports transferring all the leading data types such as videos, music, photos, messages, and so much more. Extremely easy to use, it is a must-have tool for every smartphone user out there. To learn how to move contacts from Apple iPhone SE to Android, you can take these steps:
Step 1. First of all, launch the Dr.Fone toolkit on your Mac or Windows PC, and from its welcome screen, visit the “Phone Transfer” module.

Step 2. Connect your Android and iOS devices to the system and let the application detect them automatically. Since you wish to export iPhone contacts to Android, iPhone should be the source while Android should be the destination device. You can use the Flip button to interchange their positions.
Step 3. select the category of data you wish to transfer. Once you have checked the “Contacts” option, click on the “Start Transfer” button to start the process.

Step 4. Sit back and wait for a couple of minutes as the application syncs contacts from Apple iPhone SE to Android. Make sure that both the Apple iPhone SE devices are kept connected to the system until the process is completed.

Step 5. Once the transfer completes, you will be shown a message. In the end, you can remove the 2 devices safely from your system.

Part 2: Move contacts from Apple iPhone SE to Android with Google Account
Another fast and hassle-free way to sync contacts from Apple iPhone SE to Android is by using your Google Account. Since you can add your Google account on the iPhone, you can also use it to sync your contacts. While setting up your Android, you can use the same Google account. To learn how to import contacts from Apple iPhone SE to Android using your Google account, these quick steps can be implemented.
Step 1. Unlock your iPhone and go to its Settings > Mail, Contacts, Calendars > Add Account and tap on “Google.”

Step 2. Sign in with your Google account credentials and grant your phone the needed permissions to access your Gmail data.
Step 3. Now, you can go back to your Google account from here and turn on the sync option for “Contacts.”

Step 4. Once your contacts are synced with your Google account, you can easily access them on any Android device. You can use the Google Contacts app or use the same account to set up your device for auto-sync contacts.
Part 3: Import contacts from Apple iPhone SE to Android with iCloud
Another simple way to sync contacts from Apple iPhone SE to Android is by using iCloud. Firstly, you need to sync the iPhone contacts with iCloud, and later you can export them a VCF file. To this end, the vCard can be imported to Google Contacts. Yes - it does sound a bit complicated. After all, the Dr.Fone tools provide such a hassle-free way to move contacts from Apple iPhone SE to Android compared to this technique. Though, this is a free solution and can be your plan B. To learn how to transfer contacts from Apple iPhone SE to Android via iCloud, follow these steps.
1. Before you proceed, make sure your iPhone contacts are synced with iCloud. To do this, go to the iCloud settings and turn on the sync for 1.Contacts.
2. Great! Once your contacts are synced with iCloud, you can easily access them remotely. Go to iCloud.com and log in with your Apple ID.
3. After logging in to your iCloud account, go to the “Contacts” option from the home screen.
4. This will display a list of all the synced contacts. Select the contacts you wish to move. To select all contacts, click on the gear icon (settings) at the bottom right corner.
5. Once you have made the desired selections, go to its settings again (the gear icon) and choose “Export vCard.” This will save a VCF file having all the contact details.
6. Now, go to Gmail and login with your account details. Select the Contacts option. Alternatively, you can go to the official website of Google Contacts as well.
7. From here, you can choose to Import a file. Click on the vCard option and browse the saved VCF file that you have just exported from iCloud.
8. Once you have imported these contacts to your Google account, you can easily access them on the connected device as well.
Part 4: Copy contacts from Apple iPhone SE to Android using iTunes
If you are an avid user of iTunes, you can try this technique to export iPhone contacts to Android. Earlier, iTunes has a feature to sync contacts with Google, Outlook, and Windows account. Now, the Google feature has been removed from iTunes. Therefore, you first need to sync your contacts to your Windows account and can later export them into a card. Needless to say, the technique can also be a bit complicated. Though, you can implement these steps to copy contacts from Apple iPhone SE to Android using iTunes.
1. Launch the latest version of iTunes from your system, and connect your iPhone with a cable.
2. Select your connected device and go to its Info tab. Enable the “Sync Contacts“ option and choose to sync them with Windows Contacts.
3. Ensure that you choose to sync “All Contacts” before clicking on the “Apply” button.
4. Great! Once you have synced your iPhone contacts to your Windows account, you can safely remove the Apple iPhone SE device. Go to your Account > Contacts and click on the “Export” button on the toolbar.
5. Choose to export the contacts to a vCard and select the location to save the VCF file.

6. In the end, you can manually copy the VCF file to your Apple iPhone SE or import it to your Google Contacts as well.
Part 5: Switch contacts from Apple iPhone SE to Android without a computer
Often, users don’t wish to use a computer to export iPhone contacts to Android. If you have the same requirements, then you can use a data transfer app. While there are many apps out there that can help you move contacts from Apple iPhone SE to Android, I would recommend My Contacts Backup. This is because the app is available on both iOS App Store and Google Play Store . To use this app to transfer contacts from Apple iPhone SE to Android, follow these steps.
1. Firstly, download the My Contacts app on your iPhone and launch it. Grant the app the needed permissions to access your contacts.
2. The app will automatically detect all the contacts saved on your device and would give you an option to either mail them or save them to its server.
3. You can choose to email the contacts to your own Gmail account as well. A VCF file will be mailed to your account that can later be downloaded and synced.

4. Additionally, you can also upload the contacts to its server.
5. Now, you have to install the My Contacts Backup app on your Apple iPhone SE and Google Play Store.
6. Launch the app and choose to restore your contacts using an in-app vCard. In this way, all the saved contacts will be exported to your Apple iPhone SE.

Now that you have learned 7 different ways to move contacts from Apple iPhone SE to Android, you can easily fulfill your requirements. Out of all the 8 provided options, Dr.Fone - Phone Transfer is the fastest and most convenient option to move all the contacts at once.
Complete Tutorial: Sending Photos From Apple iPhone SE to iPad
Among the array of iOS devices, the iPhone and iPad stand as popular companions for capturing and storing precious moments. However, navigating the process of transferring photos from Apple iPhone SE to iPad can sometimes feel daunting. Fortunately, with the evolution of Apple’s ecosystem, it has become a straightforward task.
Now, the process can be managed with various methods and tools available at your disposal. The guide aims to effortlessly transfer your photos from an iPhone to an iPad. From utilizing iCloud and AirDrop to exploring third-party applications, we’ll cover step-by-step instructions.

Part 1: How To Transfer Photos From Apple iPhone SE to iPad Using AirDrop
AirDrop stands as one of the most convenient and straightforward methods. It can transfer photos between Apple devices wirelessly. This functionality employs Bluetooth and Wi-Fi to establish a direct link between your iPhone and iPad. That enables smooth photo sharing without requiring additional cables or an internet connection. Here’s a detailed guide outlining the process of how to transfer photos from Apple iPhone SE to iPad using AirDrop:
- Step 1. On your iPhone and iPad, swipe down from the top right corner to open the Control Center. Tap and hold the connectivity panel; within, press and hold the network connectivity box that includes AirDrop. Choose “Contacts Only” or “Everyone” to enable AirDrop visibility.

- Step 2. To begin, access the Photos app on your iPhone and pick the photos you’d like to transfer to your iPad. Afterward, select the “Share” icon within the app, and from the available options, opt for “AirDrop.” Look for your iPad in the AirDrop panel displayed and tap on it to start the transfer process.

- Step 3. When your iPad receives the notification prompting you to accept the incoming photos from the iPhone, tap “Accept.” The selected images will be saved to your iPad’s Photos app.

Part 2: How To Transfer Photos From Apple iPhone SE to iPad Using iCloud Sync
iCloud offers a smooth way to synchronize photos across your Apple devices. It ensures your photo library remains up-to-date without manual intervention. Enabling iCloud Photos automatically uploads your images to iCloud, allowing access from any device linked to the same Apple ID. Here’s a guide to transfer photos from Apple iPhone SE to iPad automatically via iCloud:
- Step 1. Begin by accessing your iPhone’s Settings and tapping your name at the top. On the following screen, choose “iCloud” followed by “Photos” on the next window. Here, ensure that “Sync this iPhone” is toggled for iCloud Photos.

- Step 2. Now, move to iPad and ensure you are logged in with the same Apple ID. Then, go to “Settings,” tap the name, press “iCloud,” and tap “Photos.” Here, you need to toggle on the “Sync this iPad” option. Afterward, wait for some time to let the syncing process complete. The speed of synchronization depends on your internet connection and the number of photos being uploaded.

Part 3: One-Click Innovative Solution To Transfer Photos From Apple iPhone SE to iPad
Wondershare Dr.Fone presents an innovative and user-friendly solution. It offers a comprehensive way to transfer photos between your iPhone and iPad. This software provides a straightforward method to transfer photos selectively or entirely. Moreover, when using it, you are no longer bound by the constraints of iCloud or AirDrop. The following are the detailed guides for transferring photos using Wondershare Dr.Fone:
3.1 Transfer Selective Photos from Apple iPhone SE to iPad
Wondershare Dr.Fone is an intelligent iPhone transfer and management solution. It is designed to streamline your data handling. With its array of functions, you can manage your data through importing, exporting, and deletion processes. This tool offers the convenience of quick file transfers by simply dragging and dropping files. Here is how to add photos from Apple iPhone SE to iPad using Wondershare Dr.Fone:
- Step 1: Install and Open the Latest Wondershare Dr.Fone App
You can begin by installing the latest version of Wondershare Dr.Fone from its official website. Once installed, launch it and connect your iPhone and iPad to the computer. When the Apple iPhone SE devices are detected by Dr.Fone, click on the “iPhone” name to expand it in the left panel.

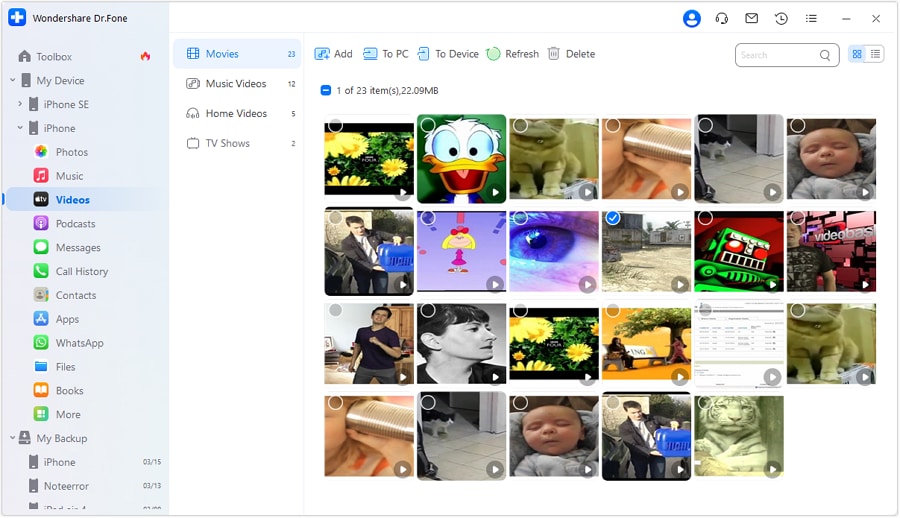
- Step 2: Transfer the Photos to the iPad from the iPhone
From the expanded options, choose “Photos” to access your iPhone’s photos. Here, select the files you want to transfer and click “To Device.” Now, choose the “iPad” from the available options, and the photos will be transferred in no time. You can send as many as you like without any constraints.
3.2 Transfer All Photos From Apple iPhone SE to iPad
When moving photos in bulk from Apple iPhone SE to iPad, Wondershare Dr.Fone also got you covered. It offers a powerful phone transfer feature that can transfer over 18 types of data from one device to another. Dr.Fone simplifies the process of transferring data between phones with just one click. It facilitates the smooth transfer of various data types, like photos. You can follow these simplified steps to transfer photos from Apple iPhone SE to iPad:
- Step 1: Navigate to Phone Transfer within Wondershare Dr.Fone
Once you have launched Wondershare Dr.Fone, connect the iPhone and iPad to the computer. Then, click “Toolbox” from the left side panel and tap the “Phone Transfer” option from the available choices. Then, you will be asked to position your devices correctly for data transfer.
- Step 2: Successfully Complete the Photos Transfer Process
When assigning positions, the iPhone will be the “Source” device. On the other hand, the iPad will become the “Destination” device. You can use the “Flip” to change the Apple iPhone SE devices’ positions. Afterward, select “Photos” from the data and click “Start Transfer” to initiate the process.

Part 4: How To Transfer Photos From Apple iPhone SE to iPad Using iTunes/Finder
iTunes or Finder can also be used to transfer photos from your iPhone to your iPad. It is the official Apple software for music, media, and backup management. Yet, iTunes/Finder can assist in manually syncing photos between your iOS devices. The steps needed to transfer photos from Apple iPhone SE to iPad automatically are given below:
- Step 1. Connect your iPhone to the PC or Mac and open the Photos app. In the Photos app, tap “Import,” select your iPhone, and wait for the computer to load photos from the iPhone. Once they are loaded, choose to transfer the targeted to the computer.

- Step 2. When photos are moved to your computer, unplug the iPhone and link your iPad. Now run the latest version of iTunes/Finder on your PC/Mac and tap the Apple iPhone SE device icon. Here, choose “Photos” from the left panel and check the box next to “Sync Photos.”

- Step 3. Now, choose the folder where you moved photos from the iPhone in the drop-down box. After that, hit the “Apply” button and wait for the images to sync with the iPad.

Part 5: How To Transfer Photos From Apple iPhone SE to iPad Using Social Media Apps
Social media apps can serve as a convenient platform for transferring photos. Numerous options are available for transferring pictures, and one of the widely used applications is WhatsApp. It is known for its communication features. Moreover, it enables users to share images and media files across various devices. Here’s a guide on how to transfer photos from Apple iPhone SE to iPad via WhatsApp:
- Step 1. After ensuring WhatsApp is running on both devices, open WhatsApp on iPhone. Tap the new chat icon to start a conversation with a WhatsApp account logged in on the iPad. Now, tap the “+” icon and choose either “Document,” “Camera,” or “Gallery” and pick the desired images. After selecting the photos, tap “Send” to transfer them to iPad.

- Step 2. Proceed to the iPad and launch the “WhatsApp Web” on Safari. Following this, access your conversations and download the images you received to complete the transfer process.

Part 6: How To Transfer Photos From Apple iPhone SE to iPad Using Email
Utilizing email provides a direct and frequently used approach for transferring photos between your iPhone and iPad. However, it might not be suitable for larger quantities of high-resolution images due to attachment size limits. Nevertheless, it is effective for smaller batches of images. Here’s a detailed guide on how to utilize email for transferring photos between your iPhone and iPad:
- Step 1. Access the email app on your iPhone and initiate a new email. Input your iPad email address in the recipient field. Next, tap on the “Attachment” icon to select the images you want to send.

- Step 2. Move to your iPad and on the “Mail” app there. Now navigate to “Inbox” and open the newly received email. Tap the attachments and save them to your device to complete the transfer process.

Conclusion
Transferring photos between your iPhone and iPad is an essential task for many users. Throughout this guide, we’ve explored various methods to transfer photos from Apple iPhone SE to iPad. These ranged from native Apple services like AirDrop, iCloud, and iTunes/Finder to unconventional approaches such as social media apps and email. Each method offers its advantages.
Yet, considering factors like convenience, ease of use, and efficiency, one option stands out as a versatile and user-friendly solution: Wondershare Dr.Fone. This innovative third-party software provides a hassle-free way to transfer photos between iOS devices. It offers both selective and bulk transfer options with a straightforward interface.
Switch Cards Between Apple iPhone SE and other iPhones Will Move All Phone Services?
The existence of SIM cards is the fundamental source of all cellular network connections. With their use from the inception of smartphones, SIM cards are associated with every significant cellular operation. All major functions, such as cellular calling, messaging, and cellular internet, are obtained through SIM cards. Whether you are using an iPhone or an Android, using a SIM card is standard.
If you are seeking to change your iPhone, you will have to shift everything, including the SIM cards. For that, the article discusses a guide explaining how to switch SIM cards in Apple iPhone SE and other iPhones properly. Look through the discussion for better awareness of switching SIM cards between Apple iPhone SE and other iPhones. The implications of shifting SIM cards and other details will be focused on throughout the discussion.
Part 1: Things To Know Before Switching SIM Cards in iPhone
Whenever you consider switching your SIM card to iPhone, you must keep a few things in mind. Considering these points will help you in avoiding all forms of discrepancies that can occur on your iOS device:
- Compatibility of SIM Card: You have to ensure that the SIM card is compatible with your iPhone. Some SIM cards do not operate on Apple iPhone SE and other iPhones since they are incompatible.
- Unlocked iPhone: If you have an unlocked iPhone, you can utilize third-party SIM cards for this purpose. An unlocked iPhone is a best-case scenario for using such SIMs.
- Backup iPhone Data: Although there is no direct involvement of iPhone data in the process, it is best to back up the data. It includes all essential contacts and media that might get physically damaged while changing SIM cards.
- Turn Off iPhone While Switching SIM Cards: It is best to turn off your iOS device during such processes. To avoid any software anomaly, turning off the Apple iPhone SE device can save you the drill.
Part 2: What Happens If You Switch Two SIM Cards in iPhone
On switching a SIM card to a new iPhone, there are multiple consequences that occur against it. The provided details explain the possible situations that can arise if you consider switching SIM cards in iPhone:
- SIM cards usually contain contacts from the previous device it is contained in. There is a possibility that the contacts present in the SIM card might be transferred into the new iPhone. On attaching the SIM card to the iPhone, the contacts will be automatically transferred.
- The cellular network, along with other cellular packages, will be in operational use as the SIM card will be attached to the iPhone. You will be paying according to the packages offered by your SIM carrier.
- If the SIM card is not compatible with the iPhone, the network operations will malfunction and not operate properly. Different connectivity issues will be reported across the scale.
- On switching your SIM card, you will have to reactivate iMessage and FaceTime under the cellular settings of the new SIM card. The previous settings for both services will be removed upon removing the SIM card.
Part 3: How To Switch SIM Card to New iPhone Safely
Once you have learned the implications of switching your SIM card to your new iPhone, you will need to understand the operability involved in the process. To know how to switch SIM cards iPhone perfectly, follow the step-by-step process provided below:
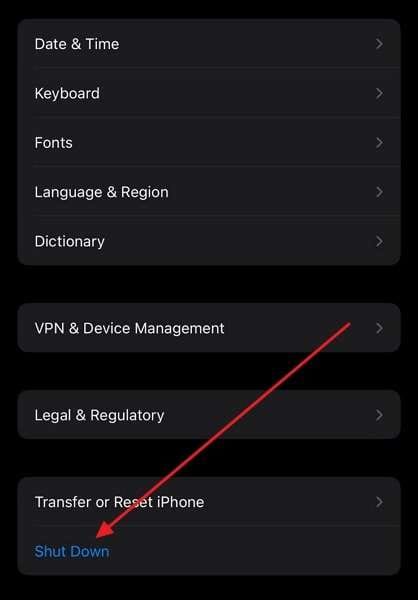
Step 1: Turn off your iPhone to remove the current SIM card from your device. For that, lead into the “Settings” and look for the “General” section. Follow through the screen and scroll down to find the option of “Shut Down” to turn off your iOS device.
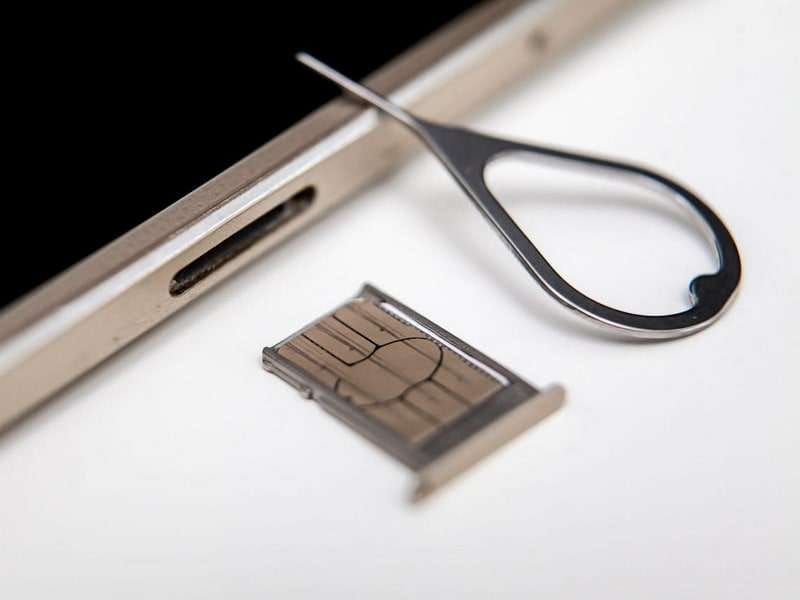
Step 2: As the Apple iPhone SE device turns off, use a proper pin to open the SIM tray on your iPhone, which completely depends on your model. For the latest and newest Apple iPhone SE and other iPhones, the SIM tray is present on the bottom-left side of the Apple iPhone SE device. Remove the old SIM card and replace it with the new one according to the position. Re-insert the SIM tray back into the Apple iPhone SE device.

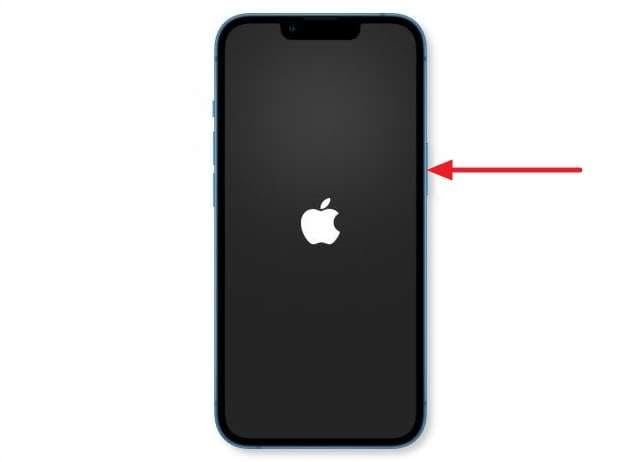
Step 3: Use the “Power” button on your iOS device to turn it on. Once it turns on, you will find the cellular operations working according to the new SIM card.
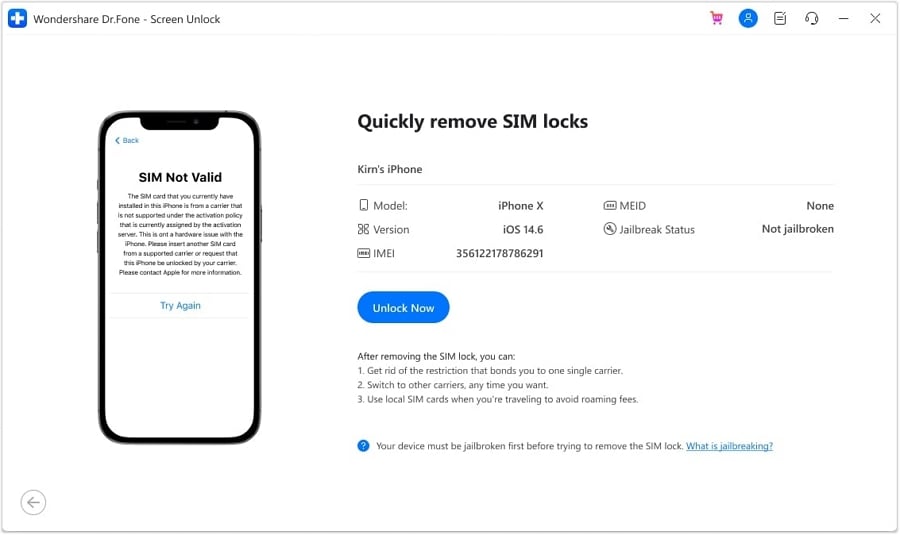
Part 4: What Happens If You Switch to an iPhone Locked to A Specific Carrier?
If you switch to an iPhone locked to a specific carrier, you might encounter several complications. These could prevent the Apple iPhone SE device from functioning with your desired network provider. In such instances, the iPhone’s functionality could be limited. It hinders your ability to use certain features or services on the Apple iPhone SE device. This issue is particularly prevalent when trying to use a SIM card from a different carrier than the one the iPhone is locked to.
To address this concern, you can use Dr.Fone - Screen Unlock (iOS) , a cutting-edge solution. It is designed to unlock SIM locks and enable the use of the iPhone with any compatible carrier. Dr.Fone provides a reliable and user-friendly method to unlock various locks. This also includes SIM locks on Apple iPhone SE and other iPhones, allowing you to switch between carriers.
Dr.Fone - Screen Unlock (iOS)
Best SIM Unlock for iPhone.
- Simple, click-through, process.
- Fix SIM unlock with a few clicks.
- Supports almost all carriers, from Vodafone to Sprint.
- No tech knowledge required, everybody can handle it.
- Supports iPhone 5S to iPhone X, which are running between iOS 12.0 and iOS 14.8.1


3,046,049 people have downloaded it
Steps To Remove iPhone SIM Lock via Dr.Fone - Screen Unlock (iOS)
The following are the steps you need to follow to remove the iPhone SIM lock with the help of Wondershare Dr.Fone:
Step 1: Access Screen Unlock Within Wondershare Dr.Fone
Start installing and launching Wondershare Dr.Fone on your computer and selecting “Toolbox.” From the main interface, click “Screen Unlock” and identify “iOS” as your device. Now, tap “Remove SIM Locked” from the “Screen Unlock” menu and connect your iPhone.
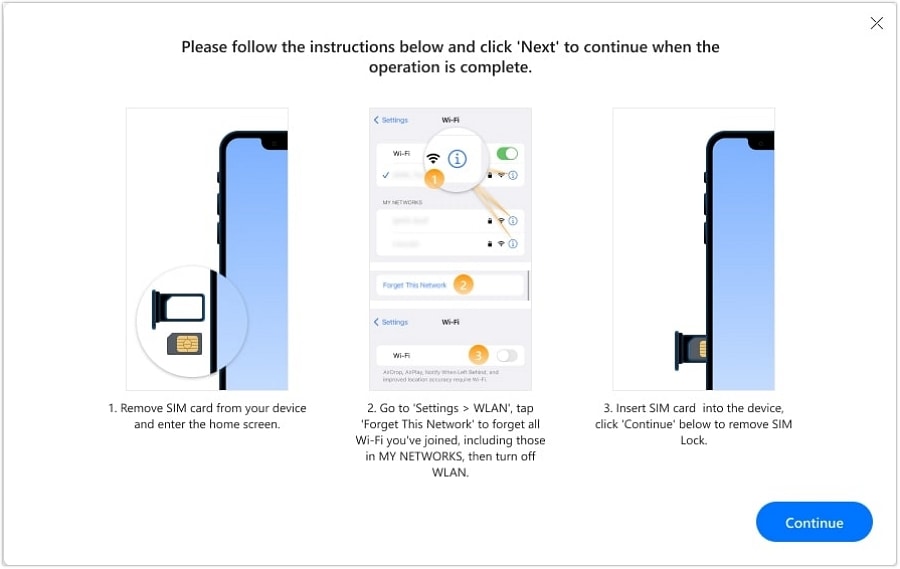
Step 2: Jailbreak Your iDevice
On the following screen, tap “Start” and follow it by clicking “Unlock Now” as Wondershare Dr.Fone recognizes your device. Now, you will need to jailbreak your device, for which the instructions are given on the screen. Remove the SIM card from the phone and access “WLAN” through device Settings.
Step 3: Complete the SIM Lock Removal Process
Go to the Wi-Fi network you are connected to and choose “Forget This Network.” Then, move to each saved Wi-Fi network in “My Networks” and remove all of them. Reinsert the SIM card to the Apple iPhone SE device and press “Continue” on the screen. It will initiate the SIM lock removal process, which will be finished in a few moments.
Part 5: How To Switch All Data to New iPhone in One Click
Whenever you consider changing your SIM card on your new iPhone, there are certain things you must look out for. Maintaining all the data is one appropriate consideration that can be effective for your operations. Keeping data backups under such circumstances is the best-case scenario to avoid discrepancies. Although you are switching SIM cards between Apple iPhone SE and other iPhones, what if you are required to shift data?
If you have bought a new iPhone and need to switch all data along with the SIM card, you will need a proper direction. For this, Dr.Fone - Phone Transfer (iOS) is the savior. This particular platform is known for making operations of data transfer easier. While Dr.Fone replicates multiple features and functions, it offers some extensive characteristics. An overview of these features is presented as follows:
- You can transfer various data between devices, ranging between 8 to 15. It entirely depends on the nature of the transfer between devices.
- The process of transferring data is straightforward. You are not required to put in any effort to transfer data.
- The results provided in the data transfer are incredibly high. Dr.Fone reports concluding proceedings within 3 minutes.
Steps To Switch Data to New iPhone With Dr.Fone - Phone Transfer
As you seek to know the steps to switch data to a new iPhone with Dr.Fone - Phone Transfer, follow the steps as provided next:
Step 1: Open Dr.Fone and Select Phone Transfer
Launch Wondershare Dr.Fone after downloading and installing it on your device. Continue to select “Phone Transfer” from the available options. Following this, connect your old and new Apple iPhone SE and other iPhones to your device.
Step 2: Set Source and Destination
As you connect both devices in the transfer process, define the source and destination. Set your old device as the “Source” and the new iPhone as the “Target.” To change the Apple iPhone SE devices, use the “Flip” button.

Step 3: Select File Types and Transfer
Select the file types that you wish to transfer from the center section. Select “Start Transfer” to initiate the process. The data will be successfully transferred in a few minutes.
Frequently Asked Questions
Here are answers to some of the FAQs available on the internet regarding how to change a SIM card on an iPhone.
- Can I use the same eSIM card to switch between different Apple iPhone SE and other iPhones?
Yes, you can use the same eSIM card to switch between different Apple iPhone SE and other iPhones, provided that the specific carrier supports eSIM technology and allows the transfer of the eSIM between devices. With eSIMs, the process of switching between devices is typically smoother compared to physical SIM cards. The reason is it involves digital activation and can be done remotely without the need to swap cards physically.
- Is there a difference between switching physical SIM cards and using eSIM for transferring phone services between Apple iPhone SE and other iPhones?
Physical SIM cards are tangible, removable chips that need to be inserted into a SIM card tray, whereas eSIMs are integrated directly into the Apple iPhone SE device’s hardware. Swapping physical SIM cards involves physically removing and inserting the card into the new device, whereas transferring an eSIM between devices can be done remotely. Physical SIM cards can store limited contact information and some network settings, whereas eSIMs can store multiple network profiles.
Conclusion
This article has provided a valuable overview of switching SIM cards to new Apple iPhone SE and other iPhones. With a proper understanding of the repercussions involved in the process, a guide has been discussed. Along with its thorough discussion, you have also figured out how to transfer data to a new iPhone. For that, Dr.Fone - Phone Transfer is the best option in the market.
Also read:
- [New] In 2024, Mastering Content Control Muting Followers
- [Updated] In 2024, Embark on a Digital Communication Adventure with Google Meet
- 2024 Approved How to Capture and Share Your Favorite Pics on Social Platforms with OBS
- Avoiding Unwanted Image Ripples
- Easy Methods How To Transfer Pictures From Apple iPhone 8 to PC | Dr.fone
- Expert Advice on Valheim Seed Selection
- How to Copy Contacts from Apple iPhone SE (2022) to SIM? | Dr.fone
- In 2024, Effortless Ways to Transfer Data from Your Apple iPhone 14 to iPhone 15 | Dr.fone
- In 2024, How to Copy Contacts from Apple iPhone 14 to SIM? | Dr.fone
- In 2024, How to Transfer Everything from Apple iPhone XS to iPhone | Dr.fone
- Methods to Transfer from Apple iPhone 6 Plus to Android | Dr.fone
- Nokia 7.1 Smartphone Review - Stunning Visual Performance Meets Cost-Effectiveness
- Speak Up and Command ChatGPT: Top 5 Techniques for Vocal Control
- The Game Changer: A High-End Sceptre 24 Curved Monitor for Gamers – Now Just $79
- Title: 5 Easy Ways to Transfer Contacts from Apple iPhone SE to Android | Dr.fone
- Author: Charlotte
- Created at : 2024-11-03 16:47:06
- Updated at : 2024-11-04 16:11:06
- Link: https://iphone-transfer.techidaily.com/5-easy-ways-to-transfer-contacts-from-apple-iphone-se-to-android-drfone-by-drfone-transfer-from-ios/
- License: This work is licensed under CC BY-NC-SA 4.0.